
Learn to create slideshows and scrapbooks for your webpage using Smilebox
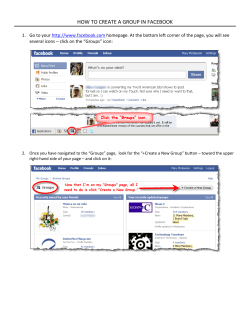
Learn to create slideshows and scrapbooks for your webpage using Smilebox STEP 1 – CHOOSE YOUR DESIGN You can choose from different categories including Holiday, Seasonal, and Family & Kids. You can also choose to search by Formats. STEP 1 – CHOOSE YOUR DESIGN You can choose from different Formats like scrapbooks, slideshows, or photo albums. STEP 2 - PERSONALIZE You are now ready to add your pictures! You will need to have your pictures already stored somewhere on your computer. Be sure you remember where they are! STEP 2 - PERSONALIZE You are now ready to drag your pictures into the designs. You are often given options of rotate, zoom, color, etc to edit your photos. The panel on the right will allow you to change the color, add music, etc. Not all designs are the same! STEP 3 - PREVIEW You are now ready to PREVIEW your design! Click on the PREVIEW button at the top to see your creation. You may need to move or click to move from slide to slide. Hit ESC when you are done. STEP 4 - SHARE You are now ready to POST your creation on your web page. Click on Share, Print, or DVD at the top. Click on POST. SMILEBOX TEACHER’S TOOLBOX PROGRAM http://media.smilebox.com/teachers/welcome/ You will need to sign up for this program in order to use Smilebox. This is a free service to teachers and there is a limited number of available slots, so sign up today! This program allows you to post a Smilebox without displaying ads! IMPORTANT STEP!!!!!!!!!!!!!!!!!!!!!!!!!!!!!!!!!!!!!!! To prevent viewers from printing and posting your slideshow to Facebook, you must set the following settings in your account! Click on your email link at the top right. Log in if prompted. Find the creation you have posted. Click on the links below it that state Turn post to Facebook off and Turn print off. Your settings will then look like the ones above! THINGS TO REMEMBER Always be sure you have a permission slip ON FILE before putting a student’s picture on the website. Be careful when using a student’s name! Keep your slideshows updated! EDMODO Edmodo is a social learning network for teachers, students, schools and districts.


© Copyright 2026