
Moving to a New PC WorldShip
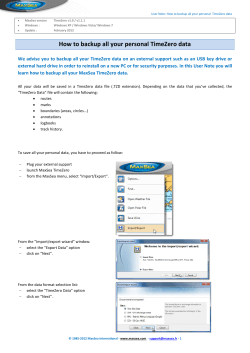
Moving WorldShip
to a New PC
®
WorldShip
© 2000-2014 United Parcel Service of America, Inc. UPS, the UPS brandmark and the color brown
are trademarks of United Parcel Service of America, Inc. All rights reserved. 11/14
Moving WorldShip® to a New PC
If you are upgrading your existing PC from one operating system to another, the
following procedures should be followed before upgrading your operating system to
save your WorldShip data. These procedures should also be used when moving your
existing WorldShip system from one PC to another. The install type must remain the
same on the upgraded system or the New PC (for example, single workstation to
single workstation or admin to admin, etc.).
5. From the Data Maintenance screen, click Backup to back up the WorldShip
database. You do not need to back up the UPSNRFRvlDB. This is optional.
Please be aware that these instructions are only to back up WorldShip data.
Please refer to Microsoft® for instructions on how to back up data and programs not
associated with WorldShip.
7. When the backup completes successfully, the Support Utility will notify you
of the location of your backup. It is important to make note of this location.
Step 1: Run WorldShip End of Day for pending data prior to backing
up your WorldShip data
9. Exit the Support Utility.
Step 2: Determine Your Import/Export ODBC DSN Names
If you perform import/export within WorldShip, go to Step 6: Determine Your
Import/Export ODBC DSN Names. If not, proceed to Step 3: Back Up WorldShip
Data Using the WorldShip Support Utility.
Step 3: Back Up WorldShip Data Using the WorldShip Support Utility
1. Click on the Start menu.
2. To open the Support Utility, choose Programs or All Programs > UPS >
WorldShip Support Utility.
N
ote: If you are using Microsoft Vista® or Windows 7, make sure to right-click
on WorldShip Support Utility and select Run As Administrator.
3. If you already know your install type, skip this step. If not, go to Step 7: Determine
Your Install Type.
4. From the main screen of the Support Utility, double-click Data Maintenance.
© 2000-2014 United Parcel Service of America, Inc. All rights reserved. 11/14
Note: If you receive a message indicating there are users connected
to the database, click the OK button and click Backup again.
6. Click the Add button (WorldShip v15 or lower).
8. Click OK.
10. Using My Computer or Microsoft® Windows Explorer®, browse to the location
of the database backup noted in step 7 above. Copy the folder to a network drive
or an external drive.
Note: Please do not copy folders to a local drive on the PC. During the operating
system upgrade, the files and folders on the local PC will be deleted.
11. Using My Computer or Microsoft Windows Explorer, browse to the folder where
WorldShip is installed. Example: C:\UPS\WSTD. Copy the following folders and
all of the contents to a network drive or to an external drive:
a. \UPS\WSTD\Archive
b.\UPS\WSTD\Backup
c. \UPS\WSTD\ImpExp
Note: If this is an Admin workstation, the \UPS\WSTD\ImpExp folder is found
in the Admin Shared folder.
12. T his procedure has saved your WorldShip data only. Please refer to Microsoft for
instructions on how to backup other programs and data. Once your operating
system has been upgraded, you may proceed with Step 5: Install WorldShip
on the New Operating System or the New PC.
1
Moving WorldShip® to a New PC
Step 4: Upgrade Your Operating System
Please refer to Microsoft for instructions on how to:
n Back up data and programs not associated with WorldShip.
n Upgrade your operating system.
Step 5: Install WorldShip on the New Operating System or the New PC
1. If you are running on a 32-bit operating system:
You can install WorldShip 11.0.16 or higher.
8. Open the Support Utility by choosing Programs or All Programs > UPS >
WorldShip Support Utility.
Note: If you are using Microsoft Vista or Windows 7, make sure to right-click
on WorldShip Support Utility and select Run As Administrator.
9. From the main screen of the Support Utility, double-click Data Maintenance.
10. From the Data Maintenance screen, browse to the database backup file that
was created earlier on the old system and copied to the new system.
Note: If you receive a message indicating there are users connected to the
database, click the OK button and click Restore again.
2. If you are running on a 64-bit operating system:
You can install WorldShip 12.0 or higher.
3. Install WorldShip to the new system. Make sure that you choose the same
WorldShip install type, LAN Admin or Single, as the original WorldShip
install type.
4. When the system reboots, WorldShip will start up.
5. Configure communications but cancel WorldShip startup when you get to the
registration process. You will restore your backed up database (which makes this
step unnecessary). Acknowledge that you wish to quit the registration process by
clicking OK.
6. Copy the database backup folder noted in step 7 of Back up WorldShip
Data using the WorldShip Support Utility to the system.
7. Restore the following folders to the same directory structure on the newly
installed WorldShip system.
a. \UPS\WSTD\Archive
b. \UPS\WSTD\Backup
11. Highlight the file under the Available Backups window and click Restore.
12. Click Yes to restore all files in the directory.
13. Click OK on the screen indicating that your backup files were restored
successfully.
14. Exit the Support Utility.
15. If you perform import/export within WorldShip, go to Step 8: Recreate ODBC
DSN’s. If you do not, proceed to the next step.
16. Start WorldShip. If the registration screen appears during WorldShip startup,
click Finish to complete the registration process.
17. Reinstall printer drivers. Thermal printer drivers should be installed through
WorldShip.
18. You have completed installing WorldShip.
c. \UPS\WSTD\ImpExp
Note: If this is a LAN Admin workstation, the \UPS\WSTD\ImpExp folder is found
in the Admin Shared folder.
© 2000-2014 United Parcel Service of America, Inc. All rights reserved. 11/14
2
Moving WorldShip® to a New PC
Step 6: Determine Your Import/Export ODBC DSN Names
Step 8: Recreate ODBC DSNs
If you perform import/export within WorldShip, you will need the existing Import/
Export ODBC DSN Names so that they can be recreated on the upgraded or new
system. Follow these steps to find the existing Import/Export ODBC DSN names.
If you perform import/export within WorldShip, you must recreate the
ODBC DSNs.
1. Start WorldShip.
2. Select Import/Export Data from the toolbar.
1. To launch ODBC Administrator on a 32-bit system
a. Click Start > Control Panel > Administrative Tools > Data Sources (ODBC)
4. Note the names and exact spellings of each entry displayed under the “Map ODBC
DSN” column. These entries are ODBC DSN names.
2. To launch ODBC Administrator on a 64-bit system
a. From My Computer, choose Local Disk (C:)
b. Navigate to Windows > SysWOW64
c. Select “odbcad32.exe” to launch the ODBC Administrator
Note: In order to continue to use WorldShip Import/Export functionality on
the New PC, you will have to configure the same ODBC DSNs in the exact same
manner as you configured them on the old PC.
3. Create new ODBC DSNs using the information from step 6. Remember,
the ODBC DSN names have to be exactly the same as on the old computer,
they are case sensitive.
5. Close WorldShip.
4. Return to Step 5: Install WorldShip on the New Operating System
or the New PC.
3. Choose Create/Edit Map…
6. Return to Step 3: Back Up WorldShip Data Using the WorldShip Support Utility.
Step 7: Determine Your Install Type
To determine your install type, choose View > WorldShip Information from the main
screen of the Support Utility.
1. Your Install Type is displayed under the Shipper box on the left side of the screen.
2. Make note of your Install Type.
Note: These procedures can only be used when the install type will be the same
on the new or upgraded PC.
3. Click Exit to return to the main screen of the Support Utility.
4. Return to Step 3: Back up WorldShip Data using the WorldShip Support Utility.
© 2000-2014 United Parcel Service of America, Inc. All rights reserved. 11/14
3


© Copyright 2026