
10 Designing Portlets and Portals Using Portal Designer
CH A P T E R
10
Designing Portlets and Portals Using Portal
Designer
Portal Designer is the Service Catalog module that allows designers and administrators to design and
manage pages and portal content and to specify which users or groups or users are able to access
particular content.
Portal Designer addresses many user interface customization requirements by providing administrators
and designers with finer control over the appearance of their Service Catalog implementation. At the
same time, the portal platform allows multiple external data sources to coexist within Service Catalog
screens, providing a holistic view into Data Center or general IT services and resources.
The portal front-end provides a way to interact with services, service items, standards, offerings, and
other core entities in the application, by integrating portlets exposing this content into the portal. Portal
Designer provides an interface to build a variety of portlets using application data, JavaScript/HTML,
ad hoc lists, or third-party JSR-compliant portlets.
Portal Designer allows interface designers to:
Note
•
Create portlets from external or third-party sources
•
Create portlets to highlight common services
•
Create portlets to show users what they already own, with links to services related to those items
•
Show announcements, video, or other types of media
•
Leverage RBAC to create a flexible user interface that is at once simple for casual users, and
advanced for power users
Portal Designer is a separately licensed module of Cisco Prime Service Catalog. You must be licensed
to run Portal Designer in order to use the content management functionality. Author Notes: Check
whether we have explained “content management functionality” in earlier chapters.
Portal Designer Roles and Capabilities
Site administrators can use the Organization Designer module to grant users access to the Portal
management modules.
Cisco Prime Service Catalog 10.1 Designer Guide
10-1
Chapter 10
Designing Portlets and Portals Using Portal Designer
Configuring Portlets
Access to the capabilities provided by Portal Designer is controlled via standard Role-Based Access
Control (RBAC). Design personnel can be granted access to all or selected portions of the Portal
Designer functionality. Capabilities to customize the portal’s appearance or manage portlet content can
be assigned to selected users, roles or groups through the use of Role-Based Access Control (RBAC).
These capabilities include:
•
Drag and drop user interface, fashioned after MyYahoo and iGoogle portals
•
User-selected skins
•
User-selected content
•
Ability for users to create their own portal pages
Details on the portal-related capabilities and how to assign these to project personnel are given in the
Cisco Prime Service Catalog Administration and Operations Guide, and in the Organization Designer
Online Help regarding roles.
Similarly, end users’ ability to access the portal front-end can be controlled via RBAC. Only users with
a role that includes the “Access Service Portal” capability are able to see the “Service Portal” module
menu and navigate to the portal pages and portlets.
Table 10-1
Portal End User Roles
Role
Description
Portal Basic User
Enables users to access the portal front-end and view portal
pages defined by the portal administrators.
End users of Cisco Prime Service Catalog who need access to the
Service Portal module should be assigned the Portal Basic User
role.
Portal Advanced User
Enables users to access the portal front-end and manage the
content and presentation of their portal pages.
Portal Professional User
Enables users to manage portal pages and make them available
to other users. This user can initiate and track service requests,
authorizations, and service items on behalf of others in their
business units and access those transactions in portlets.
Users of these roles require read permissions to particular portal pages and portlets in order to put the
pages on their portal and view the portlets.
Users may need to be granted additional capabilities and permissions if they need to access other
modules through hyperlinks on the portlets and to see the content in the portlets.
Configuring Portlets
A portlet is a software module that can be plugged into a portal page and arranged as non overlapping
portions of the page. A portal page can include one or more portlets. The following are the two types of
portlets available for users in the application:
•
Reserved Portlets, These are preconfigured portlets that are installed with every application
instance. See Customizing Reserved Portlets, page 10-16.
•
User-defined Portlets. These are JSR portlets or portlets developed using the Portal Designer.
Portal Designer allows the designer to define the content and presentation of the portlets with
predefined filters and lookup, HTML, and JavaScripts. A JSR portlet may be developed in any Java
Cisco Prime Service Catalog 10.1 Designer Guide
10-2
Chapter 10
Designing Portlets and Portals Using Portal Designer
Configuring Portlets
development environment that is compliant with JSR 168 or 286, and optionally using the Service
Catalog Java Client to leverage the application public APIs. A third-party JSR portlet can also be
easily integrated into the portal management solution.
Note
The preconfigured portlets available in the My Services module are not true portlets. They are not
available in Portal Designer and cannot be added to a portal page. Some examples are My Authorizations
and My Requisitions.
Portlets leverage the Service Catalog REST API which support the RBAC-enabled access to the
application data. The API framework, along with functionality for defining the appearance and behavior
of portlets, allow portal designers to easily include predefined content in a portlet and to configure that
portlet for inclusion in a portal page. The portlet content may consist of many types of data available
within Service Catalog such as:
•
Definitional data (agents and service definitions)
•
Directory data (people and organizations)
•
Transactional data such as requisitions
•
Service items and service standards
In addition, designers can define their own Custom Content, maintainable through Portal Designer, for
inclusion in portlets.
Creating and Configuring User-Defined Portlets Using Portal Designer
•
Creating a New Portlet, page 10-3
•
Configuring Portlet View, page 10-5
•
Defining Portlet Filter Criteria, page 10-6
•
Configuring Portlet Permissions, page 10-7
Creating a New Portlet
Procedure
Step 1
Click Portal Designers > Portlets > Actions > New Portlet.
Step 2
Enter portlet details as described in the table below.
Step 3
Click Add.
Step 4
Depending on your requirements, do the following:
•
Configure the portlet view. See Configuring Portlet View, page 10-5.
•
Define the portlet filter criteria. See Defining Portlet Filter Criteria, page 10-6
•
Configure portal permissions. See Configuring Portlet Permissions, page 10-7
Cisco Prime Service Catalog 10.1 Designer Guide
10-3
Chapter 10
Designing Portlets and Portals Using Portal Designer
Configuring Portlets
Table 10-2
Configuration Table for Adding Portlets
Field
Description
Display Name
The name to be displayed as the default portlet title; free-format.
Name
The internal name for the portal; can contain only letters, numbers, and the
underscore character (no spaces).
Author
A text string which defaults to the first and last name of the current user; may be
edited.
Content Type
The type of content of the portal. Options are:
Core Entities
Entities used by Service Catalog; all such objects are listed under the Reference
tab of Portal Designer.
Service Items
Any system- or user-defined service item, defined via Service Item Manager.
Standards
Any system- or user-defined standard, defined via Service Designer.
HTML/JavaScript
The portal designer will design the portlet according to rules specified in the
Defining HTML and JavaScript Portlets, page 10-8.
Custom Content
User-defined tables, defined and maintained using the Custom Content tab of
Portal Designer. See Configuring Custom Content Portlets, page 10-11.
Source
Once the Content Type is chosen, a drop-down list of data sources available for
that type appears. One is chosen as the basis of portlet content.
Description
Optional documentation on the portlet.
Automatic Login
You can associate a portlet that makes use of automatic authentication with the
external site by choosing the site name and checking the Automatic Login check
box.
Once the portlet has been saved (added), the rest of its definition can be provided using the tabs available
in the content portlet information pane on the General tab. The portlet is assigned to a folder
corresponding to its content data source, and selectable from the list pane on the left of the Portal
Designer window.
Note
•
All portlets are created in an “Active” status. Only “Active” portlets can be included on a portal page.
•
To disable portlets from use in portal pages, set the status of the portlets to “Inactive” and remove
them from the pages in which they are included. Inactive portlets that are still present in portal pages
are hidden from the users.
•
Keywords can optionally be associated with a portlet to allow users to search for portlets when
adding content to portal pages. Such keywords are defined using the Portal Settings tab.
Cisco Prime Service Catalog 10.1 Designer Guide
10-4
Chapter 10
Designing Portlets and Portals Using Portal Designer
Configuring Portlets
Configuring Portlet View
Content portlets are implemented with a Grid view. For such portlets, which reference a Service Portal
entity, the View tab allows designers to specify which columns from the chosen data source to display
(via the “Select Columns …” grids), and (optionally) which rows to display (via the Filter subtab). The
view properties specify the default appearance of the portlet when it is included in a portal page. These
can be overridden by individual users and on individual pages.
Procedure
Step 1
Click Portal Designer > Portlets.
Step 2
Select a portlet from the portal tree and click View.
Step 3
Enter the view properties as described in the table below.
Step 4
Click Save.
Table 10-3
Field Configuration Table for Portlet View
Field
Description
Height (px)
The initial height (in pixels) of the portlet; not applicable when the Auto
Height setting is enabled.
Auto Height
Check box that indicates whether the height of portlet should be sized to the
content automatically; not applicable to HTML portlets.
Auto Scroll
Check box that indicates whether a scroll bar should be displayed in the
portlet; not applicable to HTML portlets.
Portlet State
Whether the portlet should initially be displayed in its Normal or Minimized
view.
Show Portlet Title
Check box that indicates whether the portlet title (Display Name) should be
displayed at the top of the portlet.
Show Controls in
Portlet Title
Check box that indicates whether the controls on the title bar such as
Minimize and Maximize buttons should be displayed.
Select Columns for
Normal View
Provides a summary/overview of portlet content. Up to three columns can be
included and data sorted by the contents of one of those columns.
Cisco Prime Service Catalog 10.1 Designer Guide
10-5
Chapter 10
Designing Portlets and Portals Using Portal Designer
Configuring Portlets
Table 10-3
Field Configuration Table for Portlet View
Select Columns for
Maximized View
Provides more detailed portlet content and can include any number of
columns from the portlet’s data source.
•
Sort By and Sort
Direction
To move one or more columns between the Available Columns and
Visible Columns panes, click the columns (Ctrl-Click to choose multiple
columns) and click the upper left- and right-Arrows buttons (
).
Click the lower left- and right-Arrow buttons to move all columns
(
). Click the up- and down-Arrows (
) to rearrange the order
in which the Visible Columns appear.
Sorting, in ascending or descending order, can be applied to any of the
columns chosen in a view. The specified data is displayed in a
user-configurable grid which may be sized to fit on a portal page.
The columns that comprise Service Catalog core entities and those supported
for sorting are described in the Integrating Service Catalog Entities in Portlets.
Other data sources for content portlets (Custom Content, Service Items,
Standards) are site-specific—see your service catalog designers for detailed
information.
For HTML or JavaScript portlets, the View subtab presents an editor for the designer to enter the source
code that defines the appearance and content of the portlets. See Defining HTML and JavaScript Portlets,
page 10-8.
Defining Portlet Filter Criteria
Defining a portlet filter criteria allows designers to filter the data retrieved from the designated portlet
source.
Note
The Filter subtab is available only for portlets that are defined by directly referencing a Service Catalog
entity.
Procedure
Step 1
Click Portal Designer > Portlets.
Step 2
Select a portlet from the portal tree and click Filter.
Step 3
Click Add and choose filter criteria. For more information, see the table below.
Query criteria are formulated by specifying one or more filters. Each filter consists of a relational
statement comparing the value of a column in the entity on which the portlet is based to a specified.
Multiple filters can be combined by ANDing or ORing individual filter specifications; rules of
precedence apply.
The filtering criteria available for selection are dependent on the entity referenced in the portlet. The
drop-down lists for column and operation are context-sensitive and show only the supported
combinations in the underlying REST API of the entity.
Step 4
Click Save Filter.
Cisco Prime Service Catalog 10.1 Designer Guide
10-6
Chapter 10
Designing Portlets and Portals Using Portal Designer
Configuring Portlets
Table 10-4
Filter Criterion Table for Portlet Filters
Filter Criteria
Descriptions
Categories, services,
service offerings, and
agreements
Permissions to Order the Service/Initiate an Offering are applied on top
of the filtering criteria. Portal end users are able to view only data to
which they normally have access through the My Services module
Directory entities and
agents
RBAC read permissions are enforced along with the filtering criteria.
Portal end users are able to view only data which they would see in
Organization Designer and Service Link.
All attributes are available as filters. In addition, subscription-based
filters are available to display service items based on the user’s access
permissions:
– My Service Items: Instances of the chosen service item owned
by the portal user, or instances owned by the portal user’s
business units; the latter is applicable to users who have the My
Services capability “View Service Items for My Business
Units”.
– All Service Items: All instances of the chosen service item if the
Service items, standards
and custom content
user has the Service Item Manager “Manage Service Items”
capability.
Context-specific filters are available to restrict what the portal user can
view in the portlets. The filters mimic the predefined views that are
Requisitions, authorizations available in My Services and Service Manager (for example, Ordered for
Myself, My Assigned and Unassigned Authorizations, Available Work).
and tasks
Configuring Portlet Permissions
Configuring portlet permissions allows designers to designate which users should be able to access the
portlet and the type of access to grant. Any users so designated should also be granted the Portal module
capability to “Access Service Portal”.
Procedure
Step 1
Choose Portal Designer > Portlets.
Step 2
Select a portlet from the portal tree and click Permissions.
Step 3
Click Add Permission.
Step 4
From the Object Type drop-down list, choose one of the following: Organizational Units, Group,
Person, or Role.
Step 5
Fill in all or part of the name of the object in the search box and click Search.
To display all objects of the specified type, leave the search box blank. To display objects whose name
matches a particular pattern, you may include the wildcard character (*) in the search string.
Step 6
Click the rows to which the permission is to be granted. Use Shift-Click and Ctrl-Click to choose
multiple rows.
Step 7
From the Permission To drop-down list, select Read or Read / Write.
Cisco Prime Service Catalog 10.1 Designer Guide
10-7
Chapter 10
Designing Portlets and Portals Using Portal Designer
Configuring Portlets
Step 8
Click Add.
Portlet permissions also control which portlets users can access in Portal Designer if they have the
“Manage Portlets” capability. The user who creates the portlet is automatically granted all access
permissions to it.
Note
RBAC filtering is applied to the objects available for assigning permissions. In other words, the portal
designer needs to have read or read/write permissions to organizational units, person, groups and roles
in order to search for them in the Add Permission pane and to view them in the permission summary grid
once they have been added. To enable all users to view the portlet, portal designers can assign Read
permission to an “umbrella” organizational unit which is the parent of all business units. Alternatively,
they can work with the organization designer to grant the portlet permission to the “Anyone” role in the
Organization Designer module.
Defining HTML and JavaScript Portlets
HTML and JavaScript portlets provide the ability to define free-format portlets and use those portlets
within portal pages. Such portlets can be defined and maintained completely within Portal Designer.
They must conform to the coding rules described in this section.
For HTML and JavaScript portlets, the View and Filter subtabs are disabled as all the data displayed in
the portlet is provided using HTML or JavaScript code.
HTML Portlets
An HTML portlet consists of an HTML snippet or a URL.
After you define an HTML portlet, the View subtab adjusts its contents so that:
•
The View Type is by default set to Web Page.
•
The designer can designate the portlet subtype (HTML or URL).
•
An edit window for data entry of the appropriate type of text appears.
URL
The URL provides a hyperlink to the specified web page. It can be an absolute reference to an external
website or a relative reference to a Service Catalog page, for example:
/RequestCenter/myservices/navigate.do?query=orderform&sid=14.
Authentication settings can be optionally associated with a URL-based portlet to allow automatic login
to the external site. The common settings for the external site authentication are defined in the Portal
Settings tab in Portal Designer. Credentials for individual users are maintained through the Edit
Password tab in the portal front-end. See Authentication Setting fields in Portal Setting Options Table
table for more details regarding the different options for configuring external site authentication.
HTML Snippet
The HTML snippet can include:
tags, for applying styles to portions of the portlet
•
<div>
•
<script> definitions or invocations of JavaScript functions defined in local script, defined within
the HTML snippet.
Cisco Prime Service Catalog 10.1 Designer Guide
10-8
Chapter 10
Designing Portlets and Portals Using Portal Designer
Configuring Portlets
Make sure that the snippet does not include <head> or <body> tags because the portal is rendered as part
of the page body.
JavaScript Portlets
JavaScript portlets can display dynamic content and use the full range of JavaScript functionality. The
user interface of JavaScript portlets should be written using ExtJS functions, since ExtJS is the UI
framework used for the portal front-end. The complete reference can be found at the Sencha website.
Like the content portlets, JavaScript portlets may consist of data available within Service Catalog which
is accessible through the use of the REST API. See the Cisco Prime Service Catalog Integration Guide
for details regarding the APIs available.
After you define a JavaScript portlet, the View subtab is set to JavaScript and a text area is provided for
entering the code.
Example: Using REST API and EXTJS to Create a Grid Portlet
The key concepts for using REST API and EXTJS to create a grid portlet are illustrated in the following
sections with sample code snippets.
1.
Retrieve the data you want to show in the portlet from the REST API. See Retrieving Data from
REST API.
2.
Create a grid for displaying the data in the portlet. See Rendering Data in EXTJS Grids.
Retrieving Data from REST API
Step 1
Identify the appropriate REST API to use based on the content type and filtering method required.
For example, if the portlet is used to display all the orderable services for a particular category, the REST
API to be used is:
/RequestCenter/nsapi/definition/servicedefs?categoryName=<categoryName>
Step 2
Define an array that contains all the attributes of the content type as defined in the REST API.
fieldList = [ "serviceId",
"serviceName",
"description",
"topDescription",
"middleDescription",
"bottomDescription",
"pricingScheme",
"revisionNumber",
"status",
"statusId",
"expectedDuration",
"expectedDurationUnits",
"price",
"priceDisplaySchemaId",
"priceDescription",
"canStartLater",
"isBundle",
"dateQualityId",
"serviceLevelDescription",
"isOrderable",
"isReportable",
"serviceURL"];
Step 3
Create the proxy for REST HTTP GET calls.
var proxy = new Ext.data.HttpProxy({
Cisco Prime Service Catalog 10.1 Designer Guide
10-9
Chapter 10
Designing Portlets and Portals Using Portal Designer
Configuring Portlets
url: '/RequestCenter/nsapi/definition/servicedefs',
method: 'GET'
});
Step 4
Create an XML data store for the result set, including an XML reader that defines the parameters.
var store = new Ext.data.XmlStore({
autoDestroy: true,
storeId: 'myStore',
proxy: proxy,
root : "services",
record: 'service',
idPath: 'rowId',
totalProperty: '@totalCount',
autoLoad: true,
paramNames: {
start: 1,
limit: 10,
catName : 'Sample Category'
},
fields: fieldList
Note
In addition to REST APIs, AJAX calls can be invoked to retrieve data from other sources to provide the
content for the portlets.
Rendering Data in EXTJS Grids
Step 1
Define an array for the columns and appearance of the grid to be used to display the content.
displayList = [
{id: 'id', header: 'Id', width: 50, sortable: true, dataIndex:
'serviceId'},
{header:'Service Id',dataIndex: 'serviceId',hidden:true},
{header:'Service Name',dataIndex: 'serviceName'},
{header:'Description',dataIndex: 'description'},
{header:'Top Description',dataIndex: 'topDescription',hidden:true},
{header:'Middle Description',dataIndex: 'middleDescription',hidden:true},
{header:'Bottom Description',dataIndex: 'bottomDescription',hidden:true},
{header:'Pricing Scheme',dataIndex: 'pricingScheme',hidden:true},
{header:'Revision Number',dataIndex: 'revisionNumber',hidden:true},
{header:'Status',dataIndex: 'status'},
{header:'Status Id',dataIndex: 'statusId',hidden:true},
{header:'Expected Duration',dataIndex: 'expectedDuration',hidden:true},
{header:'Expected Duration Units',dataIndex:
'expectedDurationUnits',hidden:true},
{header:'Price',dataIndex: 'price',hidden:true},
{header:'Price Display Schema Id',dataIndex:
'priceDisplaySchemaId',hidden:true},
{header:'Price Description',dataIndex: 'priceDescription',hidden:true},
{header:'Can Start Later',dataIndex: 'canStartLater',hidden:true},
{header:'Is Bundle',dataIndex: 'isBundle',hidden:true},
{header:'Date Quality Id',dataIndex: 'dateQualityId',hidden:true},
{header:'Service Level Description',dataIndex:
'serviceLevelDescription',hidden:true},
{header:'Is Orderable',dataIndex: 'isOrderable',hidden:true},
{header:'Is Reportable',dataIndex: 'isReportable',hidden:true},
{header:'Service URL',dataIndex: 'serviceURL'}
];
Cisco Prime Service Catalog 10.1 Designer Guide
10-10
Chapter 10
Designing Portlets and Portals Using Portal Designer
Configuring Portlets
Step 2
Create an EXTJS grid, using the column array and data store defined in the earlier steps.
var grid = new Ext.grid.GridPanel({
store : store,
columns : displayList,
renderTo : '#divName#',
width : "100%",
autoHeight : true,
layout : 'fit',
viewConfig : {
forceFit : true
},
tbar : [combo,filterButton],
bbar : [new Ext.PagingToolbar({
store : store,
displayInfo : true,
pageSize : 5,
params:{
startRow: 1,
recordSize: 5
}
emptyMsg : "No record found"
})]
});
Configuring Custom Content Portlets
Custom content comprises user-defined tables that serve as a source of content for the portal. Such tables
can be referenced as the data source for portlets just like Standards. Such tables are defined and
maintained in the Custom Content tab in Portal Designer and are organized into content groups.
Content groups allow custom content tables to be grouped in a logical manner for easier navigation and
control of access permissions in Portal Designer. Read/write permissions can be granted at the group
level for managing all content tables within the group or at a more granular level for individual tables.
The “System” content group is available by default. It contains two commonly used custom content
definitions—Announcements and Links—to provide convenience to portal designers.
Creating and Configuring a Custom Content Table
Procedure
Step 1
Choose Portal Designer > Custom Content > Actions > New Content Definition to define a new
custom content table.
Step 2
Enter the field details as provided in the table below and click Add.
Step 3
Update the rest of its definition using the tabs available in Content Definition tab.
Content Definition comprises of the name, description and table columns that are characterized by the
following four attributes:
•
Display Name – Label for the table column as displayed in the portlets
•
Name – Internal name for the table column; should be unique within the same table
•
Data Type – The type and maximum value/length allowed for data stored in the table column
Cisco Prime Service Catalog 10.1 Designer Guide
10-11
Chapter 10
Designing Portlets and Portals Using Portal Designer
Configuring Portlets
•
Unique Key – Indicates whether the table column is used alone or along with other columns to
uniquely identify a row of data in the table; used for validating rows entered into the table
Step 4
Click Save.add
Step 5
In the Content Data tab, click Add and enter required values. The values entered should conform to the
data type and unique key restrictions specified in the Content Definition.
Step 6
In the Permissions tab, click Add Permission and update permission details.
Content access permissions can be controlled in a way similar to the portlets on the Permissions tab (see
the Configuring Portlet Permissions).
For users to view the content in their portal pages, read permissions to both the content definition and
data are required.
Table 10-5
Configuration table for Custom Content
Field
Description
Display Name
The name to be displayed as the name of the table; free-format
Name
The internal name for the table; can contain only letters, numbers, and
the underscore character (no spaces)
Content Group
The group in which the custom content table is located
Description
Optional documentation on the custom content table
Creating and Configuring JSR Portlets
Portlets developed using APIs which meet the Java Portlet Specification (JSR168, JSR286) standards
may be integrated into Portal management solution. These will appear in Service Catalog as “Third-Party
Portlets”. Vendor-specific implementations may include extensions to the approved APIs; these may not
be supported.
JSR portlets can also be developed using Service Catalog REST APIs for processing and displaying
Service Catalog entities. The information about these REST APIs, as well as the guidelines for
developing JSR portlets to be used within the portal management solution can be found in the Cisco
Prime Service Catalog Adapter Integration Guide.
Process for Configuring JSR Portlets
1.
Deploy JSR Portlets. See Deploying JSR Portlets, page 10-12.
2.
Add JSR Portlets to the Portal. See Adding JSR Portlets to the Portal, page 10-15.
Deploying JSR Portlets
Before You Begin
•
Assemble the portlets with Pluto-specific information for deployment. For instructions, see
Deployment Descriptor, page 10-13.
•
On the JBoss 7 application server, the tag for renderSingleLine in pluto.tld must be commented
out. For instructions, see Dependencies, page 10-13.
Cisco Prime Service Catalog 10.1 Designer Guide
10-12
Chapter 10
Designing Portlets and Portals Using Portal Designer
Configuring Portlets
•
The portlet WAR file should include the file: jboss-deployment-structure.xml, located under the
WEB-INF folder in the portlet WAR file. For instructions, see Dependencies, page 10-13.
•
(Optional) If the nsAPI java client is used in the portlets, the related Service Catalog and third-party
libraries need to be included in the application package. For more information, see nsAPI Java
Client, page 10-14.
Deployment Descriptor
The portal front-end uses Apache Pluto 1.1 libraries for the portal framework. To deploy a JSR portlet
into Service Catalog, the portlets must be assembled with Pluto-specific information for deployment.
Specifically, a servlet and servlet mapping are added to the deployment descriptor (web.xml). This
servlet (org.apache.pluto.container.driver.PortletServlet) is used to dispatch portlet requests to the
portlet application. For more detailed information, see the deployment instructions in the Apache web
site.
The following is a sample web.xml file for a portlet called “CategoryPortlet”:
<?xml version="1.0" encoding="UTF-8"?>
<!DOCTYPE web-app PUBLIC "-//Sun Microsystems, Inc.//DTD Web Application 2.3//EN"
"http://java.sun.com/dtd/web-app_2_3.dtd">
<web-app>
<display-name>CategoryPortlet</display-name>
<description>Category Portlet</description>
<servlet>
<servlet-name>CategoryPortlet</servlet-name>
<servlet-class>org.apache.pluto.container.driver.PortletServlet</servlet-class>
<init-param>
<param-name>portlet-name</param-name>
<param-value>CategoryPortlet</param-value>
</init-param>
<load-on-startup>1</load-on-startup>
</servlet>
<servlet-mapping>
<servlet-name>CategoryPortlet</servlet-name>
<url-pattern>/PlutoInvoker/CategoryPortlet</url-pattern>
</servlet-mapping>
</web-app>
Dependencies
On the JBoss 7 application server, the tag for “renderSingleLine” in pluto.tld should be commented out.
<!-<tag>
<name>renderSingleLine</name>
<tagclass>org.apache.pluto.driver.tags.PortletRenderSingleLineTag</tagclass>
<bodycontent>empty</bodycontent>
</tag>
-->
In addition, the portlet WAR file should include a file named “jboss-deployment-structure.xml”, located
under the WEB-INF folder in the portlet WAR file, to describe the dependencies on the JBoss modules.
Here is the sample content for the XML file:
<jboss-deployment-structure>
<deployment>
<dependencies>
<module name="javax.portlet" slot="main" export="true"/>
Cisco Prime Service Catalog 10.1 Designer Guide
10-13
Chapter 10
Designing Portlets and Portals Using Portal Designer
Configuring Portlets
<module name="org.apache.pluto.container.om" export="true"/>
<module name="org.apache.pluto.container.driver" export="true"/>
<module name="org.apache.pluto.tags" export="true"/>
</dependencies>
</deployment>
</jboss-deployment-structure>
nsAPI Java Client
If the nsAPI java client is used in the portlets, the related Service Catalog and third-party libraries need
to be included in the application package. A complete list of those dependent libraries and their locations
can be found in the Cisco Prime Service Catalog Adapter Integration Guide.
Procedure
•
JBoss, page 10-14
•
WebLogic, page 10-14
•
WebSphere, page 10-15
JBoss
Step 1
Create a subdirectory with the portlet name under the
“<JBOSS_HOME>\requestcenterserver\deployments” folder, for example:
<JBOSS_HOME>\standalone\deployments\<portlet_name>.
Step 2
Extract the portlet WAR file into the <portlet_name> directory that you just created.
Step 3
If the deployment descriptor has not been configured for the Apache Pluto portal server, modify the
web.xml file accordingly. See Deployment Descriptor, page 10-13.
Step 4
If the server is already running, create a text file named <portlet_name>.dodeploy.
WebLogic
Step 1
Create a subdirectory with the portlet name under the “<your_domain>\applications” folder, for
example:
<BEA_HOME>\ user_projects\domain\<your_domain>\applications\<portlet_name>
Step 2
Extract the portlet WAR file into the <portlet_name> directory that you just created.
Step 3
If the deployment descriptor has not been configured for the Apache Pluto portal server, modify the
web.xml file accordingly. See Deployment Descriptor, page 10-13.
Step 4
(For clustered WebLogic environment only) If your portlet references the URL for the Service Catalog
application, then specify the URL in the jsrportlet.properties file as
“http://localhost:<port>/RequestCenter” where <port> is the port number used by each WebLogic
server in the cluster. In other words, do not specify the URL as “http://<host_name>/RequestCenter”
where <host_name> is the computer name of the web server or a specific server in the cluster.
Step 5
Use the WebLogic Administration Console to deploy the portlet application to the same WebLogic server
(or cluster) as the Service Catalog application.
Step 6
Restart the WebLogic server (or cluster).
Cisco Prime Service Catalog 10.1 Designer Guide
10-14
Chapter 10
Designing Portlets and Portals Using Portal Designer
Configuring Portlets
WebSphere
Step 1
Use the WebSphere Administration Console to deploy the portlet application to the same WebSphere
server (or cluster) as the Service Catalog application. Make sure you choose the same virtual host and
specify an appropriate context root for the web application.
Step 2
If the deployment descriptor has not been configured for the Apache Pluto portal server, modify the
web.xml file accordingly. See the Deployment Descriptor.
Step 3
(For clustered WebSphere environment only) If your portlet references the URL for the Service Catalog
application, then specify the URL in the jsrportlet.properties file as
“http://localhost:<port>/RequestCenter” where <port> is the port number used by each WebSphere
server in the cluster. In other words, do not specify the URL as “http://<host_name>/RequestCenter”
where <host_name> is the computer name of the web server or a specific server in the cluster.
Step 4
Restart the WebSphere server (or cluster).
Adding JSR Portlets to the Portal
All successfully deployed JSR portlets will show up automatically on the JSR Portlets tab in the Portal
Designer module. The portlets are placed into the “Third-Party Portlets” folder and their statuses are
initially set to Inactive.
As with content portlets, access permissions are applied to the JSR portlets.
Procedure
Step 1
Choose Portal Designer > JSR Portlets.
Step 2
Set the portlet Status to Active.
Step 3
Modify the author and description as necessary for better documentation.
Step 4
Add appropriate keywords to the portlet to facilitate portlet search.
Step 5
Save the settings.
Step 6
On the Permissions subtab, grant the read permission to the appropriate entities.
Step 7
Edit the desired portal page and add the JSR portlet to the page, just as you would for content portlets.
Removing JSR Portlets from the Portal
Before a JSR portlet is made obsolete and permanently removed from the application server, all
dependencies and associations to the portlet should be removed. To do this, you should remove the
portlet from all portal pages that contain the portlet, and delete the portlet from the JSR Portlets tab. This
would allow permissions and subscriptions to be dropped for the portlet. Finally the portlet can be
undeployed from the application server.
Cisco Prime Service Catalog 10.1 Designer Guide
10-15
Chapter 10
Designing Portlets and Portals Using Portal Designer
Configuring Portlets
Migrating JSR Portlets between Portals
The import/export of JSR portlets configurations is not supported at this time. The steps for entering
general information and permissions for JSR portlets need to be repeated manually when the portlets are
deployed to a Service Catalog environment for the first time.
Customizing Reserved Portlets
Service Catalog includes number of Reserved Portlets—the Search, Order, Approvals, Account,
Agreement, Billing Rates, Charge History, Search, and Policy Alert portlets are listed on the Reserved
Portlets folder on Portal Designer > Portlets page.
You can modify the filtering parameters of the following reserved portlets:
•
Search Portlet, page 10-16
•
Order Status Portlet, page 10-16
•
Approvals Portlet, page 10-17
Search Portlet
The Search portlet functions the same as the “Search for Services” function (“Search for services
containing:” field) in My Services. See the My Services Online Help for more information.
To perform a Search, enter search criteria in the text box and click on the Search icon
. Clicking on
the
icon clears the search box. Wildcards (*) are supported and perform as a case-insensitive search.
A list of services matching the search criteria appears below where you can click on a service name to
pop up the Service Overview/Summary page, or click Order to pop up the Service Order page.
Order Status Portlet
The Order Status portlet, used to track and view orders, is similar to the Requisitions tab in My Services.
The Order Status portlet displays a list of requisitions filtered by requisition type and requisition status.
Procedure
Step 1
From the left drop-down menu, choose the type of requisition to view—Ordered for Myself, Ordered
for Others, or Ordered for my unit.
Step 2
In the right drop-down menu, choose a requisition status—Preparation, Ordered, Ongoing, Cancelled,
Closed, Rejected, or All.
Step 3
Click the
Note
button to filter the requisition list based on your selections in the Steps above.
Filter selections are remembered for the Order Status portlet for each user on every page the portlet is
added, even when filter selections are changed in the Requisitions tab of My Services.
Cisco Prime Service Catalog 10.1 Designer Guide
10-16
Chapter 10
Designing Portlets and Portals Using Portal Designer
Configuring Portlets
Note
The “Ordered” requisition status only appears in the requisition list if the “Submit, Approve and Review
Asynchronously” setting is turned on in the Common section of Administration > Settings >
Customizations. See the Site Administration chapter of the Cisco Prime Service Catalog Administration
and Operations Guide for more information.
Approvals Portlet
The Approvals portlet, used to track and view authorizations, is similar to the Authorizations tab in My
Services. See the My Services Online Help for more information.
Figure 10-1
Approvals Portlet
The Approvals portlet displays a list of authorizations filtered by authorization type and authorization
status.
Procedure
Step 1
From the left drop-down menu, choose the type of authorizations to view—My Authorizations, My
Assigned and Unassigned, or Authorizations for Others.
Step 2
In the right drop-down menu, choose an authorization status—Ongoing, Approved, Rejected,
Reviewed, Cancelled, or All.
Step 3
Click the
button to filter the authorization list based on your selections in the Steps above.
Note
Filter selections are remembered for the Approvals portlet for each user on every page the portlet is
added, even when filter selections are changed in the Authorizations tab of My Services.
Note
The “Ongoing” status appears as “Being Approved” or “Under Review” in the authorizations list.
For more information see Understanding Service Items Policies.
Cisco Prime Service Catalog 10.1 Designer Guide
10-17
Chapter 10
Designing Portlets and Portals Using Portal Designer
Configuring Portlets
Integrating Service Catalog Entities in Portlets
The portal management solution allows you to integrate views of Service Catalog entities (objects) into
portlets. Such reference data cover the following types of objects:
•
Core Entities represent the definitions of Service Catalog entities, such as categories, and services,
as well as directory data (people and organizations) and actual transactional data on tasks and
requisitions.
•
HTML/JavaScript reference data refers to portlets defined in Portal Designer of the corresponding
type.
•
Service Items defined in the Service Item Manager module, used to track corporate assets that have
been ordered or updated via service requests.
•
Standards defined in the Service Item Manager module, used to enforce data entry rules or
otherwise standardize the configuration of service items or other orderable assets.
Reference data serves as a quick reference to the definitions of Service Catalog entities. A list of the
attributes in each object that comprises the reference data is given in the “Content Definition” tab
displayed when that object is chosen from the Reference Data list panel, as shown in the sample below.
All attributes listed in the “Definition” section are available for inclusion in the portlet views. Detailed
descriptions of these columns are given in the sections below.
Content Definition
The Portal Designer > Reference Data > Content Definition tab lists details on each of the entities
that can be included in a portlet. This subtab is read-only, allowing portal designers to review entity
definitions before including them in a portlet.
Field
Description
Display Name
The name of the object displayed in Portal Designer.
Name
The system name of the entity as stored in the portlet content metadata tables.
Content Group
The categorization of content type; for core entities, the entity type (definitional,
directory, or transactional); for service items and standards, the service item
group or standards group, respectively.
Description
A description of the entity.
Definition
Display Name
The name of the attributes that comprise the entity. This is the column name
displayed by Portal Designer and within portlets.
Name
The name of the database column containing the attribute data.
Data Type
The data type of the attribute/column.
In addition to the attributes which comprise the entity, the content definition includes one or more
“URL” as the last attribute.
In a portlet, the URL attribute generates a clickable link which takes the user to the corresponding
application module to bring up the entity details or the actionable view of the entity on a popup page.
The user interface is the same as the one that user would see by navigating through the search views in
those modules. The only difference is that the user stays in the portal and does not lose the context once
the review/action is completed for the entity and the popup page is closed.
Cisco Prime Service Catalog 10.1 Designer Guide
10-18
Chapter 10
Designing Portlets and Portals Using Portal Designer
Configuring Portlets
Users must have the required RBAC capabilities to navigate to other modules via the URL links;
otherwise, an insufficient permission error appears.
Core Entities
The Portal Designer > Reference Data > Core Entities tab allow portal designers to expose
information on application transactional, definitional, and directory data to portal users. In general, the
attributes available correspond to the fields displayed on the corresponding user interfaces in the
application modules.
Categories
Categories are used to group services in the service catalog for presentation to end users who may wish
to browse or order those services.
Table 10-6
Categories
Column (Display Name)
Description
Category ID
Internal ID of the category
Category Name
Name of the category
Description
Description of the category
isRoot
Whether the category is a root category, that is, “Consumer Services” or
“Service Offerings”
TopDescription Enabled
Whether the top section of category details is enabled in the category
presentation
Top Description
HTML defined in the top section of category details in the category
presentation
TopDescription URL
URL defined in the top section of category details in the category
presentation
MiddleDescription Enabled Whether the middle section of category details is enabled in the category
presentation
Middle Description
HTML defined in the middle section of category details in the category
presentation
MiddleDescription URL
URL defined in the middle section of category details in the category
presentation
BottomDescription Enabled Whether the bottom section of category details is enabled in the category
presentation
Bottom Description
HTML defined in the bottom section of category details in the category
presentation
BottomDescription URL
URL defined in the bottom section of category details in the category
presentation
Category Image
Relative URL for the category image within Request Center.war
CatalogType ID
Internal ID of the category type: 1-Consumer Service category, 2-Service
Offering category
Description URL
(Not Used)
Category URL (My
Services)
Relative URL link for accessing the category in the My Services –
Category Overview tab
Cisco Prime Service Catalog 10.1 Designer Guide
10-19
Chapter 10
Designing Portlets and Portals Using Portal Designer
Configuring Portlets
Services
Table 10-7
Services
Column (Display Name)
Description
Service ID
Internal ID of the service
Service Name
Name of the service
Description
Description of the service
Top Description
HTML defined in the Overview section of service details in the service
presentation, shown only when the display is set to Show
Middle Description
HTML defined in the More Details section of service details in the service
presentation, shown only when the display is set to Show
Bottom Description
HTML defined in the Service Form section of service details in the service
presentation, shown only when the display is set to Show
RevisionNumber
Internal version number of the service
Price Description
Description of how the service is priced, shown only when the Pricing
Summary display is set to “Display both cost and price” or “Display only
price”
Pricing Scheme
Pricing scheme of the service, shown only when the Pricing Summary
display is set to “Display both cost and price” or “Display only price”
IsBundle
Whether the service is a bundle
IsOrderable
Whether the service is orderable
IsReportable
Whether the service is reportable in the Advanced Reporting module
Service Level Description Description of the service level as defined in the service general
information
Status
Status of the service; possible values are Active and Inactive
Status ID
Internal ID for the status of the service; possible values are: 1 (Active),
2 (Inactive)
Expected Duration
Expected duration of the service in hours
Expected Duration Units
Units of measure to be used when displaying the service; possible values
are “Business Days” and “Hours”
Price
Price of the service, shown only when the Pricing Summary display is set
to “Display both cost and price” or “Display only price”
Can Start Later
Whether future delivery is allowed for the service
Date Quality ID
Forecasting method defined for the service; possible values are:
2 (Estimate Due Date from task durations)
3 (Approximate Due Date using Standard Duration)
4 (Do not forecast Due Date)
Service Image
Relative URL link for the service image in the form of servlet reference
within RequestCenter.war
Service URL
Relative URL link for accessing the service in the My Services Service
Overview page
Cisco Prime Service Catalog 10.1 Designer Guide
10-20
Chapter 10
Designing Portlets and Portals Using Portal Designer
Configuring Portlets
Table 10-7
Services
Service Order URL
Relative URL link for accessing the service in the My Services Service
Order page
Ordering Mode
Ordering mode defined for the service. Possible values are
Compute Price
•
Add review enabled
•
Add review disabled
•
1-Click
•
For more information, see Creating a Service.
The value defined for computing the price of a service. The possible values
are True or False.
Agents
Agents are used by Service Link, the integration hub of Service Catalog, to provide an interface between
Service Catalog service requests and third-party systems such as help desks, inventory control systems,
purchasing systems, or other external applications.
Column (Display Name)
Description
Agent ID
Internal ID of the agent
Agent Name
Name of the agent
Description
Description of the agent
Status ID
Internal ID of the agent status; possible values are: 1 (Active), 2 (Inactive)
Action
Action to be performed by the agent, as seen in the task general information
in Service Designer
Context Type ID
Internal ID for the context of external task; possible values are: 1 (Service
Task), 2 (Service Item Task)
Inbound Adapter Name
Name of the adapter used for inbound action
Outbound Adapter Name Name of the adapter used for outbound action
InboundTransformation
Name of the transformation used for inbound document
OutboundTransformation Name of the transformation used for outbound document
Failed email
Name of the email notification used for failure
Status
Status of the agent; possible values are: Active, Inactive
Agent URL
Relative URL link for accessing the agent in the Service Link Manager
Integration tab
Requisitions
Requisitions are the service requests that have been submitted by Service Catalog users.
Table 10-8
Requisitions
Column (Display Name)
Description
Requisition
Internal ID of the requisition
Cisco Prime Service Catalog 10.1 Designer Guide
10-21
Chapter 10
Designing Portlets and Portals Using Portal Designer
Configuring Portlets
Table 10-8
Requisitions
Name
Display name of the requisition; normally the first service included in the
requisition
Initiator Id
PersonID of the initiator of the requisition
Customer Id
PersonID of the customer of the requisition
Expected Duration
(Not used)
Actual Duration
Actual duration, measured in hours, to complete the requisition
Due Date
Date on which the requisition fulfillment is expected to complete
Closed Date
Date on which the requisition was actually set to Closed status
Expected Cost
Price of the requisition
Status
Status of the requisition; possible values are: Ongoing, Closed, Rejected,
Canceled, Delivery Canceled
Initiator
First and last name of the initiator of the requisition
Customer
First and last name of the customer of the requisition
Bill To
Name of the home organizational unit of the customer of the requisition
Submit Date
Date on which the requisition was submitted
Requisition URL
Relative URL link for accessing the requisition details page in My Services
Authorizations
Authorizations are any approvals or reviews required in conjunction with completing fulfillment of a
service request. The columns cover those that are presented in the Authorization tab in My Services.
Table 10-9
Authorizations
Column (Display Name)
Description
Requisition
Requisition ID associated with the task
Total Price
Total price of the requisition associated with the task
Due On
Due date of the task
Task Name
Name of the task
Service Name
Name of the service associated with the authorization. When there are
multiple services for the authorization, only the first service name is shown.
Customer
Name and home organizational unit of the customer for the associated
requisition, presented in the format {FirstName LastName} : {OU Name}
Performer
First and last name of the performer of the task
Status
Status of the authorization task; possible values are: Under review, Being
approved, Reviewed, Approved, Rejected
Priority
Priority of the authorization task; possible values are: High, Normal, Low
Authorization ID
Internal ID (Task ID or Activity ID) of the task
Authorization URL
Relative URL link for accessing the task data page in Service Manager
Cisco Prime Service Catalog 10.1 Designer Guide
10-22
Chapter 10
Designing Portlets and Portals Using Portal Designer
Configuring Portlets
Tasks
Tasks are activities associated with a request, including reviews, authorizations and fulfillment tasks.
The columns cover those that are presented in the Home tab of Service Manager.
Table 10-10
Tasks
Column (Display Name)
Description
Task Id
Internal ID of the task (aka Activity ID)
Task Name
Name of the task
Requisition
Requisition ID associated with the task
Due Date
Due date of the authorization task
Service Name
Name of the service associated with the task
Initiator
First and last names of the initiator of the requisition associated with the
task
Customer OU
Name of the home organizational unit of the customer for the associated
requisition
Customer Name
First and last names of the initiator of the requisition associated with the
task
Performer
First and last names of the performer of the task, if the task is assigned to a
person
Queue
Name of the queue assigned to perform the task, if the task is assigned to a
queue
Status
Status of the task; possible values are: New, Ongoing, Under review, Being
approved, Completed, Reviewed, Approved, Rejected, Skipped, Cancelled,
Scheduled, Review Submitted, Approval Submitted
Scheduled Start Date
Scheduled start date of the task
Effort
Effort estimated for the task
Task URL
Relative URL link for accessing the task data page in Service Manager
Organizational Units
Organizations are the business units and service teams into which users are organized.
Table 10-11
Organization Unit
Column (Display Name)
Description
OrganizationUnit Name
Name of the organizational unit
Description
Description of the organizational unit
Organizational Unit ID
Internal ID of the organizational unit
Parent ID
Internal ID of the parent organizational unit
Parent Name
Name of the parent organizational unit
Organizational Unit Type ID
Internal ID of the organizational unit type; possible values are: 1
(Business Unit), 2 (Service Team)
Status ID
Internal ID of the status of the organizational unit; possible values are:
1 (Active), 2 (Inactive)
Cisco Prime Service Catalog 10.1 Designer Guide
10-23
Chapter 10
Designing Portlets and Portals Using Portal Designer
Configuring Portlets
Table 10-11
Organization Unit
Column (Display Name)
Description
Status
Status of the organizational unit; possible values are: Active, Inactive
Manager ID
Person ID of the person assigned to the organizational unit manager
functional position
Manager Name
First and last names of the person assigned to the organizational unit
manager functional position
isBillable
Whether the organizational unit is marked as billable
Organizational Unit URL
Relative URL link for accessing the organizational unit general
information page in Organization Designer
Persons
Persons are individual users as defined in Organization Designer.
Table 10-12
Personas
Column (Display Name)
Description
Person ID
Internal ID of the person
First Name
First name of the person
Last Name
Last name of the person
Email
Email address of the person
HomeOrganizationalUnit ID
Internal ID of the home organizational unit of the person
HomeOrganizationalUnit
Name
Name of the home organizational unit of the person
TimeZone ID
Internal ID of the time zone of the person
TimeZone Name
Name of the time zone of the person
Login Name
Login name of the person
Birth Date
Birth date of the person
Hire Date
Hire date of the person
Title
Title of the person
Employee Code
Employee code of the person
Locale ID
Internal ID of the locale of the person
Language Code
Internal ID of the preferred language for the person
Language Name
Preferred language for the person
Supervisor ID
Person ID of the supervisor of the person
Supervisor Name
Name of the supervisor of the person
Status
Status of the person; possible values are: Active, Inactive
Person URL
Relative URL link for accessing the person general information page
in Organization Designer
Cisco Prime Service Catalog 10.1 Designer Guide
10-24
Chapter 10
Designing Portlets and Portals Using Portal Designer
Configuring Portal Pages
Groups
Groups are a user-defined grouping of OUs or people that can be used in the assignment of work, roles
and permissions.
Table 10-13
Groups
Column (Display Name)
Description
Group ID
Internal ID of the group
Group Name
Name of the group
Description
Description of the group
Status ID
Internal ID of the status of the group; possible values are: 1 (Active), 2
(Inactive)
Status
Status of the group; possible values are: Active, Inactive
Parent ID
Internal ID of the parent of the group
Parent Name
Name of the parent of the group
Group URL
Relative URL link for accessing the group general information page in
Organization Designer
HTML/JavaScripts
The HTML/JavaScripts objects are those HTML/Java script portlets that have been designed in Portal
Designer.
Service Items
Both system- and user-defined service items are available for display in portlets. For user-defined service
items, the attribute names and data types correspond to those defined at your site—see your service
catalog design team for more information.
Standards
Both system- and user-defined standards are available for display in portlets. For user-defined standards,
the attribute names and data types correspond to those defined at your site—see your service catalog
design team for more information.
Configuring Portal Pages
Once a portlet has been defined, made active, and made available to users via the appropriate
permissions, it can be incorporated into portal pages. Two approaches are available for configuring
portal pages:
•
The portal designer can preconfigure the page by specifying its layout characteristics and including
portlets as appropriate.
•
Portal end users can dynamically incorporate portlets for which they have permission into their own
pages and optionally save the portal pages.
Cisco Prime Service Catalog 10.1 Designer Guide
10-25
Chapter 10
Designing Portlets and Portals Using Portal Designer
Configuring Portal Pages
Creating a Portal Page
Procedure
Step 1
Choose Portal Designer > Portal Pages.
Step 2
Click Actions drop-down arrow and choose the appropriate option to create both portal pages and page
groups. All portal pages must be in a Portal Page Group.
Page groups serve as containers of portal pages for easier navigation and control of access permissions
in Portal Designer. Only users who have read permissions to those page groups can see them in the
Service Portal module.
Service Catalog includes two preconfigured page groups, both of which are displayed in the Service
Portal module:
•
System – This portal page group is reserved for site-wide information. The Site Homepage is
located in this page group.
•
My Workspace – This portal page group is accessible by all users and is available for users to place
their portal pages.
Step 3
Click Add.
Step 4
Depending on your requirements, configure the portal page by performing the following actions:
•
Modifying Page Configuration, page 10-26
•
Adding Portlets to the Portal Page, page 10-28
•
Granting Portal Page Permissions, page 10-29
•
Configuring Subscribed Users, page 10-30
Modifying Page Configuration
After you create a Portal Page, use the General tab to view or modify the page configuration. The page
group for a portal page cannot be modified once it has been specified because of the permissions already
associated with the group.
The General information determines the overall look-and-feel of the page, including its color scheme
(“Theme”) and layout.
Procedure
Step 1
Choose Portal Designer > Portal Pages > General.
Cisco Prime Service Catalog 10.1 Designer Guide
10-26
Chapter 10
Designing Portlets and Portals Using Portal Designer
Configuring Portal Pages
Step 2
Configure fields to specify general information about a portal page as summarized in the table below.
Table 10-14
Portal Page General Tab Field Descriptions
Field
Description
Status
The current status of the portal page; values are Active and Inactive.
All portal pages are created with an “Active” status. When the page status is set to
“Inactive”, the portal page is hidden from Service Catalog. Users who currently
subscribe to the page will remain in the subscription record until the page is
deleted. If an inactive page is still marked as the landing page for a person or an
organizational unit, the setting is ignored, and users will land on their
organizational unit homepage (if one is defined) or the Site Homepage instead
when they first navigate to Service Portal.Catalog
Name
The name assigned to the page.
Theme
The default theme with which the portal page is displayed.
The Portal Manager solution is distributed with a set of “Themes”, color schemes,
and styles. Portal pages are set to use the “Gray” theme by default. They can be
configured to use other preconfigured themes both by portal designers and by
portal users who have the “Manage Portal Page Theme” capability. For more
information on themes and the styles used by the Portal, see the Cisco Prime
Service Catalog Administration and Operations Guide.
Step 3
Page Group
The page group to which the portal page was assigned.
Layout
The layout for the portal page. Details on available layouts are given below.
Author
A text field containing the name of the author or other appropriate comments about
the author; default value is the name of the user who created the portal page.
Make this page
public
Making a portal page public makes it visible to other users. Users having
appropriate permissions are able to subscribe to the page.
Modify layout configurations.
The portal page can be divided into sections and columns either vertically or a combination of vertically
and horizontally. Available page layout formats are summarized below:
Cisco Prime Service Catalog 10.1 Designer Guide
10-27
Chapter 10
Designing Portlets and Portals Using Portal Designer
Configuring Portal Pages
Figure 10-2
Page Layout
Additional properties of the Layout Configuration are inherited from the portlet’s definition, and can be
overridden on a page-by-page basis:
Table 10-15
Configuration Table for Layout Configurations
Field
Description
Section 0 Column
<n> Width
For each column in the Layout, the user can specify the percentage of the browser
width that the column should take up. The percentages should not exceed 100
percent.
The number of sections available varies with the layout chosen.
Portlet Borders
True if each portlet should have a border around it; false otherwise.
Portlet Headers
True if the grid column headers should be displayed; false otherwise.
Adding Portlets to the Portal Page
Use the Portlets subtab to include portlets on a portal page, configure their appearance, change the portlet
configuration on a page, or remove a portlet from a page.
Procedure
Step 1
Choose Portal Designer > Portal Pages > Portlets.
Step 2
Click Add Portlets to Page.
Step 3
If desired, you can filter the portlets displayed by entering a keyword and clicking Search.
Step 4
Expand the portlet groups displayed, until you find the portlets of interest. Highlight the name of a
portlet to display a summary/description in the right-hand pane. Select the check box to the left of the
portlet name to include the portlet on the page.
Step 5
Click Add to add the chosen portlets to the page.
When a portlet is added to a page, it is placed into the first section by default and set to display last on
the page. The Section, Row and Column information in the grid indicates the location of the portlet on
the page. The values in these fields cannot be modified directly but designers can change the position of
a portlet by highlighting the portlet and clicking the “Move Up” or “Move Down” buttons.
Cisco Prime Service Catalog 10.1 Designer Guide
10-28
Chapter 10
Designing Portlets and Portals Using Portal Designer
Configuring Portal Pages
If the portlet position needs to be substantially rearranged, designers may choose to do so in the portal
front-end by adding the page to their portals, and using the mouse controls to drag the portlets to the
desired location on the page.
To place a portlet into the second section or third section of a page with multi section layout (for
example, 1-2, 1-2-1 or 2-2 columns), you need to edit the page in the portal front-end, use the mouse to
drag the portlet to the bottom of the page and drop it when the second section outline appears. The third
section, if available for the page layout, shows up only when one or more portlets have been placed into
the second section.
Many of the properties shown are inherited from the portlet definition. Some of these (Name, Label,
Type, Group) can be changed only by changing the portlet’s configuration. Click on the Name to go to
the Portlets tab to modify these properties. The remaining inherited properties can be overridden on a
page-by-page basis.
Granting Portal Page Permissions
The user who creates a portal page group or a portal page is automatically granted all access permissions
to the object. For portal page groups, apart from the read and write permissions, the following
permissions are also granted to the user:
•
Read all pages in the group – Allows the user to view all the pages in the page group in Portal
Designer. Also allows the user to subscribe to all the public pages in the page group in the portal
front-end.
•
Write all pages in the group – Allows the user to edit the settings and definition of all the pages in
the page group in Portal Designer. Also allows the user to enter edit mode of the pages in the portal
front-end.
Users without these permissions can only access individual pages for which they have read/write
permissions. As with portlets, the Permissions subtabs for portal page group and page allow designers
to designate which users should be able to access the portal object and the type of access to grant.
Procedure
Step 1
Choose Portal Designer > Portal Pages > Permissions
Step 2
Click Add Permission.
Step 3
To configure permissions, see the Configuring Portlet Permissions for more information.
If you have upgraded from a previous release to the current release, the “Anyone” role is assigned the
following permissions automatically:
•
Read permission on System Page Group
•
Read/Write permission on "My Workspace" Page Group
•
"Read" permission on "Site Home Page" Portal Page
You must further remove the permissions from “Anyone” role and assign it to other roles as needed.
Cisco Prime Service Catalog 10.1 Designer Guide
10-29
Chapter 10
Designing Portlets and Portals Using Portal Designer
Configuring Global Settings for Portlets and Portals
Configuring Site Homepage
The Site Homepage is automatically provided within the System portal page group. Users with the Site
Administrator role are granted read and write permissions to this portal page in Portal Designer. They
can edit the page or grant access to the page to other users so that the page can be configured to include
site-wide information that is of interest to the portal users.
The read permission to the page is granted to “Anyone” roles. The portal page also serves as the landing
page for a portal user when the user’s home organizational unit does not have a default landing page
defined and the user has not set his/her own landing page preference.
Configuring Subscribed Users
The Subscribed Users subtab provides a read-only view of portal users who have included the current
page in their portal. Designers cannot remove user subscriptions but can prohibit users from accessing
the page by setting the status of the page to “Inactive”, or by removing the read access permissions.
Configuring Global Settings for Portlets and Portals
The Portal Designer > Portal Settings tab allows designers to specify global data and settings for use
in all portlets and portal pages.
Cisco Prime Service Catalog 10.1 Designer Guide
10-30
Chapter 10
Designing Portlets and Portals Using Portal Designer
Configuring Global Settings for Portlets and Portals
The following table describes the available options:
Table 10-16
Portal Setting Options Table
Option
Description
Common Settings
Site-wide settings for portal operations
Common settings establish parameters for portal operations. The
default settings are the recommended configurations. Changes to higher
values may affect the application performance.
•
Maximum Number of Pages Created in Service Portal – The
maximum number of portal pages that you can create a pagegroup
from Service Portal. The highest value allowed for this setting is
10.
•
Maximum Number of Portlets on a Page – The maximum number
of portlets that can be included on a portal page. The default setting
is 6 and applies to all portal users. The highest value allowed for
this setting is 10.
•
Maximum Number of Grid Portlets on a Page – The maximum
number of grid portlets that can be included on a portal page. The
default setting is 4 and applies to all portal users. The highest value
allowed for this setting is 6.
•
nsAPI Page Size for Transactional Data – The default number of
records returned by portlets and Service Catalog API clients for
Requisitions, Requisition Entries, Authorizations, and Tasks (when
the page limit is not specified in the API call). The default setting
is 10. The highest value allowed for this setting is 50.
•
nsAPI Page Size for Directory Data – The default number of
records returned by portlets and Service Catalog API clients for
People, OUs, Groups, and Accounts (when the page limit is not
specified in the API call). The default setting is 10. The highest
value allowed for this setting is 50.
•
nsAPI Page Size for Service Item and Standard Data – The default
number of records returned by portlets and Service Catalog API
clients for Standards and Service Items (when the page limit is not
specified in the API call). The default setting is 10. The highest
value allowed for this setting is 50.
•
nsAPI Page Size for Definitional and Custom Data – The default
number of records returned by portlets and Service Catalog API
clients for Categories, Services, Offerings, Agents, Agreements,
and User-defined Contents (when the page limit is not specified in
the API call). The default setting is 10. The highest value allowed
for this setting is 50.
Cisco Prime Service Catalog 10.1 Designer Guide
10-31
Chapter 10
Designing Portlets and Portals Using Portal Designer
Configuring Global Settings for Portlets and Portals
Table 10-16
Portal Setting Options Table
Organizational Unit Settings
Default settings for individual organizational units.
The Organizational Unit Settings page allows a home page to be
configured for individual organizational units (OUs). A portal page so
designated is always displayed in the portal for users who have the
organizational unit as their Home OU.
Users who have a home page defined for their Home OU will see two
pages in My Workspace page group—the OU Homepage, and the Site
Homepage. They can add/create more pages and choose to land on a
different portal page by setting the desired page as the landing page for
themselves. More information regarding the end user view of Service
Portal can be found in the .
Cisco Prime Service Catalog 10.1 Designer Guide
10-32
Chapter 10
Designing Portlets and Portals Using Portal Designer
Configuring Global Settings for Portlets and Portals
Table 10-16
Portal Setting Options Table
Keywords
Keywords that can be associated with a portlet to help users find
portlets when designing a portal page
Keywords provide flexibility in portlet search when designers or portal
users are looking for content to include in a portal page. Once defined
in the Common Settings, keywords can be associated with a portlet on
the Keyword page itself, or on the General Information subtab for
portlets.
Keywords used for portlets are distinct/disjoint from the Keywords
used/associated with services (service definitions).
Authentication Settings
Authentication details for use with external sites to allow Single
Sign-On (SSO) from enterprise login accounts to individual portlets, or
to use group account credentials to automatically login to those sites.
To connect a site that requires a login:
Step 1
Choose Portal Designer > Portal Settings >
Authentication Settings.
Step 2
Click Add External Site.
Step 3
Create an External Site profile specifying the site
name and the login URL, identifying the fields
on the login page where the user is expected to
enter a user name and password; and specifying
the authentication type.
Step 4
If the same connection criteria can be used for all
users accessing the site through the portal,
specify global authentication criteria.
Step 5
Design a portlet that has automatic login enabled
and uses the external site.
Step 6
The portlet can be included on a portal page. If
global authentication arguments are specified,
they will automatically be passed to the external
site for authentication. If global authentication is
not used, the user can enter site connection
credential via the portal’s Edit Password tab
accessible in the portal’s Edit Mode.
Step 7
Add Authentication details using Configuration
Table for External Authentication
Cisco Prime Service Catalog 10.1 Designer Guide
10-33
Chapter 10
Designing Portlets and Portals Using Portal Designer
Importing and Exporting Portal Content
The following table describes the fields used to define external site authentication settings:
Table 10-17
Configuration Table for External Authentication
Field
Description
Site Name
The name of the site.
Login URL
The URL that identifies the site’s login page.
Home Page URL
The URL that identifies the landing page of the application to be
displayed.
UserID Field Name
The field on the page specified by the Login URL which contains the
user’s ID/user name.
Password Field Name
The field on the page specified by the Login URL which contains the
user’s password.
Authentication Type
URL, Form.GET, or Form.POST.
Other Arguments
Additional arguments that must be passed to the site. These are passed
in a format depending on the authentication type. The typical format is
arg1=value1&arg2=value2.
Use Global Authentication
A check box that indicates that the User ID and Password values
specified below are used for all users to connect to the site.
UserID Value
The value of the User ID to be passed to the site for global
authentication.
Password Value
The value of the Password to be passed to the site for global
authentication.
Description
Free-format text which describes this site; documentation only.
Importing and Exporting Portal Content
Portal content and portlet definitions are developed in a Service Catalog instance, and the metadata
underlying these objects is stored in the Content Management repository. You may want to back up an
object definition to a source code control system or other file-based storage. You may want to develop
content in a Development system, then transfer the content to a Test system for testing or validation, and
then to a Production system for everyday use by end users.
To do this, you need to use the Import/Export facilities provided by Portal Designer.
Contents of an Exported File
The export file is an XML file in an industry-standard CIM (Common Information Model) compatible
format, version 2.3.1. CIM is based on an object-oriented model and uses terminology adapted from
Unified Modeling Language (UML).
Cisco Prime Service Catalog 10.1 Designer Guide
10-34
Chapter 10
Designing Portlets and Portals Using Portal Designer
Importing and Exporting Portal Content
Portlet Contents
What is included:
•
Portlet general information, view and filter definitions, including HTML and JavaScript code
•
Associated custom content definition and data
•
Associated keywords
•
Associated authentication settings
What is not included:
•
All object permissions
•
Definition and data for other content types (core entities, service items, standards)
Portal Contents
What is included:
•
Portal page general information, settings and content definitions.
•
Associated portal page groups
•
Associated portlet definitions
•
Associated custom content definition and data
•
Associated keywords
•
Associated authentication settings
What is not included:
•
All object permissions
•
Definition and data for other content types (core entities, service items, standards)
Exporting Portal Content and Portal Pages
You can export portal and non-JSR portlet definitions to the local file system.
Procedure
Step 1
Open the Portal Designer.
Step 2
Depending on your requirement, open a portlet or a portal page.
Step 3
Click Actions > Export.
Step 4
Select the portal pages or portlets that want to export.
Step 5
Click Export.
Cisco Prime Service Catalog 10.1 Designer Guide
10-35
Chapter 10
Designing Portlets and Portals Using Portal Designer
Importing and Exporting Portal Content
Importing Portal Content
The ability to create portal objects through the import utility is still controlled by the corresponding
capabilities and permissions for such actions. The user who performs the file import should be granted
appropriate roles in order to successfully execute the import.
Before You Begin
Make sure that you have a valid XML file created using the Export Portlets and Export Portal Pages
features.
Procedure
Step 1
Open the Portal Designer.
Step 2
Depending on your requirement, open a portlet or a portal page.
Step 3
Click Actions > Import to import portal objects into the same environment in which they are exported,
or another environment which does not contain those objects.
Step 4
Select the conflict resolution you want to choose:
•
Overwrite: The import replaces the existing definitions of the objects with the same names in the
environment with the definition contained in the XML file.
•
New Only: The import fails if the portal object already exists.
When the import is complete, a summary page appears. A detailed log is also available to show the names
of the portal objects created/updated.
Troubleshooting Import Failures
An import may fail due to insufficient permissions.
•
The user does not have “Manage Portlets” capability when importing a portal page that contains new
portlets. In this case, the portlets will not be created, and the import of the portal page containing
the new portlets will also fail.
•
The user does not have “Manage Custom Content” capability when importing a portlet that is based
on new custom content. In this case, the custom content table will not be created, and import of the
portlet making use of the custom content will also fail.
•
The user does not have write permission to the portal page group that is specified for a new portal
page. In this case, the portal page will not be created.
Cisco Prime Service Catalog 10.1 Designer Guide
10-36


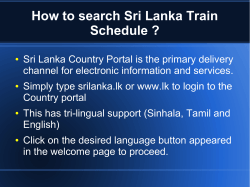
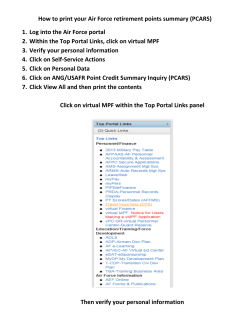


© Copyright 2026