
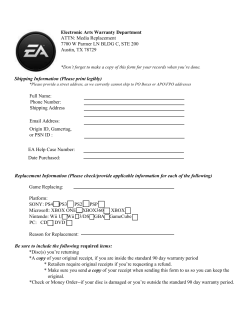
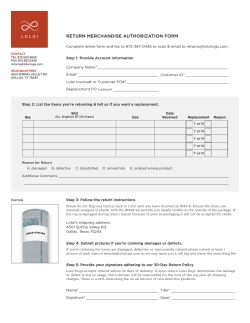
BM69 replacement board assembly guide
BM69 replacement board
assembly guide
- version 0.0.2 –
© Copyright NMJ 2014
All rights reserved
BM69 replacement board
assembly guide
Version
0.0.2
Please read this manual carefully before carrying out the
installation!!! Although our products are very robust, incorrect
wiring may destroy the module!
During the operation of the device the specified technical parameters
shall always be met. At the installation the environment shall be fully
taken into consideration. The device must not be exposed to moisture
and direct sunshine.
A soldering tool may be necessary for the installation and/or
mounting of the devices, which requires special care.
During the installation it shall be ensured that the bottom of the
device should not contact with a conductive (e.g. metal) surface!
Page 2 of 24
BM69 replacement board
assembly guide
Version
0.0.2
Content
1.
2.
3.
4.
5.
6.
Required tools.............................................................................. 4
Required materials ....................................................................... 4
Disassembly of the units.............................................................. 4
Installing the replacement kit .................................................... 10
DCC/Marklin 3 rail operation ................................................... 17
Notes .......................................................................................... 23
Page 3 of 24
BM69 replacement board
assembly guide
Version
0.0.2
1. Required tools
-tweezer
-screwdriver
-cutting plier
-cutter
-soldering station
2. Required materials
-adhesive tape
-soldering wire
-10- 15 cm isolated wire
3. Disassembly of the units
Pull the housing in side direction at the indicated points and lift it
above the base. Remove the housing from the body of the unit.
Page 4 of 24
BM69 replacement board
assembly guide
Version
0.0.2
Remove the black adhesive mask above the 2 front LEDs.
Cut a small piece of adhesive tape and label the 3 wires which
connect the front lighting boards. You have to solder them to the
replacement board in the same order.
Page 5 of 24
BM69 replacement board
assembly guide
Version
0.0.2
Unsolder the 3 wires, holding them with a tweezer might help.
The solder pads of the replacement boards are situated in the same
location as on the originals, so the positioning of the wires on the
replacement board is straight forward.
Unsolder the 4 pickup connection wires, 2 on each side of the board.
Page 6 of 24
BM69 replacement board
assembly guide
Version
0.0.2
Unsolder the speaker connection wires, and remove the speaker from
the plastic holder.
Unsolder the 2 motor connection wires. There is no polarity indicated
(the wires have the same color). It is recommended to not
interchange them, else the train will be driven in opposite direction.
Page 7 of 24
BM69 replacement board
assembly guide
Version
0.0.2
Extract the inter unit connector from the end of the board. Using a
tweezer might help.
Release the 2 screws that hold the board to the base of the unit. On
each side of the unit the screws are not interchangeable.
Page 8 of 24
BM69 replacement board
assembly guide
Version
0.0.2
Lift the board and remove it from the base unit.
Release the screw and remove the speaker housing from the bottom
side of the board. It will be assembled to the new replacement board.
Page 9 of 24
BM69 replacement board
assembly guide
Version
0.0.2
4. Installing the replacement kit
Solder the supplied 2 capacitor to the motorized board. Take care
about the polarity (the rounded pad is the positive the squared one is
the negative terminal). After soldering the capacitors cut the extra
lengths of the pins with the help of a plier.
Fit the speaker housing in the bottom of the new board. Take care to
match the 2 plastic dowel pins of the speaker housing to the holes in
the board.
Page 10 of 24
BM69 replacement board
assembly guide
Version
0.0.2
Place the board in the base of the unit,
and fasten it with the 2 screws. Two dovel pins of the body will
guide the positioning of the board in the base.
Page 11 of 24
BM69 replacement board
assembly guide
Version
0.0.2
Plug in the inter unit plug into the board.
Place the speaker in the holder and solder the wires.
Page 12 of 24
BM69 replacement board
assembly guide
Version
0.0.2
Insert the motor connection wire through the holes with the help of
the tweezer and solder them to the board solder pads. Lay down the
extra wires to the board.
Insert the 4 pickup connection wire through the holes with the help
of the tweezer and solder them to the board solder pads. Lay down
the extra wires to the board.
Page 13 of 24
BM69 replacement board
assembly guide
Version
0.0.2
Solder the 3 wires which connect the front lighting board, keep the
same wire sequence as it was on the original board. Remove the
adhesive tape from the wires.
Place over the LEDs the adhesive black mask (take care to fit the
openings exactly over the 2 LEDs). Lay it and press over the
complete surface to ensure that it sticks to the board.
Page 14 of 24
BM69 replacement board
assembly guide
Version
0.0.2
You can fit in the MTC21 connector either the delivered dummy
plug or a suitable decoder.
When assembling the housing, take care to arrange the wires to avoid
their visibility from the outside. In the pickup wires area, on the
insets (chairs) there are small adhesive black mask, which can be
used to hold the wires in the proper position. In the cabin (cockpit)
area, the wires which connect the front lighting boards can be tied
together, and in this way they will be invisible from the outside.
Page 15 of 24
BM69 replacement board
assembly guide
Version
0.0.2
The non-motorized unit of the BM69 unit has to be processed almost
in the same way. The differences are that you have to solder only the
3 wires to the front lighting board, and connect the inter unit
connector. This part does not have motor, speaker and pickup
connection wires.
In case of using a sound decoder, note that the speaker inside
the unit has an impedance of 4 Ohms (not suitable for
Loksound3 and 3.5)!!!
The decoder has to be programmed according to its manual.
While programming the decoder please take in consideration
The mapping of the lights to the MTC21 connector
FL
front light (white) on the motorized unit and rear/tail
light (red) on the non-motorized unit
RL
front light (white) on the non-motorized unit and
rear/tail light (red) on the motorized unit
AUX1
AUX2
AUX3
AUX4
central reflector on the motorized unit
central reflector on the non-motorized unit
cockpit lights on both units
interior light on both units
Page 16 of 24
BM69 replacement board
assembly guide
Version
0.0.2
5. DCC/Marklin 3 rail operation
In the AC/ 3 rail version, the current pickups of the motorized unit
are connected to the circuit board to the solder pads marked with TL.
The connection of the solder pads marked with TR is made thru the
inter unit cable, to the power pickup shoe in the non-motorized unit.
Not connected in the AC version
Connected to the current pickups in
the AC version
Connection of the power pickup shoe in the non-motorized unit
Page 17 of 24
BM69 replacement board
assembly guide
Version
0.0.2
The available 2 extra contacts in the inter-unit connector are used to
route the pickup shoe to the pcb in the motorized unit.
Release the 2 screw which holds the connector covers,
and remove the plastic covers
Page 18 of 24
BM69 replacement board
assembly guide
Version
0.0.2
Remove the connector’s body from the housing on both units.
On both connectors are available 2 unused solder pads. These will be
used to route the pickup shoe to the pcb. On the motorized unit
solder a 10 cm long isolated wire to both solder pads, on the nonmotorized unit solder the wire connected to the pickup shoe to both
solder pads. (Please note, on the motorized unit the connector is a pin
type, on the non-motorized unit it has receptacles.)
Page 19 of 24
BM69 replacement board
assembly guide
Version
0.0.2
The wires can be routed inside the body of the carriages together
with the original wires.
Replace the connectors in their housing.
Page 20 of 24
BM69 replacement board
assembly guide
Version
0.0.2
Place the plastic covers over the connectors and hold them in place
with the screws.
Check the fit of the connectors between the 2 units.
Page 21 of 24
BM69 replacement board
assembly guide
Version
0.0.2
Solder the newly routed wire in the motorized unit to the pickup
connection marked P11 on the replacement board.
The wires from the axles in the motorized unit must be connected to
the solder pads of the replacement board marked with P8 and P10.
The solder pad marked with P9 can be left open.
Page 22 of 24
BM69 replacement board
assembly guide
Version
0.0.2
6. Notes
Page 23 of 24
BM69 replacement board
assembly guide
Version
0.0.2
Copyright © 2014 NMJ
All rights reserved
The information in this document is subject to change without
notice
Page 24 of 24


© Copyright 2026