
FedEx Freight Guide FedEx Ship Manager Software
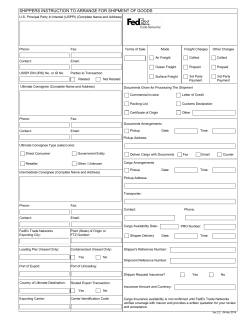
FedEx Ship Manager Software
®
FedEx Freight Guide
®
FedEx Freight Guide
Overview
FedEx Freight ® is changing the LTL (less-than-truckload) industry
by making it easy to ship fast-transit and economical freight
within one streamlined LTL network. With all-points coverage,
one Bill of Lading, one invoice statement and one pickup and
delivery, FedEx Freight is creating a whole new future for LTL.
You can rely on FedEx Freight ® Priority when speed is critical to
meet your supply chain needs or FedEx Freight ® Economy when
you can trade time for savings. FedEx Freight is committed to
delivering an easier way to ship LTL.
Now you can create FedEx Freight shipping labels and the Bill
of Lading for FedEx Freight LTL shipments within FedEx Ship
Manager Software, a single solution for your shipping needs.
FedEx Ship Manager Software offers the ability to create labels
for FedEx Freight shipments — plus the ability to rate, track,
schedule pickups and process Bills of Lading for LTL services —
and gives you electronic efficiency for larger, heavier shipments.
•
•
•
•
•
•
•
•
•
Create necessary documents, including the Bill of Lading
and FedEx Freight shipping label.
Rate and track the status of shipments.
Schedule pickups for FedEx Freight LTL shipments.
Create shipping labels for shipments from a single point.
Automate manual processes, eliminating errors.
Integrate with existing databases.
Enhance your reporting capabilities and manage cost.
Ship from the U.S. to destinations in the 48 contiguous
U.S. states.
Email Bill of Lading and shipping labels.
Broadband Requirement
The FedEx Freight LTL feature performs optimally via a broadband
Internet connection (required).
When speed is critical to meet your supply chain needs, count on
FedEx Freight Priority for your fast transit needs with the reliability
you expect from FedEx.
Eligible Shipments
For economical shipping to meet your budget, count on FedEx
Freight Economy for your basic shipping needs with the reliability
you expect from FedEx.
FedEx Freight LTL options are designed for shipments in the 48
contiguous U.S. states only. International (Canada, Mexico) and
offshore (Hawaii, Alaska, Puerto Rico) shipments are not supported
in this version of the software.
Creating FedEx Freight shipments with FedEx Ship Manager
Software enables you to:
FedEx Freight Guide 2
FedEx Freight Guide
Available Services
FedEx Freight Priority
FedEx Freight Economy
Reliable resource for time-sensitive freight when speed
is critical to your supply chain.
• All-points coverage nationwide and international service.
• Proven reliability.
• FedEx Freight Advance Notice®.
• No-fee money back guarantee (for customers on our
standard rate tariff).
• My Account secure site to manage account information.
Reliable and economical freight delivery when timing is not critical.
• All-points coverage nationwide and international service.
• Proven reliability.
• My Account secure website to manage account information.
Time-Definite Services for FedEx Freight Priority
A.M. Delivery. Early delivery by 10:30 a.m. on the standard due date ($80 up-charge), backed by the appropriate money back-guarantee service option*.
•
None. No time-definite delivery service selected.
•
A.M. Delivery. Early delivery by 10:30 a.m. on the standard due date ($80 up-charge), backed by the appropriate money back-guarantee service option*.
•
Close of Business Delivery. Delivery by 5 p.m. on the standard due date (no-fee money-back guarantee for standard tariff customers or $65 up-charge for contractual customers).
•
FedEx Freight® First Delivery. Enables you to select your shipment’s delivery time or even receive your shipment one day earlier from the published FedEx Freight Priority transit time.
Call FedEx Expedited Freight Services® at 1.800.398.0625 for more information.
•
•
Time-Definite Services for FedEx Freight Economy
None. No time-definite delivery service selected.
•
•
Close of Business Delivery. Delivery by 5 p.m. on the standard due date ($65 up-charge).
•
Volume Services
Provides solutions for large-volume shipments and spot market
quotes. Call 1.888.465.5646 for more information.
Distribution and Consolidation
Offers customized solutions to manage your supply chain.
Call 1.866.393.4585 for more information.
* Please see FXF 100 Rules Tariff for terms and conditions of service offerings and
money-back guarantee programs.
FedEx Freight Guide 3
FedEx Freight Guide
Enabling FedEx Freight LTL Accounts
Before you set up a FedEx Freight LTL account, have your FedEx
Freight account number(s) and your account addresses at hand.
For third party accounts, remember to mark them as Bill To in
the database during setup.
When enabling your account or entering addresses into the FedEx
Freight LTL account database, the address entered in the billing
address section must match the invoice billing address used
when the account was created.
To enable your FedEx Freight LTL (less-than-truckload) account, you
must know if your FedEx Freight account number is configured as
a “Shipper Account” or “Bill to” account. Most of our customers’
FedEx Freight account numbers will be configured as a “Shipper
Account.”
On the Shipment Details screen within the LTL Freight tab, enter
special delivery instructions in the Special Services and Details
section and do not enter or check more than a combination of
10 line items/special services per Bill of Lading.
For reference, a “Shipper Account” and “Bill to” account are
defined as:
Shipper Account. The shipper or the consignee is billed for the
transportation charges.
Bill to Account. The shipper does not pay for the transportation
charges but bills a third-party company’s FedEx account number
for the transportation charges.
FedEx Freight Guide 4
FedEx Freight Guide
Enabling FedEx Freight LTL Accounts,
continued
To ship using FedEx Freight functionality, you must set up
at least one FedEx Freight LTL account as follows:
1. Select LTL Freight Accounts from the Databases
drop-down menu. The View Freight Accounts
screen displays.
2. Click Add. The Add Freight Account screen displays.
3. Enter the required information to add an account.
Required fields appear in bold type on the screen.
2
4. Click OK.
5. Close FedEx Ship Manager Software and relaunch it.
Your FedEx Freight LTL account is now enabled.
3
4
FedEx Freight Guide 5
FedEx Freight Guide
Printer Setup
FedEx Freight LTL Bill of Lading
To ensure your Bill of Lading prints correctly:
1. Select Forms from the Customize drop-down menu.
The Form Settings screen displays.
2. Scroll and select FedEx LTL Freight Bill of Lading from
the Label/Report Type menu.
2
3
3. Click Change and select the appropriate laser printer.
Note: To print a Bill of Lading on a printer other than your default printer,
you must download and install Adobe® Reader ® 9.4 or higher from
http://get.adobe.com/reader.
FedEx Freight LTL Shipping Label
To ensure your freight label prints correctly:
1. Select Forms from the Customize drop-down menu.
The Form Settings screen displays.
2. Scroll and select FedEx LTL Freight Labels from the
Label/Report Type menu.
3. Click Change and select the appropriate printer.
FedEx Freight Guide 6
FedEx Freight Guide
Setting Preferences
3
4
FedEx Ship Manager Software allows you to configure the account
number, printed documents and label stock that are defaulted and
used for each shipment. To set these preferences:
1. Select Shipping Profiles from the Customize drop-down
menu.
2. Select the appropriate FedEx Freight LTL shipping profile and
click View/Edit. The View/Edit LTL Freight Shipping Profile
screen displays.
3. Click the 1-Field Preferences tab to set a default for a
particular account number that may be used more often
than others.
4. Click the 2-FedEx LTL Freight Preferences tab to set
which documents automatically print and to set the
preferred label stock.
5. Click OK to save your preferences.
5
FedEx Freight Guide 7
FedEx Freight Guide
Creating the Bill of Lading and
FedEx Freight Shipping Label
1
4
2
To create a Bill of Lading for FedEx Freight shipments, you must
complete the Origin/Destination and Shipment Details screens
within the LTL Freight tab. Click Ship on the Origin/Destination,
Shipment Details and FedEx ShipAlert® screens to create a Bill
of Lading for your shipment. The Pickup screen is an optional
screen designed for scheduling pickups only for a previously
created Bill of Lading. The FedEx ShipAlert screen is also an
optional screen.
5
6
3
7
7
To create a Bill of Lading for your FedEx Freight LTL shipments,
follow these steps:
1. Click the LTL Freight tab. The Origin/Destination screen
(default) displays.
2. Select the appropriate account number from the Account
drop-down menu.
Note: If you select a Bill To account for a third party shipment,
select the Shipper and Consignee from your Address Book.
5. Select the appropriate money-back-guarantee service option
(None, A.M. Delivery or Close of Business Delivery)
from the Guaranteed Service drop-down menu.
3. Enter the required information for your shipment. Required
fields appear in bold type on the screen.
6. Select the appropriate Bill of Lading type (Straight or VICS)
from the BOL Type drop-down menu.
4. Select the appropriate service (FedEx Freight Priority
or FedEx Freight Economy) from the Service Type
drop-down menu.
7. Enter the appropriate shipper/consignee information based on
the selected Payment Type option. Required fields appear in
bold type on the screen.
FedEx Freight Guide 8
FedEx Freight Guide
Creating the Bill of Lading and FedEx
Freight Shipping Label, continued
8. Click the Shipment Details tab. The resulting Shipment Details
screen displays.
9. Enter the required information for your shipment in the Bill of
Lading Line Items section. Required fields appear in bold type
on the screen.
10. After completing all of the required fields, click Add Line Item.
The line item information you entered displays in the Bill of
Lading Summary section.
8
9
10
11
Note: Although the Ship button is active at all times, you must enter all
required fields in bold text to complete a Bill of Lading and Pickup request.
11. Select the appropriate information in the Special Services
and Details, Declared Value and Pickup sections as needed.
Note: The total number of line items you add to the Bill of Lading Summary
section and the number of check boxes you select in the Special Services
and Details section combined cannot exceed 10.
FedEx Freight Guide 9
FedEx Freight Guide
Creating the Bill of Lading and FedEx
Freight Shipping Label, continued
To schedule a pickup when creating a Bill of Lading
To schedule a pickup for a Bill of Lading you are creating, follow
these steps. You can schedule a pickup while you are creating
the Bill of Lading or at a later time.
1. Select the Request pickup check box in the Pickup section
of the Shipment Details screen.
2. Complete all of the fields in this section, including the “Pickup
Date,” “Dock ready time,” “Dock close time,” “Dock contact
name” and “Dock contact phone”. The pickup is scheduled with
the current Bill of Lading and the pickup information displays
in the Previously Scheduled section of the Pickup screen.
To send FedEx ShipAlert notifications (optional)
To send optional FedEx ShipAlert notifications, follow these steps:
1. Click the ShipAlert tab (optional) to send shipment notifications
to your customer, yourself and others. The FedEx ShipAlert
screen displays.
2. Enter up to four email addresses for notifications and select
a Notification Language.
3. Choose one or more Notification types by selecting the
appropriate check box for each email recipient.
4. Select the BOL and Label check boxes to email the Bill of
Lading and label to your customer or another location.
FedEx Freight Guide 10
FedEx Freight Guide
Creating the Bill of Lading and FedEx
Freight Shipping Label, continued
5. Click HTML, Text or Wireless format for your email notifications.
6. Add a personal message to your notification(s). This option is not
available for Wireless format or for non-English characters.
7. Click Ship to create a Bill of Lading for your shipment.
To schedule a pickup for previously created Bills of Lading
To schedule a pickup for previously created Bills of Lading, follow
these steps:
1. If you did not schedule a pickup while creating the Bill of Lading,
the information displays in the Not Yet Scheduled section of the
Pickup screen.
2. To schedule a pickup for these Bills of Lading, click the Pickup
tab and select the appropriate Schedule Pickup check boxes in
the Not Yet Scheduled section.
3. Provide the “Pickup Date,” “Dock Ready time” and “Dock Close
time.” Also provide the “Name” and “Phone” in the “Requested
by” and “At Dock” sections. The “Email” fields in the “Requested
by” and ”At Dock” sections are optional.
Note: You can schedule multiple pickups together.
4. Click Schedule pickup. A message displays confirming that the
pickups are scheduled.
Note: Any time you want to cancel a scheduled pickup, you must call to notify
FedEx Freight. You cannot cancel a shipment through the software at this time.
FedEx Freight Guide 11
FedEx Freight Guide
Obtaining a Courtesy Rate Quote
1. Populate all of the required fields for the Bill of Lading.
2. Once the Origin/Destination screen and Shipment Details
screen are populated properly, click Rate Quote at the bottom
of the screen. A quote displays; the discounted rates are
based on the FedEx Freight account number selected.
1
2
FedEx Freight Guide 12
FedEx Freight Guide
Shipping List
To view the LTL Freight Shipped List, select LTL Freight from
the Shipping list drop-down menu. The LTL Freight Shipped List
allows you to:
•
•
•
View all FedEx Freight LTL shipments created using FedEx
Ship Manager Software.
Reprint the Bill of Lading or FedEx Freight LTL shipping label.
– To reprint, select the appropriate shipment and click
the chosen option at the bottom of the screen. To print
a Bill of Lading on a printer other than your default printer,
you must download and install Adobe® Reader® 9.4 or
higher from http://get.adobe.com/reader.
Mark a shipment as cancelled so it is reflected properly
in your reporting.
– To mark a shipment as deleted, select the appropriate shipment and click the option at the bottom of the screen.
Note: You must call FedEx Freight to actually cancel the shipment.
Note: Shipments in the Shipping List do not clear during the Close. To clear
this list, set the FedEx Freight LTL purge in the System Settings; you can set
this to clear automatically after 7 to 90 days.
FedEx Freight Guide 13
FedEx Freight Guide
Customize Reports
Only customized reports are supported for FedEx Freight LTL.
Follow these steps to customize or create FedEx Freight LTL
database reports:
1. Click the Reports tab.
2. Click Customize Shipment Reports to the left.
– To modify an existing report, select the report from the reports list and click View/Edit.
The View/Edit Customized Shipment Report
screen displays.
– To create a new report, click Add or select an
existing report and click Add by duplication,
if available.
2
3
4
3. On the View/Edit or Add screen, enter a new Report Title
or modify the existing name, if needed.
4. Select LTL Freight Shipments from the Database
drop-down menu.
For additional information, refer to the Customize Reports
section in the Interactive User Guide available in PDF format
for downloading at fedex.com.
FedEx Freight Guide 14


© Copyright 2026