
Photo- documentation in the Investigation
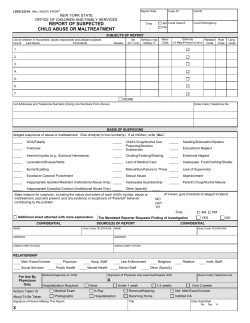
U.S. Department of Justice
Office of Justice Programs
Office of Juvenile Justice and Delinquency Prevention
Photodocumentation
in the
Investigation
of Child Abuse
Portable Guides to
Investigating Child Abuse
Foreword
A picture, so the saying goes, is worth a thousand words.
In the case of the investigation of a charge of child abuse,
a picture can determine the eventual case result.
To do the task of documentation properly, child abuse
investigators require the right tools and the right techniques.
Photodocumentation is one of the most important of these tools.
This guide provides valuable pointers regarding the selection
and use of camera equipment, film, and photographic techniques
that are most appropriate for use in cases of suspected child
abuse. Proper photographing of the child’s physical condition
will help provide evidence integral both to the investigation
and to the courtroom presentation, should formal charges ensue.
It is my hope, therefore, that this guide will help protect
children from abuse through the enhancement of investigative
techniques.
Shay Bilchik
Administrator
Office of Juvenile Justice and
Delinquency Prevention
June 1996
Third Printing March 2000
NCJ 160939
P
hotographs documenting a victim’s injuries
often provide key evidence in child abuse
cases and convictions. To ensure effective
photodocumentation, it is
important to use the most
appropriate camera
equipment and film
and to properly identify
and investigate the
child victim. Critical
to all investigations of
child abuse is the method
of photographing injuries such as pressure injuries,
bite marks, bruises, burns, facial injuries, amputations,
neglect, and sexual abuse injuries. Accurate courtroom
evidence can be hindered by the following:
✹ Ineffective camera equipment and film.
✹ Insufficient methods of photographing the victim
or the victim’s injuries.
✹ Misinformation regarding the photographs of the
case.
✹ Mislabeling of child abuse information, including
photographs.
1
This guide offers important information on
how to document cases of suspected child
abuse through photography to enhance
the investigation process or provide
courtroom evidence and testimony.
✔
Camera Equipment
To be effective in documenting child abuse cases, camera
equipment should have the following capabilities:
✹ Be easy to use and require little training.
✹ Offer accurate color balance.
✹ Provide automatic exposure and the capability for film advance
and rewind.
✹ Have a built-in flash with quick recharge (flash recharges within
2 to 3 seconds).
✹ Offer comfortable operating distance from subject.
✹ Be able to produce life-size reproductions of trauma sites and
to show much larger areas of the body or the device believed to
have caused the injury.
Camera systems for photographing abused children range
from expensive and sophisticated colposcopic (a specialized
camera/examination unit used specifically by medical examiners
for viewing or photographing subtle abnormalities or injuries
to the vagina, cervix, or anus) and 35mm closeup systems to
less expensive and simpler “bridge” cameras and instant or
self-developing cameras. Table 1 lists the types of cameras
and their advantages and disadvantages.
2
Film
The standard film for medical use in documenting child abuse
cases is 35mm color slide film, sometimes referred to as color
transparency or color reversal film. Color slides are relatively
inexpensive and easy to file and can be quickly developed and
converted into color prints if necessary.
Regardless of the camera equipment used, the following points
concerning type and use of film are important in ensuring
consistency in results and reproduction of the injury, its location,
color, size, and pattern:
✹ Use fine-grain color slide or print film that has a film speed
rating of 100 or 200 ISO (International Standards Organization).
This type of daylight film allows for a greater depth of field
(sharpness) with a minimum amount of grain and blurriness.
Always use a flash when shooting indoors with daylight film.
Sixty-second, self-developing film is not recommended.
✹ Keep film and camera equipment in a clean, empty, dry thermal
container or picnic cooler. Do not store the film unprotected in a
vehicle. Sunlight and extreme temperatures can adversely affect
color accuracy, reduce the film’s sensitivity to light, and in some
cases, result in tearing or splitting.
✹ Store film in the refrigerator or freezer to keep it fresh, but place
at room temperature for approximately 2 to 3 hours before it is
to be used (24 hours if film is frozen).
✹ Process exposed film as soon as possible to avoid a color
imbalance or shift.
✹ Remember when the film was loaded, the type of film, and how
many exposures a roll contains. Attach an end flap from the film
carton to the camera back as a reminder. Failure to do so could
result in lost evidence. Always remove rewound film from the
camera and attach an identification sticker or place in an evidence
bag before the film is sent for processing.
✹ Make sure an extra camera and set of flash batteries are available
at all times.
3
4
Advantages
Simple operation and low cost.
Inexpensive and easy to use.
Accurate, standardized equipment for
examination or photography of sexual
abuse injuries. Able to document findings
not otherwise seen with the naked eye.
Provide choices of cameras, lenses, and
accessories that offer excellent resolution
and closeup capabilities.
Type of Camera
Instant-processing cameras
Fixed-focus lens “point-andshoot” or “compact” 35mm
cameras
Colposcopic cameras
35mm-format cameras
Generally no disadvantages.
Expensive, not portable, and cumbersome to
operate. Require training usually reserved
for healthcare providers (i.e., physicians).
Not equipped for photography of large
areas of the body.
Viewfinder does not view the same image
as the lens. It creates blurred images when
the photographer attempts to magnify the
image by moving in closer (6–7 feet) than
the focusing limit of the lens.
Limited closeup capability and expendability.
Poor resolution/poor color compared with
35mm film.
Disadvantages
Advantages and Disadvantages of Types of Cameras Used in Photodocumentation
Table 1
5
“Bridge” cameras
Relatively inexpensive, fully automatic, and
incorporate telephoto (35–70mm or 35–105mm)
capability, built-in flash, autofocus, motor drive,
and optional databack.
Combine the simplicity and easy use of a
point-and-shoot camera with the versatility,
expendability, and closeup capability of
a 35mm prepackaged camera system,
“bridging the gap” between these two
kinds of equipment.
Provide accurate color balance, automatic
exposure, film advance and rewind, built-in
flash, and quick flash recharge.
Require little training and offer comfortable
operating distance from the subject.
Offer integrated (dedicated) flash that
automatically adjusts during photo sessions.
Compare favorably with and are significantly
less expensive than colposcopic cameras for
photographing the sexually abused child.
Cannot attach specialized lenses or flash
units for optional documentation of some
injuries (intraoral, intravaginal, ophthalmic).
Ultraviolet Photography
Ultraviolet (UV) photography has an established role in
clinical forensic medicine and is beginning to be used in child
abuse assessments. UV is a method of photography in which
a standard, high-speed (ISO 800/1600) color slide film is used
in conjunction with a high-powered electronic flash. The flash
must be covered with a Wood’s Filter (Wratten Filter 18A);
another filter (Wratten Filter 2B or 2E) must be used on the
camera lens. The end result of UV photography is an image
that may display healed wounds, bite marks, belt imprints,
and old pattern-type injuries.
There are disadvantages to UV photography. Photographing
conscious subjects can be difficult and may produce little
usable evidence, and the image cannot be seen until after
development. In addition, the methodology is complex, the
working parameters are tight, and any proof may be altered
by subject movement or inaccurate focusing. If UV is to be
used, the subject should also be recorded on conventional
color slide film using a standard nonfiltered flash and lens
combination.
Photographing Injuries
Prior to photographing the injuries, the investigator should
identify the suspected child abuse victim by completing an
identification sheet and/or taking a full-face picture of the
child that also displays the child’s name. Separate rolls of
film should be used for each case to avoid losing or mixing
up evidence, which could result in dismissal of the case.
Although time-consuming, it is helpful to place an identifying
sign, including name or initials, date of birth, date and time
of photographs, case number, and the photographer’s name
or initials, in front of the victim’s injury for each picture. In
addition, many 35mm cameras contain databack attachments
that imprint the time, date, and an identifying code on each
film frame.
6
In addition, the investigator can use a medical photography
form as a tool for highlighting injury sites, description of
injuries, time and date of photographs, the victim’s identification
or case number, and the number of photographs taken and
by whom. The form is then included in the finished photo
envelope as relevant to the chain of evidence. A sample form
is included as figure 1.
Tips for Photographing a Suspected Victim of
Child Abuse
✹ Take two pictures of every view and angle, one for the file and
one for court.
✹ Photograph the injury with an anatomic landmark. The inclusion
of an elbow, knee, belly button, or other body part identifies the
location of the wound.
✹ Include two pictures of each wound or other injury—one that
identifies a landmark and one that provides a closeup (fills the
film frame) of the wound.
✹ Position the camera so that the film surface or plane is parallel
to or directly facing the injury.
✹ Vary the perspective of the picture by taking various shots from
different angles and distances. This is particularly important
since the flash may produce unpredictable reflections. Darker
complexions can cause flash reflections and loss of definition.
If unsure about correct exposures, take pictures at the camera’s
recommended exposure and one slightly lighter and one slightly
darker (bracketing). To do this, adjust the lens aperture by
one-half to one full f-stop on either side of the recommended
exposure. Bracketing will ensure proper color balance and
brightness when documenting victims with very light or very
dark skin tones.
✹ Place a measuring device such as an adhesive metric scale directly
above or below the injury to ensure accurate representation of
the size and depth of the injury. A standardized color bar may be
placed in the photographic plane for comparison with the color
of the injury. This ensures that if color is distorted in the film
developing process, adequate color comparisons can still be made.
7
8
Reproduced courtesy of the Children’s Hospital of Buffalo, New York.
Figure 1
Methods for Photographing Specific Injuries
Punctures, slashes, rope burns, or pressure injuries
When documenting these types of injuries, take photographs
straight on and at a slight angle. Photographing the injury
straight on provides an overall view of the surface and extent
of the injury, while shooting from a slight angle provides depth
and texture to a picture.
Bite marks
Forensic bite mark photography is a specialized field of
medical photography and is interpreted best by a forensic
dentist or pathologist. Bite marks can be recorded by following
the method described above for punctures, slashes, and so
forth, but the size, shape, color, depth of indentations, and
three-dimensional contours also need to be documented.
Multiple views from various perspectives are important in
delineating texture and shape. Parallel or direct views best
depict shape and size, while slanted or indirect views and
lighting highlight texture.
Bruises
Bruising goes through several stages of development—a
bruise discovered several hours after abuse will become more
pronounced as time goes on, and additional photographs will
be needed to document the injury. If a second or third series
of pictures is required, the investigator should reproduce the
angles and positions that were used to photograph the first
series. If a child shows evidence of having old and new bruises,
repeated abuse may be suspected. Both old and new bruises
should be photographed. Areas of swelling (edema) sometimes
exhibit a strong reflection that is caused by the flash bouncing
off the swollen/rounded injury site. This effect may obscure the
photograph. To help minimize the reflections, take photographs
from several different angles, then do a followup series when
the swelling has gone down.
9
Burns
In cases of burns or severe scalding, take pictures from all angles
before (especially before any creams or oils are applied) and
after treatment. Accidental burns usually exhibit splash marks
or indiscriminate patterns of injury. Intentional submersions
show distinct lines or well-defined areas of damaged skin
compared with healthy skin.
Facial injuries
If an injury is inside the mouth, use a plastic or wooden tongue
depressor to keep the mouth open and the injury visible. If
there is an eye injury, use a pocket flashlight or toy to distract
the child’s gaze in different directions to show the extent of the
damage to the eye area.
Amputation
In cases where abuse involves the amputation of a body part,
photograph the dismembered part alone and then in relation
to the body as a whole. Closeups should also be taken of
the skin’s torn edges, which may help verify the method of
amputation in court.
Neglect
When there is suspected child neglect, the child’s general
appearance should be photographed, including any signs such
as splinters in the soles of the feet, hair loss, extreme diaper
rash, wrinkled or wasted buttocks, prominent ribs, and/or
a swollen belly.
Sexual abuse
If sexual abuse is suspected, the child and his or her injuries
should be approached as follows:
✹ Photograph the child in the presence of a trusted relative or
guardian.
✹ Inform the child of what will be involved in taking the pictures.
✹ Remember to consider the child’s level of development when
speaking to him or her.
10
✹ Do not make quick moves toward the child, as these may be
frightening.
✹ Make eye contact with the child to make him or her feel more
comfortable.
✹ Keep a supply of toys or coloring books as a reward for being
helpful.
✹ Allow time for the child to become accustomed to the photographer
before being photographed. Do not surprise the child. Tell him
or her what parts of the body need to be photographed.
✹ Let the child undress himself or herself or have the parent or
guardian help.
✹ Photograph sexual organs, including an overall view and closeups
of the injury. This may require that the labia (vaginal lips) be
spread apart for closer photography or that the child kneel down
on all four limbs to allow the anus to be photographed.
✹ In general, photographing a sexual abuse injury is best done by
a medical specialist in the field of child abuse, with appropriate
equipment such as a colposcope.
Photodocumentation as Court
Evidence
Photographic evidence should include a form with the victim’s
name, the case number, and the date and time the photographs
were taken. The form should also contain a remarks section that
includes case notes. Outline drawings of the child’s body are
also helpful to show the specific areas that were photographed.
Photographs must be properly verified and relevant to the case
so that:
✹ The photographer or investigator can testify in court that the
pictures accurately portray the findings and can explain how
the photographs were taken.
✹ A health professional who examined the child (other than the
photographer) can verify in court that the photographs accurately
represent the findings.
11
Photography Tips
✹ Establish a protocol or checklist for photodocumentation.
✹ Decide in advance who will be photographing the victim.
✹ Shoot a test roll before using a new camera system.
✹ Compose the picture as the injured area would normally appear.
✹ Magnify the picture (create a closeup to fill the film frame)
as it is being taken, not during printing.
✹ Bracket (vary f-stop above, at, and below expected correct or
recommended exposure) if correct exposures are uncertain.
✹ Take many pictures from different angles and distances
(more is better than less).
✹ Review all pictures after they are developed.
✹ Label all the prints and slides after development.
✹ Keep photographs protected and techniques logged.
Contributing Authors
Lawrence R. Ricci, M.D.
Director
The Child Abuse Program
at the Spurwink Clinic
17 Bishop Street
Portland, ME 04103
207–879–6160
?
Brian S. Smistek
Director of Medical Media
Kaleida Health Children’s Hospital of Buffalo
219 Bryant Street
Buffalo, NY 14222–2006
716–878–7302/7254
716–878–7914 (fax)
E-mail: [email protected]
Supplemental Reading
Barsley RE, West MH, Fair JA. Forensic photography:
Ultraviolet imaging of wounds on skin. American Journal
of Forensic Medicine and Pathology 11:300–308, 1990.
12
Bernstein ML. The application of photography in forensic
dentistry. Dental Clinics of North America 27:151–170, 1983.
Cantor BJ. Is it evidence? Industrial Photography Magazine,
August 1990.
Evidence Photographers International Council (EPIC),
Journal of Evidence Photography, October 1975.
Ford RJ, Smistek BS. Photography of the maltreated child.
In Ellerstein NS (ed): Child Abuse and Neglect: A Medical Reference.
New York: John Wiley and Sons, Inc., 1981, pp. 315–325.
Hedgcoe J. The Book of Photography. New York: Alfred A.
Knopf, 1987.
Hubbard SB. Ultraviolet photography. Photo Electronic Imaging,
June:40–42, 1992.
Langford M. Michael Langford’s 35mm Handbook. New York:
Alfred A. Knopf, 1988.
Luntz LL, Luntz P. Handbook for Dental Identification: Techniques
in Forensic Dentistry. Philadelphia: JB Lippincott, 1973.
Meadow R, Mitchels B. The ABC’s of child abuse. British
Medical Journal 229:248, 1989.
Ricci LR. Photodocumentation of the abused child. In Reece
RM (ed): Child Abuse: Medical Diagnosis and Management.
Malvern, PA: Lea and Febiger, 1994.
Ricci LR. Photographing the physically abused child:
Principles and practice. American Journal of Diseases of Children
145:275–281, 1991.
Sansome SJ. Police Photographs. Cincinnati: Anderson
Publishing, 1977.
Scott CC. Photographic Evidence. 2d ed. St. Paul, MN: West
Publishing, 1967.
Smistek B. Photography of the abused and neglected child.
In Ludwig S, Kornberg A (eds): Child Abuse: A Medical Reference.
New York: Churchill Livingstone, 1992.
Vetter JP. Biomedical Photography. Boston: Focal Press, 1992.
13
Organizations
American Professional Society on the
Abuse of Children (APSAC)
407 South Dearborn, Suite 1300
Chicago, IL 60605
312–554–0166
312–554–0919 (fax)
Internet: www.apsac.org
APSAC is the Nation’s only interdisciplinary society for professionals
working in the field of child abuse and neglect. APSAC’s annual colloquium
offers advanced interdisciplinary professional education with seminars
addressing all aspects of child maltreatment: prevention, assessment,
intervention, and treatment with victims, perpetrators, and families affected
by physical, sexual, and psychological abuse and neglect. These seminars
are designed specifically for advanced professionals in mental health, law,
medicine, law enforcement, child protective services, and allied fields.
Missing and Exploited Children’s Training Programs
Fox Valley Technical College
Criminal Justice Department
P.O. Box 2277
1825 North Bluemound Drive
Appleton, WI 54913–2277
800–648–4966
920–735–4757 (fax)
Internet: www.foxvalley.tec.wi.us/ojjdp
Participants are trained in child abuse and exploitation investigative
techniques, covering the following areas:
✹ Recognition of signs of abuse.
✹ Collection and preservation of evidence.
✹ Preparation of cases for prosecution.
✹ Techniques for interviewing victims and offenders.
✹ Liability issues.
Fox Valley also offers intensive special training for local child investigative
teams. Teams must include representatives from law enforcement,
prosecution, social services, and (optionally) the medical field. Participants
take part in hands-on team activity involving:
✹ Development of interagency processes and protocols for enhanced
enforcement, prevention, and intervention in child abuse cases.
✹ Case preparation and prosecution.
✹ Development of the team’s own interagency implementation plan for
improved investigation of child abuse.
14
National Center for Prosecution of Child Abuse
American Prosecutors Research Institute (APRI)
99 Canal Center Plaza, Suite 510
Alexandria, VA 22314
703–739–0321
703–549–6259 (fax)
The National Center for Prosecution of Child Abuse is a nonprofit and
technical assistance affiliate of APRI. In addition to research and technical
assistance, the Center provides extensive training on the investigation and
prosecution of child abuse and child deaths. The national trainings include
timely information presented by a variety of professionals experienced in
the medical, legal, and investigative aspects of child abuse.
National Children’s Alliance
1319 F Street NW., Suite 1001
Washington, DC 20004–1106
800–239–9950 or
202–639–0597
202–639–0511 (fax)
Internet: www.nca-online.org
Regional Children’s Advocacy Centers (CAC’s):
✹ Midwest Regional Children’s Advocacy Center, St. Paul, MN,
888–422–2955, 651–220–6750, www.nca-online.org/mrcac.
✹ Northeast Regional Children’s Advocacy Center, Philadelphia,
PA, 215–387–9500, www.nca-online.org/nrcac.
✹ Southern Regional Children’s Advocacy Center, Rainbow City, AL,
256–413–3158, www.nca-online.org/srcac.
✹ Western Regional Children’s Advocacy Center, Pueblo, CO,
719–543–0380, www.nca-online.org/wrcac.
OJJDP funds the National Children’s Alliance and the four regional
CAC’s to help communities establish and strengthen CAC and MDT
programs. The Alliance does this by promoting national standards for
CAC’s and providing leadership and advocacy for these programs on a
national level. The Alliance also conducts national training events and
provides grants for CAC program development and support. The four
regional CAC’s provide information, onsite consultation, and intensive
training and technical assistance to help establish and strengthen CAC’s
and facilitate and support coordination among agencies responding to
child abuse. The Alliance publishes a number of manuals and handbooks
of use to MDT’s, including Handbook on Intake and Forensic Interviewing in
the CAC Setting, Guidelines for Hospital-Collaborative Forensic Investigations of
Sexually Abused Children, Organizational Development for Children’s Advocacy
Centers, and Best Practices.
15
Other Titles in This Series
Currently there are 12 other Portable Guides to Investigating
Child Abuse. To obtain a copy of any of the guides listed below
(in order of publication), contact the Office of Juvenile Justice
and Delinquency Prevention’s Juvenile Justice Clearinghouse
by telephone at 800–638–8736 or e-mail at [email protected].
Recognizing When a Child’s Injury or Illness Is Caused by Abuse,
NCJ 160938
Sexually Transmitted Diseases and Child Sexual Abuse, NCJ 160940
Diagnostic Imaging of Child Abuse, NCJ 161235
Battered Child Syndrome: Investigating Physical Abuse and Homicide,
NCJ 161406
Interviewing Child Witnesses and Victims of Sexual Abuse,
NCJ 161623
Child Neglect and Munchausen Syndrome by Proxy, NCJ 161841
Criminal Investigation of Child Sexual Abuse, NCJ 162426
Burn Injuries in Child Abuse, NCJ 162424
Law Enforcement Response to Child Abuse, NCJ 162425
Understanding and Investigating Child Sexual Exploitation,
NCJ 162427
Forming a Multidisciplinary Team To Investigate Child Abuse,
NCJ 170020
Use of Computers in the Sexual Exploitation of Children, NCJ 170021
16
Additional Resources
American Bar Association
(ABA)
Center on Children and the
Law
Washington, DC
202–662–1720
202–662–1755 (fax)
American Humane Association
Englewood, Colorado
800–227–4645
303–792–9900
303–792–5333 (fax)
American Medical Association
(AMA)
Department of Mental Health
Chicago, Illinois
312–464–5066
312–464–5000
(AMA main number)
312–464–4184 (fax)
American Professional Society
on the Abuse of Children
(APSAC)
Chicago, Illinois
312–554–0166
312–554–0919 (fax)
C. Henry Kempe National
Center for the Prevention
and Treatment of Child
Abuse and Neglect
Denver, Colorado
303–864–5250
303–864–5179 (fax)
Juvenile Justice Clearinghouse
(JJC)
Rockville, Maryland
800–638–8736
301–519–5212 (fax)
National Association of Medical
Examiners
St. Louis, Missouri
314–577–8298
314–268–5124 (fax)
National Center for Missing
and Exploited Children
(NCMEC)
Alexandria, Virginia
703–235–3900
703–274–2222 (fax)
National Center for
Prosecution of Child Abuse
Alexandria, Virginia
703–739–0321
703–549–6259 (fax)
National Children’s Alliance
Washington, DC
800–239–9950
202–639–0597
202–639–0511 (fax)
National Clearinghouse on
Child Abuse and Neglect
Information
Washington, DC
800–FYI–3366
703–385–7565
703–385–3206 (fax)
Federal Bureau of Investigation
(FBI)
National Center for the
Analysis of Violent Crime
Quantico, Virginia
703–632–4400
National SIDS Resource
Center
Vienna, Virginia
703–821–8955, ext. 249
703–821–2098 (fax)
Fox Valley Technical College
Criminal Justice Department
Appleton, Wisconsin
800–648–4966
920–735–4757 (fax)
Prevent Child Abuse America
Chicago, Illinois
800–835–2671
312–663–3520
312–939–8962 (fax)
Official Business
Penalty for Private Use $300
Washington, D.C. 20531
Office of Juvenile Justice and Delinquency Prevention
Office of Justice Programs
U.S. Department of Justice
BULK RATE
POSTAGE & FEES PAID
DOJ/OJJDP
Permit No. G–91


© Copyright 2026