
Manual - e Post Office
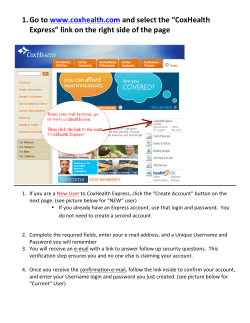
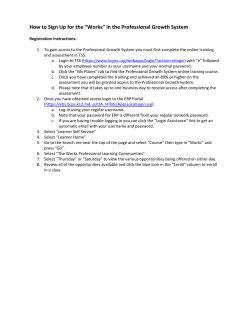
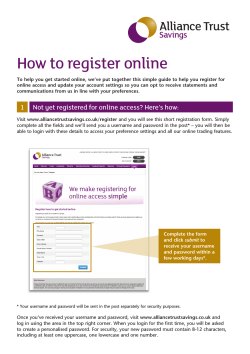
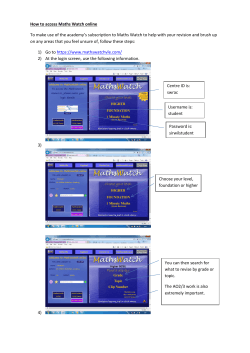
ePostoffice User Manual Jan 2015 National Informatics Centre NIC-CISD, Dak Bhawan, New Delhi User Manual Page 1 INDEX S. N CONTENTS 1. Instructions to New Users 2. Instructions to Already Registered Users 2.1 Philately Registered User 2.2 PLI Registered User User Manual PAGE NO. 3 9 15 Page 2 1. Instructions to New Users Step 1. Action Step 2. Action Go to ePostoffice site by giving the url https://epostoffice.gov.in/ on your browser . The screen 1 opens. Click on enter and you reach screen 2 where services are listed . New User Registration Page 3 Step 3. Action Step 4. Action For creating new user ,select service ‘philately’ and go to buy stamps in screen 3 For creating New account , select ‘New User’ tab in screen 4 New User Registration Page 4 New User Creation Step 5. Action In screen 5, enter username only alphabets in lower case. No other character or variable is allowed. Password must have a minimum of six characters. It should contain alphabets, numeric and special characters. Password and Confirm password should be same. The email id should be valid email id so that ecode can be send. The mobile No. should be valid Indian mobile no. so that mcode can be send. All the fields are mandatory. In case of any incorrect data the codes will not be mailed to respective email id and mobile. New User Registration Page 5 Verification of User Account Step 6. Action Select ‘Verify User’ in Screen 4 . User has to fill the above form in Screen 6 . Enter username and password that you mentioned at the time of New User Creation. Enter the ecode and mcode received on your registered email and mobile no. Please select the hint question from the given list and provide a desired answer. Kindly remember or note down the hint question and answer for future New User Registration Page 6 use. Fill your personal details as required. The address field allows alphabets, numbers and special characters like comma and hyphen. Enter the security pin and click on submit for completing the Registration. Step 7. Action Registration is completed and user can login into the ePostOffice system with created credentials. New User Registration Page 7 2. Instructions to Already Registered Users Step 1. Action Step 2. Action Go to ePostoffice site by giving the url https://epostoffice.gov.in/ on your browser and screen 1 opens. Click on enter and you reach screen 2 where services are listed . Registered Users Page 8 2.1 Philately Registered User Step 3. Action Step 4. Action Select service ‘philately’ and go to buy stamps in order to login as philately user. On login page or screen 4, user finds the option for ‘New User’, ‘Verify User’ & ‘Unlock/ Forgot password’. Manual and FAQ are also available on login form, which can be downloaded and viewed. Enter username and password in the space provided. Click on Submit to login into the system. Note : 3 subsequent incorrect login credentials can lock your account. For unlock use Unlock/Forgot password link. Philately Registered Users Page 9 Step 5. Action Step 6. Action Registered user can login into the system by providing registered username and password. This will lead to home page(screen 5) where user can do transaction- buy stamps, view transactions, edit registration and change password. Clicking on ‘Buy Stamps’ tab, will lead you to screen 6 where user can purchase stamps by selecting it . Philately Registered Users Page 10 Step 7. Action Step 8. Action Click on ‘My transactions’ tab to view transactions in philately. User can select any option-Period, Transaction No. etc to view transactions. Here in screen 7 it is shows period wise transactions. Clicking on ‘Edit Registration’ tab user can edit his details . This screen 8 is same for all the services – philately, pli . Any information can be edited . As user scroll down , there is a submit button. The validations for all the fields are same as in case of registration. Philately Registered Users Page 11 Step 9. Action Step 10. Action Click on Submit button to save the modified details. Once user clicks on submit, then mcode and ecode are send on his registered mobile number and email id. User has to re-login into the system in order to verify the codes . As user login again into the system, he needs to enter mcode and ecode in the desired places shown in Screen 10. Click on verify to validate mobile number and email id. User needs to re-login to perform the transaction. Everytime user tries to modify/edit any of his details, he will receive codes on mobile and email which he needs to verify . Philately Registered Users Page 12 Step 11. Action Step 12. Action If user wants to change his password, has to select ‘change password’ tab. This screen 11 is same for all the services – philately, pli . Provide old password, new password and confirm password and click on submit to make the desired changes. Please note that old password and new password should not be same. Also see that new password should be different from last three passwords. If user forgets his password, has to select ‘Unlock/Forgot Password’ tab shown in screen 12. This is same for all the services – philately, pli . Philately Registered Users Page 13 Step 13. Action Enter the user id that is username which you have registered. Specify the hint question and answer that you have specified at the time of registration. Provide a new password different from previous 3 passwords. Provide the same in confirm password as well. Click on submit to activate your account as shown in screen 13. Philately Registered Users Page 14 2.2 PLI Registered User Step 1. Action Step 2. Action Select service ‘PLI’ and go to pay premium in order to pay the premium in screen 14 . Enter username and password in the space provided in screen 15 Click on Submit to login into the system. PLI Registered User Page 15 Step 3. Action Step 4. Action If user wants to do transaction for pli/rpli then has to change the service form ‘select service’ checkbox to ‘PLI’ Click on ‘pay premium’ tab, which leads to screen 16. Provide policy details and click on ‘view’ to proceed. Click on ‘My transactions’ tab to view transactions in pli. Screen 17 opens, where user has to select dates and policy details. Click on search to view transactions. Note : Please see that all the other modules like edit transaction,change password and Unlock/Forgot password are same as for the philately registered users. PLI Registered User Page 16


© Copyright 2026