
INTRODUCTION Please take a few minutes to read your instructions fully...
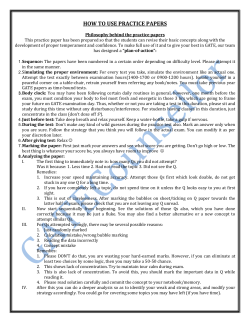
03.2009
EXTENDING YOUR GATE
7
14
81cm - 88cm
7
28
88cm - 95cm
14
109cm - 116cm
7
14
28
95cm - 102cm
28
7 14
116cm - 123cm
easy fit wood & metal easy close
102cm - 109cm
28
123cm - 130cm
28
28
130cm - 137cm (MAX)
For maximum stability you should try and achieve your required width using a minimum
number of extensions (i.e. 1 x 14cm is preferred to 2 x 7cm), and if 2 or more extensions are
fitted on the same side make sure the 7cm extension is furthest from the gate (nearest the wall).
Some suggested configurations are pictured above. To fit your extension system (available
separately) first remove the two screw adjusters from the side of your gate. Remove the plastic
bungs (G) from each corner of your gate, (you may need to prise the bung out using a flat
screwdriver and tap lightly with a hammer). Push the extension into place and press the plastic
bungs back into your extension. Slide the screw adjusters back into place and fit your safety
gate as instructed in the FIXING YOUR GATE section. Note: wall cups must be used when using
an extension. Please fit as described in the USING WALL CUPS section. If a second or third
extension is required, repeat this procedure on the other side of your gate. Extensions can be
purchased from our website at www.lindam.com
G
IMPORTANT KEEP FOR FUTURE REFERENCE
THIS SAFETY GATE IS SUITABLE FOR CHILDREN UP TO 24 MONTHS OF AGE
G
This gate complies to EN 1930:2000 when fitted as instructed
customer careline 0871 702 1000 (Mon - Fri, 10am - 4pm, UK only)
Lindam Limited Hornbeam Park Harrogate HG2 8PA England www.lindam.com
product code: 44334
7
INTRODUCTION
USING YOUR LINDAM SAFETY GATE
Please take a few minutes to read your instructions fully to ensure the full safety benefit of your gate.
To open your gate: Squeeze the 2 buttons and pull back the handle.
Please note: In the event of damage or loss, parts are only available from Lindam. For assistance
please visit www.lindam.com or call 0871 702 1000 (UK Only, Mon-Fri, 10am-4pm)
Check that you have all the contents as per the list.
A) Your safety gate
B) 4 screw adjusters
C) 4 locking nuts (spanner included)
D) Bag containing 2 wall cups with 2 screws, 2 wall plugs and 2 sticky pads.
If any component parts are missing or damaged do not use your gate.
B
C
D
To close your gate: Once you have walked through the gate, check there is no one coming
through behind you and push or swing the gate closed until it locks itself in the closed position.
WHERE TO FIX YOUR GATE
The gate will close itself if released from an opening angle of 70º or greater. Always check the
gate has correctly located. There is a gate stop at the bottom of your gate which may be set to
Your gate is ideal for restricting access to any room in your home from kitchens to bedrooms
and may be used to span hallways, doorways or appropriate stairways. Check the width of the
opening in which you intend to fit your Lindam Gate. The smallest opening is 74cm and the
restrict the opening of the gate to one direction only. It also acts as a further locking device
which should be used, especially on stairs (see page 2).
largest opening is 80cm. IMPORTANT: Do not attempt to use this gate in openings larger than
80cm. For openings greater than 80cm, extensions are available from Lindam (see page 7).
Due to the nature of the pressure fit fixing method this gate must be used in a strong and
secure opening. Ensure all surfaces are clean and free of loose materials.
MIN 70º
74c m MI N
80c m MA X
136c m MA X ( w i t h e xt e n si o n s)
1
6
NOTES ON STAIRCASE POSITIONING
SAFETY TIPS
• This safety barrier will not necessarily prevent all accidents. Never leave children unattended.
• A daily check on the gate is recommended to ensure that your gate remains securely fixed.
• Eventually your child will reach an age at which they are capable of opening your gate. Children
will develop physically and mentally at different rates, therefore it is important that you monitor your
child's capabilities.
• Always fit your gate centrally within your doorframe etc. This will help prevent it becoming dislodged
in the event of a large impact.
• Never allow young children to swing on the gate.
• Ensure that the gate is properly closed at all times.
• The gate is designed for indoor use only.
• A swinging gate can trap small hands.
• For children over 24 months of age parental supervision is advised.
• Do not allow older children to climb on or over the gate as this can result in an accident.
• Do not remove the safety notices, you may not always be the user.
• If you require spare parts for your gate please obtain them direct from Lindam Ltd.
• Retain these instructions as you may wish to reposition the gate.
• WARNING! Incorrect fitting or positioning of this safety barrier can be dangerous
• WARNING! Stop using the barrier if the child is capable of climbing it.
• WARNING! Do not use the safety barrier if any components are damaged or missing.
• WARNING! Do not leave this gate open at any time. Remove the gate if not in use for long periods.
• WARNING! This barrier must not to be fitted across windows
WARNING: The position of your safety barrier in relation to the stairs is very important for your
child's safety. Your gate may be better positioned across your landing to prevent access to the
stairs completely. If you do require your gate to be positioned at the top of the stairs to prevent
your child descending, the gate must be fitted on the very top stair. You should turn down one
gate stop (E) to prevent the gate swinging out over the stairs. The gate stop can be rotated if it
is pulled out gently. It will then spring back and lock into position. If you intend to use the gate
at the bottom of the stairs then it must be placed on the lowest stair, towards the front of the
step, away from the 2nd step.
It should only take 5 minutes to fit your gate. We recommend that you carry out the installation away
from young children as some of the smaller components may present a choking hazard when loose.
CLEANING
Simply wipe with a soft damp cloth. Do not use harsh or abrasive cleaning agents.
E
When passing through a gate at the top of a staircase, particular attention should be paid to
the bottom bar of the U shaped frame to avoid tripping.
5
2
FIXING YOUR GATE
Slide the 4 screw adjusters into the plastic bungs at each corner of your gate. Your gate must
be fitted with wall cups, these should be placed around the top 2 screw adjusters (F) and will
be secured to your wall, doorway or stairway using the sticky pads or screws provided (Do not
use sticky pads on wall paper or where there may be other loose materials).
You should find fitting easier if you offer up the gate as instructed here, and then mark the
position of the wall cups with a pencil before permanently securing them. Place the gate into
the required opening, in the closed position. To ensure that you secure the gate correctly, begin
with the screw adjusters at the bottom of the gate. Ensure that your gate is central, slide out the
adjusters and secure by tightening the locking nuts. Next, adjust the top screw adjusters, once
again ensuring that your gate is central. Tighten the locking nuts until the handle is aligned.
Once the bars of the inner and outer frame are parallel you have correctly positioned your
F
F
gate. Mark the position of the wall cups and remove your gate. Now you can permanently fix
your wall cups with the sticky pads.
If using the screws, first drill a 1/4" (6mm) hole into your wall and insert the wall plug, then
secure the wall cup with the screw. If you are drilling into plaster board you will need to
purchase expandable wall plugs (available from DIY stores). Reposition the Safety Gate and
turn the locking rings until the gate is fully secure. Always ensure that the gaps at either side
are the same.
Check that your gate is securely fitted. This check should be repeated daily to ensure that your
gate remains securely fixed and that all attachments and locking devices are operating
correctly.
MAX 2mm
3
4


© Copyright 2026