
MyST User Guide - Secure Trading
MyST User Guide This document outlines how to use the Secure Trading MyST area. Here you will find a breakdown of the various functions available and instructions on how to use them. Version: 1.27 Published: 28 January 2015 MyST User Guide Table of Contents 1 Introduction ...................................................................................................................................... 4 2 Sign In ............................................................................................................................................... 5 3 MyST Home page ............................................................................................................................. 6 3.1 Quick View ................................................................................................................................. 7 4 Roles.................................................................................................................................................. 9 5 Add a new username ..................................................................................................................... 11 5.1 6 Adding a new user ................................................................................................................... 11 User Details .................................................................................................................................... 14 6.1 6.2 6.3 7 Your User Details ..................................................................................................................... 14 Managing your Users ............................................................................................................... 15 Managing your Sites ................................................................................................................ 17 Change Password .......................................................................................................................... 19 7.1 8 Password Considerations ........................................................................................................ 19 My Transactions ............................................................................................................................. 20 8.1 8.2 8.3 9 Search ...................................................................................................................................... 20 Reporting .................................................................................................................................. 35 ST PayMe................................................................................................................................. 39 Notifications ................................................................................................................................... 42 9.1 9.2 9.3 9.4 9.5 9.6 10 10.1 10.2 10.3 11 11.1 11.2 11.3 11.4 12 12.1 13 13.1 13.2 13.3 13.4 Overview .................................................................................................................................. 42 Selecting a Site Reference....................................................................................................... 42 Add Filter .................................................................................................................................. 43 Add Destination ........................................................................................................................ 44 Assigning a Destination to a Filter ........................................................................................... 48 Manage Notification Options .................................................................................................... 49 File Manager ............................................................................................................................... 50 Selecting a Site Reference....................................................................................................... 51 Uploading a file ........................................................................................................................ 51 Deleting and Downloading ....................................................................................................... 53 Payment Pages Redirects ......................................................................................................... 54 Overview .................................................................................................................................. 54 Existing rules for site tab .......................................................................................................... 61 Manage Conditions Tab ........................................................................................................... 64 Manage Actions ....................................................................................................................... 67 Virtual Terminal .......................................................................................................................... 71 How to use the Virtual Terminal ............................................................................................... 71 Subscriptions ............................................................................................................................. 72 Introduction............................................................................................................................... 72 Viewing the parent Authorisation ............................................................................................. 72 Viewing the Subscription .......................................................................................................... 75 Update a Subscription .............................................................................................................. 79 14 Sign Out ...................................................................................................................................... 82 15 Further Information and Support ............................................................................................. 83 15.1 15.2 Secure Trading Support ........................................................................................................... 83 Secure Trading Sales ............................................................................................................... 83 © Secure Trading Limited 2015 28 January 2015 Page 2 / 84 MyST User Guide 15.3 15.4 15.5 Useful Documents .................................................................................................................... 83 Frequently Asked Questions .................................................................................................... 83 Best Practices .......................................................................................................................... 84 © Secure Trading Limited 2015 28 January 2015 Page 3 / 84 MyST User Guide 1 Introduction MyST is a secure interface providing online real-time access to your payment history. The status of every transaction can be tracked, allowing your Secure Trading account to be managed more effectively. Using MyST you can: View, refund, repeat or reverse your transactions in one place Set permission levels for different types of users Specify the settlement date of your processed transactions Change the amount of a transaction Download transaction details and export into your accounting software Manage payment pages using our secure servers Pay your Secure Trading invoices easily via credit or debit card Authorise payments that cannot be processed online – for example, telephone orders and orders by post via your Virtual Terminal for MOTO transactions When you have signed up for an account with Secure Trading, you will be issued with a MyST login comprising a username (a valid email address) and password. You will be advised of your sitereference. A sitereference is a unique code that identifies your account in our system. To access all MyST features, Secure Trading recommends enabling JavaScript in your web browser when using MyST. If you currently have JavaScript disabled, you will receive a warning message when you sign in to MyST. © Secure Trading Limited 2015 28 January 2015 Page 4 / 84 MyST User Guide 2 Sign In Before you can use MyST you must first securely sign in. Either: Navigate to https://myst.securetrading.net/ Or navigate to the Secure Trading website (http://www.securetrading.com) and click “MYST LOGIN” in the top right. The first page you will see when you access MyST is the sign in page, as shown below. Enter your username and password (as supplied by Secure Trading) in the boxes provided and click on the “Sign in” button. If both items have been entered correctly then you will be taken to your MyST home page (please see section 3 MyST Home page). If the username and password do not match then you will receive an “Invalid username/password” error message and you can try signing in again. Please note passwords are case sensitive. If you continue to experience problems and are unable to sign into MyST, please contact our Support team. Contact details can be found in section 15 Further Information and Support. © Secure Trading Limited 2015 28 January 2015 Page 5 / 84 MyST User Guide 3 MyST Home page Once you have successfully signed in, the first page you will see is your Home page. From here you can access all the other areas of the system by selecting the required link from the left side menu. Help is available throughout the MyST system by clicking the “Help” link in the left side menu. The page header, footer and menu bar will remain the same as you navigate through the MyST system. If you experience any problems using MyST please contact our Support team – contact details can be found in section 15 Further Information and Support. If possible, quote the reference number that can be seen at the bottom of the page e.g. M1-970726527. © Secure Trading Limited 2015 28 January 2015 Page 6 / 84 MyST User Guide 3.1 Quick View 3.1.1 Transaction Quick View After signing into MyST, you can view details of a transaction by inputting the Transaction Reference in the Quick View box in the left side menu and clicking magnifying glass (or pressing the return key). You must have the complete transaction reference (inputted in the correct format, e.g. 11-9-98) and also ensure you have access to view the transaction. Once you have submitted the transaction reference, you will be displayed the transaction on the “Single Transaction View” page (as shown below). For more information, please refer section 8.1.4 Single Transaction View). © Secure Trading Limited 2015 28 January 2015 Page 7 / 84 MyST User Guide 3.1.2 Site Quick View You can view details of a site by selecting the site reference in the Quick View box in the left side menu and clicking the magnifying glass. You will be displayed the site details on a single site view page (as shown below). For more information, please refer to section 6.3 Managing your Sites). © Secure Trading Limited 2015 28 January 2015 Page 8 / 84 MyST User Guide 4 Roles Each user in MyST has a role which defines which privileges have been granted to them. When signed into MyST, your role is displayed in the top-right corner of the page, next to your username. Depending on your role, you may not be able to access certain pages or perform certain actions. The following roles are available: Site admin Manual login Change password View site configuration Re-authorise transactions Refund transactions Update transactions Accountcheck transactions Risk Decision transactions View transactions View reports Use the Virtual Terminal ST PayMe View users Search for your users/sites View notifications Edit notifications Upload/download custom files Payment pages URL redirects Payment pages URL redirect conditions Site user Manual login Change password View site configuration Re-authorise transactions Refund transactions Update transactions Accountcheck transactions Risk Decision transactions View transactions View reports Use the Virtual Terminal View users Search for your users/sites Site user 2 Manual login Change password View site configuration Re-authorise transactions Refund transactions Update transactions Accountcheck transactions Risk Decision transactions View transactions View reports Use the Virtual Terminal ST PayMe View users Search for your users/sites © Secure Trading Limited 2015 Transaction admin Manual login Change password Re-authorise transactions Refund transactions Update transactions Accountcheck transactions Risk Decision transactions View transactions View reports Use the Virtual Terminal Transaction admin 2 Manual login Change password Re-authorise transactions Refund transactions Update transactions Accountcheck transactions Risk Decision transactions View transactions View reports Use the Virtual Terminal ST PayMe View only transactions Manual login Change password View transactions View reports View only transactions 2 Manual login View transactions View reports Virtual terminal user Manual login Use the Virtual Terminal Virtual terminal user 2 Manual login Use the Virtual Terminal ST PayMe ST PayMe Manual login Change password ST PayMe 28 January 2015 Page 9 / 84 MyST User Guide Developer 1 Manual login Change password View notifications Edit notifications Upload/download custom files Payment pages URL redirects Payment pages URL redirect conditions Developer 2 Manual login Change password View site configuration View transactions View reports View users Search for your users/sites View notifications Edit notifications Upload/download custom files Payment pages URL redirects Payment pages URL redirect conditions File manager Manual login Change password Upload/download custom files Webservices Process any automated transactions via Web Services interface (API) View transactions View reports Webservices 2 Process automated authorisations via Web Services interface (API) The aforementioned user roles are shown in a table format (for the purposes of directly comparing their capabilities) in the “Help” page of MyST, under the “Role” tab. © Secure Trading Limited 2015 28 January 2015 Page 10 / 84 MyST User Guide 5 Add a new username The “Add new username” option allows you to create a new user, specify which users (if any) they can manage and which sitereferences they have access to. You can only add a new user if your role is Site Admin. See section 4 Roles for more information. 5.1 Adding a new user To add a new user, select the “Add new username” link from the left side menu and fill in the forms displayed. 5.1.1 User Details Please fill in the fields below when registering a new user. © Secure Trading Limited 2015 28 January 2015 Page 11 / 84 MyST User Guide Name of field Username (required) Password (required) Role (required) Valid IP/ network(s) Role if invalid IP 5.1.2 Comment The user’s email address. e.g. [email protected] Email addresses can have a maximum length of 255 (maximum of 64 characters before the “@” symbol). By default, a randomly generated string of characters. You can opt to change this password during user account creation, or at a later time, either by yourself (see section 6.2.2) or the user you are adding (depending on role) (see section 7). The role of the new user (defaults to Site User). Click the “Role details” tab for more information (or refer to section 4 Roles in this document). You may choose to restrict access to certain IP addresses or reduce the access privileges given to a user when they connect from a different network. Multiple IP addresses should be separated by either a semicolon (;) or a comma (,). Ranges of IPs may be specified by using a netmask in the format 1.2.3.4/8. In the interest of security, this field is mandatory when creating a Webservices user account. If a user connects from an IP address outside the range(s) specified then their access can be reduced or prevented. Select "Prevent login" to disable access or choose a role with lower privileges. See section 4 Roles for more information. Allocating Usernames In the bottom section in the “Manage users” tab, you can allocate sub-users to the new user. Usernames are displayed in two columns. On the left is a list of the users which you have permission to allocate (i.e. your sub-users) and on the right is a list of the users being allocated to the new user (i.e. their sub-users). To allocate a username to the new user, click on the required username. The selected username will move from the “Available Usernames” column to the “Allocated Usernames” column. If you have many sub-users, you can search for the one you require by entering all or part of the username in the “Search for usernames” box and clicking “Search”. To remove a username from the “Allocated Usernames” column, click on the required username. The selected username will move from the “Allocated Usernames” column back to the “Available Usernames” column. You can assign or remove sub-users after the user has been created by selecting the user’s “Edit” option from the main “User Details” page (see section 6.2.2 Edit a user). © Secure Trading Limited 2015 28 January 2015 Page 12 / 84 MyST User Guide 5.1.3 Allocating Sitereferences Sitereferences are allocated in the same way as usernames. In the “Manage sites” tab sitereferences, are displayed in two columns. On the left is a list of the sitereferences which you have permission to allocate. On the right is a list of the sitereferences the new user will have access to. If you have many sitereferences, you can search for the one you require by entering all or part of the sitereference in the “Search for sitereferences” box and clicking “Search”. To allocate a sitereference to the new user, click on the required sitereference. The selected sitereference will move from the “Available Sitereferences” to the “Allocated Sitereferences” column. To remove a sitereference from the “Allocated Sitereferences” column, click the required sitereference. The selected sitereference will move from the “Allocated Sitereferences” column back to the “Available Sitereferences” column. Each user must be assigned at least one site reference. 5.1.4 Saving the user Any changes you make will not be saved until you click the “Save” button. Once you have finished entering the details, click “Save” to create the user. If any of the values entered are invalid, a warning message will be displayed and the invalid fields will be highlighted in red. Once all of the required fields have been completed correctly, a successful save message will be displayed, the new user will be created and you will be redirected to the “Edit User Details” page (see section 6.2.2) where you can make further changes to the newly added user if required. © Secure Trading Limited 2015 28 January 2015 Page 13 / 84 MyST User Guide 6 User Details From the “User Details” page you can: View your user details. See which users and sitereferences are allocated to you. View, edit and delete your sub-users and their privileges. View more information on your sitereferences. 6.1 Your User Details The top section of the “User Details” page displays your user details: Name of field Username Last logged in Role Valid ip/network(s) Role if invalid IP Comment Your username. The date and time you last logged in. Your assigned role. See section 4 Roles for more information. You may be restricted access to certain IP addresses or have reduced access privileges when you connect from a different network. Multiple IP addresses are separated by either a semicolon (;) or a comma (,). Ranges of IPs are be specified by using a netmask in the format 1.2.3.4/8. If you connect from an IP address outside the range(s) specified then your access can be reduced or prevented. See section 4 Roles for more information. The lower section contains two tabs: “Manage users” – a list of your sub-users “Manage sites” – a list of the sitereferences you have permission to access and allocate to your sub-users. © Secure Trading Limited 2015 28 January 2015 Page 14 / 84 MyST User Guide 6.2 Managing your Users Your role defines which actions you can perform on your sub-users. Please see section 4 Roles for more information. 6.2.1 View a user When you click on the username for one of your sub-users the “User Details” page will display their details including their sub-users (in the “Manage users” tab) and the sitereferences they have access to (in the “Manage sites” tab). If you have many sub-users you can search for the one you require by entering all or part of the username in the “Search for usernames” box and clicking “Search”. You can edit the user you are currently viewing by clicking the “Edit” link next to the username. 6.2.2 Edit a user The “Edit” option allows you to: Change the password of one of your sub-users. Change which users are allocated to your sub-users. Change which sitereferences are allocated to your sub-users. Change the role assigned to your sub-users (see section 4 Roles for more information). When you click on “Edit” for one of your sub-users, you will see a page similar to the below. Use the fields above the “Save” button to edit the user’s password, role and IP settings. © Secure Trading Limited 2015 28 January 2015 Page 15 / 84 MyST User Guide 6.2.3 Allocating Usernames Below the “Save” button, in the “Manage users” tab, you can change the sub-users of the currently selected user in the same way as when adding a new username (see section 5.1.2 Allocating Usernames on page 12) 6.2.4 Allocating Sitereferences In the “Manage sites” tab, you can change which sitereferences the currently selected user has access to in the same way as when adding a new username (see section 5.1.3 Allocating Sitereferences on page 13). Each user must be assigned at least one site reference. Any changes you make will not be saved until you click the “Save” button. 6.2.5 Delete a user A user can be deleted by clicking on its associated “Delete” link on the main “User Details” page (shown below). © Secure Trading Limited 2015 28 January 2015 Page 16 / 84 MyST User Guide 6.3 Managing your Sites The “Manage sites” tab contains a list of sitereferences that you have permission to access. If you have many sitereferences, you can search for the one you require by entering all or part of the sitereference in the “Search for sitereferences” textbox and clicking “Search”. For more information about a site, click the associated sitereference in the list of “SiteReferences”. You will be presented with a page similar the below. © Secure Trading Limited 2015 28 January 2015 Page 17 / 84 MyST User Guide The page shown is split into tabs: The “Site details” tab outlines fraud and duplicate check options for the current site. The “Accounts” tab provides details of all the accounts set up for the current site. The card types and currencies that you are able to process will be displayed under four headings: Name of field Acquirer Account Type Currency Payment Type Comment The name of the acquiring bank that you are able to process this card type and currency through. The type of account this card type can be processed through. These include Ecom (Ecommerce/Internet Transactions), and MOTO (Mail Order Telephone Order Transactions). For more information on the type of transactions you can process, please contact our support team (see section 15.1 Secure Trading Support on page 83). The currency you are able to process the card type through. The card type you are able to process. The “Users” tab displays all the users that have been registered using your MyST account, that have access to the current site. © Secure Trading Limited 2015 28 January 2015 Page 18 / 84 MyST User Guide 7 Change Password To change the password you use to sign into MyST, click the “Change password” link from the left hand menu. You will be presented with a new page where you are required to enter your current password, your new password, confirm new password and then click on the “Save” button. Please note that the ability to change the password for your MyST account is only available to users with certain roles. For a full list of roles and their abilities, please refer to section 4 Roles. If the current password is incorrect or the new passwords don’t match, then an error message will be displayed. Otherwise a successful save message will be displayed and your password will have been changed. 7.1 Password Considerations Change your password every 90 days. Passwords should not be sent via any form of electronic communication. Use a different password each time you change your password. Never reveal your password to anyone. Passwords should be at least 7 characters long. Passwords should contain a minimum of three of the following groups of characters o UPPERCASE letters: A-Z o lowercase letters: a-z o numbers: 0-9 o symbols: ~`!@#$%^&*()_-+={[}]|:;"'<,>.?/ © Secure Trading Limited 2015 28 January 2015 Page 19 / 84 MyST User Guide 8 My Transactions 8.1 Search The “Transaction Search” page allows you to view and manage your transactions. This section of the document covers how to use the “Transaction Search” page, including: Searching for a transaction – How to perform a search for a transaction, including advanced search and viewing options. Search Results – How the search results are displayed on screen and how to sort them. Single Transaction View – The “Single Transaction View” allows you to view all details for a single transaction, including viewing all related transactions. Actions available – How to re-authorise, refund or update a transaction. 8.1.1 Searching for a transaction 8.1.1.1 Setting the Site Reference and Date Range Step 1: Select a Site Reference The first step of performing a search is selecting a sitereference(s). Selecting “ALL” automatically selects all sitereferences available to your account. Step 2: Setting the date range and pre-defined search You can select one of the “Pre-defined searches” which will set the filters and fields for you. A date range must be specified for the search. By default, the date range will be set for all transactions for the current day. “Date type” determines if to base the search on the authorisation date or settlement date. Step 3: Press Search Once you are happy with the site references and date ranges, press the “Search” button. The search results can be displayed on screen or CSV by selecting the “Output”. © Secure Trading Limited 2015 28 January 2015 Page 20 / 84 MyST User Guide 8.1.1.2 Search Options You can make your search more specific and add/remove fields that are returned in the results. Please note that the sitereference and date ranges must be set for each search. Search Criteria Setting the “Search Criteria” allows you to be more specific with your search. By default, the field values are blank (they are optional). When left empty, all details are searched for and no constraint is placed on the search. The “Transaction reference” must match the full transaction reference; no partial matches are returned. A unique transaction reference is generated by Secure Trading for each request. The “Card number” field must match the full card number used. Spaces can be included and will not affect the search, so both “4111111111111111” and “4111 1111 1111 1111” will return the same result. Please note that to search on the card number, you must be in possession of the whole card number. © Secure Trading Limited 2015 28 January 2015 Page 21 / 84 MyST User Guide Other fields under the “Search Criteria” tab allow for full and partial matches. Full Match – The “Single Transaction View” (see section 8.1.4) allows you to view all details for a single transaction, including viewing all related transactions. Partial Match – If you select “is like” from the dropdown next to a field name, and input the first five (or more) characters followed by a “%”, the search results will return any record that begins with that value in the selected field. For example, the below would search for all Last name values that begin with “Lastn”: This would return: Filters Filter your search criteria using the checkboxes displayed under the “Filters” tab. For example, selecting USD in the “Currencies” field will return only transactions that were processed in USD. © Secure Trading Limited 2015 28 January 2015 Page 22 / 84 MyST User Guide Fields The “Fields” tab allows you to specify the fields that are returned by the search results. Please note the options you have selected will be retained on screen after the search is performed, allowing you to modify the chosen options and search again. Expanding boxes When you move your cursor over the boxes shown under the “Filters” and “Fields” tabs, they expand to show more options. This is to simplify the process of selecting options from large lists. After selecting the desired options, move your cursor away from the expanded box, and it will reduce to normal size. Please note that when using a touch-enabled browser (e.g. on an iPad), the filters may remain expanded after used. In order to close an expanded filters/fields box, please tap the corresponding field name above the box. © Secure Trading Limited 2015 28 January 2015 Page 23 / 84 MyST User Guide 8.1.2 Search Results If you have selected the “Output” as “On Screen”, the search results are displayed below the search options in the “Search Results” tab. Status keys are displayed in the “Status Information” tab and contain explanations for the different values returned by the search. Refer to section 8.1.3 Status Information on page 28 for further information. 8.1.2.1 Navigating the Results - Pagination To change the number of transactions displayed per page in the results, select the drop down on the top-left corner of the search results. Use the buttons at the bottom of the results to navigate between pages. © Secure Trading Limited 2015 28 January 2015 Page 24 / 84 MyST User Guide 8.1.2.2 Further Searching This can be used to filter the search results shown under the “Search Results” tab. For example, if you typed “Joe Sm” as is shown above, the table will display all records that have “Joe Sm” in a field. 8.1.2.3 Sorting the results By default, the Search Results are sorted by the “Timestamp” field. Click on a column heading to sort the results. For example, clicking on the “Amount” heading will sort the transactions by the “Amount”. © Secure Trading Limited 2015 28 January 2015 Page 25 / 84 MyST User Guide 8.1.2.4 Icons Icons can be displayed next to each transaction by clicking on the checkbox on the top left of the search results. Using the icons will provide you with an at-a-glance representation of the different states for your transactions. Click here to show the icons. A key corresponding to each icon is displayed in the “Status information” tab. Refer to section 8.1.3 Status Information on page 28 for further information. © Secure Trading Limited 2015 28 January 2015 Page 26 / 84 MyST User Guide 8.1.2.5 Selecting transactions Under the “Search Results” tab, you can select multiple transactions by clicking on the checkbox next to each transaction. The screenshot below shows four transactions that have been selected. You can then perform actions on the selected transactions by clicking on one of the buttons on the bottom of the page. For more information on the actions available, see section 8.1.5 Actions available on page 31. 8.1.2.6 Viewing transaction details Clicking a transaction reference in the “Search Results” will display the “Single Transaction View” which displays all details regarding a transaction. Refer to section 8.1.4 Single Transaction View on page 28 for further information. © Secure Trading Limited 2015 28 January 2015 Page 27 / 84 MyST User Guide 8.1.3 Status Information The “Status information” tab contains explanations for the different values returned by the search, including the icons described in section 8.1.2.4 (when in use). 8.1.4 Single Transaction View The “Single Transaction View” displays details relating to the selected transaction. The transaction details can be printed in a print-friendly format, by clicking the “Print” button. The “Summary” table at the top of the page displays general details regarding the transaction you have selected. Below the Summary table you can either view the transaction details or related transactions. © Secure Trading Limited 2015 28 January 2015 Page 28 / 84 MyST User Guide 8.1.4.1 Transaction details The “Transaction details” tab displays all details for the selected transaction. You can perform actions on your transactions by clicking on one of the buttons at the bottom of the page. For more information on the actions available, see section 8.1.5 Actions available on page 31. © Secure Trading Limited 2015 28 January 2015 Page 29 / 84 MyST User Guide 8.1.4.2 Security Response To help minimise fraud, checks are performed on Authorisations by the Acquiring bank. These checks typically consist of the following: Use of the Address Verification System (AVS) to check if the provided first line of the billing address matches that on the card issuer’s records. Checks to see if the billing postcode provided by the customer matches that on record for their card. Checks to see if the security code (CVV2) provided by the customer matches that on record for their card. Please contact your Acquiring Bank for further information on the checks performed. The results of these checks are displayed in the “Security Response” section of the “Transaction details” tab. The security response consists of three different fields, each containing the result of an individual check. The names of the fields are listed, below: MyST field name Comment Security code The results of the security code checks. Postcode House no. The results of the checks on the billing postcode. The results of the checks performed by the AVS on the first line of the billing address. Secure Trading will analyse the details provided by the customer and respond with the following results for each check performed: Security response value Description 0 “Not Given” 1 “Not Checked” 2 “Matched” 4 “Not Matched” Comment Your bank was not provided with the information required to perform this check. Your bank was unable to perform checks on the information provided. The information provided by the customer matches that on the card issuer’s records. The information provided by the customer does NOT match that on the card issuer’s records. For example, if the Postcode and House no. security response fields have a value of “2”, but the security code security response field has a value of “4”, this indicates that the first line of the address and the postcode match those on the card issuer’s records, but the security code (CVV2) entered by the customer does not match the code found on the back of their card. Please note that it is possible to perform these checks on a customer’s account details without reserving or transferring funds, by performing an Account Check request. See section 8.1.5.4 Account Check. © Secure Trading Limited 2015 28 January 2015 Page 30 / 84 MyST User Guide 8.1.4.3 Related transactions The “Related transactions” tab provides a list of all parent and child transactions that relate to the selected transaction. For example, any Refunds or Re-Auths linked to the transaction would be displayed. 8.1.5 Actions available On either the “Search Results” or “Single Transaction View” page, you can perform one of the actions outlined in this section. Please note that the actions that can be performed are dependent on the state of the transaction selected. For example, you cannot refund a transaction that has not settled. © Secure Trading Limited 2015 28 January 2015 Page 31 / 84 MyST User Guide 8.1.5.1 Re-Auth A Re-Auth is where you can process a new Authorisation against the customer’s card. On this page, you are able to change the expiry date and also set a different amount than the original transaction. As the security code is not saved in Secure Trading’s system, you will need to input the details again, or the card will not pass the security code check. 8.1.5.2 Refund You can process a full or partial refund for a settled transaction through MyST. Please note if you wish to update the expiry date for a refund, you will need to click on the “Show more” link to display the field, which is hidden by default. © Secure Trading Limited 2015 28 January 2015 Page 32 / 84 MyST User Guide 8.1.5.3 Update You can update the status of a transaction using the “Update” option. The transaction can be suspended or set to settle at a future date. The order reference can also be updated. Please note any transactions that have not settled after a certain period following the authorisation are set as cancelled by the system as the authorisation code is no longer valid. This is usually after 7 days, but can vary depending on your acquirer. You can update the amount for a transaction, as long as it is either equal to or less than the amount authorised. © Secure Trading Limited 2015 28 January 2015 Page 33 / 84 MyST User Guide 8.1.5.4 Account Check When activated on your Secure Trading account, an Account Check request allows a card/account to be validated by checking the customer’s address, security code and available funds. An Account Check shows the merchant that the customer’s account, address and CVV2 value are valid and that it is acceptable to proceed with the transaction. This feature is only available with select acquirers and the number of checks performed may differ based on the payment type. To find out if your acquirer supports Account Check and to activate it on your Secure Trading account, please contact Secure Trading support (see section 15.1 Secure Trading Support on page 83). Account Checks can be performed using MyST by selecting a pre-existing transaction and clicking the “Account Check” button, when shown. No funds are reserved or transferred by the Account Check process, but you may specify an amount. This amount is inherited in future transactions that refer to the Account Check as a parent transaction. Please see section 8.1.4.2 Security Response for an explanation of how to view the results of an Account Check. © Secure Trading Limited 2015 28 January 2015 Page 34 / 84 MyST User Guide 8.2 Reporting The “Reporting” feature of MyST allows you to analyse the requests processed through your account. You can view totals for transaction amounts and number of requests across date ranges for one or more site reference. 8.2.1 Generating a report 8.2.1.1 Setting the Site reference, date range and summary type Select a Site Reference Set the site you wish to generate a report for choosing sites from the “SiteReferences” box. Multiple sitereferences can be selected by clicking on the sitereference dropdown, and checking the sites that you have access to. Pre-defined reports You can select one of the “Pre-defined reports” which will set the filters and groupings for you. Setting the date range A date range must be specified for each report. By default, the date range will be set for all transactions for the current month. Summary type The “Summary types” determines which transactions are included in the generated report (Authorisations and/or settlements). Report Format The report format determines how to structure and display the report: Standard: Display Report in standard Secure Trading format. Analysis: Display a pre-set report format for transaction analysis. © Secure Trading Limited 2015 28 January 2015 Page 35 / 84 MyST User Guide 8.2.1.2 Filters Filter your search criteria using the checkboxes displayed under the “Filters” heading. For example, selecting USD in the “Currencies” field will return only transactions that were processed in USD. Expanding boxes When you move your cursor over the boxes shown under the “Filters” tab, they expand to show more options. This is to simplify the process of selecting options from large lists. After selecting the desired options, move your cursor away from the expanded box, and it will reduce to normal size. Please note that when using a touch-enabled browser (e.g. on an iPad), the filters may remain expanded after used. In order to close an expanded filters box, please tap the corresponding field name above the box. © Secure Trading Limited 2015 28 January 2015 Page 36 / 84 MyST User Guide 8.2.1.3 Group by You can set how the data in your reports are grouped together using the checkboxes provided. For the above report, transactions would be grouped by Day, then Currency, then the Request type. 8.2.2 Report Results 8.2.2.1 Navigating the Results – Pagination To change the number of transactions displayed per page in the results, select the drop-down on the top-left corner of the generated report. Use the buttons at the bottom of the results to navigate between pages. © Secure Trading Limited 2015 28 January 2015 Page 37 / 84 MyST User Guide 8.2.2.2 Further Searching This can be used to search the generated report. For example, if you typed “Jet”, the table will display all records that have “Jet” in a field. 8.2.2.3 Sorting the results By default, the generated report is sorted by the “Day” field. Click on a column heading to sort the report. For example, click on the “Settled AUTH value” heading will sort the transactions by that field. © Secure Trading Limited 2015 28 January 2015 Page 38 / 84 MyST User Guide 8.3 ST PayMe The “ST PayMe” system simplifies the process of requesting a new payment from a customer. An email will be sent to the specified email address with a link to a Payment Page, allowing them to process a transaction to your chosen sitereference. 8.3.1 Specifying the Email Details Step 1. Select the sitereference that is intended to receive the payment. Step 2. Specify the first name, last name and email address that will be included in the email. Email addresses can have a maximum length of 255 (maximum of 64 characters before the “@” symbol). Step 3. Specify the amount to be paid and select the currency to be used. © Secure Trading Limited 2015 28 January 2015 Page 39 / 84 MyST User Guide 8.3.2 Additional Fields Additional fields that can be specified include email subject, the reply to email address, the order reference, the settle status and the settle due date (must be within the next seven days). 8.3.3 Sending an Email Copy You can choose to send a bcc copy of the payment email to another email address, for your records. This is done by specifying the additional email address(es) in the “Bcc email to” field, before sending. When including multiple email addresses, separate with commas(,) or semicolons(;). Email addresses can have a maximum length of 255 (maximum of 64 characters before the “@” symbol). 8.3.4 Additional Information Secure Trading provides a large resizable text box to allow you to enter custom text to be included within the email to your customer. (e.g. Personalised message to the customer) 8.3.5 Adding a company logo See section 10.2.1 Using a company logo in customer email notifications / ST PayMe. © Secure Trading Limited 2015 28 January 2015 Page 40 / 84 MyST User Guide 8.3.6 Sending the Email Once the email details have been completed and the “Send Email” button has been clicked, an email is generated and sent to the customer allowing them to make their payment. When using ST PayMe, we advise the use of the Payment Pages site security feature. Please see the Payment Pages document for more information. When using ST PayMe it is advised to configure the site security without the billingfirstname, billinglastname or billingemail as these fields may cause the transaction to be rejected. Before sending an email to the customer requesting payment, we recommend sending an email to your own email address to ensure the account configuration and company logo appears correctly. © Secure Trading Limited 2015 28 January 2015 Page 41 / 84 MyST User Guide 9 Notifications Info on how to handle notification requests and responses can be found in the STPP Notifications document All Secure Trading documents can be found on our website. 9.1 Overview The “Notifications” system enables HTTP Posts and email notifications to be processed based on the result of a transaction. For best practices managing notifications see section 15.5. Clicking on the “Notifications” link on the left-hand side of the MyST screen will display the main Notifications page. 9.2 Selecting a Site Reference Notifications can be managed for any sitereference that you have privileges for. The “SiteReference” field contains a list of sitereferences allocated to the user. To change the sitereference, select it from the drop-down and click “Change site”. © Secure Trading Limited 2015 28 January 2015 Page 42 / 84 MyST User Guide 9.3 Add Filter A Filter defines the events under which a notification should be sent. To configure a new Filter, click on the “Add filter” button on the main “Notifications” page. The “Add new filter” page will then be displayed. For the “Description” field, input a name for the Filter. It is possible to select one or more request type, payment type and error code. The “Error codes” field allows configuration of different notifications depending on the result of the request. For example, selecting: “AUTH” in “Requests” “VISA” in “Payment types” “0 – Ok” in “Error codes” defines a Filter that would trigger the sending of a notification for successful VISA Authorisations. Press “Save” once you have finished customising the Filter. © Secure Trading Limited 2015 28 January 2015 Page 43 / 84 MyST User Guide 9.4 Add Destination The Destination will receive a notification when the conditions in the Filter are met. In order to configure a new destination, click on the “Add destination” button on the main “Notifications” page. You are required to designate each Destination a name, by filling in the “Description” field. The three types of Destination that can be configured are explained below. © Secure Trading Limited 2015 28 January 2015 Page 44 / 84 MyST User Guide 9.4.1 HTTP Post Secure Trading send an HTTP Post to a pre-defined URL within the Merchant’s system. The post can be configured to include a number of fields. For the “Notification type”, select “url”. The “Destination” field is the URL that the system will POST to. For example, http://www.example.com/test.php Select transaction fields to be included in the notification by ticking the checkboxes in the list. STPP allows Merchants to process their own custom field names through the system. They can include these fields in the HTTP Post by inputting the field name in “Custom fields”. For example, input “field1”. Please note that field names are case sensitive and spaces are not permitted. Press “Save” once you have finished customising the Destination. © Secure Trading Limited 2015 28 January 2015 Page 45 / 84 MyST User Guide 9.4.2 Email Notification to the Merchant Secure Trading send email notifications to the Merchant’s email address. In order to send an email, select “email” in the “Notification type” drop-down. In order to send emails to a Merchant, select “merchant” in the “Email type” drop-down. The “Email from” field sets the address the email will be “From” when it’s received. For example, “[email protected]”. The “Email subject” will be the text in the subject field of the email. For example, “Successful Authorisation”. “Destination” is the email address the email will be sent to. For the example, input [email protected] Email addresses can have a maximum length of 255 (maximum of 64 characters before the “@” symbol). Press “Save” once you have finished customising the Destination. © Secure Trading Limited 2015 28 January 2015 Page 46 / 84 MyST User Guide 9.4.3 Email Notification to the Customer Secure Trading send email notifications to the Customer’s email address. In order to send an email, select “email” in the “Notification type” drop-down. In order to send emails to a Customer, select “customer” in the “Email type” drop-down. The “Email from” field sets the address the email will be “From” when it’s received. For example, “[email protected]”. Email addresses can have a maximum length of 255 (maximum of 64 characters before the “@” symbol). The “Email subject” will be the text in the subject field of the email. For example, “Thank you for your order”. The “Destination” cannot be set as it will be sent to the customers billing email address. Press “Save” once you have finished customising the destination. © Secure Trading Limited 2015 28 January 2015 Page 47 / 84 MyST User Guide 9.5 Assigning a Destination to a Filter In order to complete the setup of a Notification, Filters and Destinations must be assigned on the main “Notifications” page. Select a Filter from the “Filters” drop-down box. The chosen Filter defines the conditions that trigger the sending of the notification. After selecting a Filter, select a Destination from the “Destinations” drop-down box. The Destination defines where the notification is sent when triggered. Press “Save” to establish the notification with chosen Filter and Destination. Once successfully saved, the Notification will be shown as “Active” in the Notifications page with a tick. Notifications can be deactivated by un-ticking the “Active” checkbox and clicking “Save”. © Secure Trading Limited 2015 28 January 2015 Page 48 / 84 MyST User Guide 9.6 Manage Notification Options To update the Filters or Destinations, press the “Manage notification options” button on the main “Notifications” page. Please note that only Filters and Destinations added by the user are updatable. Filters or Destinations can be deleted using this page. Filters or Destinations cannot be deleted if they are assigned to existing Notifications (shown with “IN USE” text, as below). In order to delete one of these Filters or Destinations, it will need to be removed from any existing notifications. Each Filter and Destination shown in this view is a link to a page where you can modify them. The options that are editable are the same as those set when adding a Filter or Destination. For more information on these options, please see section 9.3 Add Filter on page 43 or 9.4 Add Destination on page 44. © Secure Trading Limited 2015 28 January 2015 Page 49 / 84 MyST User Guide 10 File Manager Clicking on the “File Manager” link on the left-hand side of the MyST screen will display the main File Manager page. This allows you to upload files to your Secure Trading site reference. These files are used with the Payment Pages System and can include images, CSS and JavaScript files. More information on using these files with your Payment Pages can be found in the Payment Pages Setup Guide and the Payment Pages Customisation document. 1 2 3 1 Choose a sitereference and click “Change site”. 2 The upload panel is used to upload new files. 3 The file list is used to display files uploaded to Secure Trading for the selected sitereference. You can also delete or download files, when required. © Secure Trading Limited 2015 28 January 2015 Page 50 / 84 MyST User Guide Please note that merchants can upload a maximum of 100 files per site reference. 10.1 Selecting a Site Reference Files can be managed for any sitereference that you have privileges for. To change the sitereference, select it from the drop-down and click “Change site”. 10.2 Uploading a file Click the “Add files” button in the uploader section and select the files to upload (or drag the files into the window, if your browser supports it). In this example, “example.css” and “image1.jpg” have been selected and are ready to be uploaded. To begin, click “Start upload”. Please note that only the following file extensions may be uploaded: bmp, css, eot, gif, jpeg, jpg, js, png, svg, tif, tiff, ttf, woff The maximum size of a file is 1024kb. Files cannot be empty. Filenames must be no longer than 35 characters. Once the files have been successfully uploaded, the “Status” column will show 100% for each file, and a confirmation will be displayed at the top of the page. © Secure Trading Limited 2015 28 January 2015 Page 51 / 84 MyST User Guide The list of files already uploaded will be displayed on the lower part of the page under the “Files for <your site name>” tab. Typing in the “Search” text box will filter the files shown to match specified criteria. You can order the files shown by clicking the arrows shown in the column headers. You can also opt to view 10, 20 or 50 files per page, or show all files on a single page. Please note that it may take a few minutes for a file to be uploaded or deleted. Therefore your changes may not appear under the files tab immediately. Please note that there is no duplicate check for filenames. Uploaded files will override existing ones with the same name. © Secure Trading Limited 2015 28 January 2015 Page 52 / 84 MyST User Guide 10.2.1 Using a company logo in customer email notifications / ST PayMe In order to use a company logo in customer email notifications / ST PayMe, upload an image file via the “File Manager”. When uploading the image, it must have the filename of “emaillogo” (e.g. emaillogo.png), and it should also have a height of 50 pixels. The supported file types for a company logo are : bmp, gif, jpeg, jpg, png, svg, tif, tiff. As the company logo image is automatically resized to a height of 50 pixels, we recommend sending an email to your own email address to ensure it displays as expected. 10.3 Deleting and Downloading Files can be deleted or downloaded from the file list. Once you have selected a sitereference, uploaded files will appear on the lower part of the page. To select a file, tick the checkbox next the filename. You can select all files by clicking “Select All”. 10.3.1 Deleting Files Once you have completed your selection, click the “Delete” button. Please note It may take a few minutes for a file to be deleted. Therefore your changes may not appear immediately under the files tab. 10.3.2 Downloading Files Once you have completed your selection, click the “Download” button. The file(s) are downloaded in a zip file. You can edit the files and re-upload them with any changes you make. © Secure Trading Limited 2015 28 January 2015 Page 53 / 84 MyST User Guide 11 Payment Pages Redirects 11.1 Overview The “Payment pages redirects” system enables you to specify a URL for the customer to be redirected to, following a transaction made on Payment Pages. Please note that Payment Pages redirects can only be configured on MyST by users with the following roles: Site admin Developer 1 Developer 2 Please refer to section 4 for more information on roles that can be assigned to MyST users. Clicking on the “Payment pages redirects” link on the left-hand side of the MyST screen will display the redirects currently configured (if any) on the selected site. You are able to add, modify and delete redirects using the interface provided. For best practices managing redirects see section 15.5. When configuring Payment Pages redirects on your account, you need to consider three properties: Conditions A Condition defines the circumstances under which the customer would be redirected, following a transaction on the Payment Pages. You may only want your customers to be redirected if the transaction fits certain criteria, e.g. if a VISA payment is successful. Actions The Action defines the destination URL the customer will be redirected to. This URL can be configured to contain fields from the transaction processed, including custom fields. Secure Trading recommends always including the errorcode, settlestatus and transactionreference fields, which are used to indicate the status of the transaction when the customer’s browser is redirected back to your website. Rules Rules are used to join Conditions and Actions together to establish an active redirect. Rule = If Condition e.g. If Error codes in 0 If Requests in AUTH If Payment types in VISA then Action then redirect to https://www.merchant.com/visa.php Fields: orderreference, transactionreference The above Action will only occur if the Condition is met. © Secure Trading Limited 2015 28 January 2015 Page 54 / 84 MyST User Guide 11.1.1 Creating your first redirect 1. Click the “Payment pages redirects” option from the left side menu. Any existing Rules for the selected site will be shown in the table, in the format “If [Condition] then [Action]”. Active Rules will have a tick by them in the “Active” column, and inactive Rules will not. 2. Select the site reference of the site you would like the redirect to be associated with. There will be a drop-down box in the upper-left corner of the page that allows you to do this. When using Payment Pages redirects, we recommend that all Rules should be configured and tested using your test site before recreating them on your live site, to ensure the redirect is working as expected. © Secure Trading Limited 2015 28 January 2015 Page 55 / 84 MyST User Guide 3. To create a redirect, we first need a Condition to define the circumstances in which a redirect will be used. Click “(New)” by “Condition” in the header bar of the table, or click “Create the condition” in the numbered list. 4. You will be presented with the “Completed request condition” page. Give the Condition an appropriate and unique name, by filling in the text field in the upper-left corner of the page (e.g. successful Visa AUTH). © Secure Trading Limited 2015 28 January 2015 Page 56 / 84 MyST User Guide 5. Now choose the filters that you would like to be used in order to specify when the redirect occurs. Each filter displayed represents a different property that can be associated with a transaction. Ticking a checkbox selects the specific value. When the drop-down box by a property is set to “in” (default), the redirect will be performed when the transaction matches any of the fields ticked within this filter. When set to “not in”, the redirect will be performed when the transaction does not match the fields ticked in the box beneath it. e.g. If “Payment types” “in” “AMEX”, “MASTERCARD” and “VISA” The redirect will only be performed when the customer uses the aforementioned payment types. When you have selected all the filters required, click “Save”. Please ensure that when configuring a condition that you specify at least one Request type and Error code. Conditions without these two properties may cause unforeseen issues. © Secure Trading Limited 2015 28 January 2015 Page 57 / 84 MyST User Guide 6. You will be returned to the main “Payment pages redirects” page, with a green message at the top of the page to confirm the Condition was added. The next step is to dictate where the user is redirected to when the Condition has been met and for this we need a new Action. Click “(New)” by “Action” in the header bar of the table, or click “Create an action” in the numbered list. 7. You will be presented with the “Payment pages redirect action” page. Give the Action an appropriate and unique name, by filling in the text field in the upper-left corner of the page, and specify the URL you would like the customer to be redirected to, by filling out the “Website address (URL)” field in the middle of the page. Please note that the URL specified must be externally facing. Secure Trading cannot redirect to internal, intranet or loopback addresses Click the “Field selection” tab and select the fields you would like to be returned when the customer’s browser is redirected to your website. We recommend opting to include the errorcode, settlestatus and transactionreference fields as a minimum, as these can be used to indicate whether or not the transaction was successful. See section 11.4.3.2 for more detail. Click “Save” when you are ready to move on. © Secure Trading Limited 2015 28 January 2015 Page 58 / 84 MyST User Guide 8. You will be returned to the main “Payment pages redirects” page, with a green message at the top of the page to confirm the Action was added. The final step is to take our newly created Condition and Action and link them together to form a Rule. At the top of the table, there will be two blank drop-down boxes. To create the Rule, pick the recently created Condition from the first drop-down box and the Action from the next dropdown box. To create the Rule, click “Save” at the bottom of the table. © Secure Trading Limited 2015 28 January 2015 Page 59 / 84 MyST User Guide 9. The page will reload and a green message will be visible at the top of the page, indicating that the Rule was successfully created. The new redirect will be listed in the table, with a tick beside it in the “Active” column. All newly created redirects are active upon creation. For more information on activating and deactivating redirects, please see section 11.2.2. © Secure Trading Limited 2015 28 January 2015 Page 60 / 84 MyST User Guide 11.2 Existing rules for site tab This tab displays configured Rules for the site indicated. By default, when you click the “Payment pages redirects” link from the left side menu, this tab will be displayed first. The redirects shown here apply only to the site reference selected. To view redirects configured for other sites on your account, see section 11.2.1. Please note that Conditions and Actions can be reused on multiple Secure Trading site references. You must ensure that each transaction processed on your account only matches one Condition. If multiple matching Conditions are present, the first matching Rule will be used. You can modify Conditions and Actions shown by clicking their names. See sections 11.3.3 and 11.4.3 for information on modifying Conditions and Actions, respectively. Please note that you can only modify Conditions and Actions that have been created by your user account. These are shown in bold text (as in the screenshot above). Conditions and Actions can only be modified by the users that created them. To view the username that created the Condition and Action used in a Rule, click the icon to the left of the Rule. © Secure Trading Limited 2015 28 January 2015 Page 61 / 84 MyST User Guide 11.2.1 Selecting a Site Reference Redirects can be managed for any sitereference that you have privileges for. The “SiteReference” field in the upper-left side of the page contains a list of sitereferences allocated to the user. To change the sitereference, select it from the drop-down and click “Change site”. 11.2.2 Redirect Active When a redirect is first created, it will be shown as “Active” in the main “Payment pages redirects” page with a tick in the “Active” column. Redirects can be deactivated by un-ticking the “Active” checkbox and pressing “Save” and likewise reactivated by re-ticking the “Active” checkbox and pressing “Save”. Please note that pressing “Save” applies all changes specified on the page, including adding new Rules to a site or deleting them from your site. Please note that any user who has access to the “Payment pages redirects” page can change the active status of a Rule on sites associated with their user account. © Secure Trading Limited 2015 28 January 2015 Page 62 / 84 MyST User Guide 11.2.3 Delete Redirects On the main “Payment pages redirects” page, tick the “Delete” checkbox next to redirects you would like to remove from your site. When you are ready to delete the redirect(s), press “Save”. The page will reload to reflect the changes made. Please note that the process of deleting redirects does not delete the Conditions and Actions that they consist of. To modify or delete Conditions, please refer to section 11.3. To modify or delete Actions, please refer to section 11.4. Please note that pressing “Save” applies all changes specified on the page, including adding new rules to your account or changing their “Active” status. Please note that any user who has access to the “Payment pages redirects” page can delete Rules on sites associated with their user account. © Secure Trading Limited 2015 28 January 2015 Page 63 / 84 MyST User Guide 11.3 Manage Conditions Tab Conditions created on your user account can be managed by clicking the “Manage conditions” tab on the main “Payment pages redirects” page. This tab will list any Conditions configured on your account (if you have no Conditions configured, it will prompt you to create your first). 11.3.1 Viewing more details Conditions are listed in a table with icons to the left of each one. Clicking the icon will cause the Condition to expand in order to display its properties. When finished, you can click the icon to collapse the Condition, hiding the properties from view. Clicking the icon in the header row expands all Conditions at once. Subsequently clicking the icon in the header row will collapse all Conditions at once, returning the table to its original state. © Secure Trading Limited 2015 28 January 2015 Page 64 / 84 MyST User Guide 11.3.2 Deleting Condition Using the checkboxes to the right of each Condition, you can select Conditions for deletion. When you have selected the Conditions you would like to delete, press the “Delete” button. You will be shown a confirmation prompt before deleting a Condition(s). You can only delete Conditions that are not part of an active redirect. Conditions that are part of an active redirect are highlighted with the words “IN USE” in the “Delete” column. In order to delete these Conditions, you must first delete the redirects that are using the Conditions in question. For more information, please refer to section 11.3.3.1. 11.3.3 Modifying Condition To modify the properties of a Condition, click the Condition name in the table. You will be presented with a page that allows you to modify the Condition. © Secure Trading Limited 2015 28 January 2015 Page 65 / 84 MyST User Guide 11.3.3.1 Conditions in use When modifying a Condition that is being used by an active redirect, a yellow warning is shown at the top of the page. This lists the number of redirects that will be affected by the changes made, and their associated Secure Trading site references. In order to delete a Condition that is in use, take note of the site reference(s) in the yellow warning and navigate back to the main “Payment pages redirects” page. Go to the site reference(s) listed in the warning by choosing from the site references field and clicking “Save”, and then delete each redirect that is using the Condition you wish to delete. Once you have deleted all of the redirects using the Condition, you can return to the “Manage conditions” tab and delete the Condition using the “Delete” checkboxes provided. 11.3.3.2 Advanced Settings It is possible to specify your own custom filter in the “Advanced settings” tab. customfield1 is a field that can be submitted as part of the request to the Payment Pages when processing a payment. You can configure a Condition that redirects the customer based on the contents of this field. This is useful, for example, if you have multiple online stores using the same site reference. e.g. The following HTTP POST request to the Payment Pages: https://payments.securetrading.net/process/payments/choice?sitereferen ce=test_site12345&mainamount=123.99&version=1¤cyiso3a=GBP&custom field1=store2 Will match the Condition: customfield1 is “store2” This will be redirected following a payment attempt: 11.3.4 Add Condition Click “(New)” by “Condition” in the header bar of the table, or click “Create the condition” in the numbered list, to create a new Condition. © Secure Trading Limited 2015 28 January 2015 Page 66 / 84 MyST User Guide 11.4 Manage Actions Actions created on your user account can be managed by clicking the “Manage actions” tab from the main “Payment pages redirects” page. This tab will list any Actions configured on your account (if you have no Actions configured, it will prompt you to create your first). 11.4.1 Viewing more details Actions are listed in a table with icons to the left of each one. Clicking the icon will cause the Action to expand in order to display the redirect URL and any fields being passed through. When finished, you can click the icon to collapse the Action, hiding the properties from view. Clicking the icon in the header row expands all Actions at once. Subsequently clicking the icon in the header row will collapse all Actions at once, returning the table to its original state. 11.4.2 Deleting Action Using the checkboxes to the right of each Action, you can select Actions for deletion. When you have selected the Actions you would like to delete, press the “Delete” button. You will be shown a confirmation prompt before deleting Actions. You can only delete Actions that are not part of an existing redirect. Actions that are part of an existing redirect are highlighted with the words “IN USE” in the “Delete” column. In order to delete these Actions, you must first delete the redirects that are using the Actions in question. For more information, please refer to section 11.4.3.1. © Secure Trading Limited 2015 28 January 2015 Page 67 / 84 MyST User Guide 11.4.3 Modifying Action To modify the properties of an Action, click the name of the Action in the table. 11.4.3.1 Actions in use When modifying an Action that is being used by an active redirect, a yellow warning is shown at the top of the page. This lists the number of redirects that will be affected by the changes made, and their associated Secure Trading site references. In order to delete an Action that is in use, take note of the site reference(s) in the yellow warning and navigate back to the main “Payment pages redirects” page. Go to the site reference(s) listed in the warning by choosing from the site references field and clicking “Save”, and then delete each redirect that is using the Action you wish to delete. Once you have deleted all of the redirects using the Action, you can return to the “Manage actions” tab and delete the Action using the “Delete” checkboxes provided. © Secure Trading Limited 2015 28 January 2015 Page 68 / 84 MyST User Guide 11.4.3.2 Field selection Under the “Field selection” tab, you can opt to include fields in the redirect URL. Select the fields you would like to be included from the “Fields” pane. We recommend opting to include the errorcode, settlestatus and transactionreference fields as a minimum, as these can be used to indicate whether or not the transaction was successful. The following fields are also useful: authcode baseamount (e.g. £10.50 is “1050”)* mainamount (e.g. £10.50 is “10.50”)* currencyiso3a errorcode livestatus orderreference parenttransactionreference paymenttypedescription requesttypedescription settlestatus sitereference transactionreference *Please choose your preferred format. Custom fields can be typed into the text box in the lower-right of the page and added by clicking “Add”. Format of custom fields Any lowercase or uppercase letters. Numbers 1-9 Punctuation: _ \ . Must start with a letter (A-Z, a-z). © Secure Trading Limited 2015 28 January 2015 Page 69 / 84 MyST User Guide The following is an example of a redirect URL including the fields errorcode, requestreference, settlestatus, sitereference and transactionreference: https://www.mywebsite.com/visa?errorcode=0&requestreference=P19650046134&settlestatus=0&sitereference=test_12345&transactionreference =19-9-80000 11.4.4 Add Action Click “(New)” by “Action” in the header bar of the table, or click “Create an action” in the numbered list, to create a new Action. © Secure Trading Limited 2015 28 January 2015 Page 70 / 84 MyST User Guide 12 Virtual Terminal The “Virtual Terminal” can be used to process payments for customers who cannot pay online. This area allows you to authorise a payment of any amount over the web and get immediate authorisation from the bank. In order to use the “Virtual Terminal” you will need a MOTO (Mail Order Telephone Order) merchant id. If you do not have one and would like to make use of this facility, please contact our Support team. Contact details can be found in section 15.1 on page 83). 12.1 How to use the Virtual Terminal To access this facility you should click the “Virtual Terminal” link from the left side menu. This will display a page similar to the below. Once you have filled in the form, press the “Process” button and the transaction will be processed. After a few seconds you will be presented with a success or a failure result. A success result means that the card has been authorised. If the result is a failure, this means that the card payment has not been authorised and your customer should arrange another way to pay. © Secure Trading Limited 2015 28 January 2015 Page 71 / 84 MyST User Guide 13 Subscriptions 13.1 Introduction A Subscription transaction is the submission of a standard Authorisation (similar to the “AUTH” type transaction) with additional recurring information. This will cause Secure Trading to schedule additional continuous authority transactions to be processed at designated intervals, using the Secure Trading Subscription Engine. To enable these additional facilities on your Secure Trading account please contact the Secure Trading support team (see section 15.1 Secure Trading Support on page 83). At this time, MyST can only be used to view and update existing Subscriptions. Subscriptions are scheduled by sending a request through the Payment Pages, Web Services or the STAPI client. For more information, please consult our other documentation. All Secure Trading documents can be found on our website. 13.2 Viewing the parent Authorisation The first payment in a series of subscription payments will always be an Authorisation (AUTH) transaction (including 3D Secure Authorisations), often referred to as the “parent” transaction. You can display details of this parent AUTH by typing its transaction reference into the Quick Search box, under “Transactions”, in the left side menu within MyST (https://myst.securetrading.net), and clicking the magnifying glass button (or pressing the return key). Alternatively, you can search for it on the “Transaction Search” page (see section 8.1.1 Searching for a transaction), and click its transaction reference: © Secure Trading Limited 2015 28 January 2015 Page 72 / 84 MyST User Guide Once you have selected the parent authorisation transaction, you will be presented with the following “Single Transaction View” page: Single Transaction View of a settled parent Authorisation transaction – “Transaction details” tab © Secure Trading Limited 2015 28 January 2015 Page 73 / 84 MyST User Guide To view the Subscriptions scheduled from this AUTH transaction, select the “Related transactions” tab: Single Transaction View of an Authorisation transaction – “Related transactions” tab Note that the current transaction (in this case, the parent AUTH) is highlighted in yellow. Rows with the Account “RECUR” and the Request field “AUTH” represent subscription payments the Subscription Engine has already processed. In the table, any row with the Request field “SUBSCRIPTION” is a pending scheduled subscription, using the parent AUTH transaction for the billing and payment details. Please note that if there is more than one transaction with the request type “SUBSCRIPTION”, listed under the “Related transactions” tab of an AUTH, this indicates multiple Subscriptions have been scheduled from the original AUTH. E.g. A single Parent AUTH which has the following two subscriptions: Subscription 1 - £1 every month. Subscription 2 - £10 every 3 months. By clicking on the transaction reference of the Subscription in the “Related transactions” table (in this case, 11-64-24), you can view the details of the scheduled Subscription. This will display a new “Single Transaction View”, with the Subscription details shown. © Secure Trading Limited 2015 28 January 2015 Page 74 / 84 MyST User Guide 13.3 Viewing the Subscription To view a Subscription in the “Single Transaction View”, you can go to the “Single Transaction View” of an associated parent AUTH transaction (see section 13.2 Viewing the parent Authorisation) and the Subscription should be shown under the “Related transactions” tab: Single Transaction View of an Authorisation transaction – “Related transactions” tab Alternatively, if you already have the transaction reference of the Subscription, you can type it into the Quick Search box, under “Transactions”, on the left side menu, and click the magnifying glass (or press the return key). You can also search for the Subscription on the “Transaction Search” page (see section 8.1.1 Searching for a transaction). By changing the date fields to a range in the future and performing a search, the next payment scheduled for each subscription that falls within the specified range is shown (including pending and inactive subscriptions). Please note that for each Subscription, only the next scheduled payment will be shown in the search results. Any subsequent payments scheduled in the subscription engine will not be displayed. © Secure Trading Limited 2015 28 January 2015 Page 75 / 84 MyST User Guide It is possible to view only active subscription payments in the “Transaction Search” page, by choosing “Active subscriptions” from the “Pre-defined searches box”, before searching. Clicking the transaction reference of a Subscription request in the results will take you to the “Single Transaction View” for the aforementioned Subscription. The “Single Transaction View” for a Subscription is very similar to a regular Authorisation request. Details specific to the Subscription can be viewed under the “Subscription Details” header. Single Transaction View of an active Subscription – “Transaction details” tab Please note that if the Subscription number field has a higher number on the left to that on the right (e.g. 10/9), this indicates that no more subscription payments will be processed, because the Final Number of transactions has been exceeded. © Secure Trading Limited 2015 28 January 2015 Page 76 / 84 MyST User Guide When viewing a Subscription transaction in the “Single Transaction View”, there will be a “Summary” table at the top of the page, displaying important information about the Subscription: Summary table at the top of the Single Transaction View for an active Subscription The colour of the “Summary” table outline indicates the status of the transaction. The possible states of a Subscription are outlined in the table, below: Summary text What this represents This Subscription will become active when the initial AUTH transaction is settled (status 100). The subscription can also be manually set to “Active” by using an Update. This Subscription will take payment from the customer on the date specified in the Timestamp field. This Subscription will NOT take further payments from the customer, unless the Final Number is changed in an Update. This Subscription will NOT take further payments from the customer, unless set to “Active” by using an Update. For information on updating Subscriptions, see section 13.4 Update a Subscription. © Secure Trading Limited 2015 28 January 2015 Page 77 / 84 MyST User Guide To view all scheduled subscription payments in the sequence, click the “Related transactions” tab. You will see the following table displayed: Single Transaction View of an active Subscription – “Related transactions” tab Note that the current Subscription is highlighted in yellow. The Timestamp field displays when the subscription payments are scheduled to be processed. © Secure Trading Limited 2015 28 January 2015 Page 78 / 84 MyST User Guide 13.4 Update a Subscription To update a Subscription, first select a Subscription transaction by using the steps outlined in section 13.3 Viewing the Subscription. Step 1: Click the “Update” button at the bottom of the “Single Transaction View” page (under the “Transaction details” tab). Single Transaction View of an active Subscription © Secure Trading Limited 2015 28 January 2015 Page 79 / 84 MyST User Guide Step 2: On the “Update transactions” page, click the “Show more” that can be edited. icon to display the fields Update Transaction View of an active Subscription Step 3: Modify the necessary fields that are displayed and click the “Update” button. Update Transaction View of an active Subscription – with Additional Fields displayed © Secure Trading Limited 2015 28 January 2015 Page 80 / 84 MyST User Guide On this page, it is possible to update the billing details, in addition to the subscription fields listed in the table, below: Field Authorised amount Active Final subscription Subscription unit Subscription frequency Summary The amount that is processed for the customer each month. This value represents whether a subscription is active or not. Setting the value to “0 – Inactive”, renders a subscription inactive, temporarily stopping all future authorisations. Setting the value to “1 – Active” makes the subscription active, resuming payments. The value is “2 – Pending” before the initial AUTH transaction settles, and can be updated to either “0 – Inactive” or “1 – Active”. This represents the position of the last payment in a series of Subscription payments. Once this number has been reached, no further payments will be processed. e.g. If the final subscription number is 12, no further authorisations will be processed after an Authorisation request with the number 12. Subscriptions can be allowed to carry on indefinitely by setting the final Subscription number to ‘0’. This is the unit of time to use, e.g. “DAY”, “MONTH”. This is the number of units that should occur before the next authorisation is processed. It represents the gap between each payment in a subscription. E.g. If the unit is DAY and the frequency is 7, an authorisation will be processed every 7 days. Step 4: Click the “Update” button at the bottom of the page to submit the changes. Message displayed at the top of a page, following a successful update 13.4.1 Activating and Deactivating Subscriptions To stop a scheduled subscription payment from being processed, you must update the Active status to 0 (“Inactive”). You can activate pending or inactive subscriptions by updating the Active status to 1 (“Active”). Caution: Upon reactivating a pre-existing subscription, all payments that would have been processed during the period the subscription was inactive or pending are immediately processed. e.g. If a £10/month continuous subscription is inactive for four months and then reactivated, four £10 payments will be authorised in the next settlement run. © Secure Trading Limited 2015 28 January 2015 Page 81 / 84 MyST User Guide 14 Sign Out In the interest of security, it is important to sign out of MyST after you have finished administrating your account. To sign out of MyST, click on the “Sign out” button in the top-right of the page and select “OK”, when asked for confirmation. You will be returned to the sign in page and will have been successfully signed out of MyST. © Secure Trading Limited 2015 28 January 2015 Page 82 / 84 MyST User Guide 15 Further Information and Support This section provides useful information with regards to documentation and support for the Merchant’s Secure Trading solution. 15.1 Secure Trading Support If you have any questions regarding integration or maintenance of the system, please contact our support team using one of the following methods. Method Telephone Fax Email Website 15.2 Details +44 (0) 1248 672 050 +44 (0) 1248 672 099 [email protected] http://www.securetrading.com/support/support.html Secure Trading Sales If you do not have an account with Secure Trading, please contact our Sales team and they will inform you of the benefits of a Secure Trading account. Method Telephone Telephone (Int’l) Fax Email Website 15.3 Details 0800 028 9151 +44 (0) 1248 672 070 +44 (0) 1248 672 079 [email protected] http://www.securetrading.com Useful Documents Any other document regarding the STPP system can be found on Secure Trading’s website (http://www.securetrading.com). Alternatively, please contact our support team as outlined above. 15.4 Frequently Asked Questions Please visit the FAQ section on our website (http://www.securetrading.com/support/faq). © Secure Trading Limited 2015 28 January 2015 Page 83 / 84 MyST User Guide 15.5 Best Practices Whenever a response is received it is best practice to check all the relevant fields and values are as expected before processing the response. Every response from Secure Trading contains an Error Code* and a Request Type*. If the Request Type is not the expected type then it may indicate a configuration issue or an unexpected error. If the Error Code is not “0” then there was an error with the request. If your system is expecting a successful response to this request and the Error Code is non-zero then this case should be treated as an error. A list of error codes and their meaning can be found at: http://webapp.securetrading.net/errorcodes.html * For manually configured notifications/redirects fields may need to be selected in MyST. Other fields* should be checked if they are relevant to your request. For example: Live Status should be checked to ensure the transaction is not a test transaction (i.e. the value will be “1” for a live site reference) before sending out any goods to the customer. Settle Status should be checked to ensure it is not suspended (“2”) or cancelled (“3”) before sending out any goods. Currency and amount fields can be checked to ensure they match the expected payment value. Transaction Reference is highly recommended to be stored and referenced whenever a query is raised with Secure Trading. © Secure Trading Limited 2015 28 January 2015 Page 84 / 84


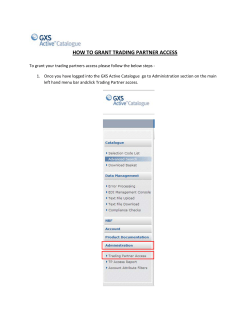


© Copyright 2026