
ADVANCED CLAY PROJECTS FOR SCHOOL
ADVANCED
CLAY PROJECTS
FOR
SCHOOL
By
Janice S. Hobbs
1
ADVANCED
CLAY PROJECTS
FOR
SCHOOL
Janice S. Hobbs
2
“Copyright © 2004 by Janice S. Hobbs.”
No portion of this publication may be reproduced or transmitted in any form or by any
means, electronic or mechanical, including photocopy, recording, or any information
storage and retrieval system, unless noted in the book, without permission in writing from
the author.
3
ADVANCED
CLAY PROJECTS
FOR
SCHOOL
By
Janice S. Hobbs
4
I DEDICATE THIS BOOK
TO ALL MY PAST, PRESENT AND FUTURE
STUDENTS AND ART TEACHERS
5
CONTENTS
AUTHOR’S PREFACE:
Part One
Chapter I. Getting Your Classroom ready!
Chapter II. Student Supplies
Chapter III. Tips
Chapter IV. Recommended books for classroom/teacher
Chapter V. Daily Lesson Plan Form
Chapter VI. How to Critique a Work of Art
Chapter VII. Wedging Table
Part Two
Chapter VIII. TEKS (Texas Essential Knowledge and Skills for Fine Arts)
Part Three
Chapter IX. Lesson Plans
Appendix
6
AUTHOR’S PREFACE
This book is a result of requests from art teachers for more advanced clay
projects. My first book, Clay Projects for School, has enough clay projects for the first
year of ceramics and does not need a potters wheel for the student to be successful
making pottery. This book, Advanced Clay Projects for School, is written to help
teachers to develop more advanced clay projects in the classroom. The last few projects
need a potter’s wheel to complete the most aesthetic quality you can achieve in relation to
the pot. However, with adjustments, pots can be completed substituting hand formed
shapes for the wheel thrown parts.
Happy potting!
Janice S. Hobbs
Granbury, Texas
7
ADVANCED
CLAY PROJECTS
FOR
SCHOOL
8
Part One
Advanced clay projects need the same consideration for classroom preparation as
a beginner class except possibly more space. Since most teachers can only work in the
space they have, they will make what space they have useful to its fullest. Don’t forget,
trays of any kind make a great way to help store and move all clay projects. The less
handling the better!
9
Chapter I
Getting your classroom ready!
1. You will need a place for the students to wedge clay. A wedging table is ideal. It has
plaster to absorb moisture and gives the students a specific area just for wedging their
clay. You can either buy a wedging table from an art catalogue or make one. A
picture of my wedging table is on page 19 if you want to build one.
2. Buy one 5 quart plastic bucket for each student to recycle their dried out clay in. For
each class you need to buy different color buckets so you will know which class left
their bucket out. Also write a number on each bucket so the student will keep better
track of his or her own bucket. I tape a list of student’s names with their number by
their name on the cabinet door. If a student has trouble remembering their number,
they can look at the list. If a student transfers, you can retrieve the bucket and take
care of it.
3. Let the students do the work when it comes time to recycle last year’s clay and their
own clay. You will have to give out a little wet clay the first few days of school, but
then they are responsible for keeping up with their clay by using their colored bucket.
4. I dry out all my scrap clay during the summer. When the students arrive for the
first/second day of school, I assign each student a colored bucket with a number and
we all go outside with buckets, hammers, a few pieces of canvas (2'x 3'is a great size),
and the dried out clay. The students take turns breaking up the dried out clay on the
canvas with the hammers. When the dried out clay is quarter size they will put the
dried clay in their bucket filling it about two thirds full. When they go inside they
will cover the clay with water and put it in the cabinet to soak up the water for several
days.
Note: I buy canvas at a fabric store. They have several widths to pick from, up to
6' wide. I cut up the canvas into pieces that the students can use easily. Canvas is
sometimes called ‘cotton duck’ by some fabric stores.
5. You will need plaster bats to dry out the clay so the students can recycle their clay.
Again, I make a wood frame out of 2x6's, put a plywood bottom on it, drill holes in
the bottom and add two 1” x 2” boards to the bottom for feet. The feet allow air to
get underneath to keep plaster bats drier. I plug up the holes with clay as well as the
inside seams and mix the plaster right inside the frame (do all this on a sheet of
plastic). Remember, to mix plaster, always add plaster to water, never water to
plaster. Once I have sealed up the seams, etc., I put the water right into the 2x6 frame
and start sprinkling plaster into the frame until the water is gone and the plaster is
absorbed. A quick guide is to fill the framework about three fourths full of water.
Make sure you have plenty of plaster just in case you misjudge. I prefer to add too
much water I can always run it over onto the plastic sheet but you cannot add more
water later.
10
6. Allow the plaster bats to dry at least two weeks before using. Make sure to take the
clay out of the plugged up holes once the plaster has dried so the air can get to the
plaster. Cover with canvas. The students can now recycle clay on the bats. Spread
really wet clay on canvas, have student put his or her name on a small piece of paper
and lay it directly on the wet clay, or they will forget whose is whose. In my
classroom it takes about 24 hours to dry out enough to use again. I have five frame
bats in my classroom for 24 students. It is usually enough, though six if space
permitted would be nice.
7. As for how much clay. I order one ton at a time and store it. Remember, the older
the clay the better it is to work in. Also, it is much cheaper and the guy not only
delivers it in boxes but also puts it where I want it. One ton of clay will usually do
two pottery classes for the year unless you make large items.
8. Things you will need to complete the following clay projects:
-5 quart buckets/one per student
-Plastic from cleaners or soft drop clothes
-Baggies (sandwich)
-One-gallon Baggies
-Cookie cutters/all seasons plus stars and shape of Texas.
-Electric skillet to melt paraffin wax
-2 to 3 dozen boards about one foot square
-Newspapers
-Paraffin wax (blocks-you can order this from an art supply company)
-Bamboo brushes of different sizes
-Small plastic bowls (3 for $1.00 kind)
-3 hammers
-6 to 8 carpenters squares
• Note make sure these are really strong. The ones in the art supply
Catalogues are not durable enough for clay work. I get these at
Lumber yards mostly.
-Canvas covered boards with ¼” sticks on sides
-Dozen 24” long rolling pins
-Dozen rolling pins, dowel rods, or broom handles sawn to 12”
-2’ x 3’ pieces of canvas (cotton duck)
-Giant box of garbage bags (50-gallon size, clear not black so students can see if it
is theirs).
-Sweeping compound (it’s orange and looks like saw dust, you buy it at a
hardware/lumber yard in the cleaning supply section.)
-Scales for weighing out clay
-Golf ball
-Baseball
-Tennis ball
11
Chapter II
Student Supplies
1. Large airtight plastic container - Tupperware is best because it is airtight. The 22quart size works great. It is used to store small tools, clay stamps, damp clay and
small on going projects. Available from most grocery stores or large discount
stores. An absolute must!
2. The student will need an old towel to wrap pots/projects in as they are being
worked on, to keep the clay damp.
3. Plastic from the cleaners.
4. Tools that will give texture to clay such as buttons, burlap, lace, etc.
12
Chapter III
Tips
Coping with clay dust
• To control the clay dust in your art room, buy a box of sweeping compound.
Sprinkle one dust pan full of sweeping compound under chairs before the first
class and let the custodians sweep it up each night. Don't try to save the
sweeping compound, it gets too dusty. It really helps!!! I buy it in the
cleaning supply area at a lumber and construction store.
•
If budget allows, get a large air filter that hangs from the ceiling. One that
would be used in a workshop and that you can change filters in. I change
mine usually twice a year, but keep an eye on the filters. This too keeps the
dust really down and keeps you much healthier.
Ordering clay
• When you order clay, tell the company to box it for you. Students will leave
the boxes alone, but leave a bag of clay out and you will always find at least
one hole in it.
Assignments
• Put a list of all assignments for a grading period on a poster board. Be sure to
list all the assignments, tests and when projects are due. Even if a student
misses a couple of classes, they will know exactly when finished projects are
due.
Keeping clay damp
• Plastic from the cleaners is best, but large plastic bags are really handy to
wrap rolled out slabs while they get stiff.
Clay storage
• Zip locks Baggies are really handy for all kinds of little projects. Especially
handy for those special needs students where you may have to help keep track
of their projects. Most projects can be down sized if needed.
13
Chapter IV
Recommended Books for classroom
The Encyclopedia of Pottery Techniques by Peter Cosentino, Running Press,
Philadelphia, Pennsylvania, ISBN 0-89471-892-4
The New Clay Techniques and Approaches To Jewelry Making by Nan Roche, Flower
Valley Press ISBN 0-9620543-408
Creative Clay Jewelry Design to Make from Ploymer Clay by Leslie Dierks, Lark Books
ISBN 0-937274-74-7
Beads and Threads by Diane Fitzgerald and Helen Banes, Flower Valley Press
ISBN 0-962054-6-4
Potter’s Workshop by Jenny Rodwell A David & Charles Book, ISBN 0 7153 0928 5
Handmade Clay Crafts by Susan Alexander & Taffnie Bogart, Sterling Publishing Co.,
ISBN 0-8069-4988-0
Simply Pottery by Sara Pearch with text by Geratdine Christy, Watson-Guptill
Publications, A Quintet Book ISBN 0-8230-4837-3
Two Books In One Ceramics by Steve Mattison, Sterling Publishing Co., Inc.,
ISBN 0-8069-6323-9
14
Chapter V
Daily Lesson Plan
The following page is an example of the Daily Lesson Plan I use. As a new
project evolves I can jot down pertinent information until I have solved all the particulars
about the project. I have a section on TEKS simply because in Texas it is required. If
you don’t need it don’t use it! The section listed artist/culture/book gives you a place to
write down the artist/s you wish to introduce in this project and/or the culture the project
relates to or list a book you will be referring to when you introduce the project. It really
is used for a quick reference.
15
Daily Lesson Plan
Grade/s
Period #
TEKS:
Artist/Culture/Book:
Subject: Advanced Ceramics
Topic:
Instructional Objectives:
•
Materials:
Vocabulary:
Procedures:
1. Motivate:
2.
Evaluation:
Closure:
16
Chapter VI
How to Critique a Work of Art
The following page is a form on ‘How to Critique a Work of Art’ that may be reproduced
as needed. As we all know writing has become very important in relation to TEKS and
taking tests. This is an excellent way for your students to practice writing using new
vocabulary in relation to art and expressing their own views and opinions.
17
Name:
Period #
How To Critique a work of Art!
Description (What do you see?)
Analysis (How is the work organized?)
Interpretation (What is the artist trying to communicate?)
Judgment (Is this a successful work of art?)
18
Chapter VII
Diagram and instructions on how to build a wedging table.
Studio equipment-a simple wedging table
Inexpensive wedging table.
19
Part Two
In the state of Texas, we no longer use the Essential Elements instead we use the
Texas Essential Knowledge and Skills or TEKS. If you are not in the state of Texas just
ignore the TEKS and use your Essential Elements or whatever your state uses to check
what you are teaching and that it meets that particular states requirements. Look for
address on next page if you need a copy of the TEKS.
20
Chapter III
TEKS
TEKS stands for Texas Essential Knowledge and Skills. TEKS are available in
paper, on CD-ROM, and on the World Wide Web at www.tea.state.tx.us. If you have
questions you can contact your regional education service centers or call Texas Education
Agency, Division of Curriculum and Professional Development at (512) 463-9581. Once
on the web, under Curriculum and Assessment, is Chapter 117 Fine Art, subchapter C
High School, you can print out the TEKS that all the Lesson Plans refer to.
Or if you prefer you can write to:
Texas Education Agency
1701 North Congress Avenue
Austin, TX 78701-1494
(512) 463-9734
Fax: (512) 463-9838
The state of Texas has adopted the TEKS to replace the Essential Elements that
most states use. However, there are national standards that have been adopted to unify
worldwide art programs. These standards are called the Visual Arts National Standards
and can be found going to www.artteacherconnection.com. The National Art Education
Standards were established and adopted in the early 1990s due to educational reform and
accountability. Its purpose is to educate all students to think creatively and critically. To
have a rounded education, a student must have a basic education in the arts. There are six
national content standards that do not change and remain constant.
For further information on the National Art Education Standards go to the web
page above.
21
Part Three
21 Lesson Plans for advanced clay projects with the TEKS,
instructional objectives, materials list, vocabulary, and procedures in each lesson plan.
22
Chapter IX
Lesson Plans
1. Review
2. Careers in Clay
3. Puzzle Pot
4. Frog
5. Perfume Bottle
6. Mirror/picture frame
7. Bookends
8. Wind chimes
9. Clay flowers
10. Flower vase
11. Bowl with filigree decoration
12. Slab plate decorated with Paper resist and Engobes
13. Three footed pot
14. Egyptian Diary
15. Clay Shoe
16. Inlaying colored clay in a bowl
17. Tall slab cylinder with capped top and three hand built spouts
18. Bonsai planter
19. Hollow form with head
20. Bank sock
21. Clay bug
23
Lesson Plan #1
Grade:
Subject: Advance Ceramics
Period #
Topic: Review
TEKS: 117.54/5 a, b (1,2), c (1 A, B, 2 C, 3 A,B, 4 A,B)
Artist/Culture/Book: Hispanic culture* (earthenware clay), Asian culture**
(porcelain clay), book Ceramics: Shape and Surface Handouts for Potters
*Hispanic cultures fire at low temperatures, barely dark red heat because
of the fuel available, sticks, dung, and straw, mostly natural things they can find
to use for fuel.
**Asian cultures discovered how to fire at a much higher temperature
when they invented kilns that retain heat and allow a much hotter fire. With the
white clays in the hillsides, called porcelain, and the discovery of kilns, the Asian
cultures are able to make much stronger glazes and pottery.
Instructional Objectives:
The student will
1. Review vocabulary in relation to clay
2. Demonstrate he/she can wedge clay
3. Connect two pieces of clay
Materials: overhead to review vocabulary or handout sheets with
vocabulary words, magic water and/or clay slip, metal fork,
newspapers, old airtight containers, large permanent marker. Pottery samples that
represent vocabulary when possible and samples of the up and coming projects
finished like the assignments will be finished.
Vocabulary: stoneware clay, porcelain clay, earthenware clay, vitrified, kiln, cone,
magic water, slip, wedging, glazes, underglazes, engobes, glass, scoring, leather hard,
watercolor, and chalks for pottery.
Procedures:
1. Have a nice set up of examples of pottery so you can hold up samples as you
review the vocabulary words. You may want to have words on an overhead or
give each student a review sheet of vocabulary words that you can use for a test
later in the grading period. (See tests at end of lesson plans for a review sheet and
a test that can be copied for handouts.)
2. After you have reviewed old vocabulary, introduce any new techniques you are
going to do this year so the students are excited about the coming year.
3. Recycle any clay from last year (how to do this is in my first book, Clay Projects
for School.
4. Have students attach to pieces of clay by scoring surfaces, then apply magic water
or slip and press together.
24
5. If I have any airtight containers from last year, I reassign them to my advance
ceramic class students at this time. Have a large permanent market so the student
can put his/her name on it.
6. Time permitting; demonstrate how to wedge again for review.
How to wedge clay.
Remember use your entire body not just your arms.
Evaluation:
Can/did the student
• Review vocabulary words
• Demonstrate wedging
• Connect two pieces of wet clay together
Closure:
•
Allow time for students to look at and touch future projects and answer any
questions they may have.
25
Lesson #1 Vocabulary Review Sheet
(This sheet may be reproduced)
1. Stoneware clay-a high fired clay body usually fired to around 2370˚ F at which
the clay body vitrifies.
2. Porcelain clay-clay that is white, vitrified and translucent; fired around 2400˚ F.
3. Earthenware clay-low fire clay fired to approximately 1700˚ F that can be
vitrified.
4. Vitrified-clay fired to the point that it will not leak water.
5. Kiln-an oven used to fire pottery in to a certain temperature. Kilns can be electric
or any combustible material.
6. Cone-tall pyramid shaped, three-sided object made of different temperature
materials used to tell the reader the temperature of a kiln. Cones bend and melt at
a specific temperature.
7. Magic water-a liquid used like slip to help stick two pieces of wet clay together,
similar to glue. Made from water, sodium silica and sodium ash.
8. Slip –a liquid made of clay and water that is paste like, used to help stick two
pieces of wet clay together.
9. Wedging-a motion used to mix clay into itself that makes the clay consistent in
moisture and gets air bubble out of the clay.
10. Glazes-glass materials and chemicals mixed to a specific chemical relationship
that forms into a glass coating on pottery when fired to the required temperature
in the correct kiln.
11. Underglazes-paste like coloring agents applied to bisque ware to create designs.
Underglazes can be used only for decoration unless a clear glaze is applied over
it.
12. Engobes-another form of slip but may have coloring agents in it; useful for
decoration on a pot.
13. Glass-used to form glazes for pottery or can be crushed up and put inside works
of art that will not be used to eat out of for decoration. Marbles can be used easier
in classrooms.
14. Scoring-making X’s in clay with a fork to create textures that will allow two
pieces of wet clay to be joined together. Always use a metal fork for scoring, it
works great!
15. Leather hard-clay that has not been fired and that is still damp to the touch. If
you put it on your cheek it will feel cold. Usually the clay is stiff at this point.
16. Watercolor underglazes-usually comes in the form of the inexpensive watercolor
pan and has wells of underglazes that you apply with a brush just like watercolor
paints. Watercolor underglazes are hard/dry cubes and you apply small drops of
water to which allows you to transfer the color to a pot. It gives very settle values
of a specific color.
17. Chalks for pottery –usually looks and feels like sticks of chalk, comes in several
colors and is usually applied to bisque ware just like coloring with color chalks. It
can be blended just like chalk.
26
Lesson #1
Vocabulary Test
(This sheet may be reproduced)
Student Name:
Period/Class #
1. Stoneware clay2. Porcelain clay3. Earthenware clay4. Vitrified5. Kiln6. Cone7. Magic water8. Slip –
9. Wedging10. Glazes11. Underglazes12. Engobes13. Glass-
27
14. Scoring15. Leather hard16. Watercolor underglazes17. Chalks for pottery –
28
Lesson Plan #2
Grade:
Subject: Advance Ceramics
Period #
Topic: Careers in clay
TEKS: 117.54/5 a, c (3C)
Artist/Culture/Book: careers may include-Pottery teacher, running a clay and
glaze business, author of books that relate to clay, owner and operator of art
gallery that will probably have 3 dimensional works of art, designer and maker of
clay molds, and professional potter.
Instructional Objectives:
The student will
• Ask questions about careers that relate to clay
• Did the student talk with the guest speaker
Materials:
•
Guest speaker that has a professional field in clay. VCR on careers in clay, field
trip to a pottery studio or plaster mold company
Vocabulary:
•
Designer, mold maker, professional potter, author, teacher (different levels
available), business owner, three dimensional art.
Procedures:
1. Have guest speaker bring samples of what they do: book, pottery, picture of a
gallery.
2. Have speaker talk to students about what he/she does.
Evaluation:
Can/did the student
• Ask questions about careers that relate to clay
• Did the student talk with the guest speaker
Closure:
•
Have students critique guest speakers artwork if available, using the four steps of
art criticism. Remember this does not mean something negative. Go through
each step with the students until they get use to doing a critique.
o Description (What do I see?)
o Analysis (How is the work organized?)
o Interpretation (What is the artist trying to communicate?)
o Judgment (Is this a successful work of art?)
29
Lesson Plan #3
Grade:
Period #
TEKS: 117.54/5 a, b (1,2), c (1A,B, 2A,B,C, 3A, 4A,B)
Artist/Culture/Book:
Subject: Advance Ceramics
Topic: Puzzle Pot
Instructional Objectives:
The student will
• Look at sample/s of puzzle pots
• Follow construction techniques demonstrated by teacher
• Make a Puzzle Pot
• Assemble Puzzle pot after its been glaze fired with material of choice
Materials: sample/s of puzzle pots, materials students will choose to tie pot together
with (wire, leather, shoe strings etc), small drill bit (1/16” to 3/32” are good sizes)
Vocabulary: puzzle pot,
Procedures:
1. Show sample/s of puzzle pots, a pot that’s been cut up and put back together
2. Discuss how to construct the pot
3. If possible, have a leather hard pot available to cut up into a puzzle for better
understanding.
4. Explain strongly, the holes must be drilled large enough for the material that will
tie the pot back together and do not glaze the holes, it will cause the holes to get
smaller and the student may not be able to put it together again.
5. Explain how to mark each piece for assemblage. You can use a number system or
the alphabet. You may also want to draw a picture as you cut apart the pot.
6. Discuss glazing the puzzle pieces so they won’t stick to the kiln shelves and
careful assembly. Also discuss the choice of glaze colors in relation to the
material you will be using for string.
7. Talk about the texture the pot will have when you finish tying it together. It’s a
totally new look!
8. Assignment: The student will make a puzzle pot that has been cut up into pieces
and then tied together with material of students choice to create a new pot.
Evaluation:
Can/did the student
• Look at sample/s of puzzle pots
30
•
•
•
Follow construction techniques demonstrated by teacher
Make a Puzzle Pot
Assemble Puzzle pot after its been glaze fired with material of choice
Puzzle Pot with leather ties
Closure:
•
Have students critique each other’s artwork using the four steps of art criticism.
Remember this does not mean something negative. Go through each step with the
students until they get use to doing a critique.
o Description (What do I see?)
o Analysis (How is the work organized?)
o Interpretation (What is the artist trying to communicate?)
o Judgment (Is this a successful work of art?)
31
Lesson Plan # 4
Grade:
Period #
TEKS: 117.54/5 a, b (1,2), c (1A,B, 2A,B,C, 3A, 4A,B)
Artist/Culture/Book: England’s Delftware (pottery)
Subject: Advance Ceramics
Topic: Frog
Instructional Objectives:
The student will
• Look at sample of frog
• Observe construction procedures by teacher
• Be given an opportunity to ask questions
• Construct a frog meeting requirements
Materials: sample frog, frog mold (metal), cobalt oxide, white glaze, picture of
Delftware, Creamware, Wedgwood, piece of stiff leather to represent leather hard clay
Vocabulary: oxide, carbonates, mold, Delftware, Creamware, Wedgwood, green
ware, slip or magic water
Procedures:
1. Show sample of frog
2. Discuss Delftware made in England-traditional white tin glaze decorated with
cobalt carbonate oxides (blue), Creamware and Wedgwood.
3. Hand out worksheet on the history of Delftware, Creamware and Wedgwood,
have students read and then discuss each ware and how it was made and where.
4. Define vocabulary words:
a. Oxide, carbonates-coloring agents for clays.
b. Delftware-style of pottery known for its blue decoration under a white
glaze. Popular for approximately 150 years.
c. Creamware-cream colored earthenware.
d. Josiah Wedgwood-first industrial potter to organize the division of labor
for greater production of pottery.
e. Greenware-dry pottery that has not yet been fired.
f. Slip/magic water-liquid made of clays and chemicals to attach two pieces
of clay together.
5. Show example of frog again.
6. Discuss how to construct the frog. See next page for pattern and instructions.
7. Review the word leather hard and discuss limitations and advantages of leather
hard clay. Advantage-stiff and easy to handle, disadvantage too stiff to bend into
shapes needed for the body without cracking.
32
8. Demonstrate how to construct the frog. Remember the body has to be built one
day, set aside and kept damp, let body get stiff then attach the legs of the frog the
next day until completely assembled. Do not attach the legs the first day!
9. Construction of frog:
• Cut out two slabs the shape of the frog’s body (pattern included).
• Score edges. Wad up newspaper and put in between the two slabs to form a
puffy body.
• Press the joints together then smooth.
• Place this shape in a towel like a birds nest to cradle the soft body.
• Place in plastic bag and let the body get leather hard.
• Next day cut out the front and back legs and feet.
• Put some wadded paper under the front of the frog so mouth is held up high,
like the frog is setting.
• Shape legs, allow to get a little stiff and attach to body on sides.
• Carefully attach feet.
• Always hold mouth higher than the tail end so legs will fit.
• Once assembled, cover with plastic and get leather hard before drying out.
10. Assignment: The student will make a frog approximately 7” x 7” and color it
with blue decoration and white glazes in Delftware style glazing.
Evaluation:
Can/did the student
• Look at sample of frog
• Observe construction procedures by teacher
• Be given an opportunity to ask questions
• Construct a frog meeting requirements
Closure:
•
Have students critique each other’s artwork using the four steps of art criticism.
Remember this does not mean something negative. Go through each step with the
students until they get use to doing a critique.
o Description (What do I see?)
o Analysis (How is the work organized?)
o Interpretation (What is the artist trying to communicate?)
o Judgment (Is this a successful work of art?)
33
The Frog made by the author
34
History of Delftware, Creamware and Wedgwood
Delftware is a tin-glazed earthenware produced at Delft in the Netherlands.
Italian potters working in Delft in the mid-16th century were the first to make Delftware.
They were greatly influenced by Oriental porcelain but did incorporate Gothic and
Renaissance decoration in their early works. Because they copied the Oriental porcelain,
which was blue on white, Delftware is thought of today as blue on white pottery.
However, there is also red-brown, yellow and green decorated ware.
It is believed Italian potters, having gone through Delft, brought the Delft
technique of pottery with them to England at least by 1630. English delft could not be
make as thin nor their glazes as high quality as the Netherlands potters, but the English
potters acquired an artistic freedom of overall decoration which was equal to any and all
delft. English delft was an important artistic expression and a practical ware. English
delft was made in Lambeth, Bristol and Liverpool and stayed in vogue for approximately
150 years. Delftware was pretty much replaced by creamware.
Creamware is a cream-colored earthenware which is the fore runner of today’s
English white earthenware. Creamware was developed by Astburys and perfected by
Whieldon and Wedgwood in the early 18th century. Creamware allowed the perfection of
glaze slop. It is believed it was introduced into southern England with the making of
delft in the 17th century and was taken up by the potters of slipware in northern England
into the early 18th century. At this time plaster of Paris was replacing gypsum and bisque
ware as mold material. And, by 1760, pottery was bisque fired before being glazed and
the foundation of mass-production had been laid.
Josiah Wedgwood was a famous potter and businessman. He was the first
industrial potter to organize the division of labor for greater production. His most famous
wares are his cream colored earthenware, renamed Queen’s Ware when Queen Charlotte
ordered tea and coffee sets in 1765. Wedgwood made Black Basalt or Egyptian Ware
from black stoneware, Red Stoneware, and Jasper Ware with finely modeled white details
or sprigging on a colored background.
Delftware, Creamware and Wedgwood have made their own place in the history
of pottery, both hand made and mold made. Each is an important link in the development
of pottery as we know it today.
35
Lesson Plan # 5
Grade:
Subject: Advance Ceramics
Period #
Topic: Perfume Bottle
TEKS: 117.54/5 a, b (1,2), c (1A,B, 2A,B,C, 3A, 4A,B)
Artist/Culture/Book: History of Perfume from the internet in relation to the Egyptians,
Persians, Greeks, and the Chinese, History of the Perfume Bottle in an encyclopedia
Instructional Objectives:
The student will
• Read handout on history of perfume and perfume bottles
• Be able to tell a short history of perfume
• Look at a sample of very small perfume bottles glazed only with underglazes and
decorated with added clay and possible wire and/or tiny chain
• Observe teacher building a perfume bottle
• Explain why a three dimensional bottle needs an air hole when it is fired
• Make a perfume bottle as per instructions.
Materials: samples of perfume bottles, handouts on history of perfumes, round
tooth picks
Vocabulary: review underglazes, perfume
Procedures:
•
•
•
•
•
•
•
•
Show sample/s of small perfume bottles
Show sample of underglazes with no clear glaze
Review how air expands and will blow up if bottle is not correctly assemble.
Discuss the history of perfume and how it was used to cover up body odor
before indoor plumbing and the great invention of deodorant.
Define perfume-the scent of something sweet smelling. A substance that
emits a pleasant odor. A fluid preparation of floral essences or synthetics and
a fixative used for scenting.
Let students read about the history of perfume either from a handout or off the
internet. This could be a written assignment.
Demonstrate construction technique. Use wadded up paper to puff the center
of the bottle in between the two shaped slabs shaped like the bottle. Place a
small object like a tooth pick in the neck of the bottle so you can keep it open
during construction. Make a small V shaped stopper that complements the
size and shape of the bottle. Discuss possible ways you may want to attach
the stopper to the bottle, a small chain for example.
Assignment: The student will construct a perfume bottle with a stopper for a
lid, and decorate with added clay and underglazes only.
36
Evaluation:
Can/did the student
Watch construction of project
• Read handout on history of perfume and perfume bottles
• Be able to tell a short history of perfume
• Look at a sample of very small perfume bottles glazed only with underglazes and
decorated with added clay and possible wire and/or tiny chain
• Observe teacher building a perfume bottle
• Explain why a three dimensional bottle needs an air hole when it is fired
• Make a perfume bottle as per instructions.
Closure:
•
Have students critique each other’s artwork using the four steps of art criticism.
Remember this does not mean something negative. Go through each step with the
students until they get use to doing a critique.
o Description (What do I see?)
o Analysis (How is the work organized?)
o Interpretation (What is the artist trying to communicate?)
o Judgment (Is this a successful work of art?)
37
Perfume bottle with stopper and chain on a leather necklace
38
Short History of Perfume
(This page may be reproduced for students)
It is believed that the Egyptians were the first to incorporate perfume into their
spiritual ceremonies with incense and embalming. They anointed their bodies with scents
of cinnamon and honey. Perfume became the essential accessory for the powerful and
the wealthy.
The Persians grew elaborate gardens of jasmine, lilacs, violets, and roses to adorn
both their homes and their bodies. The Romans also grew gardens for their fragrances
and used the flowers for garlands in maidens’ hair.
The Greeks believed the gods were perfume’s inventors. Perfumes were used for
special ceremonies; anointing the dead and weddings. They categorized perfumes by
which part of a plant the perfume was made and documented their compositions.
In China, incense was used in religious ceremonies such as a death in the family.
The body was washed and perfumed and incense would burn in the room as well as the
mourners carrying lighted sticks scented with incense. Flowers were greatly appreciated
for their fragrances and Chi Han was the first to record flowering plants. Women were
especially anxious to please their men and would massage all parts of their bodies with
perfumed oils after making sure their were extremely clean.
From ancient hyroglyphics to Socrates to Shakespeare, perfumes are documented
in great works of art and literature. The first record of perfume sellers was recorded in
1190 in Paris. As long as man is vain, there will be perfumes! The history of perfumes is
not over.
The history of the perfume bottle is as unique at the bottle became. A perfume
bottle is a vessel that was and is made to hold scent, perfume. The earliest example of a
perfume bottle is Egyptian and its believed to date around 1000 B.C. Because the
Egyptians used scents lavishly, especially in religious ceremonies, they invented glass.
The glass was used mostly for perfume bottles. This fashion spread to Greece and the
perfume bottles were made out of clay and glass and were made of a variety of shapes
like birds, animals and human heads. The Romans thought perfumes were aphrodisiacs.
They not only made their perfume bottles out of glass, but it was blown glass after its
invention at the end of the 1st century B.C. by Syrian glassmakers. The use of perfume
declined with the beginning of Christianity and the decline of glassmaking.
By the 12th century, a statute formed the first guild of perfumers (French spelling
is perumeurs) in France and by the 13th century Venetian glassmaking was well
established. By the 18th century, the scented bottle took on varied and elaborate forms
like cat s, birds, and clowns and was made of painted enamel bottles with pastoral scenes,
chinoiseries, fruits and flowers.
By the 19th century classical designs by Josiah Wedgwood were in fashion.
Again, however, it was not in fashion until in the 1920’s, Rene Lalique, a leading French
jeweler, created interest in the bottles with his production of molded glass examples.
These scented bottles had iced surfaces and elaborate relief patterns.
Like perfume, the perfume bottle is still living its history today. Only time will
tell what direction it will take next.
39
Lesson Plan # 6
Grade:
Subject: Advance Ceramics
Period #
Topic: Picture Frame
TEKS: 117.54/5 a, b (1,2), c (1A,B, 2A,B,C, 3A, 4A,B)
Artist/Culture/Book: Ceramics: Shape and Surface Handouts for potters by Lana Wilson,
ISBN 0-9666976-0-X
Instructional Objectives:
The student will
• Discuss the purpose of a picture frame
• Learn how to mix plaster and cut into plaster with tools
• Cut out designs in plaster to make clay relief attachments.
• Learn how to use a clay gun
• Be able to define picture frame and negative space
• Construct a decorated picture frame with a theme
Materials: sample of pictures frames (clay, wood, metal, etc), clay and usual clay
tools, rulers, textures and tools that can make designs in plaster, plaster, and small paper
cups for molding plaster (bathroom cups are a great size), and clay gun with different tips
if available.
Vocabulary: picture frame, plaster molds, negative spaces
Procedures:
1. Show samples of picture frames.
2. A loose definition of picture frame could be to draw attention to a particular
object by constructing objects around the subject to be focused on.
3. Define negative space-the space around objects, sometimes called ground. Spaces
surrounding shapes and forms.
4. Demonstrate how to mix plaster in a small cup to be used after it sets up.
5. Mixing plaster: put water into a cup, maybe half full, and sprinkle plaster into the
cup until the water will no longer absorb any plaster. You should see a peak that
is slowly absorbing plaster towards the end. Do not put more water into plaster
mixture. You always put plaster into water! If a half-cup of water is too much try
a little less water the next time until you get the amount of plaster you need. If
the top of the cup of plaster is a bit rough, let it set up a few hours, tear the paper
cup off the plaster mold and you should have a smooth bottom on the other end
that you can carve into.
6. Demonstrate how to cut into the top of the new plaster mold to create textures and
patterns. Use old knives, ex-acto knives, drills or any old tool that will make a
mark in dry plaster, even a file will work.
7. Demonstrate how to press small pieces of clay into the new textures or patterns
the student has made, let clay mold dry a few minutes (until clay is stiff) then
40
remove the new clay shape and attach to a mirror frame for decoration.
Remember: to attach clay to clay score both surfaces, apply a little slip then press
together firmly.
8. Demonstrate how to use a clay gun for more decorations for the picture frame. If
you do not have a clay gun this step may be omitted.
9. Assignment: The student will make a picture frame with decorations made from
molds, free hand or a clay gun or all three. Suggested size is: inside measurements
should hold a 4”x 6” picture so make the dimensions 3½” x 5½”, outside
measurements should be approximately7” x 9”. The 3 ½ “ x 5 ½” allows the
picture not to fall out of the frame. Picture can be glued in after glaze firing.
10. Construction:
1. Roll out a slab and let it get leather hard.
2. Cut out a rectangle 7” x 9” and place on a board covered with two
newspapers.
3. Find center of the rectangle.
4. Cut out a smaller rectangle in the center of the bigger rectangle
3½” x 5½” .
5. Put two layers of newspaper on a board that is bigger than the new
frame. Don’t let frame hang over edges.
6. With a sharp tool, like an ex-acto, cut an inside edge so a 4” x 6”
picture will fit inside the edge.
7. Cross section view
8. Cut all four inside edges.
9. Turn frame over onto the first board with the newspaper between the
frame and the newspaper.
10. Decorate with plaster molds the students made.
11. Dry slowly after all texture has been applied, bisque, glaze and fire
then put the picture in from the back. A couple of dots of glue will
hold in the picture or you can cut a thin piece of cardboard the size of
the opening and tape it in.
41
Evaluation:
Can/did the student
• Discuss the purpose of a picture frame
• Define what a picture frame is and negative space
• Learn how to mix plaster and cut into hardened plaster
• Cut out designs in plaster to make clay relief attachments.
• Learn how to use a clay gun
• Construct a decorated picture frame with a theme
Closure:
•
Have students critique each other’s artwork using the four steps of art criticism.
Remember this does not mean something negative. Go through each step with the
students until they get use to doing a critique.
o Description (What do I see?)
o Analysis (How is the work organized?)
o Interpretation (What is the artist trying to communicate?)
o Judgment (Is this a successful work of art?)
Display: Have each student bring a picture of them self and hang up in a display
case or in the room.
42
43
Option to textures on frame
44
Lesson Plan # 7
Grade:
Period #
TEKS: 117.54/5 a, b (1,2), c (1A,B, 2A,B,C, 3A, 4A,B)
Artist/Culture/Book:
Subject: Advance Ceramics
Topic: Book ends
Instructional Objectives:
The student will
• Discuss the purpose of bookends
• Define what bookends are/their purpose
• Define perpendicular
• Demonstrate construction abilities by making bookends perpendicular to the
surface
• Make a set of bookends with a theme that actually works
Materials: samples of bookends (metal, clay, wood, etc.), carpenters squares ( I really
like the ones you buy at hardware stores, heavy duty), clay and clay tools.
Vocabulary: perpendicular, bookends
Procedures:
1.
2.
3.
4.
5.
Define bookends-a support for the end of a row of books.
Define perpendicular-making a right angle.
Discuss the purpose of bookends-to keep books in an orderly fashion.
Display bookends/different themes/different media.
Review the weaknesses of clay and its strengths in relation to bending a slab of
clay 90º and not letting it crack It can not be leather hard or it will break but at
the same time the clay can not be too soft or it will not bend to 90º and hold its
shape. I usually prop the ends up against a wall to let it get stiffer until it holds its
shape so I can work on it for the demonstration. You should have both for
demonstration.
6. Demonstrate the construction of one bookend with a semi soft slab of clay after it
has been rolled out and let set up for a short time. Make sure you cut out the
rectangle of clay for the bookend after it sets up so it’s corners are 90º. Then cut
out all the shapes from the pattern provided. Let get stiff and then attach to the
bookends, keep one theme going for both ends. Some of the more fun bookends I
have seen have a bookworm attached with its head on one side and its tail on the
other side with the books in the middle. This idea is a bit higher level thinking
and you will have to decide the difficulty level for your students. Simple ways to
do this is let students use cookie cutters.
7. A complete pattern for one set of bookends of an airplane are at the end of this
lesson plan. The patterns are cut to size.
45
8. Assignment: The student will make a set of bookends that are 90º to the books
with a theme that can actually be used. Glaze that fits the theme is important for
the overall theme.
Evaluations:
Can/did the student
• Discuss the purpose of bookends
• Define what bookends are/their purpose
• Define perpendicular
• Demonstrate construction abilities by making bookends perpendicular to the
surface
• Make a set of bookends with a theme that actually works
Closure:
•
Have students critique each other’s artwork using the four steps of art criticism.
Remember this does not mean something negative. Go through each step with the
students until they get use to doing a critique.
o Description (What do I see?)
o Analysis (How is the work organized?)
o Interpretation (What is the artist trying to communicate?)
o Judgment (Is this a successful work of art?)
Display:
•
Present bookends in a showcase with books.
46
Pattern for airplane bookends
Motor-cut 1
Top view
Motor
Side view
Propeller
Cut 1
Wing
Cut 2
Vertical stabilizer
Cut 1
Horizontal stabilizer
Cut 1
47
Fuselage-top view
Cut 1
Fuselage-side view
Cowl
Cut 1
Strut
Cut 4
Propeller
Cut 1
Wheel support Cut 2
Wheel
Cut 2
48
Cut 2
Mountain
3¾” wide at base
Base
Rectangle slab
Cut 2
3¾” x 11”
*Due to computer sizing, you will need to make all patterns fit the rectangle slabs/book end
49
Lesson Plan # 8
Grade:
Subject: Advance Ceramics
Period #
Topic: Wind Chimes
TEKS: 117.54/5 a, b (1,2), c (1A,B, 2A,B,C, 3A, 4A,B) + Science (TEKS) wind/weather
+ music
Artist/Culture/Book:
Instructional Objectives:
The student will
• Discuss how the wind has effected the student in some part of their lives
• Discuss what makes wind/ cause and effect
• Discuss how the student may have experienced a wind chime they really liked.
Maybe it relates to their music experiences.
• Build a wind chime that can withstand the normal ever day weather and make
pleasant sounds. Must have a theme carried throughout the chime.
Materials: samples of wind chimes (clay, metal, wood, etc.) usual clay and tools, kiln
posts to hold up glazed pieces of the wind chimes, fan/s to make the wind chimes work,
fishing line, ⅛” dowel rods, clay gun
Vocabulary:
Procedures:
1. Have wind chimes hanging so the students can hear them when they come into the
room.
2. Depending on the students’ skills, chimes can be made from cookie cutters or
hand formed into delicate shapes.
3. Review how an odd number of wind chimes will be more pleasant to the aesthetic
view of the chime. Five or seven chimes usually works well.
4. Discuss construction procedures:
• Make sure you have figured out how to hang all chimes from one piece that
supports the chimes and is used to put fishing line through to hang from the
ceiling.
• Make holes in the top of each chime big enough for fishing line to go through
after glaze firing.
• Do not put glaze in these holes because it will plug up the hole and you can’t
hang it.
• You may want to make at least one if not two extra chimes for unforeseen
breakage.
• The top piece the chimes hang from can be lots of different shapes. The best
that I have found is a circle or a bar of clay. There can be many take offs from
that but keep it fairly simple and emphasize the shapes of the chimes.
50
5. Discuss glazing techniques; again this depends on the student’s skills.
• Both sides can be glazed with regular glazes if you have the kiln furniture.
• Chimes can be decorated with underglazes with or without clear glaze painted
over the underglazes.
• Textured slips can be applied over underglazes to add interest, patterns or
textures.
• There is no limit to the possibilities, it depends on the students!
6. Shapes of chimes may be made from a clay gun if available.
7. Assignment: The student will make a wind chime with 5/7 chimes that can be
hung from the ceiling and makes a pleasant noise when wind is introduced to their
wind chime.
8. Construction-chimes can be made from:
• Cookie cutters
• Clay gun
• Thin slabs of clay rolled over a ⅛” dowel rod that makes long tubes
• Student patterns cut from slabs
Evaluations:
Can/did the student
• Discuss how the wind has effected them in some part of their lives
• Discuss what makes wind/ cause and effect
• Discuss how the student may have experienced a wind chime they really liked and
why. Maybe it relates to their music experiences.
• Build a wind chime that can withstand the normal ever day weather and make
pleasant sounds. Must have a theme carried throughout the chime.
Closure:
•
Have students critique each other’s artwork using the four steps of art criticism.
Remember this does not mean something negative. Go through each step with the
students until they get use to doing a critique.
o Description (What do I see?)
o Analysis (How is the work organized?)
o Interpretation (What is the artist trying to communicate?)
o Judgment (Is this a successful work of art?)
Display:
Hang the students’ wind chimes from the ceiling in your room or possible at the
entrance of your school where the wind might make them sing.
51
52
53
Lesson Plan # 9
Grade:
Subject: Advance Ceramics
Period #
Topic: Clay Flowers
TEKS: 117.54/5 a, b (1,2), c (1A,B, 2A,B,C, 3A, 4A,B) + Science (different flower parts)
Artist/Culture/Book:
Instructional Objectives:
The student will
• Define flower
• Study the different flowers and how they are constructed
• Bring pictures of flowers or real flowers
• Figure out what flower vase they will need for the flowers to be displayed
correctly.
• Make three flowers with correct stem and leaves of their choice out of porcelain
clay that is colored with oxides and/or mason stains.
Materials: pictures of flowers, overhead picture/s of the different parts of a flower/s
(may be available from science teacher), porcelain clay, coloring oxides and/or mason
stains, measuring spoons (⅛ to ½ ), coloring oxides are Cobalt oxide (blue), Chrome
Green Oxide, Red iron oxide (rust brown), Rutile (light tan in color), mason stains will
usually give you the color they appear if fired to cone 05, golf ball (for size comparison) ,
sandwich baggies, paper towels (napkins)
Vocabulary: flower, flower parts, cobalt oxide, chrome oxide, red iron oxide, rutile,
mason stains
Procedures:
1. Define flower-a plant cultivated for its blooms
2. Review the parts of a flower-this works best with an overhead of a flower
section. Hand outs are also fine.
• Filament
• Anther
• Stigma
• Style
• Petal,
• Ovary
• Sepal
• Pedicel
• Stamen
• Pistil
• Perianth
54
3. Try and have a flower to show the students so you can point to the different
parts as you go over the flower. The flower can either be real or artificial if
necessary.
4. Discuss the difficulty of the assembly of a fragile item like a flower using
porcelain. Porcelain becomes extremely fragile until fired, especially once it
dries out. As soon as each flower is constructed, have the student put it on a
kiln shelf to dry so you do not have to handle it. Let it dry then put it in the
kiln handling the shelf rather than the flower.
5. Demonstrate how to mix the coloring oxides into the white porcelain. Try and
have a sample of the colored clay after it has been bisque fired and clear glaze
applied and fired. Its true beauty does not show until the clear glaze is fired
and the marbleizing shows under it.
6. Hints-do not over mix the coloring oxides or stains. Leave a marbling effect
to make the flowers more interesting after the clear glaze is applied to the
bisque flowers. Remember the flowers really needs to be clear glazed to see
its beautiful patterns.
7. How to color the clay-take a piece of porcelain about the size of a golf ball
and make it into a ball shape. With your thumb put a hole in the center of the
clay ball. Place a small amount of coloring agent(approximaterl1/8 teaspoon)
into the hole. Close the hole and start squeezing and pulling the clay apart to
mix the coloring agent into the clay. You may loose a little dry coloring agent
but keep mixing with your fingers. Usually ⅛ to ¼ teaspoon of coloring agent
is enough for this size of clay. Place the different colors of clay into
individual sandwich baggies and close to keep damp. Once all the clay is
colored, construction of the flowers can start.
8. Hint-keep hands clean as much as possible. Wash hands between mixing
each color and keep tools clean as you work. Also, use clean paper towels to
work on instead of newspapers to keep the ink from coming off onto the white
clay.
9. Assignment: The student will make three flowers from a picture with stems
and leaves that go with the flower/s using porcelain clay and coloring the clay
with oxides and/or mason stains. Once bisque fired, the student will glaze the
flowers with a clear glaze to bring out the colors and texture of coloring the
clays. The white of the clay may also be used. However, students need to use
at least three different colors.
Evaluations:
Can/did the student
• Define flower
• Study the different flowers and how they are constructed
• Bring samples of pictures of flowers
• Figure out what flower vase they will need for the flowers to be displayed
correctly.
• Make three flowers with correct stem and leaves of their choice out of porcelain
clay that is colored with oxides and/or mason stains.
55
Closure:
•
•
Have students critique each other’s artwork using the four steps of art criticism.
Remember this does not mean something negative. Go through each step with the
students until they get use to doing a critique.
o Description (What do I see?)
o Analysis (How is the work organized?)
o Interpretation (What is the artist trying to communicate?)
o Judgment (Is this a successful work of art?)
The students will save their flowers for the next project, a flower vase.
56
Lesson Plan # 10
Grade:
Period #
TEKS: 117.54/5 a, b (1,2), c (1A,B, 2A,B,C, 3A, 4A,B)
Artist/Culture/Book:
Subject: Advance Ceramics
Topic: Flower vase
Instructional Objectives:
The student will
• Design a flower vase that displays their porcelain flowers aesthetically correct.
• Make the flower vase they have designed out of colored porcelain appropriate for
their flowers.
•
Materials: porcelain clay, clean clay tools, coloring oxides, paper towels
Vocabulary:
Procedures:
1. Review how to color porcelain with coloring oxides and mason stains. See
Lesson Plan #9.
2. Review how fragile porcelain is once its dry but before bisque firing.
3. Assignment: The student will make a flower vase that is the appropriate size and
color/s for their three flowers they made in lesson # 9. They will seal the vase
with clear glaze and fire the vase.
4. Construction of the vase may be coil with a tinplate as a guide, slab or wheel
thrown. But remember porcelain is a little tricky on a potters’ wheel. It doesn’t
like a lot of water and needs to dry very slowly once the vase is made. The vase
does not need to be perfectly round if made from a slab. You may want them to
make a vase that does not have 90º corners or even a flat bottom, maybe pointed
feet. This can be a very open ended project.
Evaluations:
Can/did the student
• Design a flower vase that displays their porcelain flowers aesthetically correct.
• Make the flower vase they have designed out of colored porcelain appropriate for
their flowers
57
Closure:
•
Have students critique each other’s artwork using the four steps of art criticism.
Remember this does not mean something negative. Go through each step with the
students until they get use to doing a critique.
o Description (What do I see?)
o Analysis (How is the work organized?)
o Interpretation (What is the artist trying to communicate?)
o Judgment (Is this a successful work of art?)
Display: Place flower vases with their flowers in a showcase or around the room. If
there is an empty classroom display them there and invite the faculty and students to view
your garden.
Coil Flower Pot
58
Lesson Plan # 11
Grade:
Subject: Advance Ceramics
Period #
Topic: Bowl with filigree decoration
TEKS: 117.54/5 a, b (1,2), c (1A,B, 2A,B,C, 3A, 4A,B)
Artist/Culture/Book:
Instructional Objectives:
The student will
• Define filigree
• Define aesthetics
• Review what transparent glazes are
• Review history of filigree decoration, possibly through the internet
• Construct a bowl and decorate with filigree technique.
Materials: clay, clay tools plus sharp cutting tools similar to razor blades, sample of a
pot decorated in filigree design technique, baggies/plastic bags/plastic sheets, spray
bottles for water
Vocabulary: filigree, aesthetic, transparent glaze
Procedures:
1. Define filigree-very oriental looking design that makes a product very fragile,
usually to such a degree it can not be used for what it was designed for.
2. Define aesthetic- the quality of a piece of artwork that makes the piece of work
pleasing to the eye/touch/sound/smell of the viewer or participant.
3. Review transparent glazes are clear not opaque.
4. Show an example of a filigree pot.
5. Discuss the techniques of how to create filigree artwork on a piece of clay. Make
sure the students understand the clay must remain damp until completely done or
it will probably break. Handle carefully at all times.
6. Demonstrate how to cut a filigree design into damp clay and how careful you
have to be so as not to break it.
7. Review, the student needs to think of proportions of the pot. If dividing the
surface into parts, make sure that the parts are equally divided to enhance the
filigree design.
8. Assignment: The student will make a bowl and decorate it using the oriental
design technique of filigree. The glaze the student chooses must complement the
filigree design to create an aesthetic looking pot. Transparent glazes are great on
this project.
9. For construction of the bowl, I recommend a wheel thrown pot but coil is fine if
done with good craftsmanship. The walls should not be too thick, delicate.
59
Evaluations:
Can/did the student
• Define filigree
• Define aesthetics
• Review what transparent glazes are
• Review history of filigree decoration, possibly through the internet
• Construct a bowl and decorate with filigree technique.
Closure:
•
Have students critique each other’s artwork using the four steps of art criticism.
Remember this does not mean something negative. Go through each step with the
students until they get use to doing a critique.
o Description (What do I see?)
o Analysis (How is the work organized?)
o Interpretation (What is the artist trying to communicate?)
o Judgment (Is this a successful work of art?)
•
Have the class discuss if the pots are aesthetically pleasing. Yes, no, why!
60
Lesson Plan # 12
Grade:
Subject: Advance Ceramics
Period #
Topic: Slab plate decorated with engobe
TEKS: 117.54/5 a, b (1,2), c (1A,B, 2A,B,C, 3A, 4A,B)
Artist/Culture/Book:
Instructional Objectives:
The student will
• Define engobes, understand what it is and how to use it.
• Be able to create a design using positive and negative spaces in relation with
engobes
• Make a plate and decorate it using engobes
Materials: clay, clay tools, engobes in airtight containers, brushes, newspaper/paper
towels, bowls for water, large dinner plates for molding the clay plates
Vocabulary: engobe
Procedures:
1. Define engobe-liquid clay, slips with coloring oxides
2. Define positive/negative shapes-shapes that exist or shapes around positive shapes
that are formed around the positive shapes.
3. Demonstrate how to construct the plate and how to color with engobes using torn
news paper. Role out a slab of clay larger than the dinner plate you are going to
use to mold a new plate. Keep the slab thickness a good ¼ “ thick. Spray the
dinner plate with cooking oil, either inside or outside, or cover with damp paper
towels/newspaper so the new slab won’t stick. Place the slab of soft clay onto
either the inside of the dinner plate or the outside of the plate. Cut around the
plate removing any excess clay that is hanging over the edge. Smooth the edge
completely, especially the edge that is against the plate. It takes a little time but
looks bad if you don’t. I like to run a fingernail between the plate and clay to
smooth it all the way around. Let the new plate/slab get stiff and remove the
dinner plate. Place the new plate face up and sit it on a working area. Paint the
first color of engobe all over the top of the plate and let dry. Mean time tear some
newspapers into strips, no scissors yet. Once the first layer is dry, place a few
pieces of the torn, damp, papers on top of the first color of engobe. Now paint a
second color of engobe, let dry, add a few more dampened newspapers over the
dried second layer and paint a third color of engobe over the entire plate. Let it
dry, then with a needle carefully lift the layers of newspaper and you will see your
design. If the student wants at some time a few pieces of newspaper could be cut
out with scissors and dampened then applied. Once dried, bisque fire then paint a
clear glaze over all or part of the design. The back could also have three coats of
clear glaze, if you have the posts to keep it off the kiln shelf. I usually don’t do
61
this for the simple fact it is very time consuming and I don’t have that many plate
stilts. I might do a few if the plates are an outstanding quality.
4. Assignment: The student will make a plate with a slab by forming it on a dinner
plate then decorate it using engobes and torn paper. Then new plate is to be
glazes with clear glaze, all or part if it helps add to the aesthetics of the plate.
Evaluations:
Can/did the student
• Define engobes, understand what it is and how to use it.
• Be able to create a design using positive and negative spaces in relation with
engobes
• Make a plate and decorate it using engobes
Closure:
•
Have students critique each other’s artwork using the four steps of art criticism.
Remember this does not mean something negative. Go through each step with the
students until they get use to doing a critique.
o Description (What do I see?)
o Analysis (How is the work organized?)
o Interpretation (What is the artist trying to communicate?)
o Judgment (Is this a successful work of art?)
•
Have the class discuss if the pots are aesthetically pleasing. Yes, no, why!
62
Lesson Plan # 13
Grade:
Period #
TEKS: 117.54/5 a, b (1,2), c (1A,B, 2A,B,C, 3A, 4A,B)
Artist/Culture/Book: History of the three footed pots
Subject: Advance Ceramics
Topic: Three footed bowl
Instructional Objectives:
The student will
• Study the history of three footed pottery and write a short history
• Be able to discuss why pottery had three feet
• Design a three footed functional pot
• Make a pot with three feet that sits level and is functional
Materials: clay, clay tools, overhead of at least one three footed bowl
Vocabulary:
Procedures:
1. Discuss the use of three footed pottery in history. It was easier to sit a three
footed pot on the ground so it wouldn’t tip over. You could also put it over a fire
to heat/cook food.
2. Show an example of a three footed bowl
3. Assignment: The student will make a three footed, functional bowl using either
a potter’s wheel, slab or coil for the bowl and appropriate legs for an overall
visually, balanced bowl.
4. To construct the three footed bowl. Make the bowl (wheel, slab or coil) and set
aside until leather hard. Make three/four legs using a construction method that
fits the construction method of the bowl. This does not necessarily mean the
same construction but one that complements the bowl. The fourth leg is for
breakage or to find three that will make an even toped bowl. When the bowl is
leather hard cover with plastic until legs are also leather hard. Once everything is
the same moisture, assemble the pieces. Cover again tightly for a couple days to
allow all the parts to become the same moisture. Uncover and lightly cover for a
couple more days, in other words let dry slowly. Bisque fire and glaze in a
manner that aesthetically fits the pot.
Evaluations:
Can/did the student
• Study the history of three footed pottery and write a short history
• Be able to discuss why pottery had three feet
• Design a three footed functional pot
• Make a pot with three feet that sits level and is functional
63
Closure:
•
Have students critique each other’s artwork using the four steps of art criticism.
Remember this does not mean something negative. Go through each step with the
students until they get use to doing a critique.
o Description (What do I see?)
o Analysis (How is the work organized?)
o Interpretation (What is the artist trying to communicate?)
o Judgment (Is this a successful work of art?)
Three footed bowl made by author
64
Lesson Plan # 14
Grade:
Subject: Advance Ceramics
Period #
Topic: Egyptian Diary
TEKS: 117.54/5 a, b (1,2), c (1A,B, 2A,B,C, 3A, 4A,B)
Artist/Culture/Book: History of the Egyptian script, history of paper and writing tools,
printing press, look on internet: http://www.kingtut-treatures.com and
http://www.bergen.org for information and hyroglyphics
Instructional Objectives:
The student will
• Learn about the history of Egyptian writing in clay
• Get pictures of hieroglyphics
• Write a report on Egyptian’s using clay for paper and/or history of the printing
press
• Make a clay diary using hyroglyphics to write out their name
Materials: porcelain clay, clean clay tools, overhead/picture of a clay diary, sample of
a clay diary, handouts of hyroglyphics, coloring oxides/mason stains, paper towels
Vocabulary: hyroglyphics
Procedures:
1. Discuss how history was recorded on clay tablets before the invention of paper.
2. Review the history of the discovery of paper and writing tools and how it has lead
up to the computer.
3. Review how to color porcelain with oxides/mason stains. See Lesson Plan # 9
4. If porcelain is not available use whatever clay you have to construct the diary then
glaze to emphasize the design of the hyroglyphics.
5. Show an example of a clay diary or picture/overhead
6. Discuss the construction using several colors of porcelain clay and how to bring
out the characters using glazes after bisque firing.
7. Demonstrate how to construct diary.
• Role out a thin slab of porcelain 1/8”+ thick about 10”x5”, cover and allow to
get stiff.
• Design the diary on paper using a boarder possibly to frame the hyroglyphics
and draw the hyroglyphics to correct size. Recommended size of diary is 8”
tall and 3” wide total. Obviously this can be any size you would like. You
may want to cut out a half circle at the top if it complements the design.
• Cut out the back of the diary, rectangle with rounded ends, and keep damp.
• Cut out hyroglyphics, score both back of hyroglyphics and surface to be
attached to, apply a little slip and attach hyroglyphics.
65
•
•
8.
Finish the overall design by adding clay to any uncovered surface with
different colors of clay. Smooth any areas that may need attention. Keep
hands and tools clean so no color contamination occurs during construction.
Let dry slowly, bisque fire and glaze either with clear glaze or colored glazes.
Assignment: The student will design and make a clay diary using hyroglyphics
to spell out his or her name out of colored porcelains. The diary is to be glazed.
Evaluations:
Can/did the student
• Learn about the history of Egyptian writing in clay
• Get pictures of hieroglyphics
• Write a report on Egyptian’s using clay for paper and/or history of the printing
press
• Make a clay diary using hyroglyphics to write out their name
Closure:
Have students critique each other’s artwork using the four steps of art criticism.
Remember this does not mean something negative. Go through each step with the
students until they get use to doing a critique.
o Description (What do I see?)
o Analysis (How is the work organized?)
o Interpretation (What is the artist trying to communicate?)
o Judgment (Is this a successful work of art?)
Example of Clay Diary 3½” x 8”
66
Lesson Plan # 15
Grade:
Period #
TEKS: 117.54/5 a, b (1,2), c (1A,B, 2A,B,C, 3A, 4A,B)
Artist/Culture/Book: History of shoes
Subject: Advance Ceramics
Topic: Clay shoe
Instructional Objectives:
The student will
• Study the history of shoes
• Write a one/two page report on the history of shoes
• Discuss in class the history of shoes
• Define the word shoe
• Make a clay shoe that is life size and decorate in the appropriate time frame of the
design
Materials: a variety of shoes, pictures/overhead of shoes from different times in
history
Vocabulary: shoe
Procedures:
1. Display a variety of shoes, have pictures/overhead of old shoes in different times
in history.
2. Define shoe-a covering for the foot usually made of leather or manmade
materials. Shoes protect the foot from weather and rough surfaces like rocks.
3. Review the construction issues for building a sculpture: don’t let it dry out to fast,
keep it light weight, be observant to the proportions and the aesthetics of the over
all shoe.
4. Assignment: The student will make a clay shoe from a time in history and glaze
it appropriately for the period chosen.
Evaluations:
Can/did the student
• Study the history of shoes
• Write a one/two page report on the history of shoes
• Discuss in class the history of shoes
• Define the word shoe
• Make a clay shoe that is life size and decorate in the appropriate time frame of the
design
67
Closure:
Have students critique each other’s artwork using the four steps of art criticism.
Remember this does not mean something negative. Go through each step with the
students until they get use to doing a critique.
o Description (What do I see?)
o Analysis (How is the work organized?)
o Interpretation (What is the artist trying to communicate?)
o Judgment (Is this a successful work of art?)
68
Lesson Plan # 16
Grade:
Subject: Advance Ceramics
Period #
Topic: Inlayed colored clay in bowl
TEKS: 117.54/5 a, b (1,2), c (1A,B, 2A,B,C, 3A, 4A,B)
Artist/Culture/Book: Potter’s Workshop by Jenny Rodwell ISBN 7153 0928 5
Instructional Objectives:
The student will
• Define mold
• Make a plaster mold of a bowl
• Practice inlaying colored clays in a cavity
• Make a bowl in a plaster mold then carve out cavities and fill the cavities with
colored clay/s
Materials: sample of inlayed colored clay, loop tools, plaster molds of bowls or
supplies to make a mold, thin metal ribs, wooden ribs, coloring oxides/mason stains
Vocabulary: inlayed clay, mold
Procedures:
1. Define mold-a cavity in which an object is formed.
2. Have students make a plaster mold over a bowl and let it dry for approximately
two weeks.
3. To make a mold:
• Have ready a clean 5 quart plastic bucket, plaster, scoop for plaster (can be an
empty plastic container-throw away kind of thing), water, sheet of plastic,
newspaper, plastic bowl you want to use for the mold to be made over,
vegetable spray for lubricant, and an old container you can wash your hands
and equipment in after pouring/spreading plaster over bowl.
• Have all supplies ready, once you start to mix plaster there is no time to go
look for things.
• Spread newspapers over table (working area).
• Set all supplies within easy reach.
• Fill 5 quart bucket about half full of lukewarm water. Set on newspapers.
• Place plastic bowl up side down in the center of the plastic sheet (cleaner bag
is great) and spray with vegetable oil generously until all the area of the bowl
is sprayed. If you make a mold of a larger bowl, naturally you will need a
bigger bucket and more plaster.
• With one hand, sprinkle the plaster into the 5 quart container slowly and let it
absorb as you sprinkle. Keep adding more plaster until you get an island in
the middle of the water. Stop adding plaster and let that absorb then sprinkle a
69
bit more until the water can not absorb any more plaster. At this point I
usually mix the plaster with one hand, and one hand only keeping the other
hand clean. If you can drag your wet fingers in the plaster and leave a few
lines in it, its ready to pour. If it seems to wet still and isn’t getting thick you
may add a little more plaster and mix with your wet hand until you can make a
trail in the plaster. When this happens pour the plaster over the inverted bowl
that is setting on the plastic sheet. I like to smooth the outside a bit and try
and get a flat bottom so when it sets right side up its easier to work with.
Once the plaster has set up, remove the plastic bowl and let it dry for about
two weeks before using. To clean up, wash your hand in the bucket of water
and any tools you may have used including the 5 quart bucket. Throw this
water outside, dumpster somewhere but never down your drain.
• Always add plaster to water, never add water to plaster!!!!
• You will want the plaster mold to be about 2” thick all over so it won’t break
during use.
4. Review how to color clays with oxides and mason stains.
5. Role out a slab about ¼” + thick.
6. Demonstrate how to drape a slab of clay into the plaster mold, cut off the excess
clay around the edges and smooth this edge with a dampened sponge not dripping
wet. Remember as you drape the clay; press the slab gentle into the bowl mold
and smooth with a rib until you feel the bowl is an even thickness.
7. Demonstrate how to cut out a design in a slab of clay a good ¼” thick.
a. Role out a small slab of clay
b. Using a loop tool, cut out a cavity about 1/3 of the thickness of the slab of
clay in a design pattern.
c. Make sure the cavity goes under the edge of the cut so the new clay won’t
fall out when it dries.
d. Smooth out the new inlayed clay with a thin metal rib. Do not use water
and a sponge it will bleed onto the rest of the bowl surface.
8. Alternative is to buy a mold from a ceramic shop to make the bowls.
9. Show students an example of inlayed clay
10. Assignment: The student will make a plaster mold, then create a slab bowl using
the mold and decorate the inside of the bowl with inlayed colored clays.
Evaluations:
Can/did the student
• Define mold
• Make a plaster mold of a bowl
• Practice inlaying colored clays in a cavity
• Make a bowl in a plaster mold then carve out cavities and fill the cavities with
colored clay/s
70
Closure:
Have students critique each other’s artwork using the four steps of art criticism.
Remember this does not mean something negative. Go through each step with the
students until they get use to doing a critique.
o Description (What do I see?)
o Analysis (How is the work organized?)
o Interpretation (What is the artist trying to communicate?)
o Judgment (Is this a successful work of art?)
71
Lesson Plan # 17
Grade:
Subject: Advance Ceramics
Period #
Topic: Slab cylinder with capped top and three spouts
TEKS: 117.54/5 a, b (1,2), c (1A,B, 2A,B,C, 3A, 4A,B)
Artist/Culture/Book:
Instructional Objectives:
The student will
• Discuss how clay shrinks
• Define spout
• Review harmony and unity in artwork
• Build a cylinder with capped top and three spouts with textures incorporated
into the design of the pot in some form.
Materials: clay and clay tools, newspapers, masking tape, spray bottle, large plastic
bags, slab making tools or slab roller, 4”-6” plastic tubes about 8”-10” long (buy a pipe at
a hardware store in plumbing and cut it up in lengths of about 8”-10” long)
Vocabulary: spout, textures, unity, harmony
Procedures:
1. Show an example of cylinder pot
2. Or draw a picture and use the overhead/easel
3. Demonstrate how to build the cylinder
• Roll out a slab about 16” x 12”
• Wrap the plastic cylinder in several layers of newspaper and put masking tape
in about three places to hold the paper on. Hint-let paper hang over the end of
the pipe so you can pull on it later to get the new clay cylinder off.
• Cut the slab clay for height of cylinder.
• Roll the slab around the cylinder and overlap the ends.
• Cut from one end of the cylinder to the other at a diagonal then remove the
extra clay ends. The two diagonal ends will overlap a bit. Score the two sides
that touch, put some slip on the score marks, rub the ends together and smooth
with a rib until you have an even thickness.
• Let the cylinder set overnight in a plastic bag wrapper up to keep the air off it.
• Next day remove the new clay cylinder from the plastic tube carefully.
Remember it has started to shrink. It may need some convincing.
• Cut two circles for the ends of the cylinder and attach each one once they are a
little stiff. Make sure and put a pinhole in the bottom so it can slowly dry out.
You might want to cut these at the same time you cut the slab for the cylinder.
72
Spouts can easily be made on a potter’s wheel or any form of hand building. I
like to make a few extra to decide which ones I like best. However you
construct the spouts, attach all three to the top of the cylinder in some form of
aesthetic manner to complement the pot. You can cut holes in the spouts once
you have attached them or leave it for looks only.
Define spout-a conductor/pipe through which a liquid is discharged into a stream.
Discuss with the students different ways to make the spouts but that they must
have a unity, a sameness for visual harmony.
Review how to create textures in clay surfaces/demo
Discuss how artwork has to have a unity and harmony to be a successful work of
art.
Assignment: The student will make a tall, textured, slab cylinder with three
spouts and glaze appropriately. Must be approximately 8-12” tall before the
spouts and have visual harmony and unity.
•
4.
5.
6.
7.
8.
Evaluations:
Can/did the student
• Discuss how clay shrinks
• Define spout
• Review harmony and unity in artwork
• Build a cylinder with capped top and three spouts with textures incorporated
into the design of the pot in some form and glazed appropriately for the pot.
Closure:
Have students critique each other’s artwork using the four steps of art criticism.
Remember this does not mean something negative. Go through each step with the
students until they get use to doing a critique.
o Description (What do I see?)
o Analysis (How is the work organized?)
o Interpretation (What is the artist trying to communicate?)
o Judgment (Is this a successful work of art?)
73
Lesson Plan # 18
Grade:
Period #
TEKS: 117.54/5 a, b (1,2), c (1A,B, 2A,B,C, 3A, 4A,B)
Artist/Culture/Book: History of Bonsai
Asian culture
Subject: Advance Ceramics
Topic: Bonsai planter
Instructional Objectives:
The student will
• Tell how/why a bonsai planter is special
• Define bonsai
• Be able to spell bonsai
• Make a bonsai planter with legs and one drain hole
Materials: example of planter or a picture with plant (tree), clay and clay tools, slab
equipment or slab roller, large plastic bags
Vocabulary: bonsai
Procedures:
1. Discuss the oriental custom of bonsai plants. Less is more.
2. Define bonsai-a potted plant usually a tree, dwarfed by special methods of culture.
The roots and certain limbs are cut to hold the plant to dwarf size in a small
shallow planter.
3. Review slab building techniques if needed and the slow drying skills needed for a
good pot.
4. Assignment: The student will make a slab bonsai planter approximately 4” tall,
6” deep and 12” long. The planter must have legs to get it off the table and one
drain hole.
Evaluations:
Can/did the student
• Tell how/why a bonsai planter is special
• Be able to spell bonsai
• Define bonsai
• Make a bonsai planter with legs and one drain hole
74
Closure:
Have students critique each other’s artwork using the four steps of art criticism.
Remember this does not mean something negative. Go through each step with the
students until they get use to doing a critique.
o Description (What do I see?)
o Analysis (How is the work organized?)
o Interpretation (What is the artist trying to communicate?)
o Judgment (Is this a successful work of art?)
75
Lesson Plan # 19
Grade:
Period #
TEKS: 117.54/5 a, b (1,2), c (1A,B, 2A,B,C, 3A, 4A,B)
Artist/Culture/Book:
Subject: Advance Ceramics
Topic: Hollow head with body
Instructional Objectives:
The student will
• Design an imaginary animal that can be built out of clay
• Make the imaginary animal with a hollow body and a head that is at least 10”
tall. Must pay attention to textures, proportions and imagination of the
animal.
Materials: clay and clay tools, sketch paper, pencils, plastic bags, 12”x12” boards
Vocabulary:
Procedures:
1. Do a quick review on how to construct coils to form sculpture or a pot.
2. Remind the students they need to score and use slip generously during
construction.
3. Assignment: The student will design and build an imaginary animal that has a
hollow body with a head and stands approximately 10”-12” tall. The surfaces
must have textures that will complement the imaginary animal while being aware
of proportions.
Evaluations:
Can/did the student
• Design an imaginary animal that can be built out of clay
• Make the imaginary animal with a hollow body and a head that is at least 10”
tall. Must pay attention to textures, proportions and imagination of the
animal.
Closure:
Have students critique each other’s artwork using the four steps of art criticism.
Remember this does not mean something negative. Go through each step with the
students until they get use to doing a critique.
o Description (What do I see?)
o Analysis (How is the work organized?)
o Interpretation (What is the artist trying to communicate?)
o Judgment (Is this a successful work of art?)
76
Lesson Plan # 20
Grade:
Period #
TEKS: 117.54/5 a, b (1,2), c (1A,B, 2A,B,C, 3A, 4A,B)
Artist/Culture/Book:
Subject: Advance Ceramics
Topic: Bank Sock
Instructional Objectives:
The student will
• Discuss what a bank is for
• Make a bank from a flat disc (slab or wheel thrown) with a theme and make
the disc into a face with an open mouth to accept change.
• Attach a sock to the outer edge with glue
• Put a hole in the top so it can hang.
Materials: clay and clay tools, new tub socks, glue or glue gun,
Vocabulary: bank
Procedures:
1. Allow time for the students to discuss what a bank is for. If you have access,
look up some of the old banks like cast iron banks that represented different
themes and banks that had moving parts. Banks use to be a part of savings for
children.
2. Define a bank-a container that holds money. It can be a small container or a
large building.
3. Make a disc on wheel, slab or coil.
4. Cut a slit, like the opening of a mouth, in the center of the disc.
5. Pull open to form a mouth with two fingers (enough to get coins in).
6. Make the disc about 3”- 4” diameter and about ¼” + thick
7. Assignment: The student will make a sock bank creating a face on the disc by
adding pieces of clay to make the face features. The bank must have an open
mouth so that change can be put inside the sock. Glue a sock onto the outer edge
of the face after its decorated and fired. Make sure the glue is dry before you use
it.
8. Themes may include a cowboy, an opera singer, sportsman, etc. Any character
that may have his or her mouth open for whatever reason.
77
Evaluations:
Can/did the student
• Discuss what a bank is for
• Make a bank from a flat disc (slab or wheel thrown) with a theme and make
the disc into a face and an open mouth to accept change.
• Attach a sock to the outer edge with glue
• Put a hole in the top so it can hang.
Closure:
Have students critique each other’s artwork using the four steps of art criticism.
Remember this does not mean something negative. Go through each step with the
students until they get use to doing a critique.
o Description (What do I see?)
o Analysis (How is the work organized?)
o Interpretation (What is the artist trying to communicate?)
o Judgment (Is this a successful work of art?)
78
Lesson Plan # 21
Grade:
Subject: Advance Ceramics
Period #
Topic: Clay bug
TEKS: 117.54/5 a, b (1,2), c (1A,B, 2A,B,C, 3A, 4A,B), Science
Artist/Culture/Book:
Instructional Objectives:
•
Design and construct a clay bug (insect) the size of their fist with six legs, eyes
and a clay body with wings. The body will only be partially glazed and careful
attention must be given to the design taking this into consideration.
Materials: clay and clay tools, drawings of insects, sketch paper, pencils
Vocabulary: insect
Procedures:
1. Insects have a well defined head, thorax and abdomen, only three pairs of legs and
typically one or two pairs of wings.
2. Show an overhead of an insect that shows its body parts.
3. Assignment: The student will design and make a clay insect the size of his/her
fist with wings, head, abdomen and thorax. The design must include not glazing
part of the bug.
4. This is a great opportunity to raku fire the insects if you have the facility. The
unglazed parts of the bug turn black while the glazed areas turn bright colors from
the raku glazes.
Evaluations:
Can/did the student
• Design and construct a clay bug (insect) the size of their fist with six legs, head,
abdomen, a thorax, and a clay body with wings. The body will only be partially
glazed and careful attention must be given to the design taking this into
consideration.
Closure:
Have students critique each other’s artwork using the four steps of art criticism.
Remember this does not mean something negative. Go through each step with the
students until they get use to doing a critique.
o Description (What do I see?)
o Analysis (How is the work organized?)
o Interpretation (What is the artist trying to communicate?)
o Judgment (Is this a successful work of art?)
79
Appendix-a list of suppliers that I have used. Some of these suppliers give a school
discount and others are willing to help you solve problems in relation to clay.
Axner Pottery Supply
P.O. Box 621484
Oviedo, FL 32765
407-365-2600
Fax: 407-365-5573
800-843-7057
Dry Creek Pottery
8400 Cleburne Hwy
Granbury, TX 76049
817-326-4210
email: [email protected]
www. Drycreekpottery.com
L & L Kiln Mfg., Inc.
8 Creek Parkway
Boothwyn, PA 19061
Toll Free: 877-468-5456
Fax: 610-485-4665
www.hotkilns.com
Nasco Arts & Crafts
901 Janesville Ave.
Fort Atkinson, WI 53538
920-563-2446
Fax: 920-563-8296
800-558-9595
Sax Arts & Crafts
P.O. Box 510710
New Berlin, WI 53151-0710
262-784-6880
Fax: 800-928-4729
800-558-6696
Texas Pottery Supply & Clay Company
365 Sansom Blvd.
Fort Worth, TX 76179
817-626-2529
Fax: 817-626-6226
800-639-5456
80
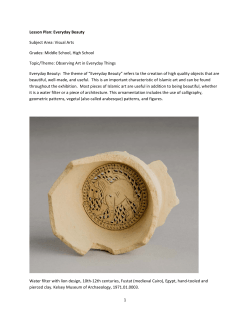


© Copyright 2026