
T200, T380, and T680 Quick Reference Guide
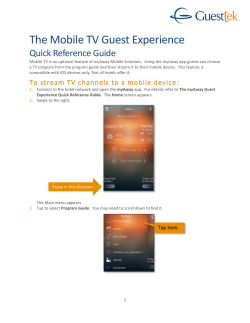
T-SERIES MID-RANGE LIBRARIES: T200, T380 AND T680 QUICK REFERENCE GUIDE 1 Keep this guide near the library for quick reference to the most common library operations. Refer to the Spectra T200, T380, and T680 User Guide on the library’s Product CD and at www.spectralogic.com/documents for detailed information about configuring, using, and maintaining the library. Front of Spectra T200 Library LCD touch screen Power On To power on the library, press and hold the front panel power POWERING THE LIBRARY ON AND OFF Power button button until the button’s LED illuminates (about 2–3 seconds). Wait while the library completes its power-on sequence, which takes about five minutes depending on the library configuration. During the power-on sequence the library initializes all components. TeraPack Access Port (TAP) This figure shows the T200 library. The relative locations of the components and procedures are the same for the other libraries unless otherwise indicated. Power Off To power off the library, press and hold the front panel power button until the button’s LED starts flashing (about 6 seconds). The power-off sequence takes approximately one minute while the library allows applications to shut down gracefully. Note: If the library is experiencing problems, do not power it off unless specifically directed to do so by SpectraGuard Technical Support. Log Into the Library: After the power-on sequence completes, the login 2 LOGGING INTO AND OUT OF THE USER INTERFACE screen displays. 1 Type “su” 1.Using the stylus, touch (to select) the User box and enter the user type. Superuser – Controls all aspects of library use and configuration. Administrator – Configures and uses the library. Operator – Performs day-to-day operations. 2 Type password su 3 Touch Login 4 Wait 2.Touch the Password box and enter the password. If you have: established a password—use the stylus to type it with the keyboard and select Login. not established a password—leave the password field blank, and select Login. 3.Wait for the initialization process to complete. 4.Close the keyboard by touching its icon with the stylus. Log Out of the Library From the Security screen, select Switch User to 5 Close keyboard Superuser—The default user name in this group is su. Administrator—The default user name in this group is Administrator. Operator—The default user name in this group is Operator. Default password = blank log out and re-display the login screen. 3 USING THE BLUESCALE INTERFACE The library’s user interface lets you set configuration options, view library and drive information and metrics, manage media, and monitor library operations. Toolbars Selecting a toolbar along the left side of each screen expands it to display the available options within that menu. The options in General toolbar access the most frequently used library screens and controls: Current toolbar General Status—Displays the current status for all of the major library components for the selected library partition. Inventory—Displays controls for viewing the library’s media inventory and for moving media from one location in the library to another. Import/Export—Displays controls for importing and exporting media. Additional toolbars Metrics—Displays metrics for tape drive performance, power consumption, and storage density for the media types in the library. Refresh Media Lifecycle Management—Displays options for generating and viewing Media Lifecycle Management reports. Status bar Status Bar The status bar is located at the bottom each screen. Icon Meaning (Touch the icon to view its information.) Refresh Button—Refreshes (updates) the information currently displayed on the user interface. System OK. All system components are functioning correctly. Messages & Feature Icons—Indicate the status of library components, as described in the Icon table to the right. Additional icons provide access to the remote support and BlueScale Vision features, if applicable. Information. An informational message about a component is available. Check messages to determine the component. Last Refreshed—Shows the time of the last screen refresh. Current BlueScale Software Version—Shows the version of the BlueScale software currently running on the library. IP Address or Library Name—Shows the library’s IP address (on the touch screen) or the library’s name (when using the BlueScale web interface). Keyboard Options Entering information into a library screen requires a keyboard. You can use any of these keyboard options: Soft Keyboard—When using the touch screen, touch the keyboard icon in the lower right corner of the screen to activate the on-screen keyboard. BlueScale Web Interface—You can connect the library to an Ethernet network and access the user interface through the BlueScale web interface using a standard web browser. External Keyboard—You can connect a keyboard and mouse directly into the LCM, located on the back of the library. IMPORTANT: When accessing the library remotely through a web browser, do not use the keyboard Enter key when entering information in any of the text fields. Various web browsers handle the Enter key differently, causing inconsistent behavior in the BlueScale interface. Always use the onscreen buttons in BlueScale screens instead of using your keyboard. Attention. A system component requires attention. Check messages to determine the component. Error. A system component has experienced an error condition. Check messages to determine the component. HHM Notification – A component has reached its maintenance threshold. Click the icon to view the Hardware Health Monitoring notification and generate an AutoSupport ticket. Soft Keyboard—Use the keyboard to “type” values in the user interface. Soft keyboard icon Stylus—Use the stylus to open and close the keyboard, type the values, and press enter to complete the process. Soft keyboard opened Touch the icon with the stylus to open or close the keyboard. Touch the icon with the stylus to switch between letters and numbers. External keyboard guidelines IMPORTANT: Do not use special characters for user names or passwords when using an external keyboard. Use only the characters that appear on the soft keyboard. © 2009–2011 Spectra Logic Corporation. All rights reserved worldwide. BlueScale, Spectra, SpectraGuard, TeraPack, and the Spectra Logic logo are registered trademarks of Spectra Logic Corporation. All other trademarks and registered trademarks are the property of their respective owners. Subject to change without notice. Spectra T200, T380, or T680 Library 4 PREPARING MEDIA FOR USE Quick Reference Guide Before loading media into the library, ensure that it is properly labeled and that the write-protect switch is set for the desired operation. Cartridge bar code label Prepare and load the cartridges into the TeraPack magazine as follows: 1.Prepare and affix a bar-code label to each cartridge if it is unlabeled. 2.Set the write-protect switch on each cartridge as required. Hub Unlocked–write enabled Locked–write protected Front of magazine Write-protect switch 3.Insert the prepared cartridges into the TeraPack magazine. Make sure that the cartridges are oriented with the hub side toward the front of the TeraPack magazine. Note: When using a cleaning partition, the cleaning cartridges must be in Maintenance TeraPacks, which are identified by a unique bar-code label. 5 IMPORTING OR EXPORTING MEDIA Cartridges are always imported or exported in TeraPack magazines using the TeraPack Access Port (TAP) and the Import/Export options on the library’s touch screen user interface. See the T-Series Mid-Range Libraries: T200, T380, and T680 User Guide for more information about importing and exporting magazines. Import Media Export Media You typically import TeraPack magazines into the entry/exit pool for a data partition. After the magazines are in the entry/exit pool, use your software to move the media into the partition’s storage pool. You typically export magazines from the entry/exit pool for a data partition. See the T-Series Mid-Range Libraries: T200, T380, and T680 User Guide if you want to export media directly from the storage pool. If you have a cleaning partition, you import the cleaning cartridges directly into the cleaning partition using a Maintenance TeraPack magazine. See the User Guide if you want to import media directly into the storage pool. 1.Eject the desired cartridges from the storage pool using your backup software. The library moves the ejected cartridges from the partition’s storage pool into a magazine in the partition’s entry/exit pool. When the software reports that the eject operation is complete, proceed to Step 2. 1.From the toolbar menu, select General > Import/Export. 2.From the Partition drop-down menu, select the partition to import the media into. Select Go to show the current status of the partition’s chambers. 3.Select Import (Entry/Exit) to open the TAP door. A Feedback Required screen displays. 4.Insert a magazine into the open TAP, making sure that it is correctly oriented. Note: Exporting one or more individual cartridges using your backup software requires a TeraPack magazine with sufficient empty slots to be present in the entry/exit pool. If necessary, import one or more empty magazines into the entry/exit pool. 2.From the toolbar menu, select General > Import/Export. 3.From the Partition drop-down menu, select the partition from which to export the media. Select Go to show the current status of the partition’s chambers. 4.Select Export/Exchange for the entry/exit pool. The raised arrows on each side of a TeraPack magazine are toward the outside of the library and point inward. The transporter retrieves a media pack and places it in the TAP. The TAP door opens and a Feedback Required screen displays. 5.Remove the media pack from the TAP. If you are exporting magazines, remove media pack, then manually raise the TAP door until it latches closed. If you are exchanging a magazine or an individual cartridge, remove the magazine or the cartridge, then return the magazine to the TAP. Manually raise the TAP door until it latches closed, moving the media pack into the TAP. 5.Gently raise the TAP door until it latches closed. This moves the media pack into the TAP. Note: Do not use force to close the TAP door. Note: Do not use force to close the TAP door. 6.Choose one of these options: Continue—Choose this option if you plan to import another magazine after the one currently in the TAP. The TeraPorter retrieves the magazine from the TAP and moves it to a chamber in the entry/ exit pool. If there are still empty chambers available, the TAP door opens again, ready for the next import. The TAP doors on the T680 alternate as you continue to import media. Stop Importing—Choose this option if the magazine you placed in the TAP is the last one you will be importing. 7.Repeat Steps 4 through 6 to import the remaining magazines. The import process continues until you choose the Stop Importing option or there are no empty chambers left in the entry/exit pool (or storage pool). 6.Choose one of these options: Continue—Choose this option if you plan to export another magazine after the one you removed from the TAP. If there are still magazines left in the entry/exit pool, the TeraPorter retrieves the next magazine and places it in the TAP. Simply continue to remove magazines from the TAP and select Continue for each one. The TAP doors on the T680 alternate as you continue to export media. Note: The magazines are exported in bar code order from the lowest to the highest. Stop Exporting—Choose this option if the magazine you removed from the TAP is the last one you will be exporting. 8.Use your backup software to move the magazines to the partition’s storage pool and update the inventory maintained by the software. 7.Repeat Steps 5 through 7 to export the remaining magazines. The export process continues until you choose the Stop Exporting option or there are no magazines left in the entry/exit pool. Note: Any chambers that do not contain a magazine will be inaccessible to the software. 8.If you exported media directly from the storage pool, use your backup software to update the media inventory it maintains. Clean the Tape Drives Tape drive cleaning can be automated by configuring a cleaning partition and using the BlueScale Auto Drive Clean feature. 6 LOCATING ADDITIONAL INFORMATION If you do not want to use the Auto Drive Clean feature, refer to the T-Series Mid-Range Libraries: T200, T380, and T680 User Guide for detailed information about additional cleaning options and instructions. Expand and Upgrade Your Library You can purchase expansion and upgrade options either separately or when you order the library by contacting a Spectra Logic sales representative (see below). You can also purchase selected items from our online store at www.spectralogic.com/shop. Read Product Documentation View these resources at www.spectralogic.com/documents. Refer to the T-Series Mid-Range Libraries: T200, T380, and T680 User Guide for information about library configuration, operation, troubleshooting, and maintenance. Refer to the Spectra T200, T380, or T680 Library Release Notes and Documentation Updates for information about BlueScale firmware and documentation updates. Perform a Backup Refer to the documentation that came with your backup application for instructions. Spectra Logic Technical Support Spectra Logic Sales (International: 00 1 303 442 2848) Technical Support Portal: support.spectralogic.com United States and Canada Europe, Middle East, Africa United States and Canada Europe Email: [email protected] Phone: 1.800.227.4637 (toll free US/Canada) 1.303.449.0160 [email protected] 44 (0) 870.112.2185 [email protected] 1.877.205.7005 [email protected] 44 (0) 870.112.2150 P.N. 91010003, Rev. E Media Sales Email: [email protected] www.spectralogic.com Page 2 of 2


© Copyright 2026