
the Personal Pie™ Instruction Booklet BPI640
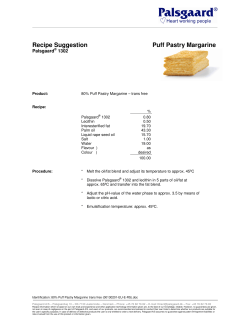
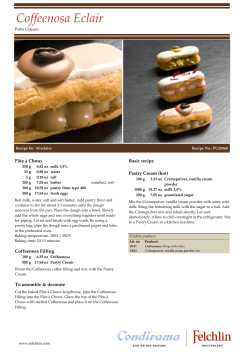
the Personal Pie™
Instruction Booklet
BPI640
CONGRATULATIONS
on the purchase of your new Breville Personal Pie™
Contents
4
Breville recommends safety first
7
Know your Breville Personal Pie™
9
Operating your
Breville Personal Pie™
13
Care and Cleaning
15
Hints for best results
19
Recipes
3
Breville recommends safety first
At Breville we are very safety conscious. We design and manufacture consumer products with
the safety of you, our valued customer, foremost in mind. In addition we ask that you exercise
a degree of care when using any electrical appliance and adhere to the following precautions.
Important safeguards
Read all instructions
BEFORE USE AND SAVE FOR
FUTURE REFERENCE
• Carefully read all instructions before
operating the appliance for the first time
and save for future reference.
• Remove and safely discard any packaging
materials and promotional labels before
using the appliance for the first time.
• To eliminate a choking hazard for young
children, remove and safely discard the
protective cover fitted to the power plug
of this appliance.
• To protect against electrical shock, do not
immerse the power cord, power plug in
water or any other liquid.
• Do not place the appliance near the edge
of a bench or table during operation.
Ensure the surface is level, clean and
free of water.
• Always use the appliance on a dry,
level surface.
• Keep the appliance clear of walls, curtains
and other heat or steam sensitive
materials.
• Do not place the appliance on or near
a hot gas or electric burner, or where it
could touch any other source of heat.
• Provide adequate space above and
on all sides for air circulation around
the appliance.
• Do not place the appliance on any
surface that may be affected by heat.
The use of a heat resistant matt is
recommended on these surfaces.
• Do not use on a sink drain board.
• Do not place anything on top of the
appliance when the lid is closed, when in
use and when stored.
4
• Unwind the power cord fully before use.
• Do not allow the power cord to hang
over the edge of a table or counter, touch
hot surfaces or become knotted.
• Do not touch hot surfaces. Use the
handle to lift and open the top lid.
• Extreme caution must be used when
moving an appliance containing hot
contents such as oil or liquids.
• Allow appliance to cool before putting
on or taking off any parts or cleaning.
• Always remove the plug from the power
outlet and allow to cool if the appliance
is not in use, before attempting to
move the appliance, before cleaning,
disassembling, assembling and when
storing the appliance.
• Do not use harsh abrasive, caustic
cleaners when cleaning the appliance.
• Strictly follow the care and cleaning
instructions described in this book.
• This appliance is for household use only.
Do not use the appliance for anything
other than its intended purpose as
described in this book. Do not use
outdoors. Do not use in moving vehicles
or boats.
• The use of attachments not sold or
recommended by Breville may cause fire,
electric shock or injury.
• Do not leave the appliance unattended
when in use.
• The appliance is not intended to be
operated by means of an external timer
or separate remote-control system.
• The appliance is not intended to be
operated by means of an external timer
or separate remote-control system
Breville recommends safety first
• This appliance can
• Keep the appliance
be used by children
and its cord out of
aged from 8 years
reach of children less
and above and
than 8 years.
persons with reduced
physical, sensory or
WARNING HOT SURFACE
mental capabilities
or lack of experience
IMPORTANT SAFEGUARDS FOR
and knowledge
ALL ELECTRICAL APPLIANCES
if they have been
• Fully unwind the power cord before use.
given supervision
• Do not let the power cord hang over
the edge of a bench or table, touch hot
or instruction
surfaces or become knotted.
concerning use
• To protect against electric shock do not
immerse the power cord, power plug or
of the appliance
appliance in water or any other liquid.
in a safe way and
• The appliance is not intended for use
by persons (including children) with
understand the
reduced physical, sensory or mental
capabilities, or lack of experience and
hazards involved.
knowledge, unless they have been given
supervision or instruction concerning
• Children shall
use of the appliance by a person
responsible for their safety.
not play with the
• Children should be supervised to ensure
appliance.
that they do not play with the appliance.
• It is recommended to regularly inspect
• Cleaning and user
the appliance. To avoid a hazard do not
use the appliance if power cord, power
maintenance shall
plug or appliance becomes damaged in
any way. Return the entire appliance to
not be made by
the nearest authorised Breville Service
Centre for examination and/or repair.
children unless they
maintenance other than cleaning
are older than 8 and • Any
should be performed at an authorised
Breville Service Centre.
supervised.
5
5
Breville recommends safety first
• This appliance is for household use only.
Do not use this appliance for anything
other than its intended use. Do not use
in moving vehicles or boats. Do not use
outdoors. Misuse may cause injury.
• The installation of a residual current
device (safety switch is recommended
to provide additional safety protection
when using electrical appliances. It
is advisable that a safety switch with
a rated residual operating current
not exceeding 30mA be installed in
the electrical circuit supplying the
appliance. See your electrician for
professional advice.
• Always turn the power off at the power
outlet and then remove the power
plug from the power outlet before
attempting to move the appliance, when
the appliance is not in use and before
cleaning or storing.
SAVE THESE
INSTRUCTIONS
6
KNOW
your Breville Personal Pie™
PAge header.....
KNOW
YOUR BREVILLE PERSONAL PIE™
A
B
E
C
D
F
H
G
A. Power 'ON' and 'Ready' Lights indicate
when the pie maker is heating or ready
to use.
B. Locking Latch secures the lid for
perfectly sealed pies.
C. 4 x 4" Diameter Pie Molds
D. Edge Crimper seals the pie edge with a
decorative trim.
8
E. Easy Clean, Non-Stick Surface allows
cooked pies to be easily removed.
F. Cord Storage
G. Pastry Cutter cuts pastry to the perfect
size for your pie top and base.
H. Pastry Press presses the pastry base into
the pie mold.
OPERATING
your Breville Personal Pie™
PAge header.....
OPERATING
YOUR BREVILLE PERSONAL PIE™
Before first use
• Remove any packaging material and
promotional labels. Wipe the Cooking
Plates with a soft damp cloth and dry
thoroughly. Wash the Pastry Cutter and
Pastry Press in warm soapy water with a
soft cloth. Rinse and dry thoroughly.
• Season the Cooking Plates (top and
bottom) with a little vegetable oil and
rub off the excess with absorbent paper
towel. After this initial seasoning, there
is no need to season the Cooking Plates
before each use as the pastry leaves
them slightly seasoned.
• When using the Pie Maker for the
first time you may notice a fine smoke
haze. This is caused by the protective
substances on the heating elements.
These are safe, not detrimental to the
performance of the Pie Maker and will
dissipate with use.
Larger end faces pastry
to cut the pie base
Fig. 2
NOTE
Ready-rolled refrigerated or frozen
pastry sheets should be brought to
room temperature before using with
the Pie Maker. Allow sufficient time
for thawing. One standard readyrolled square sheet (9.5"/25cm) or
ready-rolled round (9"/23cm) is
sufficient for two pies
(2 pastry tops and 2 pastry bases).
Pastry Press
PASTRY CUTTER
The Pastry Cutter cuts the pastry tops
and bases for your pies and is designed to
perfectly fit the Pie Molds. The smaller end
of the cutter is for the pie top (see Fig. 1) and
the larger end of the cutter is for the pie base
(See Fig. 2).
The Pastry Press (See Fig. 3) assists in
pressing down the pastry base into the
Pie Mold.
Smaller end faces pastry
to cut the pie top
Fig. 3
Fig. 1
10
1. Insert the plug into a 220V or 240V
power outlet and close the lid. The red
power ‘ON’ light will illuminate and
remain illuminated until the power plug
is removed from the power outlet.
PAge header.....
OPERATING
YOUR BREVILLE PersOnal Pie™
2. Allow the Pie Maker to preheat with
the lid closed. When the green ‘Ready’
light illuminates, the Pie Maker
is ready to use, approximately 4-5
minutes. The 'Ready' light will cycle on
and off during operation to maintain
the correct temperature.
TIP
The edge of the Pastry Cutter can be
sharp when applying pressure. For
more comfortable pastry cutting, nest
the Pastry Press inside the Pastry
Cutter and push down with the palm
of your hand.
NOTE
When baking the first batch of pies,
it is recommended to allow the Pie
Maker to preheat for two cycles
to achieve the optimum baking
temperature. To preheat the Pie Maker
for two cycles, allow the green ‘Ready’
light to illuminate then go out, then
illuminate again. The Pie Maker is
ready to use when the green ‘Ready’
light illuminates for the second time.
3. While the Pie Maker is preheating,
lightly flour the work surface, roll out
the thawed pastry sheet, then sprinkle
generously with flour. This will prevent
the pastry from sticking to the Pastry
Cutter and Pastry Press.
4. Position the Pastry Cutter over the flat
sheet of pastry. Press down firmly. Do
not twist as this will tear the pastry. Cut
4 pastry tops (using the smaller end)
and 4 pastry bases (using the larger
end). One standard ready-rolled square
sheet or ready-rolled round is sufficient
for two pies (2 pastry tops and 2 pastry
bases), so you will need 2 sheets. Ensure
the cut is smooth around the edges.
5. When the green 'Ready' light
illuminates, open the lid. Place one
pastry base over the center of one Pie
Mold. Using the Pastry Press, gently
press downwards to mold the pastry into
the Pie Mold. The edge of the pastry
should overlap the Edge Crimper. Repeat
with the remaining 3 pastry bases.
TIP
If the Pastry Press sticks to the
pastry base, lightly flour the pastry
or Pastry Press.
11
PAge header.....
OPERATING
YOUR BREVILLE PersOnal Pie™
6. Spoon cooled, pre-cooked filling into
the pastry base. It is recommended that
a L cup of filling be used per Pie Mold
unless specified in the recipe. Do not
overfill the pastry bases.
NOTE
Do not use liquid ingredients such
as sauces, gravies and custard on
their own or in large amounts, as
they will overflow and make the
pastry soggy. Always combine with
solid ingredients.
7. Place the pastry tops over the filling,
ensuring the edges of the pastry top
are positioned evenly over the pastry
base edge.
9. Different pastries and fillings require
varied cooking times. As a general
guide, for thin pastries, such as puff
pastry, allow pies to cook for 8-10
minutes or until desired shade of golden
brown. For thicker pastries, such as
ready-rolled pie crust, allow pies to cook
for 10-12 minutes plus, or until desired
shade of golden brown.
10. Remove the plug from the power outlet
before removing the pies with a plastic
heat-proof spatula or silicone tip tongs.
NOTE
Do not use metal utensils as these
may scratch the non-stick finish of the
Cooking Plates.
NOTE
NOTE
Use caution when placing the pastry
and fillings into the Pie Molds as the
appliance surfaces and Cooking Plates
will be hot.
For a light and buttery taste, use puff
pastry or butter puff pastry for the
pastry top; and puff pastry or readyrolled pie crust for the pastry base. We
do not recommend using ready-rolled
pie crust for your pastry top.
8. Close the lid, ensuring the Locking
Latch clicks into position. The lid
must be closed at all times when
baking. It is advised that the pies are
checked regularly until desired shade
of golden brown.
NOTE
During cooking you may notice a
whistling sound. This is due to steam
escaping from the pies.
NOTE
The Pie Maker is designed for
making four pies at a time. Uneven
cooking may occur if less than four
pies are made.
12
NOTE
Pastry sheets should be kept chilled
then thawed when needed. For best
results, frozen pastry should be used as
soon as it is thawed. If left out for too
long, soft pastry sheets are difficult to
handle and to cut clean shapes.
CARE AND CLEANING
PAge header.....
CARE
AND CLEANING
Before cleaning, remove the power plug
from the power outlet. Allow the Pie Maker
to cool slightly. The Pie Maker is easier to
clean when slightly warm. Always clean your
Pie Maker after each use to prevent a build
up of baked-on foods.
To clean the cooking plates
Wipe cooking plates with a soft damp cloth.
Dry thoroughly.
If baked-on food is difficult to remove, brush
with a little oil or melted butter. Allow to
stand for five minutes then wipe with a
damp cloth.
If food residue builds up, spray with a
little lemon juice and wipe clean. Do not
use abrasives or metal scourers as they
will scratch the non-stick surface of the
Cooking Plates.
NOTE
Do not use metal utensils as these
may scratch the non-stick finish of the
Cooking Plates.
To clean the exterior
Wipe with a soft damp cloth and dry
thoroughly with a soft dry cloth.
TO CLEAN THE PASTRY CUTTER
AND PASTRY PRESS
Wash with warm soapy water and dry
thoroughly with a soft dry cloth.
NOTE
Do not place the Pie Maker,
Pastry Cutter or Pastry Press in
the dishwasher.
14
Storage
Remove the plug from the power outlet
before storing. Ensure the Pie Maker is
completely cooled, clean and dry. Wrap the
power cord around the cord storage. Store
the appliance horizontally or vertically on
the bench or in a convenient cupboard.
Only place the Pastry Cutter and
Pastry Press on top of the Pie Maker
during storage.
NOTE
The Pastry Press nests inside the
Pastry Cutter for convenient storage.
HINTS FOR
BEST RESULTS
PAge header.....
Hints
for best results
Pastry
Using left-over pastry
• A selection of ready-rolled pastry,
such as pie crust, puff or butter puff, is
available in your supermarket freezer
or specialty food store. These pastries
give great results and are handy to keep
in your freezer. Allow sufficient time
to defrost to room temperature before
use. Filo pastry can be used for some
pies. Use filo pastry from the chilled
refrigerator section of the supermarket.
Frozen filo pastry can be brittle and
difficult to shape.
• Make more pies, garnishes and
decorations with the left over pastry.
Lightly knead the left-over pieces into a
ball and roll out to approximately V inch
(3mm) thick.
• Pastry sheets should be kept chilled then
thawed when needed. For best results,
frozen pastry should be used as soon as
it is thawed. If left out for too long, soft
pastry sheets are difficult to handle and
to cut clean shapes.
• For a light and buttery taste, use puff
pastry or butter puff pastry for the
pastry top; and puff pastry or readyrolled pie crust for the pastry base. This
combination is ideal for dessert pies. We
do not recommend using ready-rolled
pie crust for your pastry top.
• Some pies, such as tarts and quiches, can
be made with a pastry base only. Certain
fillings are not suitable for this - they
can overflow out of the pastry base and
onto the Cooking Plates - so follow the
recipe instructions within this booklet
or experiment with the consistency of
the fillings. Drier, firmer fillings tend to
work best.
• Unused pastry sheets can be refrozen.
Place into a large freezer bag and seal
before placing back into the freezer.
16
TIP
It is easier to roll pastry between
2 sheets of waxed baking paper.
To make garnishes and decorations,
cut the pastry into any shape, such
as leaves, hearts, or stars. Place the
shape on the pastry top before baking
as usual.
NOTE
It is recommended that only readyrolled pie crust pastry be re-rolled.
Also, keep the pastry covered to
prevent drying and cracking.
Pre-cutting pastry
• Pastry can be pre-cut and stored in the
freezer so that anyone can make pies at
their convenience. After cutting up the
pastry, separate each piece with a layer
of plastic wrap. Cover completely with
plastic wrap and return to the freezer.
PAge header.....
Hints
for best results
Bread
Fillings
• The Pie Maker can also prepare
economical pies from bread. Most types
of large-sized sandwich bread can be
used: white, wholemeal, raisin loaf etc.
It is not recommended to use thick
slices as they will prevent the lid from
closing properly. Heavy grained breads
are also not recommended as they may
scratch the Cooking Plates and are not
sufficiently pliable for shaping into the
Pie Molds. When using raisin bread,
brioche or other sweet breads that are
higher in sugar, remember that they may
brown quickly.
• Fillings should be cooked and cooled
before adding to the pastry base. The
cooking time for the pies is not sufficient
to cook raw meat fillings or soften fresh
fruit or vegetable fillings.
• To cut 4 bread tops and 4 bread bases,
use 8 slices of large-sized sandwich
bread. Position the Pastry Cutter over
each slice and cut by pressing down into
the bread. Do not twist. Ensure the cut is
smooth around the edges.
• Excess prepared fillings may be stored in
an air-tight container in the refrigerator
for up to 2 days.
• For best results we recommend to butter
the outside of the bread, that is, place
the buttered side against the Cooking
Plates. Place filling into the unbuttered
side. If you are on a low fat diet or calorie
counting, the outside of the bread may
be left unbuttered. Season the plates
occasionally to prevent the bread from
sticking and to make cleaning easier.
• Any ingredients you have in your
kitchen, left-overs and canned food make
quick and easy pie fillings.
• Ensure all ingredients are cut into
small and even pieces to allow them to
heat through.
• Pies with insufficient filling will not form
a good shape and may not brown on top.
• Be careful when biting into hot pies and
especially hot pies containing fillings
such as cheese, tomato or jam as these
retain heat and may burn your mouth if
eaten too quickly.
NOTE
Do not use liquid ingredients such as
sauces, gravies and custard on their
own or in large amounts, as they will
overflow and make the pastry soggy.
Always combine with solid ingredients.
Spoon cooled, pre-cooked filling into
the pastry base. As a general rule, use
L cup of filling per pie. Do not overfill
your pies.
17
PAge header.....
Hints
for best results
Reheating
• Keep pies hot after baking by placing
onto a rack inserted into an oven-proof
dish. Place into an oven preheated to
105-120ºC (225-250ºF) for up to
20 minutes. Pies will begin to dry out
if kept for longer in the oven.
• If pies are not being served immediately,
place onto a cooling rack or onto a paper
napkin to absorb condensation.
• Left-over pies should be cooled and
kept in an air-tight container in the
refrigerator. Reheat in a preheated
hot oven 220-230ºC (425-450ºF) for
10 minutes or until heated through.
Alternatively, reheat them in the
preheated Pie Maker until heated
through. Do not reheat pies in a
microwave oven as the pastry will soften.
18
RECIPES
Use ready-rolled refrigerated or frozen pastry sheets that have just been thawed to room
temperature for the following recipes.
TIP:
For the savory pies, we recommend using puff or butter puff for both the pastry top and bottom. As
a general guide, this combination of pastry takes approximately 8-10 minutes to brown.
For the sweet pies, puff or butter puff can be used for both the pastry top and bottom.
Alternatively, substitute ready-rolled pie crust for the pastry base for an extra buttery taste.
As a general guide, this combination of pastry takes approximately 10-12 minutes to brown.
We do not recommend using ready-rolled pie crust for the pastry top.
PAge header.....
SWEET
PIES
Berry Pies
PEAR AND LIME PIES
Makes approximately 8 pies
Makes approximately 8 pies
INGREDIENTS
INGREDIENTS
400g mixed fresh berries
L cup caster sugar
1 teaspoon vanilla bean paste
2 tablespoons all-purpose flour
Powdered sugar and cream for serving
2 sheets short crust pastry, thawed
2 sheets puff pastry, thawed
800g can pears, drained
¾ cup reserved pear juice
½ cup reserved pear juice
½ cup fresh lime juice
¼ cup caster sugar
METHOD
1. Combine berries, sugar, vanilla and flour
in a bowl.
2. Preheat the pie maker until the ‘Ready’
light illuminates.
3. Prepare pastry bases and tops. Use L cup
of filling per pie.
4. Close lid and cook for 6-8 minutes or
until pastry is golden brown.
5. Remove the pies with a plastic heat
proof spatula and cool slightly.
Serve warm or cold, sprinkle with icing sugar
and a dollop of cream.
METHOD
6. Chop pears into small pieces. Combine
in a saucepan with pear juice, lime juice
and sugar.
7. Blend cornstarch with water, add to
pears and stir until mixture boils and
thickens. Allow to cool.
8. Preheat the pie maker until the ‘Ready’
light illuminates.
9. Prepare pastry bases and tops.
Use L cup of filling per pie.
10. Cook for 6-9 minutes or until pastry is
golden brown.
11. Remove the pies with a plastic heat
proof spatula and cool slightly.
Serve warm or cold, sprinkle with icing sugar
and a dollop of cream.
20
PAge header.....
SWEET
PIES
Chocolate Chip Muffins
Pecan Pie Tart
Makes approximately 12 muffins
Makes approximately 8 pies
INGREDIENTS
INGREDIENTS
2 cups self rising flour
¾ cup caster sugar
150g chocolate chips
2 eggs, lightly beaten
½ cup vegetable oil
M cup milk
60g butter, melted
¾ cup brown sugar
½ cup golden syrup
1 teaspoon salt
4 eggs
2 cups chopped pecans
2 sheets shortcrust pastry, thawed
Whipped cream to serve
METHOD
1. Place flour, sugar and chocolate chips in
a bowl. Mix well.
2. Mix together, egg, oil and milk. Stir into
flour mixture.
3. Preheat the pie maker until the ‘Ready’
light illuminates.
4. Spoon ¼ cup of the mixture directly
into the pie molds and cook for
approximately 9-12 minutes or until
golden brown and cooked through.
5. Remove the muffins with a plastic heat
proof spatula and cool slightly.
Alternatively, blueberries can be added or
substituted for the chocolate chips.
METHOD
1. Whisk together the butter, brown sugar,
golden syrup, salt and egg. Stir in pecans.
2. Preheat the pie maker until the ‘Ready’
light illuminates.
3. Prepare pastry bases only. Use L cup of
filling per pie.
4. Close lid and cook for 10-12 minutes.
5. Remove the pies with a plastic heat
proof spatula.
6. Allow to cool on a wire rack for
5 minutes before placing in the
refrigerator for 30 minutes to chill.
TIP
We recommend using ready-rolled pie
crust pastry for this tart.
21
PAge header.....
SWEET
PIES
Quick Christmas fruit pies
Makes approximately 8 pies
INGREDIENTS
150g dried dates, finely chopped
¼ cup brandy
Zest of an orange
2 x 410g jar fruit mince
2 sheets short crust pastry, thawed
2 sheets puff pastry, thawed
METHOD
1. Combine dates, brandy and orange zest
and soak for 20 minutes. Drain dates
and stir into fruit mince.
2. Preheat the pie maker until the ‘Ready’
light illuminates.
3. Prepare pastry bases and tops.
Use L cup of filling per pie.
4. Close lid and cook for 6-9 minutes or
until pastry is golden brown.
5. Remove the pies with a plastic heat
proof spatula and cool slightly.
22
PAge header.....
SAVORY
PIES
Ham and herb quiche
Bacon and egg tarts
Makes approximately 4 pies
Makes approximately 8 tarts
INGREDIENTS
INGREDIENTS
30g butter
2 leeks, white part only, finely chopped
300g diced ham
6 eggs, lightly beaten
1 cup thickened cream
½ cup finely chopped fresh herbs (basil, parsley)
Salt and pepper, to taste
2 sheets shortcrust pastry, thawed
8 large slices soy and linseed bread, crusts removed
8 middle bacon rasher, rind removed and chopped
8 eggs
Salt and pepper
METHOD
1. Heat butter in saucepan, and lightly
sauté leek for 2 minutes, remove from
heat. Combine in a bowl leek, ham, eggs,
cream and herbs. Season with salt and
pepper.
2. Preheat the pie maker until the ‘Ready’
light illuminates.
3. Prepare pastry bases only. Use L cup of
filling per pie.
4. Close lid and cook for approximately
15 minutes or until the egg mixture has
set and is cooked through.
5. Remove the quiches with a plastic heat
proof spatula.
6. Allow to cool on a wire rack for
5 minutes before serving.
METHOD
1. Place bread onto a flat work surface and
roll out thinly with a rolling pin. Use
the pie cutter to cut the bases from the
bread slices.
2. Preheat the pie maker until the ‘Ready’
light illuminates.
3. Insert the bread bases into the pie maker
using the pie press.
4. Divide the bacon evenly amongst the
tarts and crack egg over the top. Season
with salt and pepper.
5. Close the lid and cook 8-10 minutes or
until egg is cooked to your liking.
TIP
We recommend using ready-rolled pie
crust pastry for this quiche.
23
PAge header.....
SAVORY
PIES
Beef and Guinness pie
Chicken and Mushroom Pies
Makes 8 pies
Makes 8 pies
INGREDIENTS
INGREDIENTS
¼ cup plain flour
Salt and freshly ground black pepper
800g chuck steak, cut into 2cm dice
3 tablespoons olive oil
1 large onion, diced
2 garlic cloves, crushed
440ml Guinness draught beer
1½ cup beef stock
4 sprigs fresh thyme
2 sheets short crust pastry, thawed
2 sheets puff pastry, thawed
1 large chicken breast
40g butter
1 tablespoon olive oil
1 leek, white part only, thinly sliced
100g button mushrooms, sliced
¼ cup plain flour
1½ cups (375ml) chicken stock
L cup light cooking cream
Sea salt and freshly ground black pepper
2 sheets short crust pastry, thawed
2 sheets puff pastry, thawed
METHOD
METHOD
1. Place flour, salt and pepper into a plastic
bag and mix well. Add beef and shake to
coat evenly.
2. Heat half the oil in a large flame-proof
casserole dish over medium high heat
and add beef in batches. Cook 5 minutes,
turning regularly until sealed and brown.
Transfer to a plate and repeat with
remaining beef and oil.
3. Add remaining oil to the same pan and
cook onion and garlic until softened and
lightly golden. Return the beef and stir
in Guinness, stock and thyme; bring to
the boil. Reduce heat to low, cover and
simmer 1½ hour or until beef is tender
and sauce is thick. Season to taste with
salt and pepper. Allow to cool.
4. Preheat the pie maker until the ‘Ready’
light illuminates.
5. Prepare pastry bases and tops.
Use L cup of filling per pie.
6. Cook for 6-9 minutes or until pastry is
golden brown.
7. Remove the pies with a plastic heat
proof spatula and cool slightly.
1. Place chicken breast in a small saucepan
and cover with water. Bring saucepan
to the boil then reduce heat to low and
cook for 10 minutes. Turn heat off and
allow chicken to sit in liquid for another
5 minutes; remove chicken from liquid
and allow to cool.
2. Heat butter and oil in a small saucepan
over a medium heat; add leek and
mushrooms and cook, stirring, until
softened. Add flour and cook, stirring,
for 2 minutes. Gradually add stock and
cook for about 5 minutes or until thick.
Add cream and cook for a further 2-3
minutes. Remove from heat.
3. Dice chicken and stir through
mushroom sauce. Allow to cool.
4. Preheat the pie maker until the ‘Ready’
light illuminates.
5. Prepare pastry bases and tops.
Use L cup of filling per pie.
6. Cook for 6-9 minutes or until pastry is
golden brown.
7. Remove the pies with a plastic heat
proof spatula and cool slightly.
24
PAge header.....
SAVORY
PIES
Lamb, Rosemary and garlic pie
Makes 8
7. Remove the pies with a plastic heat
proof spatula and cool slightly.
INGREDIENTS
Pork, fennel and parsnip pie
2 tablespoons olive oil
600g lamb leg, cut into 2cm dice
2 tablespoons, plain flour
1 small onion, finely chopped
4 garlic cloves, crushed
32 sprigs fresh rosemary, picked
1 carrot, diced
1 tablespoon tomato paste
¼ cup red wine
1½ cups chicken stock
2 sheets short crust pastry, thawed
2 sheets puff pastry, thawed
1 tablespoon poppy seeds
Makes 8
METHOD
1. Heat half the oil in a large non-stick
frying pan over medium heat. Toss
lamb in flour, shaking off excess
and cooking in small batches for 3-4
minutes or until browned. Continue
with remaining lamb and flour. Spoon
onto a plate and set aside.
2. Add remaining oil to the same pan and
cook onion, garlic, rosemary and garlic
until onion has softened. Stir in tomato
paste and cook for 1 minute.
3. Add wine and allow to simmer, stirring
continuously, for 2 minutes. Return lamb
to pan along with chicken stock. Cover
and reduce heat to low and simmer for
45 minutes. Remove lid and simmer
a further 15 minutes or until lamb is
tender and sauce has thickened. Season
to taste and cool completely.
4. Preheat the pie maker until the ‘Ready’
light illuminates.
5. Prepare the pastry bases and tops.
Use L cup of filling per pie. Sprinkle
each pie with poppy seeds.
6. Close the lid and cook for 6-9 minutes or
until golden brown.
INGREDIENTS
2 tablespoons olive oil
1 onion, chopped
2 garlic cloves, crushed
1 baby fennel, trimmed and finely sliced
2 small parsnips, peeled and chopped
600g pork mince
2 tablespoons plain flour
1 cup chicken stock
2 tablespoons chopped parsley
Salt and freshly ground white pepper
2 sheets short crust pastry, thawed
2 sheets puff pastry, thawed
METHOD
1. Heat oil in a large frying pan over
medium heat and cook onion, garlic,
fennel and parsnips over medium heat
for 10 minutes or until softened.
2. Increase heat to medium high heat
and add mince in batches, stirring
continuously, until meat is browned
and crumbly.
3. Add flour and mix well to coat.
Gradually stir in stock; reduce heat and
simmer for 15-20 minutes or until meat
and vegetables are cooked and sauce
has thickened. Allow to cool.
4. Preheat the pie maker until the ‘Ready’
light illuminates.
5. Prepare the pastry bases and tops.
Use L cup of filling per pie.
6. Close the lid and cook for 6-9 minutes or
until golden brown.
7. Remove the pies with a plastic heat
proof spatula and cool slightly.
25
PAge header.....
SAVORY
PIES
Ratatouille and
goat’s cheese pie
Makes 8
INGREDIENTS
1 tablespoon olive oil
1 onion, finely chopped
2 garlic cloves, chopped
2 zucchinis, diced
1 eggplant, diced
1 large red capsicum, seeds removed and diced
2 tablespoons tomato paste
400g can peeled and diced tomato
2 sprigs thyme
Salt and pepper
120g soft goat’s cheese, crumbled
2 sheets short crust pastry, thawed
2 sheets puff pastry, thawed
METHOD
1. Heat oil in a large non-stick frying
pan over medium high heat and cook
onion and garlic for 5 minutes or until
softened. Add vegetables and cook
a further 3 minutes, stirring, until
vegetables are lightly golden and just
beginning to soften.
2. Stir in tomato paste, canned tomato and
¾ cup water. Stir to mix and sprinkle over
thyme leaves. Reduce heat to medium
low, cover and simmer for 10-15 minutes.
3. Remove lid and allow sauce to
simmer for 5 minutes or until sauce
has thickened and excess juice has
evaporated. Season to taste with salt and
pepper. Allow to cool.
4. Preheat the pie maker until the ‘Ready’
light illuminates.
5. Prepare the pastry bases and tops. Use L
cup of filling per pie and top with a little
of the goat’s cheese.
6. Close lid and cook for 6-9 minutes or
until golden brown.
7. Remove the pies with a plastic heat
proof spatula and cool slightly.
26
Salmon, dill and brie pie
Makes 8
INGREDIENTS
350g smoked salmon, diced
2 tablespoons chopped dill
2 green onions, finely sliced
200g very cold brie, cut into large dice
2 sheets short crust pastry, thawed
2 sheets puff pastry, thawed
METHOD
1. Combine salmon, dill and green onions
and brie and mix well.
2. Preheat the pie maker until the ‘Ready’
light illuminates.
3. Prepare the pastry bases and tops. Use L
cup of filling per pie.
4. Close the lid and cook for 6-8 minutes or
until golden brown.
5. Remove the pies with a plastic heat
proof spatula and cool slightly
PAge header.....
SAVORY
PIES
Thai chicken curry pie
Spinach and Feta pies
Makes 8
Makes approximately 8 pies
INGREDIENTS
INGREDIENTS
1 tablespoons vegetable oil
800g chicken breast, diced
2 tablespoons green or red curry paste
2 tablespoons plain flour
400ml coconut milk
L cup chopped coriander
2 sheets short crust pastry, thawed
2 sheets puff pastry, thawed
2 bunches English spinach
1 tablespoon olive oil
1 onion, finely chopped
2 tablespoons pine nuts
200g Greek feta cheese, crumbled
2 eggs
Cracked black pepper
8 sheets Filo pastry
Olive oil cooking spray
MEHTOD
1. Heat oil in a large non-stick frying pan
over medium heat and cook chicken for
3-4 minutes to seal. Add curry paste and
cook a further 1-2 minutes.
2. Stir in plain flour and mix well to coat.
Add coconut milk and stir until sauce
comes to the boil. Reduce heat and
simmer for 10 minutes or until sauce
has thickened and chicken has cooked
through.
3. Stir through chopped coriander. Allow
to cool.
4. Preheat the pie maker until the ‘Ready’
light illuminates.
5. Prepare the pastry bases and tops. Use L
cup of filling per pie.
6. Close the lid and cook for 6-9 minutes or
until golden brown.
7. Remove the pies with a plastic heat
proof spatula and cool slightly.
METHOD
1. Blanch spinach, drain in sieve, push out
excess moisture and finely chop.
2. Heat oil in a non-stick frying pan
and cook onion for 4 minutes or until
softened. Add pine nuts and stir until
brown and toasted.
3. Remove from heat and add spinach, feta
cheese, and eggs. Season with pepper if
desired. Allow to cool.
4. Preheat the pie maker until the ‘Ready’
light illuminates.
5. Prepare pastry bases only. Place 1 sheet
of filo pastry onto a work surface.
6. Lightly spray the sheet with the cooking
spray, then top with a second sheet,
spray again. Repeat this process with the
remaining sheets of filo pastry.
7. Fold each pastry stack one short edge to
other short edge and spray again. Use
the larger end of the Pastry Cutter as a
guide to cut out 2 pastry bases per sheet
with a sharp knife or kitchen scissors.
Place pastry bases into the pie maker
and fill with L cup of filling per pie.
8. Close lid and cook for 10-12 minutes or
until golden brown.
Remove the pies with a plastic heat proof
spatula and cool slightly.
27
PAge header.....
NOTES
28
NOTES
29
Breville Customer Service Centre
Australian Customers
New Zealand Customers
Mail:
Mail:
PO Box 22
Botany NSW 2019
AUSTRALIA
Private Bag 94411
Manukau 2163
Auckland NEW ZEALAND
Phone: 1300 139 798
Phone: 0800 273 845
Fax:
Fax:
(02) 9384 9601
Email: Customer Service:
[email protected]
0800 288 513
Email: Customer Service:
[email protected]
www.breville.com.au
Breville is a registered trademark of Breville Pty. Ltd. A.B.N. 98 000 092 928.
Copyright Breville Pty. Ltd. 2011.
Due to continued product improvement, the products illustrated/photographed
in this booklet may vary slightly from the actual product.
BPI640 Issue - A11


© Copyright 2026