
Successful periimplantitis prophylaxis
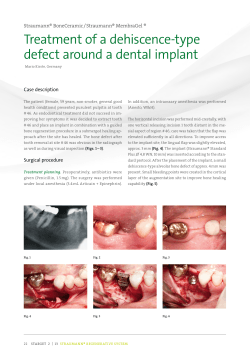
Implantology
Successful periimplantitis prophylaxis
Autor: Prof. Dr. Dr. C. U. Fritzemeier, Düsseldorf, Germany
which - under certain conditions even generates renewed bone
growth.
Against this background and since implantology with all its prosthetic treatments varieties is considered an
established method.
One of the most common and most
feared complications occurring in implantology is periimplantitis (Fig. 1),
which usually leads to implant loss in
case it remains untreated.
Prof. Dr. Dr.
Claus Udo Fritzemeier
• Born in Hamburg 1940
• Studies of medicine and
dentistry in Berlin/Zürich/
Hamburg
• Certificate for dentistry 1968
• Doctor‘s degree for dentistry
and medicine 1972/74
• Certificate for medicine 1974
• Qualification as specialist
for Oral- and Maxillofacial
Surgery 1978
• Qualification as professor for
Oral- and Maxillofacial Surgery at the University of Düsseldorf, Germany 1984
• Emeritus professor since
2006
• Speaker and consultant since
2010
Preface
During the last decades, implantology emerged as one of the most innovative enrichments in the field of
dentistry. Considerable increase is expected in the future. Compared to
earlier preprosthetic methods, endosseous implantology is a simple treatment that usually is not very stressful
for the patients and offers many advantages, e.g. the physiological transfer of chewing forces into the bone,
Introduction
Initially, the periimplantal tissue disease manifests itself as mucositis with
progressive bone loss at the implant
area, as described by ALBREKTSSON
et al. The reasons for this disease pattern are complex, and various hypotheses about the development of
periimplantitis
were
proposed,
amongst them insufficient oral hygiene, lack of fixed gingiva, and/or
overstressed implants. These putative
triggering factors contradict the
statements of well-known implantologists. „An absence or insufficient
width of keratinized gingiva is not aetiologically linked to the development
of gingivitis and periimplantitis“ or
„The functional strain placed on an
implant cannot be solely held responsible for progressive bone loss“. That
means that additional pathologic influences, which trigger and sustain
the process of disease, must exist next
to these ostensible causes.
Therapies reach from improved basic
hygiene to antibiotics and disinfectant inserts into periimplantal pockets
up to ultrasound treatments and laser
curettage of inflamed tissues. The
main attention, however, should not
be placed on therapy, but rather onto
an efficient prevention of periimplantitis.
GapSeal®, Hager & Werken
Fig. 1: Periimplantitis clinical and X-ray
Fig. 2: Design drawing showing an assembled
enossal implant, hollow spaces inside implant
and suprastructure are highlighted in red
Reso-Pac
Reflecting on gaps and hollow
spaces of assembled implants
It’s a fact assembled implants contain
hollow spaces, which can be minimized but not prevented even at the
most meticulous production. Because
also threads hold gaps, the contamination of implant interiors with germs
originating from the oral cavity is inevitable (Fig. 2).
The re-infection from an implant cannot be ruled out. On almost every assembled implant we noticed a putrid
smell of its content, which was extracted with a cotton tip. In 1996 we
initiated the examinations after that
confirmed the assumption that gaps
and hollow spaces in the interior implants were contaminated with
germs, which matched the germ
spectrum of an interdental smear. Implant interiors in their dimensions, position and size are easily recognized
by construction drawings, cross sectional shapes and X-rays, and so it becomes clear that hardly any assembled
implant is actually excluded from
those facts.
Of course, these considerations apply
to screwed superstructures as well.
Cemented superstructures seem to
be sealed at first by the fastening cement, but everyone knows the smell
that emerges when cement is drilled
from crown and bridge work and
gives evidence of germs permeating
here as well.
The access paths of germs into the implant interior are easily comprehendible, and we were able to provide
evidence by taking light- and electron
microscopic exposures of a used implant (Fig. 3).
The paper of BINON et al. „Implant
Component Compatibility“, confirms
this matter quite impressively. The results showed that the macroscopically
good fit revealed severe flaws under
electron microscopic examination.
Furthermore, the capillary forces and
micro motions between the implant
and the abutment in addition promote the exchange of infectious material, wherein the saliva is a good
vehicle.
Figure 4 shows the proportion of the
gap located between implant and
abutment compared to an erythro-
cyte. In order to make the dimensions
even more clearly, the randomly chosen germs shown are also matched to
an erythrocyte exact to scale.
Development of periimplantitis
through re-infection from an implant
The implant gets contaminated with
germs from the oral cavity as soon as
it is opened for placement of the insertion tool. Germ growth starts immediately after fastening the locking
screw, unless the implant interiors
were previously treated with a material to seal and combat germs.
The breeding conditions - warmth,
humidity and supply - enable bacterial growth and fungal colonization in
an ideal manner, so that a re-infection
of periimplantal tissues via the outward leading gaps is given. Whatever
treatment of this important area
around the implant is applied, it will
always remain short-lived.
Development and efficacy of GapSeal®
In order to counteract these re-infections we developed a material based
on a highly viscous silicone matrix
that seals the implant and protects it
from bacterial or fungal penetration
effectively.
Any antibiotic would not be sufficiently intensive and effective in such
low doses, and would moreover contribute to sensitization and the development of resistance. Afterwards we
employed the so-called split-mouth
technique to test the material against
white Vaseline, and determined the
required admixture of disinfectant.
The bactericidal and fungicidal properties and efficacy against viruses
owes the sealing due to the principle:
Where already something is, there
nothing else can enter. If the medium
does not offer a breeding ground,
then nothing can grow.
The material met its purpose as gap
and interior sealant more than satisfactorily and was subsequently
named „GapSeal®“ (Fig. 6).
For the split-mouth studies GapSeal®
was applied to the right sides of the
implants, and Vaseline to the left
sides. During this clinical comparability the Vaseline turned out to be thor-
Fig. 3: Used implant randomly chosen, on
which the marked area was light- and electron
microscopically examined. (Brand is intentionally unnamed)
Fig. 4: Gap situation between implant and abutment compared to an erythrocyte with a diameter of 7μ (μ= 10 -6 m) 745 times enlarged and
the randomly chosen germs shown true to
scale compared to an erythrocyte
Fig. 5: Retrospective comparative split-mouth
studies between GapSeal® and Vaseline. The
positive periimplantitis findings on 167 implants following local therapy and intra-implantal sealing with Vaseline resp. GapSeal®
were re-examined between 1996 and 2000.
The tissues at non-itemized implants were either in a „steady state“, or free of inflammations.
Reso-Pac
oughly contaminated, while GapSeal®
treated implants usually provided no
evidence of germ growth. This is
clearly proven by the follow-up examinations, which were conducted each
six months afterwards.
The number of germs (CFU = colony
forming unit) at each pertaining implant was determined through serial
dilution, followed by counting the
CFUs on the incubation plates. This
process enabled a definite determination of germs contained in each interior implant smear. We were able to
prove the material‘s efficacy by conducting follow-up examinations between 1996 and 2000 and do not want
to abstain from using GapSeal® ever
since (Fig. 5). These studies finally
showed a statistically significant reduction in periimplantitis by more
than a third of implants sealed with
GapSeal®.
Application
It provides an opportunity to seal implant interiors with GapSeal® immediately after inserting and removing the
insertion tool thereby eliminating the
prospective periimplantitis inducing
the re-infection factor.
For this purpose the carpule must be
inserted into the applicator at first,
and the closing cap needs to be removed. It is recommended to bend
the cannula slightly around the applicator shaft according to the filling situation. Excess material gushing from
the implant when the closure cap is
screwed in indicates a good filling situation (Fig. 7).
The material will be delivered in sterile blister packs; the applicator is autoclavable to warrant sterility. In case
the implant is treated with GapSeal®
at a later point, a thorough cleansing
of the interior spaces with alcohol is
recommended. Furthermore it is advised to fill the hollow spaces of
screwed superstructures with GapSeal® too. During implant re-entry at
recalls it is advisable to renew old material, which may be rinsed out with
alcohol. GapSeal® is very stable, retains its qualities in case of cemented
works over years, and requires neither
exchange nor replenishment.
Results and discussion
Periimplantitis is the most feared
complication occurring in implantology, especially once the implant therapy with its appropriate prosthetics is
completed. Suggestions regarding
the treatment exist in ample variations and are put into practice as well.
However, it seems to be more reasonable to prevent the causes for periimplantitis, which certainly originate to a
large percentage from re-infection
out of implant gaps and hollow
spaces. The possibility of germ colonization on implant interiors exists and
should be taken seriously. Attempts
to combat re-infection are described
in specialized literature since years.
Now GapSeal® with its sixteen years of
clinical experience offers a truly effective prevention against periimplantitis.
Fig. 6: Sterilisable GapSeal® applicator with
GapSeal® carpules, Hager & Werken
Key words
Periimplantitis, periimplantitis prophylaxis micro gap, microleakage, bone
loss, colonization of implant interiors,
GapSeal®
Fig. 7: Use of applicator and carpules
Reso-Pac
sed
Sorry, clo !
ay
from tod
?
?
?
GapSeal Set (Applicator with 10 Tips)
GapSeal (10 Tips à 0,06 ml)
Applicator separately
Video
2013103101
Hager & Werken GmbH & Co. KG
Ackerstraße 1, 47269 Duisburg
Tel. +49 (203) 99269-0 · Fax +49 (203) 299283
www.hagerwerken.de · [email protected]
REF HW-152 041
REF HW-152 040
REF HW-152 042


© Copyright 2026