
HOME FOUNTAIN CF18H, CF18M, CF18L, CF16E
HOME
FOUNTAIN
CF18H, CF18M, CF18L, CF16E
IMPORTANT
SAFEGUARDS
8.
When using an electrical appliance, basic
safety precautions should always be
followed, including the following:
1.
2.
3.
4.
5.
6.
7.
READ ALL INSTRUCTIONS BEFORE
USING THIS APPLIANCE.
Do not touch hot surfaces. The basin and
sides of the fountain base may be hot
during use.
To protect against electrical shock, keep
the base of the appliance away from water
or other liquids.
Keep hands, hair, and loose clothing away
from moving parts. Never place any object
inside the cylinder or vent holes while the
appliance is in use. Doing so may cause
severe injury to persons or damage to the
appliance itself.
Close supervision is necessary when the
appliance is used by or near children.
Do not operate the appliance if you
observe damage to the electrical cord or
plug or if the base of the appliance has
been dropped or damaged in any manner.
If the appliance is damaged, consult the
“WARRANTY” section of this manual.
Unplug the appliance from the electrical
outlet when not in use, before putting on
or taking off parts, and before cleaning.
9.
10.
11.
12.
13.
14.
Do not allow the electrical cord to come
into contact with hot surfaces. An
extension cord may be used if necessary.
Care should be taken to position the
electrical cord so that it does not create a
hazard by hanging over the table or
counter edge in a way where it might be
tripped on or pulled by those around the
appliance.
The use of accessory attachments, other
than those made available specifically for
use with this appliance, is not
recommended by the manufacturer, may
cause injury, and will void your warranty.
Extreme caution must be used when
moving an appliance containing hot liquid.
This appliance is intended for indoor
household use. Use of the appliance
outdoors is not recommended.
Do not use the appliance for other than
intended use.
Observe and follow customary sanitation
guidelines when using the appliance.
WARNING: TO REDUCE THE RISK OF
ELECTRICAL SHOCK OR FIRE, DO NOT
REMOVE THE BASE PANEL. INTERNAL
COMPONENTS ARE NOT USERSERVICEABLE. REPAIR SHOULD BE
PERFORMED ONLY BY AUTHORIZED
PERSONNEL.
1
SAVE THESE
INSTRUCTIONS
FOR HOUSEHOLD
USE ONLY
INTRODUCTION
Sephra Home Chocolate Fountains are sure to
delight family and friends and make every
gathering a special occasion! Your fountain
can accommodate many of your favorite
fondue recipes, including chocolate, cheese,
caramel, and even barbecue sauce. Visit
www.sephra.com for fun and delicious recipes.
When using Sephra Fondue Chocolate some
popular dipping items are:
Marshmallows
Strawberries
Bananas
Cream Puffs
Nut Clusters
Cookies
Pretzels
Pineapple
Biscotti
Graham Crackers
Use your imagination!
(For best results, avoid items that crumble.)
2
Family gatherings, birthday and holiday
parties, and bridal and baby showers are all
great occasions to share your Sephra Home
Chocolate Fountain and experience fondue like
never before.
This appliance has been carefully designed
for ease of use and cleaning. All removable
parts are dishwasher-safe. Please follow the
instructions in this manual to properly
assemble, operate, and clean your fountain.
Welcome to A New Dimension in Fondue.
Welcome to Sephra.
This manual covers the following Sephra Home
Chocolate Fountain Models:
CF18H (Signature)
CF18M (Elite)
CF18L (Classic)
CF16E (Select)
TABLE OF CONTENTS
BOX CONTENTS ...................................... 3
FOUNTAIN ILLUSTRATIONS .................... 4
PARTS & FEATURES ............................... 8
ASSEMBLY ................................................. 9
Preheating the Basin ........................ 1 0
CHOCOLATE PREPARATION .............. 1 0
Recommended Chocolate
Temperatures .................................... 11
Using Other Chocolate .................... 11
Checking the Fondue’s Viscosity ... 11
STARTING THE FOUNTAIN .................. 1 2
Adding Additional Fondue
to the Fountain ................................... 1 2
CLEANING AND MAINTENANCE ........ 1 3
TROUBLESHOOTING ........................... 1 3
ADDITIONAL TIPS .................................. 1 5
ADDITIONAL FONDUE RECIPES ....... 1 6
QUICK REFERENCE GUIDE ............... 1 7
WARRANTY ............................................. 1 8
BOX CONTENTS
Your fountain should include the following:
Signature model:
1 stainless steel crown
1 stainless steel top tier
1 stainless steel bottom tier
1 stainless steel full cylinder
1 black plastic stabilizer
1 plastic auger
1 detachable basin
1 fountain base with electrical cord
1 viscosity funnel
6 metal skewers
4 pounds Sephra Premium Dark Fondue
Chocolate
1 product instruction manual
1 product registration card
Elite model:
1 crown
1 top tier
1 bottom tier
2 cylinder halves
1 auger
1 detachable basin
1 fountain base with electrical cord
1 viscosity funnel
6 metal skewers
4 pounds Sephra Premium Dark Fondue
Chocolate
1 product instruction manual
1 product registration card
Classic model:
1 crown
1 top tier
1 bottom tier
2 cylinder halves
1 auger
1 fountain base with electrical cord
1 viscosity funnel
6 metal skewers
4 pounds Sephra Premium Dark Fondue
Chocolate
1 product instruction manual
1 product registration card
Select model:
1 crown
1 top tier
1 bottom tier
2 cylinder halves
1 auger
1 fountain base with electrical cord
1 viscosity funnel
10 plastic skewers
1 product instruction manual
1 product registration card
3
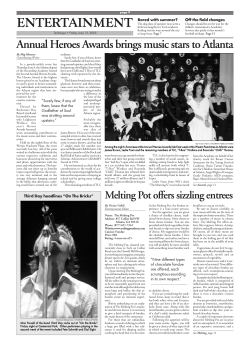
SIGNATURE FONDUE FOUNTAIN COMPONENTS
4
1
5
2
3
6
3c
7
7a
8a
8
12
12a
12b
12d
12c
4
10
9
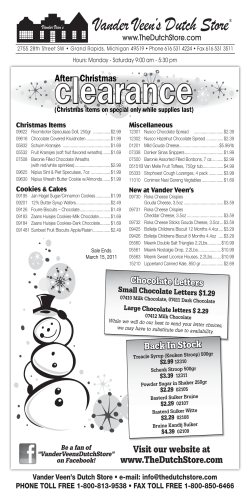
ELITE FONDUE FOUNTAIN COMPONENTS
5
1
3a
2
6
3b
3c
7a
7
8a
8
12
12a
12d
12b
9
12c
10
5
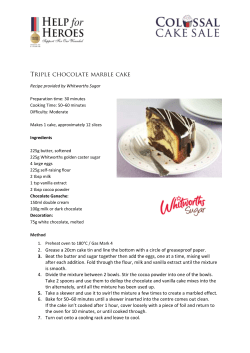
CLASSIC CHOCOLATE FOUNTAIN COMPONENTS
5
1
3a
2
3b
3c
6
8a
7a
7
8
{
13
{
10
6
14
9
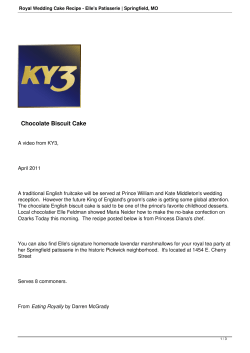
SELECT CHOCOLATE FOUNTAIN COMPONENTS
5
1
3a
2
3b
3c
6
7
7a
8
13
{
{
14
10
7
PARTS & FEATURES
(SEE ILLUSTRATIONS ON PAGES 4-7)
All models:
1. Crown—Rests on top of the stabilizer (4)
or cylinder (3a).
2. Top Tier—Slides into place after
positioning the bottom tier (6).
3. Full Cylinder (Signature model only)—
Stands on top of positioning pegs (7a) in
the center of the basin.
3a. Top Section of Cylinder (excluding
Signature model)—Attaches to the
bottom cylinder (3b).
3b. Bottom Section of Cylinder (excluding
Signature model)—Stands on top of the
pegs in the center of the basin (7a).
3c. Cylinder Sleeves—Slide over basin pegs
(7a) to hold cylinder in place.
4. Stabilizer (Signature model only)—Slides
over the top of the cylinder and holds the
top tier and crown in place.
5. Auger—Fits inside the cylinder and
carries fondue to the top of the cylinder,
creating a constant flow of the fondue from
the top of the crown into the basin.
6. Bottom Tier—Slides into position on the
cylinder (3 or 3b).
7. Stainless Steel Basin—Holds the fondue.
The Signature, Elite, and Classic models
hold 4–5 pounds of chocolate (7–9 cups).
The Select model holds 3–4 pounds of
chocolate (5–6 cups). This basin is
removable in the Signature and Elite
models.
7a. Basin Pegs—Hold cylinder in place.
8. Fountain Base—Housing that surrounds
electrical components including the motor
and the electrical circuit board.
8
8a Vent Holes (excluding Select model)—
Allow hot air produced by the motor and
heating element to escape, cooling the
electrical components. The vent holes
should not be covered.
9. Slip-Resistant Legs (excluding Select
model)—Reduce movement during use
and help prevent marks on tables and
countertops.
10. Adjustable Feet—Screwed into the bottom
of the base. Can be tightened or loosened
to raise or lower a particular side of the
fountain, adjusting its level.
11. “Whisper Quiet” Motor (not pictured)—
Inside fountain housing (8). Designed to
be as quiet and unobtrusive as possible.
Some motor and moving parts noise is to
be expected. The motor is equipped with
an automatic shut-off in the event that
the fountain overheats.
Signature and Elite models only:
12. Control Panel—Regulates all functions
of the fountain.
12a. ON/OFF/POWER button—A green LED
light will be lit when the power is ON.
12b. START button—Starts the motor, causing
the auger to spin inside the cylinder. A
green LED light will be lit when the START
button has been pressed and the auger is
spinning.
12c. HEAT button—Changes the temperature
settings. Each time the button is pressed,
the heat will cycle to the next temperature
setting, moving from OFF to HIGH. A red
LED light will be lit at each temperature
setting except the OFF position, where the
LED light is yellow. The red LED light will
blink intermittently as power is supplied
to the heating element.
12d. STOP button—Stops the motor, causing
the auger to stop spinning. A red LED light
will be lit when the auger is stopped and
the POWER is still on.
one side and will not have the “curtaining”
effect. The fountain has adjustable feet to
assist you in leveling it if your surface is
not level.
Classic and Select models only:
13. HEAT/OFF switch—Turns on the heating
element inside the fountain base. It is set
at a medium heat and should keep the
chocolate warm while it is flowing. A red
LED light will be lit when the switch is
placed in the HEAT position.
14. START/STOP switch—Starts the motor
which causes the auger to spin inside the
cylinder. A red LED light will be lit when
the switch is placed in the START
position.
Elite, Classic, and Select models only:
3. Align the notch(es) in the top cylinder
(3a) with the key(s) in the bottom cylinder
(3b) and fit securely together. Slide the
cylinder sleeves (3c) onto the basin pegs
(7a).
4. While holding the knob at the top of the
auger (5) insert the auger into the cylinder.
Make sure the auger fits into place over
the spindle centered in between the basin
pegs. Twist the auger clockwise to make
sure it is properly positioned; you should
feel some resistance as you turn the auger.
If melting chocolate in the basin, wait until
the chocolate is completely melted before
inserting the auger. Failure to do so may
damage the fountain or cause it to
malfunction.
5. Slide the bottom tier (6) over the cylinder
until it stops in position. Slide the top tier
(2) over the cylinder in the same manner
until it stops.
6. Slide the crown (1) into the slots at the
top of the cylinder and over the knob of
the auger. The widest part of the crown
should be at the top of the fountain.
INSTRUCTIONS
FOR USE
ASSEMBLY
(SEE ILLUSTRATIONS ON PAGES 4-7)
All models:
1. Wash all of the removable components
and the stainless steel basin in hot, soapy
water. Dry thoroughly. DO NOT ALLOW
WATER OR OTHER LIQUIDS TO ENTER
INTO THE BASE OF THE APPLIANCE
THROUGH ANY VENT HOLES
LOCATED ON THE SIDES OF THE
FOUNTAIN OR THROUGH THE
BOTTOM GRATE. DO NOT IMMERSE
THE FOUNTAIN BASE IN WATER.
2. Place the base of your Sephra Home
Chocolate Fountain on a sturdy, level
surface. If the fountain is not level it will
still operate, but the fondue will gap on
Signature model only:
3. Slide the cylinder sleeves (3c) onto the
basin pegs (7a).
4. While holding the knob at the top of the
auger (5), insert the auger into the cylinder.
Make sure the auger fits into place over
the spindle centered in between the basin
pegs. Twist the auger clockwise to make
9
5.
6.
sure it is properly positioned; you should
feel some resistance as you turn the auger.
If melting chocolate in the basin, wait until
the chocolate is completely melted before
inserting the auger. Failure to do so may
damage the fountain or cause it to
malfunction.
Slide bottom tier (6) over the cylinder until
it stops in position. Next, slide the black
plastic stabilizer (4) on the top of the
cylinder until it stops in place. Slide the
top tier (2) over the stabilizer until it stops.
The top tier will rest on the lip of the
stabilizer.
The crown (1) fits over the stabilizer. The
widest part of the crown should be at the
top of the fountain.
Preheating the Basin
Classic and Select models:
Plug the appliance into an electrical outlet.
Move the HEAT/OFF switch to HEAT. The
temperature is preset to a standard medium
temperature which will keep the fondue
warm and still be hot enough to melt
chocolate in the basin if you choose to do
so. Allow the basin to preheat for 5
minutes prior to adding any fondue
requiring heat.
Elite and Signature models:
Make sure the basin (7) is tightened
securely to the base (8) by turning it
clockwise. Do not over-tighten. Plug the
appliance into an electrical outlet; fountain
should beep once. Press the ON/OFF/
POWER button. The green LED light
above the power button will light up
indicating the fountain is on. A yellow LED
light will be on above the OFF temperature
position. Each time the HEAT button is
10
pressed, the temperature will cycle to the
next heat setting. A red LED light will
indicate the current temperature setting.
This light should blink intermittently when
heat is on. Set the temperature to HIGH
for about 5 minutes prior to adding any
fondue requiring heat. Turn the
temperature down to the operating
temperature before fondue is added to the
basin.
CAUTION: DO NOT TOUCH THE
FOUNTAIN BASIN WHILE IT IS
HEATING! DOING SO MAY CAUSE
INJURY.
CHOCOLATE
PREPARATION
We strongly encourage you to use Sephra
Fondue Chocolate with your fountain. It has
been specially formulated to flow perfectly
through the fountain when properly melted and
has an exquisite taste and aroma.
You may melt the chocolate in either its
microwave-safe packaging, in a microwave-safe
bowl, in a double boiler, or directly in the
fountain basin.
When melting Sephra Fondue Chocolate in
the microwave:
ALWAYS MELT ON HALF-POWER OR
CHOCOLATE MAY SCORCH. Follow
instructions on chocolate packaging. Pour
melted chocolate into the heated basin and
allow it to sit for 5-10 minutes; stir occasionally
until it reaches a uniform temperature.
When melting Sephra Fondue Chocolate in
the fountain basin:
Melting chocolate directly in the basin takes
approximately 45–60 minutes, depending on
the fountain model and heat setting. Melt
chocolate chips in the basin one pound at a
time. Use a spatula to scrape chocolate from
the basin and stir every 5-10 minutes while
melting. Melt Dark and Milk chocolate on high
heat (if available on your model) and White
chocolate on medium heat.
WAIT UNTIL CHOCOLATE IS
COMPLETELY MELTED BEFORE
INSERTING THE AUGER OR TURNING
ON THE MOTOR.
Recommended
Chocolate
Temperatures
(Signature and Elite models only)
Chocolate will flow best when fountain is
operated at room temperature; cooler
conditions may require a higher temperature
setting. Be sure to follow proper melting
instructions. Chocolate in basin should be
scraped from the bottom of the basin with a
spatula and stirred periodically while in use to
prevent scorching.
CHOCOLATE
TEMPERATURE
SETTING
DARK
MEDIUM/HIGH
MILK
MEDIUM/LOW
WHITE
MEDIUM/LOW
Use the first temperature setting listed
unless the chocolate fondue is running too
thick.
Using Other Chocolate
Thinning directions for chocolate other
than Sephra Fondue Chocolate.
Most other chocolate will require thinning to
be able to flow properly through the fountain.
The most common thinning agent is a flavorless
oil such as vegetable or canola oil. Cocoa
butter may also be used. For every 5 pounds
of chocolate you will need to use
approximately ½-1 cup of oil to obtain the
proper consistency. The amount of oil required
will vary with the type and brand of chocolate.
For best results, begin with a chocolate that is
couverture (made with at least 32% cocoa
butter). Thinning agents will noticeably dilute
the taste and aroma of the chocolate. Never
add water to chocolate as this will cause it to
harden!
Checking the Fondue’s
Viscosity (Consistency)
Sephra Fondue Chocolate, when melted
correctly, will not need to be tested with the
viscosity funnel. A viscosity funnel has been
included with your fountain. Prior to starting
the fountain, check to see that the fondue you
Viscosity Funnel
11
are using is the right viscosity to flow through
the fountain. Simply fill the viscosity funnel
with the fondue and time how quickly it drains
out. It should drain completely in 8–10 seconds.
If the fondue drains in less than 8 seconds, it
may need to be thickened. If the fondue takes
longer than 10 seconds to drain it needs to be
thinned. For chocolate fondue, add additional
oil. For other fondue recipes, thin with any
liquid consistent with the fondue’s flavor (i.e.
milk, juice, cream, water).
5.
STARTING THE
FOUNTAIN
For chocolate:
As the chocolate is depleted, add more melted
chocolate to the basin. DO NOT ADD
UNMELTED CHOCOLATE CHIPS TO THE
FOUNTAIN UNLESS YOU FIRST STOP THE
MOTOR AND ALLOW TIME FOR THE CHIPS
TO THOROUGHLY MELT. Failure to do so may
cause the fountain to malfunction!
Time to have some fun!
1.
2.
3.
4.
12
Ensure that the fountain is on a sturdy,
level surface.
Make sure you have followed the
“PREHEATING THE BASIN” directions
on page 10.
Turn the motor on. For Signature and Elite
models, press the START button. For
Classic and Select models, move the
START/STOP switch to the START
position. The auger will carry the fondue
up through the cylinder, allowing it to flow
down over the tiers and back into the
basin. Air is often trapped inside the
cylinder when the fountain is first turned
on. Air in the cylinder will cause the
fondue curtain to gap. To remedy this,
simply turn the fountain off for about 15–
30 seconds and then turn it back on.
Repeat this procedure if necessary.
Scrape the chocolate from the basin with
a spatula and stir occasionally throughout
use to avoid scorching.
Enjoy dipping a variety of foods into the
cascading fondue. See the list of
suggested dipping items in the manual
introduction for ideas. Reusable forked
skewers are provided with your fountain.
Additional skewers may be ordered online
at www.sephra.com.
Adding Additional
Fondue to the Fountain
For other fondues:
When running other fondues, be sure the
fondue you are adding is near the same
temperature as the fondue running through
the fountain. Adding fondue of a different
temperature could affect the flow. Always check
the viscosity of the fondue with the viscosity
funnel provided before adding it to the basin.
Keep a ready supply of Sephra Fondue
Chocolate on hand for the next impromptu party
or special occasion. To order chocolate, please
visit www.sephra.com.
CLEANING AND
MAINTENANCE
Clean each fountain component thoroughly
before and after every use. This will help keep
the fountain in excellent working condition for
years of continued use and enjoyment. Never
use abrasive scouring pads or scouring
powders to clean the stainless steel basin or
tier set components.
If tier set is plastic, be careful to pull pieces
apart rather than twist them as plastic may
crack if twisted against notches.
1.
2.
3.
4.
5.
When finished using the fountain turn it
off. On Elite and Signature models, press
the POWER/ON/OFF button. On Classic
and Select models, move the START/
STOP switch to the STOP position and
the HEAT switch to the OFF position.
Always unplug the power cord from the
electrical outlet before cleaning the
fountain. Never permit the electrical cord
to come into contact with water. Allow the
fountain to cool approximately 10 minutes
before cleaning as fountain basin will be
hot.
With a paper towel or food handler glove,
remove the crown from the top of the
cylinder and lift the auger out of the
cylinder. Use a spatula to scrape excess
chocolate from auger back into the
cylinder as you lift it out.
Using a rubber spatula, scrape any
remaining chocolate or fondue off the
tiers, allowing it to flow down into the
basin.
Remove the tier set and transfer it to a
sink to disassemble. Rinse parts off with
6.
7.
hot, soapy water. All removable fountain
components are dishwasher-safe. Plastic
components will stay looking newer if you
wash them by hand in hot, soapy water
and then rinse and dry them thoroughly.
ALWAYS USE THE TOP RACK OF THE
DISHWASHER WHEN WASHING
PLASTIC FOUNTAIN COMPONENTS.
IF THE HEAT ON YOUR DISHWASHER
IS TOO HIGH, IT MAY WARP THE
PLASTIC PARTS.
Pour the leftover chocolate into a sturdy
plastic bag for disposal and scrape out of
basin with a spatula. NEVER POUR
CHOCOLATE DIRECTLY DOWN THE
DRAIN. Chocolate poured down a drain
may harden in the pipes and result in
damage and blockage of the drain system.
For sanitation purposes, we do not
recommend reusing the chocolate.
However, letting the chocolate harden and
remelt will not compromise its quality.
Wipe the base of the fountain with a warm,
damp cloth to remove any residue and dry
thoroughly. DO NOT IMMERSE THE
BASE OF THE FOUNTAIN IN WATER
OR ALLOW LIQUIDS TO ENTER ANY
VENT HOLES IN THE HOUSING. Doing
so will cause damage to the electrical
components and void the product
warranty.
TROUBLESHOOTING
1.
The fondue is not flowing evenly over all
of the tiers:
This may be because:
a. The fountain is not level. If the fondue
is flowing to one side more than
another, move the adjustable feet to
raise that side of the fountain.
13
b. Air is trapped in the cylinder. Turn the
fountain off for 15–30 seconds and
allow the air to escape. Turn the
fountain back on. Repeat if necessary.
c. There is not enough fondue in the
basin. The Signature, Elite, and Classic
models require 4 pounds of chocolate
or 7 cups of fondue in them at all times
to create a solid curtain. The Select
fountain requires a minimum of 3
pounds of chocolate or 5 cups of
fondue. If you start to see gapping
during your event, add melted Sephra
Fondue Chocolate or other fondue to
the fountain.
d. A food item is blocking the flow of
fondue at the base of the cylinder. If a
food item fell into the basin and could
be blocking the flow, simply stop the
fountain motor, remove the food item
with a spatula, and start the motor again
to resume the flow. Air may become
trapped in the cylinder as a result. If
this happens, refer to the instructions
above (1b).
e. The fondue is too thick or thin. Refer to
“CHECKING THE VISCOSITY OF
THE FONDUE” on page 11.
f. The White or Milk chocolate has
thickened. If White or Milk chocolate
gets too hot it can scorch and thicken.
Add vegetable oil or cocoa butter a
little at a time to thin it out. If it has
become very thick you may have to
put it in a blender on medium speed
until it is thoroughly mixed before
returning it to the fountain.
g. Small food particles are mixed in with
the flowing fondue. If you use dipping
items that have crumbs, such as
cookies or cake, the crumbs may come
off in the fondue. Small crumbs will not
14
2.
3.
4.
5.
damage the fountain, but they may
cause gaps in the fondue curtain. If
this occurs you will need to wait until
your event is over and dispose of the
fondue.
My fountain will not turn on: Ensure that
the electrical plug is placed securely in
the outlet and try the fountain in various
outlets. If this does not work, check the
circuit breaker controlling the electrical
outlet. On Elite and Signature models,
make sure the POWER/ON/OFF button
has been pressed and that the fountain
basin is securely tightened on the base.
My fountain motor has stopped working:
The motor is equipped with an automatic
shut-off mechanism which is activated if
the motor overheats. Overheating occurs
if the fondue is too thick and is putting
extra stress on the motor. Turn the motor
and heat off and allow the fountain to sit
for approximately thirty minutes before
restarting. With the viscosity funnel,
check to be sure that the fondue is the
appropriate consistency before running
it through the fountain again.
The auger is not turning or is turning
slowly: The auger must fit into place over
the spindle centered in between the basin
pegs. Twist the auger clockwise to make
sure it is properly positioned. You should
feel some resistance as you turn the auger.
If your auger rests on a center spindle
with a horizontal pin in it, make sure the
pin is centered in the spindle. This pin
can be adjusted with an Allen wrench if
needed.
Chocolate has hardened in my fountain:
If the fountain is not cleaned immediately
after use, the chocolate will harden. When
this occurs, DO NOT TURN ON THE
6.
MOTOR. Doing so will cause the motor
to burn out. Turn on only the heating
element to remelt the chocolate in the
basin. When the chocolate has melted,
remove the tier set and soak it in hot, soapy
water. DO NOT MICROWAVE TIER SET.
My fountain is loud: If there is no fondue
in the fountain, the auger will make a noise
when moving against the cylinder. This is
normal and the fountain should operate
quietly once fondue is inside the cylinder.
5.
Doing so will cause the fondue to overflow
from the basin when the motor is turned
off.
If not cleaning the fountain immediately
after use, make sure to remove the tier set
from the fountain so chocolate will not
cause the parts to harden together.
ADDITIONAL TIPS
Thank You!
1.
We appreciate your business and hope that
you enjoy your Sephra Home Chocolate
Fountain with family and friends for many
years. Please call us at (858) 675-3088 or visit
us at www.sephra.com with any questions or
comments or to place an order. We are here to
assist you and help you get years of enjoyment
from this fine appliance.
2.
3.
4.
Always observe proper fondue etiquette
when using a Sephra Home Chocolate
Fountain. Provide each guest with a plate
and skewers. Two-pronged plastic, metal,
or wooden skewers may be ordered at
www.sephra.com. Guests should use a
separate skewer for each food item. For
health and safety precautions, it is
recommended that food not be eaten
directly from the skewer but transferred
to the guest’s plate and then eaten.
Always provide a generous supply of
napkins.
Cut all dipping items into small, bite-sized
pieces so they may easily be placed on
the skewers. Those enjoying the fondue
should never “double dip” and place a
food item that has been bitten back into
the chocolate or fondue flow.
Oil-based colorings and flavorings may
be added to chocolate for a unique touch.
These can be ordered online at
www.sephra.com or at craft or bakery
supply stores. Water-based colorings and
flavorings found at most grocery stores
will cause the chocolate to harden.
Do not add chocolate or fondue that will
exceed the basin’s maximum capacity.
Welcome to the Sephra family.
15
ADDITIONAL FONDUE RECIPES
Every fondue will have a different visual appearance when run through the fountain. Many fondues will
not curtain as well as chocolate does. This is normal and due to the natural variances in different food
products. Always test the consistency of your fondue with your viscosity funnel before use. See
“CHECKING THE FONDUE’S VISCOSITY” on page 11.
CARAMEL
5 parts liquid caramel
1 part water
Mix caramel and water in saucepan over low heat and then transfer to the fountain. Caramel naturally
thickens as it is heated and worked with. Periodically thin out with water throughout event (approx. every 45
minutes or as needed). Caramel should be stirred occasionally in the basin to help prevent air bubbles from
forming.
Heat: Varies depending on type of caramel used
Suggested dipping items: Apples, pears, chocolate-covered pretzels, cookies
NACHO CHEESE
5 parts canned nacho cheese
1 part water
Start with any store-bought liquid nacho cheese. Large cans are available at many wholesale stores. Mix
cheese and water in a saucepan over medium heat. Stir frequently to achieve the correct consistency, and
then transfer to the fountain. Add more water as needed.
Heat: Medium
Suggested dipping items: Tortilla chips, mini tacos, breadsticks, cocktail sausages
BBQ SAUCE
6 parts medium-grade* BBQ sauce
1 part water or apple juice
Mix BBQ sauce with water or apple juice in a saucepan over medium heat. Stir well and add to the fountain.
*Premium-grade BBQ sauce will require additional thinning.
Heat: Medium
Suggested dipping items: Buffalo wings, ribs, chicken strips
RANCH DRESSING
Light** ranch dressing
Water (if needed)
Some brands of ranch need to be thinned with water to flow properly. Thin if necessary and add to fountain.
**Use light ranch dressing for best results.
Heat: Off
Suggested dipping items: Fresh veggies (carrots, bell peppers, cucumbers, celery),
potato skins, chicken strips
For more great recipes, visit our website at www.sephra.com.
16
QUICK REFERENCE GUIDE
Classic and Select models:
To turn on the heat—Flip the rocker switch to HEAT.
To start the motor—Flip the rocker switch to START.
Signature and Elite models:
To activate power—Press ON/OFF/POWER button.
To change heat setting—Press HEAT button. Each time the button is pressed the
heat setting will cycle to the next temperature. Note which LED light is lit.
To start the motor—Press START button. Auger will turn.
To stop the motor—Press STOP button.
Recommended temperatures:
(Signature and Elite models only)
Dark-Medium/High
Milk-Medium/Low
White- Medium/Low
Use the first temperature setting listed unless chocolate fondue is running too thick.
If fondue curtain is gapping, check to see if:
Fountain has enough chocolate
Fountain is level
Air is trapped in cylinder. Turn motor off for 15-30 seconds to release air.
17
WARRANTY
LIMITED ONE-YEAR WARRANTY
This warranty is available to consumers only
and is void if the appliance is used
commercially. Commercial use is defined as use in
exchange for payment or compensation; use with
the intent of promoting a business or increasing
business with its presence; or use resulting in
excessive wear and tear.
This appliance has been designed for normal
household use only. Except as otherwise required
by law, this warranty is not available to retailers or
other commercial purchasers or owners.
This warranty is extended only to the original owner
and is valid only on products purchased for use in
the United States and Canada.
We warrant that your Sephra Home Chocolate
Fountain will be free of defects in materials and
workmanship under normal home use for one year
from the date of original purchase. We encourage
you to promptly register your product to facilitate
verification of the date of original purchase. You
may register online at www.sephra.com or by
mailing in your completed registration card. Failure
to register your product will not diminish your
warranty rights.
If your Sephra Home Chocolate Fountain should
prove to be defective within the warranty period,
we will repair the unit or, at our sole discretion,
replace it at no charge. The customer is responsible
for all applicable shipping expenses. To obtain
warranty service, you must first contact our
Customer Service Center. You may call us at
(858) 675-3088. Our regular office hours are
Monday-Friday 7AM-4PM Pacific Standard Time.
You may also contact us online at www.sephra.com
or write to us at:
Customer Service Center
Sephra, LLC
11035 Technology Place, Suite 100
San Diego, CA 92127
If a Customer Service Representative determines
that repair is necessary, an RMA number will be
issued. This number must be written clearly on the
18
outside of the box in at least 2 places. Products
returned to Sephra without an RMA number
are not guaranteed to be accepted or processed.
You must also include a check or money order
payable to Sephra, LLC for $15 for return shipping
and handling. (California residents need only supply
a proof of purchase and should call the Customer
Service Center for further shipping instructions).
Be sure to include your return address, a description
of the claimed defect, proof of the original purchase
date (receipt or packing list), and any other
information pertinent to the return. Sephra will then
either repair the damaged product or replace it with
a new, refurbished, or equivalent model at their sole
discretion. If express shipping is requested, a
Customer Service Representative will provide you
with rate information.
IMPORTANT: For added protection and secure
handling, we encourage you to use an insured
shipping service which provides you with a tracking
number to trace your shipment. Sephra, LLC is not
responsible for in-transit damage or for packages
not delivered to us. Lost and/or damaged products
are not covered under warranty.
Your Sephra Home Chocolate Fountain has been
manufactured to strict specifications and has been
designed for use only with authorized accessories
and replacement parts. This warranty expressly
excludes any defects or damages caused by
accessories or replacement parts, or by repair service
other than as authorized by Sephra, LLC.
Sephra, LLC is not responsible for consequential
damages relating to fountain use or misuse, such as
damage to home furnishings, clothing, or other
household items.
Excluded from this warranty are damages or defects
which resulted from other than normal household
use, such as commercial use, abuse, or damage caused
by accident, impact, negligence, improper
maintenance, or storage contamination and
deterioration due to water or other liquids or insect
infestation.
This warranty excludes all incidental or consequential
damages. Some states do not allow the exclusion or
limitation of these damages, so they may not apply
to you.
NOTES:
www.sephra.com
© 2007 Sephra, LLC
Sephra is a registered trademark of Sephra, LLC
®
11035 Technology Place, Suite 100
San Diego, CA 92127
Printed in P.R.C.


© Copyright 2026