
T-Shirt Quilt Skill Level: Beginner Nancy Wygle
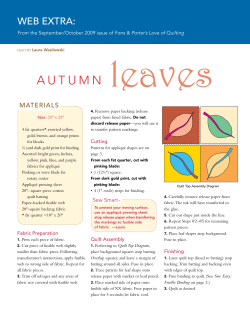
T-Shirt Quilt
Skill Level: Beginner
Designed By
Nancy Wygle
Repurpose old T-shirts and make memories at the same time. Each T-shirt quilt is one of a kind! Use your
favorite shirts to creat a custom quilt.
Materials Needed
12 Toddler T-shirts (4T- 5T) Graphic
4 yards 950F Shir-Tailor® Interfacing
Matching Thread
Fabrics Needed
2 yards Backing & Binding
1 yard of Legacy™ Natural Cotton Batting NB-96
Tools Needed
10 ½” Square Omnigrip® Cutting Ruler
Quilting Pins
Steam Iron & Ironing Board
Rotary cutter and mat
Scissors
Universal Quilting Needle
Graphic Artist Alexandra Henry
PERMISSION IS GIVEN TO REPRODUCE FOR PERSONAL USE ONLY ©2011 - PCP Group, LLC
Cutting and Sewing Instructions
Cut t-shirts at side seams. Discard the back and lay the
fronts flat.
Cut Pellon Shir-Tailor® interfacing into 12 1/2” squares,
one for each shirt. Position interfacing with resin
(rough) side down on the wrong side of each t-shirt and
iron, following the manufacturers instructions to fuse
with the back of the t-shirt squares.
Use the rotary cutting ruler and rotary cutter to
cut each lined t-shirt to 10 1/2” square blocks.
Graphic Artist Alexandra Henry
PERMISSION IS GIVEN TO REPRODUCE FOR PERSONAL USE ONLY ©2011 - PCP Group, LLC
Place blocks three across and four down. Arrange as
desired. Sew the blocks in rows, using a 1/4” seam allowance. Sew rows together, aligning intersections.
Place batting on table. Lay the quilt top on batting and
smooth out. Cut batting 3” larger than quilt top on all
sides. Open the backing fabric and press. Cut the backing fabric the same size as the batting.
Quilt Top
Batting
Placing backing fabric on table, right sides down. Lay the
batting on the backing fabric and smooth carefully. Lay
the quilt on the batting, right sides up and smooth. Pin all
layers together. Quilt at least every 4” apart when using
cotton batting. Machine quilting is recommended for
T-shirt quilts.
See the general binding instructions to bind the quilt.
Graphic Artist Alexandra Henry
PERMISSION IS GIVEN TO REPRODUCE FOR PERSONAL USE ONLY ©2011 - PCP Group, LLC
Binding
1. The number of strips is determined by the size of your finished quilt. Measure the number of
inches in the perimeter (add the length of all sides of your quilt) + approximately 9”. Cut strips 2 1/4”
wide, crossgrain (the width of the fabric 40/44”).
2. Join strips together as shown on “Piecing Binding and Borders Page”. Create one long strip equal
to the perimeter of your quilt + 9”
3. Fold your strips in half lengthwiwse with wrong sides together. Press gently.
4. Trim the edges of your quilt evenly leaving a 1/4“ seam allowance.
5. Place the raw edges of the strip even with the edge of the quilt. Leave a tail
(approximately
6”) and then stitch in place to 1/4“ away from the corner.
.
Quilt
Tail
Stop at 1/4” seam allowance with needle down
Tail
Turn work 90 degrees as shown. Lower presser foot and
backstitch off the quilt.
Graphic Artist Alexandra Henry
© 2011 Alexandra J. Henry
PERMISSION IS GIVEN TO REPRODUCE FOR PERSONAL USE©2011
Binding
Fold
Binding Raw Edge
Tail
Turn binding up at 45 degree angle (it will line up
with edge of quilt).
Quilt
Loop
Tail
Fold binding straight down lining to the edge
of the quilt as shown. It will have a loop at the
upper right corner. Make sure that your loop
lines up evenly with the raw edge of your previous
side. top
Quilt
Continue stitching the binding down until you finish
all 4 corners and are 5-6” inches from your starting point.
Fold the ends of the two pieces of binding so that there is a
gap approximately 1/4” wide between the two pieces of
binding (see diagram).
1/4” gap
Tail
Crease the folds. Open the fold out and make a small cross on
the fold through the halfway point of the binding.
.
Draw a diagonal line from left to right through the cross
you made on both pieces of binding. The lines should be
slanted as shown at left and should be parallel to each other.
Binding unfolded to single thickness
Graphic Artist Alexandra Henry
© 2011 Alexandra J. Henry
PERMISSION IS GIVEN TO REPRODUCE FOR PERSONAL USE©2011
Draw a diagonal line 45 degrees from left to right through the
cross you made on both pieces of binding. The lines should be
slanted as shown at left and should be parallel to each other.
Binding unfolded to single thickness
Fold of
Binding
Pin the two ends of binding
together matching the drawn
diagonal line. Stitch.
Drawn line
After stitching the diagonal line, make sure your binding lies flat against your quilt. Then
trim seam and press. Fold binding back in half and continue stitching.
Fold binding to back and stitch down.
Graphic Artist Alexandra Henry
© 2011 Alexandra J. Henry
PERMISSION IS GIVEN TO REPRODUCE FOR PERSONAL USE©2011


© Copyright 2026