
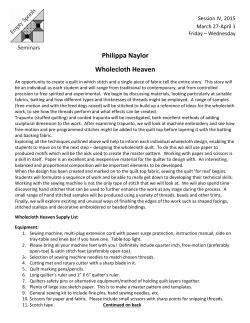
leaves a u t u m n materials
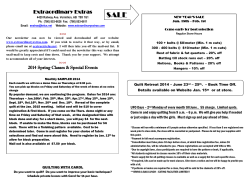
WEB EXTRA: From the September/October 2009 issue of Fons & Porter’s Love of Quilting Quilt by Laura Wasilowski. autumn materials Size: 25" x 25" 4 fat quarters* assorted yellow, gold, brown, and orange prints for blocks 1 ⁄8 yard dark gold print for binding Assorted bright green, fuchsia, yellow, pink, blue, and purple fabrics for appliqué Pinking or wave blade for rotary cutter Appliqué pressing sheet 28"- square piece cotton quilt batting Paper-backed fusible web 28"-square backing fabric * fat quarter =18" x 20" leaves 4. Remove paper backing (release paper) from fused fabric. Do not discard release paper—you will use it to transfer pattern markings. Cutting Patterns for appliqué shapes are on page 3. From each fat quarter, cut with pinking blade: • 1 (12¾") square. From dark gold print, cut with pinking blade: • 4 (1"-wide) strips for binding. Sew Smart TM To protect your ironing surface, use an appliqué pressing sheet atop release paper when transferring the markings to fusible side of fabric. —Laura Fabric Preparation 1. Press each piece of fabric. Quilt Assembly 2. Cut piece of fusible web slightly Quilt Top Diagram, place background squares atop batting. Overlap squares, and leave a margin of batting around all sides. Fuse in place. 2. Trace pattern for leaf shape onto release paper with marker or lead pencil. 3. Place marked side of paper onto fusible side of XX fabric. Fuse paper in place for 5 seconds; let fabric cool. smaller than fabric piece. Following manufacturer’s instructions, apply fusible web to wrong side of fabric. Repeat for all fabric pieces. 3. Trim off selvages and any areas of fabric not covered with fusible web. Quilt Top Assembly Diagram Quilt Top Assembly Diagram 4. Carefully remove release paper from fabric. The ink will have transferred to the glue. 5. Cut out shape just inside the line. 6. Repeat Steps #2–#5 for remaining pattern pieces. 7. Place leaf shapes atop background. Fuse in place. 1. Referring to Finishing 1. Layer quilt top (fused to batting) atop backing. Trim batting and backing even with edges of quilt top. 2. Fuse binding to quilt. (See Sew Easy: Fusible Binding on page 2.) 3. Quilt as desired. Quilting Diagram WEB EXTRA: From the September/October 2009 issue of Fons & Porter’s Love of Quilting A sew easy ™ Fusible Binding 1. Using a pinking, wavy, or straight blade, cut 1" wide binding strips from fused fabric. Finger press strips in half lengthwise, paper side in. Remove paper backing and straighten 1 end of each strip. 2. Trim backing and batting even with quilt top. Working on release paper or appliqué pressing sheet, place binding strip around edge of quilt (Photo A). Fuse binding in place. To miter corners, B fold and fuse binding (Photos B and C). 3. Join binding strips as needed by overlapping them about ½". 4. If desired, use a decorative stitch to more permanently secure binding. C FOR YOUR PERSONAL U S E O N LY. N O T T O B E S O L D O R D U P L I C AT E D I N Q U A N T I T I E S www.FonsandPorter.com/XXXXXXX © 2 0 0 9 Fons Porter’s Love of Quilting® P.O. BOX 171 54 COURT WINTERSET, IA 50273 P: www.FonsandPorter.com AMERICA’S FAVORITE QUILTING MAGAZINE™ 888.985.1020 Lo we rS tem m te S r pe p U FOR YOUR PERSONAL U S E O N LY. N O T T O B E S O L D O R D U P L I C AT E D I N Q U A N T I T I E S www.FonsandPorter.com/XXXXXXX © 2 0 0 9 Fons Porter’s Love of Quilting® P.O. BOX 171 54 COURT WINTERSET, IA 50273 P: www.FonsandPorter.com AMERICA’S FAVORITE QUILTING MAGAZINE™ 888.985.1020


© Copyright 2026