
e
e
2
3
Sequencer
Modes
In all six modes the playing of the sequencer is guaranteed. You can change the
modes, while the sequencer is running. Switching into another mode, takes place
after the last step of the current pattern.
Start/Stop
Start/Stop works in each mode, and puts the pattern back to the starting point step 1
of the current pattern.
Pattern-Group
12 pattern groups are available. One pattern Group contains 8 patterns.
4
Pattern
The current pattern is indicated with the LEDS 1-8. A pattern consists of maximally
16 steps.
Altogether 96 patterns are available (12 pattern groups with 8 patterns each).
Relation: Note / Slide / Accent
5 possible combinations:
no Note/Break (Rest)
Note
Note + Slide
Note + Accent
Note + Slide +Accent
Slide and Accent can just be programmed together with a note!
5
Pattern Play
The memory of a new bassline is empty, and new patterns must be
programmed, as described in Pattern Write mode.
In the Pattern Play mode, patterns are played. The active step lights up in the the
upper LED row. The light shows the length of the Pattern (1-16), too.
The pattern is selected from one of the 12 pattern groups. You can change the
pattern group at all times with the rotary switch, and the switching into the new
pattern group takes place after the last step of the current pattern.
Each of the 12 pattern groups has 8 patterns to select. You select the pattern with
the lower keyboard row.
The active pattern is indicated with a flashing LED over the button. When pressing a
new pattern, this LED lights continuously. After the pattern changed after the last
step, to selected pattern, this LED flashes again.
Altogether 96 patterns are available (12 pattern groups with 8 patterns each).
6
Pattern Chaining
In the Pattern Play mode, it is possible to chain patterns from a pattern group:
If pattern 1 is active, and repeats, pattern button 1 is kept pressed again, and the
pattern button 2 is pressed additionally. Both LEDs from Pattern 1 and from Pattern 2
light. Both are played repetitive. The LED of the active pattern flashes and the other
one lights continuously. This chaining of two neighbouring patterns is possible with
the patterns 1-2, 2-3, 3-4, 5-6 and 7-8.
Chaining of neighbouring patterns is possible up to all 8 pattern of the pattern group.
Even the chaining over the last pattern to the first pattern is possible!
Possible pattern chainings:
2-3, 4-6, 3-7, 1-8....., 7-3
All pattern LEDs between the two pressed pattern buttons lights up continuously, and
and the LED of the active pattern flashs.
The pattern chain repeats continuously, after the last selected pattern:
Chain of 4 pattern:
Selected buttons:
2-5
patterns:
2, 3, 4, 5; 2, 3, 4, 5....
patterns:
7, 8; 7, 8...
Chain from 2 Pattern:
Selected:
7-8
7
Pattern Copy + Paste (Pattern Play Mode)
In Pattern Play Mode, it is possible to copy patterns.
Copy Function
To copy a pattern, press one of the pattern buttons (1-8) while holding down the
Select- button. The pattern is now saved to the buffer memory and will remain there
until another pattern is selected.
8
Paste Function
To paste a pattern, press one of the pattern buttons (1-8) while holding down the
Write/Next button. This pattern will be overwritten with the pattern from the buffer
memory.
Patterns can also be copied to another Pattern Group. To do so, select the new
group with the rotary switch and then use the Paste Function.
Manual Slide and Accent (Pattern Play Mode)
In Pattern Play Mode, it is possble to add Slide and Accent manually, with the
pressing of the Slide or Accent buttom.
The pattern from the buffer memory will not be overwritten.
9
Pattern Write
The memory of a new bassline is empty, and new patterns must be
programmed:
There are two Pattern Write modes: Pattern Write Step and Pattern Write Tap
Switching from the Pattern Play mode in the Pattern Write Tap or Pattern Write Step
mode, is possible during operation. Selected chains from the pattern Play mode, are
transferred in the Pattern Write Tap mode, and are played repetitive. The whole
pattern chain can be edited in the Pattern Write Tap mode. With a change in the
Pattern Write Step mode, only the last active pattern repeats and can be edited.
E.g. if the chain 5-7 is just playing the pattern 6 in the Pattern Write Tap mode, and it
is switched into the Pattern Write Step mode, then the Pattern 6 is selected for the
Pattern Write Steps mode, and can be edited.
The selection of the pattern, that should be changed, always takes place in the
Pattern Play mode! In the Pattern Write mode, the pattern can be edited.
Pattern Write Tap mode can edit singel pattern and a chain of pattern! Pattern
Write Step mode can only edit singel pattern!
Pattern Write Tap
In the Pattern Write Tap mode, it is possible it to change the programming of pitch,
note, Slide and Accent "live". The selection of the pattern or the pattern chain that
should be edited, takes place in the Pattern Play mode. The upper LED row indicates
the active step, as in the Pattern Play mode. The lower 8 buttons of the keyboard
indicates the active pattern with a flashing LED, as in the Pattern Play mode. The
LEDs of the keyboard indicate the pitch of the playing notes:
With the pressing of a button of the keyboard, you set a note with the corresponding
pitch on the step. By continuous pressing of a button, this corresponding note is
programmed on several steps. You can add Accent, Slide and Octave Up/Down with
the corresponding buttons to the programmed notes.
10
The LEDs over the buttons indicate the programming of Slide, Accent, Oktave Up/
Down on the active note.
Octave Up/Down, Accent and Slide can only be programmed, if notes are
present!
If a note is unwanted, it can be deleted with Clear in its active moment. Accent, Slide
and Octave Up/Down are deleted too. If the button Clear is kept pressed over several
steps, then all notes of this steps are deleted.
If the button Clear is kept pressed for a whole cycle, the whole pattern or the
whole pattern chain is deleted.
If you change the pitch of a programmed note by pressing a button of the keyboard,
the programmed Octave Up/Down, Slide and Accent are kept. Only the pitch is
overwritten with the new value. When pressing the buttoms Slide and Accent, the
previous programming changes (toggles). The Octave Up/Down buttom add or
subtract a octave.
Zustand LED
Octave-Offset
buttom
Octave +
Octave +
--Octave Octave -
- Octave
+ Octave
off
off
off
constant on
flashes
flashes
constant on
off
off
off
+ 2 Octaves
+ 1 Octave
---- 1 Octave
- 2 Octaves
As described in the table, it is possible to shift the pitch of each note with the buttoms
Octave Up/Down between the 5 octaves. Without the Octave Up/Down buttons it is
always programmed in the middle octave (no LED lights).
11
Programming Pattern Length (Pattern Write Tap Mode)
When you press the buttom Lenght, the LEDs 1-8 of the row light. Now you can
select the last step 1-8, and the pattern length of your active pattern. You press one
buttom 1-8 of the keyboard, and this step is selected as the last step of the pattern.
E.g. step 3. Now the Pattern repeats after the third step, and is 3 steps long. Press
the buttom Length twice, and the LEDs 9-16 lights. Now you can select the pattern
length between 9-16. The programmed pattern length is transferred to the other
modes. The not played steps stay in the memory.
Programming Scale (Pattern Write Tap Mode)
Press the Roll/Scale buttom while holding down the Select button.
Now you can select the step 1-4, and the pattern scale of your active pattern.
12
The Scale of the active pattern will be saved to the buffer memory.
Shuffle can just be changed when the LED of Step 1 lights (4/4-Scale).
Programming Shuffle (Pattern Write Tap Mode)
The Bassline3 has two kinds of Shuffle:
-
The first kind of shuffle delays the even numbered steps (2, 4, 6, ...).
This is similar to the common shuffle found on the 909.
-
The second kind of shuffle delays steps 3, 7, 11 and 15. This second kind of
shuffle is similar to the one on the CR-8000.
Both shuffles can be applied simultaneously.
Each of the two shuffles can be adjusted over a range of 4 degrees.
To do so, press the Select and the Length/Shuffle buttons at the same time.
LEDs 1-4 of the step buttons will now indicate the shuffle setting of the first kind of
shuffle.
LEDs 5-8 indicate the shuffle setting of the second kind of shuffle.
Keeping the Select and Length/Shuffle buttons held, you can now press the
corresponding Step buttons 1-4 or 5-8 to adjust the shuffle.
When shuffle is set to step 1 and step 5, no shuffle is present.
If the Scale is changed, the shuffle settings return to the default setting (no
shuffle)!
13
Pattern Write Step
With the mode rotary switch you switch into the Pattern Write Step mode, without
stopping the equipment. In contrast to the Pattern Write Tap mode, only a single
pattern can be played and edited. The pattern is taken with the time of switching. As
in the Pattern Play mode, a flashing LED of the lower 8 buttons of the keyboard
indicates the active pattern. As in the Pattern Write Tap mode, pitch, Octave
Up/Down, Accent and Slide, can be edited, but only for a selected step individually.
In addition there is the possibility of the function Roll in the Pattern Write Step mode.
With Roll, you can shift the starting point of the pattern (also with shortened pattern).
The pattern length that is programmed, and changes of the function Roll are taken in
the Pattern Play mode and in the Pattern Write Tap mode.
Step Selection
When you switch in the Pattern Write Step mode, step 1 is selected. The Pattern
keeps running.
Forward:
Press the buttom Write/Next, and the second LED of the LED row flashes. The
programming of step 2 is shown on the keyboard.
Press the buttom Write/Next again, and the step 3 is shown, etc.. After the last step
of the patterns (dependent on the pattern length programming) the cursor jumps back
on step 1.
Backward:
Keep the Select buttom held. Now press the Write/Next buttom, and the step
selection jumps back to the previous step.
14
A second possibility to select the step (direct step-selection)
Press the buttom Select continuously, and the first LEDs of the row light.
With pressing one of the buttoms 1-8 of the keyboard, the step is directly selected
e.g. the step 7. Now this step can be changed.
With pressing the buttom Select twice and holding, the upper eight LEDs 9-16 lights,
and with the buttoms 1-8 of the keyboard, the steps 9-16 can be selected directly.
The LED in the upper LED row, shows the active step.
Step programming
The LED row always indicate the active step, with a flashing LED. The played step is
shown with the LED running from the left to the right.
The pitch of a programmed note on this step is shown continuously on the keyboard.
When there is no note programmed, no LED lights continuously (just the flashing
LED indicates the selected pattern 1-8).
With the buttoms Accent, Slide, Octave Up/Down, you can change or add these to
the programmed notes.
15
The LEDs over the keys indicate the programming of Octave Up/Down, Slide,
Accent, of the note.
Oktave UP/DOWN, Accents and Slides can be only programmed, if a note is
programmed!
If a note is unwanted, it can be deleted with Clear. Accent, Slide and Octave
Up/Down are deleted too. When pressing the buttoms Slide and Accent the
programming changes the previous programming (toggles). The buttom Octave
Up/Down adds or subtracts a octave.
LED
Octave-Offset
buttom
Octave +
Octave +
--Octave Octave -
- Octave
+ Octave
off
off
off
constant on
flashes
flashes
constant on
off
off
off
+ 2 Octaves
+ 1 Octave
---- 1 Octave
- 2 Octaves
As described in the table, it is possible to shift the pitch of each note with the buttoms
Octave Up/Down between the 5 octaves. Without the Octave Up/Down buttons it is
always programmed in the middle octave (no LED lights).
In the Pattern Tap Write mode, only one step is edited and indicated!
16
Programming Pattern Length ( Pattern Write Step Mode)
When you press the buttom Lenght, the LEDs 1-8 of the row light. Now you can
select the last step 1-8, and the pattern length of your active pattern. You press one
buttom 1-8 of the keyboard, and this step is selected as the last step of the pattern.
E.g. step 3. Now the Pattern repeats after the third step, and is 3 steps long. Press
the buttom Length twice, and the LEDs 9-16 lights. Now you can select the pattern
length between 9-16. The programmed pattern length is transferred to the other
modes. The not played steps stay in the memory.
The Pattern length programming is as in the Pattern TAP Write mode!
Programming Scale (Pattern Write Step Mode)
Press the Roll/Scale buttom while holding down the Select button.
Now you can select the step 1-4, and the pattern scale of your active pattern.
17
The scale of the active pattern will be saved to the buffer memory.
Shuffle can just be changed when the LED of Step 1 lights (4/4-Scale).
The Scale programming is as in the Pattern TAP Write mode!
Programming Shuffle (Pattern Write Step Mode)
The Bassline3 has two kinds of Shuffle:
-
The first kind of shuffle delays the even numbered steps (2, 4, 6, ...).
This is similar to the common shuffle found on the 909.
-
The second kind of shuffle delays steps 3, 7, 11 and 15. This second kind of
shuffle is similar to the one on the CR-8000.
Both shuffles can be applied simultaneously.
Each of the two shuffles can be adjusted over a range of 4 degrees.
To do so, press the Select and the Length/Shuffle buttons at the same time.
LEDs 1-4 of the step buttons will now indicate the shuffle setting of the first kind of
shuffle.
LEDs 5-8 indicate the shuffle setting of the second kind of shuffle.
Keeping the Select and Length/Shuffle buttons held, you can now press the
corresponding Step buttons 1-4 or 5-8 to adjust the shuffle.
When shuffle is set to step 1 and step 5, no shuffle is present.
If the scale is changed, the shuffle settings return to the default setting (no
shuffle)!
The Shuffle programming is as in the Pattern TAP Write mode!
18
Programming Roll
With the roll function the starting point of a Pattern is shifted. The Pattern length
remains unaffected.
The selected step and its cursor is shifted to the left when you press the buttom Roll.
Roll and a pattern with 16 steps:
the starting step sequence:
1,2,3,...15,16 (1 is the original starting point)
press Roll once:
2,3,4,5.......16,1 (2 is the new starting point)
press Roll again:
3,4,5,6......16,1,2 (3 is the new starting point)
Roll and a pattern with 3 steps: (the steps in parentheses are not played)
the starting step sequence:
1,2,3 (4.5.6.7.... 16) (1 is the original starting point)
press Roll once:
2,3,1 (4.5.6.7.... 16) (2 is the new starting point)
press Roll again:
3,1,2 (4.5.6.7.... 16) (3 is the new starting point)
pattern length is increased to 5-Steps: 3,1,2,4,5 (6.7.... 16)
press Roll once:
1,2,4,5,3 (6.7.... 16)
press Roll again:
2,4,5,3,1 (6.7.... 16)
Roll changes the step sequence just in over the programmed pattern length!
Not played steps, with pattern lengths lower than 16, are not shifted in their
position.
19
Track Play Mode
The memory of a new bassline is empty, and new patterns and tracks must be
programmed:
A track is a chaining of different and transposed patterns from a pattern group.
In the Track Write mode the chained patterns are chained to one track 1-12, that can
be selected with the rotatory switch.
For each pattern group, one track is available. A change to another new track
finishes the current pattern and starts the new track with its first pattern.
When you switch in the Pattern Play mode, the pattern 1 of this pattern group is
played.
In the Track Play mode you can only select and play the 12 programmed tracks.
With a Start/Stop the track starts again with the first pattern of the track.
Track Write Mode
In the Track Write mode, different pattern from one pattern group are selected,
transposed and chained, and form the tracks, that can be played in the Track Play
mode. The track that should be programmed or changed is selected in the Track Play
mode. With switching into the Track Write mode, the previous track is deleted, and a
new track can be programmed.
The selection of the patterns is the same as in the Pattern Play mode.
In one pattern group, there are 8 pattern to select. You select the pattern with the
lower buttoms of the keyboard.
20
The active pattern is indicated with the LED over the buttom and is played repetitive.
Press Write/Next and the current pattern becomes the first pattern of the track.
Then a new Pattern can be selected. Press the Write/Next buttom, and the second
Pattern is fixed in the TRACK. The selected Pattern is sequentially repeated as in the
Pattern Play mode. As in the Pattern Play mode you can chain several Pattern and
be written with a Write/Next completely in the track.
For example:
Select Pattern 1
press Write/Next buttom
Select Pattern 1
press Write/Next buttom
Select the chained Patterns 5-8 press Write/Next buttom
In the Track memory, the following Patterns are written:
1,1,5,6,7,8
Switch to the Track Play mode and exactly these six patterns are repeated
sequentially, as the Track of this pattern group:
1,1,5,6,7,8;1,1,5,6,7,8; ........
In the Track Write mode, there is the possibility of transposition.
Transposition (Track Write Mode)
The selected and repeating pattern can be transposed. A pitch offset (within a
oktave) can be added. While the Pattern 1 repeats, press the Select buttom
continuously, and press at the same time one of the 12 possible pitch offsets of the
keyboard.
21
Now the entire pattern is transposed by the pitch offset that has been added.
This transposed pattern repeats and can be changed with the repeated pressing of
the Select buttom and a new pitch offset again. This new, transposed pattern, can be
programmed like the other patterns, with the Write/Next buttom into the Track.
For example:
Select Pattern 1
press Write/Next buttom
Select Pattern 1
press Select buttom and the e-note buttom of the
keyboard
Press Write/Next buttom and switch in the mode Track Play mode:
Pattern 1,
Pattern 1 transposed with 4 half-tones,
Pattern 1,
Pattern 1 transposed with 4 half-tones, .....
Is played, and is written in the Track memory.
The programmed Track of a Pattern Group is deleted with switching into the
Track Write mode!
22
Synchronisation
The sequencer can be synchronized with Midi in or Sync in (Roland)!
Midi-Clock to Sync out:
If the synchronisation switch is in the position Midi in, a Midi Clock of a Midi-master
synchronises the bassline.
At the Sync socket there is a Sync Out signal that can be used to synchronise other
gear with Sync In.
Sync-Slave:
If the synchronisation switch is in the position Sync In, an external Sync Master
synchronises the bassline.
Sync-Master:
If the synchronisation switch is in the position Sync Out, the bassline is the Sync
masters and used the internal clock generator.
At the Sync socket a Sync Out signal can be used to synchronize other gear with
Sync In.
23
With Tempo, the speed of the internal clock generator is controlled.
Start and stop with the Start/Stop buttom.
The Sync cable must have all pins connected. Some Midi cables do not have all
pins connected, and do not work as a Sync cable!
Midi Mode
The Acidlab Bassline3 can also be controlled using MIDI Note Data.
The Bassline must be connected with a Midi-cable on its Midi In, to the Midi Out of
the Midi-master (Midi-sequencer, laptop, …).
To use the Bassline3 in Midi Mode, switch off the Bassline using the On-Off slide
switch on the right side of the rear panel. Now hold the the Write/Next [Midi] button
and switch the Bassline back on with the On-Off slide switch.
You can see that you are in MIDI Mode when the LEDs of Step 1-4 are
illuminated.
Repeat the same process to resume using the internal sequencer!
24
By pressing the Select button and the Write/Next [MIDI] button simultaneously, the
Midi-Learn-Mode is activated and will be indicated by the 4 blinking LEDs of Step 1-4.
The first received midi-note sets the midi-channel (1-16) and the four LEDs stops
blinking. The midi-channel will be saved untill a new Midi-Learn-Mode is activated.
Note length – Gate
The Midi-note on/off`s received by the Bassline are converted to a gate-signal.
Velocity values of `0´ are equal to a note-off and reset the gate-signal
Pitch - CV
The Midi-information of the pitch is converted to a controll-voltage CV (0-5 Volt;
`C´=65,4 Hz).
Slide
When a second Midi-note is received, while the first is playing, the Slide-function is
activated.
The pitch changes to the new pitch of the second note.
Accent
Velocity values > 100 will put an accent!
25
Inputs
Audio In
Audio in (6.3 mm, mono) is an audio input, that disconnects the audio signal path
before the filter.
The external signal is fed instead of the saw tooth or the square wave signal into the
filter.
FM In
FM in is an input (3.5 mm of mono) to modulates the cutoff frequency of the filter.
The FM input is suitable, to modulate the filter with audio signals.
Outputs
CV-, Gate- und Accent-Outputs:
Over the sockets CV Out and Gate Out (3.5 mm, mono) compatible synthesizers can
be played. CV Out is a 1V/Oktave control voltage for the pitch, and Gate Out is a
+12V impulse with the note length information.
The Accent Out is a gate out signal, with a +12V impulse. The Accent Out is primarily
used to control the Acidlab Bombass, but can be used to gate compatible
synthesizers, too.
Audio Outputs:
Output is the main output (6,3 mm of mono), to connect a mixer. Headphones is a
headphone output (3.5 mm stereo).
Both Outputs are controlled with volume.
The produced bass frequencies are a large load for amplifiers and
loudspeakers.
Without protection they can take damage!
26
Voltage Supply
The bassline can be operated only with the provided AC adapter
(14VAC/300mA).
Do not use other power adapters!
The bassline has an on/off switch on the right back panel.
In the USA or on 115VAC nets, you need another AC adapter.
This and spare AC adapters can be bought at acidlab.de.
Warranty
The manufacturer grants a warranty of two years starting from the purchase date on
the product, in accordance with the condition described here. If defects are founded
within this time, then these will be repaired. Potentiometers, switches and sockets
apply with this product are excluded from this regulation. The decision over the
warranty claim meets the manufacturer. When determined foreign modifications or
mechanical damages any warranty claim expires. Products without warranty
authorization are liable to pay the costs repaired. In order to clarify the warranty
claim, the manufacturer is to be contacted in each case before sending back. Except
the manufacturer, no third is justified to assure or implement guaranteeings. Within
the warranty term the warranty is transferable to further buyers. Further requirements
because of consequential damages are impossible.
acidlab
Dipl. Ing. (FH) Klaus Süßmuth
e-mail: [email protected]
web: www.acidlab.de
27
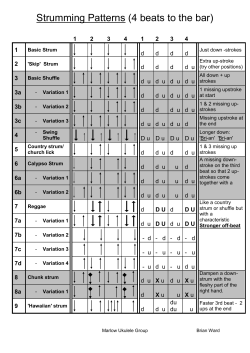


© Copyright 2026