
Mitered Placemats Super Simple
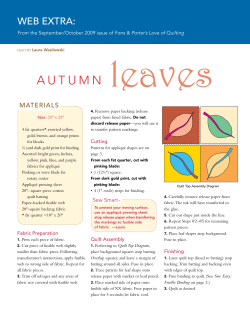
shown. Trim. Repeat for all 4 co
Mitered Placemats
12" by 16"
Instructions by Karen Montgomery
MATERIALS FOR ONE PLACE MAT
12" by 16" rectangle focus fabric
12" by 16" fusible batting
Fat Quarter for backing and mitered border
Thread for machine quilting and assembly
rotary cutting supplies
basic sewing supplies including a fabric marker
and a walking foot for your sewing machine
6. Place the 45 degree line on your ruler against
one raw edge of the focal fabric. Place the ¼
inch line on the corner of the focal fabric as
shown. Trim. Repeat for all 4 corners.
trim all
sides
he
re
1. Place the batting rectangle, fusible side
down, centered on the wrong side of the fat
quarter as shown. Press the batting in place
following the manufacturer's instructions that
accompanied the batting when purchased.
5. Using your rotary supplies, trim the fat
quarter backing fabric 2 inches from the raw
edge of the batting and focal fabric rectangles on
all sides. Your backing fabric will measure 16"
by 20".
im
tr
INSTRUCTIONS
4. After the quilting is completed or as part of
the quilting process, stitch completely around
the outside edge of the focus fabric, ¼ inch from
the raw edge.
2"
Super Simple
2"
batting
focal fabric
¼" line
wrong side of fat quarter
45° line
2. Layer the focus fabric. right side up on top of
the batting rectangle and press in place (the
fabric will not fuse to the batting, the fusible is
on the bottom. This step will create a "cling" to
help hold the fabric in place). Pin through all
layers.
Note: This is especially easy to do if you own any
ruler produced by Trudie Hughes. The 45 degree
lines on those rulers cross exactly at the ¼ inch
line. Place the Trudy ruler so that the 45 degree
lines are aligned with the top and side edge of the
focal fabric. Trim.
machine quilt as desired
3. Machine quilt through all 3 layers as desired.
This is the perfect opportunity to practice your
machine quilting! When selecting your quilting
pattern, keep in mind that only a 9" by 13
rectangle of the focal fabric will show after the
mitering process.
Select a design that will
show in that area. Also remember that all of
your stitching lines will show on the back of the
finished placemat. Select your thread color and
stitch pattern with this in mind.
The Quilt Company
3940 Middle Road, Allison Park, PA 15101
412-487-9532
www.thequiltcompany.com
Note: This is especially easy to d
© 2008 The Quilt Company, Allison Park, PA
7. Turn the placemat unit over, having the
backing fabric face up. Use your rotary ruler
and fabric marking pencil, draw a line ½ inch
from each raw edge on all four sides of the fabric.
Turn the unit over and fold the fabric to the lines
you have drawn and press. This will create a
finished edge.
9. Turn the mitered borders over to the front of
the placemat and press in place. Top stitch very
close to the folded edge on all 4 sides. Add
additional stitching lines if desired.
king with one corner, fold the plac
lly on a 45 degree angle, to the
right sideshowing, matching the f
Stitch the corner seam, backstitch
ting and stopping points. Cli
Repeat for the remaining corners.
back of placemat
mark ½" lines
and fold to
front
Repeat for additional placemats!
Enjoy!
Permission is granted to shop owners and
teachers to make copies of this pattern for
educational purposes.
This pattern may not be reproduced for sale
or commercial purposes in any format.
© 2009 The Quilt Company, Allison Park, PA
8. Working with one corner, fold the placemat
diagonally on a 45 degree angle, to the back,
with the right sideshowing, matching the folded
edges. Stitch the corner seam, backstitching at
the starting and stopping points. Clip the
corner. Repeat for the remaining corners.
fo
ld
he folded
or perfect
s
fo
ld
align the folded
edges for perfect
corners
clip this
corner before
turning
he bac
re ks
an tit
d ch
he
re


© Copyright 2026