
“Cozy Toter” Casserole Dish Carrier
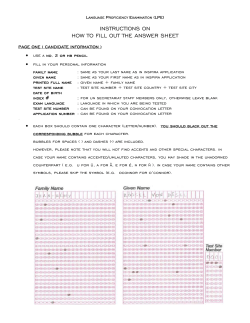
Tutorial created by Elisabeth at http://elisabeth-dixiedoodles.blogspot.com/
"Cozy Toter" Casserole Dish Carrier
“Cozy Toter” Casserole Dish Carrier
This casserole dish carrier is something that we use often in our
home. We have lunch after church each Sunday, so the machine
quilted „cozy toter‟ really comes in handy for transporting our food
and keeping it warm until time to eat. But who says that something
as common and useful as a casserole carrier can‟t be made from
fun and cute fabric?? Hey, maybe this will be the next big “haveto-have accessory” for the discerning casserole toting fashionista!
:o)
Materials Needed:
1 yard of really cute fabric
½ yard lining fabric (white is best)
½ yard cotton batting
1 (3 yd) pkg. of wide, single-fold bias tape 7/8”...color to
coordinate with your „cute‟ fabric!
1/2 yard of stiff interfacing
Shoestring (1/4" wide and at least 28" long)
1. To begin, cut a 17 1/2" diameter circle out of tissue paper. Fold
pattern in half, and lay on the fold of your main fabric, and pin.
Cut, unfold and press. Repeat with more main fabric to make
another circle for bottom layer of cozy toter. Follow the same
procedure for the lining fabric and batting. You should have six
circles in all.
2. To make the handles: Cut out two strips of main fabric 18” long
and 3” wide and then cut out two strips of interfacing with the
same dimensions. Iron each strip of interfacing to each fabric strip.
Baste or quilt around all four edges of each strip. Turn under 1/2 “
on long sides for both. Fold over and press. Sew down and stitch
near edge on both long sides. Your handles are ready!
3. At this point, fold each circle of white lining fabric in half and
press. Then fold it over again, and press. You now have four
sections on the circle with a „cross iron line‟. Repeat with second
circle of lining. Unfold back into a full circle.
4. Now create a „sandwich‟ with top layer of main fabric, middle
layer of batting, and bottom layer of lining fabric. You will do this
with the other three circle pieces as well...main fabric on top,
batting in middle, and lining fabric on bottom. Pin the three layers
of each circle firmly in place for each circle sandwich.
5. Next step: Machine quilting. Remember, you already have your
pressed „cross‟ lines in your white lining fabric to use as a starting
measuring guideline, so the next part is easy. Sew along these
„cross‟ lines, remember to backstitch at the end of each row.
Using a pencil and yardstick, measure and lightly draw lines to
create 1 ½ in. squares on the white lining fabric and machine quilt.
Repeat on second circle. See photo below.
If you already have quilted fabric, you‟re one step ahead! :o)
6. On one of your circles, cut out a middle circle that is 6 inches in
diameter...in essence creating a „doughnut‟ looking circle. Then
cut a straight slit from middle circle all the way down to the end of
the „main‟ circle.
Zigzag both edges of „slit‟, turn under ½”, press, and stitch at the
edge of the sewing machine foot all the way to end.
Center opening on the right side of bias tape to wrong side of
opening. Extend bias tape ¼” beyond edge of opening. Stitch
them together in the crease of bias tape. Turn under raw edge of
bias at the end of the slit. Turn bias tape to the outside and stitch.
7. Place your circles on top of each other (wrong sides together)
and pin in place. Again using the edge of the sewing machine
foot, baste completely around circle.
8. It‟s now time to add the handles. Place ends of handles to outer
edge of circle and baste when you have them where desired.
Clip off any excess fabric.
9. We‟re almost finished! Stitch bias tape completely around the
outside edge of the circle following the same method that we
used to add bias to the middle circle.
Hem end of bias, fold over the opposite end, and stitch.
10. Using the "safety pin" method, thread shoestring gently through
the bias "tunnel" of the inner circle. Add decorative beads if
desired.
Ta-da! This is my first tutorial, so I hope it's easy for you to
understand! :OD And thanks to Sis. Kynnette for answering all my
questions! You're the best!
*Note: When ready to use, place round or oblong casserole dish
inside the carrier. Pull the ends of shoestring together to cinch the
inner circle together to close, then tie.


© Copyright 2026