
Cooking with Ken® - Chef Apron
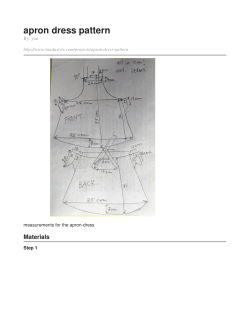
Cooking with Ken® - Chef Apron
You need a piece of woven fabric about 7” X 18” (fat quarters work well and if buying fabric off a bolt ask for
one quarter yard of fabric)
I used a bottom weight twill fabric but you can use Trigger or a light to mid weight cotton fabric. I used the
traditional white but you can make the apron and hat in any print or color you want as well. In addition to the
fabric you will need matching thread and about 24” of ¼ inch wide Grosgrain ribbon (Don’t panic… it is the
ribbon with the ribs in it, not the shiny kind.) The1/4” grosgrain ribbon works best but you can see in some of my
samples I used some printed ribbon that is satin and
slightly wider. Look for narrow ribbons in fun prints
and colors in the scrapbooking section of your craft
store. Some of those come with peel and stick
adhesive. I usually pull it off so I can sew through it.
Cut out pattern for the apron following the grain
markings. (Grain is the straight weave of the fabric.)
Save the rest of the fabric for our next edition when
we will learn how to make the chef hat!
To sew your apron: Lie the cut out fabric piece on
the ironing board with the wrong side up.
Fold down the top of the apron about 1/8 inch and
press. (If you don’t have an iron you can finger
press or you can even run a loose stitching line
across or pin it) Do the same to the apron sides and
hem (bottom edge). Fold each of these sides over
one more time, about a scant ¼ inch and stitch
across.
You can hand stitch or machine stitch. I would do the top edge first, sides next and hem last to make it all look
nice and uniform. (I stitched with contrasting thread so you can see the stitching easier)
Next take your piece of ribbon and fold it in half and
mark the center with a pin. Measure about 1 and ½
inches from the center on each side of the pin and
mark those two spots with pins as well. This will be
the neck strap for the apron. (You may want to
check it on your actual doll before stitching both
sides to make sure it will fit over his head, as this is
an average or guideline for a Ken® doll)
Lie your apron right side down on a flat surface and
place the pinned spot on your ribbon at the top neck
edge of your apron matching the slightly curved
unhemmed sides with the long edge of the ribbon as
shown. Pin in place.
Stitch along the long edge of the ribbon
closest to the apron fabric (not the
edge side) Do the same with the other
side, making sure your neck strap is not
twisted. (If using decorative ribbon with
wording or a one way pattern, be sure
you have the ribbon positioned so it
comes out right when the ribbon is
folded over and finished)
Turn the apron over so the right side is
up. Fold the ribbon toward the right
side along the line you just sewed.
Stitch the other edge to the fabric as you did before.
I like to press everything to make it look professional.
Even if your stitching is not perfect, your finished
apron will look better if it is pressed. Trim the ends of
the ribbon as you desire. Make sure you leave
enough to tie around Ken®’s waist. It takes more
than you think so check it out before cutting.
If you want to put the Cooking with Ken® Logo on your
apron, do so following the manufacturer’s instructions
on the iron on transfers you have chosen (even though I
used white fabric, I used a dark transfer so I didn’t have
to invert the logo!)
Here are the finished aprons I made. Next edition we
will make the Chef Hat to complete your set!
Happy Sewing!
Black lines are for Ken® Apron. The orange lines show the version sized to fit Barbie®. Assembly instructions are
the same for both aprons.
The pattern is 6.75” width by 6.25” high.


© Copyright 2026