
Magic Pattern A The Slip-Over Apron
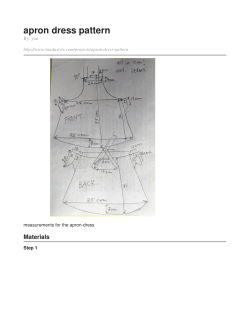
Magic Pattern
The Slip-Over Apron
Fashion Service, 1929
A
n attractive print, bias tape in a
place point b and along the open edges
harmonizing color, and less than
2-1/2 inches and place point c. Join b
an hour’s time will produce a
and c with a straight line.
practical and becoming apron if the
From b measure along the fold
simple directions on this page are fol-
about 9 inches and place point d. At
lowed. As the illustration shows, this
right angles to the fold from d measure
apron fits well because of its bias cut. It
2-1/2 inches and place point e, joining
also has smart lines, its short, slightly
the two with a straight line. From e
full back being very fashionable. The
toward a and parallel to line ad, indi-
neckline permits slipping this over the
cate a straight line for a distance of
head readily. For the average figure,
about 6 inches and mark its termination
provide 1 yard of 36-inch fabric; for
f. From f indicate a curve to b, as shown.
smaller sizes, when short, a 32-inch
From f, at right angles to line ef,
length of 32-inch fabric is better. For each
measure 3-1/4 inches and place point
provide about 5 yards of bias-fold tape.
g. Join g and c with a curved line, equidistance from fb at all points.
Cutting the Apron
From ga indicate a line to the left,
Straighten the cut edges of your
parallel to the open edges of the mate-
material and then fold on the diagonal
rial, as shown, and mark its end h.
and place it on your cutting table, all
From h measure the right about 6-1/2
edges even, having the two open edges
inches to 8 inches, depending on the
next to you and the diagonal fold to
depth you wish the back, and mark
your right.
point i. Measure the distance between
Consider the corner at the lower
i and g and, midway between them,
right a. From this point measure along
mark point j. Indicate a dotted guide-
the fold a distance of 4-1/2 inches and
line from j at right angles to line ig,
64
making it 4 inches long, and mark its end k.
To cut the apron, start at h and cut to
At right angles to line hg at point i
i, then to l, through k to g, from g to c on
measure 2 inches and mark point l. Draw
the curved line, from c to b and to e
a straight line from i to l, curve it from l to
through f, and then to d. Use the straight
k and then from k to g, as shown.
sections between line hg and the open
Mark the corner opposite a, point m.
edges for the tie.
From this point measure along the fold a
Cut the curved line from n to o to form
distance of 8 inches and place point n.
the curved edge on the front of the apron.
Along the open edges from m, measure 12
inches and place point o. Join points n and
o with a curved line, as shown.
When using 32-inch fabric, follow the
same plan except for the location of point d
which should be 7-1/2 inches from point b,
and of i, which should be 6-1/2 inches or
less from h.
Making the Apron
Join the center-back line below the
neck opening with a French seam and
baste the binding around the neckline.
Next, pin in two 3/8-inch folds on each
side of the center back in the skirt section
of the apron, making them 3-1/2 inches
long. These will narrow the back and provide fullness, as shown in the small back
view. Stitch and turn the ties and pin in
The diagram, shown at the
left, illustrates the method
of cutting the Magic
Slip-Over Apron
without a pattern.
place, locating them just beyond the folds,
as shown.
Slip the apron on. If it appears to bulge
at the armhole edge, fold in darts on each
side about 1/4-inch deep and 2-1/2 inches
long, tapering to nothing at the points. Remove the apron and stitch the darts and
the folds at the back. Then baste the binding around all unfinished edges, and stitch
accurately. Stitch the ties securely in place.
If you wish a pocket, one may be cut
from the section b, e, d remaining after
cutting out the neck opening.
65


© Copyright 2026