
Document 93195
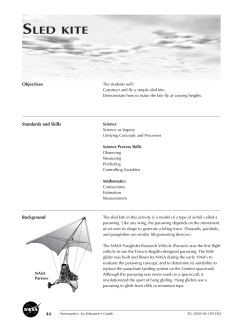
4-H Project Connections Model Rocketry Shooting Sports The Power of the Wind 4-H Science Abilities: Build / Construct Connecting Science, Technology, Engineering, and Math concepts to our everyday lives. Draw / Design Redesign Mini-Kite Design Test E n g i n e er i n g C h a l l e ng e i n a e ro d y n a m i c d e si g n s 4-H Life Skills: Critical thinking Japanese have wonderful kite designs. Do you think some fly better than others? What is a good kite design? Problem solving Introduction: Symmetry and center of gravity are the keys! Japan has many kite festivals. The Ikazaki Kite Festival, for example, is more than 400 years old. It is held on children's day (May 5th) to wish prosperity and happiness to the children who were born in the previous year. The name of the child is painted on kites 3m wide by 4m high (approximate 10 feet by 13 feet). Kites can vary greatly in size. One of the biggest is Wanwan kite, that has a 10m diameter (390 inches or more than 32 feet). It’s origin is ancient, and thought to have first been built in 1692. The largest Wanwan kite to fly had a 20m diameter (more than 65 feet!) Because of the huge scale and weight of the kite, many people and a strong wind are needed to fly it successfully. The smallest kites can be a few millimeters (about the length of a grain of rice)! These tiny kites fly above the rising heat of woks. Regardless of Colorado Mathematics whether they are gigantic or dinky, each particular kite is beautifully Standards: Eighth Grade decorated, and some kites even take the shape of flowers or animals. 4.1 Objects in a plane and Guidelines to kite building: their parts and attributes can Symmetry in cover (sail) shape: This means that the shape of the sail be analyzed on the right side exactly mirrors the shape of the sail on the left. To get a 4.2 Direct and indirect measurements can be used to symmetrical sail, fold the paper in half and cut your sail design. When you describe and make open the paper, you will have a symmetric sail. comparisons Symmetry in cover (sail) billow: This means how taut or baggy the sail Seventh Grade 4.1 Objects in space and their is on the frame. If one side is baggy and the other taut, the force applied by the wind will not be uniform. By the way, taut is better than baggy. parts and attributes can be measured and analyzed Symmetry in weight: This means that both sides are equally balanced. Sixth Grade Try to use the same amount of glue or tape on your tissue paper sail when 4.1 Polygons can be you attach the spine and spar. described, classified, and Weight: Try to make your kite as light as possible, including the thread that you analyzed by their attributes Colorado Science Standards: Eighth Grade PS1.1 Identify and calculate the direction and magnitude of forces that act on objects, and explain the results in the object’s change of motion Fourth Grade PS1.1 Energy comes in many forms such as light, heat, sound, magnetic, chemical, and electrical Fifth Grade 4.1 Geometric figures in the plane and in space are described and analyzed by their attributes Fourth Grade 4.1 Geometric figures are described by their attributes and specific location on the plane use. It needs to be strong enough to withstand the wind and pulling, but light enough that it won’t drag down your kite. Center of gravity: The point at which the entire weight of an object (for example, our kite) is concentrated so that if supported at this point the entire object would remain in balance. At that specific point, you could balance anything: the Sun, Earth, and Moon in orbit, a diesel truck, or your kite. It is at this point that you want to place your bridle. Anatomy of a kite: Spine—vertical stick, usually wood or plastic. Spar - cross-piece, often curved or bowed. Cover (also called sail)—plastic, paper, or fabric to catch the wind . Bridle—string attached to the frame. Kite Line—string from bridle to the person flying kite. Tail—a long ribbon or string with knotted bits of Team Foster’s beautiful dragon kite material that helps to balance the kite. Not all kites need a tail. Reel—the spool you wind the kite line around. Colorado State University Extension 4-H programs are available to all without discrimination. Age Appropriate: 4th—8th grades Time Required: 60 minutes Materials: Tissue paper Bamboo skewers Thread and fishing line Tape White school glue Score sheets (attached) Scissors Power Words Airfoil: An airfoil is the shape of the wing of a plane or bird—diagramed below Asymmetry: opposite of symmetry—not balanced patterns of self-similarity Center of gravity: the single point in any object (symmetrical or asymmetrical) which everything can be balanced. Symmetry is a precise and well-defined concept of patterned self-similarity. ◦ Reflection symmetry—the mirror image ◦ Rotational symmetry— the image turned on its axis ◦ Translational symmetry— the images are offset 4-H STEM: Connecting Science, Technology, Engineering, and Math concepts to our everyday lives. Build It makes a great bridle). Either the fishing line or the thread may be used as your kite line. A pin to compare the size of each kite! Note that not all kites are rectangles. Experience / “What to Do” Hand out the “Kite Design” cards. Examine the different styles of kites. Look for the airfoils on each kite. Note that the asymmetrical kite does have a center of gravity, and the bridle is attached at that point. Without that placement, the kite would not fly. Hand out the “Miniature Kite” cards. Examine the different styles of these miniature kites. Can you name the kind of kite for each of the miniature kites? For Round One of this competition, only the diamond or rectangle (a modified diamond) kite is allowed. You may build up to 4 kites. Test It You will have 20 minutes to build your Rules kite. Each participant may submit up to four kites. The bamboo skewers will act as the Kites must be less than 20cm x 20cm not including the tail. spine and spar. To cut them down to Kites will be flown by walking a marked 8m course holding the correct size for your kite, first the kite line at least 30cm from the bridle. score the bamboo with the scissors, Every kite must fly at a positive 15 degree angle or better to and when you have an indented ring be considered. around the skewer, gently break at that The score will be determined by size and flight ability. The spot. smallest score is the best. The size is the measurement of Tissue paper will be your sail. HINT: the longest axis of the kite. Flight ability is determined by iron your tissue paper, or use a section the number of times the kite flips over 360° and that numof tissue paper that is flat, without creases or folds. How ber is multiplied by the size of the kite. much area do you want for your sail to have? Can you decrease the area and increase the airfoil? Suggestion: fold Redesign It your paper from corner to corner, and when you make As a group, examine each kite. Which kite had the lowest your cuts, they will be symmetrically identical (diagram (and therefore the best) score? What do you think attributabove). ed to the overall “fly ability” of that kite? Suggestion: look You have a choice of adhesive for attaching the spine and at the front page of this STEM Connection, and review the spar to the sail—either tape or white school glue. If you section “Guidelines to Kite Building.” use the glue, only use a tiny drop. Allow to dry fully before For Round Two of this competition, you may submit only 2 testing your kite. (What is an advantage and disadvantage of kites. You have 15 minutes to build your redesigned kite. each adhesive?) Re-Test It Use the thread to string your kite and Use the same rules found in the “Test It” section above. make the bridle (knot to the right Share/Reflect/Generalize/Apply: If you change the area of the sail cover, how does that impact the aerodynamics of the kite? If you change the bridle, how does that change the aerodynamics of the kite? Can you think of a way to find the center of gravity on your kite? How would you do that? On a miniature kite, does glue or tape work better to connect the spine and spar to the cover? Can you find an airfoil on your kite? Career Connections: Careers that incorporate aerodynamic design include aeronautic engineers, automobile engineers, energy engineers (for example, those who work in wind power), surf kite, sailboard, sailboat designers in the recreational industries. References: Photos: 1st page: http://www.d-vision.co.il/?doc=151761, http://www.teamfoster.me.uk/Silver_Bay/files/archive-jul-2007.html, http://eartheasy.com/ play_kites.htm; http://www.kiteman.co.uk/index.html; 2nd page: http://miniatures.kitingusa.com/mini_plans.htm, http://wardley.org/kites/bridle/knots.html, http:// www.kiteman.co.uk/MiniKites.html, Japanese Kite Cards http://www.kiteman.co.uk/index.html; Kite Design Cards http://www.csiro.au/helix/sciencemail/ activities/Kite.html; http://www.kiteflyerinfo.com/delta-kite-design.shtml;http://www.grc.nasa.gov/WWW/K-12/airplane/kitepart.html; http://www.kiteplans.org/ planos/MBKdiamond/diamond-kite-plans.html; http://www.coastalwindsports.com/ChoosingAKite.html; http://www.breezechasers.com/bc-tips-dl2.htm This STEM Connection was developed by: Dr. Barbara J. Shaw. To find out more about 4-H STEM activities, contact your local county Extension office. http://www.ext.colostate.edu/cedirectory/countylist.cfm More activity sheets can be found at http://www.colorado4h.org/k12/activity_sheets/activity.php Mini-Kite Design Competition Score Sheet—Design Name > Positive 15° Y or N Number of 360° spins Times the length of the longest axis Equals Final Score Mini-Kite Design Competition Score Sheet—Redesign Name > Positive 15° Y or N Number of 360° spins Times the length of the longest axis Equals Final Score Teaching Tips Bring an iron and ironing board to iron the tissue paper on low heat before attaching the spine and spar. The bridle placement is perhaps the hardest part of kite making. Look for the center of gravity by trying to balance the kite on one fingertip along the spine and spar. Even if you can’t balance it on one finger (depending on the design) you will be able to determine to location of the center of gravity. Try to place the bridle at that point. An easy bridle is the overhand loop. Here is a nice video on how to tie it: http://www.ehow.com/video_4467995_tie-overhand-loop-knot.html The lighter, the better. The more symmetrical, the easier for the kite to fly. The closer the bridle is to the center of gravity, the better the kite will fly. After everyone has completed Round One, spend some time with the best kites, and ask each participant what he/she can do to improve the overall performance. Make sure that each participant is examining his/her kite to assess what factors are different Could that be a factor in the kite’s flight? Using too much school glue to attach the spine and spar to the kite will cause the kite to be unbalanced and too heavy. If anyone opts for the glue, suggest that they put the glue on a piece of paper, and carefully and sparingly spread the glue on the spine and spar. It is possible to bow the spar by soaking the bamboo skewers in water. However, you won’t have enough time in one session to shape and dry the skewer. If you students engage in the kite design, you can hold additional sessions: Same rules, but any kite design Make the biggest kite as a group project Use different material for the sail, and decorate with traditional Japanese designs Try building animal kites (like the miniature bee kite “E” on the Miniature Kite cards) There is miniature kite guild, and another website dedicated to miniature kites. They both sound very friendly. Much of the information about miniature kites, the contest, and kite designs were from two websites: http://www.miniaturekiteguild.org/main/ http://miniatures.kitingusa.com/ Challenge the participants to build an asymmetrical kite. The trick is to find the center of gravity. To do this, you will also need a weight tied to the end of the fishing line or string to make a plumb bob. Hold one of the corners of the irregular kite and hang the plumb bob from that corner. Draw a pencil line along the string as it hangs. Hold the kite by another corner and hang the plumb bob from that point. Draw a line where it intersects the first line. Repeat one more time, and where the three plumb lines meet is the center of gravity of your kite. This website has some examples: http://dev.physicslab.org/Document.aspx?doctype=3&filename=RotaryMotion_CenterMass.xml Kite Design Cards Sled Kite Tissue Paper Delta Kite 2 1 Box Kite Diamond Kite 3 4 Asymmetric Kites Transaction Kite 5 6 Miniature Kite Cards A B C D E F


© Copyright 2026