
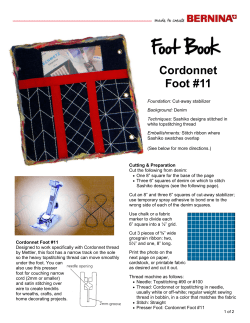
Learn at Home: Sewing 101 Getting to Know Your Machine
Learn at Home: Sewing 101
Getting to Know Your Machine
Anatomy of a Sewing Machine
Stitching Corners, Made easy!
Basic Maintenance and Cleaning
Easy-to-sew ice-breaker projects
for getting to know your new
machine.
Page 18 - 2 1
Click to navigate
Table of Contents
Anatomy of a Sewing Machine . . . . . . . . . . . . . . 3
Sewing Machine Features & Functions . . . . . . . . . . 4
Feature Focus — Feed Dogs . . . . . . . . . . . . . . . 6
Bobbin Winding . . . . . . . . . . . . . . . . . . . . 7
Bobbin Case. . . . . . . . . . . . . . . . . . . . . . 8
Thread Tension. . . . . . . . . . . . . . . . . . . . . 9
Page 6
Tension Extremes. . . . . . . . . . . . . . . . . . . 10
Get to know the doggies!
Starting & Stopping a Stitch Line. . . . . . . . . . . . . 11
There’s more to this dog than meets the eye.
Needle Threader & Needles. . . . . . . . . . . . . . . 12
Stitches & Terms . . . . . . . . . . . . . . . . . . . . 13
Sewing Supply List. . . . . . . . . . . . . . . . . . . 14
Sew Smarter
Presser Feet. . . . . . . . . . . . . . . . . . . . . . 15
Pinning & Pressing . . . . . . . . . . . . . . . . . . . 16
Right from the start
— Your SAH Learn to Sew Guide will
Basic Maintenance . . . . . . . . . . . . . . . . . . . 17
teach you the basics of sewing and have
you making your first project as soon
as you open the box. Be brave
and sew what you love!
Easy First Project. . . . . . . . . . . . . . . . . . . . 18
Appliqué Project. . . . . . . . . . . . . . . . . . . 20
Appliqué Prep and Ideas. . . . . . . . . . . . . . . . 21
Good to Know . . . . . . . . . . . . . . . . . . . . 22
© 2012 Janome Canada Ltd. and Janome Shop at Home; all content
distributed free for personal use only.
Page 2
———————
Learn at Home
—
S e w i n g 1 0 1 : G e t t i n g t o K n o w Y o u r M a c h i n e ———————
PAGES
PAGES
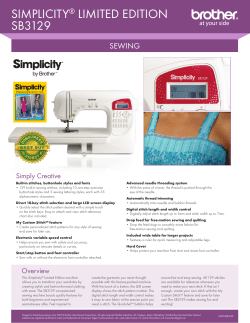
Anatomy of a Sewing Machine
Each machine is different
Please consult your owners
manual for specific details
for your SAH machine
< 26
<1
2>
4>
5>
< 22
3>
< 25
28 >
<6
27 >
7>
21 >
8>
< 23
<9
< 29
20 >
19 >
10 >
11 > 12 >
< 17
32 >
30 >
< 18
14 >
33 >
31 >
1. Bobbin winder stopper
12. Feed dogs (below presser foot)
23. Stitch selection panel
2. Bobbin winder spindle
13. Extension table
24. Presser foot
3. Additional spool pin goes here
14. Accessory storage (inside)
25. Needle
4. Spool holder/cap
15. Free arm
26. Needle clamp screw
5. Spool pin
16. Drop feed lever
27. Foot holder
6. Bobbin winder thread guide/ tension
17. Hook cover plate (bobbin cover)
28. Setscrew
7. Thread take up lever
18. Bobbin cover release button
29. Carrying handle
8. Thread tension dial
19. Reverse stitch lever
30. Handwheel
9. Thread tension discs (within thread path)
20. Stitch length dial
31. Power switch and power socket
10. Thread cutter
21. Pattern selector dial
32. Foot lifter
11. Throat plate (stitch or needle plate)
22. Stitch width dial
33. Foot pedal
Sew
Encourage Curiosity — Get acquainted with all of the parts
and operations of your new sewing machine. Don’t be afraid to turn the dials and
push the buttons. The two of you will soon be best friends!
Smarter
———————
< 15
16 >
14 >
13 >
Page 3
< 24
Learn at Home
—
S e w i n g 1 0 1 : G e t t i n g t o K n o w Y o u r M a c h i n e ———————
PAGES
Sewing Machine Features & Functions
Each machine is different — Please consult your owners manual for specific details for your SAH machine
1. Bobbin Winder Stopper — Causes
a filled bobbin to stop winding.
2. Bobbin Winder Spindle — Secures
the bobbin in place for winding.
3. Additional Spool Pin — A second
spool allows for twin needle stitching,
or sewing with two threads
4. Spool Holder/Cap — Secures spool
to stay on pin, guides thread from spool
into thread path.
5. Spool Pin — Either horizontal or
vertical. Holds thread spool.
6. Bobbin Winder Thread Guide
Tension — Maintains even tension on
thread during bobbin winding.
7. Thread Take Up Lever
This lever pulls the thread from the
spool, through the tension and feeds
it through to the needle. It keeps thread
from tangling in thread path. The sewing machine will jam if the take up
lever unthreads.
8. Thread Tension Dial — Adjust the
degree of drag or ‘pinch’ on the upper
thread. Higher number indicates
more tension.
9. Thread Tension Discs (within
thread path) — Keep thread taut in the
thread path and pulling up the bobbin thread just enough for a balanced
stitch. Always thread machine with
tension discs open (presser foot up)
to properly seat thread in thread path.
———————
the side of the machine. To use: raise
presser foot, lift the stitched piece
and drag both the bobbin and upper
thread through the cutter to trim both
threads.
11. Throat Plate — Removable flat
metal or resin plate below the presser
foot through which the feed dogs raise
and the needle passes. A standard
plate has an oval shaped needle
Computerized Conveniences
Achieving Similar Results — Mechanical and computerized sewing
machines achieve similar results in
generally the same manner. Different
features and functions are often
a matter of convenience and
preference. Mechanical machines
will use levers and dials while
computerized machines will often
use digital displays and automatic
function buttons like those seen
on the Juno M1230Q.
1. Speed Control Slider
Page 4
10. Thread Cutter — Mounted along
Learn at Home
—
2. Start/Stop
4>
3>
<1
<2
3. Auto Lock, Reverse
S e w i n g 1 0 1 : G e t t i n g t o K n o w Y o u r M a c h i n e ———————
4. Needle Up/Down
PAGES
Sewing Machine Features & Functions
25. Needle — Pierces fabric to allow
for joining upper and bobbin threads in
a locked stitch. Different needle sizes
accommodate different threads and
fabrics. The higher the needle number,
the larger the needle. Larger needles
are used with heavier fabrics.
26. Needle Clamp Screw — Secures
the needle in proper position in order
to create a balanced stitch.
opening wide enough for all stitches,
whiles an optional straight stitch plate
is for centre straight stitch only, and can
offer more thread/stitch control.
Push or hold to take several stitches or
continually reverse stitch. Most often
used for locking stitches and securing
seams.
12. Feed Dogs — Feed fabric
20. Stitch Length Dial — To manually
through the sewing path.
13. Extension Table — Flat bed of the
machine for sewing.
14. Accessory Table Storage — Holds
sewing accessories (removable).
15. Free Arm — Created when acces-
sory table is removed. Allows for sewing
in narrow spaces like cuffs or hems.
16. Drop Feed Lever — Lowers feed
dogs so that fabric can be moved freely,
or not moved at all for button sewing.
17. Hook Cover Plate (Bobbin Cover)
— Covers the bobbin and bobbin case.
18. Bobbin Cover Release Button
— Push to release the bobbin cover.
Always use JANOME bobbins : )
19. Reverse Stitch Lever (or button
(or digitally) select the length of a stitch.
A higher number gives a longer stitch.
Common length is 1.8 – 2.2mm.
21. Pattern Selector Dial (or stitch
number key) — To select stitch pattern
or turn through the steps of a four —
step buttonhole.
———————
27. Setscrew — Secures the foot
holder in place. Turn this screw to
attach feet remove the foot holder and
attach the walking or darning foot.
29. Carrying Handle — Retractable
or flip handles are built in to carry
the machine.
30. Handwheel — Used to manually
raise or lower the needle with precision.
Always turn towards you.
22. Stitch Width Dial — To manually
(or digitally) select the width of a zigzag or other stitch. When used with a
straight stitch, the stitch width controls
the NEEDLE POSITION.
— To turn the machine on or off. Always
turn the machine off when changing
needles or presser feet.
23. Stitch Selection Panel — Visual
32. Presser Foot Lifter — Handle
representation of stitch menu.
24. Presser Foot — Presses fabric in
place during stitch formation. Releases
thread tension when raised with presser
foot lifter. Different presser feet support different stitch effects such as a
blind hem or zipper insertion.
on computerized machines)
Page 5
27. Foot Holder (Ankle) — Securely
holds most presser feet by snapping or
sliding in them place. The small lever at
the back of the foot holder is depressed
to release/change feet.
Learn at Home
—
31. Power Switch and Power Socket
behind the needle used to lift or lower
the presser foot. Can sometimes be
lifted higher for extra clearance.
33. Foot Pedal — Used to regulate the
machine speed by pressing down like
a gas pedal. Can be disconnected on
some machines and replaced with the
start/stop button.
S e w i n g 1 0 1 : G e t t i n g t o K n o w Y o u r M a c h i n e ———————
PAGES
Feature Focus
SAH machine feed systems vary
between 3 (back), 4 (center) and
7 piece feed dogs (front). The 7-piece
superior feed provides more points
of contact between the machine and
fabric to make the feeding process all
the more smooth and precise.
Feed Dogs
Teeth to Lift & Pull — After a stitch is locked together, the fabric is fed
the distance of the next stitch. This feeding is accomplished by the action of the
feed dogs. A series of metal teeth along a thin metal bar rise up through the sewing
machine’s needle plate to lift and pull fabric along the stitch path. The drop feed
control keeps the feed dogs lowered and allows for free motion sewing where the
user controls the feeding pace and direction of the fabric. An even-feed or walking foot is an accessory foot which provides a second, upper set of feed dogs that
add even greater control to the fabric movement. This foot is particularly useful for
stitching quilts and other thick or multi-layered projects.
Cleaning Your Feed Dogs — Unscrew the needle plate and give the feed dogs
a thorough brushing (an old toothbrush works well for this). Lift out any fluff balls
rather than blowing them aside as you don’t want debris pushed deeper into the
machine. Replace the needle plate cover, and tighten the screws to hold it in place.
Seam Guide Lines
Accurate & Consistent Stitching — The markings etched in the
needle plate are convenient for stitching accurate and consistent seam lines. The
number indicates the distance from the centre needle position. Centimeter and
fractional inch markings are included.
Page 6
———————
Learn at Home
—
S e w i n g 1 0 1 : G e t t i n g t o K n o w Y o u r M a c h i n e ———————
PAGES
Bobbin Winding
One of the first steps in beginning to sew is to wind a bobbin.
Whether for a SAH mechanical or computerized machine, the
process is about the same. Wind the bobbin at a moderately fast
and consistent speed, and you will be ready to sew. While you’re at
it, wind several and you can sew the day away!
Winding Bobbins — The setup is the same for horizontal or vertical thread delivery
1. Prepare the machine for bobbin winding by disengaging the clutch (pulling
out the hand wheel) if necessary.
2. Set the spool on the spool pin and
secure it in place with the spool cap.
5. Place the bobbin on the bobbin winder
spindle & push the spindle to the right,
towards the stopper. (On computerized
machine, a code on the screen indicates the bobbin winder is engaged)
3. Wind the thread around the bobbin
winder tension disc in a ‘U-turn,’ not a wrap
around as with some other machines.
8. Press on the foot pedal until the bobbin
is full. It will start to ‘sputter’ and stop as the
fully wound thread contacts the stopper.
6. Hold the bobbin thread securely
between your fingers as you start to wind.
9. Disengage the winder by
pushing the spindle to the left.
10. Cut the thread at the bobbin and
7. After several turns of the bobbin,
4. Bring the thread up through one of the
small holes in the outer rim of either side
of the bobbin, not through the center hole!
Page 7
———————
snip the thread tail so as not to get
it caught in the winding thread.
Learn at Home
—
thread the machine for sewing. Be careful
NOT to keep the upper thread in the
bobbin winder tension. You must remove
the thread from this tension disc and secure
it in the first thread guide of the threading
path. Remaining in the upper bobbin
tension disc will inhibit sewing
and break threads.
S e w i n g 1 0 1 : G e t t i n g t o K n o w Y o u r M a c h i n e ———————
PAGES
Bobbin Case
Front Loading Bobbin Cases
You will quickly get a feel for the placement of a few simple parts
and bobbin winding will be a snap!
3>
<1
<4
<2
1. The Hook Cover
2. The Latch
3. The Horn
4. The Bobin Case
It is perfectly normal to see a few drips of
oil on a new machine. Check the general
bobbin case area. Remove the case and
check inside as well. Swipe it away with
paper towel.
When loading a new bobbin into the case,
be sure that the thread is unwinding away
from you (see image in your manual). Draw
the thread back towards you, into the bobbin case slot, then snap it under the tension
spring and into the delivery eye. [arrows
to spring & eye
2. The tail of the thread makes a ‘P’ shape
when correctly positioned. The image on
the cover is a helpful reminder.
4. Pop the cover back on, drawing the tail
backward, over the needle plate (see image
above). You are now ready to raise the
bobbin thread by holding the upper thread
as you lower and raise the needle. Gently
pull on the upper thread to raise a loop of
bobbin thread.
Top Loading Bobbin Case
Although the two cases look different, they
perform the same function. In the case of
the top-loading bobbin, it is easier to know
when thread is running low. Reloading your
next bobbin is simple.
1. Release the cover with a push of
the release.
Page 8
———————
3. Draw the thread to the left. Feel it
snap into the notch, and then between
the tension blades. Continue to draw it
backward into the notch at about the
“9 o’clock” position.
Learn at Home
—
S e w i n g 1 0 1 : G e t t i n g t o K n o w Y o u r M a c h i n e ———————
PAGES
Thread Tension
Understanding Tension
The mention of thread tension can scare off many-a-sewing enthusiast,
but once you understand the system, there is little to fear. Balanced
stitches, where threads meet and form a solid stitch within a smooth
flat seam or stitch line, are a result of good tension.
Good tension comes from these components working together to
have the same amount of thread on each side of the stitch:
The Tension Dial — This dial sets the closeness of the tension discs. A higher
Take-Up Lever
numbered setting increases the pressure between the discs, increasing the drag
on the upper thread which in turn pulls the bobbin thread more towards the top
of the fabric. A lower setting reduces drag and allows upper thread to flow more
freely, sometimes allowing the bobbin thread to pull the upper thread to the back
of a project.
Thread Guides — Along the thread path, including the guide on the take-up lever.
These assorted guides cumulatively increase the tension on the thread as well as
add to its proper alignment for a straight stitch.
Improper threading is often the cause of stitch troubles. Before adjusting tension,
double check all threading.
Front Loading
Top Loading
The Tension Discs — Located within the thread path, before the take up lever.
(These are not easily visible.) The presser foot must be lifted to open the tension
discs for proper threading.
Bobbin Case Tension Screw
Heavier threads will fill the tension discs more than normal sewing threads. Tension may need to be reduced when using these. The opposite is true for ultra-fine
threads that may require higher tension.
Bobbin Case Tension Spring — The tension screw controls the bobbin case
tension. Most tension issues can be resolved with upper tension adjustments.
Sew Smarter
smooth stitching
— Balanced tension may not always equal
good tension! Top and bobbin threads
may be staying on their own sides of the
fabric, but seams may still either pucker
or gap. This indicates that adjustments
need to be made to get a smooth,
well-balanced stitch.
Page 9
———————
A second bobbin case allows you to freely adjust bobbin tension, keeping the original case set for everyday sewing. With experience, you can adjust bobbin tension
by turning the screw in small increments (turn right to tighten or left to loosen). A
quarter turn is sufficient to make a change. Work over a soft cloth to catch this tiny
screw if it falls from the bobbin case while adjusting.
As you advance, you may wish to try ‘bobbin sewing’ using ultra-heavy threads in the
bobbin since they are too heavy to pass through a needle. Rather than loosening the
bobbin tension, consider bypassing it all together.
Other Factors — The thread, fabric or stitch selection, as well as the needle plate
or presser foot being used also affect tension.
Learn at Home
—
S e w i n g 1 0 1 : G e t t i n g t o K n o w Y o u r M a c h i n e ———————
PAGES
Tension Extremes
Try this: Put two different color threads in the top and bobbin.
Crank the tension all the way up to 9 or 10 and stitch a straight
and zigzag stitch. Turn it down to 0 or 1. Stitch through one or two
layers of cotton to see the effects. Over-tightened tension causes
puckering, while loosened tension shows thread loops on the back
side of the stitching.
Keep these tips in mind when evaluating your machine’s
thread tension:
1.Always TEST your stitches with the same threads and fabrics being used in your
project to set your machine up for each individual circumstance.
2.Use compatible threads: extreme variances in weight or content make balancing
a stitch more difficult
3.Loops of bobbin thread at the top suggest that the bobbin is not inserted
correctly.
Sew Smarter
4.Loops of upper thread at the back, or ‘thread nests’ in the bobbin case indicate
that the thread is not in the take up lever (sometimes the thread will ‘jump out’
of the take up if it is not clicked snugly into position). Having the presser foot up
while sewing can cause the machine to jam or thread nesting.
Dust bunnies
— Clean your machine regularly. Dust
bunnies and balls of thread can throw
off tension. Cleaning the bobbin case,
feed dogs and even the upper discs
themselves. This can be done by
‘flossing’ between the discs with
a folded piece of tightly woven
fabric (like a batik).
Page 10
———————
5. Check threading before making tension adjustments. Be sure that every thread
guide is used.
6.Use a fresh needle. Bent or dull needles impede good stitching.
7. Use a proper sized needle for the job. Forcing a heavy thread through a small
Learn at Home
needle can cause thread breaks or puckers.
—
S e w i n g 1 0 1 : G e t t i n g t o K n o w Y o u r M a c h i n e ———————
PAGES
Starting & Stopping a Stitch Line
Start and Stop — Methods for solid seam construction
Auto-lock Button — This ‘bulls eye’ but-
Auto–lock Stitch — Available on select
Reverse — Pushing the reverse button or
lever at the beginning and ending of a seam
is a quick and easy method, but can leave
bulky or noticeable areas of excess stitching
Manually Shorten Stitch Length
ton on some SAH machines can be used to
take four locking stitches in place and then
stop. It is also used to complete a decorative
stitch pattern before stopping and locking.
SAH machines, this utility stitch begins with
locking stitches and, at the touch of the
reverse button, ends with locking stitches.
Reverse vs. Auto-lock — Reverse
stitching (top) is quick and easy, but autolock (bottom) secures with less bulk at the
beginning and end of the seam.
— Temporarily adjust stitch length to the
shortest setting, for compact, difficult to
loosen stitches.
Head off sewing frustrations by securing your threads at the beginning
and ending of each seam line.
Starting Tips — Try one or more of these tips for a clean start to your sewing
1. Don’t forget to raise the bobbin thread
up above the stitch plate when using a new
bobbin. Hold the upper thread tail and
either push the needle up/down button
or turn the hand wheel to draw the
bobbin thread up in a loop.
2. Start sewing with the needle in the
down position.
3. Prevent unthreading. Hold thread tails
pinched between the fingers of your left
hand as you start to sew. Release after
a few stitches.
Page 11
———————
4. Draw the bobbin thread up to the top
of the fabric. Similar to raising the bobbin
thread up, in this case, both of the thread
tails will be at the TOP side of the fabric.
This is particularly useful with free-motion
sewing. Do this before locking stitches in
place, by lowering and raising the needle
while holding the upper thread tail to
catch the bobbin tail in the thread loop,
pulling it up through the fabric.
Learn at Home
—
5. Use a Starter Square. When starting
at the leading edge of the fabric, it is not
uncommon to get a thread tangle, as the feed
dogs are not yet propelling the fabric along
the stitch path. The fabric edge could also be
pulled into the zigzag stitch plate. A starter
square (AKA a ‘startie-stoppie’ or ‘stitch
buddy’) 1s a scrap of fabric abutted against
the project fabric to be stitched. It gives the
stitch line a bit of a ‘running start’ before
getting to the leading edge of the project.
(An optional straight stitch plate can also
help with this scenario. You can purchase
this plate from your Janome dealer)
S e w i n g 1 0 1 : G e t t i n g t o K n o w Y o u r M a c h i n e ———————
PAGES
Needle Threader & Needles
Needle Vari ety
Needle Know How
Your sewing machine needles: petite, but powerful tools that are
responsible for bringing precision and stability to your stitching. It’s
worth getting to know a little bit more about these hard working helpers.
Needle Stash
Needle sizes are marked with both the European (60 – 120) and American (8 – 19)
measurements. A size 60/8 needle is the finest needle for delicate fabrics and a
120/19 is the heaviest for fabrics like upholstery. Size is related to the needles blade
diameter. A size 75 needle has a .75mm blade.
Aside from the blade size, needles also have different types of tips, points, eyes,
scarves and grooves. The groove guides thread down the needle, across the notched
scarf and through the eye. More information can be found on the websites of quality
producers like Schmetz or Klasse.
Needle Storage
As you grow in your sewing skills, you will find that keeping a collection of varied
needles on hand will be a necessity. Changing a needle every eight hours is the
standard rule of thumb, but if you have to change needle type, you can keep track of
your needles with something as easy as a dollar store pincushion. Simply mark each
section with a ‘needle type’ as a holding area for those gently used needles.
Your SAH manual has a comprehensive needle guide on which needle should be
used with what fabric.
Needle threader — An easy-to-use convenience, available on some SAH machines
1. Lower and raise the needle to its highest
position with a turn of the hand wheel or by
pushing the needle up/down button.
2. Pull the needle threader controller down
and swing it forward towards the back of the
needle. This engages the wire threading hook
through the eye of the needle.
<2>
3. With the right hand, gently draw the
thread across the path of the threader,
which positions the thread just under the
wire hook. Hold the threader controller in
place with the left hand as needed.
<3>
<4>
Learn at Home
<5>
TO THE POINT — Signs that it is time to change a damaged or
unsuitable needle: a ‘banging’ noise as you sew, skipped or breaking stitches,
shredding thread, puckering seams or wonky tension.
Smarter
———————
5. Pull on the newly created thread loop
to draw the thread tail through the eye.
Sew
Page 12
4. Keep a light hand on the thread as you
release the controller to go back upwards.
The hook will draw the thread back
through the needle.
—
S e w i n g 1 0 1 : G e t t i n g t o K n o w Y o u r M a c h i n e ———————
PAGES
Stitches & Terms
Stitch Categories
Navigate your machine’s menu
to discover some of your favourite ‘go-to’ stitches. Don’t hesitate
to experiment with varying stitch
length, width or varying thread
type to change its look.
Utility Stitches: These are usually at
the beginning of any machine stitch menu
because they are the most frequently used,
but don’t let the utility word throw you off.
You can embellish, couch, stitch with heavy
thread and imagine all sorts of uses for this
humble category. Stitches include: straight,
zigzag, straight stretch, auto-lock stitch and
tricot stitch (triple zigzag).
Sculpture: Sometimes called ‘saddle
stitches.’ The multiple stitch passes of this
stitch make it stand out, and it looks great in
topstitching. Can also be used to create the
hand-look quilt stitch.
Satin Stitches: So named for the ‘satiny
finish’ created by the short stitch length
when stitched in a lustrous thread.
Patchwork: Also known as the feather
stitch. Great for topstitching quilt seams.
Heirloom: These stitches capture the
look of traditional heirloom sewing. They are
often created with a wing needle, which cuts
a larger whole in fabric.
Smocking: While smocking comes and
Seam Finishes: These are often
grouped together in larger stitch menus.
Appliqué: Variations on the most common
appliqué stitch, the blanket stitch. Try different versions for heavier thread appearance
or more distant spaced stitches.
goes in fashion, these stitches never go out
of style.
Decorative: A general term used to describe
most stitches outside of the utility category.
General Sewing Terms — Good to know
Baste: Temporary stitching to hold things
in place. By machine, you baste using your
longest stitch setting. Loosening the tension
makes removal easier.
Bias: The 45 degree thread line in fabric.
When cut on the bias, fabric will have a
more fluid drape and stretch. Bias strips are
great for binding. Bias can be tricky to sew,
so use extra pins.
Hand: The drape and ‘feel’ of fabric.
(Soft, smooth, crisp…)
Raw Edge: The cut edge of fabric which
will often fray if left unfinished. The fraying
bits are sometimes called ‘whiskers.’ Can
also refer to a type of appliqué where the
edges are left to show through stitching
or be unstitched.
Page 13
———————
Seam: Two pieces of fabric sewn together
create a seam. The line of sewing is called
the seam line. The distance between the
cutting edge of a pattern and the seam line
is called the seam allowance (commonly
5/8˝ in garments and 1/4˝ in quilting). Seam
finishes are the assorted techniques used
to ‘clean up’ or hide the raw edge of a seam
(including overcast stitching).
Selvedge: The factory woven edges of
fabric often used to print collection details
and colour registration dots are known as
the selvedge. This part of the fabric behaves
differently than the rest, so it is usually cut
off, and quite often used as a decorative
embellishment.
Topstitching: Your spell checker won’t
like it, but you can use this as one word. This
is the functional or decorative stitching that
Learn at Home
—
shows on the outside of a project. It can be
enhanced with heavy threads or increased
stitch length. It is not limited to the straight
stitch. When used close to the edge of
stitching, this is often called edgestitching.
Warp and Weft: Not often used in your
vocabulary, but good to know: the lengthwise grain, parallel to the selvedge is the
warp fibre and the crosswise grain is the
weft fibre. A good way to remember is weft
goes from weft to right. Shot silks will often
use different colour warp and weft fibres
for an iridescent effect.
WST/RST: You have to know this one as
it is in patterns all the time! Wrong Sides
Together (WST) and Right Sides Together
(RST) are the two most common directions
for aligning fabric together for sewing
S e w i n g 1 0 1 : G e t t i n g t o K n o w Y o u r M a c h i n e ———————
PAGES
Sewing Supply List
〉〉 Take your time
So you have just purchased your
new sewing machine and you
want to get busy sewing. Every
project has a list of tools and
supplies and your stash may not
be quite there yet. Take your
time. Add to your supplies slowly.
You do not need EVERY tool,
notion, fabric or thread seen
in the magazines.
To get you started, things
you might need
Add-ons — Nice to have
• Your first pattern
• Your machine
• Sewing needles: You have a few with
your machine. You will need specialized
ones for topstitching or fine fabrics.
• A means of cutting: Good scissors will
serve you well
• Fresh sewing thread: Black, neutrals and
your favourite colour will be a good start
• Fabric: A bundle of a few fat quarters will
give you the means to embellish and make
small items (like our coasters!). Pressing, starching and cutting up old clothes
will also give you some good scraps.
• Small trimming scissors for cutting
out appliqué and trimming threads
• Separate, budget priced scissors for
cutting paper and patterns. Leave
your sewing scissors for fabric only
and they will stay sharp longer
• A magnetic pincushion makes holding and
gathering pins much easier. Of course, making a sweet, soft cushion is a good idea too.
• More bobbins (a sewist can never have
too many, and Janome bobbins are very
affordable. PLEASE, Always use Janome
brand bobbins for your machine)
• Slowly add to your fabric and thread stash
• Iron and ironing surface (board,
mini board or mat will do)
• Pins
• A means of measuring (tape measure)
• A hand sewing needle for little details
• Lint brush and small screw driver if
they did not come with your machine
• Fusible webbing and or interfacing.
Depending on what you are sewing, having
a small stash of this will come in handy.
• A good sewing reference book will be
used often. No matter how experienced
you are, there is always something new to
learn! The Sewing Answer Book by Barbara
Weiland Talbert and The Sewing Bible by
Ruth Singer are two excellent resources.
Signs that you are really
enjoying your sewing
• Bobbin keeper box or ring to keep
your collection from unwinding
• Thread storage rack or box
• Fold away cutting table
• A dedicated sewing chair that works
for you to keep your shoulders,
back and neck in good shape.
• Auxiliary thread stand for managing
any size of thread with your machine
(a cup at the back of your machine
will work, but these stands are reasonably priced and do a good job)
• If you are quilting, look at investing in a
rotary cutter, ruler and mat. They make
cutting so much easier. Local sewing
lounges and your dealer will quite often
let you use their classroom supplies
for a small fee. This could help you to
know if the tools are right for you.
• Machine carrying tote or case for
classes and getaway weekends
• Sewing lamp
Page 14
———————
Learn at Home
—
S e w i n g 1 0 1 : G e t t i n g t o K n o w Y o u r M a c h i n e ———————
PAGES
Presser Feet
Feet First
Various assortments of these feet are found in
your SAH machines. Others can be purchased
through your Janome dealer. Your manual will
help you to select the best foot for each stitch.
The All Purpose Foot (A)
The Zipper Foot (E)
The Adjustable Buttonhole Foot
The Overedge Foot (C)
The Sating Stitch/ Craft Foot (F)
The 1/4˝ Seam Foot (O)
Designed for optimal control of most utility
and straight stitching (Packaged on the
machine when new).
Neatly finish seams and prevent unraveling.
Even Feed Foot (Walking Foot)
Evenly feed quilts, garments or home décor
projects, as well as knits, velvet and velours
through your machine with this extra set
of feed dogs.
Page 15
———————
Install a zipper, but also use to attach
piping and cording.
A beveled channel beneath this foot allows
for smooth delivery of heavier stitches, F2
(in some machines) has an open toe.
Darning Foot for Free Motion
Embroidery A spring loaded foot that
allows you to stipple and thread paint with
a clear view and consistently formed stitch.
Learn at Home
—
Creating perfectly aligned buttonholes.
Sew a perfect quarter inch seam for
consistent quilt block assembly.
The Adjustable Blind Hem Foot (G)
Place folded edge against the adjustable
guide for an invisible blind hem — great
for top stitching.
S e w i n g 1 0 1 : G e t t i n g t o K n o w Y o u r M a c h i n e ———————
PAGES
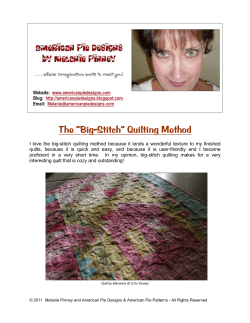
Pinning & Pressing
1>
Pinning
2>
3>
Pins hold fabric in place until you are ready to sew. They keep fabric
in one area from shifting while you sew another area. They are also
handy to mark an area for altering. You might use two different
types of pins in your sewing: straight pins and safety pins.
4>
Straight pins can vary in length and headtype. Shorter length pins are known as
sequin pins and are designed to hold small
embellishments in place. Dressmaker pins
are the most used, mid length pins, suitable
for most sewing tasks. Quilting pins are
longer and can pass through the thick
layers of a quilt.
6>
5>
7>
1. Glass Head Pin
Cheaper plastic-head pins seem like a
good bargain, but they do not hold up well.
Glass head pins resist bending and do not
melt with ironing. Flat, flower head pins are
useful, especially when laying your rotary
cutting ruler over pinned fabric.
2. Silk Pin
3. Flat Head (Tailor’s) Pin
4. Applique Pin
5. Safety Pin
6. Flower Head Pin
Specialty pins, like silk pins or fork (twoprong) pins are designed for specific tasks.
The fork pin offers more control with slippery fabrics, while the fine silk pins do not
leave visible holes in your fabric.
7. Fork Pin
Insert pins perpendicular to a seam. This will
make it much easier to remove them as you
The bad, the worse
and the headless!
Top 3 faults of plastic head pins: they
bend, they melt & their heads pop off.
———————
Safety Pins (also known as basting pins)
come in a variety of sizes and finishes. Some
can be quite small and difficult to easily
open and close, while others can be so large
that they create a visible hole in your fabric.
Some quilters like to use curved safety pins
for quick basting. Avoid oversized pins.
Remove pins as you sew. Do not sew over
pins. Broken pins or needles in your bobbin
case (and eyes) = bad.
Ironing vs. Pressing
Pressing uses heat, moisture and pressure to
manipulate fabric. While ironing is a means
of removing wrinkles, pressing is a sewing
technique, used to blend stitches into fabric,
tidy up seams (pressing them to one side
or open), set curves or sharpen creases. To
properly press, you don’t need to move the
iron much. Pick the iron up and set it down,
pressing downward with just enough pressure to feel your fabric push into the ironing
pad surface (no need to exert huge force).
Lift and move to the next area. Let the iron,
heat and steam do their work. Rapidly dusting the iron over a large area may remove
a few wrinkles and work out the arms, but
pressing keeps a project on track, properly
shaped and sized.
Page 16
approach the machine needle. Perpendicular pinning also helps to prevent puckering.
Learn at Home
—
Pressing can be more effective when using
steam. Steam can come from the iron’s
water reservoir, a spritz with a spray bottle
or it can be created from pressing through
a damp cloth. Spray starch (traditional and
newer scented products) also eases
wrinkles away and keeps fabric crisp
with a professional finish.
Pressing aids come in different forms. Pressing cloths, made of cotton or silk organza
protect delicate fabrics and prevent ‘iron
shine.’ Teflon sheets protect the iron and the
ironing board from getting gunked up with
residue from fusible webbing or interfacing.
Dressmaker’s hams and seam rolls are also
useful for pressing curves and garments.
S e w i n g 1 0 1 : G e t t i n g t o K n o w Y o u r M a c h i n e ———————
PAGES
Basic Maintenance
A clean machine is a happy machine!
“Low Maintenance” is something we all like to hear, and that is what you get with your SAH
machine. Regular cleaning of the bobbin area and feed dogs is all that you really need
to look after. Of course you will want to change your needles as needed too.
After a year or two, you may want to bring your machine in for a check-up and interior
cleaning to get the dust and fibres out of the spots that you can not reach with a lint brush.
You can talk to your dealer about this.
Cleaning — Front-loading machines
1. Turn off your machine.
Raise the needle to its
highest position, lower
the hook cover and
remove the bobbin case
by lifting its hinged latch.
2. Push aside each of the
hook race ring holders.
3. Remove the hook
cover (shuttle race ring),
noting what the top of
the ring looks like.
4. Remove the shuttle,
lifting it out of its ‘nested’
position inside of the
shuttle race.
5. Brush and wipe out
the inside of the shuttle
race and reassemble
the unit.
Cleaning — Top-loading machines
Knob Stopper
1. Turn off your machine.
Raise the needle to its
highest position and pop
open the bobbin cover.
Page 1 7
2. Unscrew the needle
plate and remove the
bobbin case.
———————
Learn at Home
—
3. Brush away the dusty
bits (ewww…). Clean the
interior of the case with
a soft cloth.
4. Replace the bobbin
case. Be sure that it feels
properly seated in position. You should be able
to gently wiggle the knob
on the case towards the
somewhat bouncy
feeling stopper.
S e w i n g 1 0 1 : G e t t i n g t o K n o w Y o u r M a c h i n e ———————
5. Replace the needle
plate and tighten the
screws to secure it.
Replace the cover by
pushing the two prongs
to the left and then
clicking the cover down
into position.
PAGES
Easy First Project
〉〉 PROJECT MATERIALS
• 4 – approximate 4 to 4.5”
squares of cotton fabric
• 4 squares of felt, same size
as fabric
• Top and bobbin thread in a colour
that contrasts with the fabric
• Hand sewing needle
• All purpose sewing foot (A)
• Your SAH sewing machine,
we used the G1206
Coasters — Blissful Pivots
Pivoting, or turning a corner
with the needle in the down position,
is one of those super simple techniques that you will use whenever
you sew. A little bit of practice will
give you time to get to know your
new sewing machine a little better.
There are TWO versions of
Blissful Pivots: Outside and Inside
Outside — Raw Edge Finish
1. Pin fabric and felt WST (Wrong Sides
2. Place under the needle, top side up,
and lower the needle into the down position,
about 1/4˝ in from both edges.
3. Start sewing. Remember to hold the
thread tails. Reverse to lockstitch and continue sewing. Slow down as you approach
1/4˝ from the next edge.
4. Once near the corner, stop sewing.
If your needle is not in the down position,
turn the hand wheel towards you to pierce
the fabric. If taking one more stitch would
extend your sewing line too far, you can
firmly hold the fabric in place while turning the hand wheel to effectively not move
forward.
Together).
6. Repeat at each corner. You can stop after
completing all sides, but continuing around
the entire square two or three times, with
slightly wonky lines gives an interesting
finish and more practice pivoting.
7. When finished, reverse (or lockstitch)
to secure threads.
OPTION: Mark 1/4˝ corners inside from
each corner with a pencil dot, or just “eye”
the measurement. Perfection is not the goal.
5. With the needle down, lift the presser
foot, turn the corner and lower the presser
foot again.
Page 18
———————
Learn at Home
—
8. Trim loose threads and press.
S e w i n g 1 0 1 : G e t t i n g t o K n o w Y o u r M a c h i n e ———————
PAGES
Easy First Project
9. Press flat. Be careful to turn under
the edges of the gap and press these
flat as well.
Inside — Turned Edge Finish
The steps here are very similar to the Outside version. The difference is that you are
working with fabrics RST, leaving a gap in the
single stitch line for turning right-side-out,
and hand closing the gap. You may choose
to finish with a top stitch.
5. As you make the final pivot to the first
side, prepare to stitch only about 1/3 of the
way down. This will leave a gap in the centre
of the first side for turning.
6. Finish stitching with a reverse or
locking stitch. Snip threads.
1. Pin fabrics RST (Right Sides Together).
2. Staring about 2/3 of the way down the
first side, lower the needle to begin sewing.
Use the OUTSIDE EDGE of the presser foot
as a guide, aligning the fabric edge with the
edge of the foot.
10. Use a hand needle to close this opening
with a whip stitch. (Basically pull the knotted
thread through the seam near the opening
from the inside to bury the knot within the
seam. Pierce the folded edge of each fabric
with the needle and draw the sides together.
Repeat until the gap is closed. Knot thread
inside the seam and clip.)
7. Clip all four corners, careful not to
cut the stitches. This makes for less bulk
when turning out the corners.
11. TOP STITCH OPTION: Top stitching
adds a nice finish to anything from coasters
to garments. This is a good opportunity to
practice. This stitch line runs close to the
fabric edge.
The goal is to leave a gap when done
3. Stitch as in step 3 of “Outside Pivot”.
Stop about 1/4˝ from the edge and pivot.
The Presser foot edge should align with this
next fabric edge. You may have to play a
bit with the first corner to pivot at the right
time, but this gets easier with practice.
4. Continue around the second, third
8. Turn right-side-out. Gently push out all
corners. You may need to use a pointed
object like a blunt pencil to help with this,
but be gentle. The corner stitching will open
if pushed too much.
and fourth sides.
Page 19
———————
Learn at Home
—
Note: the fabric may need to be coaxed
(pushed) along at the beginning until the
feed dogs can catch the fabric and do their
job. Starting between 1/8 and 1/4˝ from the
edge, take a locking stitch and start sewing.
Continue around all sides as you did above.
Press flat to finish. Fill your glass with
refreshing beverage of choice to celebrate
your first project. Cheers!
S e w i n g 1 0 1 : G e t t i n g t o K n o w Y o u r M a c h i n e ———————
PAGES
Appliqué Project
〉〉 PROJECT MATERIALS
Background material of choice. We used:
• One 8.5 x 30˝ strip of plain
background fabric
• Two 8.5 x 3.5˝ strips of print fabric
for ends
• Scrap fabrics for houses and hearts
• Small piece of fusible webbing for fusing
hearts (brands like Wonder Under or
Steam a Seam work well)
• Two or more thread colours with
matching bobbins wound
House He{art}: A Moving on Project
Appliqué: the art of stitching
one fabric shape to another, is the
focus for this project. Appliqué
can take many forms, but the most
casual stitched form would be raw
edge appliqué.
You can choose to use a simple straight
stitch, which will be fairly similar in form to
our Blissful Pivots, or you can play with your
machine’s selection of decorative stitches.
We have also added a simple bit of fused
appliqué with the small hearts. While raw
edge appliqué gives a soft and ‘thready’
edge, the fused appliqué has a firmer edge.
A first step is to decide what type of background that you would like your appliqué
practice piece to be on. We stitched a few
fabrics together to create little table scarf
<2>
Page 2 0
(to practice our seams), but you can use
a pillow, tea towel, tote bag, or any other
flat surface.
Our simple house motif is made from rectangles and triangles. You choose the size;
no templates needed!
3. On each long edge of the scarf, fold the
fabric edge over about 1/4˝. Press and then
fold again to encase the raw edge in the
hem. Press and pin in place.
Sew On! Appliqué is an easy embellishment
technique that has many applications. It is
especially fun for customizing kids projects
with names, favourite animals or themes.
Eventually you can try out different forms
of appliqué like faced or turned edge.
4. Stitch the hem in place from the back
side. Use the presser foot edge as a guide.
Repeat steps 3 & 4 on the short edges of
the scarf. When done, all four sides will be
hemmed.
Preparing Your Base fabric
5. Either at this point or after the appliqué
1. Pin together the shorter edge of the plain
and print fabrics at each end of the scarf.
Using the presser foot edge as a guide, stitch
a straight seam line from one outside end to
the other. Remember to lock your stitches at
each end. Repeat for the other end of
the scarf.
<3>
———————
2. Press the seam open and flat from the
back side.
Learn at Home
<4>
—
is added, embellish the joining seem lines
with a decorative or zigzag stitch. This
serves to hold the seam flat. You can follow
the directions for Patchwork seams in the
manuals of most of the SAH machines (1218
and higher.
<5>
S e w i n g 1 0 1 : G e t t i n g t o K n o w Y o u r M a c h i n e ———————
PAGES
Appliqué Prep and Ideas
Tip: Removing the pin after the first line of
stitching is completed can be helpful with
small patches of fabric. Otherwise, the lift
caused by the pin may cause a bubble or
pucker as you near completing the stitching
of a shape. Smooth your fabric flat as you go
and you should have no problems!
Plan out the number
and placement of
appliqué motifs.
Audition different fabrics to see
how nicely they play together.
Cut out assorted rectangles and
triangles for the house and roof
shapes. Lay these out. When happy
with the layout, pin the pieces in
place. Our houses were stitched
with the G1206 and the J1250.
This house repeats the basic
straight stitch pivot. It shows
a nice contrast between single
and multiple lines of stitching.
The straight stitches of the
heart appliqué are done with
multiple pivots to maintain
a curved shape.
Page 2 1
———————
Adding the hearts to the houses is an easy
final step. A scrap of fusible web is ironed
to red fabric. Hearts are drawn on the web’s
paper backing and then they are cut out.
The backing paper is peeled from the shape
and they are fused (ironed) in place. (Please
follow the manufacturer’s directions for your
specific fusible web product).
This utility stitch house makes
use of zigzag and blind hem
stitches for appliqué. The variation of the height of the humble
blind hem stitch shakes things
up a little. The heart is finished
with a satin style stitch made
with a narrow and short zigzag.
Learn at Home
—
Tip: As you lift your needle and presser foot
to remove the fabric from under the needle,
sometimes threads will seem to be caught in
the bobbin case. This is because the stitch
hasn’t finished forming. Turn the hand wheel
towards you to complete the stitch. If the
stitch cannot be completed, a GENTLE wiggle
of the hand wheel forward and back (about
one tenth to one eighth of a turn) should
release the threads. If not, remove the needle
plate to clear any possible thread jam. This fabric print seemed to suggest a simple stitch. The straight
stitch did most of the work. The
joining stitch was used between
the two shapes (this would be
a tricky stitch to pivot neatly
around a corner). The heart
is tacked with cross-stitch X’s.
Each single stitch is made easily
by using the auto lock button.
The traditional blanket stitch
is used on this house, with a
narrower version used on the
heart. The straight baseline of
the blanket stitch is kept off
of the appliqué fabric, running
alongside its edge, while the
horizontal ‘bite’ pierces the
fabric patch and holds it in
place. The star burst decorative
stitch was used on the roof
base just because!
S e w i n g 1 0 1 : G e t t i n g t o K n o w Y o u r M a c h i n e ———————
PAGES
Good to Know
We asked our experts what they wished they had
known when they started to sew and what they would
tell their beginner selves. Sometimes the answer
was a simple sewing trick. Sometimes it was
something more. Either way, we hope that you
find something helpful for YOU.
I wish I knew when I started to sew…
that — You don’t have to follow the rules – Ok. Maybe just use them
as general guidelines… sometimes.
that — I would be doing this for the next 40 plus years… I would have
organized my sewing room better and sewn up my fabrics as I bought them!
that — My sewing did not have to be perfect to be shown in public.
Too many lovely pieces were hidden away.
“
“
that — There are NO “Quilting Police! There might have been a few
at one time but I am sure their “jobs” were made redundant.
Mistakes are your
one-of-a-kind
“design features.”
And there’s a lot
to be learned from
what our mistakes
teach us.
”
We can learn a lot from an easy project but we can get discouraged with
one that is too complicated.
Certain fabric types are recommended for certain projects. (My first big project,
in grade seven, was a thick wale, corduroy skirt with an elastic waist. It was
so stiff that it stood up by itself.)
Its worth learning how to put in an invisible zipper. They are not that scary,
and they look great.
I was about the
‘destination’ not
the journey.
I changed that.
Page 2 2
Pass It On…
”
———————
Recycling. Fabulous doesn’t have to cost a fortune. I love to go to thrift stores
now and look at the fabrics that inspire me to create something new.
Have more than one project on the go. When one is not making you happy
or coming together as you like, move on to the other one.
Learn at Home
—
S e w i n g 1 0 1 : G e t t i n g t o K n o w Y o u r M a c h i n e ———————
PAGES
Good to Know
Always prewash dry and iron before starting a new project to avoid a bad fit.
Don’t wind one thread over another on a bobbin. The result will be a bad tension
for seemingly no reason. And, always use Janome bobbins because they are the
proper width and height for your machine.
For better control of fabric and building confidence using your machine, use a
heavier fabric for your first project.
Turn the machine and iron on at the same time. Press every seam and your work
will look good.
Better quality needles, threads and fabric are worth the investment to
avoid breakage and frustration.
Take the time to learn how to find your “happy creative space” to relax,
let go of all the stresses and worries of daily life. Let creativity take over. Even if only for ten minutes.
“
“
Get to know, embrace and develop your sewing style. Understand that it may
not be the same as your decorating or clothing style. Colour palettes, textures
and forms that appeal to your sewing self may be similar or different from
your shopping self. Go with it!
You can sew for
the sake of creating.
Sewing can transform
a wardrobe, a room
or a life.
”
You will be your biggest critic. You might see the imperfections but most others
will not. They will praise you for being so creative and you should feel
awfully proud of your sewing and quilting projects.
Challenge yourself; whatever that may be. Don’t be afraid to keep learning.
Feed your passion.
Take a class, borrow
a book, visit a
museum or show.
Look at the wide
world of design and
ask how it influences
your sewing.
Page 2 3
Accuracy is important for many (not all) quilting projects so that your finished blocks
look good but there is no need to get terribly stressed about 1/4˝ inch seams. So
long as you remain consistent throughout your project, the end result will be lovely.
”
———————
Make time to organize your space and supplies. Its not all about cleaning,
its about being familiar with the fabrics and threads that you love.
Playing with them inspires new ideas.
Babies do not walk at 3 weeks old, nor at even 6 months, and so it is with folks
who start sewing or quilting. Allow yourself the luxury of time to take baby steps.
It is a very natural progression. Enjoy the learning. You are already on your way:
you have a new JANOME sewing machine and lots of access
to information to help you every step of the way!
Learn at Home
—
S e w i n g 1 0 1 : G e t t i n g t o K n o w Y o u r M a c h i n e ———————


© Copyright 2026