
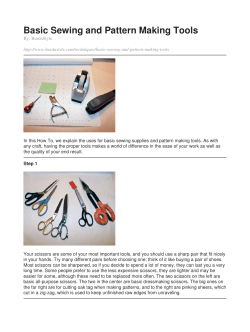
900 AD Viking Apron Dress
Martha Rice
C aitlin nic Raighne
Dun A rd, C alontir
900 AD Viking Apron Dress
Under smock of linen wit h long tight fitted sleeves and an oval neckline.
Under dress of wool, constructed as the under smock.
Apron dress of wool, cut and pieced to fit the torso.
Long sleeved caftan, or coat, of wine colored wool.
Hair braided down the back.
Headwear includes brightly colored wool scarf or a wool cap.
Shoes are of the turn-shoe style fastened by lacings. Leg bandages worn in winter.
Accessories consisting of a fabric belt , preferably tablet woven, without metal findings;
straps hanging from the various brooches to hold small implements such as scissors or
knife.
Jewelry consisting of paired brooches hooked through narrow looped straps; necklaces
and festoons of glass, semi-precious stone, and/or metal beads.
www.caitlinsclothing.com
900 A D Vik ing A pron Dress
©Martha Rice 2009
Martha Rice
C aitlin nic Raighne
Dun A rd, C alontir
GENERAL NOTES
Archeological evidence seems to point toward long sleeves on the smock, apron dress,
and caftan layers of women's clothing of this time period in Scandinavia. There is no
real evidence concerning the hemmed length of any layer of the garments, although
common sense dictates the smock, gown and apron should be long enough to stay
warm, but short enough to stay out of the mud. That's why I chose ankle length.
Leg coverings and footwear are hard to document. Those illu strations that do include
leg and footwear, show leg bandages similar to those worn by men and slipper or ankle
shoes made of the turn-shoe method, by which the sole and upper were joined
together inside out, and then turned right side out. The shoe was usually fastened by a
drawstring or lacing.
Accessories consisted of a fabric belt, preferably tablet woven, without metal findings;
straps hanging from the various brooches to hold small implements such as scissors or
knife.
Jewelry for this ensemble would have consisted of paired brooches hooked through
narrow looped straps; necklaces and festoons of glass, semi-precious stone, and/or
metal beads.
Typical fabric choices were wool and linen, with occasional trimmings made of imported
silk or caps made of tabby weave silk. Linen was generally undyed. Wool on the other
hand was generally dyed. Some of the colors worn at this time were deep reds, blues,
yellow, greens, purple, deep brownish / black. The uneven distribution of
archaeological finds of various colors suggests that certain area may have used
different predominant colors: purple in Ireland, red in the Dane law, and blue in
Scandinavia. (Priest, p.3)
Appliqué was the most common method of decorating a garment. Tablet-woven bands
were very common. Sill fabric cut in strips was also use as trimming, as was fur.
Trimming was frequently used on the sleeves, neck, and chest region of the gown and
caftan layers. The apron-dress was often trimmed around the top edge. Sometimes
narrow braid or cording covered the seams. Trimming was not used on the backs, or
bottoms of garments.
www.caitlinsclothing.com
900 A D Vik ing A pron Dress
©Martha Rice 2009
Martha Rice
C aitlin nic Raighne
Dun A rd, C alontir
LAYOUT AND CUTTING DETAILS FOR UNDER TUNIC
The tunic layout consists of a single layer of 60" by 4' long piece of cloth. The front
and back panels of a tunic work fairly well if they are as wide as the measurement
between the points of the shoulders, plus seam allowances on both sides. There needs
to be at least 4" of ease in the chest area. If 1/2 of the chest measurement is a
significantly larger number than the shoulder measurement, go wit h the chest
measurement and decrease the material in the shoulders gradually. Gores can be as
wide or as narrow as you like, but if they are too wide they will hang in deep folds
rather than draping gracefully. Sleeves should be generally 16" wide at the shoulder
and may taper at the wrist for the chemise or have lengths added for flared styles.
There needs to be at least 4-8" of ease in the length to allow for the belt.
_____A =twice your height +8"
_____ B = shoulder width + 1"
_____ C = sleeve width + 1"
_____ D = sleeve length + 1"
_____ E =half the length of the sleeve by
_____ Half the sleeve width (the hand width +2")
_____ F = fabric left from center panel minus a length equal to half of the sleeve width
cut in half and cut at an angle to give four equal pieces
_____ G = center slit for front and back gores
1-2
= main body
3-4
= front and back gores
5-8
= side gores
9-10 = sleeves
11
= neck facing
12-15 = gussets
www.caitlinsclothing.com
900 A D Vik ing A pron Dress
©Martha Rice 2009
Martha Rice
C aitlin nic Raighne
Dun A rd, C alontir
LAYOUT AND CUTTING DETAILS FOR APRON DRESS
If waist measurement is larger than bust, use the waist measurement instead.
_____A = bust measurement from side of rib cage to side of rib cage+ 2"
_____B = back measurement from side to side; bottom of shoulder blade + 2"
_____C = armpit to waist
_____D = armpit to ankle + 1"
LAYOUT FOR 45" WIDE FABRIC
1
2
3
4
5
6
7
= FRONT
= BACK
= LEFT SIDE PANEL
= RIGHT SIDE PANEL
= LEFT GORE
= RIGHT GORE
= STRAPS
www.caitlinsclothing.com
900 A D Vik ing A pron Dress
©Martha Rice 2009
Martha Rice
C aitlin nic Raighne
Dun A rd, C alontir
CONSTRUCTION NOTES
General Sewing Tips:
1. It is very important to pre-shrink all fabric and trim. Treat the fabric as you
would after the garment is complete.
2. All seams are to have 1/2" seam allowances.
3. Zigzag all edges to prevent raveling.
4. Backstitch 1/4" at the beginning and end of each seam to keep seam from
coming out.
5. Pin pieces of fabric being sewn together before sewing to keep fabric from
slipping and edges together while sewing.
6. Always put "right" sides of fabric together when sewing.
7. Mark "wrong" sides of material if necessary with a chalk pencil or soap as pieces
are cut out.
SEWING DIRECTIONS for UNDER TUNIC
Step 1
Cut out all pieces and label for ease of identification
Step 2
Finish the neck edge by sewing in a facing tape of
twill tape. Sew the tape to the raw edge of the
neck and then fold under and stit ch down with a
small running stitch. Or sew in a neck facing.
Step 3
Mark a line with chalk up the center of the front and back body the
distance from navel to hem of costume.
www.caitlinsclothing.com
900 A D Vik ing A pron Dress
©Martha Rice 2009
Martha Rice
C aitlin nic Raighne
Dun A rd, C alontir
Step 4
Cut along the marked line and insert the
front and back gores. Using a marking
instrument, mark a dot at the stitch
pivot point on the gore and at the tip of
the tunic cut. Stay stit ch the tunic just
inside the seam line to stabilize it. Pin
the gore to the tunic, matching the
pivot markings. Wit h the tunic on top,
stitch 2-3" of the gore to the tunic, hand
stitching just outside of the stay
stitching and pivoting at the point.
Finish sewing the gore in by machine if desired.
Step 5
Sew the gussets to the upper sleeve edges.
Step 6
Attach the side gores to the edge of the gussets.
Step 7
Sew the entire gore, gusset, and sleeve assembly to the side of the main body piece
being careful to center the sleeve at the shoulder point.
www.caitlinsclothing.com
900 A D Vik ing A pron Dress
©Martha Rice 2009
Martha Rice
C aitlin nic Raighne
Dun A rd, C alontir
Step 8
The dress should look like this if laid flat. This is a good time to iron out the seams
if you haven't already done so.
Step 9
Sew up the side seams. Seams should all be finished. Fold under the raw edges to the
outside and hand stitch a running stitch down eit her side of the seam. Use a
contrasting color so that the stitches show decoratively
on the outside of the dress.
Step 11
Hang the garment for at least a week. Two weeks would be better and let the dress
stretch. Then mark the length and hem.
www.caitlinsclothing.com
900 A D Vik ing A pron Dress
©Martha Rice 2009
Martha Rice
C aitlin nic Raighne
Dun A rd, C alontir
CONSTRUCTION NOTES
General Sewing Tips:
1. It is very important to pre-shrink all fabric and trim. Treat the fabric as you
would after the garment is complete.
2. All seams are to have 1/2" seam allowances.
3. Zigzag all edges to prevent raveling.
4. Backstitch 1/4" at the beginning and end of each seam to keep seam from
coming out.
5. Pin pieces of fabric being sewn together before sewing to keep fabric from
slipping and edges together while sewing.
6. Always put "right" sides of fabric together when sewing.
7. Mark "wrong" sides of material if necessary with a chalk pencil or soap as pieces
are cut out.
SEWING DIRECTIONS for APRON DRESS
Step 1
Sew left and right side gores to the side panels.
Step 2
Sew the side panels to the front.
Step 3
Sew the back panel to the side panels.
Step 4
Finish top edge by binding wit h either bias
tape or card woven tape.
Step 5
Cut 2" strips of fabric to make the straps. Sew
these straps, right sides together, to create
long narrow tubes. Turn the tubes and press.
Cut about 3" off each of these straps to make
the front loops. Turn the ends in and stit ch
down for a finished look. Another option is to
create 1/2" wide tablet woven strips.
www.caitlinsclothing.com
900 A D Vik ing A pron Dress
©Martha Rice 2009
Martha Rice
C aitlin nic Raighne
Dun A rd, C alontir
Step 6
To place the straps on the front, sew both ends down side by side to
make a small loop
Step 7
To place the straps on the back, pin both ends in place 1-2 inches on
either side of the center back seam. They should go inside the
dress, not outside. The length should be adjusted so that the loop of
the strap just clears the front loop on the front panel.
Step 8
Hem or finish wit h bias or card woven tape like the top.
www.caitlinsclothing.com
900 A D Vik ing A pron Dress
©Martha Rice 2009


© Copyright 2026