
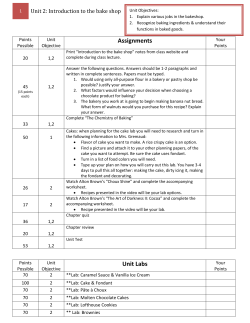
Cake Exploration INTERNATIONAL SOCIETÉ A Well-Groomed Cake
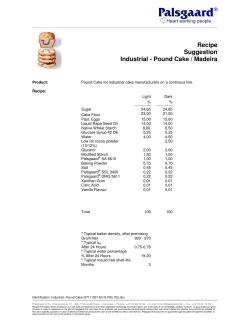
INTERNATIONAL
Cake Exploration
A Well-Groomed Cake
by Michele Hester, MO
© International Cake Exploration Societé, 01.10.gfm
SOCIETÉ
Visit ices.org
A Well-Groomed Cake
—Michele Hester, MO
SUPPLIES
3½”, 6” and 10” round layered cakes
Chocolate ganache
SugarVeil® Confectionery Icing
SugarVeil® Confectionery Comb
Silicone mat
Matte-textured silicone mat or reverse side of SugarVeil® Lace Mat
SugarVeil® Confectionery Spreader or wallpaper smoother tool
Food color powder for dark colors
SugarVeil® Icing Dispenser
Gold dusting powder
Thin plastic placemat for cut pattern pieces
Torte, fill, and ice cakes, finishing with poured ganache icing. Stack layers.
PREPARE SUGARVEIL®
Following instructions, prepare 1 cup white SugarVeil® mix (add 1/3
cup + 2 tablespoons boiling water; beat on high speed for 4 minutes) and
use as follows:
1. With the “Fine Lines” edge of SugarVeil® Confectionery Comb, comb
an 11” x 16” section of diagonal lines on a matte silicone surface and
allow to set completely. Do not remove lines from mat.
2. Spread a thin, solid 6” x 16” area of SugarVeil® onto a matte silicone
surface for the 2-piece collar and pocket handkerchief.
3. Comb a length of lines using the “Deep Lines” edge of Confectionery
Comb.
Store set pieces from #2 and #3 between parchment sheets in an
airtight zippy bag out of sunlight for later use.
From the diagonal lines, remove set diagonal lines 3-6; skip five lines,
then remove three more lines. Repeat this pattern as shown.
To ½ cup of prepared SugarVeil®, add blue color and dilute with several drops of water to a painting consistency. Paint over the “set” diagonal
lines using a soft brush. Use a ball tool to create a clean border at each of
the edges (this provides a “handle” for ease in peeling SugarVeil® when
set). Allow to set again.
Mix a small amount of prepared SugarVeil® with red color and
smooth onto a silicone mat for “fabric” to make the crest shape. When
set, store in an airtight zippy bag, as above.
Cover the remaining prepared SugarVeil® with plastic wrap and keep
to use later for the pocket design.
Mix 1 cup SugarVeil® mix with brown powdered food color. Add 11/3
cup + 2 tablespoons boiling water, beat on high speed for 4 minutes,
spread thinly onto a silicone mat, and allow to set.
COLLAR
Please note that the matte side of SugarVeil® is to be on both visible
sides of the collar.
Using the white set SugarVeil® “fabric”, cut two collar pieces, one
¼” larger at the top and both of the sides. Notch at curves of collar and
crease edges by bending around pattern piece towards shiny side of SugarVeil®.
Remove pattern and using a barely moist fingertip, dampen the edge
and secure the “hem”.
Moisten the hem and with shiny sides facing together on the inside,
fasten the two collar pieces together.
Wrap collar around top of the cake as shown.
LAPELS
Note: Do not add a “seam allowance” on the diagonally-marked line
section of patterns. These diagonally-marked sections turn under the
lapel and attach the lapels to the cake. Use the shiny side of the brown
“fabric” as the outside of the pieces.
Cut two each of the right and left lapel patterns, one the exact size of
the pattern, and the other ¼” larger on all sides, except the diagonallymarked section (cut this area as marked). Notch curves and bend the
larger pieces around the pattern to crease.
Remove the pattern piece of the right lapel and encase the smaller
lapel piece inside of the larger one. With a damp fingertip, attach pieces
at diagonally-marked section. Dampen the hem, securing both pieces
together. Repeat for left lapel.
Dampen lapel pieces at diagonally-marked areas and attach right and
left lapels to cake as shown.
A Well-Groomed Cake
POCKET
Cut pocket piece from the shiny brown SugarVeil®, ½” larger all
around. Notch curves. Bend edges over pattern to crease; dampen and
secure top hem of pocket.
Cut the crest shape from the red SugarVeil® sheet.
Dilute the prepared SugarVeil® mixture with a few drops of water and
fill into an Icing Dispenser cartridge; twist on a pink tip. Grease a piece
of cellophane with shortening and place over griffin design. Very lightly
place index finger over the hole of the dispenser to outline and fill in griffin shape. Allow to set.
Mix red, yellow, and blue colors of SugarVeil® into cartridges to trace
and decorate the crown, using greased cellophane. Allow to set.
When set, slide the griffin and crown decorations over a sharp table
edge to separate them from the cellophane. Dampen the back of the
griffin to attach to the red crest and attach crest and crown to pocket, as
shown.
Dampen the “seam allowances” on the edges and bottom of hem
pocket and attach the pocket to the cake in the position shown. The
pocket is designed to attach to the cake with both sides parallel.
Note that the pocket will open a bit from the cake.
A
Well-Groomed
Cake
ASCOT
Loosen all four sides of diagonal-lined ascot fabric and peel from mat.
Cut neck band piece and an 8” x 15” main ascot piece. Make a small
hem on both long sides of ascot pieces. Attach neck band around collar
as shown and gather the short edge of main ascot piece.
Dampen right side of gathered edge of ascot fabric and attach to
cake. Drape fabric down front of cake, tucking in places to secure drape.
Dampen a center line lengthwise down the reverse side of lapels. Attach left lapel under right lapel with a bit of moisture. Trim excess ascot
beneath lapels.
Secure pointed end of long lapel to the cake.
POCKET HANDKERCHIEF
Cut the handkerchief piece from white SugarVeil® sheet (mat side
will be the right side). Using combed SugarVeil® lines as a “rolled hem,”
dampen four lines and place near the edge of the handkerchief. Trim
outside the attached lines.
If necessary, warm the handkerchief between your hands to make the
SugarVeil® very supple. Pinch reverse (shiny) side of the handkerchief at
the center, arrange, and place pinched end in pocket.
SUGARVEIL® TIPS
Allow SugarVeil® to set about
90 minutes to “settle” after mixing.
Remember to rebeat (by hand,
if you wish) for about a minute
when using SugarVeil® mixture
that has been idle for more than
an hour. After that time, SugarVeil®
will become off-white and dull; this
signals the need to rebeat until
white-white and glossy.
When spreading SugarVeil®
to make a solid “fabric,” or when
combing lines, finish all edges with
a ball tool to provide a “handle” to
help peel the set SugarVeil®.
If combing lines and other lines
are not consistent, refrigerate SugarVeil® for about 30 minutes for
perfect lines.
When greasing cellophane or
silicone mat (note: SugarVeil® Lace
Mat does not need to be greased),
See pattern pieces on following pages.
use solid vegetable fat, not spray
oil.
Practice light fingertip pressure when using the Icing Dispenser for the finest possible lines
(you should be able to produce a
hairline-size SugarVeil® line). Your
finger needs to cover the entire
hole, but very lightly.
Remember to add a few drops
of water to dilute SugarVeil® before piping/pouring into cartridges
of the Icing Dispenser.
SugarVeil® decorations are intended to be eaten. In areas where
there are several layers of SugarVeil® decorations (in this case, that
would be the pocket), clip through
SugarVeil® using the Confectionery
Snips or small, thin scissors before
slicing the cake, so the decorations
can be eaten with each portion.
Michele Hester is the creator
and patent-holder of the awardwinning SugarVeil® Confectionery Icing. She and SugarVeil® are
the recipients of awards for both
product innovation and design,
and Hester’s creations have been
featured in multiple magazines. For
more information, visit SugarVeil.
com and youtube.com/SugarVeil.
A Well-Groomed Cake
pattern pieces
Collar
(cut 2)
Handkerchief
(cut 1)
A Well-Groomed Cake
pattern pieces
(cu
Asc
ot
Ne
t 1)
ckb
and
Cut the
Ascot Front
8” x 15”.
Crest
(cut 1)
A Well-Groomed Cake
pattern pieces
Diagonal Lines
(attach to cake)
↑
Turn under
↓
Left
Lapel
(cut 2)
Pocket
(cut 1)
Right
Lapel
(cut 2)


© Copyright 2026