
dare to be square Crochet queens, unite! free {
Crochet queens, unite!
We've got a roomful of fresh and funky projects
that'll put those hooks of yours to good use!
dare to be square
{CREATIVE
INSPIRATIONS
free F R O M H O B B Y L O B B Y }
®
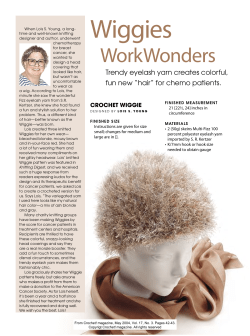
Crochet Away
Whether you're a novice needleworker
or were practically born with a crochet
hook in your hand, you're going to love
our home décor crochet crafts. And
we're not just talking coasters. Scroll
down to see just what we've got up
our [crocheted, of course] sleeves!
2
Room with a Hue
What's cute and colorful and fabulous all over? This vibrant crochet-covered room, of course!
And we're giving you the complete patterns for all the crocheted pretties you see here—no joke!
1
3
2
SPECIAL STITCH
Blossom stitch – After any dc, ch 6. Tr into the fourth ch from
the hook, dc into the next ch (closer to the hook) and sl st into
the next. This creates one petal. Make 3 more petals, then sl
st into the dc from the granny square to make a ring of petals.
Then continue with the granny square.
Blossom stitch used in:
1. Garland (pg. 4)
2. Granny's Garden Square (pg. 11)
3. Tablet Case (pg. 14)
3
INTERMEDIATE
SIZE: Banner strand = approx. 94"
MATERIALS:
• I Love This Yarn™ (shown in Rouge, Mulberry, Turquoise,
Fuchsia Neon, Limelight, Peacock Sparkle and Antique
White), 7 oz. skeins of 355 yds.
• Yarn needle
4
Medium
CROCHET HOOK: Size E-4 (3.5 mm) or size needed to obtain gauge
TRIANGLE GRANNY SQUARE
GAUGE: 1 rnd = 2 ½"
DIRECTIONS (MAKE 5)
Using Color 1, ch 4, join with sl st to
form ring.
Rnd 1: Ch 4 (counts as first tr), [1 tr, ch
3, 3 tr] into ring, ch 3, *2 tr, ch 3, 3 tr,
ch 3, rep from * once more. Sl st to
join to top of beg ch 4.
Rnd 2: Join new color at any ch sp, ch
2 (counts as first hdc), 6 hdc in same
sp, ch 4, *7 hdc in next sp, ch 1, 7 hdc
in next sp, ch 4, rep from * one more
time, 7 hdc in the next sp, ch 1. Sl st
to join to top of beg ch 2.
Rnd 3: Join new color in any ch 4 sp, ch
7 (counts as 1 dc, ch 4), 1 dc in same
sp, *1 sc bet each of the next 7 hdc (6
sc total), 1 dc in ch 1 sp, 1 sc bet each
of the next 7 hdc, [1 dc, ch 4, 1 dc] in
next sp, rep from * once more, 1 sc
bet each of the next 7 hdc (6 sc total),
1 dc in ch 1 sp, 1 sc bet each of the
next 7 hdc. Sl st to join.
Rnd 4: Using same color in any ch 4 sp,
ch 11 (counts as 1 dc, ch 8), 1 dc in
same sp, 1 sc in each st, [1 dc, ch 8, 1
dc] in each corner. Sl st to join.
Rnd 5: Attach color from rnd 1 in any
corner, ch 1, [6 sc, ch 4, 6 sc] in each
corner, 1 sc in each st around. Sl st to
join. Finish off and weave in ends.
GARDEN GRANNY SQUARE
GAUGE: 1 granny square = approx.
5" x 5"
DIRECTIONS (MAKE 5)
Rnds 1-4: Rep rnds 1-4 from Granny’s
Garden Square pattern (pg. 11),
adding the blossom stitch in rnd 3
(refer to pg. 3 for blossom stitch).
SMALL ROUND CIRCLE
GAUGE: 1 circle = 2" diameter
DIRECTIONS (MAKE 11)
Ch 7, join with sl st to form ring.
Rnd 1: With Antique White, ch 2
(counts as first sc), 9 sc into ring (10
sc total). Join with sl st to beg ch.
Rnd 2: Ch 2 (counts as first sc), 2 sc bet
each st (20 sc total). Join with sl st to
beg ch. Finish off and weave in ends.
GARLAND
BANNER STRAND (MAKE 1)
Holding three strands of yarn together
(we used two strands of Antique White
and one strand of Peacock Sparkle), ch
until desired length (ours is 94").
SMALL TASSEL (MAKE 2 - 1 IN
PEACOCK SPARKLE AND 1 IN ANTIQUE
WHITE)
*Ch 15, blossom stitch (refer to pg.
3 for this stitch), rep from * 6 times.
Finish off and weave in ends.
MEDIUM TASSEL (MAKE 2 - 1 IN
PEACOCK SPARKLE AND 1 IN ANTIQUE
WHITE)
*Ch 18, blossom stitch, rep from * 6
times. Finish off and weave in ends.
LARGE TASSEL (MAKE 2 IN
ANTIQUE WHITE)
*Ch 20, blossom stitch, rep from * 6
times. Finish off and weave in ends.
ASSEMBLY
Using color of choice and yarn needle,
hand stitch granny squares and circles
to banner strand. To finish, stitch one
short, one medium and one long tassel
to each end of banner strand.
4
INTERMEDIATE
MATERIALS:
• I Love This Yarn™ (shown in Antique
Teal, Turquoise and Peacock), 7 oz.
skeins of 355 yds.
Color 1 (A) – 1 skein
4
Color 2 (B) – 1 skein
Medium
Color 3 (C) – 1 skein
• Yarn needle
CROCHET HOOK: Size G-6 (4 mm) or
size needed to obtain gauge
GAUGE: 2 rnds of 10 dc = 2" x 1"
SPECIAL STITCHES:
Increase (inc): Work 2 dc into same st.
STOOL AROUND
DIRECTIONS
Grab a seat—but first, make sure it's sporting a chic spiral cover.
With A, ch 4, join with sl st to form ring.
Rnd 1: Ch 3 (counts as first dc now and throughout), 11 dc in ring (12 dc total), join with sl st to top of beg ch 3.
Rnd 2: With B, ch 3, 1 dc in same st, 2 dc in each st around (24 dc). Join with sl st to top of beg ch 3.
Rnd 3: With C, ch 3, 1 dc in same st, 1 dc in next st, *inc in next st, 1 dc in next st, rep from * around (36 dc). Join
with sl st to top of beg ch 3.
Note: From here on, you’ll change colors with each new rnd, alternating bet A, B and C.
Rnd 4: Ch 3, 1 dc in next 2 sts, inc in next st, *1 dc in next 3 sts, inc in next st, rep from * around (48 dc). Join with sl
st to top of beg ch 3.
Rnd 5: Ch 3, 1 dc in next 3 sts, inc in next st, *1 dc in next 4 sts, inc in next st, rep from * around (60 dc). Join with sl
st to top of beg ch 3.
Rnd 6: Ch 3, 1 dc in next 4 sts, inc in next st, *1 dc in next 5 sts, inc in next st, rep from * around (72 dc). Join with sl
st to top of beg ch 3.
Rnd 7 and subsequent rows: Continue working 1 dc in each st, continuing to put one more st bet each inc in each
new rnd until piece matches the diameter of the cushion you’re covering (For example, in rnd 7 you will work 1
dc into next 6 sts and then inc in the next. In rnd 8 you will work 1 dc into next 7 sts and the inc in the next, and
so forth). Continue from there by working 1 st in each st (no more increases) until piece covers the sides of your
cushion. Place piece right side up on cushion, flip cushion over, and work decreases as follows:
Decrease rnd: 1 dc in first st, sk 1 st, 1 dc in next st. Continue on like this, working 1 dc then skipping one dc until
piece covers the bottom of your cushion snugly. Finish off and weave in ends.
5
BEGINNER
HEXAGON (MAKE 16)
MATERIALS:
• I Love This Yarn™ (shown in Rouge,
Mulberry, Turquoise, Fuchsia Neon,
Limelight, Antique Teal and Antique
White), 7 oz. skeins of 355 yds.
• Yarn needle
• Sewing needle
• Clear jewelry line or thread
4
Medium
CROCHET HOOK: Size G-6 (4 mm) or size
needed to obtain gauge
GAUGE: 1 granny square = 4.5" across and
5" from point to point
ABBREVIATIONS:
Beg – beginning
Bet – between
Ch – chain
Dc – double crochet
Rep – repeat
Rnd – round
Sc – single crochet
Sl st – slip stitch
Sp(s) – space(s)
St(s) – stitch(es)
Tr – treble crochet
Ch 5, join with sl st to form ring.
Rnd 1: Ch 4 (counts as first tr), 2 tr into ring, ch 2, *3 tr into
ring, ch 2, rep from * around (18 tr total). Join with sl st to
top of beg ch 4.
Rnd 2: Attach new color with sl st in any ch sp, ch 7 (counts
as 1 sc, ch 6), 1 sc bet next 2 tr, *1 sc in next ch sp, ch 6, 1
sc in same sp, 1 sc bet next 2 tr, rep from * 4 more times
(6 ch 6 sps total). Join with sl st to first ch of beg ch 7.
Rnd 3: Attach new color with sl st in any ch sp, ch 1 (counts
as first sc), [1 sc, ch 2, 2 sc] in same sp, 1 dc in next 3 sts,
*[2 sc, ch 2, 2 sc] in next ch sp, 1 dc in next 3 sts, rep from
* 4 more times (6 ch 2 sps total). Join with sl st to beg
ch 1.
Rnd 4: Using same color as rnd 2, join with sl st in any dc,
ch 1 (counts as first sc), 1 sc in each st around, [1 sc, ch 1,
1 sc] in each ch sp. Join with sl st to beg ch 1. Finish off
and weave in ends.
ASSEMBLY
With right sides facing, use coordinating yarn to sl st
hexagons together at one side. With Antique White, ch
length long enough to wrap lampshade. Use a sewing
needle and clear jewelry line or thread to sew the hexagons
onto the lampshade.
6
INTERMEDIATE
READY, SET, CROCHET!
MATERIALS:
• I Love This Yarn™ (shown in Rouge,
Mulberry, Turquoise, Fuchsia Neon,
Limelight, Antique Teal and Antique
White), 7 oz. skeins of 355 yds.
• Ornaments (size 3")
• Yarn needle
4
Here's a fresh DIY project: acorn-esque
ornament wraps.
Medium
Size G-6 (4 mm) or size
needed to obtain gauge
CROCHET HOOK:
GAUGE:
• Chains = 3" and top = 3" diameter
DIRECTIONS
TOP OF ORNAMENT
Ch 7, join with sl st to form ring.
Rnd 1: Ch 4 (counts as first tr), 22 tr in ring
(23 tr total), sl st to top of beg ch 4 to join.
Rnd 2: Join new color in any st, ch 1 (counts
as first sc), 2 sc in each st (46 sc total), sl st
to beg ch 1 to join.
BOTTOM OF ORNAMENT
Using same color as rnd 2, ch 4, join with sl st
to form ring.
Rnd 1: Ch 8, sl st to join to any st of rnd 2 of
the top of ornament, sl to next st, ch 8 and
sc back into ring. *Ch 8, skipping 2 sts, sl st
back into rnd 2 of the top of ornament, sl st
into next st, ch 8 and sc back into ring. Rep
from * until about ¾ of the way around.
Insert ornament and continue from *
around. Finish off and weave in ends.
7
COASTER TO COASTER
Here’s a beginner level take on granny square
coasters. So crochet a bundle for gifts, for
matches-the-curtains décor or just for fun!
BEGINNER
DIRECTIONS
MATERIALS:
• I Love This Yarn™ (shown in
Turquoise, Fuchsia Neon and
Antique White), 7 oz. skeins
of 355 yds.
• Yarn needle
4
Medium
CROCHET HOOK: Size G-6 (4 mm)
or size needed to obtain gauge
GAUGE: 1 coaster = 3.5" across and
4" from point to point
ABBREVIATIONS:
Beg – beginning
Bet – between
Ch – chain
Dc – double crochet
Lp – loop
Rep – repeat
Rnd – round
Sc – single crochet
Sl st – slip stitch
Sp(s) – space(s)
St(s) – stitch(es)
Tr – treble crochet
With desired color, ch 5 and join with sl st to form ring.
Rnd 1: Ch 3 (counts as first dc), [1 tr, 1 dc] into ring, ch 2, *1 dc, 1
tr, 1 dc, rep from * 4 more times. Join with sl st to top of beg ch 3.
Rnd 2: Attach new color in any ch 2 sp, ch 7 (counts as 1 sc, ch 6),
1 sc into same sp, 1 sc bet next 2 sts, *[1 sc, ch 6, 1 sc] into ch sp,
1 sc bet next 2 sts, rep from * 4 more times. Join with sl st to first
ch of beg ch 7.
Rnd 3: Attach new color to any ch 6 sp, [ch 1, 1 sc, ch 2, 2 sc] in
same sp, 1 dc in next 3 sts, *[2 sc, ch 2, 2 sc] into next lp, 1 dc in
next 3 sts, rep from * 4 more times. Join with sl st to beg ch 1.
Rnd 4: Attach same color from rnd 2 in any ch sp, [1 sc, ch 1, 1 sc] in
each ch sp, 1 sc in each st around. Join with sl st to beg ch 1.
Finish off and weave in ends.
POCKETFUL OF COZIES Mugs and thermoses do a fine job of
keeping our hot beverages just that, so it’s only fair to crochet some pretty
cozies to keep them warm (and stylish) too.
For this pattern, we used I Love This Yarn™ in
Fuchsia Neon,Turquoise and Limelight.
To make this cute cozie, just follow the
Coaster to Coaster directions rnds 1-4
(above) and assemble as directed (below).
ASSEMBLY
With Turquoise and right sides facing, sl st
hexagons together at sides. Finish off and
weave in ends.
8
BEGINNER
MATERIALS:
• I Love This Cotton™ (shown in Brown),
3.5 oz. skeins of 180 yds. - 4 skeins
• Yarn needle
4
Medium
CROCHET HOOK: Size J-10 (6 mm) or
size needed to obtain gauge
GAUGE: 7 rnds of 7 sc = 2" x 2" square
ABBREVIATIONS:
Beg – beginning
Bet – between
Ch – chain
Dc – double crochet
Rep – repeat
Sc – single crochet
Sk – skip
Sl st – slip stitch
Sp(s) – space(s)
St(s) – stitch(es)
BLESS MY BASKET
DIRECTIONS
Note: This pattern was worked
holding two strands of yarn together.
GRANNY SQUARE (MAKE 8)
Ch 4, sl st to form ring.
Rnd 1: Ch 3 (counts as first dc now
and throughout), 2 dc into ring, ch
3, *3 dc into ring, ch 3, rep from * 2
more times. Sl st to join.
Rnd 2: Ch 3, 2 dc into ch 3 sp, ch 3, 2
dc into same sp, ch 1, *3 dc into ch
3 sp, ch 3, 3 dc into same sp, ch 1,
rep from * 2 more times. Join to top
of beg ch 3 with sl st.
Rnd 3: Sl st to next ch sp, ch 3
(counts as 1 dc), [1 dc, ch 2, 2 dc]
in same sp, 1 dc bet next 6 sts, *[2
dc, ch 2, 2 dc] in next ch sp, 1 dc bet
next 6 sts, rep from * twice more.
Join to top of beg ch 3 with sl st.
Finish off and weave in ends.
With matching yarn and yarn needle,
sew the sides of squares together to
form a circle (these will be the sides
of the basket).
BOTTOM OF BASKET
Ch 5, sl st to form ring.
Rnd 1: Ch 3 (counts as first dc), 11
dc in ring (12 dc total). Join to top
of beg ch 3 with sl st.
Rnd 2: Ch 3, 1 dc in same st, 2 dc in
each st around (24 dc total). Join to
top of beg ch 3 with sl st.
Rnd 3: Ch 3, 1 dc in same st, 1 dc in
next st, *2 dc in next st, 1 dc in next
st, rep from * around. Join to top of
beg ch 3 with sl st.
Rnd 4: Ch 3, 1 dc in next st, 2 dc in
next st, *1 dc in next 2 sts, 2 dc in
next st, rep from * around. Join to
top of beg ch 3 with sl st.
Rnd 5: Ch 3, 1 dc in next 2 sts, 2 dc in
next st, *1 dc in next 3 sts, 2 dc in
next st, rep from * around. Join to
top of beg ch 3 with sl st.
Rnd 6: Ch 3, 1 dc in next 3 sts, 2 dc in
next st, *1 dc in next 4 sts, 2 dc in
next st, rep from * around. Join to
top of beg ch 3 with sl st.
Rnd 7: Ch 3, 1 dc in next 4 sts, 2 dc in
next st, *1 dc in next 5 sts, 2 dc in
next st, rep from * around. Join to
top of beg ch 3 with sl st.
What a better place to stash your stash
of yarn than a cozy crocheted basket?
ASSEMBLY
Sl st bottom of granny square circle
around the bottom circle.
TOP OF BASKET
Rnd 1: Working at the top of the
basket, sl st at the beg of any
square. Ch 1, work sc around the
basket (10 sc in each square). Sl st
into first ch 1 st.
Rnd 2: Ch 1, *30 sc in each sc, ch 14
separately (this will form the basket
handle), sk 10 sc. Rep from * 2
times. Sl st into first ch 1 st.
Rnd 3: Ch 1, work sc all the way
around (84 sc). Sl st into first ch 1 st.
Rnd 4: *Ch 4, 1 dc in the same st, sk
2 sc, sl st into next sc st. Rep from *
all the way around.
9
Chill Spot
Your idea of relaxation usually involves yarn and
a crochet hook, right? Then you're sure to be
inspired by with this lucky-in-lounge project.
10
BEGINNER
Granny’s Garden Square (pg. 10)
MATERIALS:
• I Love This Yarn™ (shown in Rouge, Mulberry, Turquoise,
Fuchsia Neon, Limelight, Antique Teal and Antique White),
7 oz. skeins of 355 yds.
Color 1 (A) – 1 skein Color 5 (E) – 1 skein
4
Color 2 (B) – 1 skein Color 6 (F) – 1 skein
Medium
Color 3 (C) – 1 skein Color 7 (G) – 1 skein
Color 4 (D) – 1 skein
• Yarn needle
CROCHET HOOK: Size G-6 (4 mm)
ouge Granny Square
Pillowcase (pg. 10)
MATERIALS:
• I Love This Yarn™ (shown in Rouge), 7 oz.
skeins of 355 yds. – 1 skein
4
Medium
• Yarn needle
• Pillow form – 12" x 16"
CROCHET HOOK: Size G-6 (4 mm) or
size needed to obtain gauge
GAUGE: 1 granny square = 6.25" x 6.25"
GAUGE: 1 granny square = 4" x 4"
ABBREVIATIONS:
DIRECTIONS (MAKE 24)
Beg – beginning
Ch – chain
Dc – double crochet
Rep – repeat
Sl st – slip stitch
Sp(s) – space(s)
SPECIAL STITCHES:
Beg corner – [Ch 3, 2 dc, Ch 2, 3
dc, ch 1] in sp indicated.
Corner – [3 dc, ch 2, 3 dc, ch 1]
into previous rnd ch 2 sp.
Cluster – [3 dc, ch 1] in previous
rnd ch 1 sp.
DIRECTIONS
Note: Add the blossom stitch after any dc in rnds 3, 4 and 5 (refer to
pg. 3 for blossom stitch).
With A, ch 4, sl st to form ring.
Rnd 1: Ch 3 (counts as first dc now and throughout), [2 dc, ch 2]
into ring, *[3 dc, ch 2] into ring, rep from * twice more, join with
sl st to top of beg ch 3.
Rnd 2: Attach B in any ch 2 sp, beg corner, *corner, rep from *
twice more, join with sl st to top of beg ch 3.
Rnd 3: Attach C in any ch 2 sp, beg corner, *cluster, corner, rep
from * 2 times, cluster, join with sl st to top of beg ch 3.
Rnd 4: Attach D in any ch 2 sp, beg corner, *1 cluster in next 2
sps, corner, rep from * 2 times, 1 cluster in next 2 sps, join with
sl st to top of beg ch 3.
Rnd 5: Attach E in any ch 2 sp, beg corner, *1 cluster in next 3 sps,
corner, rep from * 2 times, 1 cluster in next 3 sps, join with sl st
to top of beg ch 3.
Rnd 6: Attach F in any ch 2 sp, beg corner, *1 cluster in next 4 sps,
corner, rep from * 2 times, 1 cluster in next 4 sps, join with sl st
to top of beg ch 3.
Finish off and weave in ends.
Rnds 1-4: Rep rnds 1-4 from Granny’s
Garden Square pattern (left), but do not
add the blossom stitch.
ASSEMBLY
FRONT PANEL
Sl st 12 squares together in 4 rows of 3
squares each.
BACK
Sl st 2 rows of 3 squares each together.
Rep this once, so you have 2 six-square
rectangles. Sew the short sides of these
to the front panel, but do not sew the 2
back rectangles together. This opening will
allow you to slip the pillow inside the case,
and will also allow you to remove the case
for washing (see yarn label for laundering
instructions).
EDGING
Dc evenly around the edge of the
assembled pillowcase, working 4 dc into
each corner. Join with sl st to beg.
Finish off and weave in ends.
11
INTERMEDIATE
MATERIALS:
• I Love This Yarn™ (shown in Rouge,
Limelight and Turquoise), 7 oz.
skeins of 355 yds.
Color 1 (A) – 1 skein
4
Color 2 (B) – 1 skein
Medium
Color 3 (C) – 1 skein
• Button
• Yarn needle
CROCHET HOOK: Size G-6 (4 mm) or
size needed to obtain gauge
GAUGE: 1 granny square = 3.5" x 3.5"
SPECIAL STITCH
Scalloped Edge Stitch - Ch 3 in top corner,
*3 dc in next 2 sts, ch 3, 2 sc in next sp, rep
from * 2 more times, ch 3, 1 sc in corner
opposite beg ch 3. Finish off and weave
in ends.
DIRECTIONS (MAKE 4)
Rnds 1-3: Rep rnds 1-3 from Granny's
Garden Square pattern (pg. 11), but do
not add the blossom stitch.
ASSEMBLY
Using C, sl st squares together (two
for front and two for back; leave the
top open to insert phone). Across
one side of the opening and using
With A, scalloped edge stitch across one side
of the opening. Join with sl st, finish off and weave in ends.
Using yarn needle, attach button about half way down on
the side opposite of the scalloped edge. The middle scallop
will act as the buttonhole.
WRISTLET
Sl st to the top side sp. Ch st until ch is desired length. Attach
back to side sp with sc. Sc around the lp to make it thicker
and to add strength. Finish off and weave in ends.
HOLD THE PHONE
Your cell phone does a lot for
you—keeps you in contact with
your favorite pizza place, takes
pictures of your pizza, lets your
friends know you're eating pizza.
So keep your faithful friend well
protected in a comfy-chic granny
square case.
12
Tablet Talk
Don’t settle for an off-the-shelf tablet case when you can make one yourself.
And while you're at it, whip one up for all your tech-savvy friends too!
13
INTERMEDIATE
SIZE: Approx. 8" x 11"
MATERIALS:
• I Love This Yarn™ (shown in
Rouge, Limelight and Antique
Teal), 7 oz. skeins of 355 yds.
Color 1 (A) – 1 skein
Color 2 (B) – 1 skein
Color 3 (C) – 1 skein
•
•
•
•
4
Medium
Button
Sewing needle and thread
20" x 14" piece of fabric
Yarn needle
CROCHET HOOK: Size E-4
(3.5 mm) or size needed to
obtain gauge
GAUGE: 1 granny square = approx. 3.5" x 4" SQUARE FOR FRONT (MAKE 6)
Rnds 1-3: Rep rnds 1-3 from Granny’s Garden Square
pattern (pg. 11), adding the blossom stitch after any
dc in rnd 2 (refer to pg. 3 for blossom stitch).
Slip stitch three sides of the pocket square on top of
one middle square on the backside, leaving one side
not stitched for pocket opening. After squares for
front and back all are connected, slip stitch the front
and back pieces of case together on three sides (two
long edges and one short edge).
FOR THE CLOSURE
SQUARE FOR BACK (MAKE 6)
Rnds 1-3: Rep rnds 1-3 from Granny’s Garden Square
pattern, leaving out the blossom stitch.
POCKET SQUARE (MAKE 1)
Note: We changed our colors to make this square pop!
Rnds 1-3: Rep rnds 1-3 from Granny’s Garden Square
pattern, leaving out the blossom stitch.
ASSEMBLY
Using same color from rnd 3, sl st squares for front
together and squares for back together in 2 rows of 3
(see photo).
Sl st in center of the front side of case.
Rnds 1-8: 10 sc, ch 1, turn.
Rnd 9: 3 sc, 4 ch, 3 sc (to form the button hole), ch 1,
turn.
Rnd 10: 10 sc. Finish off and weave in ends.
LINING FOR THE CASE
Fold fabric in half lengthwise, with right sides together
and sew the side and bottom edges together to make
lining. Insert lining inside the crocheted case. Fold
the edge of lining under and pin it to ¼" lower than
the edge of crocheted case. Hand stitch lining to case.
Using a sewing needle and thread, sew button to front
of case.
©2014 Hobby Lobby®
www.hobbylobby.com •
• Needle Art - 889667
DO NOT ALLOW CHILDREN TO COMPLETE PROJECTS ALONE. ADULT SUPERVISION REQUIRED.


© Copyright 2026