
Suture materials and suture techniques 5.1 Suture materials 5.2 Suture techniques
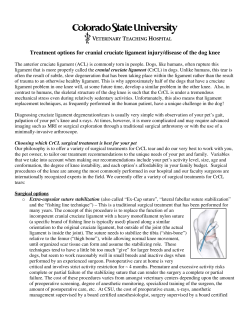
Suture materials and
suture techniques
5.1 Suture materials
5.1.1 Introduction
5.1.2 Suture materials
5.1.3 Suture needles
5.1.4 Staples and clips
5.2 Suture techniques
5.2.1 Introduction
5.2.2 Handling needle holder, needle and suture
5.2.3 The surgical knot
5.2.3.1 Knot tying with instruments
5.2.3.2 Knot tying by hand
5.2.3.3 Cutting the sutures
5.2.4 Interrupted suture patterns
5.2.4.1 Simple suture
5.2.4.2 Horizontal, mattress suture
5.2.4.3 Vertical, mattress suture
5.2.4.4 Cross-stitch or cruciate suture
Chapter 5
5.2.5 Continuous suture patterns
5.2.5.1 Simple, continuous sutures
5.2.5.2 Lock-stitch suture
5.2.5.3 Continuous, mattress suture
5.2.5.4 Continuous, subcutaneous or subcuticular suture
5.2.5.5 Far-near, patterns
5.2.6 Specific sutures for hollow organs
5.2.6.1 The simple, interrupted, approximating technique
5.2.6.2 The crushing technique
5.2.6.3 The Schmieden suture
5.2.6.4 The Lembert suture
5.2.6.5 The Cushing suture
5.2.6.6 Uterine suture (Utrecht method)
5.2.6.7 Single or double suture layer
5.2.6.8 Parker-Kerr suture
5.2.6.9 Non-perforating, purse-string suture
56
Chapter 5 Suture materials and suture techniques
5.1 Suture materials
5.1.1 Introduction
This term includes the various suture materials, such as sutures, needles, staples and
(haemo)clips.
5.1.2 Suture materials
multifilament
monofilament
absorbable
non-absorbable
Suture materials may be classified in different ways. A practical classification is based on structure
and absorbability. A difference is made between braided (multifilament) and single strand
(monofilament), and between absorbable and non-absorbable suture material. Applied to a number
of well-known suture materials, this gives the following classification (Table 1):
For absorbable materials, a further subdivision is possible, based upon the speed of absorption.
A difference should be made between loss of strength and disappearance of the material from the
tissue (absorption). For all materials, the speed with which the strength decreases exceeds that of
absorption. This is clearly illustrated in Table 2, which includes the results of independent research
and data from the manufacturers.
Table 1. Suture materials: structure and absorbability
Absorbable Non-Absorbable
Monofilament
polyglecaprone (Monocryl®)
polydioxanone (PDS®)
polyglycolate (Maxon®)
steel wire
polyamide (Nylon)
polypropylene (Prolene®, surgilene®)
Multifilament
catgut chromic catgut
polyglycolic acid (Dexon®)
polyglactin 910 (Vicryl®)
steel wire
polyamide (Nylon)
polyester (Dacron®, Mersilene®)
silk
When choosing an appropriate suture material, besides the factors mentioned above, handlebility
and the degree of tissue reaction are also of importance. The ideal material is easy to handle,
causes little tissue reaction, keeps its strength as long as necessary and rapidly dissolves afterwards.
Unfortunately, there is no material that satisfies all these criteria, but recent developments have
decreased the distance between the ideal and reality for certain materials. The traditional natural
Table 2. Absorbable material: structure, loss of strength and absorption time
Name
Structure
Strength 50%
Strength 0%
absorbed
Vicryl rapide®
Braided
5 days
2 weeks
1 month
Vicryl®
Braided
14 days
1 month
3 months
Monocryl®
Monofilament
7 days
1 month
3 months
PDS II®
Monofilament
28 days
2 months
6 months
Rien van der Velden and Freek van Sluijs
catgut, chromic catgut
silk, steel wire
tissue reaction
USP
EP units
materials (catgut, chromic catgut and silk) are now considered obsolete, also in the case of catgut
because of the potential risk for spread of BSE. Steel wire has a number of advantages (great
strength, little tissue reaction) but is not easy to handle and therefore less suitable for general
practice. The synthetic braided non-absorbable materials are generally easy to handle, but may
cause a certain degree of tissue reaction and are easily colonised by micro-organisms. This may
lead to suture granulomas and fistulas, which may be very hard to treat. This means that, in
situations where the suture material remains in the body, the best option is synthetic absorbable
material. The choice is furthermore determined by the speed of tissue recovery and the forces
exerted on the sutures during healing. For skin closures, non-absorbable suture material is a good
option; monofilament is generally preferred over braided material. Suture thickness is expressed
as a number, which does not only indicate the diameter but also the suture strength (USP, United
States Pharmacopoeia). Thickness is expressed as a whole number (strong) or with several zeroes
(the more zeroes, the thinner the material). Materials with the same number may have a different
diameter if they have another tensile strength: e.g. catgut 0 is thicker than stainless steel 0. The
choice of the suture size is determined by the forces exerted on the suture; this varies according to
the species. In small animals, the commonly used sizes are between 4-0 (intestinal sutures) and 0
(sutures in the linea alba of a large dog). In the horse and farm animals, sizes usually vary from 3-0
to 6. Besides the USP units, EP units (European Pharmacopoeia) are also used. This unit merely
indicates the thickness: 1 EP = 0.1 mm, 2 EP = 0.2 mm.
5.1.3 Suture needles
shaft, eye
round needle
cutting needle
reverse cutting needle
flat needle
Visi-black®
Suture needles are characterised by the following features:
1. diameter;
2. curvature;
3. suture attachment.
The diameter is not identical over the entire length of the needle; the profile of the tip is generally
different of that of its shaft, which is again different from that of the eye. The main difference is the
one between round and cutting needles.
Round needles have a rounded tip and a round or oval shaft. In these needles, the shape of the
needle path matches that of the suture material, leading to a minimal risk of leakage along the
suture and tearing of the tissue. However, tissue penetration is more difficult than with cutting
needles, especially notable at the moment of insertion. Round needles are mainly used in soft tissue
and in locations where leakage via the suture path or tearing of the tissue are undesirable. Examples
are sutures of the digestive tract and the bladder.
Cutting needles have a sharp tip, although the shaft is usually round or oval. There are cutting and
reverse cutting needles. In both cases, the needle tip has a triangular profile; in the cutting needle,
the tip of this triangle points inwards and in the reverse cutting needle, it points outwards. Since
tissue is compressed mainly at the inside of the needle curvature, there is an increased risk with
cutting needles that, when tightened, the material will cut deeper into the tissue than with reverse
cutting needles. Individually supplied needles are usually cutting, while needles of atraumatic
suture material (see below) usually are reverse cutting.
The taper point cutting needle is an intermediate between a round and cutting needle. The shaft is
round but the tip is (reverse) cutting. The needle is usually a little thicker than its round equivalent.
Taper point cutting needles are used in tissues requiring a round needle path, but which have
reasonably firm consistency, such as the canine gastric wall. Also, for closing a rectal tear, a taper
point cutting needle may be a good choice.
A recently developed needle is the flat needle, usually with a rounded tip and made of extra-strong,
black material (Visi-black®).
57
58
Chapter 5 Suture materials and suture techniques
spatula needle
straight needle
loose suture needle
atraumatic needle
Besides all these needle types, there are also a number of variants developed for a specific use. An
example is the spatula needle, used for sutures of the cornea. The shape of the needle has been
designed to create a needle path with minimal tissue trauma.
The curvature of the needle is given in eighths of a circle and varies from straight to 5/8 of a circle.
Straight needles are rarely used nowadays; they are indicated for the penetration at right angles of a
flat surface. An example is the suturing of an aural haematoma in the dog.
The curvature of the needle determines the pathway of the needle through the tissue (depth) and
the angle at which the needle enters and leaves the tissue. Lightly curved (3/8) needles are used
for superficial sutures in easily accessible areas (e.g. skin sutures), moderately curved (4/8) needles
for tissue that is less accessible or that needs deeper sutures (e.g. perforating intestinal suture) and
strongly curved (5/8) needles for tissue that is poorly accessible and requires deep sutures (e.g.
closing an inguinal hernia).
In loose suture needles, the suture material is threaded through the eye. This part of the needle
is considerably wider than its shaft. Since the suture is threaded through the eye, this means that
the needle is much bulkier at eye level than the diameter of the suture material causing more
trauma to the tissue (traumatic needles) than needles with suture material threaded into the needle
(atraumatic needles). The large needle path that it creates is a disadvantage, in particular in areas
where leakage is undesirable, such as the intestines or the urinary bladder. The increased resistance
caused by the ‘bulky eye’ leads to a stronger pull during tissue fixation and needle penetration.
In atraumatic needles, the material is attached to the base of the needle during manufacturing.
The transition from needle to suture is therefore much smoother. As the diameter at the eye level
of the needle is similar to that of the thickness of the material, the needle path is narrower. As a
consequence, less force is needed for needle penetration. These two effects make these types of
sutures more atraumatic
5.1.4
staple
subcutaneous suture
mechanical stapler
endoscopic surgery
haemoclips
Staples and clips
Staples are increasingly used in veterinary surgery. They are mainly used for skin closure or for
suturing organs with specific stapling instruments. The major advantage of staples is their ease (and
therefore speed) of use. In skin closure, stapling clearly saves time when compared to conventional
suture techniques, without loss of safety or cosmetic effect. While stapling the skin leads to a poorer
cosmetic end result than the use of a continuous subcutaneous suture (the gold standard for skin
closure), its outcome is certainly no worse than that of interrupted skin sutures.
When stapling organs (e.g. intestinal anastomosis or excision of a lung or liver lobe), some
mechanical staplers carry out several actions simultaneously. When ‘firing’ such staplers, both
segments are stapled and transsected simultaneously. Mechanical staplers are expensive and only
have a limited number of applications in veterinary practice. Most applications for which the
mechanical staplers were designed can be carried out by hand. The exception to this is endoscopic
surgery. Endoscopic staplers, designed specifically for this
purpose, allow the carrying out of operations in body cavities
through a small incision, whereby the surgeon handles the
instruments by remote manipulation (outside the body).
Endoscopic surgery has taken flight in human surgery and is
also gaining popularity in veterinary surgery. The required
instruments are expensive, and ‘remote operating’ via the
screen requires special skills. The technique is therefore often
reserved to specialists.
Haemoclips are fasteners used to clamp off blood vessels.
These clips exist in metal and absorbable material (polyglactin
910 and PDS®). Metal clips are V-shaped and are clamped
Figure 1. A mesh-graft is apposed by
around the blood vessel. The absorbable clips have a locking
means of a skin stapler
Rien van der Velden and Freek van Sluijs
mechanism at the tip. Although this secures closure, absorbable clips are considerable bigger than
metal clips of the same size.
Haemoclips are placed around the blood vessel with special forceps. The size of the clip should
match that of the blood vessel. It should be several mm longer than the diameter of the (flattened)
blood vessel, so that the clip ends interlock well and the locking mechanism (absorbable clips) lies
completely free of the blood vessel. If the clips are too small, the tips may puncture the wall of the
blood vessel; this may result in bleeding, the opposite of what was intended by using clips in the
first place.
The advantage of clips compared to ligatures is the relative ease with which blood vessels may be
safely clamped in less accessible (deeply located) places. Less manipulation is needed than when
ligating, although the blood vessels should be well separated from the surrounding structures for
haemoclips, too. A drawback is that only small blood vessels (diameter < 11 mm) can be clamped
this way.
ligature
5.2 Suture techniques
5.2.1
Introduction
An incision is closed by pulling the edges together with sutures to obtain healing by
first intention. This generally requires a good apposition of the wound edges, which
is achieved by sutures that are as simple as possible and use as little suture material
as necessary. Sutures that are too tight or too numerous may cause ischemia of the
wound edges, which may severely impair wound healing.
If a wound consists of several tissue layers, such as skin, subcutaneous tissue and
muscle, each layer should be sutured separately. A wide choice of suture techniques
is available; the surgeon should know the pros and cons of each technique in order
to make a reasoned choice.
interrupted suture
There is an important difference between interrupted and continuous (or running)
sutures. Interrupted sutures ensure wound closure by individual sutures, and
were often considered safer in the past. This is because the unravelling of one
single suture has no consequences for the wound closure as a whole. However, if
something were to go wrong with a continuous suture (unravelling of a knot, suture
breakage, tearing of tissue) this may have serious consequences, as the entire suture
becomes loose. On the other hand, a well-tied knot should not become unfastened.
Furthermore, the risk of spontaneous breakage of modern synthetic suture material
when handled appropriately is minimal, while the risk of tissue tearing mainly
depends on the suture technique used (sufficient tissue taken up by the suture, not
pulled too tight). As a drawback, interrupted sutures require more suture material
to close the wound and leave more behind, mainly in the form of numerous knots.
Furthermore, tying interrupted sutures takes more time; each suture needs to be
tied and cut separately.
An interrupted suture is also said to be less resistant to tension in the wound area.
The pull of the independent sutures on the tissue is high, causing them to tear
continuous suture pattern more easily. In continuous suture patterns, the tension is spread evenly over the
entire length of the wound, leading to a lower pressure of the suture material on
the tissue at the level of the perforation. This means a continuous suture tears the
tissue less easily.The discussion, whether to use interrupted or continuous sutures
for the closure of the abdomen following a midline laparotomy in the dog and
59
60
Chapter 5 Suture materials and suture techniques
wound dehiscence
5.2.2
needle
needle holder
joint
French eye
open eye
closed eye
cat has been going on for some time. However, retrospective research has shown
that a continuous suture does not lead to an increased risk of tearing or wound
dehiscence.
Handling needle holder, needle and suture
When placing the needle in the needle holder, three points should be observed:
1. the position of the needle in the beak of the needle holder;
2. the place on the needle where it is picked up;
3. the angle the needle makes with the beak of the needle holder.
The needle is picked up by the beak tip of the needle holder; gripping nearer the joint puts a greater
burden on the needle holder and increases the risk of breakage. The needle should be picked up
between the tip and the eye. The nearer the needle is grasped by its tip, the more pressure can be
exerted without bending or breaking the needle. The closer the needle is held by its eye, the larger
the part that will reappear after tissue penetration and the easier the needle can be picked up again.
In soft tissue, the needle is therefore held closer to the eye, in firm tissue closer to the tip.
The angle between the needle and the beak of the needle holder may vary from wide to narrow; it
is also possible to turn the needle around its longitudinal axis. The simplest and most common way
is to hold the needle at right angles with the beak. In this way, the needle holder only needs to be
rotated along its longitudinal axis to push the needle through the tissue. At angles other than 90°,
additional movement of the needle holder is necessary to make the needle move along the required
needle path; these movements require extra space. Paradoxically, the smaller the available space, the
larger the tendency to hold the needle at a diverging angle.
The way in which the suture is fed through the eye of the loose needle depends on the type of eye.
There are two types of needle eyes: closed and open (French eye). The French eye needle is in fact
a double eye; a second eye exists behind the open eye. In closed eye needles, the material is fed
through the eye. In open eye needles, the suture material is pulled through a spring slot above the
needle eye; after pulling the suture through this slot, the sides of the spring coil back into place
and close the eye. By feeding the suture first through the underlying closed eye, extra fixation can
be obtained. This thickens the transition from needle to suture, however, and renders its passage
through the tissue more difficult.
Suture material is fed through a closed eye needle as follows (right-handed method): Grasp the
needle with the needle holder, needle eye towards the right. Pull the suture along the lower leg of
the needle holder towards the beak with the needle, ensuring the suture lies under the needle. Pull
the suture just past the needle, then upward and sideways over the tip of the needle holder. The
right hand (holding the needle holder) keeps tension on the suture while it is fed through the eye
with the left hand.
When inserting the needle, the tissue is held by tissue forceps, as close as possible near the place of
needle insertion and until the needle has passed through the tissue completely.
The tip of the needle should be placed correctly at the first go. During needle insertion, a higher
resistance must be overcome than during the rest of the passage; the position of the needle tip at
insertion partially determines the resistance met. Insertion is easiest when the needle is inserted at
right angles to the skin.
The distance between the point of insertion and wound margin depends on the thickness of the
layer to be sutured. The distance between insertion point and wound edge should be equivalent to
the thickness of the layer.
When pushing the needle through the tissue, two forces play a role:
1. a driving force, pushing the needle forward;
2. a rotating force, which ensures that the suture path has the same shape as the needle (‘follows
the curve of the needle’).
Rien van der Velden and Freek van Sluijs
These two forces should be in balance; when pushing without sufficient rotation (or the opposite),
the needle meets additional resistance, leading to tissue damage. The degree of rotation depends on
the shape of the needle. A 3/8 curved needle should be rotated over 135° through the tissue, a 4/8
needle over 180°.
pronation
supination
The hand position at the moment of insertion determines the ease with which the rotation can be
obtained. There are two starting positions: pronation (with the back of the hand turned upward)
and supination (with the palm upward). By starting in pronation, the wrist will automatically turn
in the correct direction and the needle will naturally follow the correct pathway.
When passing through firm tissue, the needle should be grasped near the tip and must be grasped
again several times by placing the needle holder closer and closer to the eye of the needle; in doing
so, the needle is gradually pushed through the tissue rather than pulled out at the tip. Grasping the
needle by the tip should be avoided under all circumstances, as it damages the tip and will render
the passage of the needle more difficult during subsequent sutures.
Once the needle has been driven through up to the eye, it should be pulled out at the other
side. For this, the needle needs to be released and picked up again. This has the risk that nearby
structures may be punctured; to avoid this, the needle should be stabilised during the ‘take-over’.
This may be done in two ways: extraction with the needle holder while the tissue is fixed with
forceps or extraction with forceps without holding the tissue.
When the needle holder is used for extraction, the needle is stabilised by fixing the tissue near
the needle. The needle is released and picked up again by the needle holder at the other side. At
extraction, the same forces play a role as with needle insertion and driving. Again, the needle holder
can be held in either pronation or supination. In pronation, the wrist turns to supination with
ease, making the rotating movement needed for the needle path. This movement allows pulling the
needle out of the tissue without awkward twisting of the wrist. As a drawback, the needle needs to
be repositioned in the needle holder before re-insertion into the tissue. Extraction of the needle
in supination saves time, as the needle is in the correct position for the next suture insertion. Its
disadvantage is that it is more difficult to follow the needle path, as it is awkward to further rotate
the hand already in supination without excessive twisting of the elbow and shoulder.
Most needles are not curved over their entire length; at its eye, the needle is usually straight. As a
consequence, the needle should no longer be rotated when the eye is pulled through. A continued
rotating movement would make the extraction more difficult and lead to tissue damage, as the eye
‘ploughs’ through the tissue. Especially, French open eyes may cause a lot of damage.
suture forceps
When extracting the needle with tissue forceps, the forceps are transferred from the tissue to the
needle. The needle holder will hold on to the needle until the tissue forceps have been placed at an
angle of 90° to the needle. The needle is then pulled out of the tissue with the forceps, held in the
left hand. Here, too the hand movement may start from pronation or supination. Pronation has the
same advantages as described above; the disadvantage of being picked up again no longer applies.
This method requires fewer manipulations and is therefore faster, but has as a disadvantage that the
needle cannot be grasped well with normal surgical forceps; special suture forceps are needed.
When pulling the needle through the tissue, two factors play a role:
1. the angle at which the suture material is pulled out of the tissue;
2. the quantity of suture material pulled through the needle path.
The suture lies in the groove at the end of the needle eye; the angle at which the suture is pulled
out of the tissue is equivalent to that at which the eye is pulled out of the tissue. A sharp or wide
angle will cause increased “sawing” effect and more trauma. The quantity of suture material pulled
through the needle path depends on the type of knot used and the length of the material.
61
62
Chapter 5 Suture materials and suture techniques
5.2.3
half hitch
knot
slip knot
surgical knot
square knot
The surgical knot
A knot is the entwining of two suture ends allowing resistance to a certain force. A single entwining
is called a half hitch; a knot always consists of several half hitches. Additional half hitches may
be symmetrical or not. In a knot with symmetrical half hitches, both strands participate in equal
degrees to form the knot; each strand will leave the knot at opposite directions. In knots with
asymmetrical half hitches, the hitches are formed by one single strand; the strands do not leave the
knot at opposite directions. Symmetrical knots are more stable than asymmetrical knots which are
also known as “slip knots”.
Surgical knots consist of symmetrical knots, derived from the square knot. The difference with the
square knot is that the suture ends of the first half hitch entwine twice rather than once. As in the
square knot, surgical knots consist of two half hitches. They can be tied with instruments or by
hand.
5.2.3.1 Knot tying with instruments
When tying knots with instruments, the needle holder and tissue forceps may be used. In absence
of professional assistance in the form of an operating and an instrument assistant, this method is
faster than tying by hand. Less suture material is used, making the method also more economical.
The knot is tied as follows: the short end of the suture material is at the ‘far’ side of the incision;
it is just long enough to be picked up by the needle holder. The long end is at the ‘near’ side. The
needle holder is placed in closed position upon the long end of the thread, parallel to the incision.
The long end of the suture is wound twice around the beak of the needle holder. The short end is
then grasped by the needle holder. The first half hitch is tied by pulling with equivalent force on
both ends, with the long end away from the surgeon (far side) and the short end (in the needle
holder) towards him (near side). To obtain a ‘flat’ hitch, both ends need to be pulled with the
same force. The first half hitch should not be pulled too tightly; the wound edges should join well
(appose) but should not come under pressure.
Next, the needle holder is placed in closed position at the far side of the incision, on the long end of
the suture. The long end is wound once around the beak of the needle holder. The short end is then
grasped by the needle holder. The half hitch is pulled tight by moving the long end towards the
surgeon (to the near side) and the short end away from him (to the far side).
In fact, the position of the needle holder and movement are similar to that of the first half hitch,
only inverted (mirrored). The second half hitch is tightened more than the first one. If the first half
hitch was tied correctly, this will not or hardly tightened the knot any further.
For the third half hitch, the closed needle holder is placed on the long end of the suture, at the
near side of the incision. Again, the long end is wound around the beak of the needle holder. The
movements are identical to that of the first half hitch; the only difference is that the suture is only
wound once around the needle holder beak. The third and last half hitch is pulled tightly to prevent
the knot from unravelling; the pulling force should of course be adjusted to the strength of the
suture material.
Rien van der Velden and Freek van Sluijs
Simple knot (square knot)
1
2
3
4
5
6
7
8
9
1 & 2.
3.
4.
5.
6.
7. 8.
9.
The needle is taken out of the package.
The needle is held halfway the shaft by the beak tip of the needle holder.
The needle is inserted at right angles into the tissue.
By a rotating movement of the wrist, the needle is driven along the needle path in direction of
the incision.
The needle is held by the rear end and pushed through until the major part emerges from the
surgical wound.
The needle is picked up halfway the shaft by the needle holder and is pulled out of the wound
edge in a rotating movement.
The suture is pulled out as far as required.
The needle is inserted in the opposite wound edge.
63
Chapter 5 Suture materials and suture techniques
64
10
11
12
13
14
15
16
17
18
10.
The needle is pushed through the tissue and perforates the tissue at a similar distance to the wound
margin as that of the point of initial insertion.
11.
The needle is grasped at the rear of the shaft and driven through the tissue until the major part
emerges from the tissue. The tissue forceps hold the skin in place without pinching.
12.
The needle is grasped halfway up the shaft and pulled out with care in a rotating movement.
13.
The needle is held in the hand.
14.
The needle holder is placed in closed position on the long end of the suture, holding it parallel to the
incision.
15 & 16. The long end of the suture is picked up and wound twice around the beak of the needle holder (first
half hitch of the surgical knot).
17.
The short end is grasped by the needle holder.
18.
The short end of the suture is moved to the other side of the incision.
Rien van der Velden and Freek van Sluijs
19
20
21
22
23
24
25
26
27
19.
The first hitch is tightened by pulling with equal force on both sides.
20.
The needle holder is placed in closed position at the far side of the incision on the long end.
21 & 22. The long end is wound around the beak of the needle holder once.
23.
The short end is grasped by the needle holder.
24.
The half hitch is tightened by pulling the long end to the near side and the short end to the far side.
25.
The knot is tightened.
26.
The same movement starts again.
27.
At the end, the suture is cut with scissors, taking care that both ends are of equivalent length.
65
66
Chapter 5 Suture materials and suture techniques
two-handed knot
one-handed knot
pistol grip
thumbs-up sign
5.2.3.2 Knot tying by hand
Knots can be tied by hand in two ways: with one hand or two. Both methods have a number of
variations and will be illustrated for both hands. Contrary to what might be expected, both hands
are needed to tie knots with one hand. Knots are called one-handed as all manipulations are carried
out with the left hand (right-handed technique); the right is passive and its only role is to keep
tension on the long end of the suture. For two-handed knots, the right hand plays a greater role in
the manipulation of the suture. One-handed knots can be tied faster than two-handed knots and
this is particularly useful when the placing of sutures and the tying of knots alternate.
In the two-handed knot, the force applied on both ends can be better gauged; but what is gained
in precision is lost in speed. Both types of knots have their own indications. The one-handed knot
is used when speed is particularly important and precision plays a minor role (e.g. closing a skin
incision); the two-handed knot is preferred when precision is essential (e.g. ligating blood vessels).
The knot is tied as follows (right-handed technique; the number of the associateed picture is given
between brackets): the far side end is held in the palm of the left hand, leaving the thumb and index
free to manipulate the suture, while the near side end is held in the right hand (2). The left index
finger is held over the incision (pistol grip), with the base of the far side suture hooked behind it
(3). The near side suture is crossed over the far side suture on the left index finger (4). The tip of
the left thumb is then closed against that of the left index, forming a circle, enclosing both ends
of the suture (5). The left wrist is rotated, moving the thumb through the suture loop so that the
suture intersection slips from index to thumb (6). The near side suture end (now at the far side) is
grasped between the left thumb and index and pulled through the loop by returning the thumb and
index back to the starting position (7-9). The right hand releases the suture and picks it up again
once it has been fed through the loop (10).
For surgical knots, this is repeated once again. The first half hitch is then tightened, with the right
hand pulling away and the left hand towards the surgeon (11). The pulling force on both ends
should be balanced so that the knot does not slide horizontally and stays right above the incision.
The suture should be tightened just enough to make the wound edges meet. Too tight sutures may
lead to oedema and ischemia, which may result in the worst case to necrosis of the wound edges.
When tightening the sutures, the suture ends are pulled at right angles to the incision and at level
with the knot. If the ends are pulled in opposite directions, there is only one resulting force acting
on the tissue. This force is needed to appose the wound edges. If the ends are held higher than the
knot during tightening, the tissue is submitted to a second force, pulling the wound upwards. In
particular when ligating blood vessels, this may lead to the tearing of tissue in the knot.
For the second half hitch, the suture ends are held as at the end of the previous step, with the near
end in the left hand and the far end in the right (12). The left thumb is extended (thumbs-up sign)
and hooked (clockwise) under the base of the near side suture (13-15). The left thumb with the
hooked suture is brought above the incision and the far side suture end is crossed over the near side
end, across the left thumb (16). Care should be taken not to pull at this stage, which might loosen
the first half hitch. The tip of the left index finger is then opposed to the left thumb, forming a
circle (17-18). The left wrist is bent, moving the left index finger through the suture loop without
opening the circle (19). The far side end is picked up between left thumb and index finger and fed
back through the loop (20-22). The loose end is picked up by the right hand (23) and the knot is
tightened (24-25).
The same rules apply as for the first half hitch, with two differences:
1. the right hand now moves towards the surgeon, the left hand away (25);
2. the second half hitch should be tighter than the first, but not so tight that the first one closes
further.
The third half hitch is a repetition of the first one, but is single, not double.
Rien van der Velden and Freek van Sluijs
Two-handed knot for right-handers
1
2
3
4
5
6
1.
2.
3.
4.
5.
6.
The far side end of the suture is held in the left hand, the near side end in the right.
The far side end is held in the palm of the left hand, leaving the thumb and index finger free
to manipulate the suture. The near side end is held between the thumb and index finger of
the right hand.
The first half hitch is made in the left hand; the right hand needs to move over a larger
distance than the left. This is why the near side end should be a little longer than the far side
end. The left index finger is held over the incision (pistol grip), with the base of the far side
suture hooked behind it.
The near side suture is crossed over the far side suture on the left index finger.
The tip of the left thumb is then closed against that of the left index finger, forming a circle.
The left wrist is rotated, moving the thumb through the suture loop, so that the suture
intersection slips from index finger to thumb.
67
Chapter 5 Suture materials and suture techniques
68
7
8
9
10
11
12
13
14
15
16
17
18
7.
The near side suture end (in the right hand) is taken over by the left hand and held between
the left thumb and index finger.
8.
The right hand releases the suture.
9.
The suture is pulled through the loop by flexing the wrist and returning the left thumb and
index finger back to the starting position.
10.
The right hand picks up the suture once it has been fed through the loop.
11 & 12. The first half hitch is tightened. The (now) far side end is pulled away by the right hand, the
near side end towards the surgeon by the left.
13.
The left thumb is extended (‘thumbs-up’ sign).
14 & 15. The left thumb is hooked around (clockwise) the near side suture and placed on its base.
16.
he far side suture end is crossed back over the near side end, on the left thumb.
17 & 18. The tip of the left index finger is then closed on the left thumb, forming a circle.
Rien van der Velden and Freek van Sluijs
19
20
21
22
23
24
25
26
27
19.
20.
21.
22.
23.
24.
25.
26.
27.
The left wrist is flexed, moving the left index finger through the suture loop without opening
the circle.
The far side end (in the right hand) is pulled between thumb and index finger of the left
hand.
The right hand releases the suture.
The left wrist returns to its original position, moving the left thumb back through the suture
loop without releasing the suture.
The loose end is taken over by the right hand.
The knot is tightened.
The right hand pulls towards the surgeon, the left hand away from the surgeon.
The third half hitch is a repetition of the first half hitch, but is single not double.
Close-up view of the tightened square knot.
69
Chapter 5 Suture materials and suture techniques
70
Two-handed knot for left-handers
1
2
3
4
5
6
7
8
9
1.
2.
3.
4.
5.
6.
7.
8.
9.
The far side (‘upper’) end of the suture is held in the right hand, the near side end in the left.
The far side end is held in the palm of the right hand, leaving the thumb and index finger
free to manipulate the suture. The near side end is held between the thumb and index of the
left hand. The first half hitch is made in the right hand; the left hand needs to move over a
larger distance than the right. This is why the near side end should be a little longer than the
far side end. The right index finger is held over the incision (pistol grip), with the base of the
far side suture hooked behind it.
The near side suture is crossed over the far side suture on the right index finger.
The tip of the right thumb is then closed against that of the right index finger, forming a
circle.
The right wrist is rotated, moving the thumb through the suture loop, so that the suture
intersection slips from index to thumb.
The near side suture end (in the left hand) is taken over by the right hand and held between
the left thumb and index finger.
The left hand releases the suture.
The suture is pulled through the loop by flexing the wrist and returning the right thumb and
index finger back to the starting position.
The left hand picks up the suture once it has been fed through the loop.
Rien van der Velden and Freek van Sluijs
10
11
12
13
14
15
16
17
18
10.
11.
12.
13.
14.
15.
16.
17.
18.
The first half hitch is tightened.
The (now) far side end is pulled away by the left hand, the near side end towards the surgeon
by the right hand.
The right thumb is extended (‘thumbs up’ sign).
The right thumb is hooked around (counter-clockwise) the near side suture and placed on its
base.
The far side suture end is crossed back over the near side end, on the right thumb.
The tip of the right index finger is then closed on the right thumb, forming a circle.
The right wrist is flexed, moving the right index finger through the suture loop without
opening the circle.
The far side end (in the left hand) is pulled between thumb and index finger of the right
hand.
The left hand releases the suture.
71
Chapter 5 Suture materials and suture techniques
72
19
20
22
23
19.
20.
21.
22.
23.
21
The right wrist returns to its original position, moving the thumb back through the suture
loop without releasing the suture.
The loose end is picked up again by the left hand.
The knot is tightened.
The left hand pulls towards the surgeon, the right hand away from the surgeon. The third
half hitch is a repetition of the first half hitch, but is single, not double.
Close-up view of the tightened square knot.
Single-handed method for right-handers
1
2
1.
2.
3.
3
The white (upper) end is held in the right hand and the purple (lower) end in the left.
The white end is held in palm of the right hand, leaving the thumb and index finger free to
manipulate the suture. The near end is held between thumb and index finger of the left hand.
The first half hitch is made in the right hand. As the left hand needs to move over a larger
distance than the right, the near side end should be a little longer. The right index finger is
parallel to the incision (pistol grip).
The near side suture is crossed over the far side end on the right index finger.
Rien van der Velden and Freek van Sluijs
4
5
6
7
8
9
10
11
12
4.
5 & 6. 7.
8.
9.
10.
11.
12.
The right index finger hooks over the upper (white) suture and pulls it under the lower
(purple) suture.
The white suture is pulled through the loop made by the purple suture.
The purple suture end (in the left hand) is pulled away from the surgeon, the white end (in
the right hand) towards the surgeon.
The little finger of the right hand is hooked over the base of the near side (white) suture with
the palm facing the surgeon.
The far side (purple) suture, in the left hand, is then crossed back over the middle finger of
the right hand.
The middle finger of the right hand hooks behind the near side (white) suture and pulls it
under the purple suture.
The white suture is pulled under the purple suture, taken up again in the right hand and
pulled through the loop.
The knot is tightened by pulling the right hand (white suture) away from the surgeon and the
left hand (purple suture) towards the surgeon.
73
Chapter 5 Suture materials and suture techniques
74
Single-handed method for left-handers
1
2
3
4
5
6
7
8
9
1.
The purple (lower) suture end is taken in the right hand and the white (upper) end in the
left.
2.
The white end is held in the palm of the left hand, leaving the thumb and index finger free
to manipulate the suture. The near end is held between thumb and index finger of the right
hand. The first half hitch is made in the left hand. As the right hand needs to move over a
larger distance than the left, the near side end should be a little longer. The left index finger is
parallel to the incision (pistol grip).
3.
The near side suture is crossed over the far side suture on the left index finger.
4.
The left index finger hooks over the upper (white) suture and pulls it under the lower
(purple) suture.
5, 6 & 7. The white suture is pulled through the loop made by the purple suture.
8.
The purple suture end (in the right hand) is pulled away from the surgeon, the white end (in
the left hand).
9.
The little finger of the left hand is hooked over the base of the near side (white) suture, with
the palm facing the surgeon.
Rien van der Velden and Freek van Sluijs
10
11
13
14
12
10 & 11. The purple suture is crossed by the right hand over the middle finger of the left hand.
12.
The middle finger of the left hand hooks behind the white suture and pulls it under the
purple suture.
13.
The white suture is pulled under the purple suture, picked up again in the left hand and
pulled through the loop.
14.
The knot is tightened by pulling the left hand (white suture) away from the surgeon and the
right hand (purple suture) towards the surgeon.
ligature scissors
5.2.3.3 Cutting the sutures
The cutting of the sutures is a task for the operating assistant. This task can only be performed well
if the surgeon allows a good view of the sutures, by pulling them slightly up and towards him. The
sutures are cut with ligature scissors. These scissors have short, curved blades with rounded tips. To
avoid cutting the tissue, the scissors are held with the convex side to the patient. The joint of the
scissors may be supported by the free hand; this increases stability and precision of cutting.
The length at which the sutures are cut depends on the tissue and the suture material concerned.
Skin sutures are left long (1 to 2 cm) to facilitate their removal. All other sutures are cut short (2
to 5 mm). Catgut tends to swell inside the tissue by fluid absorption; this causes the suture ends
to be ‘pulled into the knot’. This is why catgut sutures were generally left a little longer than other
material.
5.2.4
Interrupted suture patterns
5.2.4.1 Simple suture
simple suture
A simple suture is made as follows. The needle and attached suture are inserted, from outside (skin)
to inside (wound), through one wound margin and then, from inside to outside, in the opposing
margin. Both suture ends are pulled together and the suture is tied. There are no set measures for
the distance of the sutures to the wound edge or to each other. Both distances depend on the type
and firmness of the tissue, its thickness and the tension on the wound edges. However, neither of
these distances should be smaller than the thickness of the tissue layer to be sutured (Figures 1A
and B).
75
76
Chapter 5 Suture materials and suture techniques
Simple sutures are the most commonly used suture technique. The sutures
are easy to place and lead to a good apposition of the wound edges and
therefore a good wound closure. This technique can be used as a general
rule if there is no tension on the wound edges.
horizontal U-suture
horizontal mattress
suture
horizontal mattress
suture with tubing
support
far-far near-near suture
5.2.4.2 Horizontal, mattress suture
This suture is sometimes also called horizontal U-suture. The suture starts
as a simple suture. After penetrating both wound edges, the needle and
suture pass through both wound edges again, but in opposite order and
direction. The suture ends, which now lie at the same side of the wound,
are tightened and tied. This results in a knot on one side of the wound and
a suture loop on the other side, parallel to the wound (Figure 2).
Horizontal mattress sutures are used in particular in case of tension on
the wound edges. By using horizontal mattress sutures, the tension is
spread over a larger surface. The risk of tearing is thereby reduced, and
smaller than with simple sutures. The tension can be further decreased by
placing more sutures, as the tension is divided over their total. The sutures
are tightened so that the opposite wound edges just touch each other.
Postoperative swelling of the wound will ensure proper closure of the
wound. If the sutures are tied too tightly, this leads to wound edge eversion
and possibly to ischaemia. This increases the risk of the tearing of sutures.
In order to ensure a good circulation of the wound edges, subsequent
sutures should not be placed too close together. The distance between
individual sutures should be roughly the same as the width of the ‘Us’.
Figure 1a
Figure 1b
Interrupted horizontal mattress sutures can be used for the closure of
Figure 2
skin, fascia and muscles. A specific indication is the closure of abdominal
hernias, such as an umbilical hernia. If such sutures are used for the
closure of a small skin wound with much tension, the risk of tearing can be reduced by feeding
the suture through short lengths of latex, plastic or rubber tubing at both sides of the wound:
‘horizontal mattress suture with tubing support’.
5.2.4.3 Vertical, mattress suture
This suture is also known as the ‘far-far near-near suture’. Vertical mattress sutures are used to
closed several tissue layers with one single suture. The advantage is said to be the possibility to
remove the suture material from the deeper layers once the healing process is far enough advanced.
In case of contaminated wounds, this would reduce the risk of abscesses and fistulas. However, this
has never been proven, and it is doubtful whether it also applies if modern, synthetic absorbable
suture material is used.
The suture is carried out as follows. First, at a reasonable distance to the wound, both tissue
layers (skin and muscle) are penetrated as with an interrupted suture. Needle and suture then
pass through the tissue in opposite direction at the same level, but nearer to the wound and only
through the superficial layer (skin). The suture is tied (Figure 3).
The knot is at one side of the wound and the suture loop on the other, at right angles to the wound.
The first, deep stitch goes through skin and muscle while the second, superficial stitch only goes
through the skin. The suture is removed by cutting the suture loop and pulling at the knot. Both
superficial and deep sutures are thus removed at the same time. If both tissue layers were to be
Rien van der Velden and Freek van Sluijs
vertical mattress suture
figure-of-eight
cross-stitch suture
sutured separately, suture material would remain in the deeper (muscle)
layer for some time to come after removal of the superficial suture.
Vertical mattress sutures always lead to wound edge eversion, which means
that the wound edges, especially of the skin, will turn a little up- and
outwards. This leads to a poorer cosmetic result than with good apposition
of the wound edges.
5.2.4.4 Cross-stitch or cruciate suture
The suture is also known as figure-of-eight suture and can be considered
as a double interrupted suture. After penetrating both wound edges as in a
simple interrupted suture, the suture ends are not tied but a second stitch
is placed, next to and in the same direction as the first. Only after this
second stitch the suture ends are tightened and tied (Figure 4). The visible
part of the suture looks like an ‘X’. Like mattress sutures, cross-stitch
sutures can be used for closing wounds under tension, as the pressure of
the suture is spread over the wound. Cross-stitch sutures furthermore
result in a good apposition of the wound edges, since wound eversion is
avoided by the sutures crossing over it. Scars from cross-stitches are more
visible than those of simple interrupted sutures.
Figure 3a
Figure 3b
5.2.5 Continuous suture patterns
5.2.5.1 Simple continuous sutures
After placing a simple interrupted suture and tying the knot, the suture
is continued with the long end of the suture. The wound edges are
penetrated in the same manner with each stitch, i.e. from outside to inside
through the first wound edge and from inside to outside in the opposing
wound edge. Once the wound is closed over its entire length, the suture is
tied (Figure 5).
Figure 4
At the time of needle insertion, the already sutured part of the thread is
kept tight by an assistant to avoid unravelling.
The suture can be placed in two ways: with the needle entry and exit
points straight opposite each other, or with these points at an angle. In
the first case, the non-visible parts of the suture are at right angles with
the wound, while the externally visible parts cross the wounds at an angle
of 45°. In the second case, the visible parts are at straight angles with the
wound and the non-visible parts at an angle of 45°.
There is no major difference between the two techniques; preferences are a
matter of taste.
The knot is tied differently than that of the interrupted suture. Once the
suture is finished, the needle is inserted as near as possible to the final
stitch at the same side of the incision. This final stitch is not tightened
completely; a loop of a length of approximately 2 cm should remain. This
loop is used during knotting as the short end of the suture; the knot is tied
in the same manner as with an interrupted suture.
This suture is easy and rapid to make and gives a good apposition of the
wound edges. This technique is generally used for the closure of wounds
Figure 5
77
Chapter 5 Suture materials and suture techniques
78
under normal tension. It is used for the suturing of subcutaneous tissue, muscles and fascia. It does
not really matter in what direction the suture is performed, although there is a difference. When
suturing from left to right, the (right-handed) surgeon has a good view of the part that is already
closed, but less so of the part still to be sutured; when suturing from right to left, the opposite
applies. Closure from left to right makes it easier to keep a constant distance between the sutures,
as the finished part of the suture is in constant view. However, this only applies if the wound edges
are of equal length. If they are of different length, the sutures at the longer side should have a larger
distance between them than at the shorter side. The constant adjustment that is needed will be
easier to achieve if the surgeon has a good view of the part still to be sutured; in this situation, it is
therefore easier to work from right to left.
Continuous suture
1
2
3
4
5
6
1.
2.
3.
4.
5.
6.
After placing a simple interrupted suture and tying the knot, the suture is continued with the
long end of the suture.
The wound edges are penetrated in the same manner with each stitch.
In this example, both wound edges are penetrated in one single movement instead of two.
The needle is grasped halfway down the shaft and pulled out of the tissue in a rotating
movement.
The needle and suture are pulled out of the tissue with care.
The suture is pulled taut.
Rien van der Velden and Freek van Sluijs
7
8
9
10
11
12
13
14
15
16
17
18
7.
8.
9.
10.
11 & 12.
The needle is inserted again.
The needle is driven through the tissue.
The needle is picked up on the other side.
The suture is pulled taut.
Once the suture is finished, the needle is inserted as near as possible to the final stitch at the
same side of the incision.
13. The needle is picked up on the other side.
14.
This extra stitch is not tightened completely, leaving a loop of approximately 2 cm.
15.
The knot is tied in the same manner as with an interrupted suture. The closed needle holder
is placed parallel to the incision on the long end of the suture.
16 & 17. The long end of the suture is wound once around the beak of the needle holder (first half
hitch for a square knot).
18. The loop is grasped by the needle holder.
79
Chapter 5 Suture materials and suture techniques
80
19
20
21
22
23
24
25
26
27
28
29
30
19. 20. 21. 22. 23. 24. 25. 26. 27. 28.
29.
30.
The needle holder is closed.
The loop is pulled in the opposite direction of the long suture.
The needle holder is opened.
The first half hitch is tightened by pulling with equal force on both suture ends.
The needle holder is closed and placed on the long suture end.
The long end of the suture is wound once around the beak of the needle holder.
The loop is grasped by the needle holder.
The needle holder closes on the loop.
The half hitch is tightened by pulling the long end to the left side and the short end to the right
side.
The half hitch is tightened.
Two further half hitches are placed.
The suture and loop are cut at equal length.
Rien van der Velden and Freek van Sluijs
5.2.5.2 Lock-stitch suture
[or continuous suture after Reverdin, or Feston suture]
This suture is a modified version of the simple continuous suture.
However, after every stitch, the emerging needle and suture are fed
through the loop of the previous stitch (Figure 6). Only then the suture
is pulled taught, forming a self-locking stitch by blocking the suture. If
the first loop is twisted over 180° before feeding the needle and suture
through, the self-locking mechanism is even stronger. The lock-stitch
suture prevents the slipping of the suture during suturing and thereby
the loosening of the entire suture. This type of suture is therefore often
used by surgeons without an assistant to pull the suture taut, or whenever
it is undesirable that a continuous suture loosens during suturing. The
lock-stitch suture is therefore often used in general practice for closing the
skin in abdominal flank operations in cattle (Caesarean section, abomasal
displacement).
zig-zag suture
Figure 6
5.2.5.3 Continuous, mattress suture
This suture, also known as zig-zag suture, is the continuous version of the
interrupted horizontal mattress suture (Figure 7). All stitches are made
at right angles with the wound, and every stitch goes in the opposite
direction of the previous one. In the end, the visible parts of the suture
run parallel to the wound, while the non-visible parts are at right angles to
it. This continuous suture leads to a certain degree of wound eversion, but
is still used occasionally for closure of the skin, in particular in cattle.
Figure 7
continuous
subcutaneous
subcuticular
5.2.5.4 Continuous, subcutaneous or subcuticular suture
The skin (cutis) consists of a superficial epithelium layer (epidermis) and a deeper layer of
connective tissue (dermis). Underneath this lies loose subcutaneous fatty tissue. The continuous
subcutaneous (or subcuticular) suture is placed just beneath the skin in the subdermal fatty tissue
(Figure 8). The skin edges are thereby appositioned so closely that it is not necessary to place
separate skin sutures. The advantages of this suture are the highly cosmetic effect, the lack of need
to remove skin sutures and the avoidance of premature skin suture removal by biting or licking. As
a disadvantage, the suture does not give a good cosmetic result on all parts of the body.
The suture starts with a simple knot, which is placed a little deeper than the rest of the suture in
the subcutaneous tissue. The risk that the suture ends will stick out of the wound edges after skin
closure is thereby reduced. This risk can be further reduced by placing the first suture inverted or
‘upside-down’ (deep-superficial-superficial-deep). This is achieved by inserting the needle from
bottom to top in one side of the wound and from top to bottom in the opposite side. If the suture
is cut after tying the knot, the short end will point downwards instead of up. After the first stitch,
the needle is inserted again in the subcutaneous tissue, but this time superficially (just below the
skin).
swallowtail pattern
The suture is continued by inserting the needle and suture in the subcutaneous tissue parallel to the
wound, alternately in one and the other side (Figure 8). The needle should pass through the tissue
with ease; if a resistance is felt, the dermis has probably been perforated, and the needle should be
repositioned (deeper). When crossing to the other side, a ‘swallowtail pattern’ is made: the stitch
does not cross straight over but the needle is inserted a little backwards of the suture exit point
81
82
Chapter 5 Suture materials and suture techniques
in the opposite side. The tension created by tightening the suture causes
the suture entrance and exit points to be joined. When the cross-over is
straight, these points are slightly displaced and small openings are created
in the suture.
The end of the suture is very similar to its beginning. The one-but-last
stitch is placed deep and exits in the tip of the wound. The needle is then
placed once again deep in the subcutaneous tissue. This is only possible
if the last stitches are not pulled too tight. Once the suture is tied in a
deep-lying knot, the loop is cut short. The needle and the long end of the
suture are inserted from bottom to top through the skin, so that the needle
emerges just next to the wound. The suture is pulled taut and the suture
is cut close to the skin, so that the cut end disappears back into the tissue.
The end result is a completely closed incision without suture parts sticking
out.
Alternatively, the final knot can be tied to a long end of the subcutaneous
suture, or by placing the second-last stitch from superficial to deep. The
one-but-last stitch is then placed from deep to superficial (the loop is
thereby placed deep), and the last stitch is placed from superficial to
deep again. By doing so, all suture ends lie deep and the knot is pulled
downwards during tying.
far-near-near-far
pattern
Figure 8
5.2.5.5 Far-near patterns
Both with interrupted and continuous sutures, the stitches are placed at
Figure 9a
equal distance to the wound. If the suture is used for wound closure of
tissues such as fascia or muscle aponeurosis, with a certain amount of
tension on the wound, there is a considerable risk that the wound will tear
after suturing. In this case, not only one or several sutures will tear, but the
entire wound with the suture material will tear along the insertion points
of the sutures (like tearing paper along a perforated line). Such tearing can
Figure 9b
be prevented by placing the stitches at varying distances to the incision.
This may be done with interrupted and with continuous sutures. The interrupted version of such
a suture is placed according to the ‘far-near-near-far’ pattern. First, the needle is inserted far to one
side of the wound edge and re-emerges in the opposite side near to the wound edge. In the same
vertical plane, the needle is inserted again in the first wound edge, but now
near to the edge, to re-emerge far in the opposite wound edge. Both suture
ends are tightened and tied (Figure 9a and 9b).
The continuous version follows the ‘far-far-near-near’ pattern. The suture
starts as a normal continuous suture. After tying the first knot, the suture
continues as follows: first, the needle is inserted far to one side of the
wound edge. The wound is crossed straight and the needle re-emerges
in the opposite side, far to the other side of the wound edge. The wound
is now crossed at an angle and the needle is reinserted near to the first
wound edge and emerges on the other side near to the edge. This pattern is
continued until the suture is completed (Figure 10).
Figure 10
5.2.6 Specific sutures for hollow organs
When suturing hollow organs, leakage should be avoided and the lumen should not be reduced
to such a degree that it hinders the passage of the content. Leakage may have very serious
Rien van der Velden and Freek van Sluijs
consequences as the content of hollow organs is not sterile. This applies to the gut, but also the
diseased stomach, the urinary bladder or the gall bladder often have contaminated contents. A
reduction of the lumen has a particular impact if the organ concerned is small to start with, such as
the intestines of a cat.
Leakage of a suture line (e.g. in the intestines) depends on various factors: the general condition of
the patient, the condition of the tissue, the suture technique used and the suture material of choice.
Most of these factors can be influenced by the surgeon.
As for the suture technique, it is important to choose between a single and a double seam. Double
seams reduce the lumen to a greater extent than a single seam and are mainly used in organs with
a large lumen. The size of the lumen depends on the organ and on the species concerned. A double
seam in the intestines of a dog leads to a substantial reduction of the lumen, but less so in the
stomach. In the horse, the intestinal diameter is so large that a double seam poses no hindrance to
the passage of ingesta.
A second important aspect concerns the layers that are perforated by the suture. In 1887, it was
already proven that the submucosa is the strongest layer of the intestine (“A suture of this coat is
much stronger thatn a shred of the entire thickness of the serosa and muscularis” ). The other layers
(serosa, muscularis and mucosa) contribute to a much lesser extent to the strength of the seam.
This has lead to the basic principle that in intestinal sutures, the submucosal layer should always
be included. In most single-layer techniques both the submucosa and the mucosa are included. In
double-layer techniques, the submucosa is included in the first layer, but not in the second.
If the mucosa is included in the single-layer technique, there is - in theory - an open connection
with the lumen, but in practice, the implications are questionable. The incision itself also is an
open connection and will not become watertight after suturing. The seam is sealed mainly by
fibrin clotting in the wound. If this is insufficient (e.g. patients in poor general condition), even a
perfectly placed seam may leak.
When choosing the suture material, two factors play a role: the chemical composition and
the structure. In intestinal sutures, absorbable material is preferred. Regarding the structure,
monofilament suture material (such as Monocryl®) is to be preferred over braided material (such as
Vicryl®). Braided material has the disadvantage that it may be colonised by bacteria. In an intestinal
suture, this could lead to the migration of intestinal micro-organisms to the abdominal cavity. The
risk is reduced in absorbable sutures, as these are not easily colonised. This is because the core of
the suture contains a bacteriostatic concentration of polyglycolic acid released by hydrolysis.
However, in spite of this reduced risk, most surgeons will prefer monofilament absorbable suture
material. The diameter of the suture also plays a role, as it determines the size of the needle path.
Depending on the species, relatively thin material is chosen, ranging from 4-0 (dog, cat) to 2-0
(horse, cattle).
appositional suture
5.2.6.1 The simple, interrupted, approximating technique
This is a simple interrupted suture pattern where the sutures are tightened in such a manner
that the wound edges are appositioned without tension or compression. This suture is used for
longitudinal incisions (e.g. enterotomy) and intestinal resections (end-to-end anastomoses). With
this suture, the wound edges have a tendency to eversion. Often, the mucosa of the wound edges
protrudes through the sutures. If this is not corrected, the mucosa remains visible on the outside
of the closed suture. This can be avoided by having pushed the mucosa back inwards during the
tightening of the suture by an assistant using curved artery forceps such as mosquito forceps.
In this way, a seam is created where the various layers of the intestinal wall (serosa, muscularis,
mucosa) are appositioned without inversion or eversion. This is called an appositional suture and is
considered as the best anatomical reconstruction. The technique was introduced in 1974 by DeHoff
and remains the most commonly used method in companion animals.
83
84
Chapter 5 Suture materials and suture techniques
crushing suture
Schmieden suture
Lembert suture
5.2.6.2 The crushing technique
In this technique, the sutures are placed in the same manner as with the
simple interrupted approximating technique. However, when tying, the
sutures are pulled so tightly that they ‘cut’ through both the serosa and the
muscularis (Figure 11). The suture thereby only remains attached to the
submucosa. This is the only layer involved in the suture. The technique was
introduced in 1968 by Poth and Gold with the idea that the circulation of
the intestinal wall would be less disrupted if the sutures would encompass
Figure 11
less tissue. However, no research done so far has been able to support this
theory.
The advantage of appositional sutures is that they do not reduce the lumen size and that they allow
good wound healing due to the correct anatomical reconstruction with a minimal formation of
inflammatory and therefore scar tissue. The disadvantage is that appositional sutures are always
interrupted, which causes a certain risk of leakage. This is particularly true for the crushing suture.
When an appositional closure is chosen, the individual sutures should be placed with the utmost
care to reduce the risk of leakage to a minimum.
5.2.6.3 The Schmieden suture
The Schmieden suture is a continuous perforating suture where the needle
always passes through the wound edges from top to bottom. The suture
therefore passes through all layers of e.g. the intestinal wall: mucosamuscularis-serosa. When the suture is tightened, the mucosa of one wound
edge is always pulled on top of the serosa of the opposite side (Figure 12).
This prevents both wound inversion and eversion. The lumen is hardly
reduced at all. The Schmieden suture can be placed easily and fast.
5.2.6.4 The Lembert suture
The Lembert suture is often used as a second layer of a double seam. It is
a non-perforating (seromuscular) suture, which can be either interrupted
(Figures 13a and 13b) or continuous (Figure 14). The suture is made as
follows: starting at one wound edge, the needle is inserted in the intestinal
wall, through the serosa and muscularis into the submucosa and then back
out again through the muscularis and serosa. The direction of insertion
is at right angles with the wound. This means that the needle is inserted
a little further from the wound edge and emerges nearer to the wound.
The needle is inserted in a similar way in the opposite side, starting nearer
the wound edge and re-emerging a little further away. The suture ends are
tightened and tied. In a similar pattern, the suture is continued either in an
interrupted or continuous manner.
When tightening the sutures, the wound edges inverse (serosa against
serosa), over a distance determined by the distance between the wound
and the outer stitches of the suture. Wound inversion causes a tissue ridge
that reduces the lumen. The degree of lumen reduction depends on the
amount of tissue inverted. This in turn depends on the distance between
stitches and the wound edge. The degree of lumen obstruction depends on
the degree of inversion and the normal lumen size of the intestine.
A certain amount of inversion in the small intestine of a dog may have
serious consequences for the passage of ingesta, while the same amount of
inversion in the large intestines of a horse may have none at all.
Figure 12
Figure 13a
Figure 13b
Rien van der Velden and Freek van Sluijs
Cushing suture
5.2.6.5 The Cushing suture
The Cushing suture is a continuous, non-penetrating, and therefore
seromuscular, suture (Figure 15). This suture is also often used as a second
layer in a double seam. The needle is passed through the intestinal wall
at each stitch and, like in the Lembert suture, through the serosa and
muscularis into the submucosa and then back out again through the
muscularis and serosa. However, here the stitches are placed parallel to the
wound (as opposed to perpendicular in the Lembert suture) (Figure 14).
After every stitch, the needle crosses to the other side for the next stitch.
The Cushing suture also causes inversion of the wound edges. The closer
the stitches are placed to the wound edge, the less the degree of inversion,
and therefore the less the degree of lumen reduction.
5.2.6.6 Uterine suture (Utrecht method)
For the closure of an incision in the uterus (Caesarean section), a specific
suture technique has been developed: the Utrecht method. The suture can
be considered as a modified Cushing suture (Figure 16). It is a continuous
seromuscular suture, whereby perforation of the endometrium should
be avoided. If the suture is placed correctly, both wound edges are well
appositioned, while there is little inversion of the wound edges.
In a Caesarean section of a cow, the suture is placed as follows.
Approximately 2 cm above the upper wound angle, the needle is inserted
through the uterine wall (serosa - muscularis - serosa) after which it
emerges some 2 cm to the left. The needle is then inserted about 2 cm to
the right of the initial point of insertion, to emerge at or near the starting
point. When the knot is tied, the wound edges inverse in such a way that
the knot is embedded.
At 1.5 cm from the wound margin, the needle is then inserted into the
uterine wall at an angle of 30-45° to the incision and emerges close to the
wound margin. This stitch is repeated on the other side of the incision,
whereby the insertion point is approximately 1/3 stitch length higher than
the exit point of the previous stitch. These stitches are repeated until the
lower incision point is reached. Here, the suture is closed in a similar way
in which it began, so that the final knot and both wound margins are
embedded.
Figure 14
Figure 15
Figure 16
5.2.6.7 Single or double suture layer
The closure of incisions in the wall of the digestive tract or of an anastomosis following intestinal
resection should be carried out with care. Leakage at the seam, causing non-sterile intestinal
content to leak into the abdomen, may lead to septic peritonitis, often with a fatal outcome.
Depending on the size of the intestine, many surgeons will prefer to close such wounds with
a double suture layer: after wound closure, a second suture is placed. Often, a different suture
technique is used for the second layer than for the first. This means that there are many different
ways to close an incision of the digestive tract in two layers. The method used depends on the
species and the part of the digestive tract concerned, which determine the diameter of the digestive
tube at incision level. The personal preference of the surgeon will also play a role.
If an intestinal wall is closed in two layers, the second layer is always a non-perforating (serosa and
muscular layers) and inverting suture. A Lembert or Cushing suture may be used. The first layer
should always include the submucosa; usually a continuous suture is chosen for its speed. When
85
86
Chapter 5 Suture materials and suture techniques
using a second (inverting) suture layer, the final amount of inverted tissue will be bigger than when
using a single non-perforating suture. This is because the second layer will completely invert the
first suture layer. A double suture layer therefore has an even bigger impact on the local intestinal
lumen than a single layer of inverting sutures. This is why a Cushing suture is often preferred as a
second layer, as this leads to less inversion than the Lembert suture.
Parker-Kerr suture
purse-string suture
tobacco pouch suture
5.2.6.8 Parker-Kerr suture
After intestinal resection, the open ends of the
digestive tube sometimes need to be closed. This
is for example done in a side-to-side anastomosis.
For the closure of the open ends, traditional suture
methods may be used as well as the Parker-Kerr
suture, specifically designed for this purpose. Prior
to the actual intestinal resection, the intestinal
Figure 17a
lumen is clamped at the incision site using two
intestinal forceps. Different kinds of intestinal
forceps may be used, but on the part that will
be preserved (closed), straight intestinal forceps
should be placed. The intestine is transsected alongside these forceps. A
Cushing suture is placed across the forceps without a knot at the start
or end (Figure 17a). Once the suture is placed over the entire length, the
forceps are carefully removed, while pushing the wound margins inward
and pulling on the opposite ends of the suture. This will cause the wound
edges to invert and the wound to close. With the suture end containing the
Figure 17b
needle, a second suture layer is placed, either again a Cushing or a Lembert
suture (Figure 17b). This second suture layer will go in the opposite
direction to the first. The suture is finished by tying the two suture ends. The Parker-Kerr suture
gives a good closure of the intestinal incision. During suturing, the risk of bacterial contamination
from the intestinal lumen is minimal, as the intestine is kept closed and the leakage of intestinal
content is avoided.
5.2.6.9 Non-perforating purse-string suture
A non-perforating purse-string suture, also known as ‘tobacco pouch suture’ is mainly used for
the closure of small openings in the wall of hollow organs. These mainly concern holes caused by
puncturing the organs, e.g. for the removal of excessive gas. If the puncture is carried out by a thin
needle (compared to the wall thickness) at an angle (not perpendicular) to the intestinal wall, the
opening will close once the needle is withdrawn. In this case, the risk of leakage is nil. However, if a
relatively thick needle is used, it is preferable to close the puncture opening.
The suture is a continuous suture that consists of several non-perforating
(sero-muscular) stitches placed in a circular manner. The suture ends near
its beginning (Figure 18). The suture is usually placed before the needle
is inserted through the intestinal wall. At the same time that the needle is
withdrawn, the suture ends are tightened and tied. The puncture opening
is closed effectively while the wound margins will invert due to the seromuscular stitches. No second layer is needed.
Figure 18
Rien van der Velden and Freek van Sluijs
87


© Copyright 2026