
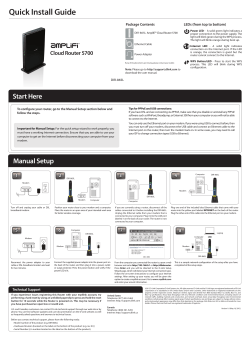
Router Techniques T e c h n i q u e •
®
Te c h n i q u e • C o l l e c t i o n
Router Techniques
A Publication of August Home Publishing
Routed Profiles
You don’t need a drawer full of router bits to create interesting profiles.
Make all of these and more with just three basic bits.
Bearing can be
removed for
deeper cut
!/2"
roundover
bit
!/4" roundover
bit
!/2"-dia.
core box bit
1
Woodsmith.com
COL011
Over the years I’ve accumulated a lot of different router
bits. The “workhorse” bits that have standard profiles
get used over and over, while the more exotic “big
money” bits usually just gather dust. This led me to the
realization that you don’t need a drawer full of expensive bits to rout complex profiles.
Just Three Bits. The photo above illustrates the point.
Each of the molded edges shown (all examples are
3⁄ "-thick stock) can be made using just three common
4
router bits. These are bits you’ll find in just about any
woodworker’s collection. And as you can clearly see,
the possibilities for putting them to use are pretty varied and impressive.
The three bits (shown at left) that I used to make
these examples are a 1⁄2" roundover bit, a 1⁄4" round-over
bit, and a 1⁄2"-dia. core box bit.
© 2013 August Home Publishing Co. All Rights Reserved.
One bit, several cuts. Here, and on the next two pages,
you’ll see how to make seventeen of my favorite
profiles. There’s really no great secret to the process.
First, I try to avoid getting stuck on the idea that a
single router bit can only make one type of cut. The
truth is that many types of bits can produce a variety of shapes depending on how you put them to
use. To make some of the profiles shown in the main
photo on the opposite page, I used different parts of
the bit or changed the depth or height of the cut. For
example, a core box bit (or cove bit) can be used to
create a wide, shallow cove or a deep hollow.
Multiple Bits. Some of the simple profiles you see
in the main photo were made using only a single
bit. But to create the more complex shapes, you’ll
need to use a combination of bits. For instance, a
1⁄ " roundover along with an accurately cut 1⁄ " cove
2
4
creates a large reverse ogee.
Accurate cuts. One of the keys to success is to make
the cuts carefully and accurately. Two or three (or
more) light cuts will often yield smoother results
than one deep cut. This is more important than
doing the job quickly. And finally, a little fine sanding is often needed to “blend” multiple cuts into
one smooth, seamless profile.
How-To: 17 Easy Profiles
One Setup
1
2
3
Designing Profiles
As you can see, the layout tools I used to design
these profiles are pretty basic. A section of 1⁄2"dia. dowel is a great template for a 1⁄4" roundover or a 1⁄4" cove (1⁄2"-dia. core box bit). And a
1"-dia. dowel is my 1⁄2" roundover bit. Chances
are, if you can draw it on paper, you can find a
way to make it with a few common router bits.
4
5
2
Woodsmith.com
COL011
© 2013 August Home Publishing Co. All Rights Reserved.
6
Two Setups
7
8
9
10
11
3
Woodsmith.com
COL011
© 2013 August Home Publishing Co. All Rights Reserved.
12
13
Three Setups
14
#/4
!/2"-dia. core
box bit
#/16
15
16
17
4
Woodsmith.com
COL011
© 2013 August Home Publishing Co. All Rights Reserved.
Flush
Trimming Tips
Get more from your router by following these
simple tips and tricks to make perfect parts.
Regular
Flush
Trim Bit
Spiral
Flush
Trim Bit
Shaping accurately sized parts
sounds like a simple process. Just
rough-cut the piece a little oversize
and trim it flush with a template,
router, and flush trim bit.
However, my first flush trimming experience didn’t go so well.
The bit began to grab and take
huge, ugly bites out of the wood.
The results weren’t pretty. Since
then, I’ve learned a few tips that
guarantee better results.
Different Angle on Bits. Speaking of bits, using the right one can
make a big difference in the quality
of cut. You can see three commonly
available bits in the left margin
photo.
A standard flush trim bit has cutters that are straight. This results
in a chopping cut that can leave
noticeable ripples.
To soften the cutting action, you
can use a shear-cutting flush trim
bit. The cutting edges on this bit are
skewed slightly. This creates more
of a slicing cut that leaves a much
smoother finish.
TSmooth Template.
LLess is
Spend a few extra minutes
shaping the template
to get smoother
finished parts.
More. Stay
as close as you
can to the layout
line to make the flush
trimming easier.
Shear-Cutting
Flush Trim Bit
5
A third type of flush trim bit is
a spiral flush trim bit. The flutes
wrap completely around the bit to
provide the smoothest cutting.
Router Table is Better. Besides
the bit, the method you use can
improve the outcome. When possible, I do my flush trimming tasks
on the router table instead of using
a hand-held router.
Overall, I have better visibility using the router table and
it’s more comfortable to stand
upright. The large table also
Woodsmith.com
COL011
© 2013 August Home Publishing Co. All Rights Reserved.
a.
LThick Template. A thick template allows
you to raise the bit so the cutting edge
trims the entire edge of the workpiece.
WASHER
WASTE
b.
THIN TEMPLATE
WEB OF MATERIAL
CAN WEDGE BETWEEN
BEARING AND BIT
BEARING
DOUBLE-LAYER
TEMPLATE
{ Tape It Down. Attach the
template to the workpiece with
strips of double-sided tape.
provides support for all but the
largest workpieces.
Less is More. Before you start
routing there’s another important
thing to keep in mind. It has to do
with the amount of waste material
you need to remove.
This was the main problem in
my first attempt. To avoid spoiling
the part, I cut too far to the waste
side of my layout line. Then I tried
to remove all the remaining waste
in one pass. This puts a lot of stress
on the router and bit. And taking
such a big bite can cause the wood
to split and tear.
The solution is simple. When cutting pieces to rough size, aim to leave
just 1⁄16" to 1⁄8" of waste, as shown in
the lower right inset photo on the
previous page. This amount is easily
handled by the router and bit. And
it actually saves time because cutting is quicker than routing in most
cases.
Sometimes, you’ll stray from
the layout line and end up with
more material to remove. In these
situations, I like to take skim cuts to
knock down the high spots before
running the bearing along the template to complete the cut.
A Template for Success. The
whole point of flush trimming a
piece is to make a precisely shaped
workpiece using a template as a
guide for the router bit. So it stands
to reason that the result is only as
good as the template.
Any irregularities in the template will be transferred to the edge
of the workpiece. So it pays to take
6
WASTE
extra care and make the template
as smooth as possible, as you can
see in the lower left photo on the
opposite page.
One often overlooked consideration is the thickness of the
template. I like to use 1⁄4" hardboard to make templates because
it’s easy to shape and has a fine
consistency. The key here is
to make sure it’s at least 1⁄4" thick.
You can see the problem with a thin
template in the photo and drawings above.
There’s a small gap between the
bearing and cutting edges on a
bit. A thin template may not allow
you to raise the bit high enough
to make a full cut while still keeping the bearing in contact with the
template.
My solution is to glue two layers
of thinner hardboard together. The
result is a template that’s still easy
to shape and provides a wider reference edge for the bit.
Curves & Grain Direction. The
proper setup for flush trimming
will take you a long way toward
getting a smooth result. Another
part of the equation is paying attention to the grain direction of the
wood as you’re flush trimming it.
You can see what I mean in the
photo at right. On certain sections
of a curved workpiece, you may
find yourself routing “uphill”
against the grain. Because the
wood fibers aren’t supported, the
wood can tear away as the bit trims
away the waste.
There are a couple options for
Woodsmith.com
COL011
dealing with this situation. The first
is to take light, freehand passes.
This reduces the chance of the bit
tearing out the material.
Pattern Bit. A better option is to
switch to another type of trimming
bit. Instead of a flush trim bit, use
a pattern bit. On a pattern bit, the
bearing is on the shank of the bit
(right margin photo). To use this
bit, you need to flip the workpiece
and template over (photo below).
This means you’ll approach the cut
from the opposite direction and the
wood fibers will be supported during the cut.
When you make these tips part
of your woodworking routine, you
can get smooth accurate results
when flush trimming. The payoff
is better-fitting parts and betterlooking projects.
BIT CAN BE RAISED
HIGH ENOUGH
TO TRIM THE
ENTIRE EDGE
Pattern Bit
{ Change the Bit & Direction. In tight curves,
switching to a pattern bit and flipping the workpiece can stop tearout in its tracks.
© 2013 August Home Publishing Co. All Rights Reserved.
flush-fitting joints
Without
the Fuss
One of the tricks I keep up my
sleeve to create seamless joints and
tight-fitting assemblies is to start
with parts that are slightly oversize.
Then, after assembly, I trim the parts
smooth and flush.
You can see a good example of
this in the photo above. Gluing
> Flawless. In a
minute or two, you
can trim hardwood
edging perfectly
smooth and level.
7
Woodsmith.com
A router and this
simple jig can tackle all
kinds of trimming tasks.
hardwood edging to a plywood
panel is easier when the strips are
slightly wider than the thickness
of the plywood. The catch is you
need a method for trimming parts
smooth and flush that’s quick and
reliable. For that, I often turn to my
router and a specialized jig.
Simple Jig. The reason for the jig
is shown in the drawing at right.
A standard baseplate will catch
on any protruding edging. The
stepped design of this jig solves
that problem. A portion of the base
is elevated to provide clearance to
trim excess material. While I made
this jig to fit a compact router, you
could easily make one to accommodate a standard-size model.
COL011
ROUTER
BASE
RISER
STRAIGHT
BIT
STOP
WORKPIECE
BIT TRIMS
EDGING
FLUSH WITH
WORKPIECE
LIP
EDGING
In the exploded view drawing
that is shown on the following
page, you can see the details for the
jig. But I want to point out a few
highlights. First, I used Plexiglas
for the main part of the base. This
increases the amount of light and
visibility around the bit during use.
But you can also use 1⁄2" plywood
as a less expensive alternative.
© 2013 August Home Publishing Co. All Rights Reserved.
The second thing is the base
is considerably larger than the
stock router baseplate. This extra
size gives the router a more stable
stance in use.
Finally, I included a reversible
stop on one end. When trimming
along an edge, the stop acts like an
edge guide to limit the travel of the
bit. For trimming tasks away from
the edge, you simply flip the stop
over and it provides support so the
router won’t tip.
Straight Bit. You can get good
results with almost any kind of
straight bit. But I’ve found that bits
with flutes running straight across
the end “plane” the surface and
leave it much flatter (right margin
photo). Some types of straight bits
have a V-shaped end that may leave
swirl marks on the workpiece.
The Setup. It only takes a little
work to get the bit and jig ready for
use. First, you need to adjust the
depth of the router bit.
Ideally, you want the bit perfectly flush with the surface of the
bottom of the jig. A small straightedge is a great tool for getting you
in the ballpark, as you can see in the
upper right photo. But it’s always a
good idea to do a quick test cut.
Next, I set the stop at the end of
the baseplate. It’s positioned so the
inside edge of the bit is flush with
End of bit
is flat, not
V-shaped
{ Set the Bit. A metal ruler makes a handy gauge to set the end
of the bit even with the bottom face of the riser. Make a test cut on
some scrap to double-check the setting.
the edge of the plywood panel
(drawing on facing page).
The Technique. Once the bit
and baseplates are set up, you’re
ready to start routing. There are
a few things to keep in mind.
The main thing is to apply firm
pressure on the handle. This prevents the router from tipping and
spoiling the cut.
Unless the edging is thin, I like
to remove the waste in several
light passes, as in the main photo
GLUE
!/4"-DIA. x #/4"
STEEL PIN
INTO
BASE
STOP
exploded view
(1!/4" x 4" - !/2" Ply.)
HANDLE
#/4
(6" x 4%/8" - #/4" Ply.)
1#/8
%/8"RAD.
COUNTERBORE FOR
CARRIAGE
BOLT ON
TOP FACE
OF STOP
(1&/8" x 5!/4" - !/4" Hdbd.)
NOTE:
!/4"-20
THROUGH
KNOB
FOR HANDLE
PATTERN, TURN
TO PAGE 9
{ Trim Plugs. Use a sweeping motion to nibble away screw
plugs flush to the surface.
2"-dia.
straight bit
on the previous page. Finally, rout
in the opposite direction (right to
left) to get a clean cut and prevent
the edging from tearing out on the
exposed front face.
This setup can be used for
more than just trimming edging.
The lower left drawings show a
couple other examples. The small
amount of effort spent in making
the baseplate will pay off with
smooth surfaces and perfectfitting assemblies.
HANDLE CHEEK
PROUD
SCREW
PLUG
1⁄
MATCH
HOLES TO
ROUTER
BASE
!/4"
ROUNDOVER
4!/8
2#/4"DIA.
RISER
45°
(5" x 7#/8" - !/2" Ply.)
BASE
(5" x 12" !/2" ACRYLIC)
PROUD
DOVETAIL
PIN
4#/8
5"-RADIUS
LIP
(1!/4" x #/4" !/4" Hdbd.)
{ Dovetails & More. The router
makes quick work of leveling dovetails, box joints, and rabbets.
8
Woodsmith.com
#8 x 2" Fh
WOODSCREW
COL011
!/4"-WIDE
SLOT,
2!/2" LONG
BOTTOM VIEW
!/4"-20 x 1!/4"
CARRIAGE
BOLT
© 2013 August Home Publishing Co. All Rights Reserved.
router jig
Handle Pattern
NOTE: SAND
HANDLE FOR
COMFORT AFTER
ASSEMBLY
!/4" HARDBOARD
CHEEKS
#/4" PLYWOOD
HANDLE
SAND !/4" ROUNDOVER
ON CHEEKS BEFORE
GLUING TO HANDLE
{ Shop-Made Handle. The handle
for the router jig on page 8 is easy to
make. Use the pattern to cut the parts
to shape. Then, round over the edges
of the cheeks before attaching them.
9
Woodsmith.com
COL011
© 2013 August Home Publishing Co. All Rights Reserved.


© Copyright 2026