
focus on your business, not your business communications.
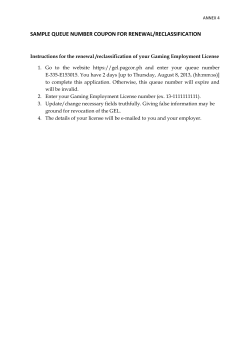
FOCUS ON YOUR BUSINESS,
NOT YOUR BUSINESS
COMMUNICATIONS.
WELCOME TO COMCAST BUSINESS VOICEEDGE™
TECH ADMIN GUIDE
Table of Contents
Welcome to Comcast Business VoiceEdge™ . . . . . . . . . . . . . . . . . . . . . . . . . . . . . . . . . . . . . . . . . . . . . . . . . . . . . . . . . . . . . . . . . . . . . . . . . . . . . 3
Tech Admin. . . . . . . . . . . . . . . . . . . . . . . . . . . . . . . . . . . . . . . . . . . . . . . . . . . . . . . . . . . . . . . . . . . . . . . . . . . . . . . . . . . . . . . . . . . . . . . . . . . . . . 4–13
Set Up and Manage Your Voicemail Messages . . . . . . . . . . . . . . . . . . . . . . . . . . . . . . . . . . . . . . . . . . . . . . . . . . . . . . . . . . . . . . . . . . . . . . . . . . . . . . . . 4
VoiceEdge Online. . . . . . . . . . . . . . . . . . . . . . . . . . . . . . . . . . . . . . . . . . . . . . . . . . . . . . . . . . . . . . . . . . . . . . . . . . . . . . . . . . . . . . . . . . . . . . . . . . . . . . . 4–5
VoiceEdge Mobile App. . . . . . . . . . . . . . . . . . . . . . . . . . . . . . . . . . . . . . . . . . . . . . . . . . . . . . . . . . . . . . . . . . . . . . . . . . . . . . . . . . . . . . . . . . . . . . . . . . 5–6
Basic Troubleshooting Tips . . . . . . . . . . . . . . . . . . . . . . . . . . . . . . . . . . . . . . . . . . . . . . . . . . . . . . . . . . . . . . . . . . . . . . . . . . . . . . . . . . . . . . . . . . . . . . . . . 6
Auto Attendant . . . . . . . . . . . . . . . . . . . . . . . . . . . . . . . . . . . . . . . . . . . . . . . . . . . . . . . . . . . . . . . . . . . . . . . . . . . . . . . . . . . . . . . . . . . . . . . . . . . . . . . . . . 7–8
Hunt Group — Automatically Handled . . . . . . . . . . . . . . . . . . . . . . . . . . . . . . . . . . . . . . . . . . . . . . . . . . . . . . . . . . . . . . . . . . . . . . . . . . . . . . . . . . . . . 8–9
Call Pickup. . . . . . . . . . . . . . . . . . . . . . . . . . . . . . . . . . . . . . . . . . . . . . . . . . . . . . . . . . . . . . . . . . . . . . . . . . . . . . . . . . . . . . . . . . . . . . . . . . . . . . . . . . . . . . . 10
On-Hold Music . . . . . . . . . . . . . . . . . . . . . . . . . . . . . . . . . . . . . . . . . . . . . . . . . . . . . . . . . . . . . . . . . . . . . . . . . . . . . . . . . . . . . . . . . . . . . . . . . . . . . . . . . . . 10
Call Park. . . . . . . . . . . . . . . . . . . . . . . . . . . . . . . . . . . . . . . . . . . . . . . . . . . . . . . . . . . . . . . . . . . . . . . . . . . . . . . . . . . . . . . . . . . . . . . . . . . . . . . . . . . . . . . . . 10
Call Park and Retrieve. . . . . . . . . . . . . . . . . . . . . . . . . . . . . . . . . . . . . . . . . . . . . . . . . . . . . . . . . . . . . . . . . . . . . . . . . . . . . . . . . . . . . . . . . . . . . . . . . . . . . 10
Call Queue Agent. . . . . . . . . . . . . . . . . . . . . . . . . . . . . . . . . . . . . . . . . . . . . . . . . . . . . . . . . . . . . . . . . . . . . . . . . . . . . . . . . . . . . . . . . . . . . . . . . . . . . . . 11–13
More Services. . . . . . . . . . . . . . . . . . . . . . . . . . . . . . . . . . . . . . . . . . . . . . . . . . . . . . . . . . . . . . . . . . . . . . . . . . . . . . . . . . . . . . . . . . . . . . . . . . . 14–15
Business Level Support. . . . . . . . . . . . . . . . . . . . . . . . . . . . . . . . . . . . . . . . . . . . . . . . . . . . . . . . . . . . . . . . . . . . . . . . . . . . . . . . . . . . . . . . . . . . . . . . . . . . 14
Directory Listings. . . . . . . . . . . . . . . . . . . . . . . . . . . . . . . . . . . . . . . . . . . . . . . . . . . . . . . . . . . . . . . . . . . . . . . . . . . . . . . . . . . . . . . . . . . . . . . . . . . . . . . . . 14
Directory Assistance. . . . . . . . . . . . . . . . . . . . . . . . . . . . . . . . . . . . . . . . . . . . . . . . . . . . . . . . . . . . . . . . . . . . . . . . . . . . . . . . . . . . . . . . . . . . . . . . . . . . . . 14
Directory Assistance Call Completion . . . . . . . . . . . . . . . . . . . . . . . . . . . . . . . . . . . . . . . . . . . . . . . . . . . . . . . . . . . . . . . . . . . . . . . . . . . . . . . . . . . . . . . 14
Diversion Inhibitor. . . . . . . . . . . . . . . . . . . . . . . . . . . . . . . . . . . . . . . . . . . . . . . . . . . . . . . . . . . . . . . . . . . . . . . . . . . . . . . . . . . . . . . . . . . . . . . . . . . . . . . . . 14
Enhanced Directory Assistance. . . . . . . . . . . . . . . . . . . . . . . . . . . . . . . . . . . . . . . . . . . . . . . . . . . . . . . . . . . . . . . . . . . . . . . . . . . . . . . . . . . . . . . . . . . . . 14
IP Phone Information . . . . . . . . . . . . . . . . . . . . . . . . . . . . . . . . . . . . . . . . . . . . . . . . . . . . . . . . . . . . . . . . . . . . . . . . . . . . . . . . . . . . . . . . . . . . . . . . . . . . . . 15
911 Emergency Calls. . . . . . . . . . . . . . . . . . . . . . . . . . . . . . . . . . . . . . . . . . . . . . . . . . . . . . . . . . . . . . . . . . . . . . . . . . . . . . . . . . . . . . . . . . . . . . . . . . . . . . . 15
Toll Free Service. . . . . . . . . . . . . . . . . . . . . . . . . . . . . . . . . . . . . . . . . . . . . . . . . . . . . . . . . . . . . . . . . . . . . . . . . . . . . . . . . . . . . . . . . . . . . . . . . . . . . . . . . . 15
Help Tab and Useful Links. . . . . . . . . . . . . . . . . . . . . . . . . . . . . . . . . . . . . . . . . . . . . . . . . . . . . . . . . . . . . . . . . . . . . . . . . . . . . . . . . . . . . . . . . . . . . . . . . .15
Billing Features. . . . . . . . . . . . . . . . . . . . . . . . . . . . . . . . . . . . . . . . . . . . . . . . . . . . . . . . . . . . . . . . . . . . . . . . . . . . . . . . . . . . . . . . . . . . . . . . . . . . . 16
Online Bill Access. . . . . . . . . . . . . . . . . . . . . . . . . . . . . . . . . . . . . . . . . . . . . . . . . . . . . . . . . . . . . . . . . . . . . . . . . . . . . . . . . . . . . . . . . . . . . . . . . . . . . . . . . 16
Block Calls to 900/976 Numbers. . . . . . . . . . . . . . . . . . . . . . . . . . . . . . . . . . . . . . . . . . . . . . . . . . . . . . . . . . . . . . . . . . . . . . . . . . . . . . . . . . . . . . . . . . . .16
Block Collect Calls and Bill to Third Party Calls . . . . . . . . . . . . . . . . . . . . . . . . . . . . . . . . . . . . . . . . . . . . . . . . . . . . . . . . . . . . . . . . . . . . . . . . . . . . . . . 16
International Calling Plans. . . . . . . . . . . . . . . . . . . . . . . . . . . . . . . . . . . . . . . . . . . . . . . . . . . . . . . . . . . . . . . . . . . . . . . . . . . . . . . . . . . . . . . . . . . . . . . . . . 16
Useful Tips. . . . . . . . . . . . . . . . . . . . . . . . . . . . . . . . . . . . . . . . . . . . . . . . . . . . . . . . . . . . . . . . . . . . . . . . . . . . . . . . . . . . . . . . . . . . . . . . . . . . . . 17–19
Last Number Redial . . . . . . . . . . . . . . . . . . . . . . . . . . . . . . . . . . . . . . . . . . . . . . . . . . . . . . . . . . . . . . . . . . . . . . . . . . . . . . . . . . . . . . . . . . . . . . . . . . . . . . . 17
Lists. . . . . . . . . . . . . . . . . . . . . . . . . . . . . . . . . . . . . . . . . . . . . . . . . . . . . . . . . . . . . . . . . . . . . . . . . . . . . . . . . . . . . . . . . . . . . . . . . . . . . . . . . . . . . . . . . . . . . 17
Domestic Dialing. . . . . . . . . . . . . . . . . . . . . . . . . . . . . . . . . . . . . . . . . . . . . . . . . . . . . . . . . . . . . . . . . . . . . . . . . . . . . . . . . . . . . . . . . . . . . . . . . . . . . . . . . . 17
International Dialing. . . . . . . . . . . . . . . . . . . . . . . . . . . . . . . . . . . . . . . . . . . . . . . . . . . . . . . . . . . . . . . . . . . . . . . . . . . . . . . . . . . . . . . . . . . . . . . . . . . . . . . 17
Operator Services . . . . . . . . . . . . . . . . . . . . . . . . . . . . . . . . . . . . . . . . . . . . . . . . . . . . . . . . . . . . . . . . . . . . . . . . . . . . . . . . . . . . . . . . . . . . . . . . . . . . . . . . 17
Additional Business Service. . . . . . . . . . . . . . . . . . . . . . . . . . . . . . . . . . . . . . . . . . . . . . . . . . . . . . . . . . . . . . . . . . . . . . . . . . . . . . . . . . . . . . . . . . . . . 17–18
Feature Access Codes. . . . . . . . . . . . . . . . . . . . . . . . . . . . . . . . . . . . . . . . . . . . . . . . . . . . . . . . . . . . . . . . . . . . . . . . . . . . . . . . . . . . . . . . . . . . . . . . . . . . .19
Index. . . . . . . . . . . . . . . . . . . . . . . . . . . . . . . . . . . . . . . . . . . . . . . . . . . . . . . . . . . . . . . . . . . . . . . . . . . . . . . . . . . . . . . . . . . . . . . . . . . . . . . . . . . . . . 20
Table of Contents
2
Welcome to Comcast Business VoiceEdge™
As the technical administrator, you can manage features and passwords for all end users as well as manage key group features
such as auto attendants, hunt groups and more. This user guide will give you a basic overview including resources for additional
training and support.
Note:In your welcome email you will receive two sets of credentials (Enterprise/Technical Administrator or End User).
Introduction to VoiceEdge Phones
Business VoiceEdge comes with Polycom® IP Phones and each user will receive a quick reference guide specific to the phone model.
Please refer to the diagrams below to get quickly introduced to the buttons and functions of popular VoiceEdge phones.
Polycom VVX310 Series Phone
Handset
Polycom 335 Series Phone
Message Waiting
Indicator
Display
Handset
Display
Softkeys
Home Button
Line Keys
Navigation Arrows
Softkeys
Feature Buttons
Line Keys
Navigation Arrows
Hold
Mute
Headset
Headset
Volume Keys
Speaker Phone
Speaker Phone
Mute
Polycom VVX410 Series Phone
Handset
Volume Keys
Polycom VVX500 Series Phone
Message Waiting
Indicator
Display
Display
Handset
Home Button
Line Keys
Navigation Arrows
Softkeys
Headset
Message Waiting
Indicator
Home Button
Dialpad
Headset
Volume Keys
Speaker Phone
Speaker Phone
Mute
Mute
Volume Keys
Polycom VVX600 Series Phone
Handset
Display
Message Waiting
Indicator
Home Button
Headset
Dialpad
Speaker Phone
Polycom 670 Series Phone
Line Keys
Feature Buttons
Hold
Display
Navigation Arrows
Softkeys
Mute
Headset
Mute
Volume Keys
Message Waiting
Indicator
Handset
Volume Keys
Speaker Phone
Polycom VVX1500 Series Phone
Message Waiting
Indicator
Display
Handset
Volume Keys
Dialpad
Mute
Headset
Speaker Phone
Welcome3
Customer training
Customer training is provided via online, interactive sessions, and ensures your end users have what they need. Below please find a
schedule of regular sessions that you and your users can join at any time. To register, visit business.comcast.com/getstarted.
Overview & Feature Demo
High level basics of VoiceEdge
Monday, Tuesday
Basic Phone Training
How to use your VoiceEdge phone
Wednesday, Thursday
Unified Communications
Advanced features for desktop and mobility integration
Thursday
Tech Admin Training
Manage users and group features via Business VoiceEdge portal
Friday
Reception Console
Learn the software based Reception Console software
Custom session
Typically, individual users attend Basic Training. Power-users who want to integrate with mobility features, attend the Unified
Communications Training. Technical administrators attend Tech Admin Training to learn how to manage individual users as well as
group features such as auto attendants and hunt groups. If you ordered Reception Console, you will receive a trainer-on-the-phone
consultation to ensure you and your front desk personnel are comfortable using the software. Please visit business.comcast.com/
getstarted to learn more or register for sessions.
Note:If the regular training sessions do not work for your schedule, please contact your project manager to discuss a custom session.
Set up and Access your Voicemail Messages — Online or On the Phone
Setting Up Voicemail
To set up your new Comcast Business VoiceEdge Voicemail service, follow these easy-to-use instructions. The first time you call into
your Comcast Business VoiceEdge Voicemail, you will be asked to create a new password and record your name to personalize the
greeting that callers will hear when they reach your voicemail.
Note:Each line has its own voicemail and will need to be set up individually.
Accessing Voicemail
There are many ways to access your voicemail:
From Your Desktop:
From BVE Mobile App:
• Log into the portal at business.comcast.com/bveportal to view
voicemail online or click the Dial Voicemail icon on the Telephony
Toolbar.
• Click the Voicemail icon. UC Seat users can use the VoiceEdge
mobile app to listen to voicemail and record and manage greetings.
From Your Office:
Away From Your Office:
• Press the Messages button or messages soft key on your phone, dial
your own extension number, or dial 62.
• Dial your office telephone number. When your personal greeting
starts, press . Enter your password when prompted.
*
*
VoiceEdge Online
Tech Admin Portal
The VoiceEdge Tech Admin portal is used to access all End User Profile and Feature settings and to modify Group settings (i.e. Hunt
Group, Auto Attendant). To access the Tech Admin portal, log on to business.comcast.com/bveportal and provide your Enterprise
Admin or Tech Admin username and password. The Enterprise Admin and Tech Admin have the same capabilities but the Enterprise
Admin can implement these activities for multiple/all sites in the Enterprise.
Once logged in, the Tech Admin portal will display the User Account area for your group/business. You can access all the users in
your business and do the following:
•
•
•
•
•
•
•
•
Tech Admin
Set up users Voicemail to Email
Set up and activate users features (Remote Office, Be Anywhere and Call Forwarding)
Access Company Directory
Access Help Page
View users Call History
Change Login Ids, passwords and directory names
Reset User Voicemail, Feature Portal/Toolbar passwords
Access Voicemails and Voicemail settings for Standalone Voicemail boxes
4
The Tech Admin can also access the Group Account area of the Tech Admin portal. This area will allow the Tech Admin to modify
the following:
• Auto Attendant settings
•
•
•
•
•
•
Hunt Group settings
Call Queue settings
Create and modify Time Schedules and Holiday Schedules
Control all Music on Hold settings
Access Call Detail Records
Allow or deny users access to International Long distance
The Tech Admin can also change Users extension numbers and usernames (along with re-setting passwords) using the User Profile
tab. This feature will help when new employees start at your business. If you change a User’s username, you will need to inform the
User of the new username (and password) so that they can access their Web Portal, Toolbar and Mobile App. Changing a User’s
username will change the login id, not the directory name or calling line name of the user.
To learn more about Tech Admin portal features and functionality, please visit business.comcast.com/getstarted and register for a
Tech Admin interactive session.
VoiceEdge End User Portal
The VoiceEdge Feature portal can be used to setup and activate individual VoiceEdge features. Each user can login at
business.comcast.com/bveportal and use his/her Feature Portal/Toolbar username and password.
The Feature Portal provides the ability to:
•
•
•
•
•
•
•
•
•
•
Listen to and delete your Voicemails
Set up your Voicemail to Email
Record and manage Greetings
Access your Company Directory
Access your Call History and Distribution Lists
Set up and activate features like Remote Office, Be Anywhere and Call Forwarding
Access Toolbar, Comcast Softphone and Reception Console Downloads
Access a Help screen that defines features
Modify your User Profile
Reset your own Voicemail, Feature Portal/Toolbar passwords
Download & Configure the Telephony Toolbar
The Business VoiceEdge Unified Communication package includes a Telephony Toolbar that is fully integrated with Microsoft®
Outlook, Internet Explorer™ and Mozilla Firefox. The Telephony Toolbar resides in Microsoft Outlook, Internet Explorer™ and Mozilla
Firefox and allows for click-to-dial functionality from existing Outlook contacts or from phone numbers on a Web page, as well as
advanced feature control and setup.
Downloading the Telephony Toolbar
•Visit business.comcast.com/bveportal, click downloads, then click Telephony Toolbar to run the exe.
Configuring the Telephony Toolbar
• Click the Options
button from the Toolbar. Click the Account icon.
• Enter your username and password found in your Toolbar Credentials email, check the “Save Username and Password”
boxes and click OK.
VoiceEdge Mobile App
The VoiceEdge Mobile App lets you make calls from your smartphone using your VoiceEdge business
number, just as if you were in your office. You can check your business voicemail, set your smartphone and
other phones as your ring to devices, change and record your voicemail greetings, see your call logs, and
have easy access to your VoiceEdge phone directory, all from your smartphone.
Following are some of the other features that the VoiceEdge Mobile App provides:
• Use the keypad for extension dialing
• Record and select your VoiceEdge No Answer greetings
• Get notifications when you have an incoming call and new voicemail
• Turn Do Not Disturb on and off for privacy
• Get notified if service is set in a way that may result in missed calls
•Move calls to the phone of your choice while a call is in progress with a swipe of the finger
Tech Admin
5
The Business VoiceEdge Mobile App integrates the Business VoiceEdge phone with your iPhone or Android. The VoiceEdge Mobile
App is free but you must have a Business VoiceEdge Unified Communication seat to use this application.
Basic Troubleshooting Tips
I have one phone that will not ring (calls may be going directly to Voicemail).
• Check to see if Do Not Disturb is set either on the phone or using the Toolbar.
• Check to see if line is Call Forwarded to another number.
• Check to see if line is set to “All Calls go to Voicemail”.
The user has forgotten or lost their End User Portal or Toolbar password.
• Reset the password to a generic password using the Tech Admin Portal.
• This can be done in the Password section of the User Profile area in the Tech Admin Portal.
• Password must be at least 8 characters long and contain at least one uppercase, one
lowercase and numeric character.
The user has forgotten or lost their Voicemail PIN to access their Voicemail box.
• Reset the password to a generic password using the Tech Admin Portal.
• This can be done in the Voicemail PIN section of the User Profile area in the
Tech Admin Portal.
• PIN must be a 4 to 8 digit number.
Additional Resources
Visit business.comcast.com/getstarted for additional VoiceEdge resources, including:
•
•
•
•
•
Complete A-Z User Guide for VoiceEdge features, including call queues, Hunt Groups, managing Auto Attendants, Hoteling,
call pick up groups and more.
Reception Console, VoiceEdge Softphone, VoiceEdge Mobile Application and Call Detail Record guides.
Online forum community to find answers or post questions.
Free online training sessions that give you access to Comcast Business trainers — learn about features and ask questions in a
small training session.
Additional recordings, videos and tutorials to ensure you and all the users in your company have what you need to optimize
VoiceEdge services.
For 24x7x365 support, or to add or change services, please call 877-761-7401.
Tech Admin
6
Tech Admin
Business VoiceEdge gives Tech Administrators the ability to manage and designate group level features such as Auto Attendants,
Hunt Groups, and On-Hold Music. The Tech Admin also can change feature settings of users of the group he/she manages, which is
useful in helping an individual troubleshoot issues with their service.
Note:The tech admin level is set up during the provisioning process. If you need to change the access/permission rights of an employee, contact Customer Care.
Business VoiceEdge Auto Attendant
Auto Attendant ensures that incoming calls receive prompt, consistent and professional treatment.
Customers route themselves via menu prompts directly to the specific information or department they seek. Auto Attendants can
provide information frequently asked for like hours of operation, make sales and daily “specials” announcements or give detailed
directions to your location.
Auto Attendant gives your company the “Big Business” sound of multiple departments with a receptionist or frees your receptionist for
other duties.
Note:There is a monthly charge for this feature.
Auto Attendant Options can be routed to internal company telephone numbers, cellular telephone numbers and other external
numbers, voicemail boxes and Hunt Groups.
Incoming call
Option 1
Option 2
Option 3
Option 4
Option 5
Customer Service Hunt Group
Ext. 317
Agent 1
303-555-1234
Agent 2
Ext. 525
Event Planning Auto Attendant
Option 1
Option 2
Option 3
Option 4
Agent 3
‘Press 1 for Corporate Events’
‘Press 2 for Event Billing’
Etc.
Etc.
Note:Auto Attendants have the ability to provide nine (9) different locations for calls to go. If you require more than nine options, you may need to purchase additional
Auto Attendants to create a stacked or tiered Auto Attendant.
On the VoiceEdge portal, you can easily program, change greetings or manage Auto Attendant time schedules. To navigate to Auto
Attendant settings when logged in as an administrator, select Group Account at the top of your screen and then select Auto Attendant.
Tech Admin
7
Greetings and Keypad Setup
The Auto Attendant has a standard greeting, but we advise you record your own greeting to announce your company name and tell
your callers what their options are.
To change or update your Auto Attendant Greeting:
1. Select either the “Business Hours” or “After Hours” greeting to change that greeting. To use
the standard greeting select “Standard Greeting”.
2.To record your own greeting:
a.Select “Personal Greeting”.
b.Press the “Record Greeting” icon.
c.Press the “Record” button.
d.Record using the microphone on your computer.
e.Press the “Record” button again to stop recording.
f.Use the “Play” button to review.
g.Press the “Save Changes” button.
3.To Upload your own greeting:
a. Select “Personal Greeting”.
b. Press the “Upload” icon.
c. Press the “Browse” button.
d. Browse to the WAV file you wish to upload.
e. Press “Save” when selected.
Auto Attendant greetings can also be managed via the voice portal. To do so, hit messages on your phone and login using the “Be
Anywhere/Voicemail Group PIN” provided in the technical administrator’s credentials.
To change your Auto Attendant routing options:
1. Select either the “Business Hours” or “After Hours” section.
2.For each number that has a function, write a description for the action when a user presses the key.
3.For each number and *, # that has a function select the appropriate option. (Note: Not all numbers have to be used).
4.For transfer options, you must enter in an extension or 10-digit phone number to route the call to the appropriate number.
5.For transfer options enter in an extension or telephone number to transfer to. Note: To transfer directly to voicemail use the Feature
Access Code *55 before the extension in the box provided.
6.Press “Save Changes” when finished.
Below is the list of prompt options, the message the caller hears, and a description of the action the platform takes.
Description Key
Prompt Played To Caller
Description Of What Happens
Transfer to Operator
“Please wait while your call is transferred to the
operator”
“Please wait while your call is transferred”
None
None
None
“Thank you for calling”
None
Transfer is completed
Transfer with Prompt
Transfer without Prompt
Name Dialing
Extension Dialing
Exit
Repeat Menu
Transfer is completed
Transfer is completed
Access to name dialing. First or Last Name
Access to extension dialing
Call is released
Menu greeting is replayed
Hunt Group — Automatically Handled
A busy signal is an opportunity lost. But with Hunt Group, when an incoming call reaches a busy signal, the call is automatically routed
to the next open line. Hunt Group allows incoming calls to ring a group of users in a specific pattern.
When you place your Business VoiceEdge order for multiple lines, Hunt Group will be set up to ensure swift and timely answers to all
your customer calls.
Note:A Hunt Group is an INCLUDED feature of each Business VoiceEdge seat you purchase. If you require more Hunt Groups you may purchase additional Hunt Groups
for a monthly charge.
Tech Admin
8
As a Tech Admin you can change your hunt group call routing type and manage the users in your various hunt groups through the Hunt
Group settings on the VoiceEdge portal. To navigate to the hunt group settings page when logged in as an administrator navigate to
Group Account at top of the screen and select Hunt Group.
Hunt Group Routing Types and Settings:
1. Enter or edit the hunt group name so that is easily identifiable, such as “Sales” or “Customer Service”.
2.Enter in the Hunt Group Call Line ID First Name and Last Name (limit 15 characters).
3.Select the language of the hunt group for the standard greeting and prompts.
4.Select the time zone of the hunt group.
5.Select Hunt Group Type from the following options:
Regular
Incoming call
Rings each user in the order they
appear on the User List
Simultaneous
User 1
User 2
User 3
User 4
User 1
User 2
User 3
User 4
User 1
User 2
User 3
User 4
User 1
User 2
User 3
User 4
Incoming call
Rings all users at once
Circular
Notes the last user to answer a call then
rings the next user on the User List
Uniform
Incoming call
Incoming call
Rings the user that has been idle
the longest
6.Select “Enable Call Waiting For Hunt Group Users” if you want the hunt group to route calls regardless if that user is on another call.
7.Press the “Save” button when complete.
The name of the Hunt Group is passed to users along with the Caller ID number so they know what type of call is incoming (e.g., “Sales
Group” or “Customer Care Group”).
Note:One Hunt Group is included with each seat purchased. Additional Hunt Groups are available for a monthly charge.
Managing Hunt Group Users
To add a user to a Hunt Group:
1. Select the user(s) in the Directory Box.
2.Click on “Add People”.
3.Click “Save”.
To remove a Hunt Group user:
1. Check the names of the users in the Hunt Group Users box.
2.Click on “Remove Users”.
3.Click “Save” to complete.
Tech Admin
9
No Answer Settings
These settings will define how calls that aren’t picked up by a hunt group participant are treated.
1. Click “Skip to the Next Agent” and select rings to define how long the hunt group shall try to reach each participant.
2.Click “Forward Call after waiting” and enter in between 0-7200 seconds to minimize the time a caller is routed in the hunt group.
3.Enter in an Extension or Telephone number for forward calls to after the waiting period has expired.
4.Click “Save” to complete.
Call Pickup
Call Pickup allows users to answer any ringing line within their call-pickup group. A call pickup group is defined by your site
administrator and is a subset of the users in your group and configured by Comcast VoiceEdge Customer Care.
To pick up a ringing call coming to another user of the group, users go off-hook and dial the Call Pickup feature access code, which
connects them to the ringing party. If more than one line in the call pickup group is ringing, the call that has been ringing the longest
is picked up. Users already engaged in a two-way call can flash the switch hook to put the other party on hold and dial the Call Pickup
feature access code to answer an incoming call to the call pickup group. Users then flash the switch hook to toggle between the two
parties. The Call Park and Directed Call Pickup feature enhances the Call Pickup service so that its scope encompasses an enterprise
as opposed to being restricted to a group.
Note:A single group can have multiple Call Pickup groups defined simultaneously, but a given user can only belong to a single Call
Pickup group.
On-Hold Music
Comcast Business VoiceEdge enables a generic music stream for people to hear when on hold. As a technical administrator, you
can manage on-hold music in the VoiceEdge portal. The On-Hold Music section allows you to upload your own music to play while
customers are on hold and to define when on hold music should be played. Note: You are responsible for appropriate music licensing
for on-hold music.
To navigate to the On-Hold Music settings page, login as an administrator and navigate to Group Account, then select Advanced
Settings and then the On-Hold Music tab.
To add a Custom On-Hold Music File:
1. Click on the “Upload Your On-Hold Music File”.
2.Use the browser to find the file to upload.
3.Once file is selected using the dialog box press Open.
The audio file must have the following attributes:
•May not be longer than 10 minutes.
•The WAV file must be saved using u-law 8-bit mono settings. This can be done using
Windows sound editor, or other audio editing software.
Options to select On-Hold Music include:
a.Click “Play Custom Music File” to play a file that has been uploaded.
b.Click “Play System Default” to play the system defined on-hold music.
Call Park
Call Park is the ability to place a call on hold and retrieve it in another location. A call can be parked to a single destination or to a
group.
To have Call Park configured you need to collect the following information prior to calling Customer Care:
1. What would you like to name your Call Park Group?
2.Which seat or group of seats (users) would you like to have as a part of this Call Park Group?
3.What would you like the recall timer set to? The value needs to be in seconds. When the Call Park Recall Timer expires, the call is
recalled to the person that parked it. The Recall Timer option has a range from 30 through 600 seconds. The default is “45 seconds”.
Call Park and Retrieve
Place a call on hold with the intent of retrieving it from another extension or location. The call can be parked on your own extension
or any other within an enterprise group. As a user on the platform, you may place a call on park using *68 flash/star code. Use *88 to
retrieve the parked call from a different location.
Tech Admin
10
Call Queue Agent
Call queues are used to temporarily hold calls in the cloud when all users assigned to receive calls from the queue are unavailable.
Queued calls are routed to an available agent when he or she is no longer on an active call. These queues include greeting and
message options that play to callers as they wait in queue.
Each call queue can be assigned a unique phone number, which outside callers can dial to reach the agents assigned to the call
queue. Call queues are also assigned an extension which internal callers can dial to reach agents in the call queue.
Setting up Call Queues requires the completion of 4 steps:
1. Configuring the call queue settings.
2.Assigning agents.
3.Configuring the call flow for the queue.
4.Assigning greetings and messages to the queue.
To modify your call queue settings go to business.comcast.com/bveportal.
Then enter your assigned administrator user name and password and click “Sign In”. Then click “Group Account”.
If you are an administrator that is managing multiple locations, select your location from the drop-down menu. Then click “Call Queue”.
All call queues that have been assigned to this location are displayed in the drop-down menu. Select the Call Queue to modify.
Configuring Call Queue Settings
Start by configuring the call queue settings.
1. Enter a name for the call queue. For example, Main Line Queue.
2.Select your time zone from the drop-down menu.
3.Select the call queue policy. This determines the order in which calls are presented to
available agents. There are five options to choose from.
• Circular: If this option is selected, queued calls are sent to user following the last user to receive a call. When the end of the list is
reached, the hunting circles back to the first user in the list. The hunting ends when an idle user is found or all the users have been
visited.
• Regular: If this option is selected, the phones ring one at a time, always starting with the same user and ringing in the same order.
The user configured at the top of the Selected Call Queue Agent List rings first, followed by the users listed beneath, in sequential
order.
• Simultaneous: If this option is selected, all phones ring the agents in the queue at the same time. Once a user has answered the
call, all other phones stop alerting.
• Uniform: If this option is selected, the call is sent to the user who has been idle (specifically, has not taken a queued call) the
longest. If that user doesn’t answer, the call is sent based on who has been idle the longest in the call queue.
• Weighted: If this option is selected, calls are sent to agents based on an assigned percentage. These percentages are assigned in
the ‘Assigning Agents’ page.
4.Click “Save” to save your changes and “Next” to advance to the next page.
Assigning Agents to Call Queues
Users that have been assigned the Call Queue feature are listed in the ‘Available Call Queue Agents’ list.
To add an agent to the call queue, check the box next to the agent or agents, and click the “Add
People” button.
To remove agents from the call queue, select the agent to remove and click the “Remove
People” button.
To change the order of the agents, use the “Move up” or “Move down” buttons.
If you have selected the Weighted Call Queue Policy, you can assign percentages to agents here. For example, if Andrew is to receive
90% of the calls and the Receptionist is to receive the other 10%, you would enter those weights here.
Note:The percentages must total 100%. Agents that are assigned a 0% weight only receive calls if all other agents are on a call.
Scroll down to modify your Call Waiting preference. If call waiting is enabled, then calls are sent to agents even if they are already on
the phone.
Tech Admin
11
If you would like to allow agents to join or remove themselves from this queue, click “Allow
Agents to Join Call Queue”. Agents can perform this function by logging in to the portal and
making their ‘join’ selection.
Click “Save” to save your changes and “Next” to advance to the next page.
Note:If an agent is not joined to a call queue they will not receive any queued calls.
Configuring the Call Flow for the Queue
The call flow configuration page allows you to configure rules for routing calls during particular situations.
The first setting is the size of the queue. This determines how many callers can be in the queue
before those calls get routed to another destination. Make a selection from the drop down menu.
If you select 15, the 16th caller is routed to the overflow treatment destination. We will be covering
the overflow treatment settings below.
Next, enable or disable Call Forwarding Busy. Then enter the number or extension you want to
forward calls to. This feature is used if the overflow policy is set to ‘Perform Busy Treatment’.
To play the ringing tone to the caller when the call is being offered to an agent, select “Play Ringing When Offering a Call”.
Now, configure the overflow policy. This determines where callers are routed when the queue size limit is exceeded or the queue
timer is reached.
The Queue Timer setting is configured here. Check this box if you want to send callers to the
overflow destination after they have been in queue for a specific number of seconds. Select the
number of seconds from the drop down menu.
Next, select the Perform Busy Treatment option if you would like callers to be routed to the Call
Forwarding Busy destination that was configured above.
To route callers to another destination, such as another extension or an external ten digit phone number, click “On” and enter the
destination.
To configure your overflow policy to play ringing to callers until they hang up, select that option.
Optionally, you can allow callers to press a configured digit if they wish to escape from the call queue and leave a voicemail message.
To enable this functionality for callers, turn on “Escape From Queue”. Then enter the digit that callers press to escape from the queue.
This can be zero through nine, star or pound.
Finally, you can choose to preserve the callers wait time. This setting is applied if overflow calls are routed to another call queue. When
enabled, those callers retain their wait time when they move to the next call queue.
Click “Save” to save your changes and “Next” to advance to the next page.
Tech Admin
12
Assigning Greetings and Messages to the Queue
Each call queue includes options for assigning 3 unique greeting files to the call queue – an entrance greeting, a comfort message
and music on hold. These are audio files that callers hear when they reach the queue. These can be customized for your business and
uploaded from this page.
The first greeting file to configure is the Entrance Greeting. If enabled, callers that reach the call
queue hear this message before they hear the comfort greeting and music on hold. To enable
this greeting, click “On”. To use the default greeting option click “Standard”.
To customize the entrance greeting, click “Custom”. From here, you can either record your
greeting from the web portal or upload a prerecorded file.
To record your greeting from the web portal, click the “Record Your Greeting” link. If prompted,
click “Allow” then “Close” to enable the Adobe Flash setting that allows you to record from your
computer.
Then click the “Microphone” button to begin recording. Click it again to stop recording. Click “OK”.
To listen to your greeting, click the “Play” button.
To upload a prerecorded greeting, click the “Upload your Greeting” link.
Note:You must have your greeting file saved in C.C.I.T.T. u-law settings with eight kilohertz, eight bit-mono attributes as a WAV file. To save a recording in this format,
you may need to use a basic sound recorder.
Once you have saved your file in the proper format, click “Browse” and find the file on your computer. Then click “Open” to upload the
file. Click “Save” to save your changes.
Next configure your Comfort Message. This is the message callers hear after the entrance
message, but before the music on hold. To enable this message, click “On”.
To use the default comfort message, click “On”.
To customize the comfort message, click “Custom”. From here, you can either record your
greeting from the web portal or upload a prerecorded file.
To record your message from the web portal, click the “Record Your Greeting” link. If prompted,
click “Allow” then “Close” to enable the Adobe Flash setting that allows you to record from your
computer.
Then click the “Microphone” button to begin recording. Click it again to stop recording. Click “OK”.
To listen to your greeting, click the “Play” button.
To upload a prerecorded message, click the “Upload your Greeting” link.
Note:You must have your message file saved in C.C.I.T.T. u-law settings with eight kilohertz, eight bit-mono attributes as a WAV file. To save a recording in this format,
you may need to use a basic sound recorder.
Once you have saved your file in the proper format, click “Browse” and find the file on your computer. Then click “Open” to upload the
file.
Next, configure the time between messages. This is the time that the music on hold (if enabled) plays before the comfort message
repeats. Enter the number, in seconds. Then click “Save” to save your changes.
Next configure your Music On Hold settings. Music on hold is the audio file callers hear after the
comfort message. To enable music on hold, click “On”.
To use the default music on hold file, click “Standard”.
To customize the music on hold, click “Custom”. Then click the “Upload Your Greeting” link.
Note:You must have your music on hold file saved in C.C.I.T.T. u-law settings with eight kilohertz, eight bit-mono attributes as a WAV file. To save a recording in this
format, you may need to use a basic sound recorder.
Once you have saved your file in the proper format, click” Browse” and find the file on your computer. Then click “Open” to upload the
file. Click “Save” to save your changes and “Done” to complete the configuration of your call queue.
Tech Admin
13
More Services
Business Level Support
Your dedicated Business Technical Support Team is available to assist you 24 hours a day, 7 days a week. To contact Tech Support,
call 877-761-7401.
Directory Listings
A simple directory listing in both the White Pages and Yellow Pages is included with your Comcast Business VoiceEdge service. Blue
Pages/Government listings are available for such entities. A Directory Listing for an address that is not local to the telephone number
(foreign listing), is also available.
Directory Assistance
Dial
for access to local, long-distance and international numbers.
Directory Assistance Call Completion
Dial
for access to both local and long-distance numbers, then press the indicated key and your call will be connected.
Diversion Inhibitor
The Diversion Inhibitor service prevents calls, redirected by a user, to be redirected again by the called party. This service is especially
useful to help prevent calls from being answered by another user’s voicemail when using Sequential Ring.
A feature access code (FAC) can be activated as a dial prefix on a per-call basis or as a static prefix for the destination number for the
caller’s redirection services. The FAC is *80. There is no provisioning configuration for the service and can only be used on a per-call
basis via the FAC dial prefix.
The following services can be inhibited with the Diversion Inhibitor FAC:
• Call Forwarding No Answer, Busy, Always
• Selective Call Forwarding
•Voicemail
• Sequential Ringing
The following redirection services are not affected by the FAC and cannot be inhibited:
• Remote Office
• Hunt Group
• Auto Attendant
• Call Pickup (all variations)
Enhanced Directory Assistance
Now when you dial
live operator.
, you can get even more valuable information like fully interactive, turn‑by-turn driving directions from a
Note:Directory Assistance calls are charged on a per use basis. For prices, call Comcast Customer Support.
IP Phone Information
Your VoiceEdge IP phone has many capabilities. To view the different models, capabilities, data sheets, videos, quick reference guides
and end-user training, please visit business.comcast.com/getstarted. If you want to upgrade your device, please call 877-761-7401.
Please feel free to visit the Basic Configuration at menu->settings->basic to customize your phone for backlight, ring tone and other
basic settings. Note: We recommend that you leave everything in the Advanced Configuration as is to prevent service issues.
Advanced settings include SSL Security, Network Configuration and other settings that can negatively change how your service is
delivered.
Headsets: Comcast does not offer headsets for cordless capability, but your VoiceEdge IP device is compatible with many headset
options. Please reference materials offered by Polycom to learn more about compatible headsets at www.polycom.com.
More Services
14
911 Emergency Calls
In most major cities, emergency police, fire and medical services can be reached by dialing 911. Enhanced 911 (E911) automatically
provides the emergency service with your telephone number and location when
you dial 911 from your business phone. Remember, dial
immediately in case of any emergency.
Comcast Business Enhanced Voice Services, including Business VoiceEdge™ (“Enhanced Voice Services”) may have the E911 limitations
specified below:
• In order for 911 calls to be properly directed to emergency services using Enhanced Voice Services, Comcast must have
the correct service address (i.e. street address, floor and/or office number) for each telephone number and extension used
by the Customer with the Enhanced Voice Services. If Enhanced Voice Services are moved to a different location without
Customer providing the correct information, 911 calls may be directed to the wrong emergency authority, may transmit the
wrong address, and/or Enhanced Voice Services (including 911) may fail altogether. Customer is solely responsible for
programming its telephone system to map each telephone number and extension to the correct location, and for updating
the system as necessary to reflect moves or additions of stations within the premises.
• Enhanced Voice Services uses electrical power in the Customer’s premises. If there is an electrical power outage, 911 calling
may be interrupted if the battery back-up in the associated multimedia terminal adapter is not installed, fails, or is exhausted
after several hours.
• Enhanced Voice Services calls, including calls to 911, may not be completed if there is a problem with network facilities,
including network congestion, network/equipment/power failure, or another technical problem.
• Comcast only supports 911 emergency calling with Enhanced Voice Services in those areas in the U.S. where Comcast can
direct your company’s 911 call to the appropriate PSAP in a manner consistent with applicable laws, rules, and regulations,
including, without limitation, FCC rules and requirements. In an area where Comcast cannot support 911 calls, Customer will
be notified before the completion of the update call. In this case, Customer must use an alternative means of accessing 911.
• Failure by Customer to make subsequent address updates, including updates to restore service address to the original
registered Service Location, or failure to allot sufficient time for the Service Location update provisioning to complete may
result in emergency services being dispatched to the incorrect Service Location.
• If the Registered Service Location provided in conjunction with the user of nomadic Comcast Equipment is deemed to be in
an area Comcast cannot support for 911 calls, Customer will be notified before the completion of the update call. In this case,
Customer must use an alternative means of accessing 911.
• Customers should call Comcast at 1-877-761-7401 (for Customers using nomadic functionality) if they have any questions or
need to update a service address in the E911 system.
• Customers can change their E911 registered location by using the following process:
To change your E911 Registered Location:
1. Log on to business.comcast.com/bveportal.
2.On the Main Navigation Page, select “Update” in the E911 Registered Location box.
3.Provide new E911 Registered Location information.
4.Click “Save”.
Toll Free Service
Can help you generate more calls and more business opportunity. Toll Free Service can help you expand your business by
enabling your customers to place orders via a toll free number. Many customers include their toll free numbers on their website, as
it makes them easier to do business with. A Comcast Business Toll Free line for your company is as fast and easy as a toll free call to
your Business Customer Support Team at 877-761-7401.
Help Tab and Useful Links
To get access to Help and Useful Links:
1. Log on to business.comcast.com/bveportal.
2.From the Main Navigation Page, select “Help”.
3.Click “Useful Links”.
From here you will have access to Animations, Getting Started Page, User Guide, Videos and
Live and Recorded webinars.
More Services
15
Billing Features
Online Bill Access
If you are the billing administrator for your company, you may have access to the VoiceEdge monthly statement. It will include a
summary of charges you’ve incurred for the month. You can view the bill online, or you may choose to receive a paper invoice. Please
note, to view detailed call records, you will need to access your bill online. Registration is fast, easy and free. First-time users will be
prompted to create a user profile and password. Returning users can log in by entering their username and password.
1. Go to www.comcastpaymentcenter.com.
2.To set up an account, click on the link for new users, and enter your account number and your
invoice number (both are found on a recent invoice).
3.Follow the prompts to view billing statements, make payments, order services and more.
Block Calls to 900/976 Numbers
All Comcast business phone lines come with 900/976 Call Blocking activated so that calls to these numbers are automatically blocked.
Call Blocking to these numbers cannot be removed. There is no charge for this service.
Block Collect Calls and Bill to Third Party Calls
Collect calls and bill to third party calls are blocked. For more information, contact Business Customer Care.
International Calling Plans
Business VoiceEdge offers three settings for international calling. This may be set by phone line or extension. It is important that you
select the appropriate international calling option, as potential means to limit the expense, if fraudulent calls are made from your phone.
1. No international calls may be placed from the device.
2.Standard — limited international calling access to major international destinations.
3.Expanded — this offers the largest list of international destinations that may be placed from a device.
International Calling can be restricted by your Business VoiceEdge Technical Administrator on a per user basis.
To navigate to International Long Distance settings when logged in as an administrator, select
“Group Account” at the top of your screen and then select “Advanced Settings”, and
“International Long Distance”.
Billing Features
16
Useful Tips
Last Number Redial
Polycom SoundPoint 335: User may press the “Dial” button and last number dialed is displayed and may be dialed.
Polycom SoundPoint VVX500, VVX1500 or 670: User may press the “Redial” button to dial the last number dialed.
Lists
Some of the calling features require you to create a list (e.g.: priority list, block list, etc.). These lists are distinct from one another and
remain stored so that each time you activate a particular feature, the feature will refer to the list created for it.
Domestic Dialing
Dial as you normally would. You can also reference your local telephone book for more information on dialing instructions and calling
areas. Dialing a “1” before dialing the area code and number is not required.
International Dialing
To place the call yourself, dial
, plus the country code, then the phone number.
Operator Services
To contact the operator, press
calls such as:
for local calls and
for long-distance calls. An operator can help you place certain types of
• Collect calls — The operator will connect you and request payment from the called party.
• Person-to-person calls — The operator will connect you to a specific person.
• Bill to third party calls — The operator will connect you and request payment from a third party.
Note:Services may not be available in all areas. Additional charges will depend on the service requested. For prices, call Customer Care.
Additional Business Services
In addition to Business VoiceEdge, you may have one of our other business services. To learn more, visit business.comcast.com.
Business Voice
With your Comcast Business Voice service, you will enjoy the convenience of staying connected with high quality and robust voice
service. Additionally, many Business VoiceEdge customers have Business Voice lines to connect with alarm, elevator, fax or other
devices. For information, visit business.comcast.com/help.
Business Internet
Your Comcast Business Internet comes with many valuable features that can help you manage your business more efficiently.
Hosted Microsoft® Exchange
With hosted Microsoft® Exchange, you have an on-the-go communications platform including:
• Microsoft® Outlook — Share and synchronize email, calendars, contacts and tasks.
• Windows® SharePoint — Share documents and information, coordinate projects and get up to 10 GB of storage and backup.
• Mobile Access — Communicate from anywhere you have Internet access, on all your mobile devices.
Need help migrating from your existing email platform to Microsoft Hosted Exchange? Get MaaX®, available on the Upware™
marketplace, easily migrates your email, calendar and contacts from your existing email to Microsoft Hosted Exchange.
Web Hosting
Your Business Internet Package comes with our Starter Web Hosting Package, which includes a custom domain with a 3-page
template formatted website. To activate and view your Web Hosting Plan, login at business.comcast.com/myaccount. If your
e-commerce needs are more advanced, our Web Hosting upgrades include:
• Business Package — With 300 GB of storage space, you can build a dynamic site with Web scripting and database support. This
package lets you host lots of pages and take lots of hits, but does not cost lots of money.
• Commerce Package — Put a large catalog online and sell your products securely with 400 GB of storage space and integrated
e-commerce functionality.
• Professional Package — All of the functionality included in the Commerce Package with even more storage space. This bundle
lets you build, run and promote a big website without a big price.
Note:If you would like to upgrade your service, please visit business.comcast.com/myaccount, navigate to Manage Services and select Websites then choose
Upgrade hosting plan.
Cloud Marketplace
For your protection, log on to your account at business.comcast.com/upware to download Norton™ security tools. Take advantage
of the free services included with your account such as Norton Internet Security, Microsoft Hosted Exchange and Web Hosting.
Useful Tips
17
Comcast Business WiFi
As a Comcast Business Internet customer, you can now enjoy the convenience of WiFi for your employees and your customers.
And it’s included with your Business Internet service.*
Business WiFi is a comprehensive WiFi solution which includes:
• Private WiFi — a private/secure WiFi connection for your business
• Public WiFi — an XFINITY WiFi Hotspot for patrons and customers
To learn more, visit business.comcast.com/wifi.
*Business WiFi is not included with Starter Internet-only service, and is not available for Comcast Hospitality Internet and Comcast Ethernet services.
Business TV
With Business TV, you will stay connected like never before with access to the latest news, finance, sports and pop culture trends.
Accessing Your Channel Lineup
Log on to your account at business.comcast.com/myaccount and select My Services at the top of the page. Select TV. Sort the
list numerically or alphabetically. Scroll left or right using the arrows at the bottom of the page to view more channels. In addition,
depending on your area and whether you have a set-top box, you can view your lineup on your TV by one of the following methods:
• Use the channel up and down buttons on the remote control for your television.
• Use the on-screen guide, which is accessed through the remote control provided by Comcast.
Comcast Business Promise
You depend on Comcast Business for the success of your business and we take that trust seriously. Comcast Business
is committed to delivering on the promise of providing customers the most reliable data, voice, and TV services that
consistently exceed expectations. If your service is interrupted, we promise to resolve it as quickly as possible. If you
report a service interruption that was our issue, you will receive a bill credit. It’s that simple. That’s Comcast — we back
our service with this promise because business can’t wait.
We make the following commitments to our Business VoiceEdge customers:
• 60 Day Money Back Guarantee limited to the monthly recurring fee paid for your first 60 days of service, excluding installation
charges, fees, taxes or per-call charges
• Dedicated project managers from design to install
• Service Level Agreement for end-to-end coverage of Comcast-provided equipment, the local access network and the backbone
network
• VoiceEdge equipment maintenance with next business day replacement for the term of the phones
• 24x7 Dedicated Business Support
To learn more about our Comcast Business Promise, please visit business.comcast.com/promise.
Useful Tips
18
Feature Access Codes
Feature
Anonymous Call Rejection
Activation
*77
Automatic Callback
n/a
Automatic Callback Menu Access
#9
*14
*15
*72
*21*
*21
*90
*67*
*40
*92
*61*
*41
*94
#76
*67
*31
*65
*68
*88
*98
*11
*69
#92#
*43
*70
*99
*57
*97
*33
*55
*80
*78
*22
#58
*66
*12
n/a
*610
*50
*74
*75
*47
*62
BroadWorks Anywhere E.164 Dialing
Call Bridge
Call Forwarding Always
Call Forwarding Always Interrogation
Call Forwarding Always To Voicemail
Call Forwarding Busy
Call Forwarding Busy Interrogation
Call Forwarding Busy To Voicemail
Call Forwarding No Answer
Call Forwarding No Answer Interrogation
Call Forwarding No Answer To Voicemail
Call Forwarding Not Reachable
Call Forwarding Selective
Calling Line ID Delivery Blocking per Call
Calling Line ID Delivery Blocking Persistent
Calling Line ID Delivery per Call
Call Park
Call Park Retrieve
Call Pickup
Call Retrieve
Call Return
Call Return Number Deletion
Call Waiting Persistent
Cancel Call Waiting
Clear Voice Message Waiting Indicator
Customer Originated Trace
Directed Call Pickup
Directed Call Pickup with Barge-In
Direct Voicemail Transfer
Diversion Inhibitor
Do Not Disturb
Flash Call Hold
Group Call Park
Last Number Redial
Location Control
On-Hold Music Per-Call
No Answer Timer
Push to Talk
Speed Dial 8
Speed Dial 100
Sustained Authorization Code (calls unlocking)
Voice Portal Access
Useful Tips
Deactivation
*87
#8
n/a
n/a
n/a
*73
n/a
#21
*91
n/a
#40
*93
n/a
#41
*95
#77
n/a
#31
n/a
n/a
n/a
n/a
n/a
n/a
n/a
#43
n/a
n/a
n/a
n/a
n/a
n/a
n/a
*79
n/a
n/a
n/a
*13
*60
n/a
n/a
n/a
n/a
*37
n/a
19
Index
Anonymous Call Rejection 19
Auto Attendant 7–8
Automatic Callback 19
Be Anywhere 4–5, 8
Block Calls 16
Business Level Support 14
Call Forwarding Always 19
Call Forwarding Busy 12, 19
Call Forwarding No Answer 14, 19
Call Forwarding Not Reachable 19
Call Forwarding Selective 19
Call Park 10, 19
Call Park and Retrieve 10, 19
Call Pickup 10, 19
Call Queue Agent 11–13
Call Return 19
Call Waiting 11, 19
Directed Call Pickup with Barge–In 19
Directory 14
Directory Assistance 14
Directory Assistance Call Completion 14
Directory Listings 14
Diversion Inhibitor 14
Do Not Disturb 19
Domestic Dialing 17
Emergency Calls 15
Enhanced Directory Assistance 14
Extension Dialing 8
Feature Access Codes 19
Greetings 8
Help Tab and Useful Links 15
Hunt Group 8–9
International Calling 16
IP Phone Information 14
Last Number Redial 17
Lists 17
On-Hold Music 10, 19
Online Bill Access 16
Operator Services 17
Polycom® IP Phones 3
Push to Talk 19
Speed Dial 19
Telephony Toolbar 5
Toll Free Service 15
Voicemail 4
© 2015 Comcast. All rights reserved.
BC BVE POR_TechAdmin_Rev. 02.15
Index20


© Copyright 2026