
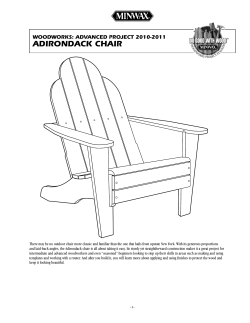
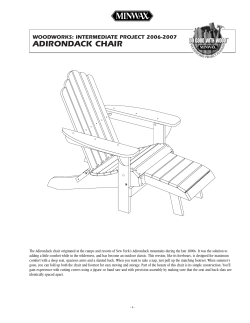
Adirondack Chair T Build this comfortable, lightweight
Adirondack
Chair
Build this comfortable, lightweight
version of an American classic
B Y
adIrO n dac k W I T h a T W I s T
See a gallery of chairs (pp. 60-61) from Indiana
University of Pennsylvania’s design competition.
Chair makers were invited
to develop their own
interpretations, using
the basic concept of this
classic chair as a point of
departure.
54
T O M
B E G N A L
T
his quintessentially American outdoor chair was born in
the early 1900s in the Adirondack mountain region of New
york state. The generous slant of the seat and back make
it an inviting place to relax outdoors. And for those who like to
graze while relaxing, armrests the size of small tables offer plenty
of room for a plate of snacks and a favorite beverage.
Unlike the original, our chair has a curved seat and back, making
it a place where you won’t mind spending a lot of downtime. It
is made from western red cedar, a weather-resistant, lightweight
wood available at most lumberyards. Cypress, mahogany, and
redwood also are lightweight and enjoy the outdoors. Ipé and
Photos, this page: Michael Pekovich (top); Roy Engelbrecht (bottom left)
COPYRIGHT 2007 by The Taunton Press, Inc. Copying and distribution of this article is not permitted.
The pIeces and parTs
Stainless-steel
#8 wood screw,
1½ in. long
Unlike the original Adirondack, this chair has a
curved seat and back, making it an even more
comfortable place to relax. Large armrests offer
plenty of room for snacks and a beverage.
Armrest, 3⁄ 4 in. thick
by 71 ⁄ 4 in. wide by
311⁄ 2 in. long
Upper cradle,
1 in. thick by
4½ in. wide by
197⁄ 8 in. long
7 back slats, 3⁄ 4 in. thick
by 34 in. long, tapered
from 2 in. wide at top to
1¾ in. wide on bottom
UPPER CRADLE C/L
4½ in.
12¾-in.
radius
2¼ in.
LOWER CRADLE
3½ in.
10¾-in.
radius
21⁄ 8 in.
FRONT STRETCHER
Lower back slat
cradle, 1 in. thick by
3½ in. wide by
19 in. long
Riser, 1 in. thick
by 31⁄ 2 in. wide
by 243 ⁄ 8 in. long
¾ in.
2½ in.
33-in.
radius
Riser bracket, 3⁄ 4 in. thick
by 2 in. wide by 45 ⁄ 8 in. long
Stainless-steel
#8 wood screw,
1¼ in. long
Front stretcher,
3⁄ 4 in. thick by 2½ in.
wide by 19 in. long
7 seat slats,
3⁄ 4 in. thick by 2½ in.
wide by 19 in. long
Side, 1 in. thick
by 5½ in. wide by
36½ in. long
Arm support
block, 3⁄ 4 in. thick
by 31⁄ 2 in. wide by
5¾ in. long
65°
38 in.
20½ in.
19 in.
5¼ in.
4 in.
Leg, 1 in. thick
by 31⁄ 2 in. wide
by 19 in. long
Stainless-steel
carriage bolt,
3 ⁄ 8 in. dia. by
2½ in. long
Leg bracket, 3⁄ 4 in.
thick by 3½ in.
wide by 15 in. long
19 in.
teak are at home outdoors, too, but expect a chair made from
either to be a muscle-strainer.
Most of the parts are made from presurfaced “1-by” stock, but for
the parts that carry extra load—sides, legs, risers, and cradles—I
used 5/4 presurfaced stock. Much like a 2x4, the actual dimensions
end up slightly less. That said, if you use teak, ipé, or any other
hardwood, you can build the entire chair from 1-by boards.
Begin with the sides
The sides are the foundation of the framework. Cut a full-size
pattern, then transfer it to the stock, and cut out the shape on the
www.finewoodworking.com
tiP
Make a jumbo compass. The
compass is a thin strip of wood
about 36 in. long. Measure 1 in.
from the end, and drill a hole to
accept a nail. Create a pivot point
by driving the nail through the
strip and into a square block of
3 ⁄4-in.-thick stock. The location of
the pencil hole will vary depending
on the radius of the arc.
JUly/AUgUST 2007
COPYRIGHT 2007 by The Taunton Press, Inc. Copying and distribution of this article is not permitted.
55
beGIn WITh The sIde pIeces
2½ in.
FUll-SiZe teMPlateS
Make cUrVeS eaSY
Copy these patterns at 400% and use
them to draw templates. Cut out the
templates and transfer the shapes to
the workpieces.
Trace the shape. Use a thickpaper template to outline the
side shape on stock.
77⁄ 8 in.
SIDE
1 in. thick by
5½ in. wide by
36½ in. long
Tape sides together. Begnal
uses double-sided tape to hold
the boards together as he cuts
them.
ARM REST
⁄ in. thick by
7 ⁄ in. wide by
31 ⁄ in. long
34
14
12
Keep the parts taped together. A file, followed with sandpaper, is a
good way to smooth the edges of inside or outside curves. Start sanding
with coarse paper, say P80-grit, working up to P150-grit.
bandsaw. Smooth the sawblade marks on the edges of the sides
with a plane, scraper, or sanding block.
Cut seat slats, stretcher, and lower back-slat cradle
Cut the seat slats to size before moving on to the front stretcher.
To lay out the curve along the bottom edge of the stretcher, make
a jumbo compass (see tip, p. 55) Measure 33 in. from the compass
pivot point and drill a 1⁄ 8-in.-dia. hole to accept a pencil point.
Before scribing the curve, add reference points to the stretcher.
At a point 3⁄4 in. from the front edge, draw a line across the length
of the piece. On that line, mark the center point. Now, place the
stretcher on a workbench. Align the pivot point of the compass
with the center mark on the stretcher, positioning the pencil on the
center point. Use the compass to scribe the arc across the stretcher,
use a bandsaw to cut it out, then smooth the sawn edges.
Again, turn to the jumbo compass to scribe the curved front edge
of the lower cradle. Relocate the pencil hole to create a 103⁄4-in.
radius. At a point 21⁄ 8 in. from the front edge of the cradle, draw a
reference line across the length of the piece. Then, mark the end-
Reproduce
at 400%
56
FINE WOODWORKINg
Photos, except where noted: Anissa Kapsales; drawings: Bob la Pointe
COPYRIGHT 2007 by The Taunton Press, Inc. Copying and distribution of this article is not permitted.
Taper and shape the back slats
Easy tapering on the jointer. With the infeed table set to make a 1 ⁄8-in.-deep
cut, add a piece of tape to the fence 1 in. from the front edge of the outfeed table.
Also, wedge the guard open 1 in. or so. Now, with the machine running, lower the
top end of a slat onto the outfeed table, using the tape as a guide and keeping
your hands a safe distance from the cutterhead.
One pass per side. Use a push block to feed the back slat
through the cutterhead. Flip the slat over and repeat. The short
untapered portion at the top end won’t be visible after sanding.
to-end center point on the line and cut the curve on the bandsaw.
After that, smooth, sand, and round over the edges.
Move on to the leg assemblies, then the back
Each of the two leg assemblies is made up of a leg, a leg bracket,
and an arm-support block. With the parts disassembled, drill all
the shank holes in the legs and support block. Use a bandsaw to
cut the taper on the bracket, and then smooth with a smoothing
plane. Now, sand all the leg parts and round over the edges. But
do not round edges where parts meet. Screw one block to the
top of each leg. For each leg assembly, screw a bracket to the
underside of a block and outside of a leg.
The back assembly is made up of two parts: a pair of vertical
risers and a pair of riser brackets. Once the parts are cut, rounded,
and smoothed, screw them together. To locate the proper position
for the riser brackets, place a leg assembly on the riser with both
bottom ends flush, then use the arm-support block as a straightedge to scribe a line across the riser. Position the bracket so that
its face is flush with the front edge of the riser and its top edge is
at the marked line. Secure each bracket in place by driving three
screws through the inside face of the riser and into the bracket.
Pencil
Scribe an arc
on the back
slats
10 in.
Use the tip on p. 55
to create a jumbo
compass. After that,
measure 10 in. from
the nail hole and drill
a 1 ⁄ 8-in.-dia. hole—a
size just big enough
to accept a pencil
point.
⁄ -in.wide
blocks
38
185 ⁄ 8 in.
⁄ -in.wide
blocks
14
Make the upper cradle
To create the curved front edge, use the jumbo compass again.
This time, though, locate the pencil hole 123⁄4 in. from the nail
hole. Again, add a reference point to the cradle. Draw a line 21⁄4 in.
from the front edge of the cradle, and then mark the end-to-end
center point on the line. Use the compass to scribe the arc.
The end curves are next. I experimented with several shapes on
the end of a 41⁄2-in.-wide piece of cardboard. When I hit on one
that looked good, I cut out the curve and used the cardboard to
trace the shape on each end of the cradle. Use a bandsaw to cut
them out, and then smooth the sawn edges.
Cut out the arms
The arms are the focal point of the chair. Enlarge the drawing on
p. 56 to trace a full-size pattern on stiff paper or cardboard. Cut
www.finewoodworking.com
Mark the arc. A
clamp and some
light pressure
keep the back
slats and spacers from shifting
while Begnal
uses the jumbo
compass.
J u l y / A u g ust 2 0 0 7
COPYRIGHT 2007 by The Taunton Press, Inc. Copying and distribution of this article is not permitted.
57
out the pattern and use it as a template to trace the shape on
each length of stock. Then use a bandsaw to cut out both arms
at the same time. Smooth the edges, round them over, and sand
through P150-grit.
assemble
The base
Taper the back slats
#8 wood
screw
Countersink
and 1⁄ 8-in.dia. shank
hole
No pilot
hole
needed
for soft
woods.
SCREW DETAIL
Make a subassembly. Screw the stretcher to the
front and follow with the lower cradle.
To taper the seven back slats, I use an old jointer trick that makes
the process quick and easy. First, apply a piece of tape to the
jointer fence to establish a point about 1 in. from the front edge
of the outfeed table. lower the infeed table 1⁄ 8 in. (the amount of
taper you want on each edge). Then wedge the guard open so
that you can lower a slat onto the cutterhead.
Next, with the machine turned on, rest the bottom end of the slat
on the infeed table (or, if the infeed table is short, overhanging the
end), and align the top end of the slat with the tape. Holding the
slat against the fence with your hands well behind the cutterhead,
lower the end onto the outfeed table. Use a push block to feed the
slat through the cutterhead. Repeat on the opposite edge.
Now you’re ready to trace the top curve on the back slats. Start
by placing all the back slats edge to edge with a pair of spacers
between each. Redrill the pencil hole on the jumbo compass
Add one leg
assembly at a
time. Use a spring
clamp to temporarily clamp each one
to a side piece,
then square it to
the worksurface.
Secure the leg
assemblies. Once
the leg assemblies
are in place, drill
3 ⁄ 8-in.-dia. holes
through the sides
and legs and add
bolts, nuts, and
washers.
FineWoodworking.com
Tom Begnal walks through the
complete assembly process.
Attach the upper cradle. Use a temporary spacer board to ensure that
the risers stay parallel when the upper cradle is attached.
58
FINE WOODWORKINg
COPYRIGHT 2007 by The Taunton Press, Inc. Copying and distribution of this article is not permitted.
Add the arms and slats
Add the arms. Drive the riser screws (at the back)
first to be sure the arm notch fits snugly around the
riser. Begnal conceals the screws by driving them in
from the inside of the riser and the underside of the
support block.
Position the back slats. Start with the center
slat, then the two end slats, and work your way
in. The slats must be aligned at the bottom of
the lower cradle, with even spacing between
them.
Layout trick. Place the chair on its
back and use spring clamps to level
it. This will allow you to rest the slats
on the cradles and adjust positioning
without slippage.
10 in. from the nail. Position the pivot point 10 in. from the top
end of the slats and centered on the middle slat. Scribe the arc
across all the slats.
Cut out the curved ends with a bandsaw. Sand or scrape each
sawn edge and sand the faces through P150-grit before rounding
the edges.
Assemble all the parts
You are ready to start putting the chair together. Stainless-steel
screws (countersunk) and carriage bolts eliminate the need for
glue. Start the assembly by screwing the stretcher to the front end
of each side piece. With the stretcher mounted, add the lower
back-slat cradle to give some rigidity to the subassembly.
Now, on each side piece, mark a line 51⁄4 in. from the front face
of the stretcher. Elevate the stretcher until the back ends are flat
on the worksurface. Then place a leg against the side piece, and
use a square to make sure it is square to the worksurface and on
your mark. Add a clamp to make sure it won’t inadvertently shift
out of position as you drill a pair of 3⁄ 8-in.-dia. holes through the
legs and sides. Bolt the leg in place, then attach the other leg.
With the legs safely at first base, the back assembly is now at
bat. At a point 4 in. from the back end of the side, clamp a riser
to a side piece. Check for square with the worksurface, then drill
the holes and add the bolts. Follow the same procedure for the
second riser.
The upper cradle is next. Position the cradle so that its back edge
is set back 1⁄4 in. from the back edges of the risers. Measure and
drill for a pair of shank holes at each end of the upper cradle.
After you attach the upper cradle, add the arms, as it becomes
a chore to attach them once the back slats are in place. Position
each arm so that the notch fits around the riser, and screw through
the riser and arm-support block.
The back slats are attached to the lower and upper cradles. I
attach the center slat first, then move to the two outside slats and
work inward. Before drilling the shank holes, it is important to
www.finewoodworking.com
Seat slats are the final step. The seven slats are attached at each end.
The 3 ⁄8-in. spacers between each slat make placement a snap.
align them from left to right, up and down, and keep the spacing
even to maintain a nice curve on the bottom and the top.
Give the entire project a quick once-over with P150-grit sandpaper, and break any sharp edges. You can leave the chair unfinished and let it weather naturally. Or, three coats of spar varnish
provide a finish that will hold up well in an outdoor environment.
A fresh coat every couple of years should keep the chair happy
and fit for decades to come.
Tom Begnal is an associate editor.
J u l y / A u g ust 2 0 0 7
COPYRIGHT 2007 by The Taunton Press, Inc. Copying and distribution of this article is not permitted.
59
A gallery of inventive designs
these chairs are a sampling from indiana University of Pennsylvania’s second exhibition on the
adirondack theme. Professor christopher Weiland and director Steve loar invited students and
alumni from recognized furniture and design programs, challenging them to explore and redesign
the century-old adirondack chair. these are design exercises, so feel free to vary materials or
joinery for outdoor use.
NICOLE TARTONI Indiana University of Pennsylvania (IUP)
this version borrows its inspiration from a sundial. to allow the chair
to recline and break down, tartoni incorporated hand-turned, threaded
dowels into the design, construction, and function. Upright, the chair
stands nearly 41 in. tall.
Dowel, 1¾ in. dia.
Fully reclined, it is 47 in.
deep and 30 in. wide.
Threaded
Cap
insert
Bolt
13 ⁄ 8 in. dia.
Turn tenons on
dowel ends.
Each cap has a threaded bolt
epoxied inside.
ANTHONY M C CARTY, IAN ELDRIDGE, AND
SAMANTHA SARHADI Purchase College, State
University of New York
While the construction of this chair is traditional,
the design is not. adirondacks can be hard to exit,
and the backs aren’t always comfortable. So the
makers removed an arm, allowing for easy exit and a
wider variety of body positions. this left the chair visually asymmetrical, so they varied the angle and
size of the back slats. the chair is 33 in.
deep by 30 in. wide by 40 in. tall.
RON MORETTI IUP
Moretti likes the traditional version, but felt it could be
streamlined and softened. his chair has more curves and is
tapered nearly 6 in. to the back. the seat slats must follow
the taper. Unlike the typical adirondack chair, which has the
seat slats resting directly across the side supports, Moretti used a
bracket to recess the slats slightly. the chair (40 in. deep by 24 in. wide
by 41 in. tall) breaks down to four pieces.
60
FINE WOODWORKINg
Photos, this spread: Roy Engelbrecht
COPYRIGHT 2007 by The Taunton Press, Inc. Copying and distribution of this article is not permitted.
MARK WEABER Lehigh University
at the time the call for entries was announced, Weaber was studying
ergonomics in design. the thin slats allowed a more ergonomic profile
than the traditional chair. he curved the front slats down and around
to avoid sharp edges. For a smoother front surface, he
glued the back and seat slats to the framework and reinforced them with a cleat and screws from the back. the joint
between the back post and back legs is a half-lap, pared by
hand for a gap-free shoulder. the chair is 40 in. deep by
25 in. wide by 41 in. tall.
ISAAC HILLSON IUP
hillson’s chair (29 in. deep by 22 in. wide by
32 in. tall) merges two typical outdoor images, the wheelbarrow and the adirondack
chair. the wheel turns on a dowel, which
is glued into larger dowels at both ends to
keep the wheel in place. the seat supports
run from the front to the back at an angle,
where they fit over the larger dowels.
MATHEW NAUMAN IUP
nauman’s chair merges the adirondack with a rocker. nauman
created the rockers as one large circle, then broke the circle into
halves. he began with eight biscuited segments. the resulting
octagon was glued and clamped,
Leave two opposite joints
and the two halves were rough cut
with no biscuit or glue.
Biscuit
to a circle on the bandsaw and then
joints
finish-routed using a template. For
strength, nauman inserted ¼-in.
dowels to support the biscuit joint.
1½ in. thick
the chair is 32 in. deep by 24 in.
67.5o
wide by 36 in. tall.
Strap
clamp
34 in. long
www.finewoodworking.com
JUly/AUgUST 2007
COPYRIGHT 2007 by The Taunton Press, Inc. Copying and distribution of this article is not permitted.
61


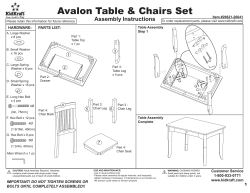


© Copyright 2026