
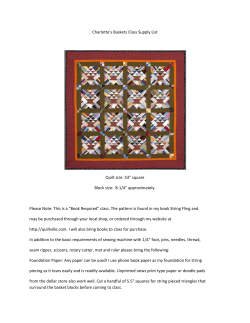
Square Dance Quilt Pattern by Sharon Holland
Sharon Holland
designs
for
A Quilt Shop Only Collection
Quilt designed by Sharon Holland with fabrics from the Dilly Day collection for Paintbrush Studio. Finished quilt size; 76” x 76”
Finished Quilt Size
120-4563 1/4 yd
76” x 76”
Cut: (2) 2 1/2” wide strips. From these strips,
cut: (6) 2 1/2 x 6 1/2” rectangles, (4) 2 1/2 x 4
1/2” rectangles, (2) 2 1/2” sqs.
Finished Block Size
120-4562 1/4 yd
(16) - 16” finished block in a 4 x 4 block setting
Cut: (2) 2 1/2” wide strips. From these strips,
cut: (6) 2 1/2 x 6 1/2” rectangles, (4) 2 1/2 x 4
1/2” rectangles, (2) 2 1/2” sqs.
General Sewing Instructions
•
•
•
•
•
•
Use a scant 1/4” when sewing seems
Remove selvedge edges from fabrics
Strips are cut from selvedge to selvedge
Borders measurements are exact size, cut larger to allow for sewing variances if desired
Press as you go for easier handling
Read all instructions through before beginning
120-4561 1/4 yd
Cut: (2) 2 1/2” wide strips. From these strips,
cut: (6) 2 1/2 x 6 1/2” rectangles, (4) 2 1/2 x 4
1/2” rectangles, (2) 2 1/2” sqs.
120-4501 1/4 yd
Cut: (2) 2 1/2” wide strips. From these strips,
cut: (6) 2 1/2 x 6 1/2” rectangles, (4) 2 1/2 x 4
1/2” rectangles, (2) 2 1/2” sqs.
Material Requirements*
120-4531 1/4 yd
120-4523 5 yd
Cut: (2) 2 1/2” wide strips. From these strips,
cut: (6) 2 1/2 x 6 1/2” rectangles, (4) 2 1/2 x 4
1/2” rectangles, (2) 2 1/2” sqs.
Cut: (2) 84” long panels the width of the
material. Reserve for backing. Cut: (2) 2 1/2” wide
strips. From these strips, cut: (6) 2 1/2 x 6 1/2” rectangles, (4) 2 1/2 x 4 1/2” rectangles, (2) 2 1/2” sqs.
120-4532 1/4 yd
Cut: (2) 2 1/2” wide strips. From these strips,
cut: (6) 2 1/2 x 6 1/2” rectangles, (4) 2 1/2 x 4
1/2” rectangles, (2) 2 1/2” sqs.
120-4481 1 1/2 yd
120-4551 1/4 yd
Cut: (8) 6 1/2” wide strips. From these strips, cut:
(4) 6 1/2” x 32 1/2” strips and (4) 6 1/2” x 38 1/2”
strips for pieced borders
Cut: (2) 2 1/2” wide strips. From these strips,
cut: (6) 2 1/2 x 6 1/2” rectangles, (4) 2 1/2 x 4
1/2” rectangles, (2) 2 1/2” sqs.
120-4502 2 yd
120-4552 1/4 yd
Cut: (25) 2 1/2” wide strips. From these strips,
cut: (96) 2 1/2 x 6 1/2” rectangles, (64) 2 1/2 x 4
1/2” rectangles and (32) 2 1/2” squares
Cut: (2) 2 1/2” wide strips. From these strips,
cut: (6) 2 1/2 x 6 1/2” rectangles, (4) 2 1/2 x 4
1/2” rectangles, (2) 2 1/2” sqs.
120-4521 1/4 yd
120-4542 1 yd
Cut: (2) 2 1/2” wide strips. From these strips,
cut: (6) 2 1/2 x 6 1/2” rectangles, (4) 2 1/2 x 4
1/2” rectangles, (2) 2 1/2” sqs.
24” x 24” square for bias tape binding
Cut: (4) 2 1/2” strips. From these strips, cut: (64) 2
1/2” squares
120-4522 1/4 yd
Cut: (2) 2 1/2” wide strips. From these strips,
cut: (6) 2 1/2 x 6 1/2” rectangles, (4) 2 1/2 x 4
1/2” rectangles, (2) 2 1/2” sqs.
120-4541 1/3 yd
Cut: (4) 2 1/2” strips. From these strips, cut: (64) 2
1/2” squares
120-4512 1/4 yd
Cut: (2) 2 1/2” wide strips. From these strips,
cut: (6) 2 1/2 x 6 1/2” rectangles, (4) 2 1/2 x 4
1/2” rectangles, (2) 2 1/2” sqs.
120-4572 1/4 yd
Cut: (2) 2 1/2” wide strips. From these strips,
cut: (6) 2 1/2 x 6 1/2” rectangles, (4) 2 1/2 x 4 1/2”
rectangles, (2) 2 1/2” sqs.
120-4511 1/4 yd
Cut: (2) 2 1/2” wide strips. From these strips,
cut: (6) 2 1/2 x 6 1/2” rectangles, (4) 2 1/2 x 4
1/2” rectangles, (2) 2 1/2” sqs.
120-4571 1/4 yd
Cut: (2) 2 1/2” wide strips. From these strips,
cut: (6) 2 1/2 x 6 1/2” rectangles, (4) 2 1/2 x 4 1/2”
rectangles, (2) 2 1/2” sqs.
*Batting - Full size batting of desired loft
120-4491 1/4 yd
Cut: (2) 2 1/2” wide strips. From these strips,
cut: (6) 2 1/2 x 6 1/2” rectangles, (4) 2 1/2 x 4 1/2”
rectangles, (2) 2 1/2” sqs.
2
Piecing Instructions
4. Attach another short rectangle to the unit created.
Chain sewing can be used to continuously join like set
pieces. Prepare all pieces need to complete a given step
and sew one set right after another without cutting threads
until finished with the set.
Square Dance Block Assembly
Each 16” finished Square Dance block is made up of four
smaller 8” finished blocks. Two smaller blocks of one fabric
arrangement and two smaller blocks of another fabric
arrangement.
5. Attach a long rectangle to the unit.
The assembly of the blocks can be done in sets and chain
sewing can be used throughout the construction of the
blocks. Follow the diagrams below to assemble the blocks.
1. These are the pieces needed to assemble one block.
6. Sew a long rectangle to the units already created.
2. Start by chain sewing the center squares to the
corresponding square print for that block.
7. Sew a corner square onto the corresponding long
rectangle.
3. Attach a short rectangle to the square units.
3
8. Attach square and long rectangle
unit to the units already created.
9. Sew the four units together to
create one block.
Quilt Assembly - Finished quilt size: 76 x 76” set in a 4 x 4 block setting
6 1/2” x 38 1/2”
6 1/2” x 32 1/2”
= 6 1/2” x 64 1/2”
16 1/2” unfinished
4
= 6 1/2” x 76 1/2”
Making Bias Tape
There are many ways to bind a quilt. You may have a
preferred method and may not choose to do a bias tape
binding.
Yardage has been included in this project to create a bias
tape binding, which is recommended. Bias tape binding
is made by cutting strips of fabric on the bias (45 degree
diagonal cut.) You will need about 312 ” of bias tape for this
quilt. Ample inches have been added into this amount for
seam allowance and finishing.
Step 4:
Place two strips right sides together at right angles and
sew straight across with 1/4” seam. Continue till you have
one long strip of fabric, press open seams. Fold in half lengthwise
with right sides out along entire length of bias tape. Attach to quilt
following standard binding practices.
Step 1:
Cut off selvedge edge and place a straight pin parallel to
selvedge edge for reference. Cut binding fabric into a
24” x 24” square.
selvedge edge
24” x 24” square
Step 2:
Fold the fabric back diagonally so a straight edges are
matched, parallel to the selvedge edge (the edge marked
by the straight pin.) Iron this fold.
Figuring Out How Much Bias Tape You’ll Need
Add up the lengths of all four sides of your finished
quilt, throw in an extra 12 inches for seam allowance
and finishing off - That’s how much bias tape you will need.
wrong side of fabric
selvedge edge
fold on the
diagonal, iron
the fold
About the Designer
Sharon Holland is a textile designer, graphic artist and
landscape painter. Her love of colors, patterns and vintage
textiles combined with her love of nature inspired motifs
are the emphasis to her textile designs.
Follow Sharon on her textile designer’s scrapbook blog:
www.sharonhollanddesigns.com
Step 3:
Use a ruler to mark parallel lines from the pressed line at
2 1/2 “ apart. Cut on these lines to cut apart.
Sharon Holland
designs
5


© Copyright 2026