
CLOSE WINDOW
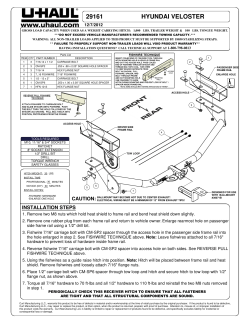
Form No . 1-627
Nov. 1987
W
pmow
rao0s
CLOSE WINDOW
PARTS & INSTALLATION INSTRUCTIONS
MEYER SNOW PLOW MOUNTING FOR
SUZUKI SAMURAI
VEHICLE MUST COMPLY WITH VEHICLE MANUFACTURER'S
SPECIFICATIONS FOR SNOW PLOW APPLICATION.
PARTS LIST
Item
1
2
3
4
5
6
7
B
9
10
11
12
13
Part No .
18040
11120
11135
11130
11131
11125
11136
11137
11138
10514
10529
13600
12984
12978
Quantity
1
1
1
1
1
1
2
2
2
1
1
1
1
Z
14
15
16
17
1B
19
20
21
22
23
24
25
26
27
28
29
30
31
32
33
34
08573
20049
20050
20056
20062
20083
20139
20141
20144
20147
20149
20305
20309
20319
10538
21984
20327
20353
20315
11139
11140
11067
35
36
37
38
39
40
41
42
08511
11006
21984
12150
20309
13598
13591
20150
20318
1
2
2
2
5
2
1
2
4
08470
1
43
44
45
46
47
09916
08201
12816
20005
20312
20325
48
49
50
51
09103
09104
21943
20307
1
2
4
2
2
1
2
4
1
2
2
6
9
2
2
2
4
8
1
3
1
2
1
2
2
2
2
2
1
1
5
5
Description
MOUNTING CARTON
. Frame Support
. Lift Frame
" Sidemember, R.H .
. Sidemember, L.H .
. Clevis Frame
" Strap
" Light Bracket
" Light Bracket Brace
" Lift Arm
. Support Arm
. A-Frame
" Pivot Bar
Trip Spring
. Mounting Hardware Bag
.. Bolt H 3/8-16 x 1" Gr . 2
» Bolt H 3/8-16 x 1-1/4" Gr.
» Bolt H 3/8-16 x 2-3/4" Gr.
» Bolt H 3/8-16 x 4-1/2" Gr.
» Bolt H 7/16-14 x 4" Gr. 5
» Bolt H 5/8-11 x 1-1/2" Gr .
» Bolt H 5/8-11 x 2" Gr . 5
» Bolt H 5/8-11 x 2-3/4" Gr .
» Bolt H 5/8-11 x 3-1/2 " Gr .
"" Bolt H 5/8-11 x 4" Gr. 5
» Locknut 3/8
"" Locknut 5/8
"" Locknut (Eslok) 5/8
"" Quick Disconnect Pin
.. Hair Pin Cotter
.. Lockwasher, 3/B
"" Flatwasher, 3/8
» Locknut (Eslok) 7/16
.. Plate Washer 5/8
.. Plate Washer 7/16
.. Plate
2
2
2
5
5
5
. Hardware Bag - Moldboard
» Hinge Pins
» Hair Pin Cotter
» Eye Bolts
» Locknuts 5/8-11
» Pivot Bolts
.. King Bolt
"Bolt, H 5/8-11 x 4-1/2" Gr. 5
» Nuts, Eslock, 5/8-11
" Snow Plow Marker Kit
"Snow Plow Marker Assy.
» Clamps
"" Bolt . H 1/4-20 x 1 "
** Locknuts, 1/4-20
"" Lockwasher 1/4
" Kit, Electrical Disconnect
MOLDBOARD ASSEMBLY - TM-6
. Cutting Edge - TM-6
" Bolt C 1/2-13 x 1-3/4"
" Locknut 1/2-13
Parts indented are included in the carton, bag or assembly under which they are indented . When
ordering parts furnish Part No ., Name and Description. Also furnish Vehicle Model and Year, Type of
Hydraulic Unit and Moldboard Size.
Meyer Products reserves the right, under its continuing product improvement program, to change construction or design details,
specifications and prices without notice or without incurring any obligation .
12877M
Printed in U.S.A .
f DUCTS
18513 Euclid Ave. " Cleveland, Ohio 44112-1084
Phone 486-1313 (Area Code 216)
GENERAL INFORMATION
CAUTION : Always disconnect battery before beginning installation.
DO NOT burn holes or weld vehicle frame . This may cause frame
failure .
After first use retighten all mounting bolt connections to specified
torque . All mounting bolt connections to be checked periodically for
tightness.
Check contents against the parts I ist to determ ine all are correct and
included, and also to familiarize yourself with them .
Locknuts are furnished . Do not tighten bolts and nuts until
installation is complete (unless otherwise specified), then be sure to
tighten all attaching parts per specified torque chart .
It is important that the Mayer harness, all wires from the Meyer light
switch, and all other electrical wires be routed around hot or moving
engine parts, and any sharp sheet metal . Protection must be
provided to guard against wire damage at these points . All excess or
loose wire must be neatly secured using wire ties .
TORQUE CHART FOOT LBS.
Bolt-Nut Size
1/4
3/8
-20
-1"
7/16-14
1o -1s
6K -11
3/4 -10
GR .
-18 5/16
O
4-5
f-11
17-20
GR
5
or ©
e .5 Metric
42-46
64-72
127-141
227 - 261
INSTALLATION INSTRUCTIONS
A.
B.
C.
D.
E.
F.
Remove bumper, keep all fasteners.
Remove tow hooks and place in cab of vehicle .
Insert Frame Support (1) in ends of vehicle frame and secure
using 3/8 x 2-3/4" Bolts (16), Locknuts (24) and Flatwashers
(30) in the upper hole on each side . Use 3/8 x4-1/2" Bolts (17),
Flatwashers (30), Plate (34) and Locknuts (24) in the lower hole
on each side . Refer to drawing for proper location of Flatwashers and Plates . Tighten all fasteners to proper torque .
Re-attach bumper using original fasteners and tighten to
proper torque .
Temporarily attach hole "A" of Sidemembers (3 & 4) to Frame
Support (1) at hole "A" . While holding Sidemembers (3 & 4)
tightly up against vehicle frame, use them as a template to drill
one 1 1 /16" diameter hole on the driver's side frame rail and
two 11 / 16" diameter holes on the passenger side .
Install 5/8x3-1 /2" Bolt (22), 5/8 Platewasher (32) and Locknut
(25) in forward hole of R .H . Sidemember (3) and hole "B" on
passenger side of vehicle frame . Remove steering gear bolt
from hole "B" on driver's side and install 7/16x4" Bolt (18),
7/16 Platewasher (33) and Locknut (31) in hole "B" and
forward hole of L .H . Sidemember (4). Install Straps (6) using
5/8x4" Bolts (23), 5/8 Platewasher (32) and Locknuts (25) in
rear hole of Sidemembers (3 & 4) and holes "C" in vehicle
frame. Refer to drawing for proper order of fasteners . Do not
tighten .
GR .
5
26-9
90-1
60179-0
FIGURE 1
45
10
49
51
From
Electro-Touch
Carton - See
Paragraph "Q"
G.
H.
I.
Attach Lift Frame (2) and Clevis Frame (5) to Frame Support (1)
and Sidemembers (3 & 4) using 5/8x2" Bolts (20) and Locknuts
(25). Do not tighten.
Attach loose end of Straps (6) to Clevis Frame (5) using 5/8x
1-1 /2" Bolts (19) and Eslok nuts (26) . [Eslok nuts are not as tall
as the other locknuts and have the locking material in the
threads themselves.] Eslok nuts must be used to allow proper
installation of Hinge Pins (35) .
M.
N.
O.
Tighten all remaining fasteners to proper torque as shown in
torque chart while pulling forward on Lift Frame (2) and
pushing back on Clevis Frame (5) .
J.
Install Light Brackets (7) to top of Lift Frame (2) using 3/8x
1-1 /4" Bolts (15), Lockwashers (29) and Light Bracket Braces
(8) using 3/8x1 " Bolts (14) and Locknuts (24).
K.
Install lights per separate instructions, making certain lights do
not interfere with opening of hood . IMPORTANT : Follow
" special instructions" paragraph
on light instruction sheet
1-625 to locate vehicle high and low beam wires . The white
wires are attached as follows :
connect white
wire to :
L.
Driver's Side
Passenger Side
White/Blue Stripe
White/Red Stripe
Attach Electro-Touch Unit to Support Arm (10) using 5/8"x
3-1 /2" bolt (22) and 5/8" locknut (25) and to Lift Arm (9) using
5/8" x 2-3/4" bolt (21) and 5/8" locknut (25) . Secure this
assembly to Lift Frame (2) using Quick-Disconnect pins (27)
and Hair Pin Cotters (28).
Install Electro-Touch wiring system per separate instructions .
Attach Pivot Bar (12) to Moldboard (48) using pivot bolts (39)
coated with chassis lubricant, and 5/8" locknut (38) .
Attach Trip Springs (13) to Pivot Bar (12) and Moldboard (48)
with eye bolts (37) and locknuts (42) . Flat end of eye bolt (37)
must be in a vertical position, as shown in Figure 1, to hinge
properly when Moldboard (48) trips . Proper tension is attained
when Trip Spring (t3) coils begin to separate and then
tightening top locknut (42) four additional turns . Tighten
bottom locknut (42) to secure eye bolt (37) in position . See
Figure 1 .
P.
Assemble A-frame (11) to Pivot Bar (12) using Kingbolt (40) and
5/8" locknut (38) . Grease King bolt (40) prior to installation .
Q.
Install Power-Angling Rams with fitting end to the A-frame (11)
using 5/8"x 3-1/4" bolt and 5/8" locknut (packed in hardware
bag 08363 in Electro-Touch carton). Attach piston end of ram to
Pivot Bar (12) using 5/8" x 4-1 /2" bolt (41) and 5/8" locknut
(38) .
R.
Straighten end of Plow Markers (43) so they will be vertical
after installation. Attach using 1/4" x 1 " Bolt (45), Clamp (44),
1 /4" Locknut (46) and Lockwasher (47 ) .
S.
Secure the Moldboard-Pivot Bar-A-frame assembly to vehicle
at Clevis Frame (4) using Hinge Pins (35) and Hair Pin Cotters
(36) . Attach Lift Chain to Lift Arm (8) with sufficient slack to
allow Moldboard to follow ground contours .
CLOSE WINDOW
22
Ground
Special Nut See Paragraph "H"
NOTICE : Meyer Products assumes no responsibility for
installations not made in accordance with these instructions .


© Copyright 2026