
How to Create 1940s Hairstyles '40s Hairstyle .
How to Create 1940s Hairstyles
'40s Hairstyle
The glamorous hairstyles of Rita Hayworth and Bette Davis are the epitome of 1940s glamour. The
'40s were exemplified with curls in every hairstyle. Curls were the definition of polished femininity.
These old school styles are still very much en vogue. The side parts and pin curls of yesteryear are
deemed to delicate by some to replicate authentically in present day. With a few tips, you can
replicate a 1940s hairstyle in your own home.
Difficulty: Moderate
Instructions
Things You'll Need:
Large pack of bobby pins Comb Ponytail holder Hairspray
1. Step 1
Pin the entire head in pin curls. To do this, comb the hair out in 1-inch sections and roll them
around the index finger. Once secured, push the curl to the root of the head with your hand.
2. Step 2
Place two bobby pins in the hair to hold the curl in place. The first bobby pin should go straight
across the middle of the curl to anchor it to the hair. The second bobby pin should go in the hair in
an angle perpendicular to the first bobby pin. The end result should appear as if the bobby pins
are making the letter "X" on top of the curl.
3. Step 3
Repeat the pinning process until the entire head is pin curled and leave the style to set for at least
8 hours. It is recommended to try this style at night, so that it may set appropriately.
4. Step 4
Remove the pins after the required setting time and gently shape the curls with your finger. This is
the basic starting point for any '40s style.
5. Step 5
Comb the hair to one side and bobby pin for a page boy look that is simple yet elegant.
6. Step 6
Pull your hair into a ponytail after making a side part to pull of a '40s school girl look. You can also
pull your front bangs out and roll them towards your forehead and then pin them for extra height
and a cool '40s rockabilly look.
7. Step 7
Finish with hairspray after you've decided your look. No '40s style is complete without hairspray to
hold it all together.
____________________________________________________________________________
Emulate the hairstyles of the early '40s. These saw a bit more change than fashion did. The styles
were often very creative and elaborate and the short haircuts of the 1930s gave way to the popularity
of shoulder length, or a bit longer hair.
o
Hair started to be styled with more height, not close to the head as was popular in the 1930s.
o
The finger waves that had been popular since the 1920s became incorporated into more
feminine and flirty styles. Finger waves would be styled along the side of the face, leading up
to piles of curls. Finger waves were worn as a way to style the hair swept up from the face into
a style, rather than showing up as the entire hairstyle.
o
Curls were often tight and well defined. Pin curls were made tight and not brushed through as
much as they would be later in the 1940s. There are more variations than there is room to
describe here, but a lot of elements in a combined form that were popular through the decade
continued into the 1950s hairstyles.
o
The styles were often very creative and elaborate and the short haircuts of the 1930s gave
way to the popularity of shoulder length, or a bit longer hair.
Wear 1940s makeup. It was still using some colors that had been popular in the 1930s, however,
small changes began to come into vogue.
o
o
o
Eyes weren't emphasized with dark shadows, rather just some mascara, though mascara was
often worn on top and bottom lashes. Eyeliner was generally worn on the top lids, not the
bottom.
Eyebrows were arched more naturally, but still had an arc to them that could only be achieved
with tweezing and shaping, and eyebrow pencil.
Lipstick was still darker shades of red, maroon was popular. Mauves and corals were also
popular, and Tangee lipstick, the original color-change lipstick, is still available. It was still
common to fill in lipstick beyond the lip line, especially to emphasize the curve of the “Cupid's
bow” of the top lip to more of a gentle arc.
________________________________________________________________________________
Wear more natural and simple makeup that was characteristic during the mid-'40s.
o
o
o
o
o
Eyebrows were to be well manicured, but to a more natural arc, much less stylized.
Eye makeup was understated, also, mascara being generally worn only on top lashes and
eyeliner on the top lids for evening events.
Rouge was matched to the complexion to be most natural and flattering.
Lipstick was popular in fire-engine red, or any brighter shade of reds.
Nail varnish was also often of a similar red, often worn to match the lipstick.
Make this look work with red or pink lipstick, go a tad heavy on the blush, use tans, browns or
dark grays on your eyelids to complete your 40's Pin Up Girl look!
____________________________________________________________________________
Add the hairstyle of the mid-40s. This was the time when most of the hairstyles we think of as the
1940s style began to be worn by everyone.
o
o
o
Side reverse rolls, worn so that the rolls end closely together on the top of the head, would
create a “V” shape, and they were commonly called “Victory Rolls.”
Pin curls at this time were essential in creating complicated styles. For casual looks, pin curls
would be made in even rows, and brushed through for a lovely wavy effect.
Ribbons, flowers, and snoods were popular hair accessories.
o
Red, coral or pink lipstick suited to your skin tone.
Hair rats are great for the hairstyles, to accomplish rolls and faux bangs
___________________________________________________________________________
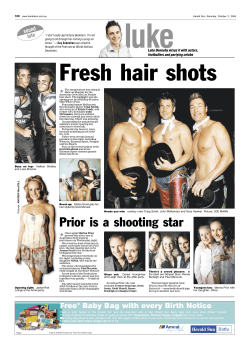
1940's
Rita Hayworth wears gorgeous victory rolls.
Curly hair in the 40's was worn longer (past the shoulders) and carefully rolled. Because of the
economic hardships brought about by World War II, many women couldn't afford extravagant
fashions, so they counteracted the plainness of their clothing with complicated hairstyles.
For an easily recognizable 40's hairdo, do your hair in victory rolls. The easiest way to achieve this
style is with a curling iron. Hair is curled and rolled away from the face, either on the sides (aka "side
reverse rolls") or on the top of the head ("top reverse rolls"), and pinned in place. The ends are curled
and flow loosely down the back.
Pin curls were another popular way to wear curly hair. They can be done all over the head, or just
around the temples and forehead. To get the pin-curl look, separate damp hair into small sections.
Curl each section around your finger and secure with a bobby pin. If you're sleeping on your hair,
cover it with a silk scarf to keep the pins in place.
More detailed instructions on styling your hair in victory rolls and pin curls can be found below in
"Resources."
______________________________________________________________________
R
1930s
Making Finger Waves
A finger wave may be defined and described as a wave
made by wetting the hair, combing it flat,
making sharp ridges at intervals over the head,
stretching the hair between the ridges, covering with a net,
and drying under the electric dryer.
The process of finger waving may be described briefly as follows:
Hair that has been dampened with water is combed out straight
and sponged with curling fluid (setting lotion). The first wave
should begin an inch or more from the scalp,
depending upon personal preference. The hair is pressed down
near the part with the left hand and drawn by the comb
toward the brow, making a sharp ridge. The comb is pressed
upward and should graze the scalp so that every hair will be included
in the wave. The comb is not released until the ridge is held firmly
in place between the first and second fingers of the left hand
and then it is drawn through the hair to the ends. It is advisable
to wave around the head instead of downward toward the ends.
To make the second wave the comb is drawn sharply away
from the brow, while the first wave is held firmly in place.
Continue the wave, working down from the part, around the head.
The ends in front of the ear are curled into a flat ringlet.
The hair over the ear is curled in back of it and, when dry,
is combed to cover the ear.
A net should be placed over the head and the hair dried
before combing the wave. While the hair is drying, the waves
can be pressed in more deeply. After the hair is dry it should be
combed back from the face, not downward from the part,
and pushed upward into waves by the hand and the comb.
Important Points to Remember in Finger Waving:
The hair must be throughly saturated in order to obtain the best results.
The hair should be combed smooth and into the direction it is to be waved.
The hair should then be pushed up with palm of the hand
to ascertain the direction of the natural wave. The durability
of the wave depends entirely upon following the natural wave.
The smoothness and durability of the finger wave is also due
to the continual combing. It is necessary that the teeth of the comb
penetrate the scalp. This eliminates any straight hair underneath and is accomplished
by bringing the comb under the finger and combing the hair until the comb is free.
The amount of hair taken upon the comb should never be over one inch on the sides
and 1/2 inch at the crown. One of the chief faults in finger waving
is swinging the hair too far, When hair is spare upon the head, the wave
should be swung into position and then the comb should be drawn back slightly,
which will allow the hair to cover the bare spaces.
A becoming style should be decided upon and the waves
mathematically figured to fit the head, before the wave is begun.
There is a tendency to push the hair up on the head
rather than to draw the hair in a tight, straight line. In forming waves,
the finger should always be placed slightly above the ridge to avoid
the ridge being formed lower than the one previously made.
The small strands of hair to be made into face curls should be removed
before commencing the wave. These are not curled or pinned until the finish
of the wave but are moistened with finger wave lotion and shaped to the face.
Finger wave lotion [setting lotion] should never be used
too generously or of too thick consistency, as it will flake
on the hair and retard the drying action. Thin hair should be set
without lotion as it makes the wave too flat on the head.
The finish at the back of the head is as important as the face line
and the hair if too short to make into curls, should be waved as far as possible.
If the hair at the hair line is too straight and stubborn to curl, the ends should be turned
on a warm bob curl iron [curling iron] when the wave is dry.
The nicest finish for the finger wave is pin curls;
however, some women prefer the curls rolled on a stick as described in the Wet Mae Murray.
If curls are to be rolled up at the lower back section of the head, a heavy cordtwo ends of which are held tighly at the front by the patronwill keep the hair hair smooth while the operator is rolling the curls.
The size of the wave is governed by the placement of the fingers below the ridge, as follows:
* To produce a small wave, the fingers are not moved after they straddle the ridge,
but the hair is drawn along the finger with the fingers still in this position.
* To produce a medium wave, the finger is rolled a half turn downward
after the fingers have been placed astride the wave.
* To produce a large wave, both index finger and middle finger are placed
below the ridge and the hair drawn along the index finger.
If the ridges are to be deepened the hair will have to be moistened between the waves.
This is accomplished by sprinkling the center of the waves with water
on the comb. You may use the index and middle fingers to sharpen the ridge.
Rules for shaping the hair properly around the ears:
* If the wave is directed forward in the section of hair just above the ear,
1/2 inch of hair is included from behind the ear, while if the wave
is directed backward at this point 1/2 inch of hair from the front is included.
As a general rule, it is considered much better to wave directly over the ear.
The hair must not be wet.
At the point where the wave reaches the ear, the comb should be tilted
slightly backward to control the hair.
In shaping the wave the hair should be held out away from the ear.
Otherwise the forming of the wave is the same. The hair must
not only fit well around the ears when waved, must match when dried and combed.
How to do a Victory Roll hair style
By Aslynn, eHow Member
I want to do this!
do a Victory Roll hair style
Many women are looking for something new, feminine, sexy... and they are finding it in the past.
Classic 1940's Pin Up Girl is a look that is on the rise. These lovely ladies were painted on the side of
aircraft during World War II and appeared in many magazines while their toned down sisters worked
the factories back home and in hospitals throughout Ally territory. They shared one similarity more
often then not, the Victory roll or curl hairstyle, named for the V shape they made if a lady didn't have
bangs or fringe. Easy, versatile, and very stable even in poor weather, this classic, classy hairstyle is
perfect for our economy crisis too! Dirt Cheap!
Difficulty: Moderately Easy
Instructions
Things You'll Need:
Shoulder length hair or longer, without too many short layers around the face
Hair Pins
Curling iron or rollers
Comb or brush
Hair spray (optional)
Two Hair Rats (optional)
Patience (NOT optional)
1. 1
The Victory Roll hair style is amazingly forgiving of ladies of different races, face shapes and sizes
and can be adjusted easily to give you the most appealing look for you. Any hair color or cut
works so long as you have enough length to "roll". Having drastically layered hair can make this
style more difficult, if not impossible. If you have anything close to a "pixie" cut, forget about it!
Read this article again in a few months.
2. 2
Lay out your tools. These will include the items listed, but you may also need a straightening iron,
spray bottle with water, hair elastics or even a decorative flower, be it real or fake.
3. 3
Decide if you want your Victory Rolls symetrical or asymetrical. Do you want one roll or two? Part
your hair down the middle or off to the side. Ladies in the 40's did both so just choose one you
think will work well with your facial features. Use a comb or parting tool to make a crisp part.
4. 4
Start out by parting your hair just behind your ear and moving up to the top of your head. Once
you have done this on both sides you should have 3 sections of hair; right, left and back. Use an
elastic or pins to keep the back section of your hair out of the way while you work.
5. 5
If your hair is curly to the point of frizzyness, you may need to straighten your hair first. If your hair
is very thick and stiff (Asian or red heads for example) it might help to get the curl started with a
curling iron.
6. 6
Victory Rolls in shoulder length hair: Choose a side and brush your hair until it is smooth and held
high, say near your temple. Spray on a little water or hair spray and run your hair between your
first and middle fingers like a curling iron, making your hair flat and about 2 inches wide. Use your
other hand to curl it inside itself, rolling it several times if possible. Rotate your fingers and try to
keep the ends of your hair inside the Victory Roll curl.
7. 7
Use at least 3 hair pins in the front to hold this Victory Roll in place and add as many as you need
down the side closest to your part. As you can see in this photo my hair is a little short to make
perfectly smooth Victory Rolls. Don't worry about pins showing, once you raise your head no one
will see them. And besides, you bought some that match your hair color, right?
8. 8
Repeat on the opposite side, always curling toward the part. Finish with hair spray to smooth any
stray hairs and take a look at your Victory Rolls. Are they in the right place? If one seems off, just
take it down and do again, practice makes perfect!
9. 9
Are they too poofy or not poofy enough? If they are too poofy you can literally "squish" them down
with your hand pushing the top of the curl back, so it will lay flatter. Not poofy enough may mean
your didn't get enough turns into the curl. No problem, take it down and try again.
10. 10
Another no no that usually happens with Victory Rolls in shorter hair is "hair tunnel". This is when
you get a perfect tube of hair on top of your head that you can see straight through. You should
not be able to see any light through your curl, it makes your hair look thin. First, try to "squish" the
roll, pressing the top of the curl back. If that doesn't do it, try to roll it again. If that doesn't work
your hair may be very thin. That's ok, this is where the hair rats come in.
11. 11
If you have very thin hair you can purchase small hair rats to use inside the Victory rolls. These
add bulk and can be bought to match your hair color. They can even help you make the rolls
easier, just start at step 6, place the rat at the end of your hair, and start rolling like a curler. Be
sure to cover the rat with your hair, you don't want anyone to know it is there! Pin in place with as
many pins as you need.
12. 12
For very long hair: If your hair is past your shoulders you are going to do more of a twist then a roll
to get the same effect. The ends of your hair will come out the back of the curl and down the back
of your head. Pull up one side of your hair, hold it about 2 inches away from the scalp and wrap
your hair around your thumb, wrapping towards your part. Smooth the end of your hair backwards
behind the roll. Pin the curl in place using as many pins as you need, usually 3 in front at least.
13. 13
Finishing the Victory roll hair style is easy too! Spray down stray hairs, then add a flower, clip, or
even a pair of cherries just above one ear. The back of your hair can be put in a bun, curled
under, or set in waves down your back. The variations are endless! You can even leave one side
down! (Especially nice if you've made one good roll and can't get the other side to work!) Put the
flower on the side with the Victory roll!
14. 14
Women would make their own rats! They collected the hair from their combs every day and
either rolled it in their hands to make a kind of dreadlock or their put it in a hair net and sewed
it closed! Women have been doing this for years!
Victory Rolls are a growing trend in weddings too, for both brides and bridesmaids.
____________________________________________________________________________
Change the hair. Hairstyles of this time became more casual. Fingerwaves had all but vanished.
Short hairstyles with modest curls were the highest fashion. Some women began to grow their hair
longer now. Rolls were still popular but were giving way to more sleek and short hairstyles popular in
France. Bangs began to show up more frequently.
Select different makeup. Makeup after the war saw a few interesting changes. For the most part it
had stayed the same, though now, lipstick wasn't worn much outside the natural lip line and followed
a more natural arc of the Cupid's bow. This can be seen in pin-up girl posters of the time.
If you learn to apply fake lashes, this goes a long way.
edit Tips
Use your common sense, as many of these make up styles look best on a certain type of face,
which the individual must consider before incorporating any such style into her own unique
"look."
________________________________________________________________________________
Think Bette Davis or Ginger Rogers for that Hollywood Glamour look. Healthy, powdered skin. Bow
shaped bright red lipsticks, clearly defined. Highly arched penciled eyebrows with a little pale blue
eyeshadow. Beauty spots. Eyelashes and a clear dark fine line on the top of the eyelid, give elegant
definition. Rouge was worn to blend with the lipstick close to the nose in a triangular shape: frequently
created by three dots blended together. Elaborate hairstyles, made by rolling hair either in a sausage
shape, or with small pin curls and decorated with large flowers or bows. Lots of hair spray!
Think Bette Davis or Ginger Rogers for that Hollywood Glamour look. Healthy, powdered skin. Bow
shaped bright red lipsticks, clearly defined. Highly arched penciled eyebrows with a little pale blue
eyeshadow. Beauty spots. Eyelashes and a clear dark fine line on the top of the eyelid, give elegant
definition. Rouge was worn to blend with the lipstick close to the nose in a triangular shape: frequently
created by three dots blended together. Elaborate hairstyles, made by rolling hair either in a sausage
shape, or with small pin curls and decorated with large flowers or bows. Think lots of hair spray.
________________________________________________________________________________
1940s Hair and Makeup
We Can Do It!
Remember one of the most famous WWII posters of Rosie the Riveter? A woman in a red scarf with
white polka-dots wrapped around her head and knotted at the top, in blue union uniform showing us
her bicep with the tag line at the top that reads "We Can Do It!"? Well this Poster epitomizes the the
woman's story during the century of WWII. This poster was put out by a government group named the
War Production Co-ordinating Committee. The purpose of course was to enlist women's support back
home in the war effort.
Like the decades previous this one had the war to set the tone and helped to define a woman's hair
and makeup choices. Simplicity was the catchword of the day. For woman were being called on to do
a lot during this decade. Makeup was more natural (i.e. creamy skin, smoothly powdered with a
natural looking pinkish hue, lips in a patriotic red. The focus for 1940s eyes is the lashes as mascara
had found its place during this decade.
Hair was longer and smooth, rendered in a more romantic, softer look than the previous decade.
Simplicity may have been important but not at the expense of looking good. According to
freebeautytips.org :
"1940's women were asked to do a lot, and working for the war effort took a toll. But glamour was in,
fresh from Hollywood, and women who were earning their first paychecks were also shopping,
dressing elegantly and using cosmetics like movie stars. Part of the rationale was that the nation's
women couldn't afford to look frumpy in a time of war; the other reason for spending so much time
and effort on one's appearance was to stay somewhat positive and optimistic. "Putting a brave face
on" was more than an interior process: wearing makeup and nice clothes was a statement of selfworth and confidence. "
As in previous decades woman looked to the ladies of the silver screen for "the look"
Hedy Lamarr
Lauren Bacall
Betty Davis
How to Apply 1940s Makeup
The dames in the 1940s were ideally "naturally beautiful," not like the tanned, athletic and freshscrubbed 1970s women, but in a soft, feminine and rosy way. Vivien Leigh, Jennifer Jones, Ava
Gardner and Ingrid Bergman were among the most famous and beautiful faces of the decade. In the
history of Old Hollywood, the makeup of this era is one of the easiest to re-create. Keep that in mind
the next time you are invited to a costume party.
Difficulty: Moderately Easy
Instructions
Things You'll Need:
Foundation in your skin tone
Translucent rosy powder
Dark-brown eyebrow pencil or powder
Eye makeup primer
Sheer eyeshadow
Eyelash curler
Black or black-brown mascara
False strip eyelashes
Black liquid eyeliner
Light rosy blush
Makeup sponge
Highly pigmented lip liner in a shade of red and matching lipstick
Lip brush
1. 1
Apply foundation in your skin tone.
2. 2
Dust your face lightly with a translucent rose-tinged powder to give your complexion a naturallooking, pinkish hue.
3. 3
Shape and define well-groomed brows with a brow pencil or powder in a shade that matches your
hair color if you have dark hair, but darker by a notch or two if you have light hair. Eyebrows
should appear perfect, with pronounced arches, regardless of thickness.
4. 4
Apply a soft, subtle shade of eye makeup primer on your lids to complement your skin tone. Very
sheer eyeshadow is fine; the focus for 1940s eyes is on the lashes.
5. 5
Curl your eyelashes and lightly stroke black or black-brown mascara on your top lashes.
6. 6
Glue false strip lashes that are longer than your natural ones on your upper lash line, just enough
to make your real ones appear more noticeable and defined.
7. 7
Use a black liquid eyeliner over the region where your false lashes meet your lash line. Make sure
your line is very thin, fine and even.
8. 8
Buff a light, rosy blush softly into the apples of your cheeks. Blend hard edges away with a
makeup sponge to keep your look natural.
9. 9
Exaggerate your top lip by drawing slightly past your natural lip line with a waxy highly pigmented
lip liner. Select a shade of red that suits your coloring and your current mood. True red, tomato
red and orange red were very popular in the 1940s, but deeper and cooler reds, such as
raspberry and crimson, were common as well.
10. 10
Draw over your bottom lip line following its natural contour. Still using the lip liner, fill in your new
lip shape.
11. 11
Layer on a lipstick in a matching shade with a lip brush for even coverage.
______________________________________________________________________________
then powdered over
with a powder that
was lighter than
normal skin.
Natural beauties (natural with "a little
support") were the ideal of the forties.
Face powder was used to match the skin
.
or to gave a nice rosy glow. To get this
effect a slightly darker warmish
foundation was used and then powdered
over with a powder that was lighter than
normal skin.
To get a natural rosy look popular rouge
colors were red with pinkish undertones,
bright pinks with fuchsia undertones and
bright roses.
.. some color
examples:
.
Pink Red
For the eye dark brown or black mascara Rouge
and a small eyeliner was used.
Eyeshadows mostly varied in muted
.
grays and browns.
Eyebrows were kept fairly natural in
thickniss, but were manicured into clean,
Fuchsia
well defined arches and accented by use
of a dark brown pencil .
Rouge
.
Pink Red
Lipstick
.
For lips all shades of red including clear
bright reds, cherry reds, pinkish reds,
and orange reds were popular. Two
different color plans for lipstick use
existed. On the on hand the "monotone",
where lipstick was used to support a
glorified natural look (includes light red,
reddish orange, and raspberry tones) and
on the other hand the "contrast", where
lips brought a definite accent (includes
cherry red, crimson and vermillion
shades). In any case lips should look full
and soft. To effect this top lip was
slightly exaggerated.
Bright Red
Lipstick
.
Cherry Red
Lipstick
.
Deep Red
Lipstick
.
Orange Red
Lipstick
It was popular to wear nail polish
according to clothes and accessories.
Therefore a lot of colors were used.
Especially blue-reds, brown-reds, bright
reds, green, mustard yellow, black, navy
blue, plum, and mauve were popular.
Basic look was a polished nail with a left
out white half-moon and a white sliver at
tip.
.
Crimson
Lipstick
.
Brick Red
Lipstick
.
Mustard
Yellow
Nail Polish
.
Violet
Polish
Navy Blue
Nail Polish


© Copyright 2026