
Equinox 10.1 User Manual
Equinox 10.1
User Manual
Table of Contents
1. Licence Terms and Copyright ....... 4
1.1 Copyright ................................................. 4
1.2 Equinox Licensing .................................... 6
2. Equinox Setup ............................... 8
2.1 General Setup (If You Don’t Have an
Automation Engine Server) ............................. 8
2.3 Setup in PackEdge .................................. 9
2.4 Setup for the Photoshop Plug-in ............ 11
2.2 Setup in ArtPro ........................................ 8
3. Equinox in Color Engine Pilot ...... 16
3.1 Creating an Equinox Color Strategy ....... 16
3.3 Settings for Spot Color Linework ............ 20
3.2 Settings for CMYK ................................. 17
4. Equinox in ArtPro ......................... 27
4.1 Converting your ArtPro File to CMYKOGB 27
4.3 Settings for CMYK Linework and Images 29
4.2 Settings for Input and Output ................. 28
4.4 Settings for Spot Color Linework and Images
32
5. Equinox in PackEdge ................... 39
5.1 Converting your File to CMYKOGB ........ 39
5.3 Settings for CMYK Linework and Images 41
5.2 Settings for Input and Output ................. 40
5.4 Settings for Spot Color Linework and Images
44
6. Equinox Plug-in ........................... 51
6.1 The Equinox Plug-in in Photoshop ......... 51
6.4 Gamut Matching .................................... 70
6.2 Converting an Image to Equinox Colors . 53
6.5 Separation Options ................................ 71
6.3 Gamut Expansion .................................. 54
6.6 The Equinox Preview Conversion plug-in 80
2
T
Equinox Manual
Table of Contents
6.7 Creating an Equinox Device Link ............ 81
7. Equinox in Automation Engine .... 84
7.1 Using the Convert Colors task ................ 84
8. Glossary ....................................... 87
3
Chapter 1. Licence Terms and Copyright
1.1. Copyright
© Copyright 2011 Esko Software BVBA, Gent, Belgium
All rights reserved. This material, information and instructions for
use contained herein are the property of Esko Software BVBA. The
material, information and instructions are provided on an AS IS basis without warranty of any kind. There are no warranties granted or
extended by this document. Furthermore Esko Software BVBA
does not warrant, guarantee or make any representations regarding
the use, or the results of the use of the software or the information
contained herein. Esko Software BVBA shall not be liable for any direct, indirect, consequential or incidental damages arising out of the
use or inability to use the software or the information contained
herein.
The information contained herein is subject to change without notice. Revisions may be issued from time to time to advise of such
changes and/or additions.
No part of this document may be reproduced, stored in a data base
or retrieval system, or published, in any form or in any way, electronically, mechanically, by print, photoprint, microfilm or any other
means without prior written permission from Esko Software BVBA.
This document supersedes all previous dated versions.
PANTONE® Colors displayed in the software application or in the
user documentation may not match PANTONE-identified standards. Consult current PANTONE Color Publications for accurate
color. PANTONE® and other Pantone, Inc. trademarks are the
property of Pantone, Inc. ©Pantone, Inc. 2008.
Pantone, Inc. is the copyright owner of color data and/or software
which are licensed to Esko Software BVBA to distribute for use only
in combination with this software. PANTONE Color Data and/or
Software shall not be copied onto another disk or into memory unless as part of the execution of this software.
This software is based in part on the work of the Independent JPEG
Group.
Portions of this software are copyright © 1996-2002 The FreeType
Project (www.freetype.org). All rights reserved.
Portions of this software are copyright 2006 Feeling Software,
copyright 2005-2006 Autodesk Media Entertainment.
4
1
Equinox Manual
License Terms and Copyright
Portions of this software are copyright ©1998-2003 Daniel Veillard.
All rights reserved.
Portions of this software are copyright ©1999-2006 The Botan
Project. All rights reserved.
Part of the software embedded in this product is gSOAP software.
Portions created by gSOAP are Copyright ©2001-2004 Robert A.
van Engelen, Genivia inc. All rights reserved.
Portions of this software are copyright ©1998-2008 The OpenSSL
Project and ©1995-1998 Eric Young ([email protected]). All rights
reserved.
This product includes software developed by the Apache Software
Foundation (http://www.apache.org/).
Adobe, the Adobe logo, Acrobat, the Acrobat logo, Adobe Creative
Suite, Illustrator, InDesign, PDF, Photoshop, PostScript, XMP and
the Powered by XMP logo are either registered trademarks or trademarks of Adobe Systems Incorporated in the United States and/or
other countries.
Microsoft and the Microsoft logo are registered trademarks of Microsoft Corporation in the United States and other countries.
SolidWorks is a registered trademark of SolidWorks Corporation.
Portions of this software are owned by Spatial Corp. 1986 2003. All
Rights Reserved.
The Esko software contains the RSA Data Security, Inc. MD5 Message-Digest Algorithm.
Part of this software uses technology by BestTM Color Technology
(EFI). EFI and Bestcolor are registered trademarks of Electronics For
Imaging GmbH in the U.S. Patent and Trademark Office.
Contains PowerNest library Copyrighted and Licensed by Alma,
2005 – 2007.
Example images used are courtesy of Dreamstime (http://
www.dreamstime.com) and GeekPhilosopher (http://www.ezjooz.com/GeekPhilosopher.com/photos/photos.aspx).
All other product names are trademarks or registered trademarks of
their respective owners.
Correspondence should be addressed to:
Esko Software BVBA
Kortrijksesteenweg 1095
B – 9051 Gent
[email protected]
5
1.2. Equinox Licensing
The Equinox technology is available in Color Engine Pilot, Adobe
Photoshop (as a plug-in), ArtPro, PackEdge and Automation Engine.
Licenses are activated through the EskoArtwork License Manager,
either:
• on a license server (using the Server License Manager),
• on the computer where your EskoArtwork application is running (using the Local License Manager).
For more information about licensing, see the Server License Manager and / or Local License Manager documentation.
Note:
6
You need the “color engine link” license to link the Equinox plug-in,
ArtPro and PackEdge to the Color Engine database of color settings.
1
Equinox Manual
License Terms and Copyright
7
Chapter 2. Equinox Setup
2.1. General Setup (If You Don’t Have an Automation Engine Server)
If you don’t have an Automation Engine server, you should use your
Color Engine Pilot’s color settings.
All of your color settings (ink books, color strategies...) are located
in a shared folder called “bg_data_cms_v010”, created when installing the Color Engine Pilot.
You can find this folder under C:/Esko if you have installed the Color
Engine Pilot at the default location.
bg_data_cms_v010 has two subfolders:
• r (read), that has all the default settings,
• w (write) where all your custom settings are saved.
This folder must be available on all machines running Equinox
software.
• On Macintosh machines (for ArtPro and the Photoshop plugin), mount it using the smb protocol.
Note:
If you restart your machine, you will need to mount this folder again.
• On Windows machines (for PackEdge and the Photoshop
plug-in), add it as a network place or a network drive.
2.2. Setup in ArtPro
2.2.1 If you are connecting
to an Automation Engine
server
8
1. Go to ArtPro/Preferences... or use Command + K.
2. Go to the Servers tab and click “Automation Engine”.
3. Fill in your Automation Engine Server’s name or IP address.
2
Equinox Manual
Equinox Setup
4. Fill in the User Name and Password you use to connect to this
server.
If the connection is successful, you will see a green dot and
the word “Connected”.
5. In the Color tab of the Preferences, choose “Automation Engine” in the “Load Color Engine Ink Books From” list.
ArtPro will use your Automation Engine server’s
bg_data_cms_v010 folder.
6. Select the “Load Color Engine Ink Books” option.
7. If you want an ink book to be loaded by default when adding
a separation from a Color Engine Ink Book, select it in the
“Preferred Color Engine Ink Book” list (see the ArtPro manual
for more information about ink books).
8. Click OK.
2.2.2 If you are not
connecting to an
Automation Engine server
1. Go to ArtPro/Preferences... or use Command + K.
2. In the Color tab, choose Browse... in the “Load Color Engine
Ink Books From” list.
3. Browse to the “bg_data_cms_v010” folder you mounted earlier (see 2.1. General Setup (If You Don’t Have an Automation
Engine Server) on page 8).
4. Select the “Load Color Engine Ink Books” option.
5. If you want an ink book to be loaded by default when adding
a separation from a Color Engine Ink Book, select it in the
“Preferred Color Engine Ink Book” list (see the ArtPro manual
for more information about ink books).
6. Click OK.
2.3. Setup in PackEdge
2.3.1 If you are connecting
to an Automation Engine
server
1. Go to Edit/Preferences... or use Ctrl + Alt + Shift + P.
2. Go to the Servers&Resources tab and select “Connect to Automation Engine Server”.
9
3. Enter your Automation Engine Server Name and click
“Check”.
You should see a message saying the server is up and running.
4. Select “Login with the following user account settings”, and fill
in the User Name and Password you use to connect to this
server.
If the connection is successful, you will see a green dot and
the message “Connected as user ...”.
5. In “Data Resources”, choose “As defined on the Automation
Engine server”.
PackEdge will use your Automation Engine server’s
bg_data_cms_v010 folder.
6. Click OK and restart PackEdge.
2.3.2 If you are not
connecting to an
Automation Engine server
1. Go to Edit/Preferences... or use Ctrl + Alt + Shift + P.
2. Go to the Servers&Resources tab and make sure “Connect to
Automation Engine Server” is NOT selected.
3. In “Data Resources”, define where the “bg_data_cms_v010”
folder is:
- if PackEdge and the Color Engine Pilot are installed on different computers, select “From share on remote computer”, and
enter the name of the computer where the Color Engine Pilot
is installed.
- if PackEdge and the Color Engine Pilot are installed on the
same computer, select “Use from local system”.
10
Equinox Manual
Equinox Setup
4. To check where the “bg_data_cms_v010” folder you selected
is, you can click the “Show Location of Data Resources...”
button.
5. Click OK and restart PackEdge.
2.4. Setup for the Photoshop Plug-in
2.4.1 Using the Photoshop
Plug-in on a 64-bit System
The Equinox plug-in runs only in 32-bit mode.
On a 64-bit system, your copy of Photoshop may run in 32 or 64bit mode. You need to make sure it runs in 32-bit mode.
• On Mac
This only applies when running Photoshop CS5 on Mac 10.5 or
later.
If you have an older (supported) version of Photoshop and / or of
Mac OS X, you don’t need to do anything special.
To run Photoshop in 32-bit mode:
1. In the Finder, right-click your Adobe Photoshop CS5 application and select “Get Info”.
11
2
2. In the Info panel, select “Open in 32-bit mode”.
3. Close the Info panel.
When you launch Photoshop, it will be running in 32-bit mode.
• On Windows
This only applies when running Photoshop CS4 or CS5 on a 64bit Windows 7 system.
If you have an older (supported) version of Photoshop and / or of
Windows (or a 32-bit Windows 7), you don’t need to do anything
special.
When installing Photoshop on a 64-bit Windows 7 system, both
a 32-bit and a 64-bit copy are installed.
Make sure you use the 32-bit copy with the Equinox plug-in. You
can find it in “C:/Program Files x86/Adobe/Photoshop CS4” or
“C:/Program Files x86/Adobe/Photoshop CS5”.
12
Equinox Manual
Equinox Setup
2.4.2 Setup in the
EskoArtwork Setup Plug-in
1. In Photoshop, go to File/Automate/EskoArtwork Setup... The
EskoArtwork Setup dialog will open.
2. If your Equinox plug-in is licensed through a License Server,
enter its name or IP address in “License Server”, and click the
“Apply” button.
3. In “Installed Plug-ins”, make sure that “Equinox” is checked.
4. If you have a “color engine link” license, select “Link to Color
Engine”.
5. If you are connecting to an Automation Engine server:
- select “Use color settings from server”,
- fill in your Automation Engine Server’s name or IP address,
- fill in the User Name and Password you use to connect to
13
2
this server,
- click the Apply button.
You should see a green tick
under “Color settings folder”.
6. If you are NOT connecting to an Automation Engine server:
- select “Use custom color settings folder”,
- click the Choose... button and browse to the
bg_data_cms_v010 folder you mounted earlier (see 2.1. General Setup (If You Don’t Have an Automation Engine Server) on
page 8).
You should see a green tick
under “Color settings folder”.
7. Click OK.
Depending on your settings, Equinox will use a different Color settings folder. It will use:
• your server’s “bg_data_cms_v010” folder if you are connecting
to an Automation Engine server,
• the “bg_data_cms_v010” you mounted and browsed to if you
are not connecting to an Automation Engine server,
• a local color settings folder if you do not have a Color Engine
Link license.
14
Equinox Manual
Equinox Setup
15
2
Chapter 3. Equinox in Color Engine Pilot
You can create Equinox color strategies in Color Engine Pilot. These
color strategies contain color management settings to be used in
Equinox conversions.
You can use them in Automation Engine, ArtPro, PackEdge and the
Equinox plug-in for Photoshop, to convert CMYK, RGB or spot color files to CMYKOGB.
3.1. Creating an Equinox Color Strategy
1. In the Color Engine Pilot pane, click “Color Strategies”.
2. Right-click “Equinox” and select “New”.
3. In the dialog that opens, select an Input Profile and an Output
Profile.
You can:
- Select your press’s multicolor profile as Input and Output
Profile (most frequent case).
See 3.2.1 When Using the Same Input and Output Profile on
page 17.
- Select an ISO profile (for example “ISOcoated_v2_eci.icc”)
as Input Profile and your press’s multicolor profile as Output
Profile (if you have originally printed your file on an ISO standard press).
See 3.2.2 When Using Different Input and Output Profiles on
page 18.
Note:
16
By default, the Output Profile is set to <Automatic>. This means that
the input profile will also be used as output profile, so CMYK colors
don’t need to be converted.
Equinox Manual
Equinox in Color Engine Pilot
Note:
To view information about the input/output profile (inks it contains,
measurements...), click or
.
4. If you have chosen a multi-channel Esko profile as output profile but you don’t want to use some of its RGB/OGB inks, click
then click the RGB/OGB ink you don’t want to use so the
turn into a - .
5. Double-click “Settings for CMYK...” to use an Equinox device
link or fill in CMYK conversion settings.
See 3.2. Settings for CMYK on page 17.
6. Double-click “Settings for Spot Color Linework...” to fill in your
spot color conversion settings.
See 3.3. Settings for Spot Color Linework on page 20.
7. When you are finished creating your Equinox color strategy,
go to File/Save or use Ctrl+S.
3.2. Settings for CMYK
You can fill in different settings depending on the Input Profile and
Output Profile you have chosen.
3.2.1 When Using the Same
Input and Output Profile
17
3
Process colors are not converted but you can choose to use an
Equinox device link:
1. Click “Convert CMYK” to be able to select a Device Link.
2. Choose a Device Link for the input / output profile.
You can use Equinox Device Links here (when the input / output
profile you selected is the same as the press profile the Equinox Device Link was made for).
For more information about Equinox Device Links, see 6.7. Creating
an Equinox Device Link on page 81.
3.2.2 When Using Different
Input and Output Profiles
• Device Link
This list contains all the Color Engine Pilot device links using the selected input and output profiles. Those are not Equinox device links
but proofing device links. Either:
• choose an existing device link in the list (this makes the rest of
the settings unavailable).
• choose <Automatic> and create a custom (but limited) device
link using the rest of the settings.
Note:
The color accuracy is higher when using an existing device link.
• Gamut Mapping
Choose either:
• Closest Color (Classic): out-of-gamut colors are mapped to the
closest color on the border of the destination profile’s gamut.
The distance is calculated in CIE Lab Delta E 76.
This might introduce a hue shift.
• Constant Hue: out-of-gamut colors are mapped to a color on
the border of the destination profile’s gamut that has the same
hue. This option tries to keep the hue when performing gamut
mapping.
18
Equinox Manual
Equinox in Color Engine Pilot
• CMYK Generation
Use this option to define how to simulate the CMYK of the source
profile using the destination profile.
If you are working with an Esko multi-color profile as destination,
you can decide whether you want to use the full color gamut (5, 6
or 7 colors) to simulate the source CMYK, or limit the output inks to
CMYK.
• Generate no CMYK means you will use the full color gamut.
• Generate only CMYK means that, even though you are specifying a multi-color profile, you would like the CMYK of the
source profile to be simulated with CMYK only. Spot colors will
still be converted using the full gamut.
• Black Generation
Choose a black generation mode.
• Minimal Black: this generates the lowest possible amount of
black, so black is used only in the shadows.
• No Black Mapping: this uses the same amount of black in the
target as in the source profile, wherever possible. This keeps
the general level of black (e.g. skeleton black), but black objects may contain some CMY after conversion.
• Map Black on Black: this converts black separately from CMY,
and maps the source black channel onto the destination black
channel. This means that objects that are black in the source
profile will still be black (with no CMY) in the destination profile.
Note that the general level of black may change slightly due to
dot gain.
• Single Color Black: this combines the advantages of No Black
Mapping and Map Black on Black.
The source’s black channel is mapped onto the destination’s
black channel, but this black generation mode puts color first
in the rest of the color space. This provides an accurate conversion of CMY+K overprints, as black text, barcodes... stay
100% black.
• Use B2A Tag (only when you select an ICC target profile): this
uses the target ICC profile’s B2A tag to convert separations.
A B2A tag is a part of an ICC profile used to convert data from
a device-independent color space into a device-dependent
color space.
• Custom: this allows you to define your own custom black generation (see the Color Engine Pilot manual for more information).
19
3
3.3. Settings for Spot Color Linework
Use this dialog to set conversion options for spot colors.
We recommend you do the following to define your settings:
1. Choose if you want to:
• “Convert Opaque Inks” or not,
• “Convert Unregistered Inks” (ink that are not in the Color Engine
Pilot database) or not.
2. Choose the ∆E Formula you want to use.
Note:
By default, the Default ∆E Formula you chose in the Color Engine
Pilot Preferences is selected.
3. Add a few test inks (to see the effect of the settings and pick
the best ones for your inks).
• Click
to add an ink, and/or type the ink name in the next
available row.
• Click
20
to open an ink book then drag and drop inks from it.
Equinox Manual
Equinox in Color Engine Pilot
For each ink that you added, you can see the Color Build values (the
percentages of each output ink that will be used) and the ∆E at right.
The color builds show “Best Match”, as the software calculates the
color builds with the lowest possible delta E by default.
4. If you wish, you can set “Stabilize Settings” to smooth the appearance of the color builds on print (for example, to get rid of
really small dots by eliminating an ink with a very low percentage for a particular color...).
See 3.3.1 Stabilizing the Color Builds on page 22 for details.
5. Add the remaining inks to be converted (click
complete ink books).
to add
You will see this progress bar while your settings are applied to the
ink books you just added.
6. If necessary, you can then edit individual color builds by:
• changing some of the inks percentages manually (see 3.3.2
Editing a Color Build Manually on page 25).
• comparing “Best Match” and edited ink percentages and refining color builds (see 3.3.3 Refining a Color Build on page 25).
• keeping some inks always unconverted when using this color
strategy (see 3.3.4 Keeping an Ink Unconverted on page 26).
21
3
Note:
3.3.1 Stabilizing the Color
Builds
To display the color builds with the highest ∆E at the top of the list,
click the ∆E column twice.
Stabilizing your color builds avoids having separations, or white
space, with very few dots. This makes the color appear smoother
on press.
The example below illustrates that the most accurate separation
conversion might not be the best build for press for a printing process such as flexo: for the spot color on the left, the closest ∆E color
match (∆E = 2.3) is not the best printable match (∆E = 3.1).
22
Equinox Manual
Equinox in Color Engine Pilot
• Using Stabilize Settings
1. In the Settings for Spot Color Linework dialog, click the “Stabilize Settings...” button to open the Stabilize Color Builds Settings dialog.
2. Specify your Stabilize Settings (see • Stabilize Settings Details
on page 23).
3. Click OK.
4. Back in the Settings for Spot Color Linework dialog, select
“Stabilize Color Builds”.
• Stabilize Settings Details
• Total color difference should be less than
In this field you can set the maximum color difference (in ∆E) between the original color and the color build generated by Equinox.
After applying all the stabilize settings, the color difference should
be less than the one you specify here.
Note:
If the software can’t apply all of the stabilize settings without going
over the Total color difference, it will apply some of the settings, as
long as the resulting ∆E is within the Color difference defined in
these settings and the Total color difference.
• Maximum number of inks
This option limits the inks used in the color build to 2 or 3.
When using only 2 inks:
• you need to specify a Delta E tolerance,
• you can only use the Force to solid option, not Drop Black or
Drop Minimum.
23
3
• Force to solid when
This option makes the separation with the highest percentage
solid (100%), to avoid visible white dots on the print, if either:
• the Color difference (between the original color and the color
build) after applying this option is less than the ∆E value you enter.
• the highest Ink value is higher than the percentage you enter.
Note:
This never makes the Black separation solid.
• Drop Black when
This option sets the Black separation to 0%, to avoid visible black
dots on the print, if either:
• the Color difference after applying this option is less than the
∆E value you enter.
• the Black Ink value is lower than the percentage you enter.
• Drop Minimum when
This option sets the separation with the lowest percentage to 0%,
to avoid visible small colored dots on the print, if either:
• the Color difference after applying this option is less than the
∆E value you enter.
• the lowest Ink value is lower than the percentage you enter.
24
Note:
This never sets the Black separation to 0%. If you wish to do that,
use the “Drop Black when” option.
Note:
These settings are applied differently to in-gamut and out-of-gamut
colors.
• For in-gamut colors, the settings will only be applied if the resulting
Delta E is under the number you specify.
• For out-of-gamut colors, the Delta E tolerance will be loosened
gradually as the color gets away from the gamut.
When a color is very far away from the gamut, the stabilize settings
will always be applied regardless of the Delta E tolerance (if the stabilize settings are enabled).
Equinox Manual
Equinox in Color Engine Pilot
3.3.2 Editing a Color Build
Manually
1. Right-click the ink’s “Conversion Type” and select “Custom
Values”.
2. Edit the ink percentages fields as you wish.
The ∆E value is updated automatically.
Note:
3.3.3 Refining a Color Build
You can’t edit color builds that are set to remain unconverted
(whose “Conversion Type” column shows “Keep in output”).
You can refine the color builds by fixing one or more ink value and
letting the software recalculate the other ink values accordingly.
1. Select your ink in the Settings for Spot Color Linework dialog
and click
to open the Refine dialog.
This dialog shows the Best Match color build percentages, the Current Values (which can be for example stabilized or custom values,
depending on what you did to the percentages previously), and allows you to set New Values.
The schema at the top of the dialog shows a preview of the Original,
Best Match, Current Values and New Values colors.
Note:
For best results, your monitor should be calibrated.
25
3
2. To change a certain value, select its box in the Fix Values row,
then edit it in the New Values row.
You can also fix all the values if you want.
The software will recalculate all the other values to give a new color
build.
3. If you are not satisfied with the result, you can either:
• Reset to Best Match,
• Reset to Stabilized and Fix.
Note:
This will only reset the build to the stabilized values if it was stabilized. Otherwise it will reset it to the best match values (and fix all the
values).
4. When you are satisfied with the result, click OK.
3.3.4 Keeping an Ink
Unconverted
26
If you don’t want to convert a certain ink using your Equinox color
strategy, right-click its Conversion Type and select “Keep in output”.
Equinox Manual
Equinox in ArtPro
Chapter 4. Equinox in ArtPro
4.1. Converting your ArtPro File to CMYKOGB
1. Open the file to convert in ArtPro.
2. Go to Prepress/Equinox to open the Equinox conversion dialog.
3. Define settings for input and output (see 4.2. Settings for Input
and Output on page 28).
4. Define settings for CMYK Linework and Images (see 4.3. Settings for CMYK Linework and Images on page 29).
5. Define settings for Spot Color Linework and Images (see 4.4.
Settings for Spot Color Linework and Images on page 32).
6. If your file contains complex blend modes, you can flatten it to
make sure the colors are converted accurately (with the “Flatten document” option).
7. Click Convert.
27
4
4.2. Settings for Input and Output
1. Select the Output Profile you want to use.
2. The Color Strategy list shows all the color strategies using that
output profile. Select the one you want to use.
The dialog shows the inks contained in your color strategy’s
input and output profiles.
Note:
28
If your color strategy contains an Esko Profile as input profile, you
can save it as a CMYK ICC profile, to use as the Working Color
Space* Profile in ArtPro, or to use it in other applications (for example Adobe Photoshop).
However, any non-CMYK color information it contains will be lost.
Equinox Manual
Equinox in ArtPro
4.3. Settings for CMYK Linework and Images
Use these settings to define how to convert CMYK.
1. Select “Convert Images” if you want to convert CMYK images.
2. Select “Convert Linework” if you want to convert CMYK linework.
3. Choose a Color Engine Pilot Device Link, or use the Gamut
Mapping, CMYK Generation and Black Generation settings.
(see • Conversion Settings on page 30).
Note:
You can use Revert to go back to the default settings.
29
4
• Conversion Settings
• Device Link
This list contains all the Color Engine Pilot device links using the
selected input and output profiles. Either:
• choose an existing device link in the list (this makes the rest of
the settings unavailable).
• choose <Automatic> and create a custom (but limited) device
link using the rest of the settings.
Note:
The color accuracy is higher when using an existing device link.
• Gamut Mapping
Choose either:
• Closest Color: out-of-gamut colors are mapped to the closest
color on the border of the destination profile’s gamut. The distance is calculated in CIE Lab Delta E 76.
This might introduce a hue shift.
• Constant Hue: out-of-gamut colors are mapped to a color on
the border of the destination profile’s gamut that has the same
hue. This option tries to keep the hue when performing gamut
mapping.
• CMYK Generation
Use this option to define how to simulate the CMYK of the source
profile using the destination profile.
If you are working with an Esko multi-color profile as destination,
you can decide whether you want to use the full color gamut (5,
6 or 7 colors) to simulate the source CMYK, or limit the output
inks to CMYK.
• Generate no CMYK means you will use the full color gamut.
• Generate only CMYK means that, even though you are specifying a multi-color profile, you would like the CMYK of the
source profile to be simulated with CMYK only. Spot colors will
still be converted using the full gamut.
• Black Generation
Note:
30
The Black Generation option is only available if you selected the
“Generate only CMYK” option.
Equinox Manual
Equinox in ArtPro
Choose a black generation mode.
• Minimal Black: this generates the lowest possible amount of
black, so black is used only in the shadows.
• No Black Mapping: this uses the same amount of black in the
target as in the source profile, wherever possible. This keeps
the general level of black (e.g. skeleton black), but black objects may contain some CMY after conversion.
• Map Black on Black: this converts black separately from CMY,
and maps the source black channel onto the destination black
channel. This means that objects that are black in the source
profile will still be black (with no CMY) in the destination profile.
Note that the general level of black may change slightly due to
dot gain.
• Single Color Black: this combines the advantages of No Black
Mapping and Map Black on Black.
The source’s black channel is mapped onto the destination’s
black channel, but this black generation mode puts color first
in the rest of the color space. This provides an accurate conversion of CMY+K overprints, as black text, barcodes... stay
100% black.
• Custom: if you have created custom black generation modes
in Color Engine Pilot, you can see them at the bottom of the list.
See the Color Engine Pilot manual for information about creating a custom black generation mode.
31
4
4.4. Settings for Spot Color Linework and Images
Use these settings to define how to convert spot colors.
1. Choose if you want to:
• “Convert Opaque Inks” or not,
• “Convert Unregistered Inks” (ink that are not in the Color Engine
Pilot database) or not.
2. Choose the Delta E Formula you want to use.
3. If you wish, you can set “Stabilize Settings” to smooth the appearance of the color builds on print (for example, to get rid of
really small dots by eliminating an ink with a very low percentage for a particular color...).
See 4.4.1 Stabilizing the Color Builds on page 33 for details.
32
Equinox Manual
Equinox in ArtPro
4. After changing settings, click the Reapply Conversion Settings
button.
You will see a progress bar while the color builds corresponding to your file’s spot colors are recalculated.
For each of your file’s inks, you can see the Color Build values
(the percentages of each output ink that will be used) and the
∆E at right.
5. If necessary, you can then edit individual color builds by:
• changing some of the inks percentages manually (see 4.4.2
Editing a Color Build Manually on page 36).
• comparing “Best Match” and edited ink percentages and refining color builds (see 4.4.3 Refining a Color Build on page 36).
• keeping some inks always unconverted when using this color
strategy (see 4.4.4 Keeping an Ink Unconverted on page 37).
Note:
To display the color builds with the highest ∆E at the top of the list,
click the ∆E column twice.
6. If you want, you can store a color build you have edited in the
Color Strategy, so that color build is suggested by default the
next time you convert this color (see 4.4.5 Adding a Color
Build to the Color Strategy on page 37).
4.4.1 Stabilizing the Color
Builds
Stabilizing your color builds avoids having separations, or white
space, with very few dots. This makes the color appear smoother
on press.
For more information, see 3.3.1 Stabilizing the Color Builds on page
22.
33
4
• Using Stabilize Settings
1. In the Settings for Spot Color Linework dialog, click the “Stabilize Settings...” button to open the Stabilize Color Builds Settings dialog.
2. Specify your Stabilize Settings (see • Stabilize Settings Details
on page 34).
3. Click OK.
4. Back in the Settings for Spot Color Linework dialog, select
“Stabilize Color Builds”.
• Stabilize Settings Details
• Total color difference should be less than
In this field you can set the maximum color difference (in ∆E) between the original color and the color build generated by Equinox.
After applying all the stabilize settings, the color difference should
be less than the one you specify here.
Note:
34
This is only applied to the settings using the “Color difference is less
than” option (not those using “Ink value is greater than” or “Ink value
is less than”).
Equinox Manual
Equinox in ArtPro
Note:
If the software can’t apply all of the stabilize settings (that use the
“Color difference is less than” option) without going over the Total
color difference, it will apply some of the settings, as long as the resulting ∆E is within both the Color difference defined in these settings and the Total color difference.
• Maximum number of inks
This option limits the inks used in the color build to 2 or 3.
When using only 2 inks:
• you need to specify a Delta E tolerance,
• you can only use the Force to solid option, not Drop Black or
Drop Minimum.
• Force to solid when
This option makes the separation with the highest percentage
solid (100%), to avoid visible white dots on the print, if either:
• the Color difference (between the original color and the color
build) after applying this option is less than the ∆E value you enter.
• the highest Ink value is higher than the percentage you enter.
Note:
This never makes the Black separation solid.
• Drop Black when
This option sets the Black separation to 0%, to avoid visible black
dots on the print, if either:
• the Color difference after applying this option is less than the
∆E value you enter.
• the Black Ink value is lower than the percentage you enter.
• Drop Minimum when
This option sets the separation with the lowest percentage to 0%,
to avoid visible small colored dots on the print, if either:
• the Color difference after applying this option is less than the
∆E value you enter.
• the lowest Ink value is lower than the percentage you enter.
35
4
Note:
4.4.2 Editing a Color Build
Manually
Note:
4.4.3 Refining a Color Build
This never sets the Black separation to 0%. If you wish to do that,
use the “Drop Black when” option.
Double-click any ink percentage to edit it manually.
This updates the color build’s ∆E value and changes the “Conversion Type” column to “Custom values”.
You can’t edit color builds that are set to remain unconverted
(whose “Conversion Type” column shows “Do not convert”).
You can refine the color builds by fixing one or more ink value and
letting the software recalculate the other ink values accordingly.
1. Select your ink in the Settings for Spot Color Linework dialog
and click the “Refine color build...” button to open the Refine
dialog.
This dialog shows the Best Match color build percentages, the Current Values (which can be for example stabilized or custom values,
depending on what you did to the percentages previously), and allows you to set New Values.
36
Equinox Manual
Equinox in ArtPro
The schema at the top of the dialog shows a preview of the Original,
Best Match, Current Values and New Values colors.
Note:
For best results, your monitor should be calibrated.
2. To change a certain value, select its box in the Fix Values row,
then edit it in the New Values row.
The software will recalculate all the other values to give a new color
build.
3. If you are not satisfied with the result, you can either:
• Reset to Best Match,
• Reset to Stabilized.
Note:
This will only reset the build to the stabilized values if it was stabilized. Otherwise it will reset it to the best match values.
4. When you are satisfied with the result, click OK.
4.4.4 Keeping an Ink
Unconverted
If you don’t want to convert a certain ink using your Equinox color
strategy, select “Do not convert” in its “Conversion Type” column.
4.4.5 Adding a Color Build to
the Color Strategy
Color builds that are already stored in the Color Strategy you are using have a green check .
To store a new color build in the color strategy:
1. Click it in the Color Builds list.
You will see the message “This Color Build has not been added to the Color Strategy” at the bottom of the dialog.
2. Click “Add to Color Strategy”.
The color build now has a grey check
list.
in the Color Builds
37
4
Note:
38
If you have edited a color build that was stored in the Color Strategy,
you will see a yellow warning icon
beside it.
To revert back to the Color Strategy build, select the build in the list
and click “Get from Color Strategy” at the bottom of the dialog.
Equinox Manual
Equinox in PackEdge
Chapter 5. Equinox in PackEdge
5.1. Converting your File to CMYKOGB
1. Open the file to convert in PackEdge.
2. Go to Production/Equinox... to open the Equinox conversion
dialog.
3. Define settings for input and output (see 5.2. Settings for Input
and Output on page 40).
4. Define settings for CMYK Linework and Images (see 5.3. Settings for CMYK Linework and Images on page 41).
5. Define settings for Spot Color Linework and Images (see 5.4.
Settings for Spot Color Linework and Images on page 44).
6. If your file contains complex blend modes, you can flatten it to
make sure the colors are converted accurately (with the “Flatten document” option).
7. Click Convert.
39
5
5.2. Settings for Input and Output
1. Select the Output Profile you want to use.
2. The Color Strategy list shows all the color strategies using that
output profile. Select the one you want to use.
The dialog shows the inks contained in your color strategy’s
input and output profiles.
Note:
40
If your color strategy contains an Esko Profile as input profile, you
can save it as a CMYK ICC profile, to use in other applications (for
example in Adobe Photoshop, or as the Working Color Space* Profile in ArtPro).
However, any non-CMYK color information it contains will be lost.
Equinox Manual
Equinox in PackEdge
5.3. Settings for CMYK Linework and Images
Use these settings to define how to convert CMYK.
1. Select “Convert Images” if you want to convert CMYK images.
2. Select “Convert Linework” if you want to convert CMYK linework.
3. Choose a Color Engine Pilot Device Link, or use the Gamut
Mapping, CMYK Generation and Black Generation settings.
(see • Conversion Settings on page 42).
Note:
You can use Revert to go back to the default settings.
41
5
• Conversion Settings
• Device Link
This list contains all the Color Engine Pilot device links using the
selected input and output profiles. Either:
• choose an existing device link in the list (this makes the rest of
the settings unavailable).
• choose <Automatic> and create a custom (but limited) device
link using the rest of the settings.
Note:
The color accuracy is higher when using an existing device link.
• Gamut Mapping
Choose either:
• Closest Color: out-of-gamut colors are mapped to the closest
color on the border of the destination profile’s gamut. The distance is calculated in CIE Lab Delta E 76.
This might introduce a hue shift.
• Constant Hue: out-of-gamut colors are mapped to a color on
the border of the destination profile’s gamut that has the same
hue. This option tries to keep the hue when performing gamut
mapping.
• CMYK Generation
Use this option to define how to simulate the CMYK of the source
profile using the destination profile.
If you are working with an Esko multi-color profile as destination,
you can decide whether you want to use the full color gamut (5,
6 or 7 colors) to simulate the source CMYK, or limit the output
inks to CMYK.
• Generate no CMYK means you will use the full color gamut.
• Generate only CMYK means that, even though you are specifying a multi-color profile, you would like the CMYK of the
source profile to be simulated with CMYK only. Spot colors will
still be converted using the full gamut.
• Black Generation
Note:
42
The Black Generation option is only available if you selected the
“Generate only CMYK” option.
Equinox Manual
Equinox in PackEdge
Choose a black generation mode.
• Minimal Black: this generates the lowest possible amount of
black, so black is used only in the shadows.
• No Black Mapping: this uses the same amount of black in the
target as in the source profile, wherever possible. This keeps
the general level of black (e.g. skeleton black), but black objects may contain some CMY after conversion.
• Map Black on Black: this converts black separately from CMY,
and maps the source black channel onto the destination black
channel. This means that objects that are black in the source
profile will still be black (with no CMY) in the destination profile.
Note that the general level of black may change slightly due to
dot gain.
• Single Color Black: this combines the advantages of No Black
Mapping and Map Black on Black.
The source’s black channel is mapped onto the destination’s
black channel, but this black generation mode puts color first
in the rest of the color space. This provides an accurate conversion of CMY+K overprints, as black text, barcodes... stay
100% black.
• Custom: if you have created custom black generation modes
in Color Engine Pilot, you can see them at the bottom of the list.
See the Color Engine Pilot manual for information about creating a custom black generation mode.
43
5
5.4. Settings for Spot Color Linework and Images
Use these settings to define how to convert spot colors.
1. Choose if you want to:
• “Convert Opaque Inks” or not,
• “Convert Unregistered Inks” (ink that are not in the Color Engine
Pilot database) or not.
2. Choose the Delta E Formula you want to use.
3. If you wish, you can set “Stabilize Settings” to smooth the appearance of the color builds on print (for example, to get rid of
really small dots by eliminating an ink with a very low percentage for a particular color...).
See 5.4.1 Stabilizing the Color Builds on page 45 for details.
44
Equinox Manual
Equinox in PackEdge
4. After changing settings, click the Reapply Conversion Settings
button.
You will see a progress bar while the color builds corresponding to your file’s spot colors are recalculated.
For each of your file’s inks, you can see the Color Build values
(the percentages of each output ink that will be used) and the
∆E at right.
5. If necessary, you can then edit individual color builds by:
• changing some of the inks percentages manually (see 5.4.2
Editing a Color Build Manually on page 48).
• comparing “Best Match” and edited ink percentages and refining color builds (see 5.4.3 Refining a Color Build on page 48).
• keeping some inks always unconverted when using this color
strategy (see 5.4.4 Keeping an Ink Unconverted on page 49).
Note:
To display the color builds with the highest ∆E at the top of the list,
click the ∆E column twice.
6. If you want, you can store a color build you have edited in the
Color Strategy, so that color build is suggested by default the
next time you convert this color (see 5.4.5 Adding a Color
Build to the Color Strategy on page 49).
5.4.1 Stabilizing the Color
Builds
Stabilizing your color builds avoids having separations, or white
space, with very few dots. This makes the color appear smoother
on press.
For more information, see 3.3.1 Stabilizing the Color Builds on page
22.
45
5
• Using Stabilize Settings
1. In the Settings for Spot Color Linework dialog, click the “Stabilize Settings...” button to open the Stabilize Color Builds Settings dialog.
2. Specify your Stabilize Settings (see • Stabilize Settings Details
on page 46).
3. Click OK.
4. Back in the Settings for Spot Color Linework dialog, select
“Stabilize Color Builds”.
• Stabilize Settings Details
• Total color difference should be less than
In this field you can set the maximum color difference (in ∆E) between the original color and the color build generated by Equinox.
After applying all the stabilize settings, the color difference should
be less than the one you specify here.
Note:
46
This is only applied to the settings using the “Color difference is less
than” option (not those using “Ink value is greater than” or “Ink value
is less than”).
Equinox Manual
Equinox in PackEdge
Note:
If the software can’t apply all of the stabilize settings (that use the
“Color difference is less than” option) without going over the Total
color difference, it will apply some of the settings, as long as the resulting ∆E is within both the Color difference defined in these settings and the Total color difference.
• Maximum number of inks
This option limits the inks used in the color build to 2 or 3.
When using only 2 inks:
• you need to specify a Delta E tolerance,
• you can only use the Force to solid option, not Drop Black or
Drop Minimum.
• Force to solid when
This option makes the separation with the highest percentage
solid (100%), to avoid visible white dots on the print, if either:
• the Color difference (between the original color and the color
build) after applying this option is less than the ∆E value you enter.
• the highest Ink value is higher than the percentage you enter.
Note:
This never makes the Black separation solid.
• Drop Black when
This option sets the Black separation to 0%, to avoid visible black
dots on the print, if either:
• the Color difference after applying this option is less than the
∆E value you enter.
• the Black Ink value is lower than the percentage you enter.
• Drop Minimum when
This option sets the separation with the lowest percentage to 0%,
to avoid visible small colored dots on the print, if either:
• the Color difference after applying this option is less than the
∆E value you enter.
• the lowest Ink value is lower than the percentage you enter.
47
5
Note:
5.4.2 Editing a Color Build
Manually
Note:
5.4.3 Refining a Color Build
This never sets the Black separation to 0%. If you wish to do that,
use the “Drop Black when” option.
Double-click any ink percentage to edit it manually.
This updates the color build’s ∆E value and changes the “Conversion Type” column to “Custom values”.
You can’t edit color builds that are set to remain unconverted
(whose “Conversion Type” column shows “Do not convert”).
You can refine the color builds by fixing one or more ink value and
letting the software recalculate the other ink values accordingly.
1. Select your ink in the Settings for Spot Color Linework dialog
and click the “Refine color build...” button to open the Refine
dialog.
This dialog shows the Best Match color build percentages, the Current Values (which can be for example stabilized or custom values,
depending on what you did to the percentages previously), and allows you to set New Values.
48
Equinox Manual
Equinox in PackEdge
The schema at the top of the dialog shows a preview of the Original,
Best Match, Current Values and New Values colors.
Note:
For best results, your monitor should be calibrated.
2. To change a certain value, select its box in the Fix Values row,
then edit it in the New Values row.
The software will recalculate all the other values to give a new color
build.
3. If you are not satisfied with the result, you can either:
• Reset to Best Match,
• Reset to Stabilized.
Note:
This will only reset the build to the stabilized values if it was stabilized. Otherwise it will reset it to the best match values.
4. When you are satisfied with the result, click OK.
5.4.4 Keeping an Ink
Unconverted
If you don’t want to convert a certain ink using your Equinox color
strategy, select “Do not convert” in its “Conversion Type” column.
5.4.5 Adding a Color Build to
the Color Strategy
Color builds that are already stored in the Color Strategy you are using have a green check .
To store a new color build in the color strategy:
1. Click it in the Color Builds list.
You will see the message “This Color Build has not been added to the Color Strategy” at the bottom of the dialog.
2. Click “Add to Color Strategy”.
The color build now has a grey check
list.
in the Color Builds
49
5
Note:
50
If you have edited a color build that was stored in the Color Strategy,
you will see a yellow warning icon
beside it.
To revert back to the Color Strategy build, select the build in the list
and click “Get from Color Strategy” at the bottom of the dialog.
Equinox Manual
Equinox Plug-in
Chapter 6. Equinox Plug-in
The Equinox Photoshop plug-in enables you to convert CMYK or
RGB images to CMYKOGB*.
You can either match or expand the image’s gamut.
Matching the gamut allows you to reproduce RGB images on press
more accurately (the CMYKOGB gamut* covers more RGB colors
than the CMYK gamut).
Expanding the gamut of CMYK or RGB images using CMYKOGB
yields brighter images, containing a wider range of colors.
The options in the Equinox plug-in allow you to control the conversion* precisely.
Note:
To convert an RGB image to CMYKOGB, the image must have an
RGB source profile.
Note:
Please note that Equinox does not support layers. To convert an image with layers to CMYKOGB, you need to flatten it first.
6.1. The Equinox Plug-in in Photoshop
To use Equinox in Photoshop, go to the File menu, and select Automate/Convert with Equinox...
51
6
This opens the “Convert with Equinox” dialog.
The Preview at left shows how the image will looks once converted
with the settings at right.
You can click the preview to briefly see the original image again.
1. You can preview:
- all channels,
- only the CMYK channels,
- only the OGB channels (to see the added color),
- each channel individually.
2. You can:
- zoom in and out of the image,
- make it fit the preview area using .
- drag the image to pan it.
The channels visible in the preview have a
icon.
You can see the CMYK, OGB and LCH values of any point of
your image as you place your mouse on it.
52
Equinox Manual
Equinox Plug-in
This shows the original values when applicable (for example
original CMYK values of CMYK images but not of RGB images), followed by the converted values.
3. You can choose general conversion settings, such as the
Press Profile to use, and whether to expand or simply match
your image’s gamut.
4. The color wheel* shows what part of the gamut is being edited: the “Orange” (Magenta-Yellow-Orange-blacK), “Green”
(Cyan-Yellow-Green-blacK) or “Blue” (Cyan-Magenta-BlueblacK) sector when expanding the gamut, or the whole gamut
when matching it.
5. You can set Expand Gamut or Match Gamut options in this
area (depending on what Conversion Type you chose).
See 6.3. Gamut Expansion on page 54 and 6.4. Gamut
Matching on page 70.
6. You can set extra options to convert your separations here
(black generation, smoothing...).
See 6.5. Separation Options on page 71.
6.2. Converting an Image to Equinox Colors
1. Open your image in Photoshop and make sure it is the current
image.
2. If your image is RGB, make sure it has a profile.
3. Go to File/Automate/Convert with Equinox... to open the
“Convert with Equinox” dialog.
4. Choose the Press profile corresponding to your press.
The Press Profile menu contains all multicolor profiles (5, 6 or
7 ink profiles containing CMYK inks) defined in Color Engine
Pilot. Those profiles can be either Esko or ICC profiles.
5. Choose to either expand or match your image’s gamut, and
set expansion or matching options.
See 6.3. Gamut Expansion on page 54 and 6.4. Gamut
Matching on page 70.
6. Set Separation Options (see 6.5. Separation Options on page
71).
7. When you are satisfied with the result shown in the Preview,
click OK.
53
6
Note:
If the result is not satisfactory, you can revert to the original image
using the History palette or File/Revert. You can then edit the conversions options as you wish and convert your image again.
6.3. Gamut Expansion
When expanding your image’s gamut with an Equinox conversion,
you need to define which parts of the gamut you want to expand.
You can expand the gamut in the “Orange”, “Green” and “Blue” Hue
Sectors, and within each sector, in the Lightness*, Chroma* and
Hue* ranges.
6.3.1 Pre-defined Gamut
Expansion Presets
The Equinox plug-in comes with eight pre-defined presets for gamut expansion:
• “Max Gamut”,
• “High Gamut”,
• “Mid Gamut”,
• “Normal”,
• “Normal Fleshtones”,
• “Smooth”,
• “Smooth Fleshtones”,
• “Subtle”.
54
Equinox Manual
Equinox Plug-in
• Max Gamut
Using this preset expands your image’s gamut as much as possible. This means that Equinox will generate a maximum of color
in all the relevant areas of your image. For example, it will generate a maximum of Orange in the reds and oranges of your image.
For each sector (Orange, Green, and Blue), you can see that
each curve is maintained at 100% gamut expansion (the Boost
value is 100) throughout the Lightness, Chroma and Hue ranges.
• Maximum Expansion in Lightness range
100% expansion throughout the Lightness range means the
Equinox color(s) will be added to all shades of a same color, from
the darkest to the lightest.
• Maximum Expansion in Chroma range
100% expansion throughout the Chroma range means the Equinox color(s) will be added to all degrees of saturation of a color,
from pure gray to the most saturated form of this color.
• Maximum Expansion in Hue range
100% expansion throughout the Hue range means the Equinox
color(s) will be added to all colors of the image.
55
6
The pictures below show the result of an Equinox conversion using the “Max Gamut” preset: the color wheel on the left is the original CMYK image, the middle wheel is the resulting CMYKOGB
image, and the wheel on the right shows the OGB separations,
that Equinox created and added to the original image.
Note:
Use the “OGB” preview to view the newly created Orange, Green
and Blue separations.
• Example
You can see the benefit of the Equinox conversion in the example
below: the picture on the left is CMYK, the one on the right has
been converted to CMYKOGB using the “Max Gamut” preset.
56
Equinox Manual
Equinox Plug-in
You can see the added OGB separations below. Note that Equinox added the most orange in the saturated red areas, and the
most green in the saturated green areas.
• High Gamut
The “High Gamut”, “Mid Gamut” and “Normal” presets generate
a maximum expansion of the gamut in all areas except neutrals.
They differ in how much they preserve neutrals.
The “High Gamut” preset only keeps pure grays from gamut expansion. You can see this in the Chroma curves: the Boost is 0
for pure grays, and rises sharply to 100 when the grays start turning into colors.
• Mid Gamut
The “Mid Gamut” preset keeps most neutral areas from gamut
expansion (the curves rise a bit later).
57
6
• Normal
The “Normal” preset keeps the conversion’s effects out of neutrals altogether, and expands the gamut only when the colors
start to be saturated.
• Example
You can use this preset to convert an image with both saturated
and neutral areas (as the one below) to Equinox colors.
58
Equinox Manual
Equinox Plug-in
A conversion with a “Max Gamut” Gamut Expansion (left) gives
an unnatural orange color to part of the wooden bench. You can
see at right that it generates too much orange in the neutral areas.
The solution is to choose a preset that leaves out the neutral color, like “Normal”. This gives the bottom left picture as a result,
where the tulips are still brighter than in the original image, but
where the bench keeps a natural color. This conversion only generates orange in the saturated areas.
59
6
• Normal Fleshtones
The “Normal Fleshtones” preset limits the creation of Orange in
areas with a high lightness and/or a low chroma.
You can use it to convert images containing flesh tones and/or
beige colors.
In the Green and Blue Hue Sectors, it expands the gamut the
same way the Normal preset does.
60
Equinox Manual
Equinox Plug-in
• Example
For this image, an Equinox conversion with Maximum Gamut Expansion (“Max Gamut”) makes the skin tones look too orange.
61
6
A conversion with the “Normal Fleshtones” preset gives a more
natural effect in the skin tones, while still expanding the gamut in
the other areas (bright green leafy background).
• Smooth
The “Smooth” preset expands the gamut gradually into the saturated colors (so more Orange / Green / Blue is added as the color
gets deeper).
The Equinox conversion effect is then more subtle, as shown in
the CMYKOGB and generated OGB wheels below:
62
Equinox Manual
Equinox Plug-in
Use this to make the final result subtler than with a Maximum
Gamut Expansion (“Max Gamut”) conversion.
• Example
In the example below, the original CMYK image is a bit dull:
However, an Equinox conversion with “Max Gamut” makes it
look more like a colorized picture. The Orange and Blue tones are
especially bright, and really different from the original image.
63
6
A conversion with the “Smooth” preset adds chroma more gradually into the saturated colors, which gives a more natural effect,
as you can see below.
• Smooth Fleshtones
The “Smooth Fleshtones” preset limits the creation of Orange in
areas with a high lightness and/or a low chroma.
In the Green and Blue Hue Sectors, it expands the gamut more
gradually into the saturated colors than the “Normal Fleshtones”
preset (it uses the same curves as the “Smooth” preset for those
sectors).
64
Equinox Manual
Equinox Plug-in
Use this preset to convert images containing flesh tones and/or
beige colors, and to add chroma gradually into all saturated colors.
• Example
For this image, an Equinox conversion with Maximum Gamut Expansion (“Max Gamut”) makes the picture too bright and the skin
tones too orange.
65
6
While a conversion with the “Normal Fleshtones” preset (below)
solves the skin tones problem, you may also want to limit the
gamut expansion in the other areas (e.g. if the sweaters are too
brightly colored).
A conversion with the “Smooth Fleshtones” preset limits the
gamut expansion in all areas, to keep the image looking natural.
66
Equinox Manual
Equinox Plug-in
• Subtle
The “Subtle” preset expands the gamut very gradually into the
saturated colors and preserves neutrals.
Use this if you want a moderate gamut expansion for your images, to prevent them from looking dull but without making them
too bright and looking unnatural.
• Example
In the example below, the original CMYK image is a bit dull:
67
6
However, an Equinox conversion with Maximum Gamut Expansion adds too much chroma, and makes the picture too bright
and looking unnatural.
A conversion with the “Subtle” preset gives a more natural effect:
it only adds a blush of color to the peaches.
6.3.2 Creating a Custom
Preset
68
1. Choose the Orange Hue Sector.
Equinox Manual
Equinox Plug-in
2. Drag the points of the Lightness curve to adjust the gamut expansion as necessary for different lightness levels.
You can also edit the Lightness and Boost values below the
curve.
The Preview at left adjusts immediately.
Keep refining the curve until you are satisfied with how your oranges and reds look at different lightness levels.
3. Adjust the Chroma and the Hue curves using the same method.
4. Adjust the Green and Blue Hue Sectors’ Lightness, Chroma
and Hue curves too.
5. The Expand Gamut Preset list shows Custom. Click
then
“Save As...”
Choose a name and location for your preset and click Save.
Your Expand Gamut preset is saved as a “.gmt” file.
6.3.3 Importing a Custom
Preset
If you want to use a preset that you haven’t created on this computer (for example a preset saved on another computer within your network, or a preset that a colleague emailed to you):
1. Click
beside the Preset list then click “Load...”
2. Browse to the preset and click Open.
Note:
6.3.4 Editing a Custom
Preset
You can save that preset on your computer (for ease of use), by
clicking
then “Save As...”
1. Select the preset you want to edit in the Preset list (under
“Custom”), or import it (see 6.3.3 Importing a Custom Preset
on page 69).
2. Adjust the curves as necessary.
3. Click
then “Save As...”, and overwrite your preset.
69
6
6.3.5 Deleting a Custom
Preset
1. Click
beside the Preset list.
2. In the “Expand Gamut” pop-up, select the preset to delete
and click “Remove”.
3. Click “Yes” in the confirmation message.
Note:
You cannot delete pre-defined presets.
6.4. Gamut Matching
When matching your image’s gamut, you need to define a rendering
intent (to define the way the colors are transformed to the output
device’s color space), and decide if you want to use black point
compensation or not.
• Intent
Select the rendering intent to use when converting CMYK or RGB
objects, taking in account the purpose of output (the nature and
aim of your graphics, what paper they will be printed on, etc.).
You can choose:
• “Absolute Colorimetric”: this leaves colors that fall inside the
destination gamut unchanged.
Absolute Colorimetric is more accurate if the image's color profile contains correct white point information: it then includes
paper simulation and can give an exact color match (for ingamut colors).
However, Absolute Colorimetric maintains color accuracy at
the expense of preserving relationships between colors: when
converting to a smaller gamut, two colors that are different in
the source gamut may be converted to the same color in the
destination gamut.
• “Relative Colorimetric”: this rendering intent is similar to Absolute Colorimetric, except in its treatment of the white point.
Relative Colorimetric maps the white point to the destination
paper’s white (so no ink is used when printing white).
Relative Colorimetric is a good choice for photographic imagery, because it preserves color relationships without sacrificing
color accuracy.
• Black Point Compensation
Use Black Point Compensation to preserve details in the shadows when converting RGB images to Equinox colors.
70
Equinox Manual
Equinox Plug-in
Without Black Point Compensation, several out-of-gamut dark
RGB colors may be converted to the same color, resulting in a
loss of detail.
Black Point Compensation preserves the relationship between
those dark colors in the converted image, resulting in more detail
in the shadows.
6.5. Separation Options
Separation Options allow you to set Gray Component Replacement*, Smoothing, and color balance options.
6.5.1 Pre-defined Presets
The Equinox plug-in comes with two pre-defined separation options presets: “Maximum Black” and “Preserve Black”.
• Maximum Black
This preset:
• ignores the CMYK profile embedded in your original image,
• uses a “Maximum Black” Black Generation,
• uses a Smoothing value of 40.
• Preserve Black
This preset:
• ignores the CMYK profile embedded in your original image,
• uses a “Map Black on Blacks” Black Generation,
• uses a Smoothing value of 40.
For more information, see • Black Generation on page 73 and •
Smoothing on page 72.
6.5.2 Creating a Custom
Preset
1. Choose to use or ignore your image’s CMYK profile (for CMYK
images only). See • Source CMYK Profile on page 72 for more
information.
2. Enter a Smoothing value (see • Smoothing on page 72).
3. Choose what to prioritize when using this preset: accuracy,
speed or smoothness (see • Conversion Priority on page 72).
4. Choose what type of Black Generation to use (see • Black
Generation on page 73).
5. If you want to use OGB inks to print your shadows instead of
Black inks, select Replace black with OGB.
You can also can adjust the level of shadows in your image using the Mid-point option, and use your press profile’s OGB
measurements if available.
See • Replace black with OGB on page 76.
71
6
6. Select Preserve original separations if you want to maintain a
certain level of C, M, Y, and /or K in your image.
See • Preserve original separations on page 78
7. The Separation Options Preset list shows Custom. Click
then “Save As...”
Choose a name and location for your preset and click Save.
Your Separation Options preset is saved as a “.spn” file.
• Source CMYK Profile
Use this parameter when converting CMYK images that have an
embedded source profile.
Choose if you want to use the profile embedded in your original
CMYK image for the conversion, or ignore this profile.
Note:
We recommend you ignore the embedded profile when using “Preserve Black” in Black Generation (as an embedded profile changes
the separations -including black- so using it may give unexpected
results).
• Smoothing
Use this parameter to produce smoother results, especially in
vgnettes/gradations. This minimizes sharp color transitions when
converting images with gradations. We recommend to use the
default value of 40 for most images.
Note:
Smoothing can reduce the color accuracy by a small amount (the
accuracy decreases as you increase the smoothing value).
• Conversion Priority
Choose what is more important for you during the conversion:
• Use “Accuracy” to convert the colors in the most accurate way.
• Use “Speed” to speed up the conversion for large images (this
may result in a small loss of accuracy).
• Use “Smoothness” to get smoother separations. This is less
accurate than the “Accuracy” or even the “Speed” option, but
may be useful when the profiles are of a lesser quality (for example if it is difficult to take consistent measurements off the
press).
72
Equinox Manual
Equinox Plug-in
Note:
We recommend that you choose “Speed” when trying out an Equinox conversion on large files, and “Accuracy” when converting the
files for production.
• Black Generation
Choose how to handle the black channel and perform GCR*
when converting your image.
This doesn’t affect the Orange / Green / Blue generation or the
final (composite) image.
Note:
Only “Maximum Black” (full GCR) can be considered accurate. The conversion becomes progressively less accurate as you
reduce the level of GCR (even if the original image had very little
black).
In the example below, the conversion of the original CMYK image
on the left gives the CMYKOGB image on the right with all Black
Generation options.
Black Generation options only affect how much Black and how
much C / M / Y are used in the converted image.
73
6
• Maximum Black
Use “Maximum Black” to perform as much GCR as possible. This
maximizes Black and minimizes Cyan, Magenta and Yellow in the
converted image.
74
Equinox Manual
Equinox Plug-in
• Map Black on Black
Use “Map Black on Black” to perform less GCR and keep the
original image’s level of black in the converted image. The resulting level of Cyan, Magenta and Yellow is higher than when using
“Maximum Black”.
75
6
• Minimal Black
Use “Minimal Black” to perform minimal GCR and get the lightest
possible black separation. The resulting level of Cyan, Magenta
and Yellow is higher than when using “Maximum Black” or “Map
Black on Black”.
• Custom Black Generation Settings
If you have defined custom black generation settings in Color Engine Pilot (and you have a “color engine link” license), you will be
able to select them here (they will be at the bottom of the “Black
Generation” list).
• Replace black with OGB
Select “Replace black with OGB” if you want to use OGB inks to
print your shadows instead of Black inks.
Note:
76
This is not a color accurate operation (the preview will not be
accurate either).
Equinox Manual
Equinox Plug-in
For example, using Black and OGB inks (option off) will look like
this:
while using OGB and no Black (option on) will look like this:
77
6
• Mid-point
If you have selected “Replace black with OGB”, you can define a
Mid-point to adjust the mid-tones in your image (to avoid the
black looking too weak in your converted image).
For example, the default Mid-point (50) gives the image on the
left, while an increased Mid-point (75 here) gives the image on the
right.
• OGB Profile
Choose where you want to get your OGB measurements from
when using OGB to print shadows:
• Choose “Use Press Profile if Applicable” to use the OGB measurements in the press profile (if it contains any). If the press
profile contains no OGB measurements, the standard OGB
calculation will be used.
• Choose "Standard OGB Calculation" to ignore the press profile
when replacing black with OGB and use standard OGB measurements instead.
• Preserve original separations
Select “Preserve original separations” if you want to restore some
or all of the CMY removed (replaced by OGB) during the gamut
expansion.
This doesn’t affect the black or OGB levels but simply adds some
C, M and / or Y in the areas affected by gamut expansion.
78
Equinox Manual
Equinox Plug-in
Note:
This option does not give a color accurate result.
This option does not restore any CMY replaced by black during
Black Generation.
If you want to keep more CMY during Black Generation, you
should use a Black Generation setting that is more appropriate to
your needs (see • Black Generation on page 73).
If you want to keep your CMYK separations relatively unchanged
during the conversion, you can do the following:
1. Set the Black Generation to “Map Black on Black”.
2. Set “Preserve original separations” to 100% for C, M and / or
Y.
Note:
6.5.3 Importing a Custom
Preset
When using this option, we advise you to refine the color balance
by choosing a lower gamut expansion (for example Mid-Gamut).
If you want to use a preset that you haven’t created on this computer (for example a preset saved on another computer within your network, or a preset that a colleague emailed to you):
1. Click
beside the Preset list then click “Load...”
2. Browse to the preset and click Open.
Note:
6.5.4 Editing a Custom
Preset
You can save that preset on your computer (for ease of use), by
clicking
then “Save As...”
1. Select the preset you want to edit in the Preset list (under
“Custom”), or import it (see 6.3.3 Importing a Custom Preset
on page 69).
2. Adjust the options as necessary.
6.5.5 Deleting a Custom
Preset
3. Click
then “Save As...”, and overwrite your preset.
1. Click
beside the Preset list.
2. In the “Separation Options” pop-up, select the preset to delete and click “Remove”.
3. Click “Yes” in the confirmation message.
79
6
Note:
You cannot delete pre-defined presets.
6.6. The Equinox Preview Conversion plug-in
The display of CMYKOGB images in Photoshop is not color managed.
The Photoshop display can be used to accurately look at a single
separation (as a gray scale), and to measure dot percentages in the
separation(s). However, due to a limitation of Photoshop, the display of all separations together will not necessarily match the result
on press.
To preview the results of your Equinox conversion more accurately,
go to the File menu and select “Automate/Preview an Equinox Conversion...”. This opens the “Preview an Equinox Conversion” dialog.
It contains options to simulate converting your image to Equinox
colors.
1. Select the Press Profile to use (the one you defined in Color
Engine Pilot) in the list.
2. Choose to simulate the paper color or not.
• Leave Simulate Paper Color disabled to map the press’s white/
black range (the white point being the paper’s color) to the
monitor's white/black range. This shows white CMYK areas will
as monitor white and black CMYK areas as monitor black, and
scales everything in between accordingly.
• Enable it to simulate the real result of printing on paper.
Note:
Older versions of the Equinox plug-in always simulate the paper color.
The Equinox Preview Conversion plug-in generates a LAB Preview
file. This file shows your file’s colors as they will look after an Equinox conversion with your chosen options.
80
Equinox Manual
Equinox Plug-in
In the example below, the picture on the left is the original CMYK
file, while the picture on the right is the LAB Equinox Conversion
preview file.
Note:
The accuracy of the preview depends on your monitor’s calibration.
6.7. Creating an Equinox Device Link
You can create an Equinox device link to convert CMYK images,
and use it in other applications with the Equinox functionality. Proceed as follows:
1. Make sure you have the correct setup for using Equinox device links.
See 6.7.1 Checking Your Setup on page 81.
2. Create an Equinox device link in the Photoshop plug-in.
See 6.7.2 Creating an Equinox Device Link on page 82.
3. In Color Engine Pilot, use this Equinox device link to create an
Equinox color strategy.
See 3.1. Creating an Equinox Color Strategy on page 16.
4. Use this Equinox color strategy to convert files in ArtPro and /
or PackEdge.
See Chapter 4. Equinox in ArtPro on page 27 and Chapter 5.
Equinox in PackEdge on page 39.
6.7.1 Checking Your Setup
To use this way of working, make sure that:
• you have the Color Engine Pilot 10.1 installed,
81
6
• you are linked to the Color Engine Pilot (in the EskoArtwork Setup plug-in, select “Link to Color Engine” and define where the
color settings are).
See 2.4.2 Setup in the EskoArtwork Setup Plug-in on page 13.
6.7.2 Creating an Equinox
Device Link
Once your setup is correct, you will see a “Device Link” option in the
Convert with Equinox dialog (only when converting a CMYK image).
To create a device link:
1. Choose the Press profile corresponding to your press.
2. Choose to either expand or match your image’s gamut, and
set expansion or matching options.
See 6.3. Gamut Expansion on page 54 and 6.4. Gamut
Matching on page 70.
3. Set Separation Options (see 6.5. Separation Options on page
71).
Note:
If the image has a CMYK profile, it will be ignored in the Equinox device link, even if you choose “Use Assigned Profile” in the “Source
CMYK Profile” option.
4. When you are done, click “Save as Equinox device link...” at
the bottom of the dialog.
Enter a name for your Equinox device link and click OK.
This saves the device link in your color settings folder.
Note:
You can select an Equinox device link you created previously in the
“Device Link” list to see its settings in the “Convert with Equinox” dialog, and how it will affect an image you want to convert.
Changing the settings of an Equinox device link shows "Automatic"
again in the “Device Link” list.
You can save your changes by clicking “Save as Equinox device
link...” and overwriting the device link.
82
Equinox Manual
Equinox Plug-in
83
6
Chapter 7. Equinox in Automation Engine
Automation Engine’s Convert Colors task enables you to automatically convert your files’ colors using Equinox.
7.1. Using the Convert Colors task
1. In the Automation Engine Pilot, launch the Convert Colors task
on your file.
2. In the task ticket, define the output folder and the output file
name as you usually do in Automation Engine.
3. The Color Strategy lists contains all of the color strategies defined in Color Engine Pilot. Choose the color strategy you want
to use to convert your file.
84
Equinox Manual
Equinox in Automation Engine
4. Select Hide Technical Inks if you want to keep technical inks
out of the conversion.
5. Click the Launch button.
Note:
By default, this task flattens all the complex blend modes in your file,
to make sure the colors are converted accurately.
85
7
86
Equinox Manual
Glossary
Chapter 8. Glossary
• Best Build for Press
A Color Build* generated by Equinox to replace a spot color. Stabilize Settings* like “Drop Black”, “Drop Minimum” and “Force
Solid” mean you can avoid having separations, or white space,
with very few dots. This makes the color appear smoother on
press.
• Black Generation
Black Generation is used when converting an RGB image to the
CMYK color space. In theory, equal parts of C, M, and Y should
create grays/blacks, but due to printing inks impurities, they tend
to produce muddy browns instead.
To compensate for this, a percentage of Cyan, Magenta and Yellow is removed when creating separations, and replaced with a
percentage of Black (corresponding to the same theoretical color).
The replacement of Cyan, Magenta and Yellow inks in neutral areas only is called Undercolor Removal (UCR).
The replacement of Cyan, Magenta and Yellow inks in saturated
areas as well as in neutral areas is called Gray Component Replacement (GCR).
• Chroma
The property of a color that makes it appear saturated, or strongly colored. For example black, white, and gray have no Chroma,
pastel colors are low in Chroma, and a vibrant red is high in Chroma.
The Chroma attribute is part of the LCH* color model.
• CMYKOGB
This is the color space used by Equinox. Adding OGB to the
CMYK color space expands the Gamut*, for example giving
brighter and more colorful greens and oranges.
Spot colors can be reproduced much more accurately with
CMYKOGB than with CMYK matching.
With Equinox, users can choose their own CMYKOGB inks.
87
G
• Color Build
A color mix generated by Equinox and containing 5, 6 or 7 colors.
The Color Build is made of different percentages of the
CMYKOGB* inks (1 or 2 of them being 0% in the case of 6 or 5
colors).
Equinox suggests the closest color match, or the Best Build for
Press*, but the Color Build is still user-editable, to cater for specific cases.
• Color Wheel
A representation of all visible colors, arranged in a circle. Complementary colors such as red and green are located directly across
from each other, while neutral colors like grays are in the middle.
• Conversion
Equinox Conversion of a spot color to CMYKOGB*: Equinox
analyses the Lab Values* of a spot color, and generates a Color
Build*, made of different percentages of the CMYKOGB* inks.
The suggested Color Build is the closest color match to the spot
color but, thanks to Stabilize Settings*, you can also make it the
Best Build for Press*.
Equinox Conversion of an image to CMYKOGB*: When processing an image on different devices, each device change reduces
the image’s Gamut. This is because only the colors at the intersection of the successive devices’ Gamuts are kept, while the
other colors are mapped to the new Gamut by rendering intents.
Equinox expands the image’s Gamut, either to make it closer to
the original image’s Gamut, or to get brighter colors. The Conversion includes various parameters, allowing to get customized results.
• ∆E
The measurable difference between two colors, in the Lab* color
space. The higher the ∆E is, the more the colors will be visibly different.
The ∆E can be calculated with several formulas from the CIE
(Commission Internationale de L’Eclairage):
• “∆E” is the oldest formula, created with the Lab color space in
1976.
• “∆E 94” and “∆E CMC” are more recent, and take into account
differences in color perception (for example, the eye is more
sensitive to a small difference between two orange colors than
between two green colors).
• “∆E 2000” is the most recent. It also takes into account differences in Lightness* perception.
88
Equinox Manual
Glossary
If your company has been using specifically one of those formulas, we recommend that you use the same one. Otherwise, you
should use the most recent formula, ∆E 2000.
• Gamut
The range of colors that a device can capture, display or reproduce. Gamuts within the RGB color model usually contain more
colors than those within the CMYK color model, but no device
Gamut can reproduce all of the colors visible to the human eye.
To convert a set of colors from one device’s Gamut to another’s,
ICC Profiles* are needed.
• GCR
Gray Component Replacement is replacing part of a color (made
from an addition of Cyan, Magenta and Yellow inks) by a certain
amount of Black ink, to get the same color.
• Hue
The property of a color identified by its color name, such as “red”
or “green”.
The Hue attribute is part of the LCH* color model.
• ICC Profile
Color management profiles from the International Color Consortium. They are used to ensure colors stay the same throughout
the graphic chain. They take into account a device’s characteristics, and influence the way colors are displayed or reproduced on
this device, to balance those characteristics, and obtain consistent colors.
• Lab Values
Values of a color in the Lab color space. The Lab color space is
a theoretical model defined by the Commission Internationale de
L’Eclairage (CIE), based on large studies about human vision. It
represents all colors visible to the average human eye.
It is a three-dimensional color space, with three axis: “L” (Lightness*, or black-white axis), “a” (green-red axis) and “b” (blue-yellow axis).
Being device-independent and based on a mathematical definition of colors, it is a reference for measuring colors.
• LCH
The LCH color space is a theoretical model based on the Lightness*, Chroma* and Hue* attributes.
As LCH uses the Color Wheel* to define the Chroma* and Hue*
attributes, this color space is easier to visualize and more intuitive
than the Lab* color space.
89
G
Being device-independent and based on a mathematical definition of colors, it is a reference for measuring colors.
• Lightness
The degree of lightness or darkness of a color.
The Lightness attribute is part of the LCH* color model.
• Sector Profile
A Sector Profile is an ICC Profile* representing a sector of the Color Wheel*. For example Magenta-Yellow-Orange-blacK (generally called “Orange”) is a Sector Profile.
• Shared Angle Shift
When using AM screening, the OGB inks will share screen angles
with the CMYK ones. To avoid moiré patterns, Equinox reduces
to an absolute minimum the amount of a process ink where the
OGB ink sharing its screen angle is present.
• Stabilize Settings
Stabilize Settings avoid having separations, or white space, with
very few dots. This makes the color appear smoother on press.
They include “Drop Black”, which drops the black ink to 0%,
“Drop Minimum”, which drops the ink with the lowest percentage
to 0%, and “Force Solid”, which increases the ink with the highest
percentage to 100%.
• Working Color Space
A Working Color Space is a CMYK or RGB ICC Profile*, assigned
to a particular application/device, that defines the way it displays
or outputs colors.
In ArtPro, the Working Color Spaces define how the Equinox Color Builds are displayed on the monitor, and output to a proofer.
90


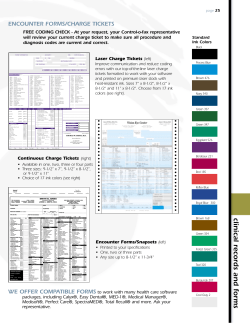


© Copyright 2026