
Step By Step to Maintaining a Healthy Life-Style!
Owner’s Manual & Nutritional Guide
Step By Step
Instructions
to Maintaining
a Healthy Life-Style!
Step by Step Instructions to Maintaining a Healthy Life-Style
Owner’s Manual
TABLE OF CONTENTS
OWNER’S MANUAL ....................................................................2
BEFORE YOU BEGIN ..................................................................................3
HARDWARE ILLUSTRATIONS......................................................................3
HOW TO ASSEMBLE ..................................................................................4
PRODUCT PARTS DRAWING........................................................................6
PRODUCT PARTS LIST ................................................................................7
AB-DOs......................................................................................................8
AB-DOn’ts..................................................................................................9
FLEXIBILITY AND WARMUP PROGRAM ....................................................10
TORSO TWISTS..........................................................................................10
SIDE LEANS ..............................................................................................11
ARM CIRCLES ............................................................................................11
SQUAT........................................................................................................11
FORWARD LEAN (STANDING)....................................................................12
FORWARD LEAN (SEATED)........................................................................12
CAT STRETCH............................................................................................12
PENDULUM ..............................................................................................12
WORKOUT ROUTINE................................................................................13
BODY BOBS ..............................................................................................13
GOOD MORNINGS ....................................................................................13
BODY BOOGIES ........................................................................................13
TWIST & SHOUT ......................................................................................14
TOSSES......................................................................................................14
HOP SCOTCH ............................................................................................14
FIGURE 8s ................................................................................................15
STREET BRAWL ........................................................................................15
SUGGESTED ROUTINES ............................................................................16
NUTRITION GUIDE ....................................................................18
FOOD AND HOW TO CONTROL IT............................................................19
DON’Ts ......................................................................................................19
DOs ..........................................................................................................20
FOOD TIMING ..........................................................................................21
WHEN TO EAT; WHEN TO STOP................................................................21
RESTAURANT EATING................................................................................22
CHEATING (INDULGING)............................................................................22
HOW TO PREVENT CRAVINGS ..................................................................23
NUTRITIONAL SUPPLEMENTATION ..........................................................24
GOOD JUDGEMENT ..................................................................................24
WHEN TO SEE YOUR DOCTOR ................................................................24
WOMEN; SPECIAL FACTS AND CONSIDERATIONS ....................................25
SPECIAL NUTRITIONAL REQUIREMENTS ..................................................25
THE BODY ................................................................................................25
PREGNANCY..............................................................................................25
Step by Step Instructions to Maintaining a Healthy Life-Style
Owner’s Manual
OWNER’S MANUAL
! WARNING
Consult your physician before
starting this or any exercise
program. This is especially
important for persons with
preexisting health problems
or who are pregnant. If you
experience dizziness or faintness, discontinue use of the
AB-DOer immediately. Do not
use the AB-DOer or attempt
any exercises until you have
read this entire manual
and have watched the
instructional video tape.
Follow all safety instructions.
Thane Fitness assumes no
responsibility for personal
injury or property damage
sustained by or through the
misuse of this product.
NOTE: If your body weight is in excess of 275 pounds use at your discretion.
This Product is Brought to You by
MADE IN CHINA
Product may vary slightly
from one pictured.
in association with
John Abdo, inventor and spokesperson
2
Customer service number:
1-888-367-6206
U.S. Customers Only
Step by Step Instructions to Maintaining a Healthy Life-Style
Owner’s Manual
BEFORE YOU BEGIN
Dear Fellow Fitness Enthusiast,
I want to thank and congratulate you for making The AB-DOer™ your choice in
abdominal training.
And once you see the amazing results, not only to your abs, but to your entire midsection you’ll be telling all your friends how great the AB-DOer is.
The AB-DOer was invented to provide you with a multitude of benefits. Not only will
you strengthen, tone and reduce fat from your abdominals, but you will also strengthen your
lower back and spinal column.
Common ab exercises are prone to increase (not decrease) the size of your stomach
muscles, this is called hypertrophy, as traditional exercise uses a resistance factor that actually stimulates muscle
enlargement. Now, instead of anywhere from five to ten different exercises that are time consuming, energy draining,
inefficient, and ridiculous all you need is the AB-DOer.
From one comfortably seated location you can easily condition every muscle in and surrounding your midsection
while shaving away all of that excess fat. And the great thing is The AB-DOer is fun and easy to use.
So without further delay, finish reading this manual, pop the video into your VCR and get ready for all the
compliments when your friends see how great you look.
I wish you phenomenal success!
Sincerely,
John Abdo
Inventor
HARDWARE ILLUSTRATIONS
This reference chart is provided to help you identify some of the small parts utilized in the assembly of
your AB-DOer.
PLEASE NOTE: From time-to-time the manufacturer will substitute a comparable part for another. This
sheet may identify parts that are not included for the assembly of your AB-Doer. Do not become alarmed
if you do not have the specific parts listed on this sheet.
Hex Head Bolt (4x)
Carriage Bolt (4x)
Flat Washer (4x)
Hex Head Bolt Top (4x)
Pull Pin (3x)
Spring Washer (4x)
Phillips Bolt (4x)
Acorn Nut (4x)
3
Arc Washer (4x)
Step by Step Instructions to Maintaining a Healthy Life-Style
Owner’s Manual
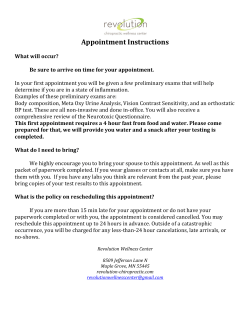
HOW TO ASSEMBLE
Before beginning lay out all parts and hardware in a clear area. Put all packing material back into the box.
Familiarize yourself with all the parts and assembly by carefully reading the instructions before you do anything else.
If you are missing a part please call customer service at 1-888-367-6206 (US Customers Only).
10
34
25
10
32
UPRIGHT
ASSEMBLY
22
28
21
10
27
32
34
10
22
19
14
19
21
STEP 1
Unfold the UPRIGHT ASSEMBLY to an upright position by pulling out the PULL PIN (10) located to the rear
of the SEAT FRAME (14) then swing the UPRIGHT ASSEMBLY up and lock in position by reinserting the
PULL PIN. Pull out the PULL PIN (10) on the SPRING SET (34) and lock the MASSAGE ROLLER
BRACKET (32) into position with the pin.
STEP 2
The ARM BAR (22) has been attached in the upside-down position to save space in packaging. Pull out the
PULL PIN (10) on the CONNECTION BUSHING (25) and turn the ARM BAR (22) 180˚ to make the LOCKING
KNOB (27) face to the backside. Secure the ARM BAR (22) with the PULL PIN (10).
NOTE: You can adjust the position of the MASSAGE ROLLER (28) and ARM BAR (22) to fit your body size.
STEP 3
The ARM BAR (22) can be locked in any angle by loosening the LOCKING KNOB (27). Roll back the foam
at the end of the ARM BAR (22) to reveal the holes and attach the HANDGRIPS (19) onto both ends of the
ARM BAR (22) WITH THE PHILLIPS HEAD BOLT (21).
4
Step by Step Instructions to Maintaining a Healthy Life-Style
9
7
8
Owner’s Manual
6
5
7
8
35
4
7
8
3
1
1
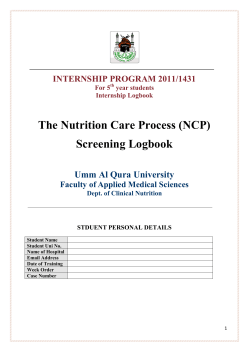
STEP 4
Attach the FRONT STABILIZER (3), the shorter one, onto the FRONT BASE FRAME (9) with CARRIAGE
BOLTS (1) ARC WASHERS (8) and ACORN NUTS (7). Repeat for the REAR STABILIZER (35) which is longer.
STEP 5
Lay the unit on its side. Attach the top half of AB-DOer to the BASE FRAME (9) with HEX HEAD BOLTS (4),
SPRING WASHER (5) and FLAT WASHER (6).
5
Step by Step Instructions to Maintaining a Healthy Life-Style
PRODUCT PARTS DRAWING
6
Owner’s Manual
Step by Step Instructions to Maintaining a Healthy Life-Style
Owner’s Manual
PRODUCT PARTS LIST
PART NO.
1
2
3
4
5
6
7
8
9
10
11
12
13
14
15
16
17
18
19
20
21
22
23
24
25
26
27
28
29
30
31
32
33
34
35
36
DESCRIPTION
CARRIAGE BOLT
END CAP
FRONT STABILIZER
HEX HEAD BOLT
SPRING WASHER
FLAT WASHER
ACORN NUT
ARC WASHER
BASE FRAME
PULL PIN
BOLT
SCREW
SQUARE PLUG
SEAT FRAME
LOCK NUT
SEAT
FOAM TUBE A
FOAM TUBE B
HAND GRIPS
HANDLE BAR PLUG
PHILLIPS HEAD BOLT
ARM BAR
ROUND PLUG
PLASTIC BUSHING
CONNECTION BUSHING
LOCK BUSHING
LOCKING KNOB
MASSAGE ROLLER
ROLLING TUBE
INNER SUPPORT BAR
SCREW
MASSAGE ROLLER BRACKET
BACK FOAM PAD
SPRING SET
REAR STABILIZER
RECTANGLE PLUG
7
QUANTITY
4
4
1
4
4
4
4
4
1
3
1
4
4
1
1
1
2
2
2
2
4
1
1
2
1
1
1
1
1
1
2
1
1
1
1
1
Step by Step Instructions to Maintaining a Healthy Life-Style
Owner’s Manual
AB-DOs
For best results f ollow these AB-DOs!
• Please consult a professional trainer, licensed fitness authority, or physician before attempting this or any
exercise machine or program.
• Use only on a level surface.
• Follow any one of the instructional video routines which compliment your level of fitness.
• Sit upright on the AB-DOer placing your back against the massage roller and your buttocks approximately
2 - 4 inches from the upright bar. The massage roller is adjustable, so adjust it until it is comfortable.
• To ensure stability and balance, place your feet on the floor wider than shoulder width apart.
• Secure a firm grip on the handles and tuck the Arm Bar underneath your armpits. The AB-DOer offers an
adjustable height Arm Bar. So position Arm Bar to a level that is suitable and comfortable for your height.
And make sure you are sitting upright to decompress the spine.
• The function of the AB-DOer is to strengthen and firm all the midsection muscles. DO NOT PULL WITH
YOUR ARMS, otherwise you will engage upper body muscles.
• To begin any session, just move slowly and easily. Short movements will begin to limber up stiff or
unconditioned waistline and back muscles. As your conditioning builds you will want to move through
wider ranges of motion and increase your movement speed.
• When you fatigue during an AB-DOer session, simply:
1. Slow down the speed of each movement, or
2. Transition to another movement, or
3. Reduce the range of motion, or
4. Stop, you’ve had enough – great job. You finished your workout today! (Note: Don’t stop until you
have had a challenging workout.)
• An important feature of the AB-DOer is the great aerobic workout you obtain. Stay moving for the
period of time listed on the video. To maintain an aerobic time duration, as you fatigue from one
movement simply transition to another, but keep moving.
• Use the AB-DOer to help loosen up and help relieve stiffness of back muscles, before and after playing
your favorite sport, or before and after lifting weights. This is especially helpful if you sit or stand all day
or are involved in strenuous labor.
• I do not recommend adding resistance to abdominal and/or mid-section exercises. Adding resistance has a
tendency make the muscles bigger (hypertrophy), not smaller. If you want more resistance, you can try
any of the following:
1. Slow down the speeds of your movements, or
2. Perform larger or exaggerated ranges-of-motion. This will place more anaerobic emphasis on
the muscles, or
3. Stop and hold your body in various positions for a short period of time to increase the flexion time
or power of each contraction, or
4. Position the Arm Bar over your shoulders to increase the resistance leverage.
• Concentrate your mental focus on your mid-section muscles and your lower back only.
• If at first your movements seem awkward, don’t get alarmed. Your midsection muscles and lower back
are most likely out of shape. These muscles aren’t accustomed to the workout that’s provided with
the AB-DOer. Just give it time and you will become accustomed.
8
Step by Step Instructions to Maintaining a Healthy Life-Style
Owner’s Manual
AB-DOn’ts
Now for the AB-DOn’ts!
• Don’t place your feet together; they must be wide and flat and firmly planted on the floor.
• Don’t look down, instead keep your chin up and eyes forward. This will prevent your upper back from
slouching and help keep your spinal column straight and upright.
• Don’t perform any fast movements until your muscles have had a chance to adjust to their new
exercise routine.
• Don’t perform extreme ranges of motion until your midsection muscles and lower back have become
more flexible.
• Don’t pull the Arm Bars with your hands. Instead, let your midsection muscles perform all the work.
• Don’t count repetitions. Rather, treat your AB-DOer workouts like any other aerobic activity.
You wouldn’t count steps on a treadmill or stepper. Instead, just have fun and "dance" from a
seated position.
John Abdo’s AB-DOer™ does it all!
It targets the ABDOMINALS,
It targets the SPINAL COLUMN,
It targets the MUSCLES OF THE LOWER BACK,
AND
It targets the THE OBLIQUES, those nasty
love handles everybody desperately wants to eliminate.
NOT SHOWN:
Intervetebral Discs and Spinal Vertebrae
9
Step by Step Instructions to Maintaining a Healthy Life-Style
Owner’s Manual
FLEXIBILITY & WARMUP PROGRAM
Designed by John Abdo
A flexibility or warmup program is an important aspect of all fitness or health routines. Typically,
warmup routines comprise any number of mobility movements which are intended to condition the body
to move more freely during activity. When you become more flexible you will realize better
performance in all your sports and exercise routines while, as an added bonus, you will also feel much
healthier ALL THE TIME!
Performing warmups consistently not only conditions the muscles, you will also reach deeper
tissues like the ligaments and tendons of your body.
Before using your AB-DOer it is wise to spend some time conditioning your body with stretching
movements to allow you to become more flexible. I have intentionally designed The AB-DOer instructional
video to include both a warm-up and a cool-down period on the unit itself. This prepares you for your
workout while it helps to speed post workout recovery as well. So you have the option of performing
warmups outside of those you can perform on The AB-DOer as well as those you can’t.
My objective is to make sure that you get healthy while you’re striving to obtain your best shape
ever. I have designed The AB-DOer and its routines to enable you to quickly, enjoyably, and safely reach
your goals. I’m A DOER, and I encourage you to commit to becoming a “DOER” yourself!
DESCRIPTIONS
1. TORSO TWISTS: While standing with a slightly wider than
shoulder-width foot stance, fix your eyes on an object in front of you.
Hold your torso upright by lifting your chest then lift both arms,
bending them at the elbows. While keeping your focal point, slowly
pivot, or twist, at your midsection as far as you can to the right then,
without any jerking motions, rotate in the opposite direction past your
starting point twisting as far to the left as your flexibility will permit.
Tr y to obtain a rhythmical cadence as you twist from side to side. This
Torso Twists
simple movement will loosen up stiff and unconditioned muscles,
tendons and ligaments to the entire abdominal region, the obliques
and the mid-to-lower back, including the spinal column in that region.
Perform as long as you like, 30 seconds minimum.
1
10
Step by Step Instructions to Maintaining a Healthy Life-Style
Owner’s Manual
DESCRIPTIONS (continued)
2. SIDE LEANS: [Standing]: While standing with a
slightly wider than shoulder-width foot stance, fix your eyes on an
object in front of you. Hold your torso upright by lifting your chest
then lean to your right side as far your flexibility will permit, while
keeping both feet planted on the floor for balance. Reach your
farthest, most comfortable lean, without any jerking motions. Then
rotate to the opposite side leaning as far to your left as your
flexibility will permit. Try to obtain a rhythmical cadence as you lean
from side to side. This simple movement will loosen up stiff and
unconditioned muscles, tendons and ligaments to the obliques,
the mid-to-lower back and the entire spinal column, and the
entire abdominal region. Perform as long as you like, 30
seconds minimum.
Side Leans
(Standing)
3. ARM CIRCLES: While standing
with a slightly wider than shoulder-width
foot stance, fix your eyes on an object in
front of you. Hold your torso upright by
lifting your chest allowing both arms to
freely hang to each side. Slowly start to lift
your arms in front of you, keeping your
elbows rigid if possible, and make large
circles with both your arms. Perform 5-10
circles with your arms in this direction then
reverse directions and perform 5-10 more
circles. Always perform this motion slowly
with no jerky movements. This simple
exercise will strengthen and increase the
flexibility to the shoulders, chest, upper
back, neck and arms.
2
Squat
4
Arm Circles
3
4. SQUAT: While standing with a slightly wider than shoulder-width
foot stance, fix your eyes on an object in front of you. Hold your chest
upright to obtain an erect back posture. Bend slowly at the knees and
allow your body to lower itself toward the floor. Only squat down as far
as you feel comfortable or until your heels start to raise off the floor.
Use your arms for balance by moving them in front of you if necessary.
Squat down slowly and never bounce back up. Perform as many squats
as you feel comfortable with, 5-10 is a preferred minimum. Squats are
an incredible exercise for developing body balance and control while
strengthening the muscles of the thighs, hips, buttocks, groin area,
calves and ankles.
11
Step by Step Instructions to Maintaining a Healthy Life-Style
Owner’s Manual
DESCRIPTIONS (continued)
5. FORWARD LEAN: [Standing]: While standing
with a shoulder-width foot stance, lift your chest so your back is
upright and your spine is erect. Bend your torso at the
waistline and allow yourself to lean forward. Simply let your arms
hang or use them to grab onto a wall or a chair for balance if
needed. Lean forward as far as you feel comfortable and hold your
deepest, most comfortable forward position, then return to the
upright position, make sure you do not bounce. Do this movement
slowly as it may have a tendency to make you a little dizzy due to the
lowering and lifting of the head. Perform between 3-10 forward
leans. This movement is great for conditioning the mid-to-lower back
and spinal column, the buttocks and hamstrings. [If standing is
uncomfortable please try exercise #6.
Forward Lean
(Standing)
5
6. FORWARD LEAN: [Seated]: While seated on a bench
Forward or chair obtain a firm shoulder-width foot stance on the floor. Lift your
chest so your back is upright and your spine is erect then bend forward at
Lean
(Seated) the waistline allowing yourself to lean forward as far as you feel comfort-
6
able and hold your deepest, most comfortable forward position for 3-5
seconds before returning to your upright seated position. Make sure you
do not bounce. Do this movement slowly as it may have a tendency to
make you a little dizzy due to the lowering then lifting of the head. Perform
between 3-10 forward leans. This movement is great for conditioning the
mid-to-lower back and spinal column, the buttocks and hamstrings.
Cat Stretch
7
7. CAT STRETCH: Lay face down with the
palms of each hand planted firmly onto the floor just
lateral your chest. By keeping your legs and pelvic/hip region pressed against the floor push your upper body
upwards with your arms to allow you to perform a backward bend from your lower back. Press yourself up as high
as you feel comfortable then hold for a count of 1-3 seconds then slowly lower yourself back to the floor; repeat
3-5 times. Never over extend and always perform this motion slowly. This is a great movement for conditioning
the abdominals with added benefits to the shoulders, arms, chest and back.
Pendulum
(Seated)
8
8. Pendulum: [Seated]: While seated on the floor
spread your legs as far as you feel comfortable with knees locked.
Start by bending your body at the waistline, and lean toward your
right ankle or foot. Reach as far as your flexibility will permit then
hold this position for 1-3 seconds. Release slowly and return back
to your starting position then lean toward your left ankle or foot and
repeat this movement for a minimum of 3-5 times to each side. This
exercise will condition the hamstrings, buttocks, knees, ankles and
mid-to-lower back and spinal column.
12
Step by Step Instructions to Maintaining a Healthy Life-Style
Owner’s Manual
HERE’S YOUR WORKOUT ROUTINE – HAVE FUN!
NOTE: All movements begin from a seated upright position; this is known as the Starting Position (SP).
Place both feet in a wide stance, sit upright with your back pressed against the massage roller, and pull the
Arm Bar firmly underneath your armpits to decompress your spine and maintain an upright posture.
1) BODY BOBS: (Lateral Bending):
Sit upright in the Starting Position (SP) then lean to
the right side with your torso (STEP 1), pause
momentarily. After you reach the right lean position come back to the upright SP (STEP 2), pause
momentarily before proceeding to lean over to the
left side (STEP 3), pause momentarily then return
to the SP (STEP 4). Repeat this cycle.
P1
This drill works ALL of the midsection muscles
with emphasis to the oblique and low back!
P2
SP
2) GOOD MORNINGS:
(Forward/Rearward Bending):
P1
Sit upright in the SP then proceed to lean forward
bringing your chest toward your knees (STEP 1),
pause momentarily. After you reach this position
return to the upright SP (STEP 2), pause momentarily before proceeding to lean rearward (STEP 3).
After reaching this position (STEP 3), pause
momentarily, then return to the SP (STEP 4).
Repeat this sequence.
P2
Although this drill works ALL of the midsection
muscles, more emphasis is placed on the
abdominals and the lower back!
SP
3) BODY BOOGIES: (Circular; Clockwise and Counter-clockwise):
Sit upright in the SP then lean forward bringing your chest towards your thighs SP1. Once you reach this position (STEP
1), begin to rotate your torso to the right in a circular fashion until you perform a complete circle with your upper
body (STEP 2). Start slowly with little circles, then as you warm up, increase the size of the circle. Rotate in the opposite
direction.
This drill is incredibly effective for working ALL the midsection muscles, no muscle is ignored!
P1
P2
SP
SP1
13
Step by Step Instructions to Maintaining a Healthy Life-Style
Owner’s Manual
WORKOUT ROUTINE (continued)
4) TWIST & SHOUT: (Twists):
Sit upright in the SP then twist, or rotate, your
torso leading with your right hand (STEP 1), pause
momentarily. Return to the SP position (STEP 2),
pause momentarily then proceed to twist to the
opposite side leading with your left hand (STEP 3),
pause momentarily. Return to the SP (STEP 4), and
then repeat the entire cycle.
This drill works ALL of the midsection
muscles; abdominals, obliques, lower back, ALL
OF THEM!
P2
P1
SP
5) TOSSES:
Start with your chest near your legs (STEP 1) [this
is the starting position]. Begin to sit upright while
twisting your torso so your right shoulder is lifting
faster than your left and proceed past the upright
SP until your torso is leaning rearward (STEP 2),
pause momentarily then proceed to sit upright this
time leading with your left shoulder; proceed until
you are leaning rearward again (STEP 4). Pause
momentarily then return to the starting position
(STEP 5). Repeat the entire cycle.
P1
P2
Although this drill works ALL of the midsection
muscles, more emphasis is placed on the lower
back, obliques, and abdominals.
SP
6) HOP SCOTCH:
Sit upright in the SP then start to lean forward bringing your right hand toward the top of your right knee (STEP 1),
pause momentarily. Now lift yourself and lean rearward crossing the SP diagonally leading with your left shoulder as
you lean rearward (STEP 2), pause momentarily. Now bring your left hand down to your left knee (STEP 3) pause
momentarily. From this position, lean rearward crossing the SP diagonally leading with your right shoulder as you lean
rearward (STEP 4), pause momentarily. Now bring your right hand back down to your right knee (STEP 5), pause, and
repeat the cycle.
Although this drill works ALL of the midsection muscles, more emphasis is placed on the lower back, obliques,
and abdominals.
P1
P2
SP
SP1
14
Step by Step Instructions to Maintaining a Healthy Life-Style
Owner’s Manual
WORKOUT ROUTINE (continued)
7) FIGURE 8s:
Sit upright in the SP then start to move your torso
and midsection so your hands scribe the Figure 8
(don’t pull with the arms or hands). Really
concentrate on making the most perfect "8" figure
you can. Once you master this figure, try reversing
your motion to scribe a perfect figure 8 in the
opposite direction.
P1
Although this drill works ALL of the midsection
muscles, more emphasis is placed on the
obliques and abdominals.
P2
SP
8) STREET BRAWL:
Lean forward so your chest is near your thighs and
your hands are close to your knees. By radically
pivoting from side-to-side in short little bursts, try
to punch your knees in alternate fashion. You can
lift your chest away from your knees and still
maintain a pivoting punching action.
P2
P1
This drill places a lot of emphasis to the
abdominals and obliques.
SP
NOTE: To increase the challenge, instead of pausing at the various points suggested, move gracefully through the
entire cycle without hesitation. You can also increase the challenge by positioning the Arm Bars over your shoulders.
Performing your drills in this manner will be for Intermediate and Advanced level AB-Doer participants, indicating a
greater degree of skill improvement and muscle control! If you fatigue in any position simply:
1. Change to another movement, or
2. Slow down the speed, or
3. Reduce the range-of-motion, or
4. Return the Arm Bar to underneath your arms, or
5. STOP, your workout has ended – congratulate yourself.
15
Step by Step Instructions to Maintaining a Healthy Life-Style
Owner’s Manual
SUGGESTED ROUTINES
BEGINNER – 8 MINUTES
Start – Warm-up for 2 minutes
BODY BOBS – 1 minute
GOOD MORNINGS – 1 Minute
BODY BOOGIES – Clockwise – 30 seconds
Counter Clockwise – 30 seconds
You may increase the range of motion and pace at this point.
BODY BOBS – 1 minute
GOOD MORNINGS – 1 minute
BODY BOOGIES – Clockwise – 30 seconds
Counter Clockwise – 30 seconds
COOL-DOWN
INTERMEDIATE – 12 MINUTES
Special notes:
Perform routine every other
day; no more than 4 times
weekly.
After 2 to 4 weeks you might
be ready to graduate to the
Intermediate routine.
Special notes:
Start – Warm-up for 2 minutes
BODY BOBS – 1 minute
GOOD MORNINGS – 1 Minute
BODY BOOGIES – Clockwise – 30 seconds
Counter Clockwise – 30 seconds
FIGURE 8s – 1 Minute
Add 2 to 6 minutes to entire
routine if you are capable.
You may increase the range of motion and pace at this point.
TWIST & SHOUT – 1 Minute
TOSSES – 1 Minute
After 2 to 4 weeks, you
might try to graduate to
the Advanced routine.
Perform routine every
other day; no more than
4 times weekly.
{Raise Arm Bar over your shoulders}
BODY BOOGIES:
Clockwise – 1 Minute
Counter Clockwise – 1 Minute
TOSSES – 1 Minute
BODY BOBS – 1 Minute
COOL-DOWN
Key Points for all Routines
•
•
•
•
Obtain a wide stance!
Sit upright with back pressed against massage roller!
Pull Arm Bar underneath your armpits!
Follow all drills as assigned in sequence
without hesitation!
• Limber up your lower back and midsection
muscles before using the AB-DOer™!
• To obtain a productive ABDOBIC workout,
Abdominal Aerobic, remain in constant motion
while using The AB-Doer™!
• Be creative!
• Listen to music!
• Have fun!
Please refer to the instructional video for proper exercise demonstration and explanation.
16
Step by Step Instructions to Maintaining a Healthy Life-Style
Owner’s Manual
SUGGESTED ROUTINES (continued)
ADVANCED – 20 MINUTES
Start – Warm-up for 2 minutes
BODY BOBS – 45 Seconds
GOOD MORNINGS – 45 Seconds
BODY BOOGIES – 45 Seconds – Clockwise
45 Seconds – Counter Clockwise
[You may increase the range of motion and pace at this point]
TWIST & SHOUT – 1 Minute
TOSSES – 1 Minute
HOP SCOTCH – 1 Minute
FIGURE 8s – 1 Minute
STREET BRAWL – 1 Minute
[Raise Arm Bar over your shoulder]
BODY BOBS – 1 Minute
GOOD MORNINGS – 1 Minute
BODY BOOGIES
1 Minute – Clockwise
1 Minute – Counter Clockwise
TWIST & SHOUT – 1 Minute
TOSSES – 1 Minute
STREET BRAWL – 1 Minute
[Lower Arm Bar under armpits]
HOP SCOTCH – 1 Minute
FIGURE 8s – 1 Minute
BODY BOOGIES – 30 Seconds – Clockwise
30 Seconds – Counter Clockwise
COOL-DOWN
Special notes:
Perform routine every
other day – no more
than 4 times a week.
After you’ve mastered
the Advanced routine,
you can increase your
time to 30 minutes,
or more.
You might also enjoy
choreographing your
own routines.
BACK & SPINE STABILIZER – 5 MINUTES
Special notes:
Start
Move slowly and easily.
BODY BOBS – 30 Seconds
GOOD MORNINGS – 30 Seconds
BODY BOOGIES – 30 Seconds – Clockwise
30 Seconds – Counter Clockwise
[You may increase the range of motion and pace at this point]
BODY BOBS – 45 Seconds
GOOD MORNINGS – 45 Seconds
BODY BOOGIES – 45 Seconds – Clockwise
45 Seconds – Counter Clockwise
COOL-DOWN
You may perform this routine
once or even twice per day. It’s
ideal to use after you get out of
bed in the morning, or before
retiring in the evening. It’s also
great to use as a Warmup and
Cool-down when engaging in
any strenuous activity.
This is NOT a workout. Only
use it to relieve stressed out,
tight, and sore muscles.
INSTRUCTIONAL VIDEOS available for the AB-DOer™.
1. Beginners 2. Intermediate
3. Advanced
4. Back and Spine Stabilizer
17
Step by Step Instructions to Maintaining a Healthy Life-Style
Nutritional Guide
Nutritional
Guide
Any medical or health-related information contained in this book is not intended as a substitute for consulting your physician. Any attempt to diagnose or
treat any illness or medical condition should come under the supervision of a
qualified physician familiar with your personal medical history.
The information contained in this book, and the Weight Loss System described
herein, are intended for use by normally healthy individuals as part of a
general program of improvement of body appearance.
CHECK WITH YOUR PHYSICIAN BEFORE STARTING ON THIS OR ANY
PROGRAM OF PHYSICAL CHANGE.
18
Step by Step Instructions to Maintaining a Healthy Life-Style
Nutritional Guide
FOOD and HOW TO CONTROL IT
DON’TS
1) Avoid going on repeated diets, each of which usually sets you up to regain everything you lose,
and then some, just as soon as you “go off” your diet. Instead, follow the simple
guidelines below.
2) Don’t add any fat or oil to anything you eat... ever! This is by far the most important rule to
remember, and it cannot be overemphasized. The words “added fats and oils” have a very
specific and special meaning here, referring to all those unnatural fats and oils that humans
manufacture, process, and add to the food they eat. There are no such things as added fats and
oils in nature. They just don’t exist. NATURE makes corn... HUMANS make corn oil, margarine
and deep-fried food. NATURE creates soybeans and peanuts... HUMANS manufacture soy oil,
mayonnaise, and peanut oil.
It is very important to avoid ALL added fats and oils, not just because they’ll make you fat, but
because they’ll also make you sick, linked as they are to such disorders as breast and colon
cancers, heart disease, and other serious illnesses.
Eliminating added fats and oils means avoiding:
• Margarine,
• Mayonnaise,
• Olive Oil,
• Butter,
• Oily salad dressings,
• Chips of all kinds (unless they’re baked),
• Fried foods,
• French fries,
• Cream cheese,
• Ice cream,
• Lard,
• and any other manufactured fat or oil.
Note that if you don’t like salads without dressing — try lemon juice and seasoning salt.
It’s delicious! Or... try any of the oil-free salad dressings now widely available.
All the above-listed items are horrible for you. But the hydrogenated products such as margarine,
mayonnaise, and all heated fats and oils are the worst, as they are high in trans fats,
substances that form when fat or oil is heated or heavily processed. Trans fats are directly implicated in
the onset and/or exacerbation of obesity, cardiovascular disease and cancer. Avoid these “foods”
at all costs.
3) Try to avoid processed foods high in sugar and white flour. Check your labels and do not eat
anything that has too much of these items in the ingredient list, as they too contribute to
obesity and ill health.
19
Step by Step Instructions to Maintaining a Healthy Life-Style
Nutritional Guide
DOS
1) ALWAYS BALANCE YOUR FOOD INTAKE -- so that your intake of carbohydrates (all flour products
such as bread, pasta, etc., and all sweet foods) approximately matches your intake of protein (e.g.,
meat, fish, fowl, egg, milk products, soy products). You may do this by simply eyeballing the foods
your are eating. Example: if you have a dish full of pasta in front of you (high carbs) then you need
to balance it with what you approximate to be an equal amount (by volume or better, by weight)
of high protein food. The best high protein foods are those fat-free turkey or chicken breast deli
slices found in the deli section of your supermarket. They are inexpensive, and they are pure
protein, with NO fat, NO carbs. Note that egg whites are also pure protein, and may be eaten in
just about any (reasonable) quantity.
2) DRINK PLENTY OF WATER! Try to drink eight 8 ounce glasses of water each day, or more. It is
usually best to use bottled spring or distilled water, since the water in most areas
today is heavily treated with chlorine and other unhealthful chemicals.
3) The BEST possible foods to eat are green vegetables: eat all you want of them (within reason, of
course). And remember not to ruin things for yourself by adding oily salad dressings!
There are several vegetables that actually use up more energy getting digested than they bring to
your body. The digestion of any food requires an expenditure of energy by the body. Once the food is
digested, it releases its own stored energy in the form of calories, which are then either used (“burned”) or
stored, mostly as fat. Sometimes, the number of calories in a food is lower than the number of calories it
takes to chew and digest it. The act of eating, for example, celery or cucumber, can be a weight losing
proposition all by itself — without exercise or anything! Now isn’t that interesting...?
Vegetables whose digestion can use more calories than they contain include:
•
•
•
•
•
•
•
•
•
•
•
Alfalfa sprouts
Beet greens
Broccoli - (a close call)
Cabbage
Cauliflower - (a close call)
Celery
Chard, Swiss
Chives
Cucumber
Eggplant - (a close call)
Endive
•
•
•
•
•
•
•
•
•
•
•
Garlic
Lettuce
Mushrooms
Peppers - (a close call)
Radishes
Seaweeds of all kinds
Spinach
Tomato - (a close call)
Turnip greens
Water chestnuts
Watercress
FOOD PREPARATION
This subject could fill a book all by itself. The essential point to remember is, once again, to avoid added
fats and oils! Do not fry with oil. Use non-stick pans and fry with water. A little experimentation and you’ll
see how easy this is. Also remember that any menu that contains oil, butter or margarine can easily be
made as well or nearly as well without those ingredients. You must experiment to apply this concept to
every one of your favorite recipes, but the reward for doing so is very high. It will mean better and better
health as well as greater and greater success.
20
Step by Step Instructions to Maintaining a Healthy Life-Style
Nutritional Guide
FOOD TIMING
The best way to arrange your food day is to spread out your daily intake into several meals, as
opposed to eating, say, one large meal per day. Studies have shown that when two comparable groups of
people eat the same number of calories but on different schedules, the group that eats one large meal per
day gains weight and feels worse, while the group that spreads its calories out during the day feels better
and gains no weight.
Other studies indicate that when food is eaten late in the day, closer to bedtime, weight is gained as
compared to no weight gain when the same food is eaten earlier in the day.
Therefore, LARGEST MEAL=Lunch, SMALLEST MEAL=Dinner, MODERATE MEAL=Breakfast.
This is the optimal way to arrange your days. The typical large dinner with which most people are
familiar is problematic because the natural daily rhythms of the body are such that evening is when it is
preparing for rest, not a large meal. More importantly, food eaten late in the day is much more likely to be
converted to stored body fat. So eat a very light meal for dinner — salad, perhaps soup and a small side
dish. Not much more. Remember: food eaten this late will almost certainly be converted to body fat; and
body fat, once accumulated, comes off much slower, and with much greater difficulty, than it goes on - a
fact with which many people are already familiar.
Breakfast can go either way. If you’re hungry in the morning, by all means, eat away. If not, eat
lightly. Follow your body’s signals.
Lunch is the perfect time to eat your largest meal of the day, if you have one. There’s plenty of
time left to burn it off, and the satiety will probably last well into dinnertime, thereby helping to keep
dinner small.
WHEN
TO EAT;
WHEN
TO STOP
Naturally thin people typically follow both of these two simple patterns:
1) Eat only when hungry; and
2) Stop eating when no longer hungry.
This is how primitive man ate, a good indication that it is the way nature intended. Most of us have
been conditioned to eat when it’s time to eat: lunchtime, dinnertime, breakfast. But the truth is that it is far
more natural to eat when you’re hungry. That means truly hungry, not just craving food. As much as possible, try to follow this simple but powerful principle of eating.
The second timing principle - to stop eating when you’re no longer hungry - is also very powerful,
but may contradict some childhood training. Remember “Eat! Children are starving in India/
Somalia/wherever...”?
That may be true, but it is certainly no reason to stuff yourself. Childhood lessons are not always
good ones. The most natural time to stop eating is when you’re full, which is, surprisingly, not what most
of us do. This principle means that you should stop even if 95% of the food is still left on your plate or if
only 5% is left. It doesn’t matter. The amount of food on the plate is of no importance; it is completely
arbitrary and irrelevant to your body’s needs. What is important is only how you feel. If you’re satisfied...
if the hunger is gone... STOP.
If you can master these two basic eating concepts, you will, to a large extent, master your
nutritional and weight situation forever.
21
Step by Step Instructions to Maintaining a Healthy Life-Style
Nutritional Guide
RESTAURANT EATING
This is a particularly troublesome area. Restaurants, for some unknown reason, love oil. Even simple
salads are drowned in truly ridiculous amounts of oil. This abuse of oil is the single biggest
problem with eating in restaurants.
Food freshness is also an area of concern. Fish, poultry and meat, in descending order, are most
likely to be problematic. Be careful. Ask plenty of questions, particularly about freshness. If there is any
reason to believe your food is not fresh, order something else, or leave.
When ordering in a restaurant follow these simple rules:
• Always ask how much oil is in the dish(es) you wish to order.
• Insist that the dish(es) you want be made with no oil, or at worst, a very small amount.
• Refuse any offer of sprinkled cheese to go over your food.
• Order salads with vinegar dressing only, or lemon wedges that you can squeeze onto the salad.
If you must order dressing from the house, get one that separates, like vinaigrette, so that
you can pour off the oil that floats on top, using only the tasty part below the oil. Or bring your
own, healthful salad dressing.
• Never order anything that is deep fried! Remember to ask about this, because there are many more
foods that are deep fried than is obvious from most menus. For example, Italian restaurants often
deep fry their “eggplant parmigiana”. You must ask, and avoid all foods that are so prepared.
• Avoid creamy foods. Many dishes that are normally prepared with cream are just as tasty without
it. Ask the kitchen to prepare it the way you want it.
• Order a salad first, the larger the better, and ask that it be brought out immediately. Avoid the
oily/cream dressings, and eat the salad as soon as it comes out. This will help “take the edge off”
your hunger, help you resist the temptation to eat those unhealthful white flour rolls and butter, and
get you started in the right direction.
• Try to resist the temptation to order dessert. If you must do so, get one that is as close to “real
recognizable food” as you can get. A cup of fruit, or a fruit tart may do. In any event, avoid
the creamy cakes and pies.
• In general, do not be afraid to ask for what you want. If they say “no”, say “good-bye”. There are
plenty of restaurants that will be only too happy to accommodate you, so don’t put up with
anything less than what you know is right for your body.
CHEATING (INDULGING)
OK, we all know you’re going to do it. Nobody’s perfect.
That’s why we use that well-worn euphemism... “indulging”, instead of “cheating”.
The secrets of success are:
(a) Use the tips outlined below to help STOP your cravings, and thereby your cheating!
(b) Don’t “indulge” too often, and
(c) If you do cheat, choose ways that are not so bad for you; i.e., minimize the damage.
There is no quota for “cheating”. We urge you to strive for perfection. If you find yourself succumbing once in a while, consider it cheating, not your “quota of bad stuff for the week”. You should always strive
to reject your old, bad ways — to renew your dedication to yourself and to the new body and health you
are determined to achieve.
22
Step by Step Instructions to Maintaining a Healthy Life-Style
Nutritional Guide
But if you are going to cheat, at least don’t eat all of whatever you’re cheating with. Leave some to throw
out. That way you’ll get in the habit, and someday you may find yourself throwing it out before you eat it!
HOW
TO
HELP PREVENT CRAVINGS
1) BREAK THE CYCLE!
• Food quality: This is the most important factor you can change in the area of negative food cycles.
Avoid all junk food. Avoid all foods that trigger cravings. Avoid all added highly processed foods.
Eat real, recognizable food.
• Avoid all added fats: The most important diet principle of all. Added fats and oils (a) make you
fatter faster than anything else you can do or eat, (b) increase your risk of heart disease and
cancer, and shorten your life, and (c) can cause you to crave sweets, which in turn further damage
your health and increase fat levels.
• Avoid sugar: Refined white sugar (table sugar) is damaging to your health in many ways, and will
(a) directly cause weight gain, and (b) cause cravings for fats that will further cause weight gain.
• Drink plenty of water: This is an easy, healthful way to help avoid cravings. Often, a perceived
craving for food, particularly fatty food, may be satisfied with a cup or two of water!
Drinking plenty of water also helps to naturally control appetite through a direct effect on the
stomach. Always drink pure, fresh water; avoid tap water laden with chlorine and other chemicals.
Aim for at least 6-8 cups of water per day.
• Try brushing your teeth instead of eating! Often, a craving for a particular food, especially high-fat,
high-sugar food, is caused by something no more complicated than a bad taste in the mouth.
A quick, refreshing tooth brushing or mouthwash rinse will often get rid of cravings immediately
and painlessly.
• Food timing: Do not skip breakfast; this only leads to hypoglycemia and severe cravings sometime
around mid-morning, which may, in turn, cause you to eat cookies or doughnuts with coffee and
sugar, which in turn can set you up for a roller-coaster blood sugar ride for the rest of the day.
Not a good idea.
• Avoid eating anytime within three hours of bedtime. Not eating anything near bedtime can lower
your fat levels and can change your eating patterns so that you are hungrier in the morning,
leading you to indeed eat a small-to-moderate breakfast. This in turn helps control your
mid-morning cravings.
If you need to snack between meals, eat some fresh vegetables, or fat-free turkey deli slices, or a
whole grain (not white flour) product, or some fruit.
• Meal size: A pattern of smaller, more frequent meals throughout the day is much more conducive
to craving control than a pattern of starvation or mild snacking during most of the day
combined with one large (often very large) daily meal. Studies have also shown that spreading food
intake throughout the day helps in the weight loss effort, while concentrating calories all in one
large meal sabotages it.
• Avoid overly salted foods, if they lead to sugar cravings or if you suffer from kidney disease or high
blood pressure.
• Eat slowly: This will help minimize the effect of cravings, because you will find that you are
satisfied sooner than you would be if you were wolfing your food down.
23
Step by Step Instructions to Maintaining a Healthy Life-Style
Nutritional Guide
• Vary your diet: Useful when food allergies are suspected. Try to avoid eating any single food,
such as milk or milk products, bread or other wheat products, eggs, meat, corn, soy, and any
other potentially allergenic food too often. Rotating your diet, so that you do not consume any
single allergenic food more often than once every three to four days is the easiest way to
accomplish this.
• Try the following trick: Carry with you a small pad of paper on which to write down everything you
decide to eat before you actually eat it. This will introduce an important time delay during which
you are writing down what you’re about to do. There is a good chance you will often find yourself
changing your mind.
NUTRITIONAL SUPPLEMENTATION
It is often thought that a good, balanced diet should contain all the nutrients your body needs. But in
today’s world, with mass food production and soil depletion, it usually doesn’t. And besides, how many of
us really eat a “good, balanced diet”?
For these reasons, and because optimal nutrition is especially important during a period of active fat
metabolism and breakdown, we recommend that a good multi-vitamin-mineral be taken regularly.
TIPS:
• One-pill-a-day multi-vitamin preparations are usually poor in quality and not very helpful. Better
quality formulas require at least 3 tabs/caps per day. Multi-nutrient formulas should usually always
be taken with at least some food. This helps improve absorption, prevent abdominal discomfort,
and prevent the “niacin flush” that sometimes otherwise occurs.
• Look for a formula that contains a full range of B vitamins, vitamins A, C, E and D, and a full
complement of minerals. Vitamin B6, magnesium and chromium are particularly important, yet
often deficient in typical diets.
• Many people benefit additionally from taking extra Essential Fatty Acids, vitamin C, and sometimes,
a digestive enzyme called bromelain.
• The best place to find high-quality, complete nutritional supplementation is usually your local
health store.
• Finally, don’t forget to drink plenty of clear, pure water to help flush out all those toxins your
body stores along with its fat.
GOOD JUDGEMENT
In general, use your good judgment. Do not overdo anything. Keep all nutritional supplementation
to levels consistent with what nature intended for the human body.
And look at the ingredient list of any packaged item you put in your mouth. Look at the source.
The maker of a food or food supplement should be a reputable company, with qualified experts doing
the formulations.
IF YOU ENCOUNTER PROBLEMS
Most people who experience this weight loss system meet with complete, ecstatic success.
24
Step by Step Instructions to Maintaining a Healthy Life-Style
Nutritional Guide
If you sense that your results should be different, remember that every human on this planet is distinct from every other and you are likely to react differently from anyone else to a given external stimulus.
So if by some chance your rate of fat loss seems too slow, note this important fact:
Everyone loses fat at his or her own individual pace.
Just continue following the system and working out with your AB-DOer™ and your goals WILL be
reached. You may simply be one of the few who are “slow reactors”. It may take a bit longer, but you WILL
get there!
Also, you will want to make sure you’re maximizing your success by following the ENTIRE
program outlined here. This is most important for anyone whose initial results may be slower in coming
than others.
WHEN
TO SEE
YOUR DOCTOR
In general, see your doctor if any physical symptom or sign occurs that is unusual or makes you
uncomfortable or worried in any way! Also, see the next chapter for special information regarding women
and their special health considerations.
WOMEN; SPECIAL FACTS AND CONSIDERATIONS
Women have certain unique requirements that also vary with age. Here are some of those factors, and
how they can impact on weight control.
SPECIAL NUTRITIONAL REQUIREMENTS
Food requirements are typically lower for women as compared to men. This latter point means that
on average, women must eat less food in order to maintain their weight as compared to men.
After adjustment for weight, women often need more vitamin B6, folic acid, calcium, magnesium,
and iron than do men. Women also often require more EFAs (Essential Fatty Acids).
THE BODY
Women naturally have more body fat, measured as a percentage of total body mass, than do men.
Often this fat is distributed in undesired places. Regardless of what we think of it, this is nature’s reality.
For most women, it is unnatural and nearly impossible to attain the ultra-thin appearance of professional
models. It is best not to try. Maximize the body you were born with with your new weight control system,
but do not try to accomplish that which is unhealthy.
PREGNANCY
Pregnancy is not a time to try to lose weight, however it’s important to stay in good physical
condition during a normal pregnancy and to watch your weight gain. The AB-DOer is a wonderful way to
achieve this as it provides a safe, non-impact workout. Talk to your doctor first and follow his or her advice
regarding your activity level, your nutritional status, and other health-related issues.
25
Step by Step Instructions to Maintaining a Healthy Life-Style
NOTES:
NOTES
Owners Manual & Nutritional Guide
This Product is Brought to You by
www.thanefitness.com
REV 8/00


© Copyright 2026