
Museums Australia Thinker1 Poster
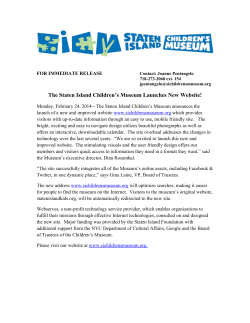
M
y students had never programmed
before, but with the Thinker1 they
were controlling the LEDs and the buzzer
in just a few minutes. It is a great way
to introduce students to the internet
of things.
James Oliver
Peter Mahony
Year 9 DesignTech Teacher,
After students completed a Thinkspace Thinker1 session
Thinker1 Mark II
1
2
3
5
4
Original Prototype
Thinker1 Mark I
Learning material
Thinker1 Mark II
Thinker Shield
Designed to remove the need
for a breadboard normally used
with Arduino microcontrollers.
Built in house at MAAS with the
prototype going with several
redesigns to suit education
market.
Over 500 of the Thinker1 boards
were made with the majority
ending up in the hands of
young learners of MAAS holiday
programs
Learning material designed to
ensure end users can continue to
code with the Thinker1 without
educator help. Materials provided
free on museum website.
The board was redesigned to
include additional features such
as keyboard emulation. Research
showed additional functionality
made it less user friendly.
In partnership with
Freetronics the board
was turned into a shield
capable of extending the
functionality of any standard
Arduino board.
The Thinker1
Transforming electronics education
T
hinker1 was designed at
the Museum of Applied
Arts and Sciences to fill an
educational need in physical
computing. It is made up of
a unique blend of on-board
components and can also
be easily expanded using
standard Arduino compatible
components.
Often in the classroom when physical
computing is taught it requires a circuit
to be created and then connected to the
board before you can even start coding the
microcontroller. The Thinker1 eliminates this
complicated setup and allows students to
get outcomes quickly. It is easy to setup and
works on Mac, PC and Linux.
This allows learners of ages 9 and up to
code in a professional language. Within 30
minutes learners are able to control, using
the Arduino language based on C, a row
of LEDs. At the end of a full day workshop
learners are able to write music with the
buzzer and created persistence of vision
activities with the LEDs.
The learning materials have been refined
over time based on real classroom
experiences. It has been used in schools,
at home, workshops, drop-in sessions and
teacher professional development. Based
on feedback, activities have been refined
to have less steps and have more powerful
outcomes.
Not only have the learning materials been
updated over time but the actual hardware
configuration has been adapted. The
initial board was stand alone and included
a dedicated microcontroller. The design
being mass produced is a shield which is
compatible with any Arduino board with a
standard header setup.
The Thinker1 Shield, known as the
ThinkerShield, opens up physical computing
to an even wider age range. It can be
programmed from visual programming
languages such as Scratch and
TouchDevelop.
The biggest problem MAAS has had with the
development process has been struggling
to meet the demand of teachers who
would like a set of the boards for their own
classroom after completing a workshop in
the museum.
Learning Materials
The learning materials are all freely
available from the museum website. They
are designed to allow a parent with no
knowledge to assit their child. All activies
have an outcome in 6 steps or less!
Classroom tested
The Thinker1 has been used in both school
and holiday workshops at MAAS for the
last 2 years. It has become part of maker
spaces in classes and is in schools in 3
different states.
For further information visit our Thinkspace
site via the learn section of the MAAS site:
maas.museum/learn
The ThinkerShield is
the consumer version
of the Thinker1. It
extends the features
of the Thinker1 to
allow learners to
connect additional
components using
alligator clips. It is fully
compatible with the existing Thinker1 code.
New learning materials are being developed in
preparation for entry into the wider market. It
is an ideal first step into physical computing for
any age from 7 to adult.
Expandable
Learners once they have mastered the
onboard components can add additional
components via the breakout headers. In
this example a learner controls a Minecraft
character using the Thinker1.
[email protected]


© Copyright 2026