
To View This Guide As A PDF
CrucibleWDS 2.3.3
Next
CrucibleWDS Documentation
Version: 2.3.3
Revision: 1
License: GPLv3
Changelog
Topics that have changed since 2.3.2 are highlighted
0. CrucibleWDS License
1. Introduction To CrucibleWDS
1.1 What Is It
1.2 What It Is Not
1.3 How Does It Work
1.4 System Requirements
1.5 Performance
2. Getting Started
2.1 Decide What OS To Install On
2.1.1 Install On Windows
2.1.2 Install On Ubuntu
2.1.3 Install On FreeNAS
2.1.4 Install On Open Media Vault
2.1.5 Install On CentOS 6
2.1.6 Install On CentOS 7
2.2 Client Boot Method
2.3 Create An Image Definition
2.4 Add A Host
2.5 Upload An Image
2.6 Deploy The Image To Other Hosts
3. Web Interface
3.1 Hosts
3.2 Groups
3.3 Images
3.4 Tasks
3.5 Users
3.6 Admin
4. Additional Help Topics
4.0 Kernel Dependencies
4.1 On Demand Mode
4.2 Prepare An Image For Upload
4.3 Automatic PC Name Changing
4.4 Automatic Domain Joining
4.5 Prepare Host For PXE Booting
4.6 Wake On Lan
4.7 Custom Scripting
4.8 Backup
4.9 Changing The Server IP Address
4.10 Partition And Hard Drive Control
4.11 Arguments
4.12 Modify Initrd
4.13 Create A Custom Kernel
4.14 Storage
4.15 Security Permissions
4.16 CWDS Proxy DHCP
5. Troubleshooting
6. Known Bugs
7. Limitations
8. Forum Guidelines - Please Read, Even If You Don't Use The Forums.
Next
License
Previous
Chapter 0. CrucibleWDS License
CrucibleWDS 2.3.3
Next
Chapter 0. CrucibleWDS License
CrucibleWDS is free and open source software, licensed under GPLv3.
Use this program at your own risk. The makers of CrucibleWDS are not
responsible for any data loss.
Do not use this program on any device with irreplaceable data. Do Not Install On An existing Production
Server.
This program should not be used as a backup solution. It is
intended for mass deployments of
generic images only. Read this license agreement before continuing.
CrucibleWDS A Windows
Deployment Solution
Copyright (C) 2011 Jon Dolny
This program is free software: you can redistribute it
and/or modify
it under the terms of the GNU General Public License as published by
the Free Software
Foundation, either version 3 of the License, or
any later version.
This program is distributed in the hope
that it will be useful,
but WITHOUT ANY WARRANTY; without even the implied warranty of
MERCHANTABILITY or FITNESS FOR A PARTICULAR PURPOSE. See the
GNU General Public
License for more details.
You should have received a copy of the GNU General Public License
along
with this program. If not, see http://www.gnu.org/licenses/ GNU GENERAL PUBLIC LICENSE
Click Here To View The Entire GPLv3 License
Previous
TOC
TOC
Next
1. Introduction To CrucibleWDS
Previous
Chapter 1. Introduction To CrucibleWDS
CrucibleWDS 2.3.3
Next
Chapter 1. Introduction To
CrucibleWDS
1.1 What Is It
1.2 What It Is Not
1.3 How Does It Work
1.4 System Requirements
1.5 Performance
Welcome to the CrucibleWDS Documentation. This guide will attempt to share everything
there is to know about CrucibleWDS.
Guide Legend
Commands with green border are entered exactly as shown
Commands with red border need changed to fit your install
The terms host and client are used interchangeably in this guide.
1.1. What Is It
CrucibleWDS is a free open source solution for computer cloning / imaging. It most closely
resembles an alternative for Symantec Ghost Solution Suite™ or Acronis Snap Deploy™.
It supports imaging Windows XP, Windows Vista, Windows 7, Windows 8, Linux, OSX,
and probably others. CrucibleWDS is not the first of its kind, but what separates it from the
rest, is it's simplicity. It is also the only open source imaging solution that can be installed
on Windows, Linux, BSD, and FreeNAS. It supports Unicast and Multicast technologies.
CrucibleWDS was originally created on the ASP.NET Framework with my preferred
language being C#. It was later reworked to be compatible with Mono.net giving it the
ability to be installed on virtually any OS. It also heavily relies on some basic shell
scripting.
CrucibleWDS was created to be used primarily in schools or small businesses. It can be
used to image 1000's of computers. It was designed be used with an existing
infrastructure. Meaning, a network with managed routers / switches, DHCP server, etc.
CrucibleWDS is intended to be installed on a server that is always running to ensure
imaging is readily available.
1.2 What It Is Not
CrucibleWDS IS NOT a backup solution and should never be used as such. It is only
intended to provide imaging capabilities for generic images that do not contain
irreplaceable data.
CrucibleWDS IS NOT an unattended installation of Windows. CrucibleWDS is a cloning
program. It creates an image of an existing machine that can then be deployed to other
machines. Yes, it could be thought of as unattended because it is totally automated, but
there is a difference.
1.3 How Does It Work
CrucibleWDS is a managed solution consisting of two parts. A server side component and
a client side component. The server side is installed on Windows, Linux, BSD, or FreeNAS
and the UI can be accessed from any web capable device within your network. The client
side uses Linux. Since the process is automated, no previous Linux experience is required,
although it may be helpful. Imaging is achieved through your network with the use of PXE
booting and WOL or you can use the standalone client iso for CD booting or a thumb drive
for USB booting. To achieve the best results all of your clients are added to a database,
then you simply search for the computer you wish to deploy and start the task. The client
will automatically turn on and begin to image. Imaging can be accomplished without ever
being present at the physical machine's location.
1.4 System Requirements
Server
The CrucibleWDS server can be anything from a standard laptop to an Enterprise Server.
Both 32 and 64 bit are supported It must be running a compatible OS for CrucibleWDS.
These Include:
Server 2012
Server 2008
Server 2003
Windows 8
Windows 7
Windows XP
Most Linux Distros
FreeNAS 9.2, 9.3
Hardware requirements are minimal. CPU and RAM requirements are that of the OS. At
least one Gigabit NIC and enough HD space for all your images.
Client
CrucibleWDS can image clients with the following OS's:
Windows 8 / 8.1
Windows 7
Windows Vista
Windows XP
Most Linux distros.
OSX
Any client that has the option to PXE boot, USB boot, or CD boot, has a NIC, and is
compatible with the Linux kernel is compatible with CrucibleWDS.
Web Browser
The Web Interface supports the following browsers:
IE 9 +
Latest Chrome
Latest Firefox
1.5 Performance
Before we answer what performance you can expect to see, let's examine some hardware
limitations. First, your network equipment. If you are using a 100Mb NIC or switch, you
theoretical max transfer rate is 12.5MB/sec or 1.2GB/min. If you are using all Gigabit
equipment your max rate is 125MB/sec or 12GB/min. Next, your hard drive speed. An
average desktop 7200rpm drive transfers at speeds of 50-60 MB/s or around 3GB/min and
a laptop drive at 5400rpm's is even lower at 25-40MB/sec or around 2GB/min. Then we
have compression factors, uploading an image causes it to be compressed, slowing down
the rate. Downloading the image it is decompressed and actually increases the rate. Next
we have the transfer mode(unicast or multicast), and finally concurrent imaging tasks. Now
lets see how all of this plays out.
Lets assume the CrucibleWDS Server is a standard desktop PC with a Gigabit NIC,
connected to Gigabit Switch, with a single 7200rpm HD. The client is laptop with a Gigabit
NIC connected to the same Gigabit switch, with 5400rpm drive. When we upload the
image we know that we are limited to around 2.5GB/min because of the hard drive. But
since we are uploading we make take a small hit for compression, maybe around
1.5GB/min. When we download the image over nfs or http the image is downloaded
compressed and then decompressed on the client before it is written to the hard drive this
may appear to make the transfer faster at a speed of around 3GB/min. If we download the
image through a multicast we will not see the speed increase of the decompression. On a
multicast the image is decompressed before it is sent, so the amount of data you are
transferring is actually larger than if you are doing a unicast.
The main goal of this little lesson was to show you will almost always be limited by your
client machine's slowest piece of hardware. Not your server. The advantage of a better
server( with multiple nics, faster hard drives, raid array) is that you will be able to unicast
more clients concurrently before seeing a bottleneck. Also, upload is always slower than
download, and multicast is always slower than unicast.
A general rule is b/w 1.2GB/min and 2GB/min on 100Mb network. And between 2.5GB/min
and 6GB/min on a Gigabit network.
Previous
0. License
TOC
Next
2. Getting Started
Previous
Chapter 2. Getting Started
CrucibleWDS 2.3.3
Next
Chapter 2. Getting Started
2.1 Decide What OS To Install On
2.1.1 Install On Windows
2.1.2 Install On Ubuntu
2.1.3 Install On FreeNAS
2.1.4 Install On Open Media Vault
2.1.5 Install On CentOS 6
2.1.6 Install On CentOS 7
2.2 Client Boot Method
2.3 Create An Image Definition
2.4 Add A Host
2.5 Upload An Image
2.6 Deploy The Image To Other Hosts
2.1. Decide What OS To Install On
Before installing CrucibleWDS you will need to decide what OS to you want to use for your
server. CrucibleWDS operates in the same manner regardless of what you choose.
Most
testing and development will occur on the latest
Windows Server. Which is currently
Server 2012. If you have that as an option, that is the route I would take. CrucibleWDS is
also available for Linux, BSD and FreeNAS.
Unix variants should only be used if you prefer
them over Windows. They don't offer any additional features, installation is more difficult
and not automated, but you have the advantage of not
running on Windows. This is more
for advanced users, you will need some previous Linux / BSD experience.
The following
will try to explain pros and cons of
each OS.
Windows
Installation on Windows has the major benefit of being completely automated. Simply run
the installer and you are ready to go.
Server 2012
Server 2008
Windows 8
Windows 7
Server 2003 - Should work but no longer being actively tested.
Windows XP - Should work but no longer being actively tested.
Linux / BSD
If licensing is tight or you simply prefer Linux servers over Windows, then installing on Linux
will give you the same experience as installing on Windows.
Installation is possible on any
system that supports Mono.NET. Linux also has the benefit that it seems to handle
multicasting slightly better than Windows.
FreeNAS
FreeNAS is my latest addition of compatible OS's. This is a great option if you already have
a FreeNAS server setup. It installs directly on the FreeNAS
server as a plugin in a jail. If
you don't already have a FreeNAS server setup I would recommend just using the
Windows or Linux installation.
Previous
1. Introduction To CrucibleWDS
TOC
Next
2.1.1 Install On Windows
Previous
Chapter 2. Getting Started
CrucibleWDS 2.3.3
Next
2.1.1 Install On Windows
2.1.1.1 Upgrading To CrucibleWDS 2.3.3
2.1.1.2 New Installation Of CrucibleWDS 2.3.3
2.1.1.3 Manual Installation Of CrucibleWDS 2.3.3
2.1.1.4 Uninstalling CrucibleWDS
I. Upgrading To CrucibleWDS 2.3.3
IMPORTANT: Images created prior to version 2.3.0 cannot be used in Version 2.3.x
You must re-upload the images after the Upgrade.
Only CrucibleWDS 2.x.x can be upgraded to 2.3.3.
Download the CrucibleWDS 2.3.3 Windows Installer
Select the upgrade option when asked.
Enjoy!
II. New Installation Of CrucibleWDS 2.3.3
Pre-Requisites
.NET 4.0 or Greater
A DHCP Server (One is also provided for use on isolated networks.)
Assign your server a static IP
It is recommended not to have any Anti-Virus software as this may cause a performance decrease
or block necessary ports
Installation
Download and run the CrucibleWDS Windows Installer
When asked enter your machine's ip address, and create 2 passwords, 1 for a local user account
and 1 for the database
Enjoy!
Post Install Setup
On the Windows installation there are no additional changes required in the UI Settings.
1. Open the CrucibleWDS Web Interface
http://serverIP/cruciblewds
2. Login using
cruciblewds / password
Client Boot Method
Finally you must decide how you will boot your clients. You can do a network boot with PXE
or use a bootable ISO with a CD or USB drive. You can also
use both options together.
Skip to the Client Boot Method section for more info.
Installation Problems
If installation fails check the install log located at:
c:\cruciblewdstmp\CrucibleWDS_Install.log
You can also try installing the software manually using the guide in the next section or
check the forums for help
III. Manual Installation
Some users have requested directions for installing CrucibleWDS manually on Windows.
Here it is. This section is only for users that do not want to use the automated installer, or
have been unsuccessful using the automated installer.
Download the CrucibleWDS 2.3.3 Windows Manual Installation Zip
Extract the contents
Open a cmd prompt as administrator
cd to the cwds folder you extracted
Enter all of the following relative to the cwds directory
1. Install PostgreSQL
postgresql\postgresql-9.2.6-1.exe --mode unattended --servicename PostgreSQL-WDS -superpassword replaceMeWithAPassword
If using a 32 bit OS:
"c:\program files\PostgreSQL\9.2\bin\psql.exe" -c "create database
cruciblewds" -Upostgres
If using a 64 bit OS:
"c:\program files (x86)\PostgreSQL\9.2\bin\psql.exe" -c "create database
cruciblewds" -Upostgres
enter your password when asked
If using a 32 bit OS:
"c:\program files\PostgreSQL\9.2\bin\psql.exe" -W -Upostgres -d cruciblewds <
postgresql\cruciblewds.sql
If using a 64 bit OS:
"c:\program files (x86)\PostgreSQL\9.2\bin\psql.exe" -W -Upostgres -d
cruciblewds < postgresql\cruciblewds.sql
enter your password when asked
2. Install IIS and Create Application
Server 2012
powershell -command import-module servermanager; add-windowsfeature web-server;
add-windowsfeature web-asp-net; add-windowsfeature web-asp-net45; addwindowsfeature web-mgmt-console
Server 2008
servermanagercmd -install web-server
servermanagercmd -install web-asp-net
Windows 8 / 8.1
powershell -command enable-windowsoptionalfeature -online -featurename iiswebserverrole -norestart;enable-windowsoptionalfeature -online -featurename iiswebserver -norestart;enable-windowsoptionalfeature -online -featurename iisisapifilter -norestart;enable-windowsoptionalfeature -online -featurename iisisapiextensions -norestart; enable-windowsoptionalfeature -online -featurename
netfx4extended-aspnet45 -norestart; enable-windowsoptionalfeature -online featurename iis-netfxextensibility45 -norestart;enable-windowsoptionalfeature online -featurename iis-aspnet45 -norestart
Windows 7
dism /online /enable-feature /featurename:IIS-WebServerRole /featurename:IISWebServer /featurename:IIS-ISAPIFilter /featurename:IIS-ISAPIExtensions
/featurename:IIS-NetFxExtensibility /featurename:IIS-ASPNET /norestart
All OS'S
copy the cruciblewds folder to c:\inetpub\wwwroot\. Your folder structure should look like
this c:\inetpub\wwwroot\cruciblewds\
Edit c:\inetpub\wwwroot\cruciblewds\web\web.config and change PGSQLPASS on line
5 to the database password you used when you installed PostgreSQL.
icacls c:\inetpub\wwwroot\cruciblewds /T /C /grant "network service":(OI)(CI)F
icacls c:\inetpub\wwwroot\cruciblewds /T /C /grant IIS_IUSRS:(OI)(CI)F
c:\windows\system32\inetsrv\appcmd add app /site.name:"Default Web Site"
/path:/cruciblewds /physicalpath:c:\inetpub\wwwroot\cruciblewds\web
If using Server 2008 or Windows 7
c:\windows\microsoft.net\framework\v4.0.30319\aspnet_regiis.exe -i -enable
cwds.reg
iisreset
At this point you should have a working UI.
3. Setup Client Image Access
CrucibleWDS can access the image files from the clients via NFS or SMB. The default
installer uses NFS for Server 2012 and Server 2008, and uses
SMB for Windows 7/8. If
you prefer to use SMB for Server versions feel free to skip the NFS installation and use
SMB.
Server 2012 - NFS
powershell -command import-module servermanager; add-windowsfeature fs-nfs-service
nfs.reg
C:\windows\system32\nfsshare images=C:\inetpub\wwwroot\cruciblewds\images -o
anon=yes anonuid=0 anongid=0 ro root
C:\windows\system32\nfsshare images_hold=C:\inetpub\wwwroot\cruciblewds\images_hold
-o anon=yes anonuid=0 anongid=0 rw root
icacls c:\inetpub\wwwroot\cruciblewds\images /T /C /grant Everyone:(OI)(CI)F
icacls c:\inetpub\wwwroot\cruciblewds\images_hold /T /C /grant Everyone:(OI)(CI)F
lsa.reg
net stop NfsService
net start NfsService
gpupdate /force
Server 2008 - NFS
servermanagercmd -install fs-nfs-services
nfs.reg
C:\windows\system32\nfsshare images=C:\inetpub\wwwroot\cruciblewds\images -o
anon=yes anonuid=0 anongid=0 ro root
C:\windows\system32\nfsshare images_hold=C:\inetpub\wwwroot\cruciblewds\images_hold
-o anon=yes anonuid=0 anongid=0 rw root
icacls c:\inetpub\wwwroot\cruciblewds\images /T /C /grant Everyone:(OI)(CI)F
icacls c:\inetpub\wwwroot\cruciblewds\images_hold /T /C /grant Everyone:(OI)(CI)F
lsa.reg
net stop NfsService
net start NfsService
gpupdate /force
Windows 7 / 8 - SMB
net user cruciblewds replaceMeWithAPassword /add
WMIC USERACCOUNT WHERE Name='cruciblewds' SET PasswordExpires=FALSE
net share images=C:\inetpub\wwwroot\cruciblewds\images /grant:cruciblewds,FULL
icacls C:\inetpub\wwwroot\cruciblewds\images /T /C /grant cruciblewds:(OI)(CI)F
4. Install TFTP Server
mklink /J c:\inetpub\wwwroot\cruciblewds\tftpboot\proxy\bios\kernels
c:\inetpub\wwwroot\cruciblewds\tftpboot\kernels
mklink /J c:\inetpub\wwwroot\cruciblewds\tftpboot\proxy\bios\images
c:\inetpub\wwwroot\cruciblewds\tftpboot\images
mklink /J c:\inetpub\wwwroot\cruciblewds\tftpboot\proxy\efi32\kernels
c:\inetpub\wwwroot\cruciblewds\tftpboot\kernels
mklink /J c:\inetpub\wwwroot\cruciblewds\tftpboot\proxy\efi32\images
c:\inetpub\wwwroot\cruciblewds\tftpboot\images
mklink /J c:\inetpub\wwwroot\cruciblewds\tftpboot\proxy\efi64\kernels
c:\inetpub\wwwroot\cruciblewds\tftpboot\kernels
mklink /J c:\inetpub\wwwroot\cruciblewds\tftpboot\proxy\efi64\images
c:\inetpub\wwwroot\cruciblewds\tftpboot\images
c:\inetpub\wwwroot\cruciblewds\tftpd32\tftpd32_svc -install
sc config tftpd32_svc start= auto
net start tftpd32_svc
5. Create Firewall Exceptions
netsh firewall add portopening tcp 1048 mountd
netsh firewall add portopening tcp 2049 nfs
netsh firewall add portopening tcp 1047 nolockmgr
netsh firewall add portopening tcp 6677 passSync
netsh firewall add portopening udp 1035 pcnfsd
netsh firewall add portopening tcp 111 portmapper
netsh firewall add portopening tcp 1039 Status
netsh firewall add portopening udp 67 dhcps
netsh firewall add portopening udp 68 dhcpd
netsh firewall add portopening udp 4011 proxyDHCP
netsh firewall add portopening udp 69 tftp
netsh firewall add portopening tcp 80 http
netsh firewall add portopening tcp 443 https
netsh firewall add allowedprogram C:\inetpub\wwwroot\cruciblewds\web\data\apps\udpsender.exe udpsender
netsh firewall add allowedprogram C:\inetpub\wwwroot\cruciblewds\web\data\apps\udpreceiver.exe udpreceiver
6. Post Install Setup
1. Open the CrucibleWDS Web Interface
http://serverIP/cruciblewds
2. Login using
cruciblewds / password
3. Select Admin
4. Change Server IP to your IP
5. Next to Server Key click Generate
6. If you are using Windows 7 /8 or are using SMB on Server 2012 / 2008, change image transfer
mode to smb
7. Click Update Settings at the bottom
8. When prompted to create a new boot menu select yes
9. On the next screen Click Create Boot File
7. Reboot - You are done
Client Boot Method
Finally you must decide how you will boot your clients. You can do a network boot with PXE
or use a bootable ISO with a CD or USB drive. You can also
use both options together.
Skip to the Client Boot Method section for more info.
IV. Uninstalling CrucibleWDS
There is no automated un-installer for CrucibleWDS. Follow these steps if you want to
uninstall CrucibleWDS.
1. Remove PostgreSQL
If using a 32 bit OS:
"c:\program files\PostgreSQL\9.2\uninstall-postgresql.exe"
If using a 64 bit OS:
"c:\program files (x86)\PostgreSQL\9.2\uninstall-postgresql.exe"
2. Remove TFTP Server
net stop tftpd32_svc
c:\inetpub\wwwroot\cruciblewds\tftpd32\tftpd32_svc -remove
3. Remove Extra Services
These services may or may not exist depending on your version and what options you are
using. You should attempt to remove
each one anyway.
net stop CrucibleWDSKeepAlive
C:\Windows\Microsoft.NET\Framework\v4.0.30319\InstallUtil.exe /u
C:\inetpub\wwwroot\cruciblewds\keepalive\CrucibleWDSKeepAlive.exe
net stop cwds_proxydhcp
C:\Windows\Microsoft.NET\Framework\v4.0.30319\InstallUtil.exe /u
C:\inetpub\wwwroot\cruciblewds\CWDS_ProxyDhcp\cwds_proxydhcp.exe
4. Remove NFS Server
If you are using an OS with an NFS Server it should be removed
Server 2012
powershell -command import-module servermanager; remove-windowsfeature fs-nfsservice
Server 2008
servermanagercmd -remove fs-nfs-services
5. Remove Web Sever
Server 2012
powershell -command import-module servermanager; remove-windowsfeature web-server;
remove-windowsfeature web-asp-net; remove-windowsfeature web-asp-net45; removewindowsfeature web-mgmt-console
Server 2008
servermanagercmd -remove web-server
servermanagercmd -remove web-asp-net
Windows 8 / 8.1
powershell -command disable-windowsoptionalfeature -online -featurename iiswebserverrole -norestart;disable-windowsoptionalfeature -online -featurename iiswebserver -norestart;disable-windowsoptionalfeature -online -featurename iisisapifilter -norestart;disable-windowsoptionalfeature -online -featurename iisisapiextensions -norestart; disable-windowsoptionalfeature -online -featurename
netfx4extended-aspnet45 -norestart; disable-windowsoptionalfeature -online featurename iis-netfxextensibility45 -norestart;disable-windowsoptionalfeature online -featurename iis-aspnet45 -norestart
Windows 7
dism /online /disable-feature /featurename:IIS-WebServerRole /featurename:IISWebServer /featurename:IIS-ISAPIFilter /featurename:IIS-ISAPIExtensions
/featurename:IIS-NetFxExtensibility /featurename:IIS-ASPNET /norestart
All OS'S
Delete C:\inetpub\wwwroot\cruciblewds
open regedit and delete HKEY_LOCAL_MACHINE\SOFTWARE\CrucibleWDS
5. Reboot - You are done
Previous
1. Getting Started
TOC
Next
2.1.2 Install On Ubuntu
Previous
Chapter 2. Getting Started
CrucibleWDS 2.3.3
Next
2.1.2 Install On Ubuntu
2.1.2.1 Upgrading To CrucibleWDS 2.3.3
2.1.2.2 New Installation Of CrucibleWDS 2.3.3
Tested versions of Ubuntu include 12.xx - 14.xx
I. Upgrading To CrucibleWDS 2.3.3
IMPORTANT: Images created prior to version 2.3.0 cannot be used in Version 2.3.x
You must re-upload the images after the Upgrade.
Only CrucibleWDS 2.x.x can be upgraded to 2.3.3.
cd /tmp
service apache2 stop
mv /tftpboot /tftpboot.old
mv /var/www/cruciblewds /var/www/cruciblewds.old
wget "http://sourceforge.net/projects/cruciblewds/files/2.3.3/cruciblewds2.3.3.tar.gz"
tar xvzf cruciblewds-2.3.3.tar.gz
cp -r cruciblewds /var/www/
cp -r tftpboot /
ln -s /tftpboot/images /tftpboot/proxy/bios/images
ln -s /tftpboot/kernels /tftpboot/proxy/bios/kernels
ln -s /tftpboot/images /tftpboot/proxy/efi32/images
ln -s /tftpboot/kernels /tftpboot/proxy/efi32/kernels
ln -s /tftpboot/images /tftpboot/proxy/efi64/images
ln -s /tftpboot/kernels /tftpboot/proxy/efi64/kernels
chown -R www-data:www-data /tftpboot /var/www/cruciblewds
chown -R postgres /var/www/cruciblewds/data/dbbackup
cp /tftpboot.old/pxelinux.cfg/* /tftpboot/pxelinux.cfg/
If upgrading from 2.3.2:
su postgres -c "psql cruciblewds < dbUpgrades/2.3.3.sql"
If upgrading from 2.3.1:
su postgres -c "psql cruciblewds < dbUpgrades/2.3.3.sql"
If upgrading from 2.3.0:
su postgres -c "psql cruciblewds < dbUpgrades/2.3.1.sql"
su postgres -c "psql cruciblewds < dbUpgrades/2.3.3.sql"
If upgrading from anything before 2.3.0:
su postgres -c "psql cruciblewds < dbUpgrades/2.3.sql"
su postgres -c "psql cruciblewds < dbUpgrades/2.3.1.sql"
su postgres -c "psql cruciblewds < dbUpgrades/2.3.3.sql"
1. Change PGSQLPASS to yourdbpass on line 5 of this file
/var/www/cruciblewds/web.config
service apache2 start
II. New Installation
Pre-Requisites
A DHCP Server
Assign you server a static IP
Installation
Setup CrucibleWDS
apt-get update
apt-get install mono-devel libapache2-mod-mono apache2 udpcast
There is a bug when installing libabpache2-mod-mono on Ubuntu that causes the
installation to hang. When you see this:
* Restarting web server apache2
apache2: Could not reliably determine the server's fully qualified domain name,
using 127.0.1.1 for ServerName
... waiting apache2: Could not reliably determine the server's fully qualified
domain name, using 127.0.1.1 for ServerName
[ OK ]
simply open another terminal window and issue
service apache2 restart
The installation will then continue
wget "http://sourceforge.net/projects/cruciblewds/files/2.3.3/cruciblewds2.3.3.tar.gz"
tar xvzf cruciblewds-2.3.3.tar.gz
cp wds.conf /etc/apache2/sites-available/
cp -r cruciblewds /var/www/
cp -r tftpboot /
ln -s /tftpboot/images /tftpboot/proxy/bios/images
ln -s /tftpboot/kernels /tftpboot/proxy/bios/kernels
ln -s /tftpboot/images /tftpboot/proxy/efi32/images
ln -s /tftpboot/kernels /tftpboot/proxy/efi32/kernels
ln -s /tftpboot/images /tftpboot/proxy/efi64/images
ln -s /tftpboot/kernels /tftpboot/proxy/efi64/kernels
mkdir /images; mkdir /images_hold; mkdir /var/www/.mono
chown -R www-data:www-data /tftpboot /images /images_hold /var/www/cruciblewds
/var/www/.mono
chmod 1777 /tmp
Depending on your version disable the default site
a2dissite default
Or
a2dissite 000-default
a2ensite wds.conf
cd lz4/programs
make lz4 ; make install
cd ../../
service apache2 restart
Setup Database
apt-get install postgresql
su postgres -c "psql -c \"CREATE DATABASE cruciblewds;\""
su postgres -c "psql cruciblewds < cruciblewds.sql"
su postgres -c "psql -c \"ALTER USER postgres with password 'yourdbpass';\""
1. Change PGSQLPASS to yourdbpass on line 5 of this file
/var/www/cruciblewds/web.config
chown -R postgres /var/www/cruciblewds/data/dbbackup
service apache2 restart
Install NFS Server
apt-get install nfs-kernel-server
echo "/images
/etc/exports
echo "/images_hold
>> /etc/exports
*(ro,sync,no_wdelay,no_root_squash,insecure)" >>
service nfs-kernel-server restart
*(rw,sync,no_wdelay,no_root_squash,insecure)"
Install TFTP Server
apt-get install xinetd tftpd-hpa
echo "TFTP_USERNAME=\"root\"
TFTP_DIRECTORY=\"/tftpboot\"
TFTP_ADDRESS=\"0.0.0.0:69\"
TFTP_OPTIONS=\"-s\"" > /etc/default/tftpd-hpa
echo "service tftp
{
socket_type = dgram
protocol = udp
wait = yes
user = root
server = /usr/sbin/in.tftpd
server_args = -s /tftpboot
disable = no
per_source = 11
cps = 100 2
flags = IPv4
}" > /etc/xinetd.d/tftp
service tftpd-hpa restart
service xinetd restart
Post Install Setup
1. Open the CrucibleWDS Web Interface
http://serverIP/cruciblewds
2. Login using
cruciblewds / password
3. Select Admin
4. Change Server IP to your IP
5. Next to Server Key click Generate
6. Click Update Settings at the bottom
7. Still in the Admin screen, select Boot Menu at the top right
8. Select Templates then select default
9. Click Create Boot File
Client Boot Method
Finally you must decide how you will boot your clients. You can do a network boot with PXE
or use a bootable ISO with a CD or USB drive. You can also
use both options together.
Skip to the Client Boot Method section for more info.
Installation Problems
There are a lot different versions of Mono used in different distros. It is difficult to say what
issues you may come across.
Some distros need to modify the permissions of /tmp for
Mono to work correctly. You could either give ownership of apache2 to /tmp or
give it more
permissions. When starting apache if you see a permission denied error, this is typically
the reason.
If installation fails, browse or post something in the forums
Previous
2.1.1 Install On Windows
TOC
Next
2.1.3 Install On FreeNAS
Previous
Chapter 2. Getting Started
CrucibleWDS 2.3.3
Next
2.1.3 Install On FreeNAS
2.1.3.1 Upgrading To CrucibleWDS 2.3.3
2.1.3.2 New Installation Of CrucibleWDS 2.3.3
I will only be creating a pbi / plugin for major releases of CrucibleWDS. Version 2.3.3 is a
minor release. If this is a new installation
you must follow the documentation below for a
new install of 2.3.0, then you can follow the upgrade guide to update to 2.3.3.
This guide will show you how to install CrucibleWDS on FreeNAS 9.2.1.6. Only 64bit is
supported. Some settings may be slightly different on other versions of FreeNAS. This
guide also assumes you have a basic understanding of FreeNAS, plugins, jails and BSD.
Guide Legend
Commands with green border are entered exactly as shown
Commands with red border need changed to fit your install
I. Upgrading To CrucibleWDS 2.3.3
IMPORTANT: Images created prior to version 2.3.0 cannot be used in Version 2.3.x
You must re-upload the images after the Upgrade.
Only CrucibleWDS 2.x.x can be upgraded to 2.3.3.
The following commands are entered in the CrucibleWDS Jail Shell
cd /usr/pbi/cruciblewds-amd64
service apache22 stop
mv tftpboot tftpboot.old
mv www/cruciblewds www/cruciblewds.old
mkdir cwds2.3.3
cd cwds2.3.3
wget "http://sourceforge.net/projects/cruciblewds/files/2.3.3/cruciblewds2.3.3.tar.gz"
tar xvzf cruciblewds-2.3.3.tar.gz
cp -r cruciblewds ../www/
cp -r tftpboot ../
ln -s /usr/pbi/cruciblewds-amd64/tftpboot/images /usr/pbi/cruciblewdsamd64/tftpboot/proxy/bios/images
ln -s /usr/pbi/cruciblewds-amd64/tftpboot/kernels /usr/pbi/cruciblewdsamd64/tftpboot/proxy/bios/kernels
ln -s /usr/pbi/cruciblewds-amd64/tftpboot/images /usr/pbi/cruciblewdsamd64/tftpboot/proxy/efi32/images
ln -s /usr/pbi/cruciblewds-amd64/tftpboot/kernels /usr/pbi/cruciblewdsamd64/tftpboot/proxy/efi32/kernels
ln -s /usr/pbi/cruciblewds-amd64/tftpboot/images /usr/pbi/cruciblewdsamd64/tftpboot/proxy/efi64/images
ln -s /usr/pbi/cruciblewds-amd64/tftpboot/kernels /usr/pbi/cruciblewdsamd64/tftpboot/proxy/efi64/kernels
cp ../tftpboot.old/pxelinux.cfg/* ../tftpboot/pxelinux.cfg/
chown -R www:www ../tftpboot
chown -R www:www ../www/cruciblewds
If upgrading from 2.3.2:
psql -Upgsql cruciblewds < dbUpgrades/2.3.3.sql
If upgrading from 2.3.1:
psql -Upgsql cruciblewds < dbUpgrades/2.3.3.sql
If upgrading from 2.3.0:
psql -Upgsql cruciblewds < dbUpgrades/2.3.1.sql
psql -Upgsql cruciblewds < dbUpgrades/2.3.3.sql
If upgrading from anything before 2.3.0:
psql -Upgsql cruciblewds < dbUpgrades/2.3.sql
psql -Upgsql cruciblewds < dbUpgrades/2.3.1.sql
psql -Upgsql cruciblewds < dbUpgrades/2.3.3.sql
service apache22 start
II. New Installation - CrucibleWDS 2.3.0
Setup CrucibleWDS
1. Login to your FreeNAS Server
2. Select the Plugins option from the top menu
3. Install The CrucibleWDS 2.3.0 Plugin from the FreeNAS Repository
4. Still in Plugins select the Installed tab and enable CrucibleWDS - Some users are reporting
that apache is not being enabled after install.
I believe it is because this step is being
skipped.
Setup Database
1. Select the Jails option from the top menu
2. Click on the cruciblewds jail
3. Click on Edit Jail
4. Change the Sysctls box to: (Ensure there are no spaces)
allow.raw_sockets=true,allow.sysvipc=1
5. Save your changes
6. Select the jail and click Stop
7. Select the jail and click Start
8. Select the jail and click Shell (Not the FreeNAS shell)
cd /usr/pbi/cruciblewds-amd64
./dbsetup.sh
9. New for version 2.3.3 make the following symlinks while you are in the CrucibleWDS jail shell
ln -s /usr/pbi/cruciblewds-amd64/tftpboot/images /usr/pbi/cruciblewdsamd64/tftpboot/proxy/bios/images
ln -s /usr/pbi/cruciblewds-amd64/tftpboot/kernels /usr/pbi/cruciblewdsamd64/tftpboot/proxy/bios/kernels
ln -s /usr/pbi/cruciblewds-amd64/tftpboot/images /usr/pbi/cruciblewdsamd64/tftpboot/proxy/efi32/images
ln -s /usr/pbi/cruciblewds-amd64/tftpboot/kernels /usr/pbi/cruciblewdsamd64/tftpboot/proxy/efi32/kernels
ln -s /usr/pbi/cruciblewds-amd64/tftpboot/images /usr/pbi/cruciblewdsamd64/tftpboot/proxy/efi64/images
ln -s /usr/pbi/cruciblewds-amd64/tftpboot/kernels /usr/pbi/cruciblewdsamd64/tftpboot/proxy/efi64/kernels
exit
Setup NFS Server and Storage
This example uses the following settings
A ZFS volume named storage
A ZFS Dataset named wds
Make changes as necessary
1. Create a new ZFS Dataset named wds on the storage volume. Ensure compression and dedup
are disabled, Also ensure it has enough space to hold your images.
2. Open the FreeNAS Shell on the left
cd /mnt/storage/wds
mkdir images
mkdir images/store
mkdir images/hold
exit
3. Go back to Storage and select the wds dataset
4. Select Change Permissions
5. Change Owner (user): to www
6. Change Owner (group): to www
7. Check Set permission recursively
8. Click Change
9. Select Sharing from the left menu and select Add Unix (NFS) Share
10. Change Mapall User and Mapall Group to www
11. Change Path to:
/mnt/storage/wds/images/hold
12. Click Add extra Path
13. Change the Extra Path to:
/mnt/storage/wds/images/store
14. Don't forget to enable the NFS Service
15. Select the Jails option at the top menu
16. Select your cruciblewds jail and select Add Storage
17. For the Source enter:
/mnt/storage/wds/images
18. For the Destination enter:
/usr/pbi/cruciblewds-amd64/images
19. Click OK
Setup TFTP Server
This example uses the following settings
Jails located at /mnt/jails
Make changes as necessary
1. Select Services from the left menu and select TFTP
2. Change Directory to:
/mnt/jails/cruciblewds_1/usr/pbi/cruciblewds-amd64/tftpboot
3. Click OK
4. Don't forget to enable the TFTP Service
Post Install Setup
This example uses the following settings
Jail IP Address: 192.168.56.101
FreeNAS IP Address: 192.168.56.50
Make changes as necessary
1. Open the CrucibleWDS Web Interface
http://192.168.56.101/cruciblewds
2. Login using
cruciblewds / password
3. Select Admin
4. Change Server IP to your jail ip address
192.168.56.101
5. Change Image Store Path to
/usr/pbi/cruciblewds-amd64/images/store/
6. Change Image Hold Path to
/usr/pbi/cruciblewds-amd64/images/hold/
7. Change TFTP Path to
/usr/pbi/cruciblewds-amd64/tftpboot/
8. Next to Server Key click Generate
9. Change NFS Upload Path to (Using FreeNAS ip address)
192.168.56.50:/mnt/storage/wds/images/hold/
10. Change NFS Deploy Path to (Using FreeNAS ip address)
192.168.56.50:/mnt/storage/wds/images/store/
11. Change Sender Arguments blocksize to
1456
12. Change Sender Arguments interface to your jail ip address
192.168.56.101
13. Click Update Settings
14. Still in the Admin screen, select Boot Menu at the top right
15. Select Templates then select default
16. Click Create Boot File
Client Boot Method
IMPORTANT: When setting up your dhcp server for PXE booting, you need
to point to your FreeNAS Server, NOT your CrucibleWDS jail ip.
Finally you must decide how you will boot your clients. You can do a network boot with PXE
or use a bootable ISO with a CD or USB drive. You can also
use both options together.
Skip to the Client Boot Method section for more info.
Installation Problems
If installation fails, browse or post something in the forums
Previous
2.1.2 Install On Ubuntu
TOC
Next
2.1.4 Install On Open Media
Vault
Previous
Chapter 2. Getting Started
CrucibleWDS 2.3.3
Next
2.1.4 Install On Open Media Vault
2.1.4.1 Upgrading To CrucibleWDS 2.3.3
2.1.4.2 New Installation Of CrucibleWDS 2.3.3
This guide will walk you through installing CrucibleWDS on Open Media Vault. This is
considered experimental
at this point and is highly recommended to evaluate on a test
system first. Very limited testing has been done. All tests up to this point have been done
on OMV 1.9.
Guide Legend
Commands with green border are entered exactly as shown
Commands with red border need changed to fit your install
I. Upgrading To CrucibleWDS 2.3.3
IMPORTANT: Images created prior to version 2.3.0 cannot be used in Version 2.3.x
You must re-upload the images after the Upgrade.
Only CrucibleWDS 2.x.x can be upgraded to 2.3.3.
cd /tmp
service nginx stop
service cwds stop
mv /media/f7ba9f57-81b1-47dc-980c-94b9eb2e9823/tftpboot /media/f7ba9f57-81b1-47dc980c-94b9eb2e9823/tftpboot.old
mv /var/www/cruciblewds /var/www/cruciblewds.old
wget "http://sourceforge.net/projects/cruciblewds/files/2.3.3/cruciblewds2.3.3.tar.gz"
tar xvzf cruciblewds-2.3.3.tar.gz
cp -r cruciblewds /var/www/
cp -r tftpboot /media/f7ba9f57-81b1-47dc-980c-94b9eb2e9823/
ln -s /media/f7ba9f57-81b1-47dc-980c-94b9eb2e9823/tftpboot/images /media/f7ba9f5781b1-47dc-980c-94b9eb2e9823/tftpboot/proxy/bios/images
ln -s /media/f7ba9f57-81b1-47dc-980c-94b9eb2e9823/tftpboot/kernels /media/f7ba9f5781b1-47dc-980c-94b9eb2e9823/tftpboot/proxy/bios/kernels
ln -s /media/f7ba9f57-81b1-47dc-980c-94b9eb2e9823/tftpboot/images /media/f7ba9f5781b1-47dc-980c-94b9eb2e9823/tftpboot/proxy/efi32/images
ln -s /media/f7ba9f57-81b1-47dc-980c-94b9eb2e9823/tftpboot/kernels /media/f7ba9f5781b1-47dc-980c-94b9eb2e9823/tftpboot/proxy/efi32/kernels
ln -s /media/f7ba9f57-81b1-47dc-980c-94b9eb2e9823/tftpboot/images /media/f7ba9f5781b1-47dc-980c-94b9eb2e9823/tftpboot/proxy/efi64/images
ln -s /media/f7ba9f57-81b1-47dc-980c-94b9eb2e9823/tftpboot/kernels /media/f7ba9f5781b1-47dc-980c-94b9eb2e9823/tftpboot/proxy/efi64/kernels
chown -R www-data:www-data /media/f7ba9f57-81b1-47dc-980c-94b9eb2e9823/tftpboot
/var/www/cruciblewds
chown -R postgres /var/www/cruciblewds/data/dbbackup
cp /media/f7ba9f57-81b1-47dc-980c-94b9eb2e9823/tftpboot.old/pxelinux.cfg/*
/media/f7ba9f57-81b1-47dc-980c-94b9eb2e9823/tftpboot/pxelinux.cfg/
If upgrading from 2.3.2:
su postgres -c "psql cruciblewds < dbUpgrades/2.3.3.sql"
1. Change PGSQLPASS to yourdbpass on line 5 of this file
/var/www/cruciblewds/web.config
service nginx start
service cwds start
II. New Installation
Pre-Requisites
A DHCP Server
Installation
Setup CrucibleWDS
CrucibleWDS will be installed on the OMV System partition. You will also need a separate
volume to store your images and tftp files.
On this volume create a folder called images and two subfolders - hold and store.
Your folder structure should look something like this:
/media/f7ba9f57-81b1-47dc-980c-94b9eb2e9823/images
/media/f7ba9f57-81b1-47dc-980c-94b9eb2e9823/images/store
/media/f7ba9f57-81b1-47dc-980c-94b9eb2e9823/images/hold
apt-get update
apt-get install mono-devel mono-fastcgi-server4 udpcast make gcc build-essential
wget "http://sourceforge.net/projects/cruciblewds/files/2.3.3/cruciblewds2.3.3.tar.gz"
tar xvzf cruciblewds-2.3.3.tar.gz
cp -r cruciblewds /var/www/
cp -r tftpboot /media/f7ba9f57-81b1-47dc-980c-94b9eb2e9823/
ln -s /media/f7ba9f57-81b1-47dc-980c-94b9eb2e9823/tftpboot/images /media/f7ba9f5781b1-47dc-980c-94b9eb2e9823/tftpboot/proxy/bios/images
ln -s /media/f7ba9f57-81b1-47dc-980c-94b9eb2e9823/tftpboot/kernels /media/f7ba9f5781b1-47dc-980c-94b9eb2e9823/tftpboot/proxy/bios/kernels
ln -s /media/f7ba9f57-81b1-47dc-980c-94b9eb2e9823/tftpboot/images /media/f7ba9f5781b1-47dc-980c-94b9eb2e9823/tftpboot/proxy/efi32/images
ln -s /media/f7ba9f57-81b1-47dc-980c-94b9eb2e9823/tftpboot/kernels /media/f7ba9f5781b1-47dc-980c-94b9eb2e9823/tftpboot/proxy/efi32/kernels
ln -s /media/f7ba9f57-81b1-47dc-980c-94b9eb2e9823/tftpboot/images /media/f7ba9f5781b1-47dc-980c-94b9eb2e9823/tftpboot/proxy/efi64/images
ln -s /media/f7ba9f57-81b1-47dc-980c-94b9eb2e9823/tftpboot/kernels /media/f7ba9f5781b1-47dc-980c-94b9eb2e9823/tftpboot/proxy/efi64/kernels
chown -R www-data:www-data /media/f7ba9f57-81b1-47dc-980c-94b9eb2e9823/tftpboot
chown -R www-data:www-data /var/www/cruciblewds
chown -R www-data:www-data /media/f7ba9f57-81b1-47dc-980c-94b9eb2e9823/images
wget "http://docs.cruciblewds.org/omv/cwds"
wget "http://docs.cruciblewds.org/omv/cwds.conf"
cp cwds.conf /etc/nginx/openmediavault-webgui.d/
cp cwds /etc/init.d/
chmod +x /etc/init.d/cwds
echo "fastcgi_param
PATH_INFO
echo "fastcgi_param SCRIPT_FILENAME
/etc/nginx/fastcgi_params
\"\";" >> /etc/nginx/fastcgi_params
\$document_root\$fastcgi_script_name;" >>
service nginx restart
service cwds start
update-rc.d cwds defaults
cd lz4/programs
make lz4 ; make install
cd ../../
Setup Database
apt-get install postgresql
su postgres -c "psql -c \"CREATE DATABASE cruciblewds;\""
su postgres -c "psql cruciblewds < cruciblewds.sql"
su postgres -c "psql -c \"ALTER USER postgres with password 'yourdbpass';\""
1. Change PGSQLPASS to yourdbpass on line 5 of this file
/var/www/cruciblewds/web.config
chown -R postgres /var/www/cruciblewds/data/dbbackup
Post Install Setup
1. Open the OMV Web Inteface
2. Create 2 nfs shares: ( You could also use SMB shares )
The first one should be named images
Set the volume and path to your images/store folder
Set the permission to everyone r/w
Set the client to *
Set the Privelege to read only
Set the extra options to sync,no_wdelay,no_root_squash,insecure
The second one should be named images_hold
Set the volume and path to your images/hold folder
Set the permission to everyone r/w
Set the client to *
Set the Privelege to read write
Set the extra options to sync,no_wdelay,no_root_squash,insecure
3. If you plan on PXE booting, setup the tftp service using the tftpboot shared folder
Open the CrucibleWDS Web Interface
http://serverIP/cruciblewds
Login using
cruciblewds / password
Select Admin
Change Server IP to your IP
Change Image Store Path to
/media/f7ba9f57-81b1-47dc-980c-94b9eb2e9823/images/store/
Change Image Hold Path to
/media/f7ba9f57-81b1-47dc-980c-94b9eb2e9823/images/hold/
Change Tftp Path to
/media/f7ba9f57-81b1-47dc-980c-94b9eb2e9823/tftpboot
Next to Server Key click Generate
Change Nfs Upload Path to
[server-ip]:/export/images_hold/
Change Nfs Deploy Path to
[server-ip]:/export/images/
Click Update Settings at the bottom
Still in the Admin screen, select Boot Menu at the top right
Select Templates then select default
Click Create Boot File
Client Boot Method
Finally you must decide how you will boot your clients. You can do a network boot with PXE
or use a bootable ISO with a CD or USB drive. You can also
use both options together.
Skip to the Client Boot Method section for more info.
Installation Problems
There are a lot different versions of Mono used in different distros. It is difficult to say what
issues you may come across.
Some distros need to modify the permissions of /tmp for
Mono to work correctly.
If installation fails, browse or post something in the forums
Previous
2.1.3 Install On FreeNAS
TOC
Next
2.1.5 Install On CentOS 6
Previous
Chapter 2. Getting Started
CrucibleWDS 2.3.3
Next
2.1.5 Install On CentOS 6 (x86_64 only)
2.1.5.1 Upgrading To CrucibleWDS 2.3.3
2.1.5.2 New Installation Of CrucibleWDS 2.3.3
I. Upgrading To CrucibleWDS 2.3.3
IMPORTANT: Images created prior to version 2.3.0 cannot be used in Version 2.3.x
You must re-upload the images after the Upgrade.
Only CrucibleWDS 2.x.x can be upgraded to 2.3.3.
cd /tmp
service httpd stop
mv /tftpboot /tftpboot.old
mv /var/www/html/cruciblewds /var/www/html/cruciblewds.old
wget "http://sourceforge.net/projects/cruciblewds/files/2.3.3/cruciblewds2.3.3.tar.gz"
tar xvzf cruciblewds-2.3.3.tar.gz
cp -r cruciblewds /var/www/html/
cp -r tftpboot /
ln -s /tftpboot/images /tftpboot/proxy/bios/images
ln -s /tftpboot/kernels /tftpboot/proxy/bios/kernels
ln -s /tftpboot/images /tftpboot/proxy/efi32/images
ln -s /tftpboot/kernels /tftpboot/proxy/efi32/kernels
ln -s /tftpboot/images /tftpboot/proxy/efi64/images
ln -s /tftpboot/kernels /tftpboot/proxy/efi64/kernels
chown -R apache:apache /tftpboot /var/www/html/cruciblewds
chown -R postgres /var/www/html/cruciblewds/data/dbbackup
cp /tftpboot.old/pxelinux.cfg/* /tftpboot/pxelinux.cfg/
If upgrading from 2.3.2:
su postgres -c "psql cruciblewds < dbUpgrades/2.3.3.sql"
1. Change PGSQLPASS to yourdbpass on line 5 of this file
/var/www/html/cruciblewds/web.config
service httpd start
II. New Installation
Pre-Requisites
Disable selinux, (or don't, this guide assumes you did)
A DHCP Server
Assign you server a static IP
Installation
Setup CrucibleWDS Core
cd /etc/yum.repos.d/
wget http://download.opensuse.org/repositories/home:tpokorra:mono/CentOS_CentOS6/home:tpokorra:mono.repo
cd /tmp
yum install httpd mono-opt mono-opt-devel mono-xsp-opt mono-libgdiplus-opt
mod_mono-opt gcc perl
wget "http://sourceforge.net/projects/cruciblewds/files/2.3.3/cruciblewds2.3.3.tar.gz"
tar xvzf cruciblewds-2.3.3.tar.gz
rm wds.conf
wget http://docs.cruciblewds.org/centos6/wds.conf
cp wds.conf /etc/httpd/conf.d/
cp -r cruciblewds /var/www/html/
cp -r tftpboot /
ln -s /tftpboot/images /tftpboot/proxy/bios/images
ln -s /tftpboot/kernels /tftpboot/proxy/bios/kernels
ln -s /tftpboot/images /tftpboot/proxy/efi32/images
ln -s /tftpboot/kernels /tftpboot/proxy/efi32/kernels
ln -s /tftpboot/images /tftpboot/proxy/efi64/images
ln -s /tftpboot/kernels /tftpboot/proxy/efi64/kernels
mkdir /images; mkdir /images_hold; mkdir /var/www/.mono
chown -R apache:apache /tftpboot /images /images_hold /var/www/html/cruciblewds
/var/www/.mono
chmod 1777 /tmp
echo "/opt/mono/lib/" >> /etc/ld.so.conf
ldconfig
chkconfig httpd on
service httpd restart
cd lz4/programs
make lz4 ; make install
cd ../../
wget https://www.udpcast.linux.lu/download/udpcast-20120424.tar.gz
tar xvzf udpcast-20120424.tar.gz
cd udpcast-20120424
./configure
make ; make install
cd ..
Setup Database
yum install http://yum.postgresql.org/9.4/redhat/rhel-6-x86_64/pgdg-centos94-9.41.noarch.rpm
yum install postgresql94-server
service postgresql-9.4 initdb
Edit /var/lib/pgsql/9.4/data/pg_hba.conf
Change
host
all
all
127.0.0.1/32
ident
host
all
all
127.0.0.1/32
md5
To
service postgresql-9.4 start
su postgres -c "psql -c \"CREATE DATABASE cruciblewds;\""
su postgres -c "psql cruciblewds < cruciblewds.sql"
su postgres -c "psql -c \"ALTER USER postgres with password 'yourdbpass';\""
1. Change PGSQLPASS to yourdbpass on line 5 of this file
/var/www/html/cruciblewds/web.config
chown -R postgres /var/www/html/cruciblewds/data/dbbackup
chkconfig postgresql-9.4 on
service httpd restart
Install NFS Server
yum install nfs-utils
echo "/images
/etc/exports
echo "/images_hold
>> /etc/exports
service nfs restart
exportfs -a
*(ro,sync,no_wdelay,no_root_squash,insecure)" >>
*(rw,sync,no_wdelay,no_root_squash,insecure)"
chkconfig nfs on
chkconfig rpcbind on
The NFS Server does not always seem to start correctly after initial install, a reboot takes
care of this.
Install TFTP Server
yum install tftp-server
echo "service tftp
{
socket_type = dgram
protocol = udp
wait = yes
user = root
server = /usr/sbin/in.tftpd
server_args = -s /tftpboot
disable = no
per_source = 11
cps = 100 2
flags = IPv4
}" > /etc/xinetd.d/tftp
chkconfig xinetd on
service xinetd restart
Finally, make all necessary firewall changes for httpd, nfs, tftp
Post Install Setup
1. Open the CrucibleWDS Web Interface
http://serverIP/cruciblewds
2. Login using
cruciblewds / password
3. Select Admin
4. Change Server IP to your IP
5. Next to Server Key click Generate
6. Click Update Settings at the bottom
7. You will then be prompted to create a new boot menu
8. Click Yes
9. Click Create Boot File
Client Boot Method
Finally you must decide how you will boot your clients. You can do a network boot with PXE
or use a bootable ISO with a CD or USB drive. You can also
use both options together.
Skip to the Client Boot Method section for more info.
Installation Problems
There are a lot different versions of Mono used in different distros. It is difficult to say what
issues you may come across.
Some distros need to modify the permissions of /tmp for
Mono to work correctly. When starting apache if you see a permission denied error, this is
typically the reason.
If installation fails, browse or post something in the forums
Previous
2.1.4 Install On Open Media
Vault
TOC
Next
2.1.6 Install On CentOS 7
Previous
Chapter 2. Getting Started
CrucibleWDS 2.3.3
Next
2.1.6 Install On CentOS 7 (x86_64 only)
2.1.6.1 Upgrading To CrucibleWDS 2.3.3
2.1.6.2 New Installation Of CrucibleWDS 2.3.3
I. Upgrading To CrucibleWDS 2.3.3
IMPORTANT: Images created prior to version 2.3.0 cannot be used in Version 2.3.x
You must re-upload the images after the Upgrade.
Only CrucibleWDS 2.x.x can be upgraded to 2.3.3.
cd /tmp
service httpd stop
mv /tftpboot /tftpboot.old
mv /var/www/html/cruciblewds /var/www/html/cruciblewds.old
wget "http://sourceforge.net/projects/cruciblewds/files/2.3.3/cruciblewds2.3.3.tar.gz"
tar xvzf cruciblewds-2.3.3.tar.gz
cp -r cruciblewds /var/www/html/
cp -r tftpboot /
ln -s /tftpboot/images /tftpboot/proxy/bios/images
ln -s /tftpboot/kernels /tftpboot/proxy/bios/kernels
ln -s /tftpboot/images /tftpboot/proxy/efi32/images
ln -s /tftpboot/kernels /tftpboot/proxy/efi32/kernels
ln -s /tftpboot/images /tftpboot/proxy/efi64/images
ln -s /tftpboot/kernels /tftpboot/proxy/efi64/kernels
chown -R apache:apache /tftpboot /var/www/html/cruciblewds
chown -R postgres /var/www/html/cruciblewds/data/dbbackup
cp /tftpboot.old/pxelinux.cfg/* /tftpboot/pxelinux.cfg/
If upgrading from 2.3.2:
su postgres -c "psql cruciblewds < dbUpgrades/2.3.3.sql"
1. Change PGSQLPASS to yourdbpass on line 5 of this file
/var/www/html/cruciblewds/web.config
service httpd start
II. New Installation
Pre-Requisites
Disable selinux, (or don't, this guide assumes you did)
A DHCP Server
Assign you server a static IP
Installation
Setup CrucibleWDS Core
rpm --import "http://keyserver.ubuntu.com/pks/lookup?
op=get&search=0x3FA7E0328081BFF6A14DA29AA6A19B38D3D831EF"
yum-config-manager --add-repo http://download.mono-project.com/repo/centos/
cd /tmp
yum install httpd apache2-mod_mono mono-devel make gcc perl
wget "http://sourceforge.net/projects/cruciblewds/files/2.3.3/cruciblewds2.3.3.tar.gz"
tar xvzf cruciblewds-2.3.3.tar.gz
rm wds.conf
wget http://docs.cruciblewds.org/centos7/wds.conf
cp wds.conf /etc/httpd/conf.d/
cp -r cruciblewds /var/www/html/
cp -r tftpboot /
ln -s /tftpboot/images /tftpboot/proxy/bios/images
ln -s /tftpboot/kernels /tftpboot/proxy/bios/kernels
ln -s /tftpboot/images /tftpboot/proxy/efi32/images
ln -s /tftpboot/kernels /tftpboot/proxy/efi32/kernels
ln -s /tftpboot/images /tftpboot/proxy/efi64/images
ln -s /tftpboot/kernels /tftpboot/proxy/efi64/kernels
mkdir /images; mkdir /images_hold; mkdir /var/www/.mono
chown -R apache:apache /tftpboot /images /images_hold /var/www/html/cruciblewds
/var/www/.mono
chmod 1777 /tmp
chkconfig httpd on
service httpd restart
cd lz4/programs
make lz4 ; make install
cd ../../
wget https://www.udpcast.linux.lu/download/udpcast-20120424.tar.gz
tar xvzf udpcast-20120424.tar.gz
cd udpcast-20120424
rm console.h
wget http://docs.cruciblewds.org/centos7/console.h
./configure
make ; make install
cd ..
Setup Database
yum install postgresql-server
postgresql-setup initdb
Edit /var/lib/pgsql/data/pg_hba.conf
Change
host
all
all
127.0.0.1/32
ident
host
all
all
127.0.0.1/32
md5
To
service postgresql start
su postgres -c "psql -c \"CREATE DATABASE cruciblewds;\""
su postgres -c "psql cruciblewds < cruciblewds.sql"
su postgres -c "psql -c \"ALTER USER postgres with password 'yourdbpass';\""
1. Change PGSQLPASS to yourdbpass on line 5 of this file
/var/www/html/cruciblewds/web.config
chown -R postgres /var/www/html/cruciblewds/data/dbbackup
chkconfig postgresql on
service httpd restart
Install NFS Server
yum install nfs-utils
echo "/images
/etc/exports
echo "/images_hold
>> /etc/exports
service nfs-server restart
exportfs -a
chkconfig nfs-server on
*(ro,sync,no_wdelay,no_root_squash,insecure)" >>
*(rw,sync,no_wdelay,no_root_squash,insecure)"
chkconfig nfs-mountd on
Install TFTP Server
yum install tftp-server
echo "service tftp
{
socket_type = dgram
protocol = udp
wait = yes
user = root
server = /usr/sbin/in.tftpd
server_args = -s /tftpboot
disable = no
per_source = 11
cps = 100 2
flags = IPv4
}" > /etc/xinetd.d/tftp
chkconfig xinetd on
service xinetd restart
Finally, make all necessary firewall changes for httpd, nfs, tftp
Post Install Setup
1. Open the CrucibleWDS Web Interface
http://serverIP/cruciblewds
2. Login using
cruciblewds / password
3. Select Admin
4. Change Server IP to your IP
5. Next to Server Key click Generate
6. Click Update Settings at the bottom
7. You will then be prompted to create a new boot menu
8. Click Yes
9. Click Create Boot File
Client Boot Method
Finally you must decide how you will boot your clients. You can do a network boot with PXE
or use a bootable ISO with a CD or USB drive. You can also
use both options together.
Skip to the Client Boot Method section for more info.
Installation Problems
There are a lot different versions of Mono used in different distros. It is difficult to say what
issues you may come across.
Some distros need to modify the permissions of /tmp for
Mono to work correctly. When starting apache if you see a permission denied error, this is
typically the reason.
If installation fails, browse or post something in the forums
Previous
2.1.5 Install On CentOS 6
TOC
Next
2.2 Client Boot Method
Previous
Chapter 2. Getting Started
CrucibleWDS 2.3.3
Next
2.2 Client Boot Method
Now that CrucibleWDS is installed, it is time to determine how we will boot our clients.
There are two options for this.
2.2.1 PXE Boot
2.2.2 Bootable USB / CD
PXE Boot
A TFTP server was already installed with CrucibleWDS. Now you need to tell your clients to
boot from it. This requires a small change to your DHCP Server.
Using A Windows DHCP Server
1. Open your DHCP Configuration
2. Select your scope
3. Right click on scope options
4. Select configure options
5. Select option 66 and enter your CrucibleWDS Server IP
6. Select option 67 and enter pxeboot.0 (That is a zero)
Using The Provided DHCP Server ( Windows Installs Only )
This method is only intended to be used on isolated networks. For example, your
CrucibleWDS Server, a 24 port switch, and your client machines. Not attached to the rest
of your network.
1. Give your CrucibleWDS Server a private IP, such as 192.168.1.10
2. Set your Subnet Mask to 255.255.255.0
3. Gateway and DNS are not needed
4. Run
C:\inetpub\wwwroot\cruciblewds\Tftpd32\tftpd32_gui.exe
5. Select Settings then check DHCP Server under the Global Tab
6. Select the DHCP tab
7. Set IP Pool starting Address to 192.168.1.20
8. Set Size of Pool to 100
9. Set Mask to 255.255.255.0
10. Set Boot File to pxeboot.0 (That is a zero)
11. Click OK and exit the program
12. Run
net stop tftpd32_svc
net start tftpd32_svc
Other DHCP Servers
There are many other DHCP Server options - I won't try to list them all. If you are using
something else you will need to consult it's documentation
1. Set the boot server to your CrucibleWDS Server IP
2. Set the boot file to pxeboot.0 ( That is a zero )
CrucibleWDS Proxy DHCP
The CrucibleWDS Proxy DHCP Server is a new option as of version 2.3.3. It offer's some
important benefits over previous methods.
Enables PXE booting for clients whose DHCP Server's do not support setting DHCP options. A
prime example of this is a home router.
Enables PXE booting for a mix of legacy bios and efi clients
This is the same way that Microsoft does it when using Windows Deployment Services
Can be one of the easiest ways to setup PXE booting in a simple network setup, and is also the
hardest to setup in a more complicated network.
You can read more about it here
Bootable CD or USB Drive
This must be created on a Windows machine
Using the boot CD or USB drive offers a few advantages for you.
1. It does not require using a TFTP server or changing DHCP options
2. It can provide enhanced security
3. It can be used along side PXE booting
4. It can be helpful when some clients aren't compatible with PXE booting
The obvious drawback is that it isn't as convenient.
Bootable CD Creation
1. Download a good text editor, such as Notepad++
2. Download and install the free trial of UltraISO - The trial allows
iso's up to 300MB, we only need
100MB
3. Download the CrucibleWDS Client ISO
4. Login to your CrucibleWDS Server and select Admin
5. Copy the Server Key
6. Open UltraISO and select File then Open and select your client.iso
7. Extract syslinux/isolinux.cfg and open it with Notepad++
8. For each menu entry in isolinux.cfg
1. Replace the IP in web= to the IP of your CrucibleWDS Server
2. Change WDS_KEY= to your Server Key
9. Save your changes and copy the file back to syslinux/ in UltraISO
10. Extract EFI/boot/grub.cfg
11. Repeat step 8 for this file
12. Copy the grub.cfg back to EFI/boot/
13. Select File then Save
14. Burn the ISO to a CD
Bootable USB Creation
1. Download a good text editor, such as Notepad++
2. Download a good iso extractor such as 7-Zip
3. Download the CrucibleWDS Client ISO
4. Login to your CrucibleWDS Server and select Admin
5. Copy the Server Key
6. Format your usb drive
7. Extract the contents of client.iso to your usb drive using 7-zip
8. Rename syslinux/isolinux.cfg to syslinux.cfg
9. Open syslinux.cfg with Notepad++
10. For each menu entry in syslinux.cfg
1. Replace the IP in web= to the IP of your CrucibleWDS Server
2. Change WDS_KEY= to your Server Key
11. Save your changes
12. Edit EFI/boot/grub.cfg with Notepad++
13. Repeat steps 10 and 11 for this file
14. Run utils\win32\makeboot.bat - This must be run from your portable usb drive This must be run
as administrator
Previous
2.1.6 Install On CentOS 7
TOC
Next
2.3 Create Image Definition
Previous
Chapter 2. Getting Started
CrucibleWDS 2.3.3
Next
2.3 Create An Image Definition
An Image definition serves as a placeholder for an image you are preparing to upload
1. Login to the WebUI
2. Select Images
3. Click the + sign to create a new Image
4. Enter an Image Name
5. Click Add Image
2.4 Add A Host
A Host, also referred to as a client, is any machine( Physical or Virtual) that you will upload
images from or deploy images to.
1. Login to the WebUI
2. Select Hosts
3. Click the + sign to create a new Host
4. Enter the Host Name
5. Enter the Host MAC Address
6. Select the Host Image you just created
7. Click Add Host
Hosts can also be added from the client boot menu. This is helpful because it will fill in the
MAC Address for you.
2.5 Upload An Image
1. Login to the WebUI
2. Select Tasks
3. Click Start Unicast Session
4. Click Upload on the Host you created earlier
5. Boot your Host via the Client Boot Method you selected
2.6 Deploy The Image To Other Hosts
1. Add additional Hosts with the same Image definition
2. Select Tasks
3. Search for the Host and click Deploy
4. Boot your other Hosts via the Client Boot Method you selected
Previous
2.2 Client Boot Method
TOC
Next
3. Web Interface
Previous
Chapter 3. Web Interface
CrucibleWDS 2.3.3
Next
Chapter 3. Web Interface
3.1 Hosts
3.2 Groups
3.3 Images
3.4 Tasks
3.5 Users
3.6 Admin
The CrucibleWDS Web interface was redesigned in Version 2.0. It takes a minimalistic
approach and offers high usability across all devices including
phones, tablets, laptops,
and desktops. It requires newer versions of today's browsers.
Previous
2.6 Deploy To Other Hosts
TOC
Next
3.1 Hosts
Previous
Chapter 3. Web Interface
CrucibleWDS 2.3.3
Next
3.1 Hosts
Hosts are simply the machines that you will create images from or deploy images to. They
must be created if you wish to use them with CrucibleWDS, unless
you are using OnDemand Mode ( More on that later ). They are also referred to as clients in this guide.
3.1.1 Create
To create a Host select Hosts then select Create New Host. The table below explains
each setting.
Host Name:
The name you enter here is what the machine will be renamed to after it images.
Do not use special characters.
Host MAC
Address:
This is how CrucibleWDS knows what host is what. It must be the address of the
first NIC that is detected by the client side boot image. Valid formats include 00:00:00:00:00:00 - 00-00-00-00-00-00 - 000000000000
Host Image:
The currently assigned image of the host. Both uploading and deploying will use
this image.
Host Group:
(Optional)
The group the host belongs to.
Host Description: This is for your own use.
(Optional)
Host Kernel:
When using PXE booting this is the Kernel the host will use to boot. If you are
having hardware compatibility problems. This is most likely what needs changed.
Host Boot Image:
When using PXE booting this is the boot image the host will use. It contains the
Linux filesystem as well as the scripts needed for CrucibleWDS. There is
currently only one option.
Host Arguments:
(Optional)
Use this to pass extra kernel arguments or CrucibleWDS arguments to the client
at boot. See Arguments for the current options.
Host Scripts
Scripts can be used to perform additional tasks that are not already included in the
program. They are run immediately after the client has finished it's imaging
process while still in Linux. See Custom Scripting for more info.
Create Another?
This can be helpful when adding a lot of hosts. When this box is checked all
values will remain the same after you click Add Host. If you are only
incrementing a host name number or mac address all other values will remain the
same.
3.1.2 Search
The search screen is the default view when you select Hosts. It displays all of the hosts
that have been added to the database. The search bar implies a wildcard before and after
the string you enter. Leave it blank for all hosts. You can also use this view to delete
multiple hosts as well as view additional options for an individual host.
3.1.3 View
The view screen presents an additional set of options for the host you selected
Edit Host
Allows you to change any options that were set when you created the host.
View Host History Displays the records of all past host activity
Modify Host Boot
Menu
When PXE booting, This can be used to view or change the current boot menu.
Active Tab
This can be a helpful diagnostic tool. It shows the current boot menu the client will
get when doing a PXE boot. If there is currently an active task, it is displayed. If a
custom menu is set then it is displayed, otherwise the default global boot menu is
displayed. This is a
read only screen for information purposes only.
Custom Tab
The custom tab allows you to create a boot file specifically for the selected host.
You can start from scratch or start from a selected template. Templates are
created under the Admin View. Custom boot files are only loaded without an
active task for the host. If a task is created a new file is temporarily generated for
that host.
View Host Log
Allows you to view the log of the most recent Upload and Deploy of the host. This
is a very helpful debugging tool. An important note is that the log does not get
copied to the server unless a host checks out or displays a handled error
message.
Upload Host
Starts an Upload Task for the selected host. ( From client to server )
Deploy Host
Starts a Deploy Task for the selected host. ( From server to client )
Delete Host
Deletes the selected host.
3.1.4 Import
The Import view allows you to upload a CSV list of hosts. A template is located in the web
directory /data/dbbackup
Previous
3. Web Interface
TOC
Next
3.2 Groups
Previous
Chapter 3. Web Interface
CrucibleWDS 2.3.3
Next
3.2 Groups
Groups are comprised of a set of Hosts. They serve 3 purposes
1. To quickly change the options for a set of hosts
2. Multicasts
3. Access control for users in the User membership role
3.2.1 Create
To create a Group select Groups then select Create New Group. Fill in your options and
select the hosts you want to belong to the group. The options are the same as that of a
host, except for one option
Sender
Arguments:
(Optional)
This is only used when multicasting a group. If gives some control over the
multicast behavior. One example is specifying the NIC to use. You could dedicate
a NIC to only be used for one group. See the complete list of Sender Arguments
3.2.2 Search
The search screen is the default view when you select Groups. It displays all of the groups
that have been added to the database. The search bar implies a wildcard before and after
the string you enter. Leave it blank for all groups. You can also use this view to delete
multiple groups as well as view additional options for an individual group.
Note: Deleting a group does not delete the hosts that belong to the group
3.2.3 View
The view screen presents an additional set of options for the group you selected
Edit Group
Allows you to change any options that were set when you created the group.
View Group
History
Displays the records of all past group activity
Modify Group
Boot Menu
When PXE booting, This can be used to change the current boot menu for all
hosts in the group.
Custom Tab
You can start from scratch or start from a selected template. Templates are
created under the Admin View. Custom boot files are only loaded without an
active task for the host. If a task is created a new file is temporarily generated for
that host.
Multicast Group
Starts a Multicast Task for the selected group.
Unicast Group
Starts a Unicast Task for each individual host in the group.
Delete Group
Deletes the selected group (Not the hosts in the group).
3.2.4 Import
The Import view allows you to upload a CSV list of groups. A template is located in the
web directory /data/dbbackup
Previous
3.1 Hosts
TOC
Next
3.3 Images
Previous
Chapter 3. Web Interface
CrucibleWDS 2.3.3
Next
3.3 Images
Images contain the data that is captured from a host during an Upload. They are a
compressed block level specific format file. They cannot be viewed or modified without
deploying them back to a hard drive.
3.3.1 Create
To create an Image select Images then select Create New Image. When creating an
image it only creates an entry in the database and sets up the directory structure until an
image is uploaded.The table below explains each setting.
Image Name:
A name for your image. Do not use special characters.
Image
Description:
(Optional)
For your own use.
Protected:
A protected image cannot be deleted while in the web interface. It also cannot be
overwritten by an upload task.
Visible In On
Demand
Hides the image option from the client side On Demand Mode.
3.3.2 Search
The search screen is the default view when you select Images. It displays all of the images
that have been added to the database. The search bar implies a wildcard before and after
the string you enter. Leave it blank for all imagess. You can also use this view to delete
multiple images as well as view additional options for an individual image.
Note: Deleting an image deletes it's entry in the database as well as all directories and files
for that image.
The search screen also displays the current compressed size of the image on the server as
well as the minimum hard drive size required to
deploy the image back to. The main view
displays the first hard drive only. Click the plus sign will show all the hard drives if multiple
were uploaded.
3.3.3 View
The view screen presents an additional set of options for the image you selected
Edit Image
Allows you to change any options that were set when you created the image.
View Image
History
Displays the records of all past image activity
View Image Specs Allows you to control how an image is deployed. Any Hard drive or partition that is
marked Active
will be deployed. You may also specify a custom size for the
partition. Click Update to apply your changes. Clicking Restore will always set
everything
back to original settings. There are no validation checks for these
settings. If you make changes and you don't know what you are doing,
the image
process will most likely fail.
Warning: A destination hard drive is always erased when
restoring an image. For example, if you choose to deploy
just one partition,
the destination drive will be erased and
only 1 partition will be restored. It cannot add on to an
existing Hard Drive.
Delete Image
Deletes the selected image (And all files that belong to the image).
3.3.4 Import
The Import view allows you to upload a CSV list of images. A template is located in the
web directory /data/dbbackup. This only adds the image definitions to the database. It
does not create the directories. You will need to copy the image files manually.
Previous
3.2 Groups
TOC
Next
3.4 Tasks
Previous
Chapter 3. Web Interface
CrucibleWDS 2.3.3
Next
3.4 Tasks
Tasks is the central location to view, start, and cancel tasks.
3.4.1 View Active Tasks
The View Active Tasks Screen allows you view and cancel active unicasts and multicasts
3.4.2 Start Unicast Session
Allows you to start an Upload or Deploy task for a specific host
3.4.3 Start Multicast Session
Allows you to start a Multicast for a specific group. It also can start a unicast deploy for
each individual host in a group.
3.4.4 Start On Demand Session
Allows you start an On Demand Multicast for an individual image.
Previous
3.3 Images
TOC
Next
3.5 Users
Chapter 3. Web Interface
CrucibleWDS 2.3.3
Previous
Next
3.5 Users
Users are used for access to the web interface as well as some of the client boot options.
3.5.1 Create
To create a User select Users then select Create New User. The table below explains
each setting.
User Name:
A name for your user. Do not use special characters.
User Membership: There are 3 different membership roles for Users
Administrator
Has unrestricted access to the web ui and client boot options
Power User
Has unrestricted access to Hosts, Groups, Images, and Tasks
Has unrestricted access to client boot options
Does not have access to users or admin
User
Has no access by default
Can Start tasks,modify hosts, modify groups only for the groups assigned to
the user
Client Debug and On Demand can be individually assigned
User Password:
A password for the user. The user can change the password after they login.
3.5.2 Search
The search screen is the default view when you select Users. It displays all of the users
that have been added to the database. The search bar implies a wildcard before and after
the string you enter. Leave it blank for all users. You can also use this view to delete
multiple users as well as view additional options for an individual user.
3.5.3 View
The view screen presents an additional set of options for the image you selected
Edit User
Allows you to change any options that were set when you created the user. When
editing a user, leaving the password blank will leave the current password intact.
View User History Displays the records of all past user activity
Delete User
Deletes the selected user.
3.5.4 Import
The Import view allows you to upload a CSV list of users. A template is located in the web
directory /data/dbbackup.
Previous
3.4 Tasks
TOC
Next
3.6 Admin
Chapter 3. Web Interface
CrucibleWDS 2.3.3
Previous
Next
3.6 Admin
3.6.1 Global Settings
The table below explains each setting.
Server IP:
The IP of your CrucibleWDS Server. Many aspects of the program depend on this
being correct.
Web Server Port:
The port that you have set your CrucibleWDS Web Server to run on.
Image Store Path: The location of permanently stored image files. After an image is uploaded it is
moved here. If you change this location you must also manually change your
NFS share exports, and in Global Settings change NFS Deploy Path
Image Hold Path:
The location of temporarily stored image files during an upload. After an image is
uploaded it is moved to Image Store Path. If you change this location you must
also manually change your NFS share exports, and in Global Settings change
NFS Upload Path. Both Image Store Path and Image Hold Path must reside on
the same partition or filesystem.
TFTP Path:
Used for PXE booting. The location for all files necessary to PXE boot. Typically
you should not need to change this.
Web Service:
The web service that clients use to communicate with the server. You should
never need to change this.
Server Key:
A security key that clients use to communicate with the server. If you installed on
Linux or FreeNAS you should have generated a new key after installation.
Windows installs automatically generate a key during install. A big reason for this
was the addition of a bootable ISO or USB drive. This prevents someone from
downloading the client iso and using it on your system. Or if someone misplaces
a CD or thumbdrive, simply generate a new key and render all others obsolete.
The generate button is simply a suggestion. You can use any value here that you
want.
Server Key Mode:
Automated (Less Secure)
The key is embedded in the pxe boot menu and does not require user
intervention when imaging.
Manual (More Secure)
The key is not stored in the pxe boot menu and the user will be prompted to
enter the key on each client for each imaging task.
Image Transfer
Mode:
Specifies how images are deployed and uploaded. Multicast transfers are not
affected by this, but whatever method you have selected must still be setup
correctly in order for multicasting to work. Each has pros and cons. Changing the
Image Transfer Mode does not automatically create nfs or smb shares. You must
do that manually.
nfs
Least secure - There is a potential that someone could connect to and read
your image files, but not delete or change them.
Two nfs shares are used. Image store is a read only nfs share and Image
hold is a read/write nfs share.
The image will upload to the Image hold
location and will be moved to the Image store location upon completion. All
deployments
will then occur from the Image store location.
Both image uploads and deploys will use an nfs share
This is the most tested method and has been used since the beginning of
CrucibleWDS
nfs+http
Less secure - No one can access the image files without knowing the
Server Key
Introduced in Version 2.0
One nfs share is used. The Image hold location is a read/write nfs share.
The image will upload to the Image hold location and will be moved to the
Image store location upon completion. All deployments
will then occur from
the Image store location but using http instead of nfs, eliminating the
possibility of someone downloading the image without knowing the server
key.
Uploads are transferred over NFS and deploys are transferred over HTTP
To effectively make this more secure you will need to disable the read only
NFS Share for your Image Store Path
smb
More secure - Allows password protected smb / windows shares.
Introduced in Version 2.3.1
One SMB share is used. Both image uploads and deployments will use the
Image store location, it is important to note that the Image hold location
must still be valid even though it is not used.
To effectively make this more secure you should disable all nfs shares if
applicable.
smb+http
More secure - Allows password protected smb / windows shares.
Introduced in Version 2.3.1
One SMB share is used. Both image uploads and deployments will use the
Image store location, it is important to note that the Image hold location
must still be valid even though it is not used.
Image Uploads use SMB and deployments use http.
To effectively make this more secure you should disable all nfs shares if
applicable.
udp+http
Most secure (Subjective) - No one can access the image files without
knowing the Server Key
Most problematic
Slowest Upload method
Introduced in Version 2.0
Neither NFS or SMB is used.
Uploads are transferred via UDP across the multicast address 224.0.0.1
directly to the Image store location, Deployments are transferred via HTTP
from the Image store location.
It is important to note that the Image hold
location must still be valid even though it is not used.
Requires multicast support on your routers / switches even though the
transfer isn't really a multicast
To effectively make this more secure you will need to disable the NFS
Share or SMB Share for your Image Store Path and Image Hold Path or
disable the NFS Service completely
Image Checksum:
On
Calculates the checksum of an image before it is deployed, to make sure it
hasn't been tampered with. Everytime you upload an image, either a
power
user or an administrator must approve the new checksum before the image
can be deployed. Setting this on will cause a small delay when starting the
deploy task or viewing image specs while the checksum is calculated.
Off
The checksum feature is not used.
Queue Size:
Determines how many clients can simultaneously be deployed to. This has no
effect on multicasts or uploads. If you don't have a powerful server you will need
to keep this number low, maybe 1 or 2. This works great if you want to queue up
100 machines or so, leave for the night and come in the next morning they are all
ready.
NFS Upload Path: This is the path the client uses to connect to the NFS Upload Share. If you
changed Image Hold Path, this must be changed also. This is a read/write NFS
path.
NFS Deploy Path: This is the path the client uses to connect to the NFS Deploy Share. If you
changed Image Store Path, this must be changed also. This is a read only NFS
path.
SMB Path:
This is the path the client uses to connect to the SMB share if you are using smb
or smb+http for your Image Transfer Mode.
SMB Username:
The username to connect to your SMB share. By default uses the local user
cruciblewds that was created during installation(On Windows Only).
SMB Password:
Using Proxy
DHCP:
The password to connect to your SMB share. By default uses the password you
specified during installation for local user cruciblewds.(On Windows Only).
Yes
Tells CrucibleWDS that a proxy DHCP server is being used and that boot
files should be created in tftpboot/proxy/bios , tftpboot/proxy/efi32 , and
tftpboot/proxy/efi64, instead of the standard tftpboot directory.
When using
this mode you will always have 3 default boot menu's to manage, 1 for
each architecture. Also when tasks are created, 2 menu's are always
created. One supporting syslinux and the other supporting ipxe.
No
Only one pxe boot architecture can be supported at a time. Boot files are
created in the tftpboot directory.
PXE Mode:
When Proxy DHCP is set to no this is the Bootfile that is used. If a host is having
trouble pxe booting try changing this. Pxelinux has been around a long time and
should offer the best compatibility. Unlike Proxy DHCP, This cannot be changed
for individual hosts, everyone must use the same setting.
Proxy BIOS PXE
Mode:
When using Proxy DHCP mode, the Global boot file that is used for legacy BIOS
clients. Boot files for specific hosts can be set using the CWDS Proxy DHCP
Reservations file.
Proxy Efi32 PXE
Mode:
When using Proxy DHCP mode, the Global boot file that is used for 32 bit efi
clients. Boot files for specific hosts can be set using the CWDS Proxy DHCP
Reservations file.
Proxy Efi64 PXE
Mode:
When using Proxy DHCP mode, the Global boot file that is used for 64 bit efi
clients. Boot files for specific hosts can be set using the CWDS Proxy DHCP
Reservations file.
Compression
Algorithm:
When uploading an image this algorithm is used to compress the image. lz4 may
provide faster uploads but maybe slower downloads. gzip may provide slower
uploads but maybe faster downloads.
Compression
Level:
When uploading an image this the level of compression. 1 least compression. 9
most compression.
Force SSL:
If you have enabled SSL in your webserver, you can use this to automatically
redirect all requests for CrucibleWDS to https. Warning if you enable this without
first enabling and testing SSL you will not be able to access the site. You will
need to manually edit the database to turn it back off.
Default Host View: By default, when you select Hosts a list of all hosts are displayed. This can be
cumbersome or slow to load if you have 1000's of hosts. Changing this to search
will not display any hosts until you search for them.
On Demand Mode: Globally enables or disables On Demand Mode on both server and client.
AD Login Domain: Enables logging into the Web Interface via Active Directory Credentials. Simply
enter your domain name. Then add users to CrucibleWDS where the
CrucibleWDS username matches the AD username. The password field will still
need a random password entered. This feature only works when Installed on
Windows.
Global Host
Arguments:
The same as setting a host or group argument but applies to all hosts.
Sender
Arguments:
(Server)
Only used for multicasting. Gives you the ability to provide additional arguments
for the multicast sender. Check Multicast Arguments for the complete list. This
settings also exists under Groups. The global admin setting will be ignored if
something is set for that specific group.
Receiver
Arguments:
(Server)
Only used when image transfer mode is set to udp+http. Gives you the ability to
provide additional arguments for the multicast receiver. Check Receiver
Arguments for the complete list. A common need for this is to specify the
interface to receive the data on the server.
Receiver
Arguments:
(Client)
Gives you the ability to provide additional arguments for the multicast receiver on
the client. Check Receiver Arguments for the complete list.
UDPcast Start Port Only used for multicasting. Multicast will transfer on any of the ports in the range
/ UDPcast End
that is specified here.
Port:
3.6.2 Boot Menu
The boot menu option controls the default boot when clients PXE Boot. The default boot
menu is the menu that is displayed when clients are not part of an active task.
Editor Tab
Gives you free reign to make any changes you like to the default boot menu. Use the Sha
Generator to generate passwords for different menu entries
Templates Tab
The Templates Tab serves two purposes.
1. Allows you to always generate a new working default boot menu
1. Select default from the drop down box
2. Pick a kernel that all of the boot menu entries will use
3. Enter a password for each boot menu entry, they can be all the same or different
4. Click Create Boot File
2. Allows you to make default boot menu templates that can then be assigned to specific hosts or
groups
1. Select new template from the drop down box
2. Create a template name and fill in the menu
3. Click Create Template
4. The template can now be accessed from the Hosts and Groups view menu
3.6.3 Logs
Allows you view multicast and exception logs.
3.6.4 Export Database
Exports all Hosts, Groups, Image Definitions, and Users to a CSV file.
3.6.5 Reports
Displays some general imaging statistics
Previous
3.5 Users
TOC
Next
4. Additional Help Topics
Previous
Chapter 4. Additional Help Topics
CrucibleWDS 2.3.3
Next
Chapter 4. Additional Help Topics
4.0 Kernel Dependencies
4.1 On Demand Mode
4.2 Prepare An Image For Upload
4.3 Automatic PC Name Changing
4.4 Automatic Domain Joining
4.5 Prepare Host For PXE Booting
4.6 Wake On Lan
4.7 Custom Scripting
4.8 Backup
4.9 Changing The Server IP Address
4.10 Partition And Hard Drive Control
4.11 Arguments
4.12 Modify Initrd
4.13 Create A Custom Kernel
4.14 Alternate Storage
4.0 Kernel Dependencies
As new features are added to CrucibleWDS, there may be newer kernels that are required
to utilize the features. This might mean that a new option
was added to a kernel or that I
didn't have it enabled in previous kernels. Here is the current list
Resizable LVM Partitions
Requires kernel 3.17.1 or newer - This was the first kernel that I enabled device mapper
and will be compatible moving forward.
Storing Images On SMB Shares
Requires kernel 3.18.1 or newer - This was the first kernel that I enabled CIFS and will be
compatible moving forward.
VMWare
Currently using vmware guests requires using the kernel series 3.12.x. I have added cifs
and lvm as of 3.12.39
4.1 On Demand Mode
On Demand Mode allows you to perform a number of tasks from the client opposed to
using the WebUI. You can deploy any image to any host regardless of what is currently
assigned to the host in the WebUI. You can even deploy to hosts that aren't registered with
your CrucibleWDS Server. You can do the same for Uploading and creating new images.
Finally you can join custom multicast sessions. Automatic host name changing and custom
scripts will still run if your hosts are registered with the database. If your host is not in the
database you will be asked to give the host a name. If you enter a name it will use this
name to automatically set the name of the host. If you leave the name blank CrucibleWDS
will not attempt to change the name of the host. Entering a name does not add the host to
the database. It is only used one time to name the host.
To Use On Demand For Unicast Deploy or Upload
Boot you client using the client boot method you chose. Select On Demand from the menu
and follow the on screen prompts.
To Use On Demand For Multicast
In the Web UI, select Tasks then select Start On Demand Session. Select the image you
would like to deploy and click start multicast. Make note of the session name that was
created. The name is the port number for the multicast. Boot the clients you want to
connect to the session and select On Demand. Select the Multicast option from the menu.
A list of active multicast sessions will be listed. Enter the session number you want to join.
An On Demand multicast does not know how many clients you want to connect. Because
of this there is no way to have the session automatically start. You will need to press Enter
on any host, after all of your hosts have connected.
4.2 Prepare An Image For Upload
CrucibleWDS was designed to work with Sysprep and is always recommended, but it is
not required. To ensure successful image creation you need to make sure you file system
is clean for either Windows or Linux. To verify on Windows - open a cmd prompt and enter
chkntfs c: - make sure the result is not dirty. Imaging may also fail if you drive is heavily
fragmented. If you are uploading Windows 8 - Fast Startup must be disabled.
Once these steps are complete, simply shutdown the computer and start your image
upload.
4.3 Automatic PC Name Changing
Automatic Host Name changing is used to change the name of the computer before it boots
into Windows, saving you a step in your imaging process. Automatic hostname changing
works by modifying the Sysprep answer file if it exists or changing the registry. In order to
use this feature with Sysprep you must set the computer name in your Sysprep answer file
to CrucibleWDS (Case Sensitive). After the host has imaged CrucibleWDS will search the
answer file for the computer name CrucibleWDS and replace it with the host name set in
the database. If Sysprep is not used, the search for the answer file will fail and the host
name will be changed by modifying the system registry. Currently automatic host renaming
is only enabled for Windows Images. Linux has too many distros that could all use different
methods for setting the hostname. You can easily add this feature for you specific distro by
using custom scripting.
Note: The following locations are case sensitive
To Use This Feature With Windows 8 Sysprep
Your Sysprep file must be named unattend.xml and it must be located at
c:\Windows\System32\Sysprep
To Use This Feature With Windows 7 Sysprep
Your Sysprep file must be named unattend.xml and it must be located at
c:\Windows\System32\sysprep
To Use This Feature With Windows XP Sysprep
Your Sysprep file must be name sysprep.inf and it must be located at c:\Sysprep
4.4 Automatic Domain Joining
At this time there are no plans to provide an alternative method to automatically join a
domain after imaging. This can be done very easily with the Sysprep answer file, or by
using a startup or login script.
4.5 Prepare Host For PXE Booting
Setting your client for PXE booting varies for every computer model. This is done in the
client's bios. Usually you need to set your PC's network card to enable PXE booting or
network booting. You should also enable WOL . There are few ways to setup your PC for
PXE booting. You could set your network card as the first boot option, and then set your
hard drive after that. Using this approach your computer will always boot to PXE first, it will
check to see if it has an active task, if it doesn't it will continue to boot to Windows. The
other option is to enable PXE booting but to have your network card listed after your hard
drive in the boot order. Using this method the computer will not boot to the PXE menu by
default. You would need to manually select a Network boot when the computer is first
loading. Most computers have a shortcut key for network booting, many times it is F12.
Note: PXE booting with computers that use EFI has been added to version 2.3.1 but it still
experimental. You could also set your machine to use legacy bios or use the USB/CD boot
method for EFI.
Note: The CrucibleWDS PXE boot menu has Boot To Local Machine listed as the default
option. This does not actually mean boot to the Local Machine. It basically means, exit the
PXE boot and load from the next item in the boot order. If your hard drive is not listed in
your boot order after the Network Card, then the computer will not boot to windows. Also
not all bios handle this correctly. You may need to look into chainloading or using grub if
you are having problems.
4.6 Wake On Lan
When a task is created for uploading, deploying, or multicasting, CrucibleWDS
automatically tries to wake up the clients. The exception to this is On Demand Mode. Since
CrucibleWDS does not know the intended recipients for an On Demand Deployment there
is no way to wake them up. This feature is more for convience and should not be relied
upon. WOL is not the most reliable technology for alot of reasons. Here are a few. First
you must make sure your client has WOL enabled in the bios. Second, WOL uses
broadcast addresses. Routers break up broadcast domains. Depending on your
configuration WOL may or may not work in different subnets. Third, WOL relies on the
MAC address table of a switch. If a PC has not sent or received data for some time, it is
possible that the clients MAC will not be known to the switch and WOL will fail.
4.7 Custom Scripting
Scripts are used primarily to copy files (driver packs, startup scripts, printer scripts, etc),
modify registry settings, and modify text files. A script is run immediately after a client has
finished imaging, before it boots into the OS. This means the client is still in Linux, so the
scripts are actually bash scripts. Scripts are located at your web
directory\data\clientscripts. A sample script is provided. I would recommend downloading
Notepad++ and setting the language to shell to modify the scripts. Then view your host or
group and assign the scripts you want . Scripts are run in alphabetical order, so name
accordingly.
While we are on the topic of customization, I tried to setup CrucibleWDS in a manner that
would make it easy to customize. The CrucibleWDS web interface can be changed with
any text editor. There is no need to recompile. Additionally, the client scripts are all located
at your web directory\data\clientscripts\core. You can change any of them as you see
necessary.
4.8 Backup
A Typical Backup Scenario
This should provide you with a backup of your CrucibleWDS Server that can be restored to
any other version. It does not do a full database dump, it only saves your host, group,
image, and user list to CSV. If you want an exact database copy you will need to manually
do a database dump. When restoring from a full database dump you will most likely only
be able to restore to the exact same version of CrucibleWDS that you were using.
Login to the webui
Select Admin then Export Database
Copy your images, any custom scripts, any custom kernels, and your database export to a new
location
A Typical Restore Scenario
Copy your images, any custom scripts, and any custom kernels back to the new server
Login to the webui
Select Hosts then Import and upload your hosts csv file
Do the same for groups, images, and users
4.9 Changing The Server IP
If you need to change the IP of your CrucibleWDS Server, simply update all IP references
in the global settings and create a new default boot menu
Previous
3.6 Admin
TOC
Next
4.10 Partition and Hard Drive
Control
Previous
Chapter 4. Additional Help Topics
CrucibleWDS 2.3.3
Next
4.10 Partition And Hard Drive Control
By default CrucibleWDS will image every hard drive and every partition in the system. By
using host or group arguments you can gain some control over this behaviour. The
following are the commands to control the partitions and hard drives.
These are all specified in the host or group arguments and are case sensitive.
Uploading:
disks=
Here you can specify the hard drives to upload. The drives must be enclosed in quotes.
The command disks="/dev/sda /dev/sdb" will only upload those two drives. You can also
switch the order if you wanted to do /dev/sdb first
parts=
Here you can specify the partitions to upload. The partitions must be enclosed in quotes.
The command parts="1 2 5" will only upload the first, second, and fifth partition. This goes
by partition name not physical order.
Limitation: The parts command can only be specified globally, meaning if you upload more
than one hard drive, the parts command will be used for each one.
Deploying:
Deploying is controlled by both the disks= argument and the new view image specs
option
The view image specs screen allows you to mark Hard Drives and Partitions as active, as
well as control the size of partitions. Anything that is marked active will be restored.
They
are always restored in the same order they are listed in on the screen. You can switch the
restore order by using the disk= command. The command
disks="/dev/sdb /dev/sda"
will restore the first hd listed on the view image specs screen to /dev/sdb and the next to
/dev/sda
If you are restoring the same number of active hard drives as there are hard drives in the
system, the disks= command is not needed.
Here is where it gets a little complicated
The disks= command must match the number of active hard drives or you can expect
unexpected results.
For example, you are restoring to a computer with 2 hard drives, but you have only made 1
hard drive active.
If you forget to set disks="/dev/sda", the current
active hard drive will be restored to both
hard drives in the system.
Previous
4. Additional Help Topics
TOC
Next
4.11 Arguments
Previous
Chapter 4. Additional Help Topics
CrucibleWDS 2.3.3
Next
4.11 Arguments
4.11.1 Host / Group Arguments
4.11.2 Sender / Receiver Arguments
4.11.1 Host / Group Arguments
Host and Group arguments are set when adding or modifying Hosts or Groups or globally
under admin. These arguments are all case sensitive.
noResize=true
Only used for uploads. NTFS and Ext filesystems are always shrunk to the smallest
possible size to enable restoring images to smaller drives than the original. If this is
causing problems, you can disable the resize with this command. You will only be able to
restore the image to hard drives that are equal or greater than the original size.
lvmResize=false
Only used for uploads. Each LVM is imaged as it's own partition to enable resizable lvm
images. If this is causing problem, this argument will disable handling individual lv's and
handle it at the physical partition level. Your lvm partitions will not be resizable.
forceDynamicPartitions=true
Only used for deployments. CrucibleWDS will dynamically create partitions when restoring
images. The exception to this is when the hard drive is exactly the same size as the
original.
Then CrucibleWDS will simply restore the MBR that was used before. There are
times when this does not seem to work. This argument will tell CrucibleWDS to make it's
own partitions for the client.
sizeDebug=true
If uploading an image and it appears to freeze on calculating hard drive and image size,
this will display more output to the screen to try and determine where the problem is.
skipCoreDownload=true
When a client loads, it downloads the necessary scripts from the server. This makes it easy
for you to make customizations or apply patches. Setting this argument will skip this
download and use the existing scripts that are already included in the compiled initrd.gz
skipClock=true
When a client loads it will sync both the hardware clock and system time with the
CrucibleWDS Server. This option lets you disable that.
shutdown=poweroff
The default behaviour for a client after a task is run is to reboot. This will shutdown the
client after a task has run.
shutdown=noshut
The default behaviour for a client after a task is run is to reboot. This will return the client to
it's shell after a task, to allow user interaction. This can be a helpful debugging tool.
heads=240 spt=63
If a machine doesn't boot after a deploy it may be an issue with the MBR and the geometry
of the hard drive reported by the bios. You can try to manually set the geometry of the hard
drive with this argument. This has no effect when uploading the image. I have only ever
needed this once on one model of a Lenovo laptop.
4.11.2 Sender / Receiver Arguments
These arguments both relate to settings on Server not the client. Sender arguments control
the way a multicast behaves. Receiver arguments are only used when the image transfer
mode is set to udp+http. If you want to change the receiver arguments for the client you
need to modify the core scripts. This is the list of the most commonly used options. To
view all options see the official UDPcast documentation.
--interface 192.168.56.1
If you have more than one active NIC on your server you may need to specify which
interface the multicast should be sent from. You could also use this to dedicate a separate
NIC for multicasting.
--full-duplex
If you are sure that your multicast session will be entirely full duplex you can try enabling
this for a little performance gain. Use this option if you use a full-duplex network. T-base10 or 100 is full duplex if equipped with a switch. Hub based networks, or T-base-2
networks (coaxial cable) are only half-duplex and you should not use this option with these
networks, or else you may experience a 10% performance hit.
--blocksize 1456
You may see the biggest performance gain by tweaking this. You should change this to a
packet size that won't be fragmented on your network. Keep in mind an additional 58 bytes
of overhead is added to whatever you enter. I can't explain why but 700 gave me the most
consistent results, even though it really makes no sense. The max value is 1456.
--max-wait 600
This is used to set the wait time before a multicast will start, regardless of how many clients
have connected. The timer starts after the first client has connected. In seconds.
--nokbd
Currently a multicast can be forced to start after any number of clients have joined the
session. This is done by pressing any key after the client has joined. To disable this
feature use this command.
Note: If you use this command and do not set a max wait, there will be no way to start the
multicast if you find that a group member is missing or broken.
Previous
4.10 Partition And Hard Drive
Control
TOC
Next
4.12 Modify Initrd
Previous
Chapter 4. Additional Help Topics
CrucibleWDS 2.3.3
Next
4.12 Modify Initrd
The initrd contains the Linux filesystem that is loaded by the client. It is locate at
C:\inetpub\wwwroot\cruciblewds\tftpboot\images or /tftpboot/images in Linux. Every
host can have it's own initrd if specific changes are needed, example
tagging for vlans. It
contains all the scripts and applications needed for CrucibleWDS.
There a few ways to
make changes to it.
I. Changing CrucibleWDS Client Scripts From The Server
When a client loads initrd it loads all of the scripts needed from the CrucibleWDS web
server. This makes it easy to do custom changes to the CrucibleWDS
client process
without needing to manually change initrd. The scripts are located at
C:\inetpub\wwwroot\cruciblewds\web\data\clientscripts\core or
/var/www/cruciblewds/web/data/clientscripts in Linux.
II. Mounting initrd - Requires Linux
Initrd can be mounted as an ext2 filesystem in any Linux distro.
mkdir initmount
gunzip initrd
mount -o loop initrd initmount
Make your changes
umount initmount
gzip initrd
III. Build From Scratch(Buildroot) - Requires Linux
Grab the latest copy of buildroot
Extract and cd to buildroot directory
svn checkout
http://svn.code.sf.net/p/cruciblewds/code/trunk/src/CrucibleWDS_Buildroot/buil
2013.11/32bit
cp -R 32bit/. .
make xconfig
Make your changes and save the config
make source
make
Copy the resulting initrd.gz back to your CrucibleWDS Server
Previous
4.11 Arguments
TOC
Next
4.13 Create A Custom Kernel
Previous
Chapter 4. Additional Help Topics
CrucibleWDS 2.3.3
Next
4.13 Create A Custom Kernel
The Linux Kernel is responsible for a client's hardware compatibility with CrucibleWDS. If
your client freezes while loading the kernel
or cannot find a hard drive or network card,
then your kernel needs changed. CrucibleWDS already comes with a selection of different
kernels that can be assigned
in the host options. You should try them all first before
attempting to create a custom kernel. This guide was written for Ubuntu 12.04 but should
work for newer versions.
I. Install Necessary Packages
apt-get install build-essential subversion libqt4-dev bison flex gettext texinfo
zlib1g-dev uuid-dev git
II. Download Kernel and Kernel Config
You should always build a 32 bit kernel unless building specifically for EFI for use with the client
iso
Grab a config file from one of the existing kernels here to use as a template
Download a kernel to build from kernel.org
Extract kernel tar xf linux-x.xx.x.tar.xz
cd linux-x.xx.x and copy template config file to current directory
rename template config file to .config
git clone https://git.kernel.org/pub/scm/linux/kernel/git/firmware/linux-firmware.git
III. Build Kernel
make xconfig
Make any changes you want and save the config
make ARCH=i386 bzImage
The resulting file is located at arch/x86/boot/bzImage Rename it to something like the model of
the machine that isn't working
Copy to your CrucibleWDS Server at C:\inetpub\wwwroot\cruciblewds\tftpboot\kernels or
/tftpboot/kernels in Linux
Set your host to use that kernel
Previous
4.12 Modify Initrd
TOC
Next
4.14 Alternate Storage Server
Previous
Chapter 4. Additional Help Topics
CrucibleWDS 2.3.3
Next
4.14 Storage
4.14.1 Preface
4.14.2 Alternate Storage Location On Local Server
4.14.3 Alternate Storage Location On Remote Server
4.14.1 Preface
Out of all the pages in this guide, this one and security permissions may be the most
important. I highly recommend you take the time to understand what is happening here.
This will attempt to explain the process of
uploading and deploying images and how it
relates to your storage locations and image transfer mode. It will also talk about security
considerations for images, and how
to change your storage locations both locally and to a
remote location.
A typical Installation of CrucibleWDS sets up 2 folders for images. One is for permanent
storage of the image, all deployments will be sent
from this location, and one for temporary
upload storage designated as hold. Depending on your image transfer mode, the hold
folder may or may not be used. It is important to note, that the hold
folder must always
exist, even if your transfer mode does not use it. Here is a break down of how the two
folders are used depending on the transfer mode you select.
nfs
Least secure - There is a potential that someone could connect to and read your image files, but
not delete or change them.
Two nfs shares are used. Image store is a read only nfs share and Image hold is a read/write nfs
share.
The image will upload to the Image hold location and will be moved to the Image store
location upon completion. All deployments
will then occur from the Image store location.
Both image uploads and deploys will use an nfs share
nfs+http
Less secure - No one can access the image files without knowing the Server Key
One nfs share is used. The Image hold location is a read/write nfs share. The image will upload to
the Image hold location and will be moved to the Image store location upon completion. All
deployments
will then occur from the Image store location but using http instead of nfs,
eliminating the possibility of someone downloading the image without knowing the server key.
Uploads are transferred over NFS and deploys are transferred over HTTP
To effectively make this more secure you will need to disable the read only NFS Share for your
Image Store Path
Important: The image hold folder is only used when either nfs method is selected, to
try and overcome some of the security shortcomings.
When the image is moved
from the hold path to the store path, it cannot cross over hard drives, partitions,
filesystems, nfs shares, smb shares, volumes, datasets, etc.
smb
More secure - Allows password protected smb / windows shares.
Only One SMB share is used for the Image Store location. Both image uploads and deployments
will use the Image store location, it is important to note that the Image hold location must still be
valid even though it is not used.
To effectively make this more secure you should disable all nfs shares if applicable.
smb+http
More secure - Allows password protected smb / windows shares.
Only One SMB share is used for the Image Store location. Both image uploads and deployments
will use the Image store location, it is important to note that the Image hold location must still be
valid even though it is not used.
Image Uploads use SMB and deployments use http.
To effectively make this more secure you should disable all nfs shares if applicable.
udp+http
Most secure (Subjective) - No one can access the image files without knowing the Server Key
Most problematic
Slowest Upload method
Neither NFS or SMB is used.
Uploads are transferred via UDP across the multicast address 224.0.0.1 directly to the Image
store location, Deployments are transferred via HTTP from the Image store location.
It is
important to note that the Image hold location must still be valid even though it is not used.
Requires multicast support on your routers / switches even though the transfer isn't really a
multicast
To effectively make this more secure you will need to disable the NFS Share or SMB Share for
your Image Store Path and Image Hold Path or disable the NFS Service completely
Folder Permissions
Your image store and image hold locations must have the correct permission set or you will
encounter errors. Let's examine the permission required for them. You should also review
all of the permissions required
by CrucibleWDS here.
1. Your Web server ( IIS, Apache, or nginx ) must be able to read, create, delete, and move folders
inside of your image store and hold location, but does not need access to the top level itself.
2. If you are using NFS or NFS+HTTP, your client will connect to the NFS share as root and from
there different things will happen depending on your OS.
If using CrucibleWDS Server on WinXP, or Server 2003, the root user will be mapped to the
local user cruciblewds, the local user cruciblewds will need modify permissions for the
image folders.
If using CrucibleWDS Server on Server 2008 or 2012, the root user will be mapped to
anonymous logon, it will need modify permissions for the images folders.
If using CrucibleWDS on FreeNAS, the root user will be mapped to www, www will need
modify access to the image folders
If using CrucibleWDS on Linux, the root user will be mapped to root.
3. If you are using SMB or SMB+HTTP, your client will connect as the username and password that
you specify in the CrucibleWDS web admin. That user will need read/write permissions. By
default is setup to use the
local user cruciblewds that is created during install(Windows Only). It is
highly recommended only to use a local username for this, not domain credentials.
4. If you are using UDP+HTTP, only the web server needs permission to the image folders.
4.14.2 Alternate Storage Location On Local Server
This section will cover changing where your images are stored on the local server from the
default setup location. This specifically refers to Windows installs only. The Linux install
should be self explanatory
since the process is a manual install anyway. The default
location for images on Windows is c:\inetpub\wwwroot\cruciblewds\images and
c:\inetpub\wwwroot\cruciblewds\images_hold. The following commands are used to
create
the NFS shares during install, you can use these as an example to recreate them
elsewhere.
Windows XP
C:\sfu\common\nfsshare images=C:\inetpub\wwwroot\cruciblewds\images -o ro root
C:\sfu\common\nfsshare images_hold=C:\inetpub\wwwroot\cruciblewds\images_hold -o rw
root
cscript c:\cruciblewdstmp\installer\global\xcacls.vbs
C:\inetpub\wwwroot\cruciblewds\images /T /G cruciblewds:F /E /F
cscript c:\cruciblewdstmp\installer\global\xcacls.vbs
C:\inetpub\wwwroot\cruciblewds\images_hold /T /G cruciblewds:F /E /F
Server 2003
C:\windows\msnfs\nfsshare images=C:\inetpub\wwwroot\cruciblewds\images -o ro root
C:\windows\msnfs\nfsshare images_hold=C:\inetpub\wwwroot\cruciblewds\images_hold -o
rw root
cscript c:\cruciblewdstmp\installer\global\xcacls.vbs
C:\inetpub\wwwroot\cruciblewds\images /T /G cruciblewds:F /E /F
cscript c:\cruciblewdstmp\installer\global\xcacls.vbs
C:\inetpub\wwwroot\cruciblewds\images_hold /T /G cruciblewds:F /E /F
Server 2008 and Server 2012
C:\windows\system32\nfsshare images=C:\inetpub\wwwroot\cruciblewds\images -o
anon=yes anonuid=0 anongid=0 ro root
C:\windows\system32\nfsshare images_hold=C:\inetpub\wwwroot\cruciblewds\images_hold
-o anon=yes anonuid=0 anongid=0 rw root
icacls c:\inetpub\wwwroot\cruciblewds\images /T /C /grant Everyone:(OI)(CI)F
icacls c:\inetpub\wwwroot\cruciblewds\images_hold /T /C /grant Everyone:(OI)(CI)F
Finally, in the Web Admin you must update your Image Store Path, Image Hold Path, and if
you changed your share names then update NFS Deploy Path and NFS Upoad Path.
Windows 7 and Windows 8
Windows 7 and 8 do not have an nfs server option, so instead an SMB share is created
during install. This may become the default for all OS's if testing goes well. The shares are
created with the following commands:
net share images=C:\inetpub\wwwroot\cruciblewds\images /grant:cruciblewds,FULL
icacls C:\inetpub\wwwroot\cruciblewds\images /T /C /grant cruciblewds:(OI)(CI)F
Finally, in the Web Admin you must update your Image Store Path, Image Hold Path, SMB
Path, SMB Username, and SMB Password
4.14.3 Alternate Storage Location On Remote Server
It is possible to store your images on a separate storage server, such as a NAS,SAN, Linux
File Server, Windows File Server, etc. This guide
will give you some pointers on how to set
this up.
Here are three options for setting the storage to another server
I. Alternate NFS Server
When using an alternate NFS Server, the CrucibleWDS server must be able to mount the
nfs shares. It is necessary for creating, deleting, and moving images. Your clients must
also be able to directly
connect to the nfs server. If you are already running an nfs server
on your CrucibleWDS server, you must first disable the share/exports for /images and
/images_hold
The following steps assume a Windows / Linux Based NFS Server
Begin by making an images folder on your NAS
Inside the images folder, create two more folders named store and hold
Next create 3 NFS Shares
The root images folder should have rw permissions and only be accessible by the ip of you
CrucibleWDS Server
The images/store folder should have ro permission and be accessible to everyone
The images/hold folder should have rw permissions and be accessible to everyone
Set permissions so that clients connecting as root will have access and IIS/Apache from
CrucibleWDS Server has access
Mount your images share to /images on your CrucibleWDS Server
In The CrucibleWDS WebUI, change the following Admin Settings
Change Image Store Path To /images/store/
Change Image Hold Path To /images/hold
Change NFS Upload path to your NFS share of your hold directory
Change NFS Deploy Path to your NFS share of your store directory
Your export file should look something like this now
/images
/images/hold
/images/store
192.168.56.10(rw,sync,no_wdelay,no_root_squash,insecure)
*(rw,sync,no_wdelay,no_root_squash,insecure)
*(ro,sync,no_wdelay,no_root_squash,insecure)
The following steps assume BSD / FreeNAS Based NFS Server
If you are using an NFS Server on a BSD OS. You have a limitation. It is not possible to
export multiple shares on the same file system
with different permissions. Or at least I
have never gotten it work. If you know of a solution please let me know. This means all of
the shares must be rw
Begin by making an images folder on your NAS
Inside the images folder, create two more folders named store and hold
Share the images folder with rw permissions to everyone and allow mounting of sub folders
Set permissions so that clients connecting as root will have access and IIS/Apache from
CrucibleWDS Server has access
Mount your images share to /images on your CrucibleWDS Server
In The CrucibleWDS WebUI, change the following Admin Settings:
Change Image Store Path To /images/store/
Change Image Hold Path To /images/hold
Change NFS Upload path to your NFS share of your hold directory
Change NFS Deploy Path to your NFS share of your store directory
II. Alternate SMB Server
When using an alternate SMB Server, the CrucibleWDS server must be able to mount the
SMB shares. It is necessary for creating, deleting, and moving images. Your clients must
also be able to directly
connect to the SMB server.
Begin by making an images folder somewhere on your SMB Server
Inside the images folder, create two more folders named store and hold
Next create 2 SMB Shares
Share 1. The root images folder. It will need rw permissions from your CrucibleWDS Server
Share 2. The images/store folder. It will need rw permissions from your clients(username and
pass set inside CrucibeWDS Web Admin)
The images/hold folder will not be used but if you've been reading closely then you know that it
still must exist
Mount your root images share(Share 1) to a folder on your CrucibleWDS Server
In The CrucibleWDS WebUI, change the following Admin Settings
Change Image Store Path To the folder you mounted/store
Change Image Hold Path To /the folder you mounted/hold
Change SMB Path to Share 2
Change SMB Username and SMB Password
III. iSCSI
This option continues to use the NFS Server on your CrucibleWDS server but stores the
images on your NAS / SAN
Create an iSCSI share on your NAS
Mount it to /images on your CrucibleWDS Server
Create store and hold directories inside of /images
Modify your exports / nfs shares to reflect the new paths
In The CrucibleWDS WebUI, change the following Admin Settings:
Change Image Store Path To /images/store/
Change Image Hold Path To /images/hold
Change NFS Upload path to your NFS share of your hold directory
Change NFS Deploy Path to your NFS share of your store directory
Previous
4.13 Create A Custom Kernel
TOC
Next
4.15 Security Permissions
Previous
Chapter 4. Additional Help Topics
CrucibleWDS 2.3.3
Next
4.15 Security Permissions
This section will explain all of the minimum permissions required for CrucibleWDS to run.
When installed on Windows or if you followed any of the documentation
to install on Linux
or FreeNAS, the default permissions are higher than necessary. After you have confirmed
that your system is running properly you should revisit
this section and scale back the
permissions as necessary.
Windows
All of the Windows permissions should be set recursively. In the following section you could
replace instances of IIS_IUSRS to IIS APPPOOL\DefaultAppPool for even tighter
security. By default IIS_IUSRS contains all of the application pools for IIS. The default
installation for CrucibleWDS only uses the DefaultAppPool, unless you have changed it.
c:\inetpub\wwwroot\cruciblewds\web
The local users group requires read and execute
This enables any user of web interface to view the pages.
c:\inetpub\wwwroot\cruciblewds\web\data
IIS_IUSRS requires modify
This allows IIS to create exception logs, move kernels, upload csv files, etc.
c:\inetpub\wwwroot\cruciblewds\web\data\dbbackup
NETWORK SERVICE requires write
This allows export database function and give postgresql permission to save it here
c:\inetpub\wwwroot\cruciblewds\tftpboot
SYSTEM requires read
This allows the tftp boot files to read by the machines that are booting
IIS_IUSRS requires modify
This allows IIS to create modify and delete the pxe boot files
The permissions for your images folders vary depending on your Image Transfer Mode as
well as Windows Version
c:\inetpub\wwwroot\cruciblewds\images
c:\inetpub\wwwroot\cruciblewds\images_hold
nfs | nfs+http
Windows XP, Server 2003
IIS_IUSRS requires modify
This allows IIS to create, move, and delete image folders
cruciblewds requires modify
The linux root user will mapped to this user when creating or uploading files using nfs and will
need modify permissions to create the image files.
Windows 7, 8, Server 2008, 2012
IIS_IUSRS requires modify
This allows IIS to create, move, and delete image folders
ANONYMOUS LOGON requires modify
The linux root user will mapped to this user when creating or uploading files using nfs and will
need modify permissions to create the image files. The ANONYMOUS LOGON
user can be
changed to a different user if you want, I will most likely change it back to the local user
cruciblewds starting in version 2.3.3
smb | smb+http
IIS_IUSRS requires modify
This allows IIS to create, move, and delete image folders
cruciblewds - Or the user you specified for SMB Username requires modify
The SMB share will connect as this user, therefore the user will need the ability to create files
Linux
Note that some folder locations will be slightly different depending on your distro
/var/www/cruciblewds
All users require rx
This enables any user of web interface to view the pages.
/var/www/cruciblewds/data/
Apache requires rwx
This allows Apache to create exception logs, move kernels, upload csv files, etc.
/var/www/cruciblewds/dbbackup
Postgresql requires rwx
This allows export database function and gives postgresql permission to save it here
/tftpboot
All users require read
This allows the tftp boot files to read by the machines that are booting
Apache requires rwx
This allows Apache to create modify and delete the pxe boot files
Note: pxeboot files are always created with the apache user and group with 644 permissions
The permissions for your images folders vary depending on your Image Transfer Mode
/images
/images_hold
nfs | nfs+http
Apache requires rwx
Note: An when an image is created from the WebUI, the folder is always create as the apache
user and group with 770 permissions.
This allows Apache to create, move, and delete image folders
The root user will be used when creating or uploading files using nfs and will create files with
permission 644
smb | smb+http
Apache requires rwx
Note: An when an image is created from the WebUI, the folder is always create as the apache
user and group with 770 permissions.
This allows Apache to create, move, and delete image folders
You will also need rwx for the user of your SMB share
To enable access for your SMB user you could either add them to the apache group or do
something like this setfacl -Rm u:username:rwx,d:u:username:rwx /images
FreeNAS / BSD
Most of the permissions for FreeNAS / BSD are the same as Linux but with some minor
changes for the image locations.
If you followed my installation guide then you will notice that when setting up the NFS share
we mapped all users to www. This simply means that when the client
connects over nfs it
will be mapped as www and will require rwx permissions for the images folders for that
user when uploading / deploying images. If you decide to use an SMB share instead of
NFS the easiest way to give access to the user is to add it to the www group. If you
followed my guide the images folders should have been setup for www:www access.
Previous
4.14 Storage
TOC
Next
4.16. CWDS Proxy DHCP
Previous
Chapter 4. Additional Help Topics
CrucibleWDS 2.3.3
Next
4.16 CWDS Proxy DHCP
This section has been divided into 3 parts. The preface will explain what Proxy DHCP is,
network considerations, and limitations. The second section
will explain how to install
CWDS Proxy DHCP, the last section will explain how to integrate CWDS Proxy DHCP with
CrucibleWDS.
I. Preface
I created this small service because of the lack of Proxy DHCP servers for Windows. There
are a couple in existence but they either didn't operate in a way that was helpful to
CrucibleWDS,
weren't free, or weren't open source.
CWDS Proxy DHCP behaves in a similar manner to a traditional DHCP server except for
two things. First, CWDS Proxy DHCP does not hand out ip addresses. It only sends nextserver(option 66) and bootfile(option 67) to client requests.
Second, it only responds to
PXE Boot requests. Since this service was created specifically for PXE requests it
provides the following benefits.
1. Allows a mix of bios and efi clients to pxe boot simultaneously
2. Allows individual clients to use specific tftp servers and / or specfiic boot file names.
3. Does not require dhcp options to be set on the dhcp server
CWDS Proxy can be installed on any Windows machine in your environment. It can be on
the same server as your dhcp server, or a different one. It can also be on the same server
as CrucibleWDS or a different one. Setup varies for each scenario.
Operation When Installed On A Different Server Than Your DHCP
Traditionally when a client requests an ip address, it will send out a discover broadcast to
port 67 asking for a dhcp offer. Your dhcp server will respond with the ip address among
other things.
The CWDS Proxy Server will also be listening on port 67 but on another
server and will also send out an offer, but only if it is a PXE boot. The offer will only include
the next-server ip address and option 60. Next-server will be set
to the ip address of the
interface you bound it to. Option 60 will be set to PXEClient. Once the client receives this
offer it will realize that option 60 has been set to PXEClient. This instructs the client
to
send a request to the next-server on port 4011. In our case we set the next-server to be
the CWDS Proxy DHCP Server which is also listening on port 4011. It will then send an
acknowledgement to the client
with the ip address of your tftp server and boot file name
that is set in the CWDS Proxy DHCP config.ini.
Operation When Installed On Same Server as DHCP
If CWDS Proxy DHCP is on the same server as your DHCP server, it cannot be bound to
port 67 because it is already taken. Only port 4011 will be used. Because of this you must
set option
60 to PXEClient (case sensitive) on your dhcp server. Since CWDS Proxy Dhcp
cannot listen for discover requests on port 67 it will not be able to set option 60 for you.
You must manually
set it on your DHCP server. It will then send the appropriate tftp server
ip and boot file name based on your config.ini settings.
Network Considerations
CWDS Proxy DHCP follows the same rules as a traditional DHCP server in the sense of
broadcast domains. CWDS Proxy DHCP will only be visible to clients within the same
subnet or vlan.
If you need to access it from other segments you must add an ip helper to
your switch / router to allow the broadcasts to travel across the broadcast domain. You will
end with two ip helpers, one for your DHCP server and one for the CWDS Proxy DHCP
server.
Limitations
CWDS Proxy DHCP will not override options that are already set by your DHCP server. If
you have already set option 60, 66 or 67, you must remove them before CWDS Proxy
DHCP will work.
In addition to this, some DHCP servers automatically set the next-server
to be themselves even if you have not set it. These will not work with CWDS Proxy DHCP
because options cannot
be overridden.
II. CWDS Proxy DHCP Service Usage
CWDS Proxy DHCP is a separate program from CrucibleWDS. It is also open source. Feel
free to use it in any manner you see fit.
Installation
CWDS Proxy DHCP can be installed as a service or run in console mode from a cmd
prompt. It requires .NET 4.0 or newer to run.
CrucibleWDS ProxyDHCP is already included
with CrucibleWDS 2.3.3. Located at
c:\inetpub\wwwroot\cruciblewds\CWDS_ProxyDhcp. You can also download the latest
version here
Ensure ports 67 and 4011 are open
Modify config.ini to your liking. Directions are in config.ini or see next section
Run install.bat as administrator to install
Start the service
Or run CWDS_ProxyDHCP.exe --console --debug from a cmd prompt to run in console mode
Config and ACL Files
The service must be restarted when any of the following files are changed.
config.ini
interface: The ip address of the nic you want to bind to. Only 1 is supported. If left blank it
will bind to the first active interface that is found.
next-server: The ip address of the tftp server you want to connect to. If left blank the
interace address will be used.
listen-discover: Listen for dhcp discover requests on port 67. Must be false if a dhcp server
is running on the same server. You must set option 60 on your dhcp server to PXEClient
when false. Must be true if dhcp service is running on a different server. Option 60 should
not be set.
allow-all-mac: When true, responds to all PXEBoot request from any mac address. When
false, you must use the allow file to specify mac addresses
bios-bootfile: the boot file for legacy bios clients
efi32-bootfile: the boot file for efi 32 bit clients
efi64-bootfile: the boot file for efi 64 bit clients
allow
This file contains a list of allowed mac addresses for CrucibleWDS ProxyDHCP This file is
ignored unless allow-all-mac is set to false in the config.ini.
This file expects one mac per line in the format of 000000000000 or 00:00:00:00:00:00 or
00-00-00-00-00-00-00
deny
This file contains a list of denied mac addresses for CrucibleWDS ProxyDHCP
The denied list always overrides the allow list
This file expects one mac per line in the format of 000000000000 or 00:00:00:00:00:00 or
00-00-00-00-00-00-00
reservations
This file contains a list of mac address reservations for CrucibleWDS ProxyDHCP. This can
be used send specific clients to specific tftp servers or boot files.
This file expects one reservation per line in the format of mac,next-server,bootfile
ex: 00:11:22:33:44:55,192.168.56.1,proxy/bios/pxelinux.0
III. Integration With CrucibleWDS
Integrating with CrucibleWDS is very simple. Ensure you have read section I and
II above to understand how it works. The tftpboot directory structure is already
setup to allow proxy dhcp, and the config.ini file already has the boot files set
correctly.
You just need to do the following:
Set the next-server to your CrucibleWDS server ip in the config.ini
Start the CWDS Proxy DHCP server in console mode until you verify everything is working. Then
use service mode.
In the CrucibleWDS Admin view in the WebUI. Set Using proxy dhcp to yes. Then create a new
default boot menu.
Previous
4.15 Security Permissions
TOC
Next
5. Troubleshooting
Previous
Chapter 5. Troubleshooting
CrucibleWDS 2.3.3
Next
Chapter 5. Troubleshooting
5.1 Multicast Trouble
5.2 PXE/TFTP Trouble
5.1 Multicast Trouble
Before troubleshooting a multicast it is helpful to try and understand what is actually happening. Attached is a sample of Wireshark
capture of a successful CrucibleWDS multicast. In this example there is a CrucibleWDS Server (192.168.56.1) and two hosts (
192.168.56.7 , 192.168.56.11 ).
When a multicast session is started it advertises itself to all hosts listening on the given port as defined in the global settings. This is
always advertised to the multicast address of 224.0.0.1 The default port range is from 9000 to 10000 and every session will increment
by 2 ( every session uses 2 ports ) until it reaches 10000 and starts again at 9000. This example was the first session on the server so
the source port is 9001 and the destination is 9000. We can see this on line 1 of the packet capture. So what is the server advertising? It
is saying " I have created a multicast group 232.168.56.1 , who wants to join? ". The multicast group is always the last 3 octets of your
CrucibleWDS Server IP preceded by 232. The multicast group address is where the data transfer actually takes place. Now the first host
boots up ( 192.168.56.7 ) and listens on port 9000 and sees the advertisement on 224.0.0.1. It responds to 224.0.0.22 via the IGMP
protocol and says "I would like to join the group" this is seen on line 6 of the capture. The next host ( 192.168.56.11 ) does the same as
seen on line 12. The data transfer then begins as seen on line 16. Again the address that is used is 232.168.56.1, the advertising
multicast address of 224.0.0.1 is no longer used for anything. After the transfer is complete the hosts will then leave the group via IGMP
protocol.
From this brief explanation lets examine what configuration changes may be needed for a switch/router/firewall.
Ports 9000-1000 must be opened and not be in use by any other programs
The program udp-sender must be allowed to bypass the firewall for both incoming and outgoing traffic
The address 224.0.0.1 must be allowed and not in use
The address 232.168.56.1 must be allowed and not in use
The IGMP protocol must be enabled
If multicasting across subnets, multicast forwarding must be enabled
IGMP Snooping should be enabled to get the best performance from the switch. This ensures that the multicast data is only sent to the hosts asking
for it.
Problem 1 - Multicast Task Fails To Start From WebUI
Login To WebUI
Select Admin
Select Logs
Select Multicast.log from the dropdown
Listed in the log is the exact command that is ran for the multicast. Copy and paste into a cmd prompt or terminal. It should give you some insight as
to why the task won't start
Problem 2 - Multicast Task Starts But Clients Do Not Connect
The best way to test Multicasting is on an isolated network with a simple unmanaged switch, as it minimizes the chance of interference
from firewalls or incorrect network settings. When you have it working there, then move on to your existing infrastructure.
For debug purposes you should
Completely disable the firewall on your CrucibleWDS Server.
Run a live packet capture on your CrucibleWDS Server.
These steps were written for a Windows Server but can easily be adapted for Linux.
Test 1
On Your Server
Open a Command prompt
echo "Testing CrucibleWDS Multicast" | C:\inetpub\wwwroot\cruciblewds\web\data\apps\udp-sender --portbase 9000 --ttl 1
It should respond with Broadcasting control to 192.168.56.255 with the address being the broadcast address of your subnet.
If you have more than one NIC verify the correct one is being used
On A Host ( This host should be on the same subnet as your server - but not required)
Boot to the client console
udp-receiver --portbase 9000
Your server should show a new connection New connection from 192.168.56.7 (#0) 00000009
Now press any key to start the transfer
You should see Testing CrucibleWDS Multicast appear in the client console
If you do - Congrats multicast works with hosts in the same subnet as your server - time to try Test 2
If you don't - Revisit the multicast procedure above to pinpoint where things are going wrong, firewall, switch config, etc.
Test 2
On Your Server
Open a Command prompt
echo "Testing CrucibleWDS Multicast" | C:\inetpub\wwwroot\cruciblewds\web\data\apps\udp-sender --portbase 9000 --ttl 32
It should respond with Broadcasting control to 224.0.0.1 with the address being the multicast address.
If you have more than one NIC verify the correct one is being used
On Two Hosts ( These hosts should be on different subnets if possible - but not required )
Boot to the client console on each host
udp-receiver --portbase 9000
Your server should show a new connection from host 1 New connection from 192.168.56.7 (#0) 00000009
Your server should show a new connection from host 2 New connection from 192.168.56.11 (#1) 00000009
Now press any key to start the transfer
You should see Testing CrucibleWDS Multicast appear simultaneously in both client consoles
If you do - Congrats multicast works with multiple hosts in different subnets. You should not have problems when Imaging using Multicast.
If you don't but Test 1 was successful, most likely your network firewalls or switches need some configuration
Problem 3 - Multicast Is Slow Or Choppy
This is the most difficult problem to resolve. Here is a list of some possible culprits
Switch not configured properly - IGMP Snooping
Switch cannot handle the transfer
low end switch simply doesn't handle multicasting very well
Bad NIC
Bad Patch Cable
Incompatible Kernel
1 hosts connects at 100Mb while the rest connect at 1000Mb - effectively slowing the entire session
Extra hosts connected to the switch but not part of the session
Incorrect blocksize set in the CrucibleWDS global settings - Remember there are 58 bytes of overhead added to whatever you have set. You should
set to the best frame size for your equipment to minimize fragmenting
Faulty host - bad hd, bad ram
And probably more ....
5.2 PXE / TFTP Trouble
This guide speaks specifically to Windows installs, but the principals can be applied to other OS's
I. Verify All Boot Files Exist
Navigate to C:\inetpub\wwwroot\cruciblewds\tftpboot
Verify that pxeboot.0 and pxelinux.cfg\default exist
II. Verify The TFTP Service Is Running
III. Perform A TFTP Transfer Test
Navigate to C:\inetpub\wwwroot\cruciblewds\Tftpd32
Open tftpd32_gui.exe
Select the Log Viewer Tab - Keep it open for useful info
Download This Simple TFTP Client
Open a cmd prompt and cd to the location of your downloaded TFTP Client
Run tftp.exe yourserverip get pxeboot.0 Ex: tftp.exe 192.168.56.1 get pxeboot.0
It should respond with File pxeboot.0 was transferred successfully
The tftp client test should have been run on your server. If it was successful you should also run it from
another pc in your network to verify no
firewalls or network issues are blocking the transfer.
IV. Everything Checks Out But Clients Still Cannot PXE Boot
Verify your DHCP options are set correctly
Verify no other DHCP scopes are trying to set the same DHCP options that could override your settings
Verify no other DHCP server is serving up requests before yours
Try a different model of computer. Some machines simply refuse to PXE boot(not following standards I guess, you will need to use the client iso for
these)
Disable The TFTP Anticipation Window - Some clients don't support this
Navigate to C:\inetpub\wwwroot\cruciblewds\Tftpd32
Open tftpd32_gui.exe
Select Settings
Select the TFTP tab
Uncheck Use anticipation window
Restart TFTP Service
Previous
4.16 CWDS Proxy DHCP
TOC
Next
6. Known Bugs
Previous
Chapter 6. Known Bugs
CrucibleWDS 2.3.3
Next
Chapter 6. Known Bugs
There are currently no known bugs with CrucibleWDS 2.3.3
Previous
5. Troubleshooting
TOC
Next
7. Limitations
Previous
Chapter 7. Limitations
CrucibleWDS 2.3.3
Next
Chapter 7. Limitations
Raid
Raid is not supported. You will most likely corrupt your data if you attempt to upload an
image with a system using Raid.
Multicasting
Multicast only deploys to the first hard drive. Additional drives will be skipped.
Previous
6. Bugs
TOC
Next
8. Forum Guidelines
Previous
Chapter 8. Forum Guidelines
CrucibleWDS 2.3.3
Next
Chapter 8. Forum Guidelines (Please
Read)
Please adhere to the following rules when using the forums:
The more information you give the better I can assist you. For example, a post that says
"Not Working" is not very helpful.
It is the kind of post that drives a developer mad, and is
grounds for simply ignoring the post, but I will probably just redirect you back to this page. I
have
put a lot of my personal time into this project and the least you could do is put 5
minutes into a well constructed forum post. The following information
is helpful for every
new topic:
Clearly state the problem
CrucibleWDS Version
Server Version (Server 2012, Ubuntu 14.04, etc)
Client Boot Method
Client OS
Have you tried to fix the issue yourself, if so what did you do?
Have you made any changes to CrucibleWDS, or is it an OOB Install?
Attach any relevant logs - See below Gathering Logs
Most importantly:
Be kind, be respectful. This will NOT become a forum / Wordpress site like so many others, where
everyone fights or one person bashes another. Everyone
has different knowledge levels and
everyone learns differently. What is apparent to someone may not be to someone else, myself
included.
Be patient. I am only one person, I have a job, a family, and a life. I will respond when I have a
few extra minutes. Typically at night when I should be sleeping.
If there is a language barrier let me know in advance.
I don't have all the answers. I can try to help where I can, but you need to be willing to do some
work on your end.
This program is not for everyone, as with life, you will get out what you put in. Read the docs,
watch the videos, browse the forums, do some research.
I am not obligated to help you as you are not obligated to use the software. Do not threaten to
stop using the software. I assure you I don't care. I have no ads for this site
and make no
money(aside from the occasional donation, thank you donors). It costs me my personal money
and time to provide this software, and I do so in the hopes that it helps
a person, company,
school, etc from the rising costs of managing an IT infrastructure.
I hope the forums can become a place that users feel comfortable with. A place to talk
about all aspects of imaging, and collaborate with each other.
If the forums are being
misused, or not adhering to the guidelines set above, I will most likely ban the user or shut
down the forums.
Gathering Logs
You should also attach any relevant logs to your forum post.(Please attach the log file to
the post, DO NOT paste the contents into the post.)
Installation Logs
Installation logs are only available for Windows since it's the only automated installer.
It is located at c:\cruciblewdstmp\CrucibleWDS_Install.log
Imaging Logs
Imaging logs can be accessed from the WebUI.
Select Hosts
Find the Host in question and select View
Select View Host Log
Select Upload or Deploy from the Drop Down Box and select Export
If you are using On Demand mode. The logs are in a different location.
Select Admin
Select Logs
Select ondemand.download or ondemand.upload from the Drop Down Box and select Export
If you are troubleshooting an image upload then attach the upload log. If you are
troubleshooting a deploy you
should attach both the upload log that was used to create the
image as well as the deploy log.
Multicast Logs
Multicast logs are available in the WebUI
Select Admin
Select Logs
Select multicast.log from the Drop Down Box and select Export
Exception Logs
Exception logs are available in the WebUI only if you've had an exception.
Select Admin
Select Logs
Select exceptions.log from the Drop Down Box and select Export
Previous
7. Limitations
TOC
Next
TOC


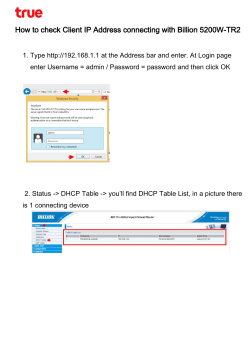


© Copyright 2026