
Sophos Mobile Control Administrator guide
Sophos Mobile Control
Administrator guide
Product version: 5
Document date: May 2015
Contents
1 About Sophos Mobile Control...................................................................................................5
1.1 Sophos Mobile Control on premise and as a Service.................................................5
1.2 About this guide..........................................................................................................6
2 About the Sophos Mobile Control web console........................................................................8
2.1 Prerequisites...............................................................................................................8
2.2 Web console user roles..............................................................................................9
3 Key steps for managing devices with the web console...........................................................10
4 Log in to the Sophos Mobile Control web console.................................................................11
4.1 First login..................................................................................................................11
4.2 Login.........................................................................................................................11
4.3 Change your password.............................................................................................12
4.4 Password recovery...................................................................................................12
4.5 Logout.......................................................................................................................12
5 The web console user interface..............................................................................................13
6 Dashboard..............................................................................................................................14
7 Reports...................................................................................................................................15
8 Tasks.......................................................................................................................................16
8.1 Monitor tasks in the web console..............................................................................16
9 General settings.....................................................................................................................19
9.1 Personal settings......................................................................................................19
9.2 Password policies.....................................................................................................19
9.3 iOS client..................................................................................................................20
9.4 Windows Phone client...............................................................................................20
9.5 Email configuration...................................................................................................20
9.6 Technical contact......................................................................................................21
10 Configure Self Service Portal use for end users...................................................................22
10.1 Create Self Service Portal groups with internal user management........................22
10.2 Configure Self Service Portal settings....................................................................23
10.3 Manage Self Service Portal users..........................................................................25
11 System setup........................................................................................................................30
11.1 Check your licenses................................................................................................30
11.2 Upload Apple Push Notification keystore................................................................30
2
11.3 Set up VPP service token (sToken)........................................................................31
11.4 Configure SCEP for iOS devices............................................................................32
11.5 Configure user setup..............................................................................................33
11.6 Samsung Knox license...........................................................................................33
12 Configure compliance rules..................................................................................................34
12.1 Available compliance settings.................................................................................35
12.2 Assign compliance rules to device groups..............................................................37
12.3 Check devices for compliance................................................................................38
13 Add devices to Sophos Mobile Control.................................................................................39
13.1 Create device groups..............................................................................................39
13.2 Create a new device...............................................................................................40
13.3 Duplicate a device..................................................................................................40
13.4 Import devices........................................................................................................41
14 Samsung Knox support........................................................................................................42
15 Work with profiles.................................................................................................................43
15.1 Create Android device profiles................................................................................43
15.2 Create Android container profiles...........................................................................59
15.3 Create profiles for Apple iOS devices.....................................................................64
15.4 Create Windows Phone 8 device profiles...............................................................92
15.5 Placeholders for profiles.........................................................................................99
15.6 Transfer iOS and Android profiles...........................................................................99
15.7 Assign Windows Phone 8 profiles...........................................................................99
15.8 Download iOS, Android and Windows Phone 8 profiles from the web console....100
16 Work with task bundles.......................................................................................................101
16.1 Create task bundles..............................................................................................101
16.2 Duplicate task bundles..........................................................................................102
16.3 Transfer task bundles to individual devices or to device groups...........................102
17 Work with apps...................................................................................................................104
17.1 Upload apps to the web console ..........................................................................104
17.2 Create links to apps .............................................................................................105
17.3 Manage apps purchased with the Apple Volume Purchase Program...................106
17.4 Install apps............................................................................................................108
17.5 Configure per app VPN and settings for iOS apps...............................................109
17.6 Uninstall apps.......................................................................................................110
18 Distribute corporate documents.........................................................................................111
18.1 Add corporate documents....................................................................................111
3
19 Manage devices.................................................................................................................113
19.1 View devices.........................................................................................................113
19.2 Edit devices..........................................................................................................116
19.3 Decommission devices.........................................................................................118
19.4 Device groups.......................................................................................................118
20 Provision devices through the Sophos Mobile Control web console..................................119
20.1 Enroll individual devices.......................................................................................119
21 Create administrators.........................................................................................................120
22 Send messages to devices.................................................................................................121
22.1 Send messages to individual devices...................................................................121
23 Licenses for managing Sophos Mobile Security and Sophos Secure Workspace.............122
23.1 Activate licenses for on-premise installations.......................................................122
23.2 Activate licenses for Software as a Service installations......................................122
24 Managing Sophos Mobile Security from Sophos Mobile Control.......................................123
24.1 Configure antivirus settings for Sophos Mobile Security......................................123
24.2 Configure web filtering settings for Sophos Mobile Security.................................125
24.3 Define Sophos Mobile Security compliance settings............................................126
24.4 View Sophos Mobile Security scan results...........................................................126
25 Managing Sophos Secure Workspace from Sophos Mobile Control..................................128
25.1 Configure Sophos Secure Workspace..................................................................128
25.2 Reset Sophos Secure Workspace app password.................................................129
25.3 Set document access - lock and unlock Sophos Secure Workspace...................129
26 Technical support................................................................................................................131
27 Legal notices......................................................................................................................132
4
Administrator guide
1 About Sophos Mobile Control
Sophos Mobile Control is a device management solution for mobile devices like smartphones
and tablets. Sophos Mobile Control helps to keep corporate data safe by managing apps and
security settings. It allows configuration and software distribution as well as security settings and
many other device management operations on mobile devices.
The Sophos Mobile Control system consists of a server and a client component which communicate
through data connections and text messages.
The Sophos Mobile Control client is easily installed and managed with over-the air setup and
configuration through the Sophos Mobile Control web console.
With the Sophos Mobile Control Self Service Portal for your users, you can reduce IT efforts by
allowing users to register their own devices and carry out other tasks without having to contact
the helpdesk.
Sophos Mobile Control supports the following mobile device platforms:
■
Android
■
Apple iOS
■
Windows Phone 8
Due to the nature of the different platforms supported features vary. For a matrix of the features
supported for the different platforms, refer to the Sophos Mobile Control technical guide.
1.1 Sophos Mobile Control on premise and as a Service
We offer two delivery models for Sophos Mobile Control:
■
Sophos Mobile Control for on-premise installation
With an on-premise installation, you keep all your data in-house on your own server. It caters
for a large number of users and offers extended device management features, for example:
■
■
Management of access to corporate email
■
Use of your directory to automatically assign devices to your existing groups
■
Customer management with the super administrator customer, see the Sophos Mobile
Control super administrator guide
Sophos Mobile Control as a Service
For our software as a Service version, no hardware is necessary on your part. Sophos Mobile
Control is not installed on site. Sophos Mobile Control as a Service is the ideal choice in case
of restricted IT resources. No resources are required for installing and maintaining Sophos
Mobile Control. As with an on-premise installation, an administrator manages devices through
the web console. With Sophos Mobile Control as a Service you can get smaller groups of
users up and running in no time.
5
Sophos Mobile Control
Differences between on-premise installations and Sophos Mobile Control as a Service are marked
in this guide.
1.2 About this guide
This guide describes how to use the Sophos Mobile Control web console.
For a description of Sophos Mobile Control installation, see the Sophos Mobile Control installation
guide.
Note: The installation procedure described in this guide is not relevant for Sophos Mobile Control
as a Service.
For information on how to use the Sophos Mobile Control web console as a super administrator
for customer management, see the Sophos Mobile Control super administrator guide.
Note: The Sophos Mobile Control super administrator guide is not relevant for Sophos Mobile
Control as a Service. Super administrators are not supported for Sophos Mobile Control as a
Service.
For a description of the key steps for initial configuration, see the Sophos Mobile Control and
Sophos Mobile Control as a Service startup guides.
For information on the Sophos Mobile Control Self Service Portal, see the Sophos Mobile Control
user guide.
1.2.1 Terminology
In this guide, the following terms are used:
Term
Explanation
Device
The mobile device to be managed (for example smartphone or
tablet).
Sophos Mobile Control client
The Sophos Mobile Control client component that is installed on
the device.
End user
The end user of the device.
Web console
The web interface of the server that is used to manage devices.
Customer
The tenant that manages devices.
Enrollment
The process of equipping devices with the Sophos Mobile Control
client.
Note: This process is also called provisioning.
6
Administrator guide
Term
Explanation
Task bundle
A package you can create in the web console to bundle several
tasks for mobile devices in one transaction. You can bundle all
tasks necessary to have a device fully enrolled and running.
Self Service Portal (SSP)
The Sophos Mobile Control web interface that allows end users
to enroll their own devices and carry out other tasks without having
to contact the helpdesk.
Sophos Mobile Security
A security app for Android phones and tablets. You can manage
this app from Sophos Mobile Control, provided that an SMC
Advanced license is available and activated in the Sophos Mobile
Control web console.
SMSec
Abbreviation for Sophos Mobile Security used in the Sophos Mobile
Control web console user interface.
Sophos Secure Workspace
An encryption app for iOS and Android phones and tablets. You
can manage this app from Sophos Mobile Control, provided that
an SMC Advanced license is available and activated in the Sophos
Mobile Control web console.
7
Sophos Mobile Control
2 About the Sophos Mobile Control web
console
The Sophos Mobile Control web console is the central instrument for managing devices with
Sophos Mobile Control. It is the web interface of the server used for device management. With
the web console you can implement a corporate policy for the use of mobile devices and apply it
to the devices registered with Sophos Mobile Control.
Note: Due to the nature of different mobile device operating systems supported features vary.
For a matrix of the features for the different device types, refer to the Sophos Mobile Control
technical guide.
In the Sophos Mobile Control web console you can:
■
Configure the system, for example personal settings or platform-specific settings.
■
Configure compliance rules and define actions to be taken if devices no longer comply with
the rules specified, see Configure compliance rules (page 34).
■
Register devices with Sophos Mobile Control, see Add devices to Sophos Mobile Control (page
39).
■
Provision new devices, see Provision devices through the Sophos Mobile Control web console
(page 119).
■
Install application packages on registered devices, see Work with apps (page 104).
■
Define profiles and security policies for devices, see Work with profiles (page 43).
■
Create task bundles to bundle several tasks for mobile devices and transfer them in one
transaction, Work with task bundles (page 101).
■
Configure settings for the Self Service Portal, see Configure Self Service Portal use for end
users (page 22).
■
Carry out administrative tasks on devices, for example reset the password of devices, lock or
wipe devices if they are lost or stolen, decommission devices, see Manage devices (page 113).
■
Create and view reports, see Dashboard (page 14) and Reports (page 15).
2.1 Prerequisites
The following prerequisites apply for using the Sophos Mobile Control web console:
8
■
You need a computer connected to the internet and equipped with a web browser. For
information on supported browsers and the relevant versions, refer to the Sophos Mobile
Control release notes.
■
A customer (a tenant whose devices are managed in Sophos Mobile Control) needs to be
available in the web console. Customers are created by super administrators. For further
information, see the Sophos Mobile Control super administrator guide.
Administrator guide
Note: For Sophos Mobile Control as a Service, a customer is predefined. Super administrators
are not supported for Sophos Mobile Control as a Service.
■
You need a Sophos Mobile Control user account and the relevant credentials for logging in to
the web console. The credentials consist of customer, user and password. For further
information, see First login (page 11).
2.2 Web console user roles
The users of the web console can have different roles. You can assign these roles when you
create new administrators in the web console, see Create administrators (page 120).
The modules/functions available in the web console depend on the role.
You can assign the following roles:
Role
Description
Administrator
Has the rights to perform all available actions.
Limited Administrator
Reporting
Content admin
Helpdesk
Is allowed to perform all actions required for enrolling
and managing a device, but cannot specify essential
settings (for example modify a client package or a
template).
A reporting administrator can view all objects in the
system, but cannot change them. A typical user is
an auditor or an employee who needs to document
the settings in Sophos Mobile Control.
This role is intended for employees responsible for
uploading, updating or removing documents
distributed via the Documents feature. Usually this
role is assigned to a person outside the IT
department. The permissions are set to limit visibility
and access only the content in the Documents
menu.
This role is intended for support purposes. It has only
limited rights (for example installation of software
packages). This role does not have access to critical
functions, for example defining settings and creating,
deleting or editing devices/device groups, packages
and profiles.
If you require further roles, please contact Sophos Support.
9
Sophos Mobile Control
3 Key steps for managing devices with the
web console
Sophos Mobile Control offers a wide range of Mobile Device Management functions depending
on mobile device types, corporate security policies and specific requirements in your company.
The key steps for managing mobile devices with Sophos Mobile Control are:
■
Configure compliance rules for devices in the web console, Configure compliance rules (page
34).
■
Create device groups, see Create device groups (page 39).
Device groups are used to categorize devices. We recommend that you put devices into
groups. This helps you to manage them efficiently as you can carry out tasks on a group rather
than on individual devices.
■
Register and provision devices, see Add devices to Sophos Mobile Control (page 39) and
Provision devices through the Sophos Mobile Control web console (page 119).
Devices can either be registered and provisioned by administrators through the web console
or by device end users through the Self Service Portal. You can configure settings for the Self
Service Portal and manage Self Service Portal users in the web console.
10
■
Set up profiles and security settings for devices in the web console, see Work with profiles
(page 43).
■
Create task bundles for Self Service Portal configuration, see Work with task bundles (page
101).
■
Configure Self Service Portal use for end users, see Configure Self Service Portal use for end
users (page 22).
■
Apply new or updated profiles and security settings to registered devices.
Administrator guide
4 Log in to the Sophos Mobile Control web
console
4.1 First login
Prerequisite: Before you log in to the Sophos Mobile Control web console for the first time, make
sure that a user account has been created for you in the web console and you have the user
credentials (customer, user and one-time password) for this account. The user account may have
been created by the super administrator or by another administrator user of the web console. For
further information on the super administrator, refer to the Sophos Mobile Control super
administrator guide. For further information on how to create new web console users, see Create
administrators (page 120).
Note: Super administrators are not supported for Sophos Mobile Control as a Service. For further
information on first login for Sophos Mobile Control as a Service, see the Sophos Mobile Control
as a Service startup guide.
1. Open the web console.
The web console login dialog is displayed.
2. Enter your Customer, User name and the one-time Password and click Login.
You are logged in to the Sophos Mobile Control web console and prompted to change your
password.
3. Enter a new password, confirm it and click the Save button.
A message confirms that the changes have been saved. You can now use the new password for
login.
4.2 Login
1. Open the web console.
The web console login dialog is displayed.
2. Enter your Customer, User name and Password and click Login.
You are logged in to the web console. The Dashboard of the customer you are logged in to is
displayed.
11
Sophos Mobile Control
4.3 Change your password
You can change your password any time after you have logged in to the web console:
1. In the web console under SYSTEM, click Setup, then General and select the Change
password tab.
2. Enter your old password, a new one and confirm it.
3. Click the Save button.
4.4 Password recovery
If you have forgotten your password for logging in to the web console, you can reset it to receive
a new password.
1. In the Login dialog of the web console, click Forgot password?
The Reset password dialog is displayed.
2. Enter your Customer and User information and click Reset password.
You receive an email with a link for resetting your password.
3. Click the link.
The Change password dialog is displayed.
4. Enter a new password, confirm it and click Change password.
Your password has been changed and you are logged in to the web console.
4.5 Logout
To log out from the web console, click Logout in the header.
12
Administrator guide
5 The web console user interface
The user interface of Sophos Mobile Control is divided into a header, a main menu, and the main
frame. The latter displays the content of the currently active menu.
■
Header
In the header, you can find:
■
■
The user name of the currently logged in user and the customer.
■
The Help button that displays online help.
■
The Logout button that logs off the currently logged in user.
Main menu
The main menu on the left-hand side lets you access all functions of Sophos Mobile Control.
Note: The functions available in the web console depend on the role of the logged in user. See
Web console user roles (page 9). For super administrators, the web console shows a specific
view for the super administrator customer. For further information, see the Sophos Mobile Control
super administrator guide. Super administrators are not supported for Sophos Mobile Control as
a Service.
13
Sophos Mobile Control
6 Dashboard
The customizable Dashboard is the regular start page of Sophos Mobile Control and provides
access to the most important information at a quick glance. It consists of several widgets providing
information about:
■
Devices, all or per group
■
Compliance status of your devices sorted by platform
■
Managed status by platform or for all devices
■
The SSP registration status
■
The platform versions in use
Click Add widget to adjust the displayed information to your needs.
Click Restore default layout to display the Sophos Mobile Control default Dashboard view.
Note: The super administrator Dashboard lists all customers.
14
Administrator guide
7 Reports
In the web console, under Reports, the following reports are available for super administrators
and administrators:
■
■
■
Device reports
■
Devices
■
Devices per user
■
Number of devices by OS version
■
Devices enrolled in last 7 days
■
Devices not synchronized in last 7 days
■
Devices checked out in last 7 days
■
Devices wiped in last 7 days
App reports
■
Apps on all platforms
■
Number of apps on all platforms
■
Apps on Android
■
Apps on iOS
Compliance reports
■
Compliance violations
■
Number of compliance violations
Click on a report to export the information to a Microsoft Excel file.
15
Sophos Mobile Control
8 Tasks
The task view gives you an overview of all tasks you created and started and displays their current
state.
You can monitor all your tasks and intervene in case of problems. For example, you can delete
a task that obviously cannot be completed but blocks the device.
To delete a task, click the Delete icon next to it.
You can filter tasks according to Type and State and sort them by Device name, Package name,
creator and scheduled date.
8.1 Monitor tasks in the web console
You can monitor all existing tasks for devices in the web console:
■
The Tasks view shows all unfinished and failed tasks as well as the finished tasks of the last
few days. The Task view is refreshed automatically, so you can watch the states of the tasks
evolve.
■
The Task details shows general information about a task from the Tasks view or the Task
archive.
■
The Task archive shows all tasks.
8.1.1 View unfinished, failed and latest finished tasks
1. In the Task view, the State column shows the task status, for example, Completely failed.
2. In the Refresh interval (in sec.) field, you can select how often the Task view is to be
refreshed.
3. To view further details about a task, click the Show magnifier icon next to the required task.
The Task details view is displayed. Besides general information on the task (for example,
Device, Package name and creator) it shows the states a specific task went through, including
timestamps and error codes. If there are commands to be executed by the device, an additional
Details button is available in the Task details view.
4. If available, click the Details button to view the command to be executed by the device.
The Commands view is displayed, showing the relevant commands. The commands sent to
the device are part of the task. They are executed by the client. Results indicating the success
or failure are transferred back to the server. If there was no error, the error code is “0”. If a
command has failed, the error code is displayed. In most cases there is also a description of
what may have caused the command to fail.
5. To return to the Task details view, click the Back button.
16
Administrator guide
6. To manually retry failed tasks, click the Execute now button.
Note: This button is only available for failed tasks. You can only retry tasks that have not
failed completely.
8.1.2 View task archive
1. In the Task view click the Task archive button.
The Task archive view is displayed. It shows all finished and failed tasks in the system.
2. In this view, you can:
■
■
■
Click the Reload button to refresh the Task archive view.
Delete a task from the archive by clicking the Delete icon next to the relevant task.
Select several tasks and click Delete selected to delete them from the archive.
8.1.3 Task states
The following table provides an overview of the task states shown in the Task view and the Task
archive.
Color icon
State
Description
Accepted
The task has been created.
Retry
The task will be retried later.
Started
The task has been started.
In progress
The execution of the task is being prepared.
Sending notification
The client is being notified.
Waiting for delivery
The server is waiting for a confirmation of the notification
by the client.
Notified
The client has received the notification.
Exported
The client has received the package and/or the commands.
Result evaluation started
The client has answered and the evaluation of the result
has been started.
Result incomplete
The result evaluation showed that not all commands’ results
have been received by now.
17
Sophos Mobile Control
Color icon
State
Description
Successful
The package has been installed or the commands have
been successfully executed.
Note: For the initial provisioning of the Sophos Mobile
Control client the task must finish with the state “installed”.
18
Installed
The Sophos Mobile Control client has been installed
successfully. The device is provisioned now.
Result evaluation failed
The result evaluation could not be executed.
Task partly failed
Not all commands of the task could be executed
successfully.
Delayed
The task will be restarted later.
Failed (retry queued)
The task has failed and will be retried later.
Task failed
The task has failed and no further retries are queued.
Completely failed
The task has failed.
Administrator guide
9 General settings
In the General Settings view you can configure some basic settings of Sophos Mobile Control.
9.1 Personal settings
To use the Sophos Mobile Control web console more efficiently, you can customize the user
interface to show only the platforms you work with.
1. In the web console, under SYSTEM, click Setup and then General.
The General settings view is displayed.
2. Go to the Personal tab.
3. Configure the following settings:
a) In the Language field, select the language for the Sophos Mobile Control web console.
b) In the Timezone field, select the timezone.
c) In the Lines per page in tables field, select the maximum number of table lines you want
to display per page in the web console. You can choose between 20 and 100 lines.
d) Select Show Extended device details to show all available information about the device.
The tabs Custom properties and Internal properties will be added to the Show device
view.
e) Under Activated platforms, select the platforms you want to use in the web console:
Android, iOS and Windows Phone are supported. If you select specific platforms, you
can only use the selected platforms with Sophos Mobile Control. All other platforms are
hidden. In addition, all modules and functions that are not required for a specific platform
are hidden.
Note: The list of available platforms depends on your platform settings from the super
administrator configuration. For further information, see the Sophos Mobile Control super
administrator guide.
The menu is customized according to your settings. Unnecessary items are hidden.
4. Click the Save button.
9.2 Password policies
To enforce password security, configure password policies for users of the Sophos Mobile Control
web console and the Self Service Portal.
Note: If you use internal user management, the password policies apply to web console users
and Self Service Portal users. If you use external user management, these password policies
only apply to web console users. In this guide, internal Self Service Portal user management is
19
Sophos Mobile Control
described as an example. For further information on external user management, see the Sophos
Mobile Control super administrator guide.
1. In the web console, under SYSTEM, click Setup and then General.
The General settings view is displayed.
2. Go to the Password policies tab.
3. Under Password policies for SMC web console user - Rules, define the required minimum
values for the password.
4. Under Password policies for SMC web console user - Settings, define the following settings:
■
■
■
Password change interval (days): You can enter a value from 0 (no password change
required) to 730 days.
Number of previous passwords which must not be reused: You can select a value
between 1 and 10.
Maximum number of failed login attempts: You can select a value between 1 and 10.
5. Click the Save button.
9.3 iOS client
With Sophos Mobile Control you can locate your devices and display their location at any time.
In previous version devices reported their location at given intervals.
You can configure Sophos Mobile Control to use this legacy location method.
To do so, activate the Force use of legacy location method option.
Note: Enabling this feature will decrease battery life.
9.4 Windows Phone client
For Windows Phone 8.0 devices you can configure the MDM polling interval. Select the interval
from the drop-down list.
Note: Synchronization is only performed in this interval. Synchronization through the server
cannot be triggered. The poll interval applies to Windows Phone 8.0 devices only. Newer devices
are able to receive push notifications and additionally poll every 24 hours by default.
9.5 Email configuration
On the Email configuration tab, you can configure settings for emails sent to users.
Select the language for emails from the drop-down list next to the Default language option and
enter the originator email address in the text field.
20
Administrator guide
9.6 Technical contact
To support users who have questions or problems, you can configure technical contact information.
The information you enter here will be displayed in the Sophos Mobile Control app and in the Self
Service Portal.
1. In the web console, under SYSTEM, click Setup and then General.
The General settings view is displayed.
2. Go to the Technical contact tab.
3. Enter the required information for the technical contact. Under Additional information, you
can enter information for supporting users who have questions or problems.
4. Click the Save button.
21
Sophos Mobile Control
10 Configure Self Service Portal use for end
users
With the Self Service Portal you can reduce IT efforts by allowing end users to register their own
devices and carry out other tasks without having to contact the helpdesk. The use of the Self
Service Portal is supported for the following platforms:
■
Android
■
Apple iOS
■
Windows Phone 8
For further information on the Self Service Portal and how to use it, refer to the Sophos Mobile
Control user guide.
In the web console, you can configure settings for the use of the Self Service Portal, for example,
for which platforms registration through the Self Service Portal should be active or which functions
should be available in the Self Service Portal. You can also manage the users of the Self Service
Portal.
10.1 Create Self Service Portal groups with internal user
management
Self Service Portal configurations are applied to groups of Self Service Portal users. With internal
user management, you can create Self Service Portal groups and assign users to them. For
further information on user management, see Manage Self Service Portal users (page 25).
Note: Internal user management is only available for a customer if it has been activated by the
super administrator. For further information, see the Sophos Mobile Control super administrator
guide. This does not apply to Sophos Mobile Control as a Service. Super administrators are not
supported in Sophos Mobile Control as a Service. For information on how to define the user
management methods for Sophos Mobile Control as a Service, see Configure Self Service Portal
user management for Sophos Mobile Control as a Service (page 26).
To create a Self Service Portal group:
1. In the web console, under MANAGE, click Users.
The Show users view is displayed.
2. Click the Show user groups button.
The Show user groups view is displayed.
3. Click the Create group button.
The Edit group view is displayed.
4. In the Name field, enter a name for the new Self Service Portal user group.
5. Click the Save button.
22
Administrator guide
The new Self Service Portal user group is displayed in the Show user groups view. When you
create new users, you can assign them to the group. When you define Self Service Portal settings,
you can select the group to assign the settings to it.
10.2 Configure Self Service Portal settings
1. In the web console, under SYSTEM, click Setup, and then click Self Service Portal.
The Self Service Portal view is displayed.
2. In the Configuration tab, configure the following settings:
a) In the Maximum number of devices field, select the maximum number of devices a user
can register through the Self Service Portal. By defining a maximum number here, available
licenses will not be exceeded.
b) Under Available functionality, select the functions that should be available for users in
the Self Service Portal. The functions supported vary according to mobile device type
(platform). For a matrix of the features supported for individual device types, refer to the
Sophos Mobile Control technical guide. You can select the following functions:
■
Locate device
With this function users can locate iOS, Android or Windows Phone 8 devices if they
are lost or stolen.
■
Lock device
With this function users can lock their devices if they are lost or stolen.
■
Reconfigure device
With this function users can reconfigure their devices if Sophos Mobile Control has been
removed from the device, but the device is still registered.
■
Show compliance violations
With this function users can view the compliance violations for all devices registered for
them in the Self Service Portal.
■
Refresh data
With this function users can manually synchronize their devices with the Sophos Mobile
Control Server. This is useful, for example, if the device has been switched off for a
longer period of time and therefore has not been synchronized with the server. In this
case, the device may be non-compliant (depending on the compliance settings
configured) and needs to be synchronized with the server to make it compliant again.
■
Reset password
With this function users can reset their unlock screen password. For Android devices,
a new password is set. The device can only be unlocked with the new password. For
iOS, the password is completely deleted. The user has to set a new password within
60 minutes.
■
Wipe device
23
Sophos Mobile Control
With this function users can reset their registered devices to their factory settings if
devices are lost or stolen. All data on the device is deleted.
■
Decommission device
With this function users can decommission devices that they no longer use. This is
useful, for example, if the number of devices users can register through the Self Service
Portal is limited.
■
Delete unmanaged device
With this function users can delete decommissioned devices. This is useful, for example,
to free up licenses.
■
Reset app protection password
With this function users can reset their app protection password on Android devices.
The app password protects defined apps and has to be entered each time users start
these apps. The password will be deleted and they have to set a new one.
■
Reset Sophos Secure Workspace app password
With this function users can reset their Sophos Secure Workspace app password. The
Sophos Secure Workspace app password has to be entered each time users start the
app. The password will be deleted and they have to set a new one.
■
Reconfigure the SMC app
With this function users can reconfigure an already installed Sophos Mobile Control
app.
3. Go to the Agreement tab and configure a mobile policy, disclaimer or agreement text that is
displayed as a first step when end users register their devices. Users have to confirm that they
have read this text to be able to continue.
Simple HTML formatting tags are supported for the text. The text will be displayed in the
relevant browser accordingly.
4. Go to the Post-install text tab and configure a text to be displayed after the automatic
installation steps in the Self Service Portal to give the user guidance for the next required
steps, for example, configuring the server in the iOS app or configuring the Android mail client.
Simple HTML formatting tags are supported for the text. The text will be displayed in the
relevant browser accordingly.
5. Go to the Group settings tab. In this tab, you configure the group settings, for example, the
device groups that SSP-registered devices will be added to and the task bundle that will be
deployed on the devices.
If you use external user management, you can assign phones to groups and profiles based
on external directory group membership.
Note: External user management has to be configured for the relevant customer in customer
management. For information on how to configure external user management for a customer,
refer to the Sophos Mobile Control super administrator guide. This does not apply to Sophos
Mobile Control as a Service. For information on how to define the user management methods
24
Administrator guide
for Sophos Mobile Control as a Service, see Configure Self Service Portal user management
for Sophos Mobile Control as a Service (page 26).
a) Under Group settings, click the Add button.
The Edit group settings view is displayed.
b) Enter a Name for the Self Service Portal configuration group.
c) In the Directory group field, enter the Self Service Portal Group you have defined in the
internal user management or the external user management group with the full LDAP path
or with wildcards. You can use an asterisk (*) as the first, the last or the only sign in this
field to specify several groups. For example: Enter Dev* to specify all group names that
start with "Dev". Enter * to specify all available groups.
d) Select if Agreement and Post-install text should be displayed.
e) Under Enrollment package, select the task bundles to be executed.
Note: You must create the task bundle in the web console first. If you have not created a
task bundle yet, update the Self Service Portal settings afterwards. For further information
on how to create a task bundle, see Work with task bundles (page 101). For further
information on the requirements for a task bundle that is to be used for provisioning through
the Self Service Portal, see the Sophos Mobile Control startup guide or the Sophos Mobile
Control as a Service startup guide.
Note: For Windows Phone 8 you select Profiles under Enrollment package. For Windows
Phone 8 only a profile is necessary to enroll a device. The profile you select here may
already contain all settings for your devices.
f) Under Platform, select the platforms that should be available in the Self Service Portal.
g) Under Add to device group, select the group the device should be added to.
Note: In the web console, a Default device group is available. If you have not defined your
own device groups yet, you can add devices to this group. For further information, see
Create device groups (page 39).
h) Click the Apply button.
6. The Self Service Portal view is displayed. Click the Save button.
Note: As a super administrator, you can also define the default customer for the login of end
users at the Self Service Portal. For further information, refer to the Sophos Mobile Control super
administrator guide. Note that this does not apply to Sophos Mobile Control as a Service. Super
administrators are not supported in Sophos Mobile Control as a Service.
10.3 Manage Self Service Portal users
Sophos Mobile Control offers different methods for managing Self Service Portal users:
■
Internal user management
With internal user management you can create users by adding them manually in the web
console or by importing them in a .csv file.
■
External user management
25
Sophos Mobile Control
With external user management you can assign devices to groups and profiles based on
external directory membership.
Note: The method used is customer-specific and is defined when the customer is created. For
further information on how to define the method and on external user management, see the
Sophos Mobile Control super administrator guide.
This does not apply to Sophos Mobile Control as a Service. Super administrators are not supported
in Sophos Mobile Control as a Service. For information on how to define the user management
methods for Sophos Mobile Control as a Service, see Configure Self Service Portal user
management for Sophos Mobile Control as a Service (page 26).
10.3.1 Configure Self Service Portal user management for Sophos Mobile
Control as a Service
Note: This section only applies to Sophos Mobile Control as a Service. If you use Sophos Mobile
Control as an on-premise installation, the user management for Self Service Portal users is
configured by the super administrator for each customer. For further information, see the Sophos
Mobile Control super administrator guide.
1. In the web console, under SYSTEM, click Setup, and then click System setup.
The System setup view is displayed.
2. Go to the User setup tab. In this tab, select the data source for the Self Service Portal (SSP)
users to be managed by Sophos Mobile Control:
■
■
■
None. No SSP and user-specific profiles available.
Select Internal directory to use internal user management for users of the Sophos Mobile
Control Self Service Portal.
Select External directory to use external user management for users of the Sophos Mobile
Control Self Service Portal.
Click Configure external directory to specify the server details, see Configure external
directory connection for Active Directory for Sophos Mobile Control as a Service (page 26).
3. Click the Save button.
If you have selected Internal directory or External directory, the selected option and the
option None. No SSP and user-specific profiles available are displayed in the User setup
tab. If you want to change your selection afterwards, select None. No SSP and user-specific
profiles available first to make all options available.
Note: The user management configuration cannot be changed as long as there are any
devices linked to the directory. If you try to change the configuration while devices are still
connected, an error message is displayed.
10.3.1.1 Configure external directory connection for Active Directory for Sophos Mobile
Control as a Service
Note: This section only applies to Sophos Mobile Control as a Service. If you use Sophos Mobile
Control as an on-premise installation, the user management for Self Service Portal users is
26
Administrator guide
configured by the super administrator per customer. For further information, see the Sophos
Mobile Control super administrator guide.
1. In the web console, under SYSTEM, click Setup and then click System setup and go to the
User setup tab.
2. In the User setup tab, select External LDAP directory to use external user management for
users of the Sophos Mobile Control Self Service Portal.
3. Click Configure external LDAP to specify the server details.
The Server details view is displayed.
4. In this view, enter the following:
a) Select the LDAP type. Sophos Mobile Control supports:
■
Active Directory
■
Domino
■
eDirectory
■
Zimbra
b) In the Primary URL field, enter the URL of the directory server. You can enter the server
IP or the server name. Select SSL to use SSL for the server connection.
c) In the Backup URL field, enter the URL of the backup server. You can enter the server IP
or the server name. Select SSL to use SSL for the server connection.
d) In the User field, enter a user who has reading rights for the directory server. You need to
enter the user with the relevant domain. Supported formats are: <domain>\<user name>
or <user name>@<domain>.<domain code>.
e) In the Password field, enter the password for the user.
Click Next.
The Search base view is displayed.
5. Select the external directory search base. The search base defines where to search for the
user/the group that tries to log in to the Self Service Portal. Click Next.
The Search fields view is displayed.
6. In this step, you define which directory fields are to be used for resolving the placeholders
%_USERNAME_% and %_EMAILADDRESS_% in profiles. Select the required fields from
the User name and Email drop-down lists.
7. Click Next.
The SSP configuration view is displayed.
8. In the SSP group field, enter the name of the group that is to be allowed to log on at the Self
Service Portal. This group has to be defined on the directory server. All members of this group
can access the Self Service Portal. If you do not want to restrict access to one group, enter *
to allow all authenticated directory users access to the Self Service Portal. After you have
entered the group, click the Resolve group button to resolve the group name into a complete
Distinguished Name (DN).
9. Click Apply.
27
Sophos Mobile Control
10. Click the Finish button.
The System setup view is displayed again.
11. Click the Save button to save your changes.
10.3.2 Create Self Service Portal users with internal user management
Prerequisite: Internal user management has been enabled for the customer you are logged in
to. For on-premise installations this is done in customer management by the super administrator.
For further information, see the Sophos Mobile Control super administrator guide.
This does not apply to Sophos Mobile Control as a Service. Super administrators are not supported
in Sophos Mobile Control as a Service. For information on how to define the user management
methods for Sophos Mobile Control as a Service, see Configure Self Service Portal user
management for Sophos Mobile Control as a Service (page 26).
1. In the web console, under MANAGE, click Users.
The Show users view is displayed.
2. Click the Create user button.
The Edit user view is displayed.
3. In the Edit user view, specify the following settings:
a) User name
b) First name
c) Last name
d) Email address
e) Groups (optional)
Click Show, to display all available user groups and select one.
4. Click the Save button.
The new Self Service Portal user is displayed in the Show users view. A welcome email is sent
to the new user.
If you click the blue triangle next to the required user, you can view the user details (Show), Edit
or Delete the user.
Note: If you click on a user name, the Show user view is displayed. This view contains the
Resend welcome mail button to send the welcome mail again if the user did not receive or lost
the initial welcome mail.
10.3.3 Import Self Service Portal users with internal user management
With internal user management, you can add new Self Service Portal users by importing a .csv
file with up to 300 users.
A sample file with the correct column names and column order is available for download from the
import page.
28
Administrator guide
Note: Use a text editor for editing the .csv file. If you use Microsoft Excel, values entered may
not be resolved correctly. Make sure that you save the file with the extension .csv.
Prerequisite: Internal user management has been enabled for the customer you are logged in
to. For further information, see the Sophos Mobile Control super administrator guide.
This does not apply to Sophos Mobile Control as a Service. Super administrators are not supported
in Sophos Mobile Control as a Service. For information on how to define the user management
methods for Sophos Mobile Control as a Service, see Configure Self Service Portal user
management for Sophos Mobile Control as a Service (page 26).
1. In the web console, under MANAGE, click Users.
The Show users view is displayed.
2. Click the Import users button.
The Import users view is displayed.
If you do not have a .csv file with users yet, you can download a sample file now and use it
for creating your import file.
3. Make sure that the Send welcome emails checkbox is selected.
4. Select the .csv file you want to import and click Upload file.
The entries in the.csv file are checked for errors and displayed on the import page.
Note: If there are any errors in the .csv file, it cannot be imported. An error message is
displayed next to the relevant entries. Edit the .csv file accordingly and try again.
5. If all entries are correct, click the Finish button.
The users are imported and displayed in the Show users view.
From the Show users view, you can view the user details, edit them and delete users.
29
Sophos Mobile Control
11 System setup
11.1 Check your licenses
Note: Sophos Mobile Control uses a user-based license scheme. One user license is valid for
all devices assigned to that user. Devices that are not assigned to a user require one license
each.
In the web console, under SYSTEM, click Setup, and then click System setup. On the License
tab, you can view the license information.
■
Number of licenses:
Shows the number of end users that can be managed from the web console.
■
Licenses used:
Shows the number of licenses in use.
■
Valid until:
Shows the license expiry date.
If you have any questions or concerns regarding the license information shown, contact your
Sophos Sales representative.
11.2 Upload Apple Push Notification keystore
To use the built-in Mobile Device Management (MDM) protocol of devices running Apple iOS 4
(or later), Sophos Mobile Control must use Apple Push Notification service (APNs) to trigger iOS
devices.To enable the Apple Push Notification service, you must upload the Apple Push Notification
keystore in the web console. For information on how to obtain your APNs certificate for Sophos
Mobile Control, refer to the Sophos Mobile Control startup guide or the Sophos Mobile Control
as a Service startup guide.
For information on how to renew your APNs certificate, see
http://www.sophos.com/en-us/support/knowledgebase/118926.aspx.
Prerequisite: You have obtained your APNs certificate for Sophos Mobile Control.
1. In the web console, under SYSTEM, click Setup and then System setup, and go to the iOS
APNS tab.
2. Click Upload a file. Browse for the .p12 certificate file you have created and enter your
password. Optionally you can enter your Apple ID for future reference.
After the file has been uploaded successfully, a confirmation message is displayed and the
Topic, Type and Expiry date information of your APNs certificate is shown.
3. Click Save.
30
Administrator guide
11.2.1 Configure destinations for AirPlay mirroring
With Sophos Mobile Control you can remotely trigger AirPlay mirroring between an iOS device
and predefined AirPlay destinations (for example AppleTV).
Note: AirPlay only works for devices within the same network.
You can define destinations for AirPlay mirroring in the web console.
1. In the web console, under SYSTEM, click Setup and then System setup, and go to the iOS
APNS tab.
In the lower part of the iOS APNS tab you can find the AirPlay destinations section.
2. Click the Create AirPlay destination button.
The AirPlay destination view is displayed.
3. Enter the Device name (required) and the MAC address (optional). If necessary, enter the
Password for the AirPlay destination device.
4. Click the Apply button.
The device is shown under AirPlay destinations in the iOS APNS tab of the System setup
view.
5. Click Save.
You can trigger AirPlay mirroring between an iOS device and this destination by using the Request
AirPlay mirroring button from the Actions menu in the Show device or Edit device view for
the relevant device.
11.3 Set up VPP service token (sToken)
To provide licenses for apps purchased by the Apple Volume Purchase Program in Sophos Mobile
Control, you need to set up a VPP service token (sToken) in the web console.
1. In the web console, under SYSTEM, click Setup and then click System setup.
The System setup view is displayed.
2. On the Apple Volume Purchase Program tab, click Upload a file. Browse for the service
token file (.vpptoken), select it and click Open.
Organization and Expiry date are taken from the imported file and entered automatically.
3. Optionally enter your Apple ID and the country code.
4. Click the Save button.
Note: After you have saved your changes, the service token text is no longer displayed in the
text field for security reasons. But the field shows that a service token is in place.
31
Sophos Mobile Control
11.4 Configure SCEP for iOS devices
For iOS devices, you can configure Simple Certificate Enrollment Protocol (SCEP) to provide
certificates. This allows devices to obtain certificates from a Certificate Authority by using SCEP.
You can configure all the settings required to access a Certificate Authority server with SCEP in
the web console.
You can define the settings required for devices in iOS SCEP configurations.
11.4.1 Prerequisites
In order to use the Simple Certificate Enrollment Protocol, the following prerequisites must be
fulfilled:
■
A SCEP-enabled Windows CA exists in the environment.
■
Login credentials for a user who can create a challenge code are available.
■
The Sophos Mobile Control Server has http or https access to the following sites:
■
https://YOUR-SCEP-SERVER/CertSrv/MSCEP_ADMIN
■
https://YOUR-SCEP-SERVER/CertSrv/MSCEP
11.4.2 Configure SCEP settings
1. In the web console, under SYSTEM, click Setup and then System setup, and go to the SCEP
tab.
2. Specify the following:
a) In the SCEP Server URL field, enter https://YOUR-SCEP-SERVER/CertSrv/MSCEP.
b) In the Challenge URL field, enter https://YOUR-SCEP-SERVER/CertSrv/MSCEP_ADMIN.
Note: If you use a Windows 2003 server as the SCEP server, enter
https://YOUR-SCEP-SERVER/CertSrv/MSCEP.
c) In the User and Password fields, enter the user credentials of the user who can create a
challenge code.
Note: In the User field, enter a user who has the necessary rights to enroll certificates.
Use the the logon format: username@domain
d) In the Challenge length field, accept the default length.
3. Click the Save button.
Sophos Mobile Control tests the connection to the SCEP server.
You now have a working connection to your SCEP server. To deploy a profile using SCEP, you
have to create an iOS profile, as described in the next step.
32
Administrator guide
11.4.3 Configure SCEP iOS profile
1. Create a new iOS profile and enter the general information as required.
2. Click Add configuration.
The Available configurations view is displayed.
3. In the list of available configurations, select SCEP.
The SCEP view is displayed.
4. In the URL field, accept the default value. This should be %_SCEPPROXYURL_%.
5. In the CA name field, enter the name of the Certification Authority.
6. In the Subject field, you can use the name of the person who will receive the certificate. Put
"CN=" in front of the actual name/value.You can use the available LDAP variables, for example
"CN=%_USERNAME_%".
7. Leave the Challenge field unchanged.
8. Make sure that the value defined in the Key size field matches the size configured on the
SCEP server.
9. Configure the remaining fields as necessary and click Apply.
The Edit profile view is displayed again.
10. Click Save.
You can now add other configurations for Wi-Fi or VPN for example and select the
certificate/Certificate Authority as the authentication method. The certificate for your device is
created once the profile has been deployed.
11.5 Configure user setup
On the User setup tab you can change the user management settings. For further information,
see Manage Self Service Portal users (page 25) and the Sophos Mobile Control super administrator
guide.
11.6 Samsung Knox license
If your company has a valid Samsung Knox license, you have to enter your license key, the
number of licenses and the expiry date in the Samsung Knox license tab in order to manage
your Knox devices with Sophos Mobile Control.
33
Sophos Mobile Control
12 Configure compliance rules
In the web console, you can:
■
Configure compliance rules for all available device types (platforms).
■
Define actions to be taken if devices no longer comply with the rules specified.
■
Define multiple compliance rules and assign them to device groups. In device groups, you can
select different compliance rules for corporate or private devices. This allows you to apply
different levels of security for corporate and private devices.
1. In the web console, under CONFIGURE, click Compliance rules.
The Compliance rules list view is displayed.
2.
3.
4.
5.
6.
Click Create compliance rules.
The Compliance rules view with tabs for all available device types is shown.
Enter a Name and a Description for the new compliance rule.
Go to the required tab.
Make sure that the Enable platform checkbox is selected.
Note: If this field is not selected, devices of the relevant platform cannot be checked for
compliance.
7. Under Rule, configure the compliance requirements for the selected device type. For a list of
all settings available for each device type, see Available compliance settings (page 35).
8. Under Deny Active Sync, you can specify that email access will be denied automatically if
devices are not compliant. Select the required checkboxes next to the corresponding rules.
9. Under Deny network access, you can specify that network access will be denied automatically
if devices are not compliant. Select the required checkboxes next to the corresponding rules.
This column is only available if network access control is configured for this customer. For
further information, see the Sophos Mobile Control super administrator guide.
10. Under Deny document access, you can specify that access to encrypted documents will be
denied automatically if devices are not compliant. Users can no longer use the Sophos Secure
Workspace app. Select the required checkboxes next to the corresponding rules.
Note: This column is only displayed if an SMC Advanced license for managing Sophos Secure
Workspace is available.
11. Under Notify admin, you can specify that administrators are notified by email if devices are
not compliant. Select the required checkboxes next to the corresponding rules.
12. Under Transfer task bundle, you can select task bundles to be transferred for the required
Rule settings. If devices do not comply with the rules, the task bundles selected are transferred
automatically.
Note: You must create the task bundle in the web console first. If you have not created a task
bundle yet, update the compliance settings afterwards. For information on how to create a
task bundle, see Work with task bundles (page 101).
34
Administrator guide
13. After you have defined all settings in all required device type tabs, click the Save button.
The new compliance set is displayed in the Compliance rules list view.
14. If you have specified that administrators receive email notifications when devices are not
compliant, click Compliance email settings and specify the relevant recipients under
Compliance email recipients. Use semicolons (;) to separate these recipients.
15. Define a notification schedule under Compliance email schedule.
16. Click the Save button.
The new compliance rule can be assigned to device groups. In device groups, you can select
different compliance rules for corporate or private devices.
12.1 Available compliance settings
The following table shows the compliance settings you can select for the individual platforms
under Rule in the relevant Compliance rules tabs.
Setting
Description
Min. client version
Enter the minimum Sophos
Mobile Control client version
that has to be installed on the
device.
Allow root rights
Select whether devices with
root rights are allowed.
Allow jailbreak
Select whether jailbroken
devices are allowed.
Password required
Select whether a password is
required for devices.
Android
iOS
Windows Phone
8
Allow non-market apps Select whether non-market
apps are allowed on devices.
Allow debug bridge
(ADB)
Select whether ADB (Android
Debug Bridge) is allowed on
devices.
Min. OS version
Select the earliest operating
system version required on
devices.
35
Sophos Mobile Control
Setting
Description
Max. OS version
Select the latest operating
system version allowed on
devices.
Max. Synchronization
gap
Specify the maximum interval
between synchronization
processes for devices.
Max. SMC app
Synchronization gap
Specify the maximum interval
between iOS app
synchronization processes for
devices. For further
information, refer to the
Sophos Mobile Control user
guide.
Note: This setting only
applies to devices with an iOS
version earlier than iOS 7. It
has no effect on iOS 7
devices.
Max. SMSec scan
interval
This field is only displayed if
Sophos Mobile Security is
available for this customer.
For further information, see
Managing Sophos Mobile
Security from Sophos Mobile
Control (page 123). In this
field, you can specify the
maximum scan interval for
malware scans performed by
the Sophos Mobile Security
app on the device.
Malware apps allowed
This field is only displayed if
Sophos Mobile Security is
available for this customer.
Select whether detected
malware apps are allowed on
devices.
Suspicious apps
allowed
This field is only displayed if
Sophos Mobile Security is
available for this customer.
Select whether detected
suspicious apps are allowed
on devices.
36
Android
iOS
Windows Phone
8
Administrator guide
Setting
Description
PUA allowed
This field is only displayed if
Sophos Mobile Security is
available for this customer.
Android
iOS
Windows Phone
8
Select whether detected
PUAs (Potentially Unwanted
Apps) are allowed on devices.
Encryption required
Select whether encryption is
required for devices.
Data roaming allowed
Select whether data roaming
is allowed for devices.
App must be able to
locate
This setting refers to the
Locate function for iOS
devices. Select whether the
user has to allow the Sophos
Mobile Control app to retrieve
location data in order to be
compliant.
Mandatory apps
Specify apps that have to be
installed on devices. Click
Edit. In the Mandatory apps
view, add the app(s) you want
to define as mandatory and
click Apply.
12.2 Assign compliance rules to device groups
1. In the web console, under MANAGE, click Device groups.
The Device groups view is displayed.
2. Click the blue triangle next to the device group you want to assign compliance sets to and
click Edit.
In the web console, a Default device group is available. For information on how to create your
own device groups, see Create device groups (page 39).
3. Under Compliance rules in the fields Company devices and Employee devices, select the
compliance sets you want to apply.
4. Click the Save button.
The selected compliance sets are shown in the Device groups view for the relevant device group
under Policy for company devices and Policy for employee devices.
37
Sophos Mobile Control
12.3 Check devices for compliance
After you have configured compliance settings, you can check if registered devices comply with
the rules defined.
1. In the web console, under CONFIGURE, click Compliance rules.
The Compliance rules view is displayed.
2. Click the Check now button.
All registered devices are checked for compliance according to the rules defined in Compliance
rules.The specified actions are carried out.The pie chart in the Dashboard is updated accordingly.
38
Administrator guide
13 Add devices to Sophos Mobile Control
Devices can be added to the Sophos Mobile Control web console in the following ways:
■
Add devices manually in the web console.
■
Import devices in a .csv file in the web console.
■
Enable end users to register their own devices through the Self Service Portal. See Configure
Self Service Portal use for end users (page 22). This portal reduces IT effort by allowing users
to carry out tasks without contacting the helpdesk. The devices are provisioned by executing
defined task bundles, see Work with task bundles (page 101).
For further information on how to use the Self Service Portal to register devices with Sophos
Mobile Control, see the Sophos Mobile Control user guide.
You can group devices for easier administration.You can assign devices to existing device groups
when you add them to the Sophos Mobile Control web console. In the web console, a Default
device group is available. If you have not defined your own device groups yet, you can add devices
to this group.
13.1 Create device groups
We recommend that you put devices into groups. This helps you to manage them efficiently as
you can carry out tasks on a group rather than on individual devices.
Note: We recommend that you only group devices with the same operating system. This makes
it easier to use groups for installations and other operating system specific tasks.
To create a new device group:
1. In the web console, under MANAGE, click Device groups.
The Device groups view is displayed.
2. Click the Create device group button.
The Edit device group view is displayed.
3. Enter a Name and a Description for the new device group.
4. Under Compliance rules in the fields Company devices and Employee devices, select the
compliance rules you want to apply.
5. Click the Save button.
Note: The device group settings contain the Enable auto-enrollment option. This option
allows you to enroll iOS devices with the Apple Configurator.
The new device group is created and shown in the Device groups view.You can now add devices
to the new group.
39
Sophos Mobile Control
Note: If you delete a device group, the group's members are moved to another group that needs
to be specified. If there is no other group left to move the devices to, the group cannot be deleted.
Before a group is deleted a warning message is displayed.
13.2 Create a new device
1. In the web console, under MANAGE, click Devices.
The Devices view is displayed.
2. Click Create device and select the device type.
The Edit device view is displayed.
3. In the Edit device view, specify the following device details:
a) In the Name field, enter a unique name for the new device.
b) In the Description field, enter a description for the new device.
c) Under Owner, select Corporate or Employee.
d) In the Email address field enter an email address.
Note: Required fields are marked with a red asterisk.
e) In the Phone number field, enter the phone number of the new device. Enter the phone
number in international format, for example "+491701234567".
f) Under Device group, select the device group the device is to be assigned to.
Note: A Default device group is available. If you have not defined your own device groups
yet, you can add devices to this group. For information on how to create your own device
groups, see Create device groups (page 39).
4. To add an LDAP link to the device, click the Actions button and then click Assign user to
device. For further information, see Assign a user to a device (page 116).
5. To add custom properties to the device, go to the Custom properties tab and click the Add
new custom property button. For further information, see Define custom properties for devices
(page 117).
6. After you have specified all relevant device details, click the Save button.
The new device is added to the Sophos Mobile Control web console and displayed in the Devices
view under MANAGE. You can now provision and manage the device.
13.3 Duplicate a device
You can create new devices in Sophos Mobile Control by duplicating existing devices.
Note: You can only duplicate devices that are not being edited. The duplicate is named "Copy
of" plus the name of the original. You can rename the devices according to your requirements.
1. In the web console, under MANAGE, click Devices.
The Devices view is displayed.
40
Administrator guide
2. Click on the device you want to duplicate.
The Show device view is displayed.
3. Click the Actions button and then click Duplicate this device.
The device is duplicated and shown in the Devices view. You can now edit the duplicated device
as required. To edit the device, click the blue triangle next to it and click Edit.
13.4 Import devices
You can add new devices by importing a .csv file with up to 500 devices. A sample file with the
correct column names and column order is available for download from the Import devices view.
Note: Use a text editor for editing the .csv file. If you use Microsoft Excel, values entered may
not be resolved correctly. Make sure that you save the file with the extension .csv.
1. In the web console, under MANAGE, click Devices.
The Devices view is displayed.
2. Click Import devices.
The Import devices view is displayed.
Note: If you do not have a .csv file with devices yet, you can download a sample file now and
use it for creating your import file.
3. Click Upload a file and browse for the .csv file, select it and click Open.
The entries in the.csv file are checked for errors and displayed on the import page.
Note: If there are any errors in the .csv file, it cannot be imported. An error message is
displayed next to the relevant entries. Edit the .csv file accordingly and try again.
4. If all entries are correct, click the Finish button.
The devices listed in the .csv file are imported and displayed in the Devices view. You can now
provision and manage the devices.
41
Sophos Mobile Control
14 Samsung Knox support
You can manage your Samsung Knox devices with the Sophos Mobile Control web console.
Note: In order to manage Samsung Knox devices, a Samsung Knox Advanced license key
needs to have been entered in the Sophos Mobile Control System setup.
Under Profiles you can create a profile that contains the settings for the Knox container. The
following configurations are available:
■
Password policies
■
Restrictions
■
Exchange Active Sync
To create a profile for a Knox device, see Create Android container profiles (page 59).
You can upload or link to apps and install them in a Knox container, see Upload apps to the web
console (page 104) and Create links to apps (page 105).
To manage your KNOX devices you can create task bundles for the following actions:
■
Container: lock
■
Container: unlock
■
Container: reset password
■
Container: remove all settings
To create a task bundle for a Knox device, see Create task bundles (page 101).
42
Administrator guide
15 Work with profiles
In the web console, under Profiles, you can create and transfer settings profiles for Apple iOS,
Android, and Windows Phone 8.
For iOS devices, you can also upload profiles created with Apple Configurator and transfer them
to devices.
For Windows Phone 8 devices, you can manage templates for settings profiles. These define the
setting options available for web console users. Templates are supplied by Sophos.
Note: For Android devices, the settings supported may depend on vendor-specific APIs.
Depending on the end-user device, some settings may not have any effect.
15.1 Create Android device profiles
1. In the web console, under CONFIGURE, click Profiles and then click Android.
The Profiles view is displayed.
2. Click Create profile and select Create device profile.
The Edit profile view is displayed.
3.
4.
5.
6.
Enter a Name and a Version for the new profile.
In the Description field, enter a description for the profile.
Under Operating systems, select the operating system the profile should apply to.
Click the Add configuration button.
The Available configurations view is displayed.
7. Select the configuration you want to add and click Next.
The settings view of the configuration is displayed.
8. Specify the required settings. For a detailed list of all configurations and settings available,
see Available Android configurations (page 43).
9. Click the Apply button to save your changes.
The configuration is displayed in the Edit profile view under Configurations.
10. After you have added all required configurations, click the Save button.
The profile is available for transfer. It is displayed in the Profiles view for Android.
15.1.1 Available Android configurations
The following configurations are available for Android profiles in the Available configurations
view when you create or edit a profile. Some configurations can be added only once within a
profile, others several times.
43
Sophos Mobile Control
Note: The settings supported may depend on vendor-specific APIs and on the Android version
in use on individual devices. Depending on the end-user device, some settings may not have any
effect. In the individual configuration, the web console shows labels to indicate if a setting is
supported as of a particular Android version or only for devices with the Samsung Safe plugin
(for example SAFEv2+) or with an active TouchDown email client (TouchDown). In the following
settings descriptions the relevant information is included at the beginning of the section or in a
minimum requirements column, if applicable.
Password policies
In this configuration, you can define password rules for devices. You can only add one Password
policies configuration within a profile.
When you select the Password policies configuration, the Password type field is displayed. In
this field, select the type of password you want to define:
■
Any
If you select this setting, users have to set a password on their devices. But there are no
requirements or restrictions concerning the password. If you have selected this option, no
further settings are required for the Password policies configuration.
■
Alphabetic
■
PIN
■
Alphanumeric
■
Complex
If you select Alphabetic, PIN or Alphanumeric, the following fields are displayed:
Setting/field
Description
Minimum password length
Specifies the minimum number of characters a
password must contain.
Idle time before password prompt
In this field, you can specify how soon (in seconds)
the device will be locked if it has not been used. The
device can be unlocked by entering the password.
Maximum password age (in days)
Requires users to change their password in the
specified interval (in days).
Maximum number of failed attempts until device In this field, you can specify the maximum number
wipe
of failed attempts to enter the correct password
before the device is wiped.
Minimum history length
44
In this field, you can specify how many old passwords
are remembered and compared with new ones.When
the user defines a new password, it will not be
Administrator guide
Setting/field
Description
accepted if it matches a previously used password.
Value range: 1 to 5 or none.
If you select Complex, the following fields are displayed in addition to the fields shown for the
other password types:
Setting/field
Description
Minimum number of letters
Specifies the minimum number of letters a password
must contain.
Minimum number of lowercase letters
Specifies the minimum number of lowercase letters
a password must contain.
Minimum number of uppercase letters
Specifies the minimum number of uppercase letters
a password must contain.
Minimum number of non-alphabetic characters
Specifies the minimum number of non-alphabetic
characters (for example & or !) a password must
contain.
Minimum number of numbers
Specifies the minimum number of numbers a
password must contain.
Minimum number of special characters
Specifies the minimum number of special characters
(for example !"§$%&/()=,.-;:_@<>) a password must
contain.
Restrictions
In this configuration, you can define restrictions for devices. You can only add one Restrictions
configuration within a profile.
Setting/field
Description
Minimum requirements
If you deactivate this option, cameras are
completely disabled on the device.
SAFEv2+ or 4.0+
Force encryption
Allow camera
45
Sophos Mobile Control
Setting/field
Description
Minimum requirements
Allow camera on lock screen
If you deactivate this option, cameras are
disabled on the device when the screen is
locked.
4.2+
Allow widgets on lock screen
If you deactivate this option, widgets are
disabled on the device when the screen is
locked.
4.2+
Allow factory reset
If you deactivate this option, users cannot
reset their devices to factory state.
SAFEv2+
Allow settings changes
If you deactivate this option, users cannot
SAFEv2+
change settings on the device. Depending on
individual devices the settings icon is
removed.
Allow backup
If you deactivate this option, users cannot
create system backups. Google backup is
deactivated. Other backup methods (for
example Sophos Mobile Control backups)
remain active.
Allow native browser
If you deactivate this option, native browsers SAFEv2+
are disabled on the device.
Allow clipboard
If you deactivate this option, users cannot
copy any contents to the clipboard.
SAFEv2+
SAFEv2+
Note: This setting applies to devices as of
Android 4.2.2.
Allow Play Store
If you deactivate this option, Play Store is
disabled on the device.
SAFEv2+
Note: This setting applies to devices as of
Android 4.2.2.
46
Allow non-market apps
If you deactivate this option, non-market apps SAFEv2+
are disabled on the device.
Allow Bluetooth
If you deactivate this option, Bluetooth is
disabled on the device.
Allow NFC
If you deactivate this option, NFC (near field SAFEv2+
communication) is disabled on the device.
SAFEv2+
Administrator guide
Setting/field
Description
Minimum requirements
Allow screen capture
If you deactivate this option, users cannot
take a screenshot of the display.
SAFEv2+
Allow SD card
If you deactivate this option, SD cards cannot SAFEv2+
be used in devices.
Allow USB debugging
If you deactivate this option, USB debugging SAFEv2+
is disabled on the device.
Allow USB
If you deactive this option, the USB mass
SAFEv2+
storage mode and the USB media player are
disabled on the device.
Allow Wi-Fi tethering
If you deactivate this option, Wi-Fi tethering
is disabled on the device.
Allow USB tethering
If you deactivate this option, USB tethering is SAFEv2+
disabled on the device.
Allow Bluetooth tethering
If you deactivate this option, Bluetooth
tethering is disabled on the device.
Allow sync while roaming
If you deactivate this option, synchronization SAFEv3+
while roaming is disabled.
Allow mobile data connection
while roaming
If you deactivate this option, mobile data
connections while roaming are disabled.
SAFEv2+
SAFEv2+
SAFEv2+
Allow home key
SAFEv2+
Allow microphone
SAFEv2+
Allow mock GPS locations
SAFEv2+
Allow SD card move options in
the device settings
SAFEv5+
Allow writing to the SD card
SAFEv5+
Allow tethering
SAFEv2+
Allow USB media player
SAFEv2+
47
Sophos Mobile Control
Setting/field
Description
Minimum requirements
Allow voice calls while roaming If you deactivate this option, voice calls while SAFEv3+
roaming are disabled.
Allow application crash reports If you deactivate this option, application crash SAFEv3+
reports are disabled.
48
Allow over-the-air firmware
upgrades
SAFEv3+
Allow power off
SAFEv3+
Allow status bar expansion
SAFEv3+
Allow video recording
SAFEv4+
Allow activation lock
SAFEv5+
Allow airplane mode
SAFEv5+
Allow Android Beam
SAFEv4+
Allow audio recording
SAFEv4+
Allow Developer mode
SAFEv5+
Allow fast encryption
SAFEv5+
Allow firmware recovery
SAFEv5+
Allow auto-sync for Google
accounts
SAFEv5+
Allow S Beam
SAFEv4+
Allow S Voice
SAFEv4+
Allow share list
SAFEv4+
Allow user mobile data limit
SAFEv4+
Allow VPN
SAFEv2.2+
Allow wallpaper change
SAFEv2.2+
Administrator guide
Setting/field
Description
Minimum requirements
Allow Wi-Fi Direct
SAFEv4+
Knox Premium restrictions
In this configuration, you can define restrictions for a Samsung Knox device. They apply to the
device and not the container.
Option
Description
Allow firmware auto update options
Allow ODE Trusted Boot verification
Prevent installation of another administrator app If activated, this option prevents the installation of
apps that require device administrator privileges.
Prevent activation of another administration app If activated, this option prevents the activation of apps
that require device administrator privileges.
Allow Common Criteria mode
App protection
In this configuration, you can define settings for protecting apps on end-user devices with
passwords. With app protection in use, users have to define a password when they start a protected
app for the first time. In the App protection configuration, you define password requirements
and the apps to be protected. After a failed login attempt a login delay is imposed.
If app protection is active on an end-user device, a Reset app protection password button is
available in the Actions menus of the Edit device and Show device views. The user can also
reset the app protection password in the Self Service Portal. For further information, see the
Sophos Mobile Control user guide.
Setting/field
Description
Password complexity
In this field, define the minimum complexity
requirements for the password to be defined by
users, for example 6 char password.
49
Sophos Mobile Control
Setting/field
Description
Grace period in minutes
In this field, select a grace period. After the grace
period has expired protected apps can only be
unlocked by entering a password.
Click on Add to add apps to be password-protected. In the Edit app view, the following fields are
available for configuring apps to be protected:
Setting/field
Description
Select source
Select the source for the apps to be added to the
list of protected apps. Depending on your choice,
different fields for defining the apps to be protected
are displayed:
If you select App list, the Apps dropdown list is
displayed with a list of all available Android apps.
Select the app from the list, click Add and then
and click Apply.
If you select Custom, the fields App name and
Identifier are displayed. Enter the app
information, click Add and then click Apply.
App control
In this configuration you can define apps that cannot be accessed on the user device. With app
control in use, defined apps are blocked and users cannot start them. For example you can prevent
apps that cannot be removed from a device from being started.
Click on Add to add apps to be blocked. In the Edit app view, the following fields are available
for configuring apps to be protected:
Setting/field
Description
Select source
Select the source for the apps to be added to the
list of protected apps. Depending on your choice,
different fields for defining the apps to be protected
are displayed:
If you select App list, the Apps dropdown list is
displayed with a list of all available Android apps.
Select the app from the list, click Add and then
click Apply.
50
Administrator guide
Setting/field
Description
If you select Custom, the fields App name and
Identifier are displayed. Enter the app
information, click Add and then click Apply.
Exchange ActiveSync
In this configuration, you can define user settings for your Microsoft Exchange Server. You can
add multiple Exchange ActiveSync configurations.
Note: Some of the settings in this configuration only apply to devices with an active TouchDown
email client. These settings are indicated by the label TouchDown in the web console.
If a TouchDown client is active on a user device, this client will be used as the primary email client
in Sophos Mobile Control 3.6 and later.
Setting/field
Description
Minimum requirements
Name
In this field, enter an account name.
SAFEv2+
Server address
In this field, enter the address of the
Microsoft Exchange Server.
SAFEv2+
Note: If you use the SMC EAS proxy,
enter the URL of the SMC proxy/server.
Domain
In this field, enter the domain for this
account.
SAFEv2+
User
In this field, enter the user for this
SAFEv2+
account. You can use the variable
%_USERNAME_% and the server will
replace it with the actual user name if the
device the profile is sent to has an LDAP
link established.
Email address
In this field, enter the email address of
SAFEv2+
the account. You can use the variable
%_EMAILADDRESS_% and the server
will replace it with the actual email
address if the device the profile is sent to
has an LDAP link established.
Sender
In this field, enter a sender name for this SAFEv2+
account. You can use the variable
51
Sophos Mobile Control
Setting/field
Description
Minimum requirements
%_EMAILADDRESS_% and the server
will replace it with the actual email
address if the device the profile is sent to
has an LDAP link established.
Password
In this field, enter the password for this
account.
SAFEv2+
Synchronization period
In this field, select the time period for
SAFEv2+
email synchronization.This is the number
of days emails are synchronized for. If
you specify a time period here, not all
emails are synchronized to the inbox on
the mobile device, but only the emails
from within the specified period. You can
select the following synchronization
periods:
One day
Three days
One week
Two weeks
One month
Synchronization interval
In this field, select the interval between
email synchronization processes:
SAFEv2+
Never
5 minutes
10 minutes
15 minutes
30 minutes
1 hour
Require manual sync when roaming If you select this option, manual
TouchDown
synchronization is required while roaming
on a device with an active TouchDown
email client.
SSL
52
Make sure this option is selected to send SAFEv2+
all communications through SSL (Secure
Socket Layer).
Administrator guide
Setting/field
Description
Minimum requirements
Default account
Select this option to define the account
as the default email account.
SAFEv2+
Allow all certificates
Select this option to allow all certificates SAFEv2+
in transfer processes from the email
server.
Client certificate
In this field, select the client certificate for SAFEv2+
the connection to ActiveSync.
Disable copy/paste
Select this option to disable copy/paste
on devices with an active TouchDown
email client.
Disable copy to phone book
Select this option to prevent users from TouchDown
copying details to their phone books on
devices with an active TouchDown email
client.
Disable printing
Select this option to disable printing on TouchDown
devices with an active TouchDown email
client.
Allow forwarding emails
Select this option to allow forwarding of
emails.
Allow use of HTML format
Select this option to allow the use of
HTML format in emails.
Maximum attachment size in MB
Select the maximum size of email from SAFEv5+
the dropdown list (1, 3, 5, 10, Unlimited)
Synchronize content types
Select the content type to be
synchronized.
TouchDown
SAFEv2+
Notes
Contacts
Calendar
Tasks
53
Sophos Mobile Control
Wi-Fi
In this configuration, you specify settings for connecting to wi-fi networks. You can add multiple
Wi-Fi configurations.
Setting/field
Description
SSID
In this field, enter the ID of the wireless network.
Security type
In this field, you select the security type of the wi-fi
network:
None
WEP
WPA/WPA2
EAP/PEAP [SAFEv2+]
EAP/TLS [SAFEv2+]
EAP/TTLS [SAFEv2+]
If you WEP or WPA/WPA2, a Password field is
displayed. Enter the relevant password.
If you select one of the EAP settings, the fields
Identity, Anonymous Identity and Password are
displayed. Enter the required EAP information.
If you select EAP/PEAP or EAP/TTLS, the field
Phase 2 authorization is displayed in addition.
Select the type of authorization:
PAP
CHAP
MSCHAP
MSCHAPv2
VPN
Minimum requirement: SAFEv2+
In this configuration, you can define VPN settings for network connections. You can add multiple
VPN configurations.
54
Setting/field
Description
Connection name
In this field, enter the name of the connection shown on the device.
Administrator guide
Setting/field
Description
Server
In this field, enter the host name or the IP address of the server.
Connection type
In this field, select the connection type:
IPsec (PSK)
If you select this type, the fields User, Password and IPsec (PSK) are
displayed. Enter the user and password. In the IPsec (PSK) field, enter the
pre-shared key for authentication.
IPsec (Certificate)
If you select this type, the fields Client certificate, Root certificate, User and
Password are displayed. In the fields Client certificate and Root certificate,
select the relevant certificates. In addition, enter the User and the relevant
Password.
Root certificate
Minimum requirement: SAFEv2+
In this configuration, you can upload a root certificate for devices. You can add multiple Root
certificate configurations. In the File field, browse for the relevant certificate and click Upload.
The name of the certificate is shown in the Certificate name field.
Note: The certificate you upload here is only available for this profile. If you require certificates
in other profiles, you have to upload them again.
Client certificate
Minimum requirement: SAFEv2+
In this configuration, you can upload a client certificate to devices. You can add multiple Client
certificate configurations. In the File field, browse for the relevant certificate and click Upload.
The name of the certificate is shown in the Certificate name field. Enter the Password for the
selected certificate.
Note: The certificate you upload here is only available for this profile. If you require certificates
in other profiles, you have to upload them again.
Antivirus
See Configure antivirus settings for Sophos Mobile Security (page 123).
Web filtering
See Configure web filtering settings for Sophos Mobile Security (page 125).
55
Sophos Mobile Control
Sophos Secure Workspace app
Minimum requirement: iOS version 7.0+
In this configuration, you can define settings for the Sophos Secure Workspace app.
Note:
Configure storage providers
Settings
Local storage
For each storage provider you can define the following settings
separately:
allows users to store files within Sophos
Sophos Secure Workspace and upload files Enable If selected, the storage provider is visible in the app.
from the local storage to cloud storage.
Offline If selected, users are allowed to add files from the
Dropbox
storage provider to the apps Favorites list for offline reading.
Egnyte
Open In (encrypted): If activated, users can send/hand over
Google Drive
encrypted files to other apps via Open In.
Media center
OneDrive
WebDAV:
Egnyte, WebDAV are referred to as
enterprise providers. For these you can
centrally define server and user credentials.
Open In (plain): If activated, users can send/hand over plain
files to other apps via Open In.
Clipboard: If activated, clipboard is enabled in the apps
document view to allow users to copy parts of a document and
to paste them to other apps.
Setting/field
Description
Enable Documents
Enables the Documents feature to securely distribute company
documents.
Enable app password
If you activate this option, users have to enter an additional
password to be able to start the app. The password has to be
defined when the app is started after the configuration has
been applied.
Password complexity
In this field, you can define the required minimum complexity
of the app password. More secure passwords are always
allowed. Passwords (a mix of numeric and alphanumeric
characters) are always seen as more secure than PINs
(numeric characters only).
You can select the following settings:
Any: App passwords do not have restrictions.
4 digit PIN
6 digit PIN
56
Administrator guide
Setting/field
Description
4 char password
6 char password
8 char password
10 char password
Grace period in minutes
In this field, you define a period of time within which no app
password has to be entered if the app comes to the foreground
again. If the device has been locked and unlocked, users must
always enter the app password, even within the grace period.
You can select 1, 2, 5, 10, 15 minutes.
Last server connect
In this field, you can define how long users can use Sophos
Secure Workspace without a connection to the Sophos Mobile
Control server.
When Sophos Secure Workspace becomes active and does
not have contact with the server within the defined period of
time, a lock screen with a Retry button will be displayed. Users
can only unlock the app by tapping on the Retry button to
trigger Sophos Secure Workspace to connect to the server. If
the connection can be established, the app will be unlocked.
If not, access will be denied.
You can define the following settings:
On access: Server connection is always required and the
app is locked when the server cannot be reached.
1 hour: Server connection is required when the app
becomes active one hour or more after the last successful
server connection.
3 hour
6 hour
12 hour
1 day
3 days
1 week
none: No regular contact is required.
Offline starts without server connection
In this field you can define how often users can start Sophos
Secure Workspace without a server connection.
Note: This setting requires the app password feature to be
enabled.
A counter is incremented whenever users enter Sophos Secure
Workspace app password. If the counter exceeds the defined
57
Sophos Mobile Control
Setting/field
Description
number, the same lock screen as for the Last server connect
setting will be displayed. The counter will be reset if a
connection to the Sophos Mobile Control server is established.
Unlimited: No server connection is required.
0: Starting the app without server connection is not
possible.
1: After one start of the app successful server connection
is necessary.
3
5
10
20
Enable keyring
If you activate this option, the keys are remembered in a
keyring. For subsequent use of the same keys, users do not
have to enter the keys passphrase again.
Passphrase complexity
In this field, you can define the required minimum complexity
of passphrases for new keys to be used for encryption. These
keys are generated on the device. More secure passphrases
are always allowed.
You can select the following settings:
4 char password
6 char password
8 char password
10 char password
Egnyte, WebDAV
You can centrally define credentials for the
enterprise providers. These cannot be
changed by users.
Credential settings that you do not centrally
define can be chosen by the users in the
apps provider credential screens.
For example you can centrally define the
server and user account to be used but you
can leave the password field undefined.
Users then would have to know the
password when accessing the storage
provider.
58
Administrator guide
Setting/field
Description
Server
In this field, enter:
the URL of the root folder on the Corporate documents
WebDAV server
the URL of the root folder on the Egnyte server
the URL of the root folder on the WebDAV server
Use the following format: https://server.company.com
User name
Password
Upload folder
In this field, enter the user name for the relevant server.
In this field, enter the password for the relevant account.
In this field, enter the upload folder for the relevant account.
15.2 Create Android container profiles
1. In the web console, under CONFIGURE, click Profiles and then clickAndroid.
The Profiles view is displayed.
2. Click Create profile and select Create container profile.
The Edit profile view is displayed.
3.
4.
5.
6.
Enter a Name and a Version for the new profile.
In the Description field, enter a description for the profile.
Under Operating systems, select the operating system the profile should apply to.
Click the Add configuration button to add configurations with Android configuration settings
to the profile.
The Available configurations view is displayed.
7. Select the configuration you want to add and click Next.
The settings view of the configuration is displayed.
8. Specify the required settings. For a detailed list of all configurations and settings available,
see Available Android container configurations (page 60).
9. Click the Apply button to save your changes.
The configuration is displayed in the Edit profile view under Configurations.
10. After you have added all required configurations, click the Save button.
The profile is available for transfer. It is displayed in the Profiles view for Android.
59
Sophos Mobile Control
15.2.1 Available Android container configurations
Password policies
In this configuration, you can define password rules for devices. You can only add one Password
policies configuration within a profile.
When you select the Password policies configuration, the Password type field is displayed. In
this field, select the type of password you want to define:
■
Any
If you select this setting, users have to set a password on their devices. But there are no
requirements or restrictions concerning the password. If you have selected this option, no
further settings are required for the Password policies configuration.
■
Alphabetic
■
PIN
■
Alphanumeric
■
Complex
If you select Alphabetic, PIN or Alphanumeric, the following fields are displayed:
Setting/field
Description
Minimum password length
Specifies the minimum number of characters a
password must contain.
Idle time before password prompt
In this field, you can specify how soon (in seconds)
the device will be locked if it has not been used. The
device can be unlocked by entering the password.
Maximum password age (in days)
Requires users to change their password in the
specified interval (in days).
Maximum number of failed attempts until device In this field, you can specify the maximum number
wipe
of failed attempts to enter the correct password
before the device is wiped.
Minimum history length
60
In this field, you can specify how many old passwords
are remembered and compared with new ones.When
the user defines a new password, it will not be
accepted if it matches a previously used password.
Value range: 1 to 5 or none.
Administrator guide
If you select Complex, the following fields are displayed in addition to the fields shown for the
other password types:
Setting/field
Description
Minimum number of letters
Specifies the minimum number of letters a password
must contain.
Minimum number of lowercase letters
Specifies the minimum number of lowercase letters
a password must contain.
Minimum number of uppercase letters
Specifies the minimum number of uppercase letters
a password must contain.
Minimum number of non-alphabetic characters
Specifies the minimum number of non-alphabetic
characters (for example & or !) a password must
contain.
Minimum number of numbers
Specifies the minimum number of numbers a
password must contain.
Minimum number of special characters
Specifies the minimum number of special characters
(for example !"§$%&/()=,.-;:_@<>) a password must
contain.
Restrictions
In this configuration, you can define restrictions for devices. You can only add one Restrictions
configuration within a profile.
Setting/field
Minimum requirements
Allow screen capture
KNOXv2+
Allow camera
KNOXv2+
Allow clipboard
KNOXv2+
Allow share list
KNOXv2+
Allow microphone
KNOXv2+
Enforce the use of the secure keypad
KNOXv2+
61
Sophos Mobile Control
Setting/field
Minimum requirements
Allow addition of new email accounts
KNOXv2+
You can configure the container to restrict manual app installation. You can add Allowed apps and Not
allowed apps.
Select either Allowed apps or Not allowed apps and click Add. In the Edit app dialog select the app
from the drop-down list or click Custom and enter App name and Identifier. Click Add.
Server-initiated installations are allowed automatically.
Exchange ActiveSync
In this configuration, you can define user settings for your Microsoft Exchange Server. You can
add multiple Exchange ActiveSync configurations.
Note: Some of the settings in this configuration only apply to devices with an active TouchDown
email client. These settings are indicated by the label TouchDown in the web console.
If a TouchDown client is active on a user device, this client will be used as the primary email client
in Sophos Mobile Control 3.6 and later.
Setting/field
Description
Minimum requirements
Name
In this field, enter an account name.
SAFEv2+
Server address
In this field, enter the address of the
Microsoft Exchange Server.
SAFEv2+
Note: If you use the SMC EAS proxy,
enter the URL of the SMC proxy/server.
62
Domain
In this field, enter the domain for this
account.
SAFEv2+
User
In this field, enter the user for this
SAFEv2+
account. You can use the variable
%_USERNAME_% and the server will
replace it with the actual user name if the
device the profile is sent to has an LDAP
link established.
Email address
In this field, enter the email address of
the account. You can use the variable
%_EMAILADDRESS_% and the server
will replace it with the actual email
SAFEv2+
Administrator guide
Setting/field
Description
Minimum requirements
address if the device the profile is sent to
has an LDAP link established.
Sender
In this field, enter a sender name for this SAFEv2+
account. You can use the variable
%_EMAILADDRESS_% and the server
will replace it with the actual email
address if the device the profile is sent to
has an LDAP link established.
Password
In this field, enter the password for this
account.
Synchronization period
In this field, select the time period for
SAFEv2+
email synchronization.This is the number
of days emails are synchronized for. If
you specify a time period here, not all
emails are synchronized to the inbox on
the mobile device, but only the emails
from within the specified period. You can
select the following synchronization
periods:
SAFEv2+
One day
Three days
One week
Two weeks
One month
Synchronization interval
In this field, select the interval between
email synchronization processes:
SAFEv2+
Never
5 minutes
10 minutes
15 minutes
30 minutes
1 hour
SSL
Make sure this option is selected to send SAFEv2+
all communications through SSL (Secure
Socket Layer).
63
Sophos Mobile Control
Setting/field
Description
Minimum requirements
Default account
Select this option to define the account
as the default email account.
SAFEv2+
Allow all certificates
Select this option to allow all certificates SAFEv2+
in transfer processes from the email
server.
Allow forwarding emails
Select this option to allow forwarding of
emails.
Allow use of HTML format
Select this option to allow the use of
HTML format in emails.
Maximum attachment size in MB
Select the maximum size of email from SAFEv5+
the dropdown list (1, 3, 5, 10, Unlimited)
Maximum calendar age
Select the maximum calendar age for
emails to be synchronized.
Maximum email age
Select the maximum age for emails to be SAFEv5+
synchronized.
Maximum email age
Select the maximum age for emails to be
synchronized.
Synchronize content types
Select the content type to be
synchronized.
SAFEv5+
Notes
Contacts
Calendar
Tasks
15.3 Create profiles for Apple iOS devices
Sophos Mobile Control offers two methods for creating profiles for iOS devices:
64
■
You can create iOS profiles directly in the web console.
■
You can import profiles created with Apple Configurator into the web console.
Administrator guide
15.3.1 Create iOS device profiles in the web console
1. In the web console, under CONFIGURE, click Profiles and then clickApple iOS.
The Profiles view is displayed.
2. Click Create profile and select Create profile.
The Edit profile view is displayed.
3. Enter a Name, your Organization (the field is pre-filled with your customers name) and a
Description. The Version information is optional.
4. In the User can remove profile field, you can select whether users may remove the profile
from their device:
■
■
Always
With authentication
If you select this option, the Authentication password field is displayed below the User
can remove profile field. Enter the password required for removing the profile. To enable
users to remove the profile, provide them with the password.
■
Never
5. In the Automatically remove on field, you can enter a date for the automatic removal of the
profile from end-user devices. The profile will be removed on the set date at 11 pm.
6. Under Operating systems, select the operating system the profile should apply to.
Note: The Operating systems field shows all iOS versions that are currently available in the
system. Not all configuration settings may be supported for individual iOS versions. If you
select all versions under Operating systems, some settings may not have any effect depending
on the iOS version on the end-user device.
7. Click Add configuration.
The Available configurations view is displayed.
8. Select the configuration you want to add and click Next.
The settings view of the configuration is displayed.
9. Specify the required settings. For a detailed list of all configurations and settings available,
see Available iOS configurations (page 66).
10. Click Apply to save your changes.
The configuration is displayed in the Edit profile view under Configurations.
11. Add further configurations as required.
12. After you have added all required configurations, click Save.
The profile is available for transfer. It is displayed in the Profiles view for Apple iOS.
65
Sophos Mobile Control
15.3.2 Available iOS configurations
The following configurations are available for iOS profiles in the Available configurations view
when you create or edit a profile. Some configurations can be added only once within a profile,
others several times.
Note: Supported settings may depend on the iOS version in use on individual devices. Depending
on the end-user device, some settings may not have any effect. The web console indicates if any
setting is supported only since a particular iOS version or only in supervised mode. In the following
descriptions, the relevant information is included at the beginning of the section or in a minimum
requirements column if applicable.
Password policies
In this configuration, you can define password rules for devices. You can only add one Password
policies configuration within a profile.
66
Setting/field
Description
Allow simple value
If you select this option, users are allowed to use
sequential or repeated characters in their password,
for example "1111" or "abcde".
Require alphanumeric value
If you select this option, passwords must contain at
least one letter or number.
Minimum password length
Specifies the minimum number of characters a
password must contain.
Minimum number of complex characters
Specifies the minimum number of non-alphanumeric
characters (for example & or !) a password must
contain.
Maximum password age (1 - 730 days or 0)
Requires users to change their password in the
specified interval. Value range: 0 (no password
change required) to 730 days.
Maximum Auto-Lock (in minutes)
In this field, you can specify the maximum value the
user is allowed to configure on the device. Auto-Lock
specifies how soon (in minutes) the device will be
locked if it has not been used.
Password history (1 to 50 or 0)
In this field, you can specify how many old
passwords are remembered and compared with new
ones. When the user defines a new password, it will
not be accepted if it matches a previously used
Administrator guide
Setting/field
Description
password. Value range: 1 to 50 or 0 (no password
history).
Maximum grace period for device lock
In this field, you can specify the maximum value the
user is allowed to configure on the device. The grace
period for device lock specifies for how long the
device can be unlocked after a lock without a
password prompt. If you select None, the user can
select any of the intervals available. If you select
Immediately, users must enter a password every
time they unlock their devices.
Maximum number of failed attempts until device In this field, you can specify the maximum number
wipe
of failed attempts to enter the correct password
before the device is wiped. After six failed attempts,
a time delay is imposed before a password can be
entered again. The delay increases with each failed
attempt. After the final failed attempt, all data and
settings are securely removed from the device. The
time delay starts after the sixth attempt. So if you
set this value to 6 or lower, no delay is imposed and
the device is wiped when the attempt limit is
exceeded.
Restrictions
In this configuration, you can define restrictions for devices. You can only add one Restrictions
configuration within a profile.
Setting/field
Description
Minimum
requirements
Device
Allow installing apps
If you deactivate this option, the App Store is
disabled and its icon is removed from the
Home screen. Users cannot install or update
apps through the App Store or iTunes.
Allow use of camera
If you deactivate this option, cameras are
completely disabled on the device and the
Camera icon is removed from the Home
screen. Users cannot take pictures, record
videos, or use FaceTime.
67
Sophos Mobile Control
Setting/field
Description
Minimum
requirements
Allow FaceTime
If you deactivate this option, users cannot
place or receive FaceTime video calls.
Allow screen capture
If you deactivate this option, users cannot take
a screenshot of the display.
Allow automatic sync while
roaming
If you deactivate this option, devices that are
roaming will only sync when the user accesses
an account.
Allow Siri
If you deactivate this option, users cannot use 5.0+
Siri, voice commands, or dictation.
Allow Siri while device is locked If you deactivate this option, users must unlock 6.0+
their devices by entering their password before
they use Siri.
Allow Siri querying content from If you deactivate this option, Siri will not query 7.0+, supervised
the web
content from the web.
68
Force Siri profanity filter
If you deactivate this option, the Siri profanity 6.0+, supervised
filter is not enforced on the device.
Allow voice dialing
If you deactivate this option, users cannot dial
by using voice commands.
Allow Passbook while device is
locked
If you deactivate this option, a device does not 6.0+
show Passbook notifications while locked.
Allow In-App purchase
If you deactivate this option, users cannot
make in-app purchases.
Force user to enter store
password for all purchases
If you select this option, users have to enter
5.0+
their Apple ID password to make any purchase.
Usually, there is a brief grace period after a
purchase before users have to authenticate
for subsequent purchases.
Allow multiplayer gaming
If you deactivate this option, users cannot play
multiplayer games in Game Center.
Allow Game Center
If you deactivate this option, Game Center
cannot be used on the device.
6.0+, supervised
Administrator guide
Setting/field
Description
Minimum
requirements
Allow adding Game Center
friends
If you deactivate this option, users cannot add
friends in Game Center.
Allow find my friends
modification
If you deactivate this option, modifications to
the Find my Friends app are disabled.
Allow host pairing
If you deactivate this option, host pairing is
7.0+, supervised
disabled with the exception of the supervision
host. If no supervision host certificate has been
configured, all pairing is disabled.
Allow AirDrop
If you deactivate this option, content sharing
with AirDrop is not allowed on the device.
7.0+, supervised
Allow Control Center on lock
screen
If you deactivate this option, settings cannot
be managed with Control Center when the
device screen is locked.
7.0+
7.0+, supervised
Allow Notification Center on lock If you deactivate this option the Notification
7.0+
screen
Center is not available when the device screen
is locked.
Allow Today view on lock screen If you deactivate this option the Today view is 7.0+
not available when the device screen is locked.
Allow over-the-air PKI updates
If you deactivate this option, over-the-air PKI
updates are not possible.
7.0+
Allow iBooks store
If you deactivate this option, users cannot
purchase books in iBooks.
6.0+, supervised
Allow explicit sexual content in
iBooks store
If you deactivate this option, explicit sexual
6.0+, supervised
content is not available through iBooks store.
Allow users to install
configuration profiles
If you deactivate this option, users cannot
install configuration profiles.
Allow iMessage
If you deactivate this option, users cannot use 6.0+, supervised
iMessage for texting.
Allow app removal
If you deactivate this option, users cannot
remove apps from the device.
6.0+, supervised
6.0+, supervised
69
Sophos Mobile Control
Setting/field
Description
Minimum
requirements
Allow erase all contents and
settings
8.0+, supervised
Allow internet search result for
Spotlight
8.0+, supervised
Allow enabling of restrictions
option
8.0+, supervised
Allow Handoff
8.0+
Company data
70
Allow documents to be shared
only within managed
apps/accounts
With this setting you can define a restriction 7.0+
on opening documents with apps/accounts (for
example a company email account) managed
by Sophos Mobile Control. For example: If this
option is selected, and users have an email
account managed by Sophos Mobile Control
and apps managed by Sophos Mobile Control
on their devices, attachments from the
managed email account can only be opened
with managed apps. In this way you can
prevent corporate documents from being
opened in unmanaged apps.
Allow documents to be shared
only within unmanaged
apps/accounts
With this setting you can define a restriction 7.0+
on opening documents with apps/accounts (for
example a private email account) not managed
by Sophos Mobile Control. For example: If this
option is selected, and users have an email
account and apps not managed by Sophos
Mobile Control on their devices, attachments
from the unmanaged email account can only
be opened with unmanaged apps. In this way
you can prevent personal documents from
being opened in managed apps.
Allow managed apps using cloud
sync
8.0+
Allow backup for enterprise
books
8.0+
Administrator guide
Setting/field
Description
Allow enterprise books notes
and highlights sync
Minimum
requirements
8.0+
Applications
Allow use of YouTube
If you deactivate this option, the YouTube app 4.0-5.0
is disabled and its icon is removed from the
Home screen.
Note: This setting only applies to iOS versions
earlier than version 6.
Allow use of iTunes Store
If you deactivate this option, the iTunes Store
is disabled and its icon is removed from the
Home screen. Users cannot preview, purchase
or download content.
Allow use of Safari
If you deactivate this option, the Safari web
browser is disabled and its icon is removed
from the Home screen. This also prevents
users from opening web clips.
Enable autofill
If you deactivate this option, Safari does not
autofill web forms with previously entered
information.
Force fraud warning
If you select this option, Safari attempts to
5.0+
prevent users from visiting websites identified
as fraudulent or compromised.
Enable JavaScript
If you deactivate this option, Safari ignores
JavaScript on websites.
Block pop-ups
If you select this option, Safari blocks popups. 5.0+
Accept cookies
In this field, you can specify if cookies should 5.0+
be accepted:
5.0+
6.0-6.1
Always
Never
From visited sites
Allow modification of cellular
data usage per app
If you deactivate this option, users cannot
change the cellular data usage per app.
7.0+, supervised
71
Sophos Mobile Control
Setting/field
Description
Minimum
requirements
Allow backup
If you select this option, users can back up
their devices to iCloud.
5.0+
Allow document sync
If you select this option, users can store
documents in iCloud.
5.0+
Allow Photo Stream
If you select this option, users can enable
Photo Stream.
5.0+
iCloud
Note: If you install a configuration profile that
restricts the use of Photo Stream, Photo
Stream photos will be removed from the user's
device. Photos will not be sent from the
Camera Roll to Photo Stream. If there are no
further copies of these photos, they may be
lost.
Allow shared photo streams
If you select this option, users can invite others 6.0+
to view their photo streams and can view photo
streams shared by others.
Allow keychain sync
If you deactivate this option, the iCloud feature 7.0+
Keychain for synchronizing passwords across
different iOS and OS X devices is not allowed
on the device.
Security and privacy
Allow diagnostic data to be sent If you deactivate this option, iOS diagnostic
to Apple
information is not sent to Apple.
72
5.0+
Allow user to accept untrusted
TLS certificates
If you deactivate this option, users are not
5.0+
asked if they want to trust certificates that
cannot be verified.This setting applies to Safari
and to Mail Contacts and Calendar accounts.
Allow account modification
If you deactivate this option, account
7.0+, supervised
modification is disabled. The Accounts menu
is not available on the device.
Allow Touch ID to unlock a
device
If you deactivate this option, the device cannot 7.0+
be unlocked by Touch ID.
Administrator guide
Setting/field
Description
Minimum
requirements
Force limit ad-tracking
If you select this option, anonymous user data 7.0+, supervised
apps use for targeting ads are no longer
provided.
Force encrypted backups
If you select this option, users must encrypt
backups in iTunes.
7.0+, supervised
Content ratings
Allow explicit music and
podcasts
If you deactivate this option, explicit music or
video content is hidden in the iTunes Store.
Explicit content is flagged by content providers,
for example record labels, when listed on the
iTunes Store.
Roaming/Hotspot settings
Minimum requirement: iOS version 7.0+
In this configuration, you can define settings for roaming and personal hotspots.
Note: Users can change these settings on their devices anytime.
Setting/field
Description
Enable voice roaming
If you deactivate this setting, voice roaming is
disabled on the device.
Enable data roaming
If you deactivate this setting, data roaming is disabled
on the device.
Enable personal hotspot
If you deactivate this setting, the device cannot be
configured to serve as a personal hotspot.
Sophos Secure Workspace app
Minimum requirement: iOS version 7.0+
In this configuration, you can define settings for the Sophos Secure Workspace app.
Note:
73
Sophos Mobile Control
Configure storage providers
Settings
Local storage
For each storage provider you can define the following settings
separately:
allows users to store files within Sophos
Sophos Secure Workspace and upload files Enable If selected, the storage provider is visible in the app.
from the local storage to cloud storage.
Offline If selected, users are allowed to add files from the
Dropbox
storage provider to the apps Favorites list for offline reading.
Egnyte
Open In (encrypted): If activated, users can send/hand over
Google Drive
encrypted files to other apps via Open In.
Media center
OneDrive
WebDAV:
Egnyte, WebDAV are referred to as
enterprise providers. For these you can
centrally define server and user credentials.
Open In (plain): If activated, users can send/hand over plain
files to other apps via Open In.
Clipboard: If activated, clipboard is enabled in the apps
document view to allow users to copy parts of a document and
to paste them to other apps.
Setting/field
Description
Enable Documents
Enables the Documents feature to securely distribute company
documents.
Enable app password
If you activate this option, users have to enter an additional
password to be able to start the app. The password has to be
defined when the app is started after the configuration has
been applied.
Password complexity
In this field, you can define the required minimum complexity
of the app password. More secure passwords are always
allowed. Passwords (a mix of numeric and alphanumeric
characters) are always seen as more secure than PINs
(numeric characters only).
You can select the following settings:
Any: App passwords do not have restrictions.
4 digit PIN
6 digit PIN
4 char password
6 char password
8 char password
10 char password
74
Administrator guide
Setting/field
Grace period in minutes
Description
In this field, you define a period of time within which no app
password has to be entered if the app comes to the foreground
again. If the device has been locked and unlocked, users must
always enter the app password, even within the grace period.
You can select 1, 2, 5, 10, 15 minutes.
Last server connect
In this field, you can define how long users can use Sophos
Secure Workspace without a connection to the Sophos Mobile
Control server.
When Sophos Secure Workspace becomes active and does
not have contact with the server within the defined period of
time, a lock screen with a Retry button will be displayed. Users
can only unlock the app by tapping on the Retry button to
trigger Sophos Secure Workspace to connect to the server. If
the connection can be established, the app will be unlocked.
If not, access will be denied.
You can define the following settings:
On access: Server connection is always required and the
app is locked when the server cannot be reached.
1 hour: Server connection is required when the app
becomes active one hour or more after the last successful
server connection.
3 hour
6 hour
12 hour
1 day
3 days
1 week
none: No regular contact is required.
Offline starts without server connection
In this field you can define how often users can start Sophos
Secure Workspace without a server connection.
Note: This setting requires the app password feature to be
enabled.
A counter is incremented whenever users enter Sophos Secure
Workspace app password. If the counter exceeds the defined
number, the same lock screen as for the Last server connect
setting will be displayed. The counter will be reset, if a
connection to the Sophos Mobile Control server is established.
Unlimited: No server connection is required.
0: Starting the app without server connection is not
possible.
75
Sophos Mobile Control
Setting/field
Description
1: After one start of the app successful server connection
is necessary.
3
5
10
20
Enable keyring
If you activate this option, the keys are remembered in a
keyring. For subsequent use of the same keys, users do not
have to enter the keys passphrase again.
Passphrase complexity
In this field, you can define the required minimum complexity
of passphrases for new keys to be used for encryption. These
keys are generated on the device. More secure passphrases
are always allowed.
You can select the following settings:
4 char password
6 char password
8 char password
10 char password
Egnyte, WebDAV
You can centrally define credentials for the
enterprise providers. These cannot be
changed by users.
Credential settings that you do not centrally
define can be chosen by the users in the
apps provider credential screens.
For example you can centrally define the
server and user account to be used but you
can leave the password field undefined.
Users then would have to know the
password when accessing the storage
provider.
Server
In this field, enter:
the URL of the root folder on the Corporate documents
WebDAV server
the URL of the root folder on the Egnyte server
the URL of the root folder on the WebDAV server
Use the following format: https://server.company.com
76
Administrator guide
Setting/field
Description
User name
In this field, enter the user name for the relevant server.
Password
Upload folder
In this field, enter the password for the relevant account.
In this field, enter the upload folder for the relevant account.
Exchange ActiveSync
In this configuration, you can define user settings for your Microsoft Exchange Server. You can
add multiple Exchange ActiveSync configurations.
Setting/field
Description
Account name
In this field, enter the account name for
the Exchange ActiveSync account.
Exchange ActiveSync Host
In this field, enter the Microsoft
Exchange Server.
Minimum requirements
Note: If you use the SMC EAS proxy,
enter the URL of the SMC proxy/server.
Allow move
If you deactivate this option, users
5.0+
cannot move messages sent or
received by this account to a different
mail account. This also prevents users
from using a different account to reply
or forward a message from this
account.
Allow recent address syncing
If you deactivate this option, recently
used addresses are not synchronized
with other devices using iCloud.
Use in Mail only
If you select this option, this account
5.0+
can only be used to send messages
from Mail. It cannot be selected as a
sending account for messages created
with other apps, for example Photos or
Safari.
6.0+
77
Sophos Mobile Control
Setting/field
Description
SSL
Make sure that this option is selected
to send all communications through
SSL (Secure Socket Layer).
Domain
In this field, enter the domain of your
environment. You can also leave this
field empty.
User
In this field, enter the user for this
account. You can use the variable
%_USERNAME_% and the server will
replace it with the actual user name if
the device the profile is sent to has an
LDAP link established.
Email address
In this field, enter the email address of
the account. You can use the variable
%_EMAILADDRESS_% and the server
will replace it with the actual email
address if the device the profile is sent
to has an LDAP link established.
Password
In this field, enter the password for this
account.
Synchronization period
In this field, select the time period for
email synchronization. This is the
number of days emails are
synchronized for. If you specify a time
period here, not all emails are
synchronized to the inbox on the mobile
device, but only the emails from within
the specified period.You can select the
following synchronization periods:
Unlimited
One day
Three days
One week
Two weeks
One month
Identity certificate
78
In this field, select the identity certificate
for the connection to ActiveSync. If no
Minimum requirements
Administrator guide
Setting/field
Description
Minimum requirements
certificate is available for selection, a
message is displayed.
Wi-Fi
In this configuration, you specify settings for connecting to wi-fi networks. You can add multiple
Wi-Fi configurations.
Setting/field
Description
SSID
In this field, enter the ID of the wireless
network.
Connect automatically
Select this option to automatically connect
to the target network.
Hidden network
Select this option if the target network is not
open or visible.
Security type
In this field, you select the security type of
the wi-fi network:
Minimum requirements
5.0+
None
WEP
WPA/WPA2
Any (personal)
Corporate WEP
Corporate WPA/WPA2
Any (company)
If you select the personal settings WEP,
WPA/WPA2 or Any (personal), a
Password field is displayed. Enter the
relevant password.
If you select the corporate settings
Corporate WEP, Corporate WPA/WPA2
or Any (company), the tabs Protocols,
Authentication and Trust are displayed.
In the Protocols tab configure the following:
Under Accepted EAP types, specify the
EAP methods to be used for
authentication. Depending on the types
79
Sophos Mobile Control
Setting/field
Description
selected here, the values in the Internal
identity field in this tab become available
for selection.
Under EAP-FAST, configure the
EAP-FAST Protected Access credential
settings.
In the Authentication tab, you specify client
authentication settings:
In the User field, enter the user name
for the connection to the wireless
network.
Select Require password on each
connect, if the password is to be queried
for each connection and transferred with
the authentication.
In the Password field, enter the relevant
password.
In the Identity certificate field, select
the certificate for the connection to the
wireless network.
Note: The certificate to be used has to
be specified in a Client certificate
configuration.
In the External identity field, enter the
externally visible ID (for TTLS, PEAP
and EAP-FAST).
In the Trust tab, you specify server
authentication settings:
Select the trusted certificates from the list.
Note: The certificates to be used has have
be specified in a Root certificate
configuration.
Proxy
In this field, select the proxy settings for the
wi-fi connection:
None
Manually
Automatic
If you select Manually, the fields Server
and port, Authentication and Password
are displayed. Enter the required proxy
information. If you select Automatic, the
field Proxy server URL is displayed. Enter
the URL of the proxy server.
80
Minimum requirements
Administrator guide
VPN
In this configuration, you can define VPN settings for network connections. You can add multiple
VPN configurations.
Setting/field
Description
Connection name
In this field, enter the name of the connection shown
on the device.
Connection type
In this field, select the connection type:
Cisco AnyConnect
IPSec (Cisco)
F5
Check Point
Custom SSL
Different entry fields are shown in the VPN view
depending on the connection type you select here.
Identifier (reverse DNS format) (connection type
Custom SSL)
In this field, enter the custom identifier in reverse DNS
format.
Server (all connection types)
In this field, enter the host name or the IP address of
the server.
Account (all connection types)
In this field, enter the user account for the
authentication of the connection.
Custom Data (connection type Custom SSL)
Enter custom data you received from your vendor
here:
Click Add and enter Key and Value in the
Custom data view.
Click Apply.
Key and Value is displayed in the VPN view.
Group (connection type Cisco AnyConnect)
In this field, enter the group that may be required for
the authentication of the connection.
Send all traffic through VPN
Select this option, if you want all traffic to be sent
through VPN.
81
Sophos Mobile Control
Setting/field
Description
User authentication (connection types Cisco
AnyConnect, F5, Custom SSL)
In this field, select the type of user authentication for
the connection:
Password
If you select this option, the Password field is
shown below the User Authentication field. Enter
the password for authentication.
Certificate
If you select this option, the Certificate field is
shown below the User Authentication field.
Select a certificate.
Device authentication (connection type IPSec
(Cisco))
In this field, select the type of device authentication:
Keys (Shared Secret)/Group name
If you select this option, the fields Group name,
Keys (Shared Secret), Use hybrid
authentication and Request password are
displayed below the Device authentication field.
Enter the required authentication information in
the Group name and Keys (Shared Secret)
fields. Select Use hybrid authentication and
Request password as required.
Certificate
If you select this option, the fields Certificate and
Including user PIN are displayed below the
Device authentication field. In the Certificate
field, select the required certificate. Select
Including user PIN to include the user PIN in
device authentication.
Proxy (all connection types)
In this field, select the proxy settings for the
connection:
None
Manually
If you select this option, the fields Server and
port, Authentication and Password are
displayed. In the Server and port field, enter the
valid address and the port of the proxy server. In
the Authentication field, enter the user name for
the connection to the proxy server. In the
Password field, enter the password for the
connection to the proxy server.
Automatic
82
Administrator guide
Setting/field
Description
If you select this option, the Proxy server URL
field is displayed. Enter the URL of the server with
the proxy setting in this field.
Per app VPN
Minimum requirement: iOS version 7.0+
In this configuration, you can define VPN settings to support the iOS feature "Per app VPN". With
this feature, apps can be configured to automatically connect to VPN when they are launched.
So you can, for example, ensure that data transmitted by managed apps travels through VPN.
After you have set up per app VPN configurations, you can select a configuration in the Edit
package view of an application, see Configure per app VPN and settings for iOS apps (page 109).
Setting/field
Description
Connection name
In this field, enter the name of the connection shown
on the device.
Connection type
In this field, select the connection type:
Cisco AnyConnect
F5
Check Point
Custom SSL
Different entry fields are shown in the VPN view
depending on the connection type you select here.
Identifier (reverse DNS format) (connection type
Custom SSL)
In this field, enter the custom identifier in reverse
DNS format.
Server (all connection types)
In this field, enter the host name or the IP address
of the server.
Account (all connection types)
In this field, enter the user account for the
authentication of the connection.
Custom Data (connection type Custom SSL)
Enter custom data you received from your vendor
here:
Click Add and enter Key and Value in the
Custom data view.
83
Sophos Mobile Control
Setting/field
Description
Click Apply .
Key and Value is displayed in the VPN view.
Group (connection type Cisco AnyConnect)
In this field, enter the group that may be required for
the authentication of the connection.
Send all traffic through VPN
Select this option, if you want all traffic to be sent
through VPN.
User authentication (connection type Cisco
AnyConnect, F5, Custom SSL)
In this field, select the type of user authentication for
the connection:
Password
If you select this option, the Password field is
shown below the User Authentication field.
Enter the password for authentication.
Certificate
If you select this option, the Certificate field is
shown below the User Authentication field.
Select a certificate.
Device authentication (connection type IPSec
(Cisco))
In this field, select the type of device authentication:
Keys (Shared Secret)/Group name
If you select this option, the fields Group name,
Keys (Shared Secret), Use hybrid
authentication and Request password are
displayed below the Device authentication field.
Enter the required authentication information in
the Group name and Keys (Shared Secret)
fields. Select Use hybrid authentication and
Request password as required.
Certificate
If you select this option, the fields Certificate and
Including user PIN are displayed below the
Device authentication field. In the Certificate
field, select the required certificate. Select
Including user PIN to include the user PIN in
device authentication.
Proxy (all connection types)
In this field, select the proxy settings for the
connection:
None
84
Administrator guide
Setting/field
Description
Manually
If you select this option, the fields Server and
port, Authentication and Password are
displayed. In the Server and port field, enter the
valid address and the port of the proxy server. In
the Authentication field, enter the user name for
the connection to the proxy server. In the
Password field, enter the password for the
connection to the proxy server.
Automatic
If you select this option, the Proxy server URL
field is displayed. Enter the URL of the server
with the proxy setting in this field.
Connect automatically on demand
Select this field to ensure that the connection to VPN
is established automatically.
Single sign-on
Minimum requirement: iOS version 7.0+
In this configuration, you can define settings for a single sign-on for third-party apps.
Setting/field
Description
Name
A human-readable name for the account.
Kerberos principal name
Optional. The Kerberos principal name. If not
provided, the user is prompted for a name during
profile installation.
Realm
The Kerberos realm name. The realm name must be
specified in upper-case letters.
In the URLs tab, you can optionally set up a list of URL prefixes that must be matched to use this
account for Kerberos authentication through HTTP. If you do not specify prefixes here, the account
matches all http:// and https:// URLs.
In the App identifiers tab, you can optionally set up a list of app identifiers that are allowed to
use this login. If you do not specify app identifiers here, the login matches all identifiers.
85
Sophos Mobile Control
Single app mode
Minimum requirements: iOS version 6.0+ supervised
In this configuration, you can define settings for the single mode that locks end user devices into
a single app and prevents users from changing to other apps.
Setting/field
Description
Select source
In this field, you can select the source for the
single app:
Minimum
requirements
If you select App list, the Apps dropdown
list is displayed with a list of all available
iOS apps for this customer. Select the app
from the list and click Apply.
If you select Custom, the field App
identifier is displayed. Enter the app
identifier and click Apply.
Options
86
7.0+
Disable touch
Select this option to disable touch for single app
mode.
Disable rotation
Select this option to disable rotation for single
app mode.
Disable volume buttons
Select this option to disable volume buttons for
single app mode.
Disable ringer switch
Select this option to disable ringer switch for
single app mode.
Disable sleep wake button
Select this option to disable the wake button for
single app mode.
Disable auto lock
Select this option to disable auto lock for single
app mode.
Enable voice over
Select this option to enable voice over for single
app mode.
Enable zoom
Select this option to enable zoom for single app
mode.
Administrator guide
Setting/field
Description
Minimum
requirements
Enable invert colors
Select this option to enable the inversion of
colors for single app mode.
Enable AssistiveTouch
Select this option to enable AssistiveTouch for
single app mode.
Enable speak selection
Select this option to enable speak selection for
single app mode.
Enable mono audio
Select this option to enable mono audio for
single app mode.
User enabled options
7.0+
Voice over
Select this option to allow voice over
adjustment.
Zoom
Select this option to allow Zoom adjustment.
Invert colors
Select this option to allow Invert colors
adjustment.
AssistiveTouch
Select this option to allow AssistiveTouch
adjustment.
Web clip
In this configuration, you can define web clips to be added to the Home screen of user devices.
Web clips provide fast access to favorite web pages. But you can also add a web clip with a
support phone number for example, to provide a quick way to dial the helpdesk. You can add
multiple Web clip configurations.
Setting/field
Description
Description
In this field, enter a description for the web clip.
URL
In this field, enter the URL of the web clip.
Can be removed
If you deactivate this option, the user cannot remove
the web clip. It cannot be deleted from the device
unless the user removes the profile that installed it.
87
Sophos Mobile Control
Setting/field
Description
Full screen
If you select this option, the web clip is opened full
screen on the device. A full screen web clip opens
the URL as a web app.
APN
With this configuration, you can change the device's Access Point Name (APN) and cell network
proxy settings. These settings define how devices connect to the carrier's network. You can only
add one APN configuration within a profile.
Note: If these settings are not correct, the device cannot access data using the cellular network.
To undo settings changes, the profile must be removed from the device.
Setting/field
Description
Access point name (APN)
In this field, enter the name of the access point of
the carrier (GPRS).
User name for access point
In this field, enter the user name for the access point.
Note: iOS supports APN user names of up to 64
characters.
Password for access point
In this field, enter the password for the access point.
Note: iOS supports APN passwords of up to 64
characters.
Proxy server and port
In this field, you can enter the valid address and the
port of the proxy server.
Web content filter
Minimum requirements: iOS version 7.0+ supervised
In this configuration, you can define URL blacklists and whitelisted bookmarks.
88
Setting/field
Description
Blacklist
Select this field to define a list of blocked URLs that
may not be accessed on end-user devices. Click
Administrator guide
Setting/field
Description
Next to display the Web Content Filter view. In this
view, you can add individual URLs.
Use a new line for each URL.
Whitelist with bookmarks
Select this field, to define a whitelist with bookmarks
to be added to the Safari browser on end-user
devices. All other sites are blocked. Click Next to
display the Web content filter view. Click Add to
add individual URLs as bookmarks.
Global HTTP proxy
Minimum requirement: supervised
Note: This configuration is only effective for supervised devices.
With this configuration, you can configure a single corporate proxy server. You can only add one
Global HTTP proxy configuration within a profile.
Setting/field
Description
Global HTTP proxy
In this field, select the proxy settings for the
connection:
Manually
If you select this option, the fields Server and
port, Authentication and Password are
displayed. In the Server and port field, enter the
valid address and the port of the proxy server. In
the Authentication field, enter the user name for
the connection to the proxy server. In the
Password field, enter the password for the
connection to the proxy server.
Automatic
If you select this option, the Proxy server URL
field is displayed. Enter the URL of the server
with the proxy setting in this field.
89
Sophos Mobile Control
Root certificate
In this configuration, you can upload a root certificate for devices. You can add multiple Root
certificate configurations. Click Upload a file and browse for the certificate. Select it and click
Open. The name of the certificate is shown in the Certificate name field.
Note: The certificate you upload here is only available for this profile. If you require certificates
in other profiles, you have to upload them again.
Client certificate
In this configuration, you can upload a client certificate for devices. You can add multiple Client
certificate configurations. Click Upload a file and browse for the certificate. Select it and click
Open. The name of the certificate is shown in the Certificate name field. Enter the Password
for the selected certificate.
Note: The certificate you upload here is only available for this profile. If you require certificates
in other profiles, you have to upload them again.
SCEP
In this configuration, you can define settings that allow the devices to obtain certificates from a
Certificate Authority by using Simple Certificate Enrollment Protocol (SCEP). You can only add
one SCEP configuration within a profile.
Note: This configuration is only available, if SCEP has been configured during Sophos Mobile
Control setup. SCEP needs to be enabled during Sophos Mobile Control installation, see the
Sophos Mobile Control installation guide. A super administrator can then configure the required
SCEP settings in the web console, see the Sophos Mobile Control super administrator guide. The
settings defined are transferred to iOS profiles.
Note: Super administrators are not supported for Sophos Mobile Control as a Service.
90
Setting/field
Description
URL
In this field, enter the URL of the SCEP server.
CA name
In this field, enter a name that is understood by the
Certificate Authority. The name can, for example, be
used to distinguish between instances.
Subject
In this field, enter the representation of an X.500
name as an array of OID and value. For example:
/C=US/O=Apple Inc./CN=foo/1.2.5.3=bar. This
translates to: [ [ [“C”, “US”] ], [ [“O”, “Apple Inc.”] ], ...,
[ [ “1.2.5.3”, “bar” ] ] ]
Administrator guide
Setting/field
Description
Type of subject alternative name
In this field, select the type of an alternative name
for the SCEP server:
None
RFC 822 name (email address)
DNS name
Uniform Resource Identifier
If you select any other option than None, the fields
Value of subject alternative name and NT user
login name are displayed below the field Type of
subject alternative name. Enter the required name
values.
Challenge
In this field, enter a pre-shared secret the SCEP
server can use to identify the request or user.
Note: If the SCEP module of the Sophos Mobile
Control server is used, this field is prefilled with
%_CACHALLENGE_%. Do not change this value.
Retries
In this field, enter the number of retries if the server
sends a "pending" response.
Retry delay
In this field, enter the number of seconds between
retries.
Key size
In this field, select the key size:
1024
2048
Use as digital signature
Select this option to define the use as a digital
signature as acceptable for the key.
Use for encryption
Select this option to define use for encryption as
acceptable for the key.
Signature
In this field, enter a hexadecimal character string as
a signature.
91
Sophos Mobile Control
Managed domains
Managed domains means that files downloaded from specific websites in Safari can only be
opened using apps that were pushed to the device using MDM.
You can enter managed Email domains and Web domains. Enter one domain per line.
Note: If a managed web domain entry contains a port number, only addresses that specify that
port number will be considered managed. Otherwise, only the standard ports will be considered
managed (port 80 for http and 443 for https).
15.3.3 Import iOS device profiles created with Apple Configurator
You can import profiles created with Apple Configurator into the web console.
Note: Apple Configurator can be downloaded from the App Store.
1. After you have created a profile in Apple Configurator, export it (unencrypted and unsigned)
and save it on your computer.
2. In the web console, under CONFIGURE, click Profiles and then clickApple iOS.
The Profiles view is displayed.
3. Click Create profile and select Import profile.
The Edit profile view is displayed.
4. Enter a Name and a Version for the new profile.
5. Under Operating systems, select the operating system the profile should apply to.
6. Click Upload a file and browse for the file you have saved on your computer, select it and
click Open.
The profile is displayed in the Edit profile view.
7. Click the Save button.
The profile is available for transfer. It is displayed in the Profiles view for Apple iOS.
15.4 Create Windows Phone 8 device profiles
1. In the web console, under CONFIGURE, click Profiles and then click Windows Phone 8.
The Profiles view is displayed.
2. Click Create profile.
The Edit profile view is displayed.
3. Enter a Name and a Version for the new profile.
4. In the Description field, enter a description for the profile.
5. Under Operating systems, select the operating system the profile should apply to.
92
Administrator guide
6. Click the Add configuration button to add configurations with Android/Windows Phone 8
configuration settings to the profile.
The Available configurations view is displayed.
7. Select the configuration you want to add and click Next.
The settings view of the configuration is displayed.
8. Specify the required settings. For a detailed list of all configurations and settings available,
see Available Windows Phone 8 configurations (page 93).
9. Click the Apply button to save your changes.
The configuration is displayed in the Edit profile view under Configurations.
10. After you have added all required configurations, click the Save button.
The profile is available for transfer. It is displayed in the Profiles view for Windows Phone 8.
15.4.1 Available Windows Phone 8 configurations
The following configurations are available for Windows Phone 8 profiles in the Available
configurations view when you create or edit a profile. Some configurations can be added only
once within a profile, others several times.
Password policies
In this configuration, you can define passcode rules for devices. You can only add one Password
policies configuration within a profile.
Setting/field
Description
Password type
In this field, select the type of password you want to
define:
Alphanumeric
Alphanumeric or numeric
Allow simple password
If you select this option, users are allowed to use
sequential or repeated characters in their password,
for example "1111" or "abcde".
Minimum password length
Specifies the minimum number of characters a
password must contain.
Maximum number of failed attempts (1 - 999 or
0)
In this field, you can specify the maximum number
of failed attempts to enter the correct password
before the device is wiped.
93
Sophos Mobile Control
Setting/field
Description
Time in minutes until the device is locked (1 - 999 In this field, specify how soon (in minutes) the device
or 0)
will be locked if it has not been used. The device can
be unlocked by entering the password.
Password history (1 - 50 or 0)
In this field, you can specify how many old passwords
are remembered and compared with new ones.When
the user defines a new password, it will not be
accepted if it matches a previously used password.
Value range: 1 to 50 or 0 (no password history).
Maximum password age (1 - 730 days or 0)
Requires users to change their password in the
specified interval. Value range: 0 (no password
change required) to 730 days.
Minimum number of different character groups
Specifies the minimum number of non-alphanumeric
characters (for example & or !) a password must
contain.
Allow the password grace period to be set
If you select this option , users are allowed to set the
password grace period.
Restrictions
In this configuration, you can define restrictions for devices. You can only add one Restrictions
configuration within a profile.
Setting/field
Description
Device
Forbid SD card
Forbid unencrypted device
Forbid action center notifications above lock
screen
94
Forbid adding of non-Microsoft accounts
manually
Forbids adding all types of email accounts, as well
as Exchange, Office 365 and Outlook.com accounts.
Forbid Microsoft account connection
The Microsoft account is the system account used
for synchronization, backup and the Store.
Administrator guide
Setting/field
Description
Forbid developer unlock
Forbid Windows Store
Forbid native browser
Forbid camera
Telemetry
Various
Forbid copy and paste
Forbid Cortana
Forbid Save as of Office files
Forbid screen capture
Forbid sharing of office files
Forbid "Sync my settings"
Forbid voice recording
Wi-Fi
Forbid Wi-Fi
Forbid internet sharing
Forbid auto-connect to Wi-Fi Sense hotspots
Forbid hotspot reporting
Forbid manual configuration
Connectivity
Forbid NFC
Forbid Bluetooth
95
Sophos Mobile Control
Setting/field
Description
Forbid USB connection
Roaming and costs
Forbid cellular data roaming
Forbid VPN over cellular
Forbid VPN roaming over cellular
Security and privacy
Forbid Bing Vision to store images from Bing
Vision search
Forbid use of location when searching
Forbid manual installation of root certificates
Forbid locating
Activating this option also forbids Sophos Mobile
Control to locate the device.
SafeSearch permission
Unenrollment
Forbid user to reset the phone
Forbid manual MDM unenrollment
Exchange ActiveSync
In this configuration, you can define user settings for your Microsoft Exchange Server. You can
add multiple Exchange ActiveSync configurations.
96
Setting/field
Description
Name
In this field, enter an account name.
Administrator guide
Setting/field
Description
Server address
In this field, enter the address of the Microsoft
Exchange Server.
Note: If you use the SMC EAS proxy, enter the URL
of the SMC proxy/server.
SSL
Make sure that this option is selected to send all
communications through SSL (Secure Socket Layer).
Domain
In this field, enter the domain for this account.
User
In this field, enter the user for this account. You can
use the variable %_USERNAME_% and the server
will replace it with the actual user name if the device
the profile is sent to has an LDAP link established.
Email address
In this field, enter the email address of the account.
You can use the variable %_EMAILADDRESS_%
and the server will replace it with the actual email
address if the device the profile is sent to has an
LDAP link established.
Password
In this field, enter the password for this account.
Synchronization interval
In this field, select the interval between
synchronization processes:
Sync on receipt
Manually
10 minutes
15 minutes
30 minutes
One hour
Synchronization period
In this field, select the time period for synchronization.
This is the number of days items are synchronized
for. If you specify a time period here, not all items
are synchronized to the inbox on the mobile device,
but only the items from within the specified period.
You can select the following synchronization periods:
Unlimited
Three days
One week
97
Sophos Mobile Control
Setting/field
Description
Two weeks
One month
Synchronize content types
In this field you select the type of items that are
synchronized:
Emails
Contacts
Calendar
Tasks
Root certificate
In this configuration, you can upload a root certificate for devices. You can add multiple Root
certificate configurations. Click Upload a file and browse for the certificate. Select it and click
Open. The name of the certificate is shown in the Certificate name field.
Note: The certificate you upload here is only available for this profile. If you require certificates
in other profiles, you have to upload them again.
Wi-Fi
In this configuration, you specify settings for connecting to wi-fi networks. You can add multiple
Wi-Fi configurations.
98
Setting/field
Description
SSID
In this field, enter the ID of the wireless network.
Connect automatically
If you select this option, the connection will be
established automatically.
Hidden network
Select this option if you want the network to be
hidden.
Security type
Select the Security type from the drop-down list. If
you select either WPA-PSK or WPA2-PSK you have
to specify the password.
Proxy
If you select Manually from the drop-down list, you
have to specify Server and port.
Administrator guide
15.5 Placeholders for profiles
Generic profiles may contain placeholders which are replaced by user data at the time of task
execution. The following placeholders can be used in profiles:
ActiveDirectory placeholders:
■
%_EMAILADDRESS_%
■
%_USERNAME_%
Device property placeholder:
%_DEVPROP(property-name)_%
This placeholder can for example be used to specify the IMEI of the device: %_DEVPROP(IMEI)_%
15.6 Transfer iOS and Android profiles
1. In the web console, go to Profiles and click the required mobile device type: Apple iOS,
Android or Windows Phone 8.
The Profiles view for the mobile device type selected is displayed.
2. Click the blue triangle next to the profile to be transfered and select Transfer.
The Select device(s) view is displayed.
3. In this view, you can:
■
■
Select individual devices you want to transfer the profile to.
Click on Select device group(s) and select one or several device groups for transferring
the profile.
4. After you have made your selection, click Next.
The Set execution date view is displayed.
5. Under Scheduled date, select Now or specify a Date and Time for the execution of this task.
6. Click the Finish button.
The Task view is shown.
The profile is transferred to the selected device(s) at the specified date and time.
15.7 Assign Windows Phone 8 profiles
To transfer profiles to Windows Phone 8 devices you have to assign them to devices first. They
are then transferred during the next synchronization process.
1. In the web console, go to Profiles and click Windows Phone 8.
The Profiles view for Windows Phone 8 is displayed.
99
Sophos Mobile Control
2. Click the blue triangle next to the profile to be transfered and select Assign.
The Select device(s) view is displayed.
3. In this view, you can:
■
■
Select individual devices you want to transfer the profile to.
Click on Select device group(s) and select one or several device groups for transferring
the profile.
4. After you have made your selection, click the Finish button.
The profile is assigned to the selected device(s) and transferred during the next synchronization
process.
15.8 Download iOS, Android and Windows Phone 8 profiles
from the web console
You can download iOS, Android and Windows Phone 8 profiles that you have configured in the
web console. This is useful, for example if you need to pass the defined settings on to Sophos
Support.
1. In the web console, go to Profiles and click the required mobile device type: Apple iOS,
Android or Windows Phone 8.
The Profiles view for the mobile device type selected is displayed.
2. Click the Name of the required profile.
The Show profile view is displayed.
3. Click the Download button and download the profile to a location of your choice.
iOS profiles are saved as .mobileconfig files (Plist), Android profiles as .smcprofile files (xml
format) and Windows Phone 8 profiles as .windowsphoneconfig files.
100
Administrator guide
16 Work with task bundles
By using task bundles you can bundle several tasks for mobile devices in one transaction. So
you can bundle all tasks necessary to have a device fully registered and running:
■
Provision the device.
■
Apply required policies.
■
Install required applications (for example managed apps for Apple iOS devices).
■
Apply required Profiles.
You can also include wipe commands in task bundles to automatically wipe non-compliant (for
example jailbroken or rooted) devices. For further information, see Configure compliance rules
(page 34).
16.1 Create task bundles
1. In the web console, under CONFIGURE, click Task bundles and select Android or Apple
iOS.
The Task bundles view is displayed.
2. Click Create task bundle.
The Edit task bundle view is displayed.
3. Enter a Name, Version and Description.
Note: Required fields are marked with an asterisk.
4. Under Operating systems, select the operating systems the new task bundle applies to.
5. Select the Selectable for compliance actions checkbox to make the task bundle it available
for use as a response to compliance violations, see Configure compliance rules (page 34).
Note: This option will be disabled when you edit an existing task bundle and the task bundle
is already used as compliance action.
6. Click the Create task button.
7. Select the task type and click Next.
The next view depends on the task type you have selected. For example, if you have selected
the type Install profile, the Install profile view is displayed.
8. Follow the wizard steps to add the required task.
9. Repeat this procedure to add further tasks. When adding new tasks you can specify your own
meaningful task names. These task names are shown during installation in the Self Service
Portal.You can set the order for selected tasks by using the sort arrows on the right-hand side
of the Tasks list.
101
Sophos Mobile Control
10. After you have added all required tasks to the task bundle, click the Save button in the Edit
task bundle view.
Note: When you edit an existing task bundle which is used as Enrollment package in the
Self Service Portal settings, the enrollment task cannot be deleted, see Configure Self Service
Portal settings (page 23).
The task bundle is available for transfer. It is displayed in the Task bundles view.
16.2 Duplicate task bundles
Since creating a task bundle can be time-consuming, you can duplicate finished task bundles.
This function is helpful, if several extensive task bundles with similar tasks are required. Then
only a few tasks need to be deleted or added.
Note: You can only duplicate task bundles if they are not edited at the same time. Copies are
named “Copy of” plus the name of the original. You can rename the bundles according to your
requirements.
1. In the web console, under CONFIGURE, click Task bundles and select Android or Apple
iOS.
The Task bundles view is displayed.
2. Click the blue triangle next to the task bundle you want to duplicate and click Duplicate.
The task bundle is duplicated and shown in the Task bundles view. You can now edit the
duplicated task bundle as required. To edit the task bundle, click the blue triangle next to it and
select Edit.
16.3 Transfer task bundles to individual devices or to device
groups
1. In the web console, under CONFIGURE, click Task bundles and select Android or Apple
iOS.
The Task bundles view is displayed.
2. Click the blue triangle next to the required task and click Transfer.
The Select device(s) view is displayed.
3. In this view, you can:
■
■
Select individual devices you want to transfer the task bundle to.
Click Select device group(s), to open the Select device group(s) view and select one
or several device groups for transferring the task bundle.
4. After you have made your selection, click Next.
The Set execution date view is displayed.
5. Under Scheduled date, select Now or specify a Date and Time for the execution of this task.
102
Administrator guide
6. Click the Finish button.
The Task view is shown.
The task bundle is transferred to the selected device(s) at the specified date and time.
103
Sophos Mobile Control
17 Work with apps
In the web console under CONFIGURE, click Apps to add apps to be installed on devices.
You can provide apps to be installed on the devices as follows:
■
You can upload the app to the web console.
■
You can provide a link to the app for download.
Note: Windows Phone 8 apps can only be installed by a link through the Enterprise App Store.
Note: For iOS devices in supervised mode silent installation of managed apps is supported, if
the relevant device allows that.
17.1 Upload apps to the web console
1. In the web console, under CONFIGURE, click Apps and then select the platform for which
you want to add the app.
The Applications view is displayed.
2. Click Add app and select Android package or iOS package.
The Edit Android package or the Edit iOS package view is displayed.
3. Enter a Name and a Version for the new package. The name field is mandatory. In the field
App identifier, you can enter the identifier for the app.
Note: If you do not know the exact identifier, leave this field empty. For iOS apps the identifier
is usually entered automatically.
4. For iOS, Android and Windows Phone 8 devices you can provide the application through the
Enterprise App Store and define it as recommended or required. They are then displayed in
the Recommended or Required sections of the Enterprise App Store. To do so, select
Recommended (unmanaged) or Required (unmanaged) in the Type field. For iOS apps
you can select Recommended (managed) or Required (managed). If you do so, the app is
pushed as a managed application to the end-user device as soon as the user selects to install
it.
If you select Server-initiated installation only, installation can only be triggered by the Sophos
Mobile Control web console.
5. Next to Available to device group, click Show and select the device groups to which the app
should be available.
6. In the Description text field, you can enter a description for the new application package.
7. Next to Operating systems, click Show and select the operating system versions the new
package applies to.
Note: For Samsung Knox devices the Install in Knox container option is available. Select
it, if you want the app to be installed in a Knox container. The option is only visible if a Knox
Advanced license key has been provided in System setup.
104
Administrator guide
8. Click Upload a file to directly upload the package to the web console. Browse for the package
and click Open.
9. Click the Save button.
The app is available for installation. It is displayed in the Applications view. If you have configured
the software as Recommended or Required, it is displayed in the Enterprise App Store of the
Sophos Mobile Control client on the end user device for download. Users can select it for
installation. The installation process runs unattended or with very little user interaction. For further
information on installing required and recommended apps on devices, refer to the Sophos Mobile
Control user guide.
17.2 Create links to apps
1. In the web console, under CONFIGURE, click Apps and then select the platform for which
you want to add the app.
The Applications view is displayed.
2. Click Add app and select Android link, iOS link or Windows Phone link.
The respective view for editing links is displayed.
3. Enter a Name and a Version for the new link. The name field is mandatory. In the field App
identifier, you can enter the identifier for the app.
Note: If you do not know the exact identifier, leave this field empty. For iOS apps the identifier
is usually entered automatically.
4. For iOS, Android and Windows Phone 8 devices you can provide the application through the
Enterprise App Store and define it as recommended or required. They are then displayed in
the Recommended or Required sections of the Enterprise App Store. To do so, select
Recommended (unmanaged) or Required (unmanaged) in the Type field. For iOS apps
you can select Recommended (managed) or Required (managed). If you do so, the app is
pushed as a managed application to the end-user device as soon as the user selects to install
it.
If you select Server-initiated installation only, installation can only be triggered by the Sophos
Mobile Control web console.
5. Next to Available to device group, click Show and select the device groups for which the
app should be available.
6. In the Description text field, you can enter a description for the new link.
7. Next to Operating systems, click Show and select the operating system versions the new
link applies to.
Note: For Samsung Knox devices the Install in Knox container option is available. Select
it, if you want the app to be installed in a Knox container. The option is only visible if a Knox
Advanced license key has been provided in System setup.
105
Sophos Mobile Control
8.
■
■
■
To create an Android link, click Obtain a link for Android, search for the required app in
Google play and open it. Copy the link shown in the web address bar of your browser.
To create an iOS link, click Search in AppStore or use Apple’s Link Maker. To go to the
Link Maker web page, click the link under the Link text field.
To create a Windows Phone link, click Obtain a link for Windows Phone, search for the
required app in the Windows Phone store and open it. Copy the link shown in the web
address bar of your browser.
9. Paste the link into the Link text field.
10. Click Save.
The app is available for installation. It is displayed in the Applications view. If you have configured
the software as Recommended or Required, it is displayed in the Enterprise App Store of the
Sophos Mobile Control client on the end user device for download. Users can select it for
installation. The installation process runs unattended or with very little user interaction. For further
information on installing required and recommended apps on devices, refer to the Sophos Mobile
Control user guide.
17.3 Manage apps purchased with the Apple Volume
Purchase Program
With the Apple Volume Purchase Program (VPP), you can buy iOS apps in volume for distribution
within your company. For detailed information on how to enroll and use the Apple Volume Purchase
Program, see http://www.apple.com/business/vpp/.
17.3.1 Manage Apple VPP apps based on service tokens
After an order placed with the Apple Volume Purchase Program has been completed, you can
download a service token (sToken) that contains the licenses for the apps purchased.
To manage apps purchased with Apple Volume Purchase Program with Sophos Mobile Control,
you can set up the service token in the Sophos Mobile Control web console. This service token
is used for authentication at the Apple web service. You can provide the licenses included in the
service token to users by inviting them to become authorized Apple VPP users. After users have
accepted their invitations, they become authorized VPP users.
The process for inviting users to become authorized VPP users differs depending on whether you
use Sophos Mobile Control's 'internal' or 'external' user management. The instructions in this
section cover both.
Note: For information on internal and external user management, see the Sophos Mobile Control
super administrator guide. Alternatively, if you are using Sophos Mobile Control as a Service, see
Configure Self Service Portal user management for Sophos Mobile Control as a Service (page
26).
The key steps for managing apps purchased with the Apple VPP based on service tokens are:
1. Set up the VPP service token in Sophos Mobile Control.
2. Invite users.
106
Administrator guide
17.3.1.1 Set up VPP service token (sToken)
To provide licenses for apps purchased via the Apple Volume Purchase Program in Sophos
Mobile Control, you need to set up a VPP service token (sToken) in the web console.
1. In the web console, under SYSTEM, click Setup and then click System setup.
The System setup view is displayed.
2. On the Apple Volume Purchase Program tab under VPP service token (sToken), click the
link to the Apple iTunes VPP Portal.
The Apple Volume Purchase Program website is displayed.
3. Select Business.
The Business Store Sign In page is displayed.
4. Enter your Apple ID and your Password to sign in.
5. On the next page, select your account.
Your Purchase History page is displayed.
6. To generate a VPP service token and download it in a text file, click the Download button at
the bottom of the page.
An sToken is generated and sent to you in a .txt file.
7. Store the file in a location you can access from the Sophos Mobile Control web console.
8. In the Sophos Mobile Control web console, under System setup, on the Apple Volume
Purchase Program tab, click Upload a file and browse for the service token file (.vpptoken),
select it and click Open.
Organization and Expiry date is taken from the imported file and entered automatically.
9. Optionally, enter your Apple ID and the country code.
10. Click the Save button.
Note: After you have saved your changes, the service token text is no longer displayed in the
text field for security reasons, but the field shows that a service token is in place.
17.3.1.2 Invite users to Apple VPP
You can invite individual users or all users to Apple VPP in the Show users view.
1. In the web console, under MANAGE, click Users.
The Show users view is displayed.
2. You can invite all users or individual users to Apple VPP:
a) To invite all users, click Invite users to Apple VPP.
A dialog, asking if you want to register all users for Apple VPP is displayed.
Click Yes. An invitation email will be sent to each user. The users are informed that their
Apple iTunes account will be connected with the Apple Volume Purchase Program by
107
Sophos Mobile Control
clicking the link in this email. Afterwards they can install and use apps licensed by your
company.
b) To invite a single user, click on the required user name in the Show users view.
The Show user view is displayed.
In the Apple Volume Purchase Program (VPP) section, click Invite user to VPP.
A dialog, asking if you want to register this user for Apple VPP is displayed.
Click Yes. An invitation email will be sent to the user. The user is informed that their Apple
iTunes account will be connected with the Apple Volume Purchase Program by clicking
the link in this email. Afterwards the user can install and use apps licensed by your company.
Note: If you use external user management, you can click Search and invite a user to
Apple VPP to browse for the desired user.
The users can now use your licensed apps.
17.3.1.2.1
Managing VPP users
On the Show user view of each user an Apple Volume Purchase Program (VPP) section is
displayed.
It shows:
■
The Apple VPP user status
■
The apps available for the user
If you want to remove the user from Apple VPP, click Delete VPP registration.
Click Re-send invitation mail to send the invitation mail again if the user did not receive or lost
the initial mail.
17.4 Install apps
Prerequisite: The required application package has been created under Apps.
1. In the web console, under CONFIGURE, click Apps and select Android, Apple iOS or
Windows Phone 8.
The Applications view is displayed.
2. Click the blue triangle next to the required app and select Install.
The Select device(s) view is displayed.
3. In this view, you can:
■
■
Select individual devices on which you want to install the software package.
Click the Select device group(s) button, to open the Select device group(s) view and
select one or several device groups for installing the software.
4. Click Next.
The Set execution date view is displayed.
108
Administrator guide
5. Under Scheduled date, select Now or specify a Date and Time for the execution of this task.
6. Click the Finish button.
The application package is installed on the selected device(s) at the specified time.
17.5 Configure per app VPN and settings for iOS apps
Note: Per app VPN and settings are supported as of iOS 7.
For iOS apps, you can select a per app VPN to support the iOS feature "Per app VPN". With this
feature, apps can be configured to automatically connect to VPN when they are launched. You
can also configure settings for the app that will be deployed on the end-user device during the
app installation.
Prerequisites:
■
To be able to select a per app VPN, you need to define a Per app VPN configuration in an
iOS configuration profile in the web console. See Create iOS device profiles in the web console
(page 65) and Available iOS configurations (page 66).
■
To define settings, you need to know the required parameter and the parameter type.
1. In the web console, under CONFIGURE, click Apps and then click Apple iOS.
The Applications view is displayed.
2. Click the blue triangle next to the required app and click Edit.
The Edit package view is displayed.
3. Click the Show button next to the Settings and VPN field.
The Edit settings and VPN view is displayed.
4. Select the required configuration from the Per app VPN dropdown list to define the VPN the
app is supposed to connect to.
5. To add managed settings, click Create parameter.
The Configuration parameter view is displayed.
6. In this view, configure the following:
a) In the Parameter field, enter the required parameter, for example, SMC_URL.
b) In the Value field, enter the parameter value, for example, smc.sophos.com.
c) In the Type field, select the parameter type: String, Bool, Integer or Real.
d) Click the Apply button.
The set of managed settings is displayed in the Edit Settings and VPN view.
7. In the Edit Settings and VPN view, click the Apply button.
The Show button in the Edit package view shows the number of sets of managed settings
configured.
8. Click the Save button.
109
Sophos Mobile Control
The selected per app VPN will be used when the app connects to VPN. The settings will be
provided to end-user devices during the app installation.
17.6 Uninstall apps
Note: Silent uninstallation works only on iOS devices for managed apps distributed by Sophos
Mobile Control. It does not work for Android devices.
1. In the web console, under CONFIGURE, click Apps and select Android or Apple iOS.
The Applications view is displayed.
2. Click Uninstall.
The Select device(s) view is displayed.
3. In this view, you can:
■
■
Select individual devices on which you want to uninstall the software package.
Click the Select device group(s) button, to open the Select device group(s) view and
select one or several device groups for uninstalling the software.
4. Click Next.
The Select app view is displayed.
5. Select the required app and click Next.
The Set execution date view is displayed.
6. Under Scheduled date, select Now or specify a Date and Time for the execution of this task.
7. Click the Finish button.
The selected applications are uninstalled from the selected device(s) at the specified date and
time. If necessary, the user is prompted the confirm uninstallation.
110
Administrator guide
18 Distribute corporate documents
Note: To use this function, you must have an SMC Advanced license for managing Sophos
Secure Workspace.
In the Sophos Mobile Control web console, you can upload files for distribution to the devices of
your users.
■
Documents managed in the Sophos Mobile Control web console are automatically added to
the Corporate Documents store of Sophos Secure Workspace.
■
In the Corporate Documents store on the device, the Category that can be defined for each
document is shown as folder.
■
If Sophos Secure Workspace is not managed by Sophos Mobile Control, the Corporate
Documents store is not visible.
■
Documents in Corporate Documents are read only. They cannot be edited in Sophos Secure
Workspace and then uploaded again.
To distribute corporate documents:
■
Install the Sophos Secure Workspace app, see Work with apps (page 104).
■
Add documents in the Sophos Mobile Control web console.
18.1 Add corporate documents
To distribute documents to devices:
1. In the web console, under CONFIGURE, click Documents.
The Documents view is displayed.
2. Click Add document.
The Edit document view is displayed.
3. Enter a category for the document.
■
The Category is the name of the folder in which the document is displayed in the Corporate
Documents store on the device.
■
Multiple files can have the same Category.
■
If you leave this field blank, the file will be shown in the root folder of Corporate Documents.
111
Sophos Mobile Control
4. Define settings for the document:
■
Activate Copy to clipboard, if the user should be able to copy the document to the clipboard.
■
Activate Share document, if the user should be able to share the document.
■
Activate Use document offline to allow users to create a Favorite for the document:
When a plain document from Corporate Documents is marked as Favorite, it will be
stored encrypted in the Sophos Secure Workspace app. When sharing the document is
allowed, the encrypted favorite file will be decrypted automatically before it is forwarded to
other apps. If you deactivate the options in the Sophos Mobile Control web console and
users already have offline copies, the file stored in Sophos Secure Workspace Favorites
on the mobile devices will be removed automatically as part of the next synchronization.
5. Click Show next to Assigned groups and select the group that should have access to the
document.
6. Add a description for the document.
7. Click Upload a file and browse for the document. Select it and click Open.
8. Repeat this step for each document you want to distribute.
The document is added to the documents list. It is distributed to the users, who can view it in the
Sophos Secure Workspace app.
112
Administrator guide
19 Manage devices
In the web console, under MANAGE > Devices and Device groups, you can keep track of all
registered devices and device groups and carry out a number of administrative tasks. After adding
devices to Sophos Mobile Control you can, for example:
■
View and edit device details.
■
Allow or disallow email access for devices.
■
Lock or unlock devices remotely.
■
Reset the passcodes/passwords of devices.
■
Wipe the device remotely in case of loss or theft.
■
Decommission devices (Android and iOS).
■
Delete devices.
19.1 View devices
1. In the web console, under MANAGE, click Devices.
The Devices view is displayed, showing all devices registered with Sophos Mobile Control for
this customer.
2. Go to the required device and click on its name.
The Show device view is displayed for the selected device.
19.1.1 The Show device view
In the Show device view, all relevant information for an individual device is displayed. At the top
of the view, you can see the most important device information at a glance:
■
Status (Managed or Not Managed)
■
Compliant (Yes or No)
■
Operating system
■
Email access (Yes or No)
■
Last synchronization
■
Last app synchronization
■
Owner (Company device or Employee device)
■
Name
■
Description
■
User
113
Sophos Mobile Control
If the device has an LDAP connection to an external user directory, the corresponding user
name is shown here.
■
Email address
■
Device group
■
Device ID
In addition, the Show device view shows detailed device information in the following tabs. The
tabs and information shown depend on the mobile device type (platform).
■
Installed profiles
Shows the profiles installed on the device.
Note: For Android devices, profiles are displayed as of Sophos Mobile Control client version
3.0.
On this tab, the Install profile button is available. Using this button, you can install profiles on
the device. You can also remove profiles from the device by clicking the Delete icon next to
the relevant profile.
This tab also lists provisioning profiles.
■
Device properties
Shows device properties, for example, properties for model, model name, OS version. For
Android devices, rooted smartphones are detected and the relevant property is shown. For
iOS devices, jailbroken smartphones are detected and the relevant property is shown.
■
Custom properties
Shows the custom properties. These are the properties that you can create yourself. Custom
properties can, for example, be used in placeholders if no Active Directory connection is
available. When you edit a device, you can also add user-specific information here.
■
Internal properties
Shows internal device properties, for example, ActiveSync traffic allowed, IMEI.
■
Compliance violations
This tab is only displayed for non-compliant devices. It shows the compliance violations of the
device. Click the Show (magnifier) icon next to a compliance violation to view the violation
History.
You can update the compliance information shown for the device from the Compliance
violations tab. Click the Edit icon on the Compliance violations tab or the Add new action
icon in the History view to display the Add action dialog. In this dialog, you can enter
information about an action taken to resolve the compliance violation. For example: Notified
user by email.
■
Installed apps
Shows the software installed on the device.
114
Administrator guide
For iOS devices, the Managed column on the Installed apps tab indicates managed apps.
Managed apps are a new functionality introduced with iOS 5.0. With Sophos Mobile Control
you can push such apps to iOS devices and also silently remove them.
Note: Sophos Mobile Control supports the managed apps functionality as of iOS 5.1.
For Android devices, Sophos Mobile Control differentiates between system apps and apps
that the user has installed on the device.
For Android devices, the data size used by the individual apps on the device is shown.
For iOS devices, the space used by an app after installation is shown. In addition, any additional
space that may be required is shown. This additional space may be required for downloads,
configurations, settings, and so on.
On this tab, the Install app button is available in the upper corner on the left. With this button,
you can install software on the device. You can also remove managed apps from iOS devices
by clicking the Delete icon next to the relevant app.
■
System apps (Android)
Shows Android system apps on the device.
Note: System software cannot be removed from the device.
■
Certificates (iOS and Windows Phone 8)
Shows the certificates in use on the device.
■
Scan results (Android)
This tab is only available if the Sophos Mobile Security functionality is available for the customer
you are logged in to. It shows the results of the last Sophos Mobile Security scan performed
on the device. Sophos Mobile Security is a security app for Android phones and tablets that
protects devices from malicious apps and assists end users in detecting app permissions that
could be a security risk.The app can be managed from the Sophos Mobile Control web console.
For further information, see Managing Sophos Mobile Security from Sophos Mobile Control
(page 123).
From the Show device view, you can directly switch to the Edit device view. To edit the device
you are viewing, click the Edit button.
19.1.2 Use the extended device filter
With the extended device filter, you can filter the device lists according to your needs.
To use the device filter:
1. In the Devices view, click the Extended filter button (magnifier icon) in the web console header.
The Device filter dialog is displayed with the status Filter is not active.
2. In the Device filter dialog, you can define your filter criteria.
3. After you have selected the required criteria, click Filter.
115
Sophos Mobile Control
The filter is activated and the list of devices is reloaded. The magnifier icon in the web console
header changes its color from blue to green to indicate that the filter is active. To reset the filter,
click Extended filter again and click Reset in the filter dialog.
Note: Remember to reset filters manually when they are no longer needed. Otherwise, lists or
reports may not include the results you expect.
19.2 Edit devices
1. In the web console, under MANAGE, click Devices.
The Devices view is displayed with all devices registered with Sophos Mobile Control for this
customer.
2. Click the blue triangle next to the required device and click Edit.
The Edit device view is displayed for the selected device.
3. Make the necessary changes (for example, install or remove software on the Installed apps
tab) and click the Save button.
Your changes are applied to the edited device.
Note: Property changes only become valid after you have clicked Save. If you do not save the
changes you have made, they do not have any effect.
19.2.1 Assign a user to a device
You can assign users managed with internal user management to devices. If you use external
user management, you can assign a user from an external directory to a device.
Note: The user management method used is customer-specific and is defined when the customer
is created. For further information, see the Sophos Mobile Control super administrator guide.
This does not apply to Sophos Mobile Control as a Service. Super administrators are not supported
in Sophos Mobile Control as a Service. For information on how to define the user management
methods for Sophos Mobile Control as a Service, see Configure Self Service Portal user
management for Sophos Mobile Control as a Service (page 26).
1. In the web console, under MANAGE, click Devices.
The Devices view is displayed with all devices registered with Sophos Mobile Control for this
customer.
2. Click the blue triangle next to the required device and click Edit.
The Edit device view is displayed for the selected device.
3. Click the Actions button and then click Assign user to device.
The Enter user search parameters view is displayed.
4. In the fields Common Name (CN) and/or Email address, enter a search parameter, for
example, the user name or part of it.
The Select data set view is displayed.
116
Administrator guide
5. Select the required user and click Next.
The Select detail fields to use view is displayed.
6. Select the required Email address and the User name and click the Apply button.
The Edit device view is displayed again.
7. Click the Save button.
Note: The device is shown in the Self Service Portal for the relevant user.
19.2.2 Define custom properties for devices
You can define custom properties, for example, system processes, for individual devices when
you create a device from a template or edit a device.
1. In the web console, under MANAGE, click Devices.
The Devices view is displayed with all devices registered with Sophos Mobile Control for this
customer.
2. Click the blue triangle next to the required device and click Edit.
The Edit device view is displayed for the selected device.
3. Go to the Custom properties tab and click the Add new custom property button.
The Edit property view is displayed.
4. Enter a Name and a Value for the new custom property.
For example, for system processes:
■
Name: SystemProcess2
■
Value: Internet;10008d39,BrowserNG.exe
For system processes the Name is always "SystemProcess" followed by an index starting at
"0". Spaces are not allowed. When you create another process, use the subsequent index,
for example, "SystemProcess1", "SystemProcess2".
The syntax for Value is: <display name>;<UID of the process>,<name of the process>.
You can also combine multiple processes, for example: <display name>;<UID of the
process>,<name of the process>;<UID of the process>,<name of the process>.
5. Click the Apply button.
The new property is displayed in the Edit device view in the Custom properties tab.
6. Click the Save button.
117
Sophos Mobile Control
19.3 Decommission devices
You can decommission managed Android and Apple iOS devices that will no longer be used, for
example, if a user gets a new device. This is useful, for example, if you have limited the number
of devices a user can register through the Self Service Portal.
1. In the web console, under MANAGE, click Devices.
The Devices view is displayed with all devices registered with Sophos Mobile Control for this
customer.
2. Click the blue triangle next to the required device and click Edit.
The Edit device view is displayed for the selected device.
3. Click the Actions button and then click on Decommission.
A message is displayed prompting you to confirm that you want to decommission the device.
4. Click Yes.
The device is decommissioned. This results in the following:
Android devices:
■
The Sophos Mobile Control Client device administrator is disabled.
■
The server login data and all other data received are removed.
Apple iOS devices:
■
All profiles are removed.
■
All managed apps are removed (from iOS 5.1).
■
■
The Sophos Mobile Control iOS client app is removed, if it was installed through managed
apps (from iOS 5.1).
All certificates received through Mobile Device Management are removed.
19.4 Device groups
Device groups are used to categorize devices. You assign devices to device groups when you
add them to Sophos Mobile Control device management manually or by import. You can change
the device group for a device by editing it. A device always belongs to exactly one device group.
We recommend that you put devices into groups. This helps you to manage them efficiently as
you can carry out tasks on a group rather than on individual devices.
Note: We recommend that you only group devices with the same operating system. This makes
it easier to use groups for installations and other operating system specific tasks.
For information on how to create device groups, see Create device groups (page 39).
Note: If you delete a device group, the group's members are moved to another group that needs
to be specified. If there is no other group left to move the devices to, the group cannot be deleted.
Before a group is deleted, a warning message is displayed.
118
Administrator guide
20 Provision devices through the Sophos
Mobile Control web console
After you have added new devices in the web console, they need to be provisioned with the
Sophos Mobile Control client component. The web console offers the following options for
provisioning devices:
■
You can provision individual, unmanaged devices by installing the SMC client using the Devices
function. For further information, see Enroll individual devices (page 119).
To provision and configure multiple devices efficiently, the following methods are recommended:
■
You can bundle all tasks necessary to have devices fully registered and running by creating
task bundles to provision devices, apply required policies and install required applications (for
example, managed apps for Apple iOS devices). For further information, see Work with task
bundles (page 101).
■
You can have devices registered and provisioned by end users through the Self Service Portal.
To do so, include a task bundle for provisioning when configuring the settings for Self Service
Portal use. For further information on how to create the task bundles required for provisioning,
see the Sophos Mobile Control startup guide or the Sophos Mobile Control as a Service startup
guide. For further information on how to select the task bundle in the Self Service Portal
settings, see Configure Self Service Portal settings (page 23). For further information on the
Self Service Portal and how to use it, refer to the Sophos Mobile Control user guide.
20.1 Enroll individual devices
1. In the web console, under MANAGE, click Devices.
The Devices view is displayed.
2. Select the desired device, click Actions and then click Enroll.
Note: It is possible to select several devices for enrollment.
3. Click Yes, when you are asked if you want to enroll the selected devices.
The enrollment task is started and displayed in the Task view. An email with instructions how to
install the Sophos Mobile Control app on the mobile device is sent to the user.
119
Sophos Mobile Control
21 Create administrators
1. In the web console, go to SYSTEM, click Setup and then Administrators.
The Show administrators view is displayed.
2. Click the Create administrator button.
The Edit administrator view is displayed.
3. Enter a Login name for the new user.
4. In the Role field, select the user role:
■
■
■
■
■
Administrator
Limited Administrator
Reporting
Content admin
Helpdesk
For further information, see Web console user roles (page 9).
5.
6.
7.
8.
Enter the First name and the Last name of the new user.
Enter the Email address of the new user.
Enter a one-time Password for the first login at the web console and confirm it.
Click the Save button.
The new user is created and shown in the Show administrators view. Forward the user credentials
(user, customer and one-time password) to the new user. The new user can log in at the web
console and is prompted to change the password.
120
Administrator guide
22 Send messages to devices
From the web console, you can send user-defined messages to managed devices. After an iOS
device has been bootstrapped and the Sophos Mobile Control app is installed, APNs messages
are sent. After an Android device has been set up, GCM push messages are sent.
22.1 Send messages to individual devices
1. In the web console, under MANAGE, click Devices.
The Devices view is displayed.
2. Click the blue triangle next to the required device and click Edit or click its name.
The Show device or Edit device view is displayed.
3. Click Actions and then click Send message.
The Enter message view is displayed.
4. In the text field, enter the message you want to send. A character counter below the field
counts down from the maximum number of available characters to 0. After 0 has been reached,
you cannot enter any further characters.
5. Click the Finish button.
121
Sophos Mobile Control
23 Licenses for managing Sophos Mobile
Security and Sophos Secure Workspace
In order to manage the Sophos Mobile Security and Sophos Secure Workspace apps from Sophos
Mobile Control, a valid license is required. After purchase you receive an SMC Advanced license
key for activating your Sophos Mobile Security and Sophos Secure Workspace licenses. How
you activate the license in the web console depends on the Sophos Mobile Control type of
installation in use (on-premise installation or Software as a Service).
23.1 Activate licenses for on-premise installations
For on-premise Sophos Mobile Control installations, SMC Advanced licenses are managed by
the super administrator in customer management. For further information, refer to the Sophos
Mobile Control super administrator guide.
23.2 Activate licenses for Software as a Service installations
1. In the web console, under SYSTEM, click Setup and then System setup.
The System setup view is displayed.
2. On the License tab, in the License key field, enter the license key you have received from
Sophos and click Activate.
The SMC Advanced license for managing Sophos Mobile Security and Sophos Secure Workspace
apps is activated. The Active license key field shows the activated license key. The Number of
licenses field shows the number of available users. The Valid until field shows the license expiry
date.
122
Administrator guide
24 Managing Sophos Mobile Security from
Sophos Mobile Control
Sophos Mobile Security is a security app for Android phones and tablets that protects devices
from malicious apps and assists end users in detecting app permissions that could be a security
risk. Its web filtering capability allows you to filter websites by category and lets you block
inappropriate content.
The Sophos Mobile Security management functionality is an optional Sophos Mobile Control
module. In order to manage the Sophos Mobile Security app from Sophos Mobile Control, an
SMC Advanced license needs to be available and activated in the Sophos Mobile Control web
console.
You can manage the Sophos Mobile Security app on managed devices from the Sophos Mobile
Control web console as follows:
■
You can configure settings for the Sophos Mobile Security app on all managed end user
devices remotely and centrally in the web console.
■
You can make sure that the Sophos Mobile Security app is installed on end-user devices and
runs scans at defined intervals. You can define this as a compliance criterion.
■
You can trigger scans for specific devices.
■
You can view scan results for devices in the web console.
For further information on Sophos Mobile Security, see the Sophos Mobile Security help.
24.1 Configure antivirus settings for Sophos Mobile Security
Prerequisite: An SMC Advanced license is available.
1. In the web console, under CONFIGURE, click Profiles and then click Android.
The Profiles view is displayed.
2. Click Create profile and select Create device profile.
The Edit profile view is displayed.
3.
4.
5.
6.
Enter a Name and a Version for the new profile.
In the Description field, enter a description for the profile.
Under Operating systems, select the operating system the profile should apply to.
Click Add configuration.
The Available configurations view is displayed.
7. Select Antivirus and click Next.
The settings view of the configuration is displayed.
8. Go to the Antivirus tab.
123
Sophos Mobile Control
9. Under General, you can specify the following:
a) In the Cloud scan mode field, define when Sophos Mobile Security should scan for the
latest malware information. Select one of the following options to define when the app
should use a cloud lookup:
■
Always
■
Not while roaming
■
Wi-Fi only
With this setting you can control the data traffic of the app. If you set Cloud scan mode to
Wi-Fi only, the cloud lookup will only be performed when the device has a Wi-Fi connection.
If you set Cloud scan mode to Not while roaming, a cloud lookup will never be performed
while the device is roaming on a foreign network.
b) In the Scheduled scan interval field, select how often scans are carried out.
10. Under Targets, you can select the following:
a) Select Scan system apps to include system apps in scans.
System apps are not scanned by default as they are protected by the Android OS and
cannot be removed by the user. But you can activate the scanning of system apps here.
b) Select Scan SD Card, USB, ... to scan all files on SD cards, USB and other external storage
devices in addition to the default scanning of all installed apps on the device.
11. Under PUAs, you can select the following:
a) Select Detect PUAs to scan for Potentially Unwanted Applications.
Potentially Unwanted Applications (PUAs) are apps that, while not malicious, are generally
considered unsuitable for business networks. PUAs include adware, dialers, system
monitors, remote administration tools, and hacking tools. However, certain apps that can
fall into the PUA category might be considered useful by some users.
If you select this option, Sophos Mobile Security will detect PUAs during scans and notify
the end user accordingly.
b) Select Enable user to allow apps to enable users to allow apps although they have been
identified as PUAs. The user can mark them as ignored. In subsequent scans, these apps
will not be shown as PUAs.
12. Under Apps with low reputation, you can specify how to deal with these apps. Classification
of apps is based on Sophos Live Protection data. Under Mode, you can select the following:
a) Select Allow to turn off scanning for low reputation apps.
b) Select Warn to display a warning on the device when a low reputation app is detected.
Users can then choose how to deal with the app. They can add it to a list of allowed apps
so that no further warning is displayed if this app is detected.
c) Select Block in order to prevent low reputation apps from being started. A warning will be
displayed but the user cannot start the app.
124
Administrator guide
13. Under Live Protection, you can select the following:
a) Make sure that Scan notification is selected to receive scan notifications.
b) Select Monitor SD Card to monitor the SD card for any changes. If new files are stored
on the card, they are scanned.
14. If your scan results include apps that should be allowed to start, you can add them to the list
of allowed apps. Apps on this list will always be allowed to start on the devices. The apps will
not be reported.
To identify such app, you can use the scan results of Sophos Mobile Security, see View Sophos
Mobile Security scan results (page 126).
15. To add allowed apps, click the Add button and select the desired app from the App list or
click Custom and enter App name and Identifier manually.
16. Click the Apply button.
24.2 Configure web filtering settings for Sophos Mobile
Security
Prerequisite: An SMC Advanced license is available.
The Sophos Mobile Security app protects you from browsing sites with malicious, undesirable or
illegal content.
Note: Web filtering only works with the built-in browser and Google Chrome.
1. In the web console, under CONFIGURE, click Profiles and then click Android.
The Profiles view is displayed.
2. Click Create profile and select Create device profile.
The Edit profile view is displayed.
3.
4.
5.
6.
Enter a Name and a Version for the new profile.
In the Description field, enter a description for the profile.
Under Operating systems, select the operating system the profile should apply to.
Click the Add configuration button.
The Available configurations view is displayed.
7. Select Web filtering and click Next.
The settings view of the configuration is displayed.
8. In the Filter malicious websites field, define if you want to Allow access to malicious websites,
Warn the user against malicious websites, or Block these sites.
9. Under Filter websites by categories, define for each category if you want to Allow access
to websites of this category, Warn the user against potential malicious, undesirable or illegal
content, or Block websites of this category.
Websites are categorized based on data from SophosLabs. The data is updated constantly.
125
Sophos Mobile Control
10. Under Website exceptions, you can define:
a) Allowed URLs: add URLs that are allowed, even though the category they belong to is
blocked.
b) Blocked URLs: add URLs that are blocked, even though the category they belong to is
allowed.
You can insert host names or IP addresses. Examples: www.company.com, *.company.com,
10.2.0.1, 10.2.0.1/24
11. Click the Apply button.
The settings are valid for all Android devices with the Sophos Mobile Security app installed for
the customer you are logged on to. The settings defined in the Sophos Mobile Control web console
cannot be changed on the end-user device. They are grayed out.
Note: Clicking the Show allow list button displays the list of allowed apps. This list can be
created out of scan results of devices.
24.3 Define Sophos Mobile Security compliance settings
Prerequisite: An SMC Advanced license is available.
You can configure compliance settings that relate to Sophos Mobile Security in the web console.
1. Add a new compliance rule or open an existing set for editing. For further information, see
Configure compliance rules (page 34).
2. Go to the Android tab.
3. In the Max. SMSec scan interval field, you can specify the maximum scan interval for malware
scans performed by the Sophos Mobile Security app on the devices.
4. In the Malware apps allowed field, select whether detected malware apps are allowed on
devices.
5. In the Suspicious apps allowed field, select whether detected suspicious apps are allowed
on devices.
6. In the PUA allowed field, select whether detected PUAs (Potentially Unwanted Apps) are
allowed on devices.
7. After you have configured all required settings, click the Save button.
24.4 View Sophos Mobile Security scan results
Prerequisite: An SMC Advanced license is available.
1. In the web console, under MANAGE, click Devices.
The Devices view is displayed with all devices registered with Sophos Mobile Control for this
customer.
2. Click the blue triangle next to the required device and click Edit or click its name.
The Show device or the Edit device view is displayed.
126
Administrator guide
3. Go to the Scan results tab.
The tab shows the Sophos Mobile Security scan results. The non-clean packages, for example,
potentially unwanted apps, are shown in a table below. Under Threat name, you can click on
the links to display further information on the relevant threat from SophosLabs.
4. Go to the Compliance violations tab to view the compliance violations related to the scan
results. The violations shown depend on the Sophos Mobile Security compliance settings.
24.4.1 Create a list of allowed PUAs and apps with low reputation
You can use the scan results to create a list of allowed apps. This list will be valid for all Android
devices with the Sophos Mobile Security app installed for the customer you are logged on to.
1. Go to the Scan result tab of one of your scanned devices.
The non-clean packages are shown in a table. The Threat name column indicates whether
the displayed package is a low reputation app, a PUA or malware. You can click the links to
display further information on the relevant threat from SophosLabs.
Detected low reputation apps and PUAs have a blue check mark icon to the left of the package
name. Only these apps can be added to the allowed apps list.
2. Click on the blue check mark icon to add the app to the allowed apps list.
A confirmation dialog is displayed.
3. Click Yes.
The app is added to the allowed apps list.
4. Repeat this step for all apps you want to add.
5. To view the list, go to Settings and click General.
6. Click the Show allow list button.
All apps you added are displayed. Apps on this list will be allowed to start on all managed
devices. The apps will not be reported anymore.
Clicking on the Clear allow list button deletes all entries in the list.
127
Sophos Mobile Control
25 Managing Sophos Secure Workspace from
Sophos Mobile Control
Sophos Secure Workspace is an app for iOS and Android phones and tablets that allows users
to access encrypted files stored in the cloud. Files can be decrypted and viewed in a seamless
way. Encrypted files can be handed over by other apps and uploaded to one of the supported
cloud storage providers. Alternatively, the documents can be stored locally within the app.
With Sophos Secure Workspace, you can read files encrypted by SafeGuard Cloud Storage or
SafeGuard Data Exchange. Both are modules of SafeGuard Enterprise or one of its different
editions. They allow you to encrypt files using a local key. These local keys are derived from a
passphrase that is entered by a user. You can only decrypt a file when you know the passphrase
that was used to encrypt the file.
The Sophos Secure Workspace management functionality is an optional Sophos Mobile Control
module. In order to manage the Sophos Secure Workspace app from Sophos Mobile Control, an
SMC Advanced license needs to be available and activated in the Sophos Mobile Control web
console.
You can manage the Sophos Secure Workspace app on managed devices from the Sophos
Mobile Control web console as follows:
■
You can configure settings for the Sophos Secure Workspace app on all managed end-user
devices remotely and centrally in the web console.
■
You can make sure that the Sophos Secure Workspace app is installed on end-user devices.
You can define this as a compliance criterion.
■
You can enable secure distribution of documents using the Corporate Documents storage
provider. See Distribute corporate documents (page 111).
Note: In order to manage Sophos Secure Workspace, the app has to be distributed using Sophos
Mobile Control. If users already have unmanaged versions of Sophos Secure Workspace installed
on their devices, they have to uninstall this version first and install the managed version.
For further information on Sophos Secure Workspace, see the Sophos Secure Workspace help.
25.1 Configure Sophos Secure Workspace
Prerequisite: An SMC Advanced license is available.
For information on configuring Sophos Secure Workspace, see Sophos Secure Workspace app
sections in Available iOS configurations (page 66) and Available Android configurations (page
43).
128
Administrator guide
25.2 Reset Sophos Secure Workspace app password
You can reset the Sophos Secure Workspace app password. This is useful, for example, when
users forget their app password. If you reset an app password, the user will be asked to define
a new app password for Sophos Secure Workspace.
1. In the web console, under MANAGE, click Devices.
The Devices view is displayed.
2. Click on the device for which you want to reset the app password.
The Show device view is displayed.
3. Click the Actions button.
The Actions menu is displayed.
4. Click the Reset SSW app password button.
A confirmation dialog is displayed.
5. Click Yes.
The Sophos Secure Workspace app password is reset on the device. The user has to enter a
new Sophos Secure Workspace app password.
25.3 Set document access - lock and unlock Sophos Secure
Workspace
You can set document access permissions to prevent access to corporate data in Sophos Secure
Workspace. If you set Set document access to Deny, Sophos Secure Workspace cannot be
used.
1. In the web console, under MANAGE, click Devices.
The Devices view is displayed.
2. Click on the device for which you want to edit document access.
The Show device view is displayed.
3. Click the Actions button.
The Actions menu is displayed.
4. Click the Set document access button.
A dialog for setting the document access permissions is displayed.
5. Select one of the following:
■
■
■
Deny to lock Sophos Secure Workspace. Users can no longer use the app.
Allow to unlock Sophos Secure Workspace. Users can continue to use the app.
Auto mode to check if a compliance violation was reported for the device. If a compliance
violation is identified, Sophos Secure Workspace will be locked.
129
Sophos Mobile Control
6. Click Yes.
Depending on your choice, Sophos Secure Workspace is locked or unlocked. If you locked the
app, a lock screen will be displayed on the device whenever Sophos Secure Workspace becomes
active. Users have no access to documents secured by Sophos Secure Workspace unless you
unlock it.
130
Administrator guide
26 Technical support
You can find technical support for Sophos products in any of these ways:
■
Visit the SophosTalk community at community.sophos.com/ and search for other users who
are experiencing the same problem.
■
Visit the Sophos support knowledgebase at www.sophos.com/en-us/support.aspx.
■
Download the product documentation at www.sophos.com/en-us/support/documentation.aspx.
■
Open a ticket with our support team at
https://secure2.sophos.com/support/contact-support/support-query.aspx.
131
Sophos Mobile Control
27 Legal notices
Copyright © 2011 - 2015 Sophos Ltd. All rights reserved.
No part of this publication may be reproduced, stored in a retrieval system, or transmitted, in any
form or by any means, electronic, mechanical, photocopying, recording or otherwise unless you
are either a valid licensee where the documentation can be reproduced in accordance with the
license terms or you otherwise have the prior permission in writing of the copyright owner.
Sophos is a registered trademark of Sophos Ltd. All other product and company names mentioned
are trademarks or registered trademarks of their respective owners.
132


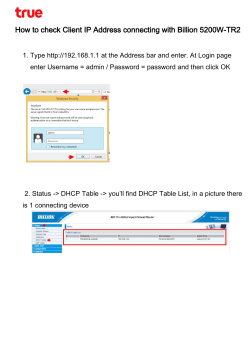


© Copyright 2026