
H Y P E R I O N
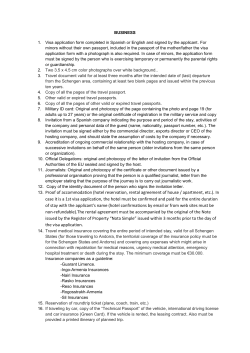
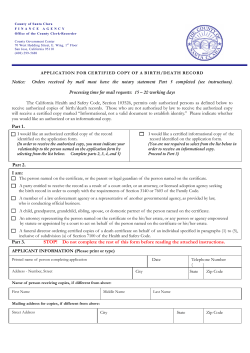
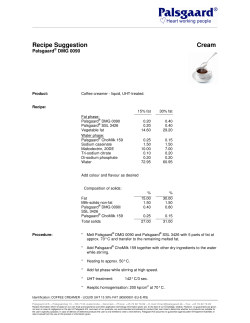
HYPERION
RELEASE 9.3.1
SSL CONFIGURATION GUIDE
CONTENTS IN BRIEF
About This Document . . . . . . . . . . . . . . . . . . . . . . . . . . . . . . . . . . . . . . . . . . . . . . . . . . 2
Assumptions . . . . . . . . . . . . . . . . . . . . . . . . . . . . . . . . . . . . . . . . . . . . . . . . . . . . . . . . . 2
Information Sources . . . . . . . . . . . . . . . . . . . . . . . . . . . . . . . . . . . . . . . . . . . . . . . . . . . . 2
Identifying SSL Points for Hyperion Products . . . . . . . . . . . . . . . . . . . . . . . . . . . . . . . . . 4
Common Activities . . . . . . . . . . . . . . . . . . . . . . . . . . . . . . . . . . . . . . . . . . . . . . . . . . . . . 9
Deploying Hyperion Products for SSL . . . . . . . . . . . . . . . . . . . . . . . . . . . . . . . . . . . . . . 10
Shared Services . . . . . . . . . . . . . . . . . . . . . . . . . . . . . . . . . . . . . . . . . . . . . . . . . . . . . . . 12
Administration Services . . . . . . . . . . . . . . . . . . . . . . . . . . . . . . . . . . . . . . . . . . . . . . . . 17
Provider Services . . . . . . . . . . . . . . . . . . . . . . . . . . . . . . . . . . . . . . . . . . . . . . . . . . . . . 18
Architect . . . . . . . . . . . . . . . . . . . . . . . . . . . . . . . . . . . . . . . . . . . . . . . . . . . . . . . . . . . 18
Planning . . . . . . . . . . . . . . . . . . . . . . . . . . . . . . . . . . . . . . . . . . . . . . . . . . . . . . . . . . . 18
Financial Management . . . . . . . . . . . . . . . . . . . . . . . . . . . . . . . . . . . . . . . . . . . . . . . . . 19
Reporting and Analysis . . . . . . . . . . . . . . . . . . . . . . . . . . . . . . . . . . . . . . . . . . . . . . . . . 21
Performance Scorecard . . . . . . . . . . . . . . . . . . . . . . . . . . . . . . . . . . . . . . . . . . . . . . . . . 31
P/N: DH98893100
About This Document
This document describes how to deploy Hyperion in Secure Sockets Layer (SSL)-enabled
environments. SSL is a cryptographic protocol used to secure data exchange over the network.
The procedures in this document are designed for users who intend to use SSL in their Web
environments to secure communication with Hyperion products.
Assumptions
●
You know how to SSL-enable the following:
❍
Application servers: Oracle Application Server, Apache Tomcat, BEA WebLogic, and
IBM WebSphere
❍
Web Servers: Oracle HTTP Server, Apache, IBM HTTP Server (IHS), Microsoft Internet
Information Services (IIS)
❍
User directories: Oracle Internet Directory, Microsoft Active Directory (MSAD)
SunONE Directory Server, and Novell eDirectory.
See “Information Sources” on page 2 for a list of reference documents that you can use
to SSL-enable your deployment environment.
●
You have determined the deployment topology and identified the communication links that
are to be secured using SSL.
●
You have obtained the required certificates from a Certificate Authority (CA) or created
self-signed certificates. See “Required Certificates” on page 8 and “Generating and Using
Self-Signed Certificates” on page 9.
●
You have installed and deployed Hyperion products using the configuration utility
according to the instructions in the appropriate Hyperion product installation guide but
have not registered the products with Oracle's Hyperion® Shared Services.
Caution!
Manual deployment of Hyperion products does not generate some files this document
references. If you manually deploy Hyperion products, you must create these files.
Information Sources
Application Servers
Information on configuring your application server for SSL is available in your application server
vendor's documentation. The following resources provide a starting point for SSL-enabling the
application server.
2
SSL Configuration Guide
●
Oracle Application Server: http://download-west.oracle.com/docs/cd/B14099_19/core.
1012/b13995/ssl_intro.htm
●
WebLogic 8.1: http://edocs.bea.com/wls/docs81/secmanage/ssl.html
●
WebLogic 9.0: http://edocs.bea.com/wls/docs90/secmanage/ssl.html
●
WebSphere 5.1: http://publib.boulder.ibm.com/infocenter/wasinfo/v5r1/topic/
com.ibm.websphere.base.doc/info/aes/ae/tsec_mngcert.html
●
WebSphere 6.0: http://publib.boulder.ibm.com/infocenter/imshelp1/v3r0/index.jsp?
topic=/com.ibm.hcn.doc/install/wasssl.html
●
Tomcat: http://tomcat.apache.org/tomcat-5.0-doc/ssl-howto.html
Web Servers
For detailed information on configuring your web server for SSL, see your web server vendor's
documentation.
●
For information on configuring Oracle HTTP Server for SSL, go to http://downloaduk.oracle.com/docs/cd/B14099_19/web.1012/b14007/ssl.htm.
●
For information on configuring IIS for SSL, go to http://support.microsoft.com/kb/
299875/.
●
For information on configuring Apache HTTP Server for SSL, go to http://httpd.apache.org/
docs/2.0/ssl/
●
IHS provides out-of-the-box support for SSL. Use the key management utility (iKeyman)
to self-sign certificates.
❍
IHS 1.3: go to http://www-306.ibm.com/software/webservers/httpservers/doc/v1326/
manual/ibm/9atikeyu.htm.
❍
IHS 6.0: go to http://publib.boulder.ibm.com/infocenter/wasinfo/v6r0/topic/
com.ibm.websphere.ihs.doc/info/aes/ae/tihs_setupssl.html.
User Directories
For detailed information, see the documentation from the user directory vendor. Useful links
are:
●
Oracle Internet Directory: http://www.oracle.com/technology/documentation/oid.html
●
Oracle Virtual Directory: http://www.oracle.com/technology/documentation/index.html
●
SunONE Directory Server: http://docs.sun.com/source/816-6698-10/ssl.html
●
Microsoft Active Directory: http://support.microsoft.com/kb/254610
●
Novell eDirectory: http://www.novell.com/documentation
SSL Configuration Guide
3
Identifying SSL Points for Hyperion Products
This section provides diagrams that indicate the secure connections that can be established for
Hyperion products. Non-SSL communication links are not depicted in these diagrams.
Hyperion applications that do not support SSL communication are not included in these
diagrams.
A Sample Secure Deployment Topology
This section presents a sample deployment topology that illustrates the SSL communication
links that can be established among Hyperion products.
Caution!
The illustrated topology is for information only and is not a suggested deployment topology.
By default, user requests to Shared Services, Oracle's Hyperion® Performance Scorecard – System
9, and Oracle's Essbase® Administration Services are not routed through a web server. Users
access these applications directly from the application server over a secure connection. You can,
however, route user requests through a web server and secure the communication channels using
SSL.
User access to Oracle's Hyperion® Reporting and Analysis – System 9 is always directed using a
web server, which can be SSL-enabled. Similarly, access to Oracle's Hyperion® Financial
Management – System 9, Oracle's Hyperion® Planning – System 9, and Oracle's Enterprise
Performance Management Architect can be routed through a web server.
4
SSL Configuration Guide
Note:
Requests sent to applications deployed to an Oracle Application Server instance are received by
a web server. By default, the Oracle HTTP Server is configured when you install Oracle
Application Server. You can configure this web server to receive secure HTTP requests.
Connections to LDAP-enabled user directories, such as Oracle Internet Directory, MSAD, and
SunOne Directory Server can be secured using LDAPS.
Shared Services
Architect
SSL Configuration Guide
5
Smart View
Essbase
Planning
6
SSL Configuration Guide
Interactive Reporting and Web Analysis
Financial Reporting
Financial Management
SSL Configuration Guide
7
Performance Scorecard
FDM
Required Certificates
Hyperion supports one-way SSL communication. One-way SSL communication occurs
when the SSL-enabled server component presents a certificate to its clients, but the clients do
not present certificates to the server.
To establish an SSL connection, the SSL client must trust the CA that issued the server's
certificate. Most popular third-party CAs are trusted by modern SSL capable applications,
including Java.
If you use a CA unknown to the applications that establish SSL connectivity (as in the case of
self-signed certificates), you must import the CA's public key certificate to the keystore of each
application. For example, if you are using self-signed certificates, you must import the public
key certificate you used to sign all the certificate requests to each SSL client. In Hyperion, SSL
clients may include web browsers and Java Virtual Machines (JVMs). See “Generating and Using
Self-Signed Certificates” on page 9.
Tip:
If you are using self-signed certificates, to reduce the number of steps involved in enabling SSL
in Hyperion, use the same CA to sign all certificate requests.
Note:
Java 1.4.x does not support SSL certificates with key lengths greater than 1024 bits.
8
SSL Configuration Guide
Common Activities
This section discusses the common tasks that you should complete to enable SSL communication
for Hyperion products. They should be completed regardless of your operating system,
application server, and web server.
Obtaining Certificates
You must use a valid certificate for each component that implements SSL. The following
components can be SSL-enabled:
●
User directories (MSAD and other LDAP-enabled directories)
●
Application servers
●
Web servers
●
Web server plug-ins (in some cases)
Use vendor documentation for detailed procedures on SSL-enabling these components.
Note:
Each SSL-enabled component requires its own certificate. Using dummy certificates is not
recommended.
Obtaining Certificates from a CA
Obtaining a certificate from a CA typically involves the following actions:
●
Generating a certificate request and sending it to the CA for processing.
●
Receiving the digitally signed certificate from the CA.
●
Importing the signed certificate into your WebLogic, WebSphere or Java keystore.
Generating and Using Self-Signed Certificates
A self-signed certificate is similar to a certificate issued by the CA: it contains a public key,
information about the certificate owner, and the owner's signature. A private key is associated
with the self-signed certificate.
After generating a self-signed certificate for an SSL server application, you must add the
certificate to the certificate keystore (cacerts).
Caution!
Self-signed certificates do not provide the level of security provided by the certificates issued by
a CA and should be used only after a careful consideration of your security requirements.
Generating and using self-signed certificates involve the following actions:
SSL Configuration Guide
9
●
Creating a CA certificate
●
Creating a JKS keystore
●
Creating a certificate request
●
Signing the certificate request
●
Importing the CA certificate, as needed, into the web server, application server, and Java
keystores (to be done on the machine where the certificate is used)
●
Importing the signed certificates into the application server, web server, and Java keystores
(to be done on the machine where the certificate is used)
Caution!
If the JRE is configured to use your own trusted keystore (and not the default trusted store
cacerts), you must load the CA root certificate into your trusted keystore and not into the default
trusted store cacerts. To determine if your JRE is using your own trusted keystore, check the
javax.net.ssl.trustStore Java start parameter.
Note:
If you are using a self-signed certificate with the Win 32 Client of Oracle's Hyperion® Data
Relationship Management, and Oracle's Hyperion® Financial Data Quality Management you
must import the certificate into the Windows certificate trusted store on the machine where the
Win 32 Client is running. Use Microsoft Management Console to import the certificate. If you
are using Microsoft certificate server, see Microsoft documentation http://
support.microsoft.com/kb/218445/ for detailed procedures to install the certificate on the client.
Deploying Hyperion Products for SSL
This section presents information on SSL-enabling each Hyperion product.
Note:
Procedures to SSL-enable Shared Services is presented in detail in “Shared Services” on page
12. Refer to these procedures for an overview of SSL-enabling other Hyperion applications.
The following order of activities is recommended:
●
“Shared Services” on page 12
●
“Administration Services” on page 17
●
“Architect ” on page 18
●
“Planning” on page 18
●
“Financial Management” on page 19
❍
10
SSL Configuration Guide
“Smart View” on page 6
❍
●
●
“Configuring Secure Communication Between Financial Management and its HTTP
Server” on page 20
“Reporting and Analysis” on page 21
❍
“Workspace UI Services” on page 21
❍
“Web Analysis” on page 22
❍
“Financial Reporting” on page 22
“Performance Scorecard” on page 31
Location References
This discussion refers to the following installation locations:
●
<Hyperion_Home> denotes the root directory where Hyperion products are installed. The
location of this directory is specified during installation. For example: C:\Hyperion
(Windows) /vol1/Hyperion (UNIX).
●
<HSS_Home> denotes the Shared Services root directory. For example: C:\Hyperion
\deployments\<App_Server_Name>\SharedServices9 (Windows) and /vol1/
Hyperion/deployments/<App_Server_Name>/SharedServices9 (UNIX).
●
<Tomcat_Home> denotes the installation location of Tomcat. By default, Shared Services
uses Tomcat installed in <Hyperion_Home>\deployments\Tomcat5 (Windows) and
<Hyperion_Home>/deployments/Tomcat5 (UNIX). Other Hyperion products use
similar <Tomcat_Home> locations.
●
<Apache_home> indicates the installation location of Apache web server. By default,
Reporting and Analysis installs Apache to <Hyperion_Home>/common/httpServers/
Apache/<apache_version>, for example, C:\Hyperion\common\httpServers
\Apache\2.0.52 (Windows) and /vol1/Hyperion/common/httpServers/Apache/
2.0.52 (UNIX).
●
<BIPLUS_Home> denotes the Reporting and Analysis root directory. For example: C:
\Hyperion\deployments\<App_Server_Name>\BIPLUS (Windows) and /vol1/
Hyperion/deployments/<App_Server_Name>/BIPLUS (UNIX).
●
<AAS_Home> denotes the Administration Services root directory. For example: C:
\Hyperion\deployments\<App_Server_Name>\AAS (Windows) and /vol1/
Hyperion/deployments/<App_Server_Name>/AAS (UNIX).
●
<BEA_Home> denotes the root directory where WebLogic is installed; for example, C:
\bea (Windows) and /vol1/bea (UNIX).
●
<WebSphere_Home> denotes the root directory where WebSphere application server is
installed; for example, C:\WebSphere\AppServer (Windows) and /vol1/WebSphere/
AppServer (UNIX).
SSL Configuration Guide
11
Shared Services
If you are deploying Shared Services to an application server other than Oracle Application
Server, the instructions in this section assume that you have installed and deployed Shared
Services to the application server.
If you are using Oracle Application Server, these instructions assume that you updated the
configuration files by selecting manual deployment of Shared Services to the Generic
application server.
➤ To SSL-enable Shared Services:
1 Start Shared Services in non-SSL mode.
2 Update the Hub.properties file to enable SSL.
a.
Using a text editor, open Hub.properties. This file is available in <HSS_HOME>/
config. For example:
●
Oracle Application Server: C:\Hyperion\deployments\Generic
\SharedServices9\config\Hub.properties
●
WebLogic 9.x: C:\Hyperion\deployments\Weblogic9\SharedServices9
\config\Hub.properties
●
WebLogic 8.x: C:\Hyperion\SharedServices\Weblogic\8.1
\SharedServices9Domain\SharedServices9\config\Hub.properties
b.
●
WebSphere: C:\Hyperion\deployments\WebSphere6\SharedServices9
\config\Hub.properties
●
Tomcat: C:\Hyperion\deployments\Tomcat5\SharedServices9\config
\Hub.properties
Create the following entry in Hub.properties.
sslEnabled=true
c.
Save and close Hub.properties.
3 Configure the SSL port on the application server.
a.
Oracle Application Server
Requests sent to applications deployed to an Oracle Application Server instance are
received by a web server. By default, Oracle HTTP Server is configured as the web server
when you install Oracle Application Server.
SSL-enable the web server to handle HTTPS requests. You may also secure the
communication between the web server and the OC4J instance that hosts Shared Services.
See the following topics for detailed information on securing your Oracle Application
Server:
Oracle Application Server 10.1.3
●
12
SSL Configuration Guide
See Enabling SSL for Oracle HTTP Server in Oracle HTTP Server
Administrator's Guide for detailed instructions on SSL-enabling Oracle HTTP Server.
The URL of this guide is http://download.oracle.com/docs/cd/B31017_01/web.1013/
b28948.pdf.
●
If you are using a web server other than Oracle HTTP Server (for example, Apache,
IIS, and SunONE) see Using Oracle Containers for J2EE Plug-in in Oracle
HTTP Server Administrator's Guide. The URL of this guide is http://
download.oracle.com/docs/cd/B31017_01/web.1013/b28948.pdf.
●
See Part IV, Secure Socket Layer in Oracle Application Server Administrator's
Guide for detailed information on SSL-enabling Oracle Application Server. The URL
of this guide is http://download.oracle.com/docs/cd/B31017_01/core.1013/
b28940.pdf.
Oracle Application Server 10.1.2
●
See Oracle HTTP Server Administrator's Guide for instructions to SSL-enable Oracle
HTTP Server.
●
If you are using a web server other than Oracle HTTP Server (for example, Apache,
IIS, and SunONE) see Using Oracle Application Server Proxy Plug-in in
Oracle HTTP Server Administrator's Guide.
●
See Enabling SSL between mod_oc4j and OC4J in Oracle HTTP Server
Administrator's Guide for instructions to SSL-enable the communication between
Oracle HTTP Server and Oracle Application Server.
The URL of Oracle HTTP Server Administrator's Guide is http://downloaduk.oracle.com/docs/cd/B14099_16/web.1012/b14007.pdf.
●
b.
See Part IV, Secure Socket Layer (SSL) in Oracle Application Server
Administrator's Guide for detailed information on SSL-enabling Oracle Application
Server. The URL of this guide is http://download-uk.oracle.com/docs/cd/B14099_16/
core.1012/b13995.pdf.
WebLogic 9.1
WebLogic 8.x procedures are similar but use different navigation paths.
i.
Log on to the WebLogic Administration Console.
ii.
Select Servers > Shared Services (admin).
iii.
From General tab, select SSL Listen Port Enabled.
iv.
Specify the port (for example, 58082) on which Shared Services will listen for SSL
communication.
v.
Navigate to Keystore tab and set up the identity and trust keystore.
If using self-signed certificates, verify that your CA certificate keys are loaded into
the trust keystore and that the server certificate is loaded into your identity keystore.
vi.
Navigate to SSL tab and set up the key alias, certificate location, and pass phrase.
vii.
Optional: Click Advanced and set Hostname Verification value to None.
SSL Configuration Guide
13
Note:
Disabling host name verification is not secure and is not recommended. If you do
not disable host name verification, ensure that the host name that the client sees
matches the host name specified in the certificate.
viii
.
c.
Save the configuration.
WebSphere
On WebSphere, Shared Services is deployed automatically to the SSL port. The SSL port
number is the non-SSL port number plus 2. For example, Shared Services deployed to port
58080 also is deployed to SSL port 58082. This port is, by default, configured to use the
built-in dummy certificates. You must modify the SSL settings to use the certificates you
generated or obtained from a CA.
d.
i.
Log on to the WebSphere Administrative console.
ii.
Select Security > SSL > SharedServices9/DefaultSSLSettings.
1.
In Key file section, identify the key file, key file password, and key file format.
2.
In the Trust file section, identify the trust file, trust file password, and trust file
format.
3.
Click Apply.
Tomcat
i.
Create the certificate keystore and import certificates into the keystore.
ii.
If you are using self-signed certificates, import the certificates into the cacerts file.
See “Generating and Using Self-Signed Certificates” on page 9.
iii.
Using a text editor, open <Tomcat_Home>/SharedServices9/conf/
server.xml; for example, C:\Hyperion\deployments\Tomcat5
\SharedServices9\conf\server.xml (Windows) and /vol1/Hyperion/
deployments/Tomcat5/SharedServices9/conf/server.xml (UNIX).
iv.
Verify that the SSL HTTP/1.1 Connector definition is available in the
URIEncoding="UTF-8" section.
Note:
If the SSL HTTP/1.1 Connector definition is commented out, uncomment the
definition. If the definition does not exist, create it.
The following is a sample SSL HTTP/1.1 Connector definition:
<!— Define a SSL Coyote HTTP/1.1 Connector on port 8443 ->
<Connector className="org.apache.coyote.tomcat5.CoyoteConnector"
port="58082"
maxThreads="150" minSpareThreads="25" maxSpareThreads="75"
enableLookups="false" disableUploadTimeout="true"
acceptCount="100" debug="0" scheme="https" secure="true"
14
SSL Configuration Guide
keystoreFile="c:\temp\ssl-keys\mykeystore.jks"
clientAuth="false" sslProtocol="TLS"/>
Note:
Specify the keystorePass element if you use a keystore (and certificate) password
other than changeit. Specify the keystoreType element if you are using a PKCS12
keystore.
Update the SSL HTTP/1.1 Connector definition.
v.
The port attribute in this definition should identify the TCP/IP port where Tomcat
listens for secure connections.
The following attributes must be specified:
●
keystoreFile: the location of a custom keystore file. Add this attribute if the
keystore you created is not in the default location where Tomcat expects the
keystore file (this file is named .keystore and generally is stored in the user
home directory). You can specify an absolute path or a path relative to the
$CATALINA_BASE environment variable.
●
vi.
keystorePass: the keystore password. You must add this attribute if you use
a custom keystore. If you are using the default keystore, you must update the
keystorePass if you use a password other than the default password
(changeit).
Optional: Set these additional attributes in the connector definition:
●
algorithm: the certificate encoding algorithm to be used. If not specified,
SunX509, the default value, is used. If you are configuring Shared Services on
Tomcat running on an AIX server machine, you must set the value of the
algorithm attribute in SSL HTTP/1.1 Connector definition to ibmX509.
●
useBodyEncodingForURI: indicates whether to use body encoding for URI.
You must set this attribute to false if using Tomcat as the HTTP server for the
Korean language version of Shared Services.
●
URIEncoding: indicates the character set for URI encoding. You must set this
attribute to UTF-8 if using Tomcat as the HTTP server for the Korean language
version of Shared Services.
Save and close server.xml.
vii.
4 SSL-enable user directory connections.
a.
Obtain CA root certificate for your LDAP-enabled user directory.
b.
Import the CA root certificate into the cacerts of your JVM. cacerts is located in
the /lib/security directory within the JRE install directory.
Make sure to load the CA root certificate into the JRE that is used by your application
server. The typical location of the JVM:
●
WebLogic:
❍
If using jRockit JVM: <BEA_Home>/jrockit<version_number>/jre/lib/
security
SSL Configuration Guide
15
❍
If using SUN JVM: <BEA_Home>/jdk<version_number>/jre/lib/
security
where <version_number> identifies the JRE version being used.
●
WebSphere: <WebSphere_Home>/java/jre/lib/security
See “WebSphere 6.1.0.5 with SSL-Enabled User Directories” on page 16 for
important information on configuring SSL-enabled user directories to work with
WebSphere 6.1.0.5.
●
Tomcat (if using Hyperion installed Tomcat): <Hyperion_Home>/common/JRE/
Sun/1.5.0/lib/security
Note:
For Java-based services, load the CA root certificate into the cacerts available in the
JRE installed by Hyperion. This cacerts is located in <Hyperion_Home>/common/
JRE/Sun/1.5.0/lib/security directory.
Caution!
When Hyperion applications are installed and deployed on multiple servers, you must
load the CA root certificate into all the JREs that are used by Hyperion applications.
5 Restart Shared Services.
6 Log on to User Management Console as Shared Services Administrator. Connect using the secure
URLhttps://<host>:<SSL-port>/interop; for example, https://myServer:58082/
interop.
7 SSL-enable the configurations of LDAP-enabled user directories.
Note:
If you are using WebSphere 6.1.0.5 with SSL-enabled user directories, you must import signer
certificate from SSL-enabled user directories, and the keystore to Shared Services environment.
See “WebSphere 6.1.0.5 with SSL-Enabled User Directories” on page 16 for details.
For detailed information on configuring user directories, see the Hyperion Security
Administration Guide. On the User Directory Configuration screen:
●
Verify that the value in the Port field identifies the SSL port of the user directory.
●
Verify that the SSL Enabled check box is selected.
WebSphere 6.1.0.5 with SSL-Enabled User Directories
If you are using WebSphere 6.1.0.5 with SSL-enabled user directories, you must import signer
certificate from SSL-enabled user directories, and port signer certificate to Shared Services
environment.
16
SSL Configuration Guide
Importing Signer Certificates
Signer certificates must be imported from each SSL-enabled user directories configured in
Shared Services.
➤ To import a signer certificate:
1 From WebSphere Administrative Console, select Security > SSL certificate and key management >
Manage endpoint security configurations.
2 From Nodes under Inbound in Local Topology, select the node where Shared Services is installed.
3 In the Configuration screen, from Additional Properties, select Signer certificates.
4 Select Retrieve from port.
5 In the Configuration screen, enter required information (host name, SSL port number, and alias) about the
user directory from which signer certificate is to be imported.
6 Click Retrieve signer information.
7 Click OK.
Porting Signer Certificate Keystore to Shared Services
Port the keystore to Shared Services environment only after importing signer certificates from
all configured SSL-enabled user directories.
➤ To port signer certificates to Shared Services environment:
1 Copy <WebSphere_Home>/profiles/<profile_name>/config/cells/<cell_name>/
nodes/<node_name>/trust.p12.
2 Paste trust.p12 into <Hyperion_Home>/deploymentss/WebSphere6/profile/config/
cells/hyslCell/nodes/hyslNode overwriting the current file.
Administration Services
Administration Services users are stored in the user directories configured in Shared Services.
If Shared Services is configured to access the user directories over a secure connection, you must
import the CA root certificate of the LDAP user directory into the JVM of the application server
that hosts Administration Services. If Shared Services and Administration Services are deployed
on the same server machine, this step may already be complete.
➤ To configure Administration Services:
1 Install and deploy Administration Services as instructed in the Administration Services Installation Guide.
2 Configure the SSL port on the application server. For detailed instructions, see step 3 on page 12. Adapt
the procedures to use the secure port used by Administration Services.
3 On the Administration Services server host machine, edit <AAS_Home>/server/
OlapAdmin.properties file to set the following.
SSL Configuration Guide
17
●
ALWAYS_USE_SSL=true
●
SSL_PORT=443, where 443 is the SSL-enabled port.
4 Register Administration Services with SSL-enabled Shared Services. You must select the SSL Enabled option
and specify the secure URL of the Shared Services while registering Administration Services.
5 Restart Administration Services.
6 Connect to Administration Services console using the non-SSL (HTTP) port number (not the HTTPS port
number). The Oracle's Essbase® Administration Services console automatically discovers the SSL port.
Provider Services
Procedures to SSL-enable Oracle's Hyperion® Provider Services are detailed in Hyperion Provider
Services Installation Guide.
Architect
Architect users are managed in the user directories configured in Shared Services. If Shared
Services is configured to access the user directories over secure connection, you must import
the CA root certificate of the LDAP user directory into the JVM of the application server that
hosts Architect. This step may already have been completed if Shared Services and Architect are
deployed on the same server machine.
➤ To configure Architect:
1 Install and deploy Architect.
2 Configure the SSL port on the application server. For detailed instructions, see step 3 on page 12. Adapt
the procedure to use the secure port used by Architect.
3 Register Architect with SSL-enabled Shared Services. You must select the SSL Enabled option and specify
the secure URL of the Shared Services while registering Architect.
4 Restart Architect.
5 Configure the SSL-enabled web server to redirect user requests to Oracle's Enterprise Performance
Management Architect.
Planning
Planning users are managed in the user directories configured in Shared Services. If Shared
Services is configured to access the user directories over a secure connection, you must import
the CA root certificate of the LDAP user directory into the JVM of the application server that
hosts Planning. If Shared Services and Planning are deployed on the same server machine, this
step may already be complete.
18
SSL Configuration Guide
➤ To configure Planning for SSL-enabled environments:
1 Install and deploy Planning as instructed in the Hyperion Planning - System 9 Installation Guide.
2 Configure the SSL port on the application server. For detailed instructions, see step 3 on page 12. Adapt
the procedure to use the secure port used by Planning.
3 For WebLogic 8.1 application server only: append the APP_SERVER_TYPE=WebLogic directive to
the global section of HspJSHome.properties file.
4 Stop and start Planning.
5 Register Planning with SSL-enabled Shared Services. You must select the SSL Enabled option and specify
the secure URL of the Shared Services while registering Planning.
6 Configure the SSL-enabled web server to redirect user requests to Oracle's Hyperion® Planning – System 9.
Refer to the Hyperion Planning - System 9 Installation Guide for information on setting up the web server.
Financial Management
Financial Management applications are not hosted on Java application servers.
Financial Management users are managed in the user directories configured in Shared Services.
If Shared Services is configured to access the user directory over a secure connection, you must
import the CA root certificate of the LDAP user directory into the JRE in <Hyperion_Home>.
If Shared Services and Financial Management are deployed on the same server machine, this
step may already be complete.
Note:
If you are using a self-signed certificate, you must import the root CA certificate into the
Windows certificate store on the machine where the Win 32 Client is running. Use Microsoft
Management Console to import the root CA certificate. If you are using Microsoft certificate
server, see Microsoft documentation http://support.microsoft.com/kb/218445/ for detailed
procedures to install the root CA certificate on the client.
➤ To configure Financial Management in SSL-enabled environments:
1 Install and deploy Financial Management applications as instructed in the installation guides.
2 Stop and start all Financial Management processes or services.
3 Using the Financial Management Configuration utility, change the Shared Services URL so that it points to
SSL-enabled Shared Services.
4 Register all Financial Management applications with SSL-enabled Shared Services.
a.
Using the secure URL, access Financial Management.
b.
Log on to Financial Management using valid credentials.
c.
Select File > Register Application.
d.
Select a cluster that contains the application to be registered.
SSL Configuration Guide
19
e.
Select the application to register.
f.
Verify that the secure URL of the web server is specified.
g.
Click OK.
Smart View
In addition to the general procedures for SSL-enabling Financial Management, you must
perform the following steps to enable SSL for Oracle's Hyperion® Smart View for Office.
➤ To enable SSL for Smart View:
1 Using the Financial Management Configuration utility, set up the Smart View virtual directory. See Smart
View documentation for details.
If the Smart View virtual directory in IIS was configured before configuring IIS for SSL, the
virtual directory may have to be deleted and reconfigured, if a secure connection to Smart View
cannot be established using the correct URL in environments where ASP.NET is configured
correctly.
Caution!
When Shared Services is configured to use SSL, the host name used in the URL must match the
host name in the Shared Services certificate received by the IIS web server used by Financial
Management. If there is a mismatch, you will receive an error indicating that the host names do
not match when connecting to Shared Services from Financial Management. In such cases,
modify the host name in the URL.
Note:
Depending on the network configuration and the certificate authority structure, the Shared
Services certificate may need to be imported to the machine's trusted root store.
2 Make sure that the version of ASP.NET in the HFMOfficeProvider (or the chosen name of the Smart View
virtual directory) is 2.x. The ASP.NET version is displayed on the ASP.NET tab in Properties dialog box of the
Smart View web server. The URL used to connect from Oracle's Hyperion® Smart View for Office is:
https://<QualifiedServerName>:<SSLPortNumber>/
<OfficeProviderVirtualDirectory>/hfmofficeprovider.aspx. For example,
https://myserver.example.com:443/hfmofficeprovider/
hfmofficeprovider.aspx
Configuring Secure Communication Between Financial
Management and its HTTP Server
Oracle's Hyperion® Financial Management – System 9 uses IIS as the default HTTP server, which
must be SSL-enabled. For detailed information, see “Information Sources” on page 2.
20
SSL Configuration Guide
Reporting and Analysis
This section discusses the procedures to SSL-enable Reporting and Analysis.
Note:
Users of Reporting and Analysis applications are managed by the user directories configured in
Shared Services. If Shared Services is configured to access the user directory over a secure
connection, you must import the CA root certificate of the LDAP user directory into the JVM
of the application servers that host Reporting and Analysis applications. If Shared Services and
Reporting and Analysis applications are deployed on the same server machine, this step may
already be complete.
Workspace UI Services
Using the Configuration Utility, deploy Oracle's Hyperion® Workspace UI Services to the
application server. After completing the deployment process, SSL-enable Workspace UI
Services.
➤ To SSL-enable Workspace UI Services:
1 Start Workspace UI Services in non-SSL mode.
2 Log on to the application server console that controls Workspace UI Services.
3 Configure the SSL port on the application server. For detailed instructions, see step 3 on page 12. Adapt
the procedure to use the Workspace UI Services secure port.
4 Register Workspace UI Services with SSL-enabled Shared Services. You must select the SSL Enabled option
and specify the secure URL of the Shared Services while registering Workspace UI Services.
Note:
After registering, verify that the Shared Services URL in the BpmServer.properties file
reflects the secure Shared Services URL.
5 Verify that the v8_prop_value table in the repository has values (see following table) showing that SSL
is being used.
PROP_NAME
VALUE0
ConfigurationManager.cssConfigURL
A Shared Services URL that uses the secure protocol; for example,
https://myserver.example.com:58082/interop/
ConfigurationManager.hubUseSSL
true
6 Verify that the BpmSSO value in the BpmServer.properties file contains the secure URL.
7 Restart Workspace UI Services.
8 SSL-enable the web server connection to Workspace UI Services. See “Configuring Reporting and Analysis
for SSL-Enabled Web Servers” on page 23.
SSL Configuration Guide
21
Web Analysis
Using the Configuration Utility, deploy Oracle's Hyperion® Web Analysis – System 9 to the
application server. After completing the deployment, SSL-enable Web Analysis.
Note:
If Web Analysis is SSL-enabled, you must load the root CA into the JRE keystore used by the
browser so that the Web Analysis client (Java applet) can connect successfully to the SSL-enabled
server.
➤ To SSL-enable Web Analysis:
1 Start Web Analysis in non-SSL mode.
2 Configure the SSL port on the application server. For detailed instructions, see step 3 on page 12. Adapt
the procedure to use the Web Analysis secure port.
Note:
If Web Analysis is SSL-enabled, the Web Analysis client (Java applet) requires that the root CA
be loaded into the JRE keystore used by the browser.
3 Register Web Analysis with SSL-enabled Shared Services. You must select the SSL Enabled option and
specify the secure URL of the Shared Services while registering Web Analysis.
4 In <BIPLUS_Home>/InstalledApps/config/WebAnalysis.properties file, verify that:
●
The URL set for URLConfigURL property specifies the secure protocol (HTTPS) and the
SSL port as indicated in the following example:
URLConfigURL=https://<WorkSpace_Host_Name>:<WorkSpace_SSL_port>//
workspace/browse/configURL
●
WebLogic only: NativeAppserverSSLSupport property value is true. For example,
NativeAppserverSSLSupport=true.
5 Restart Web Analysis.
6 SSL-enable web server connection to Web Analysis. See “Configuring Reporting and Analysis for SSL-Enabled
Web Servers” on page 23.
Financial Reporting
Oracle's Hyperion® Financial Reporting – System 9 comprises the web application and standalone Java components (Studio, Report Server, and Print Server).
Note:
If Financial Reporting is SSL-enabled, Financial Reporting Studio requires the root CA to be
loaded into <Hyperion_Home>/Common/JRE.
22
SSL Configuration Guide
SSL-Enabling Financial Reporting Web Application
Using the Configuration Utility, deploy Financial Reporting to the application server. After
completing deployment, SSL-enable it.
➤ To SSL-enable Financial Reporting:
1 Start Financial Reporting in non-SSL mode.
2 Configure the SSL port on the application server. For detailed instructions, see step 3 on page 12. Adapt
the procedure to use the secure Financial Reporting port.
3 Open <BIPLUS_Home>/lib/config.properties file. Financial Reporting uses this file to identify
the host and protocol that are used to interact with Workspace. Verify that the URL of the Financial Reporting
base web application specifies the secure URL that points to the right host and SSL port. For example,
FR_BaseWebApp=https\://<WorkSpace_Host_Name> \:<WorkSpace_SSL_port>.
4 Restart Financial Reporting.
5 SSL-enable the web server connection to Financial Reporting. See “Configuring Reporting and Analysis for
SSL-Enabled Web Servers” on page 23.
Encrypting RMI Communication Among Financial Reporting Components
Commutation among Financial Reporting's stand-alone Java components (Studio, Report
Server, and Print Server) uses Remote Method Invocation (RMI) and can be encrypted.
➤ To encrypt RMI communication among Financial Reporting components:
1 Open the fr_repserver.properties file on the server machine that hosts the Financial Reporting
Report Server.
2 Uncomment the following line:
RMI_Encryptor=com.hyperion.reporting.security.impl.HsRMICryptor.
3 Save fr_repserver.properties.
Configuring Reporting and Analysis for SSL-Enabled Web
Servers
Apache
The Apache web server installation provided by Hyperion does not provide SSL support.
Hyperion recommends that you obtain SSL-compatible Apache web server (version 2.0.52 or
2.0.59) to support Hyperion products.
SSL Configuration Guide
23
Note:
Hyperion recommends that you back up the existing Apache installation in
<Hyperion_Home>/common/httpservers/Apache/<apache_version> and then install
Apache so that it overwrites the existing Apache installation.
You must SSL-enable Apache after installing it. For detailed information on SSL-enabling
Apache, go to http://httpd.apache.org/docs/2.0/ssl/ssl_howto.html.
Apache Web Server with the Tomcat Application Server
Communication between Apache and Tomcat uses the binary Apache JServ Protocol (AJP),
which cannot be SSL-enabled.
SSL-enabling Apache establishes secure communication between Apache and the browser.
Note:
If this Apache installation is used as a web server for other Hyperion products, must perform
additional configuration steps as described in the product installation guides.
Apache Web Server with the WebSphere Application Server
If you plan to enable SSL communication between a web server and a WebSphere application
server, you must install the Global Security Kit (GSKit) on the machine hosting the web server.
See IBM documentation for detailed instructions to install GSKit.
The plugin-cfg.xml file that is required to establish communication between Apache and the
WebSphere application server that hosts Reporting and Analysis application is autogenerated
in <Apache_Home>/conf directory when you deploy the application using the configuration
tool. This file must be updated with appropriate transport information from plugincfg.xml generated by the SSL-enabled application server.
WebSphere 5.x
This procedure must be completed after deploying the applications to the application server and
SSL-enabling the application server.
➤ To generate plugin-cfg.xml:
1 Open WebSphere Administrative Console.
2 Select Environment > Update Web Server Plug-in.
3 Click OK to generate the plug-in.
4 Copy the generated plugin-cfg.xml into the <Apache_Home>/conf directory, replacing the existing
file.
24
SSL Configuration Guide
WebSphere 6
This procedure must be completed after deploying the applications to the application server and
SSL-enabling the application server.
The automated deployment process deploys Reporting and Analysis applications to separate
profiles on the application server. You must generate plugin-cfg.xml for each application.
➤ To configure Reporting and Analysis for an SSL-enabled Apache web server:
1 Generate plugin-cfg.xml for an application; for example, Web Analysis.
a.
Open a command prompt window.
b.
Navigate to <BIPLUS_Home>/InstalledApps/WebSphere/6.0/<app_name>/
profile/bin, where <app_name> indicates the Reporting and Analysis application
(Workspace, WebAnalysis, or FinancialReporting for which you are generating
plugin-cfg.xml.
c.
Execute GenPluginCfg.cmd (Windows) or GenPluginCfg.sh (UNIX).
WebSphere generates plugin-cfg.xml in <BIPLUS_Home>/InstalledApps/
WebSphere/6.0/<app_name>/profile/config/cells, where <app_name>
indicates a Reporting and Analysis application.
2 Copy the transport definition from the plugin-cfg.xml , which you generated in the preceding step.
a.
Using a text editor, open <BIPLUS_Home>/InstalledApps/WebSphere/6.0/
<app_name>/profile/config/cells/plugin-cfg.xml that you generated in the
preceding step.
b.
Copy the Transport definition, a sample of which is presented below:
<Transport Hostname="myServer.example.com" Port="45000"
Protocol="http" />
<Transport Hostname="myServer.example.com" Port="45002"
Protocol="https" >
<Property Name="keyring" Value="c:\Program Files\IBM\WebSphere
\Plugins\etc\plugin-key.kdb" />
<Property Name="stashfile" Value="c:\Program Files\IBM\WebSphere
\Plugins\etc\plugin-key.sth" />
</Transport>
3 Update Apache's plugin-cfg.xml.
a.
Using a text editor, open Apache's plugin-cfg.xml. The location of this file is
<Apache_home>/conf; for example, C:\Hyperion\common\httpServers\Apache
\<apache_version>\conf
b.
Paste the Transport definition you copied from the WebSphere generated plug-in file to
replace the existing Transport definition.
Caution!
plugin-cfg.xml contains three Transport definitions, one for each Reporting and
Analysis application. Be sure to paste the transport definition to the correct location.
SSL Configuration Guide
25
c.
Verify that the value of keyring and stashfile properties in the Transport definition
are accurate.
d.
In the <VirtualHostGroup> definition, insert a virtual host definition for the Reporting
and Analysis application. The virtual host definition should identify the SSL port used by
the application; for example, you may insert the following definition for Web Analysis:
<VirtualHost Name="*:16002" />
e.
Save and close plugin-cfg.xml.
4 Repeat the procedure for other Reporting and Analysis applications.
5 Restart the web server.
Apache Web Server with WebLogic Application Server
This discussion assumes that you have SSL-enabled the Apache web server.
The web server plug-in (HYSL-WebLogic.conf) required to establish a connection between
Apache and WebLogic is generated in <Hyperion_Home>/common/httpServers/Apache/
2.0.52/conf directory. You must modify HYSL-WebLogic.conf to specify SSL ports for
Workspace, Web Analysis, and Financial Reporting.
➤ To update the web server configuration file:
1 Using a text editor, open <Hyperion_Home>/common/httpServers/Apache/2.0.52/conf/
HYSL-WebLogic.conf.
2 In each LocationMatch definition, update the WeblogicCluster property value to reflect the
application server SSL port where the appropriate Reporting and Analysis application is running.
HYSL-WebLogic.conf contains numerous LocationMatch definitions. Workspace UI
Services definitions are indicated by /workspace (for example, <LocationMatch /
workspace/..) , Web Analysis-related definitions are indicated by /WebAnalysis (for
example, <LocationMatch /WebAnalysis/..), and Financial Reporting definitions are
indicated by /hr (for example, <LocationMatch /hr).
A sample LocationMatch definition for Workspace UI Services follows:
<LocationMatch /workspace/cdsrpc$>
SetHandler weblogic-handler
PathTrim /
KeepAliveEnabled ON
KeepAliveSecs 20
WeblogicCluster host.example.com:45003
</LocationMatch>
3 In HYSL-WebLogic.conf turn on the secure proxy and identify the absolute path where trusted CA file
is stored. This can be done by including the following parameters:
SecureProxy ON
TrustedCAFile <location_of_certificate>
<location_of_certificate> must be expressed as the absolute path to the certificate file,
for example, C:/certificates/ssl-keys/CA.crt.
26
SSL Configuration Guide
Note:
If you get a host name mismatch error during a session, you can either turn off SSL host matching
by including the parameter RequireSSLHostMatch=false, or ensure that the host name that
the client sees matches the host name in the certificate.
4 Save and close HYSL-WebLogic.conf.
5 Restart Apache.
6 Connect to Reporting and Analysis applications by accessing the SSL-enabled web URL.
IIS
IIS with the Tomcat Application Server
Communication between IIS and Tomcat uses AJP. No action is necessary to establish the AJP
connection between IIS and Tomcat. SSL-enabling IIS is sufficient to establish secure
communication between IIS and the browser.
Note:
If this IIS installation is used as the web server for other Hyperion products, you must perform
additional configuration steps as described in the product installation guides.
IIS with the WebSphere Application Server
If you plan to enable SSL communication between a web server and WebSphere application
server, you must install GSKit on the machine hosting the web server. See IBM documentation
for detailed instructions to install GSKit.
The plugin-cfg.xml file that is required to establish communication between IIS and the
WebSphere application server that hosts Reporting and Analysis application is autogenerated
when you deploy the application using the configuration tool. The default location of plugincfg.xml file:
●
Workspace: <BIPLUS_Home>/AppServer/InstalledApps/WebSphere/6.0/
Workspace/profile/config/cells
●
Web Analysis: <BIPLUS_Home>/AppServer/InstalledApps/WebSphere/6.0/
WebAnalysis/profile/config/cells/
●
Financial Reporting: <BIPLUS_Home>/AppServer/InstalledApps/WebSphere/6.0/
FinancialReporting/profile/config/cells
This file must be updated with transport information from the SSL-enabled application server.
Transport information can be extracted from plugin-cfg.xml generated by the application
server.
SSL Configuration Guide
27
WebSphere 5.x
This procedure must be completed after deploying the applications to the application server and
SSL-enabling the application server.
➤ To generate plugin-cfg.xml:
1 Open WebSphere Administrative Console.
2 Select Environment > Update Web Server Plug-in.
3 Click OK to generate the plug-in.
4 Copy the generated plugin-cfg.xml into <Apache_Home>/conf, replacing the existing file.
WebSphere 6
This procedure must be completed after deploying the applications to the application server and
SSL-enabling the application server.
The automated deployment process deploys Reporting and Analysis applications to separate
profiles on the application server. You must generate plugin-cfg.xml for each application.
➤ To configure Reporting and Analysis for an SSL-enabled Apache web server:
1 Generate plugin-cfg.xml for an application; for example, Web Analysis.
a.
Open a command prompt window.
b.
Navigate to <BIPLUS_Home>/InstalledApps/WebSphere/6.0/<app_name>/
profile/bin, where <app_name> indicates the Reporting and Analysis application
(Workspace, WebAnalysis, or FinancialReporting for which you are generating
plugin-cfg.xml.
c.
Execute GenPluginCfg.cmd (Windows) or GenPluginCfg.sh (UNIX).
WebSphere generates plugin-cfg.xml in<BIPLUS_Home>/InstalledApps/
WebSphere/6.0/<app_name>/profile/config/cells, where <app_name>
indicates a Reporting and Analysis application.
2 Copy the transport definition from the plugin-cfg.xml, which you generated in the preceding step.
a.
Using a text editor, open <BIPLUS_Home>/InstalledApps/WebSphere/6.0/
<app_name>/profile/config/cells that you generated in the preceding step.
b.
Copy the Transport definition, a sample of which follows:
<Transport Hostname="myServer.example.com" Port="45000"
Protocol="http" />
<Transport Hostname="myServer.example.com" Port="45002"
Protocol="https" >
<Property Name="keyring" Value="c:\Program Files\IBM\WebSphere
\Plugins\etc\plugin-key.kdb" />
<Property Name="stashfile" Value="c:\Program Files\IBM\WebSphere
\Plugins\etc\plugin-key.sth" />
</Transport>
3 Update plugin-cfg.xml in Reporting and Analysis distribution.
28
SSL Configuration Guide
a.
Using a text editor, open plugin-cfg.xml located in <BIPLUS_Home>/AppServer/
InstalledApps/WebSphere/6.0/WAS6_IIS6_connector.
b.
Paste the Transport definition you copied from the WebSphere generated plug-in file to
replace the existing Transport definition.
Caution!
The default plugin-cfg.xml file contains three Transport definitions, one for each
Reporting and Analysis application. Be sure to paste the transport definition to the
correct location.
c.
Verify that the value of keyring and stashfile properties in the Transport definition
are accurate.
d.
In the <VirtualHostGroup> definition, insert a virtual host definition for the Reporting
and Analysis application. The virtual host definition should identify the SSL port used by
the application; for example, you may insert the following definition for Web Analysis:
<VirtualHost Name="*:16002" />
e.
Save and close plugin-cfg.xml.
4 Repeat the procedure for other Reporting and Analysis applications.
5 Restart the web server.
IIS with WebLogic Application Server
The iisproxy.ini file is generated during the deployment of Reporting and Analysis
applications to the application server using the configuration tool. iisproxy.ini contains
name=value pairs that define configuration parameters for the IIS plug-in (iisproxy.dll).
The locations of iisproxy.ini file:
●
Oracle's Hyperion® Workspace: <BIPLUS_Home>/AppServer/InstalledApps/
WebLogic/9.1/VirtualHosts/workspace
●
Web Analysis: <BIPLUS_Home>/AppServer/InstalledApps/WebLogic/9.1/
VirtualHosts/WebAnalysis
●
Oracle's Hyperion® Financial Reporting – System 9: <BIPLUS_Home>/AppServer/
InstalledApps/WebLogic/9.1/VirtualHosts/hr
A sample iisproxy.ini:
WlForwardPath=/workspace
PathTrim=/
WebLogicHost=myserver.example.com
WebLogicPort=45003
KeepAliveEnabled=true
KeepAliveSecs=20
SecureProxy=ON
TrustedCAFile=<location_of_certificate>
<location_of_certificate> must be expressed as the absolute path to the certificate file,
for example, C:/certificates/ssl-keys/CA.crt.
SSL Configuration Guide
29
Note:
If you get a host name mismatch error during a session, you can either turn off SSL host matching
by including the parameter RequireSSLHostMatch=false, or ensure that the host name that
the client sees matches the host name in the certificate.
➤ To configure IIS redirection to Reporting and Analysis running on WebLogic:
1 Using a text editor, open iisproxy.ini for the application; for example, Oracle's Hyperion® Web Analysis
– System 9, for which you want to configure IIS redirection.
2 Verify that the following directives are set correctly:
SecureProxy=ON
TrustedCAFile=<location_of_certificate>
<location_of_certificate> must be expressed as the absolute path to the certificate file,
for example, C:/certificates/ssl-keys/CA.crt.
Note:
If you get a host name mismatch error during a session, you can either turn off SSL host matching
by including the parameter RequireSSLHostMatch=false, or ensure that the host name that
the client sees matches the host name specified in the certificate.
3 Save and close iisproxy.ini.
4 Repeat the procedure for other applications.
If Using IIS as Web Server for Reporting and Analysis
The Configuration utility does not allow you to register IIS proxy URLs directly in Shared
Services. You must complete the following manual steps if Reporting and Analysis applications
use IIS as the web server. These procedures are not applicable if an Apache web server is used.
Perform the following procedure after registering Oracle's Hyperion® Reporting and Analysis
– System 9 applications with SSL-enabled Shared Services.
➤ To register IIS proxy URLS with Shared Services:
1 Open Microsoft Word.
2 Select File > Open.
3 In File name field in the Open dialog box, enter the following URL:
http://<hss_server_name>:<port_no>/interop/content; for example, http://
myserver:58080/interop/content.
4 Log in as admin user.
5 Browse to files/Products/<product_name>/Published/
6 Open every instance file that is present.
7 Right-click every context node and select Attributes.
30
SSL Configuration Guide
8 Change the URL and port number as needed.
9 Save the document.
Performance Scorecard
Performance Scorecard users are managed by user directories configured in Shared Services. If
Shared Services is configured to access a user directory over a secure connection, you must
import the CA root certificate of the LDAP user directory into the JVM of the application server
that hosts Performance Scorecard. If Shared Services and Performance Scorecard are deployed
on the same server machine, this step may already be complete.
➤ To configure Performance Scorecard:
1 Install and deploy Performance Scorecard as instructed in Performance Scorecard Installation Guide.
2 Configure the SSL port on the application server. For detailed instructions, see step 3 on page 12. Adapt
the procedure to use the secure port used by Performance Scorecard.
3 Register Performance Scorecard with SSL-enabled Shared Services. You must select SSL Enabled option
and specify the secure URL of the Oracle's Hyperion® Shared Services.
4 Restart Oracle's Hyperion® Performance Scorecard – System 9.
SSL Configuration Guide
31
COPYRIGHT NOTICE
Hyperion SSL Configuration Guide, 9.3.1
Copyright © 2005-2007, Oracle and/or its affiliates. All rights reserved.
Authors: James Chacko
The Programs (which include both the software and documentation) contain proprietary information; they are provided under
a license agreement containing restrictions on use and disclosure and are also protected by copyright, patent, and other
intellectual and industrial property laws. Reverse engineering, disassembly, or decompilation of the Programs, except to the
extent required to obtain interoperability with other independently created software or as specified by law, is prohibited.
The information contained in this document is subject to change without notice. If you find any problems in the documentation,
please report them to us in writing. This document is not warranted to be error-free. Except as may be expressly permitted in
your license agreement for these Programs, no part of these Programs may be reproduced or transmitted in any form or by any
means, electronic or mechanical, for any purpose.
If the Programs are delivered to the United States Government or anyone licensing or using the Programs on behalf of the
United States Government, the following notice is applicable:
U.S. GOVERNMENT RIGHTS Programs, software, databases, and related documentation and technical data delivered to U.S.
Government customers are "commercial computer software" or "commercial technical data" pursuant to the applicable Federal
Acquisition Regulation and agency-specific supplemental regulations. As such, use, duplication, disclosure, modification, and
adaptation of the Programs, including documentation and technical data, shall be subject to the licensing restrictions set forth
in the applicable Oracle license agreement, and, to the extent applicable, the additional rights set forth in FAR 52.227-19,
Commercial Computer Software--Restricted Rights (June 1987). Oracle USA, Inc., 500 Oracle Parkway, Redwood City, CA
94065.
The Programs are not intended for use in any nuclear, aviation, mass transit, medical, or other inherently dangerous applications.
It shall be the licensee's responsibility to take all appropriate fail-safe, backup, redundancy and other measures to ensure the
safe use of such applications if the Programs are used for such purposes, and we disclaim liability for any damages caused by
such use of the Programs.
Oracle is a registered trademark of Oracle Corporation and/or its affiliates. Other names may be trademarks of their respective
owners.
The Programs may provide links to Web sites and access to content, products, and services from third parties. Oracle is not
responsible for the availability of, or any content provided on, third-party Web sites. You bear all risks associated with the use
of such content. If you choose to purchase any products or services from a third party, the relationship is directly between you
and the third party. Oracle is not responsible for: (a) the quality of third-party products or services; or (b) fulfilling any of the
terms of the agreement with the third party, including delivery of products or services and warranty obligations related to
purchased products or services. Oracle is not responsible for any loss or damage of any sort that you may incur from dealing
with any third party.


© Copyright 2026