
HOW TO: Configuring NetScaler SSL Offload to work with the N-series Summary:
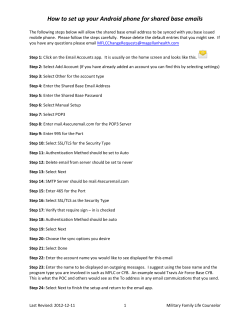
HOW TO: Configuring NetScaler SSL Offload to work with the N-series HOW TO: Configuring NetScaler SSL Offload to work with the N-series Summary: The Access Gateway configuration outlined in this guide will allow users to authenticate via a NetScaler by taking advantage of the SSL Offload module within the NetScaler. If you have an existing Access Gateway Virtual Server configured, no additional configuration is required on the Server end. The ICA Proxy will work in conjunction with the SSL Offload site. The following components will be required before you start: A new virtual IP address. A new SSL certificate (existing wildcard certificates can be used). A new DNS name associated with to the new VIP. Steps: 1. Create a new SSL Offload Services Server Name: (Name of your XenDesktop Service Site server.) Server: (IP address of your XenDesktop Services Site server.) Protocol: HTTP Port*: 80 Page 1 of 3 HOW TO: Configuring NetScaler SSL Offload to work with the N-series 2. Create a new SSL Offload Virtual Servers Name: (for example) “ssloffload.domain.com” Protocol: SSL IP Address: (Your new VIP) Enable the service you created in the previous step by clicking on the checkbox below the Active column. Page 2 of 3 HOW TO: Configuring NetScaler SSL Offload to work with the N-series 3. Click on the SSL Settings Tab. 4. Select your new SSL Certificate and click “Add”. 5. Click “Create”. 6a. On the N series device, enter the following for the XenDesktop Services Site URL: https://ssloffload.domain.com 6b. If you are using a non-standard XenDesktop services site URL (the default path is https://ssloffload.domain.com/Citrix/PNAgent/), then you will have to enter the entire URL: https://ssloffload.domain.com/Citrix/CAG/config.xml You should now be properly configured to access your XenDesktop environment via NetScaler. Page 3 of 3


© Copyright 2026