
7 HONDA RIDGELINE (KIT #601) Installation Instructions
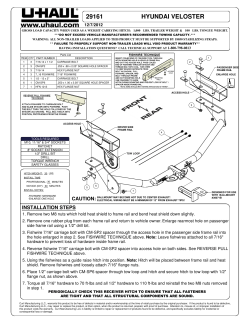
7
HONDA RIDGELINE (KIT #601)
Installation Instructions
Carriage Bolt
Front Bar
(to be used in addition to owners manual)
Rail
IMPORTANT NOTE:
Push rail firmly
against box
Flat Washer
Lock Washer
Nut
ILLUSTRATION 11
a) At front of rail insert carriage bolt through hole
in rail and front bar. Assemble flat washer, lock
washer and nut.
ILLUSTRATION 12
b) Push firmly against front of rail to compress
weather seal tight - hold and tighten nut on
carriage bolt.
FOR REMAINING INSTALLATION:
Refer to ACCESS Cover owners manual beginning with step 2 “Adhering Element Seal to Header”
TIP:
Use piece of element seal at corner.
(Cut about 1 inch long)
TIP: Use left over piece of Element Seal™ to make
best possible seal at corner of box. Trim off leg
of seal without adhesive. Use piece with adhesive
and position into corner forcing rubber to shape of
box corner.
Read before beginning installation. These instructions
replace all of Step 1 of the instructions in the ACCESS
owners manual. The Honda Ridgeline has a unique box
design. When the cover is installed, it will set recessed
down from the top of the box sides. Also, this truck is
equipped with a trunk-like lid on the bed floor. The lid
remains functional, but is restricted from fully opening avoid forcing the lid beyond its limit.
LID SHOWN IN MAXIMUM
OPEN POSITION
COVER
ROLLED
OPEN
COVER
SIDE RAIL
TOOLS NEEDED:
a) T-40 Torx
b) 10 mm socket
c) (2) 7/16 wrench or socket
d) inch pound torque wrench
e) protective eyewear
1
Helpful hints when sealing the sides of this cover.
Use these in conjunction with the operating instructions in the ACCESS owners manual.
Remove Torx Bolts
(5 total)
header bar
ILLUSTRATION 1
When sealing the sides, push
down on vinyl next to rail...
as cover edge turns up, grip
and pull it snug by the edge...
then push it down to seal along
rail from front to back. NOTE:
For best results always keep
valley between box and cover
clean of debris
a) Remove top 3 torx bolts on front box wall panel
(T-40). Then remove 1 torx bolt at top rear on
each side of box.
Page 4 of 4
50336 RevE
©2008 COPYRIGHT AGRI-COVER INC., ALL RIGHTS RESERVED
ILLUSTRATION 2
102109
b) Mount header bar to front box wall with 6mm x
40mm hex bolt, lock washer and flat washer
where the 3 top torx bolts were removed. Torque
center bolt to about 20 inch lbs. Torque each
outer bolt to 60 inch lbs. (10 mm socket)
Page 1 of 4
2
5
3
Side Rail - Right Hand
(passenger side)
Align bolt to near
side of slotted hole in
bracket and tighten
Right Side
Rear Bracket
(passenger side)
Hex Bolt ¼ x ¾
With rail
engaged
in notch at
front, push
forward
on rail and
swing rear
toward
box
Flat Washer
Lock Washer
Nut
ILLUSTRATION 3
ILLUSTRATION 4
a) Assemble bracket to rear of rail. Use Hex bolt,
flat washer, lock washer and nut. Align bolt to
near side of bracket and tighten. (7/16 wrench)
Repeat bracket assembly for left hand rail (driver side). NOTE: Slotted hole in bracket is for
adjustments later if needed.
Turn bolt w/ flat washer
(no lock washer) where
torx bolt was
a) Pull paper off of weather stripping down full length
of rail.
ILLUSTRATION 7
a) Push rail forward - and at same time swing
rear carefully toward box. CAUTION: Do not let
adhesive on rail make contact with box wall.
See b), Illustration 8 next.
4
Insert front of side rail into
notch at front of header bar
as shown in Illustration 6
This portion of
front side rail
should rest on top
of header bar
ILLUSTRATION 8
b) While holding rail carefully so as not to let
adhesive contact box, align 6mm bolt with
flat washer through bracket of rail and into
opening where torx bolt was removed at rear of box.
Start turning bolt into threads where torx bolt was
removed.
6
Push rail into
notch in front
header bar
This portion of side
rail should be under
header bar
ILLUSTRATION 5
ILLUSTRATION 6
a) Engage front end of cover rail into notch at front
header. Do not let adhesive on rail touch box at
this time. See Illustrations 5 & 6.
b) Front of siderail inserted into notch of header bar.
Page 2 of 4
ILLUSTRATION 9
ILLUSTRATION 10
a) After bolt has been partially turned in, hold rail
level and use bolt as a guide then push rail toward
box wall until weather strip adhesive makes full
contact.
b) Tighten bolt until rail is secure to box. Torque to
80 inch lbs. Repeat steps 3, 4, 5 and 6 for driver
side rail.
TIP: IF NEEDED, the slotted hole in rear bracket can be
Page 3 of 4
used to compress the weather seal tighter against box
wall (Bracket assembly step 2). Loosen bolt that holds
bracket to rail, push rail directly against box, hold and
tighten bolt.


© Copyright 2026