
Chapter 14: Ten Frequently Asked Questions
Part VI
The Part of Tens
I
In this part . . .
n the famous For Dummies Part of Tens, we answer the
ten most-asked questions — or at least the ten questions we most wanted to answer. In the chapter on the ten
best Flash resources, we manage to give you dozens of
Flash resources, such as the many Flash resource Web
sites (while convincing our publisher that only ten exist).
Finally, to top off the book, we give you our votes for ten
great Flash designers. Surf to see the work of all ten and
be amazed and inspired by the possibilities!
Chapter 14
Ten Frequently Asked Questions
In This Chapter
How do I combine two Flash movies?
Why is motion tweening not working?
How can I sync sound with motion?
What is the best way to import bitmaps?
How do I rescale my movie’s size?
What are the best tips for creating movies?
Can Flash do 3-D?
How do I center a Flash movie in a Web page?
What are the size limits for a Flash movie?
How do I dynamically load music from the Web?
I
n this chapter, we answer some frequently asked questions about Flash
while explaining how to create some cool effects and streamline the
process of creating Flash movies.
How Do I Combine Two Flash Movies?
It’s not difficult to merge two Flash movies. You simply copy all the frames in
each scene in your first movie to new scenes that you create in your second
movie. To merge two Flash movies into one, follow these steps:
1. Choose File➪Open. In the Open dialog box that appears, navigate
to and select the Flash movie you want to copy from.
The Flash movie you select appears on the Stage.
2. Click the Edit Scene button near the top right of the Stage. In the
drop-down list that appears, choose the scene you want to copy.
The scene you select appears on the Stage.
316
Part VI: The Part of Tens
3. Unlock all the layers in the scene.
See Chapter 6 for information on unlocking layers.
4. Choose Edit➪Timeline➪Select All Frames.
This selects all keyframes and tweens in all layers in the scene.
5. Choose Edit➪Timeline➪Copy Frames.
This copies all the keyframes and tweens in your scene.
6. Choose File➪Open. In the Open dialog box that appears, navigate to
and select the Flash movie you want to copy to.
The Flash movie you select appears on the Stage.
7. Choose Insert➪Scene.
An empty scene appears on the Stage.
8. Click the first frame in the Timeline and choose Edit➪Timeline➪
Paste Frames.
This pastes the scene you copied from your first movie into your new
scene in your second movie.
9. Repeat Steps 1 through 8 for each scene you want to copy from your
first movie.
10. Choose Control➪Test Movie.
Your second movie now includes all the scenes you copied from your
first movie.
Why Is Motion Tweening Not Working?
When you create a tween correctly, Flash draws an arrow on the Timeline
between the two keyframes. If there’s a broken line between the two
keyframes instead, something is wrong and the tween won’t work. Here
are some possible solutions:
Tween the right stuff. Make sure that you’ve created a group, some text,
or an instance of a symbol. Motion tweening requires this.
Add an ending keyframe. If you have a dashed line instead of a solid
line indicating your motion tween on the Timeline, you didn’t properly
create an ending keyframe. Undo the steps that created the tween,
create an ending keyframe, and try again. And make sure the ending
keyframe is also a group, some text, or an instance of a symbol, and
nothing else. If you accidentally paste something extra in either
keyframe, the tween won’t work.
Chapter 14: Ten Frequently Asked Questions
Isolate the problem. If you can’t figure out why your motion tweening
isn’t working, you might have some action or setting that you don’t even
remember. Movies can get complex, and comprehending all the relationships and interconnections can be difficult. Try copying to the Clipboard
the object that you’re animating and then pasting it into a new, “clean”
movie. You can copy and paste frames as well. In the new movie, you
should be able to analyze the situation more clearly.
Undo or revert. If the animation worked previously, try undoing your
last several actions. You can also try removing any recently created
objects or ActionScript. If you can revert to the time your animation
worked, you can start again from there.
Put each object on its own layer. If you have more than one object on a
layer, place each object on its own layer. (Refer to Chapter 6 for a discussion of working with layers.) Animate only one object on a layer. This
solves many, many tweening problems.
How Can I Sync Sound with Motion?
Suppose that you want certain parts of your animation synchronized with
specific sounds. For example, you want a bouncing ball to synchronize with
the beat of some music you imported into Flash. Without specifically synchronizing the sounds, the sound and the animation might play at different
speeds. A faster computer might play the animation faster but doesn’t adjust
the length of the sound. Or a slow computer might take its time displaying a
transparent ball bouncing, and the synchronization with sound will drift. (For
basic information on adding sound to Flash, refer to Chapter 11.)
To synchronize the animation with the sound, you need to use a stream
sound. When you add the sound file to a frame, choose Stream in the Sync
drop-down list in the Property inspector. Then adjust the keyframes so that
the animation and the sound end at the same time.
To be more precise, you can synchronize your animation with specific parts of
the sound. To accomplish this task, choose Modify➪Timeline➪Layer Properties
and choose 200% or 300% in the Layer Height drop-down list. You can also click
the little button in the upper-right corner of the Timeline and choose Medium or
Large for the size of the frames in the option menu that appears. Now you can
see the shape of your sound wave more clearly so that you can adjust the
keyframes of your animation to match certain parts of the sound.
One way to pinpoint which frame to use for placing an animation event is to
drag the playhead (the red rectangle) just above the Timeline. This technique
lets you control the speed of the animation. You can drag left or right until
you find the exact frame that you want to work with. You can then move a
keyframe to that frame, for example, to move an animation event to a frame
that contains a specific portion of your sound.
317
318
Part VI: The Part of Tens
What Is the Best Way to Import Bitmaps?
Maybe you’re working on an animation, and you need to include your boss’s
photograph or a photo of the product that you sell. Or maybe you want an
effect in your Flash movie that you can create only in Photoshop. So you
need to use a bitmap image. What bitmap format do you use?
You might not have a choice of format. If your information systems department hands you a logo with a solid white background in JPEG format, you
probably have to use it.
At other times, you can choose your format. For example, when you scan a
photo, most scanner software lets you choose from among several formats.
A digital camera may also let you choose the format. Of course, if you create
the bitmap in an image-editing program, you can choose from any format
that the program supports. (Turn to Chapter 3 for instructions on importing
bitmap images. Hint: Choose File➪Import➪Import to Stage or File➪Import➪
Import to Library.)
Here are some commonly used bitmap formats:
The GIF file format can’t have more than 256 colors. You can use the GIF
format for simple drawings that have a limited color palette, but for that
you may be better off with the PNG format, described later in this list.
JPEG files can display many more colors than GIF files and therefore
produce more realistic photos and other complex drawings. Although
JPEG graphics can be highly compressed to reduce file size, they may
lose some detail or color fidelity as a result, depending on how much
you choose to compress them.
BMP doesn’t lose quality when compressed, but the BMP format results
in larger file sizes than GIF or JPEG.
PNG is a nice compromise between file size and image quality. The PNG
format doesn’t lose quality when compressed and allows many more
colors than the GIF format. And it provides the capability for transparency. If you want the smallest file size but don’t want to compromise
quality, the PNG format is a good choice. The Flash image compressor
works best and most efficiently with images that have not been compressed by using techniques that may lose some image quality.
Your final result is the .swf file that you publish. Flash compresses bitmaps
(as well as the entire movie) when the movie is exported to an .swf Flash
Player file. Therefore, you need to think about the entire round-trip journey
that your bitmap will make. You might have to test varying bitmap formats
and publish the movie for each one to see the exact results.
Chapter 14: Ten Frequently Asked Questions
When you export, you can set the JPEG quality on the Flash tab of the
Publish Settings dialog box. You also set the overall quality on the HTML tab.
For that quality setting, only the High and Best settings smooth (anti-alias)
the bitmaps in the movie. (Refer to Chapter 13 for more information about
publishing your Flash movie.)
When you import a bitmap image into Flash, you can take the following steps
to ensure good-looking results:
Save your graphics in the highest quality possible. If you have a photograph, don’t import it as a GIF file.
Don’t overcompress your original bitmaps. Find a happy medium. Try
saving an image at several compression levels to see the difference in
quality and size.
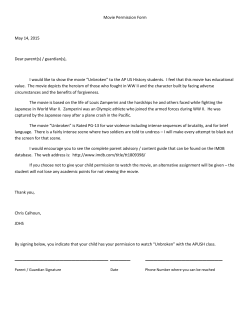
Set the compression type and quality in the Bitmap Properties dialog
box. After you import the image, open the Library (choose Window➪
Library) and right-click (Windows) or Control+click (Mac) the image and
choose Properties to open the Bitmap Properties dialog box, as shown
in Figure 14-1.
Figure 14-1:
Use the
Bitmap
Properties
dialog box
to fiddle
with your
bitmaps.
How Do I Rescale My Movie’s Size?
You create a beautiful Flash movie that takes up the entire page. But then
your boss says that you need to fit it into an existing HTML page, which
translates into reducing the size of the whole thing by 25 percent. What do
you do? Get a new boss, if possible. Barring that, you can rescale the size of
the movie by following these steps:
1. Decide the amount of the reduction you need to achieve, such as
25 percent.
2. If you have any hidden layers, right-click (Windows) or Control+click
(Mac) any layer and choose Show All.
This step ensures that all layers are considered in the reduction.
319
320
Part VI: The Part of Tens
3. Click the Edit Multiple Frames button (just below the Timeline).
4. Drag the onion-skin markers to the beginning and ending frames of
your animation.
See Chapter 9 if you need more information on how to use the onion-skin
markers.
5. Choose Edit➪Select All.
6. Choose Window➪Transform to open the Transform panel.
7. In the Transform panel, select the Constrain check box.
8. In the Width or Height input box, type the new number for your
reduction percentage, and press Enter (Windows) or Return (Mac).
Flash scales your animations by the reduction percentage.
9. Choose Modify➪Document.
The Document Properties dialog box appears.
10. In the Width and Height boxes, type new numbers reflecting the
reduction percentage size.
Here you’ll have to first do a little math, multiplying the old Width and
Height by the reduction percentage to come up with the new numbers
you type in.
You’re done! Flash scales your entire movie as you specified. You may have to
drag everything so that it fits appropriately within your smaller-sized movie.
Size requirements are key pieces of information that you need to nail down
before building a Flash movie so that you can avoid any need to rescale your
movie’s size.
What Are the Best Tips
for Creating Movies?
Every Flash user collects a number of techniques that make creating a Flash
movie easier. Following are a few ideas to help you get started:
Save multiple versions of your movie by choosing File➪Save As. If a
problem arises, you can always go back to a previous version and
start again.
Chapter 14: Ten Frequently Asked Questions
As soon as you have an overall structure, test your movie in a variety
of browsers (for example, Internet Explorer, Mozilla Firefox, and on a
Macintosh, Apple’s Safari) at various resolutions, if possible. It’s easier
to correct problems early, before your project becomes too complex.
Choose Control➪Test Movie as soon as you develop your animation and
continue to test it in this way for each new significant change. It’s also a
good idea to keep testing your movie with Publish Preview (by pressing
F12) to see how it will work in a browser.
Add comments (see Chapter 10) to your ActionScript so that you
can figure out what you did when you go back to your movie after
your vacation.
Use consistent names for symbols. Many Flash users add the type of
symbol after the name, so a button could be called Contact_btn and a
movie clip could be called Intro_mc. When you start creating movie clips
inside buttons, you might get confused if you don’t name your symbols
intelligently.
Use meaningful names for your instances. If you have three instances of
a button symbol, you need to be able to distinguish which is which. You
can name them by their purpose, such as Email, Services, and Clients.
When you complete work on a layer, lock the layer to avoid making
unwanted changes.
You’re sure to discover other techniques as you become more experienced
in Flash.
Can Flash Do 3-D?
You can’t really create 3-D in Flash. Flash is decidedly a 2-D program. But, not
to be deterred, Flash users have created many tricks to make you think
you’re seeing 3-D.
One simple approach is to rotate a 2-D object in what appears to be 3-D
space. For example, you can draw a circle, turn it into a symbol instance, and
in a motion tween scale it in one dimension so that it becomes progressively
more of an oval until all you see is a straight line. Continue to expand it from
the line through fatter and fatter ovals until you have a circle again. You’ve
apparently rotated the circle 180 degrees. Continue until you’re finished.
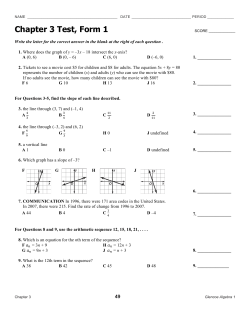
You can select a group of frames and copy them or reverse them. (Turn to
Chapter 9 for more details.) You can see a simple example in Figure 14-2.
321
322
Part VI: The Part of Tens
1
Figure 14-2:
The circle is
2-D, but it
looks like it’s
rotating in
3-D; here,
you see the
first quarter
revolution.
2
3
4
55
66
You can also use shape tweening to create this 3-D effect. You can shape
tween a circle into a line and back again to make it look like it’s rotating.
For fancier results, you can use software packages designed for creating 3-D
animation for Flash, such as Swift 3D. Also, some high-end 3-D animation
packages, such as Maya, have Flash export capabilities built in. Another
technique for simulating 3-D is to import an object from a 3-D program,
such as 3D Studio Max, AutoCAD, or Maya.
In the following steps, we use AutoCAD as an example. To import an object
from AutoCAD, follow these steps:
1. In AutoCAD, create the 3-D object and display the view you want to
start with.
2. Choose File➪Export.
The Export Data dialog box opens. The Files of Type drop-down list
should read Metafile (*.wmf).
3. In the File Name box, enter a name for the file. Add a 1 after the filename. Click Save and select the object when prompted.
Chapter 14: Ten Frequently Asked Questions
4. Rotate the 3-D model slightly.
In AutoCAD 2000 and later, you can use the 3DORBIT command for
this step.
5. Save this new view as a .wmf file as we explain in Step 2, consecutively numbered from the first file.
For example, if the first file is 3d1.wmf, name the second file 3d2.wmf.
6. Repeat Steps 2 through 5 until you’ve rotated the model 360 degrees.
7. In Flash, choose File➪Import➪Import to Stage.
8. In the Files of Type drop-down list, select Windows Metafile (*.wmf),
select the first WMF file that you created, and then click Open.
9. When Flash asks whether you want to import all the files in the
sequence, click Yes.
Flash imports all the files, placing them in consecutive keyframes. The
WMF file may be imported with a border as well as the lines that make
up the object.
10. For each keyframe, do the following:
a. If your graphic has a border: Click anywhere outside the objects,
select just the border, and press Delete.
b. If your graphic is imported as one object: Select all the objects
and then choose Modify➪Break Apart.
c. Select the objects and then choose Modify➪Convert to Symbol.
You can now play your animation. Note that you lose any shading or materials that you created in AutoCAD, so your model has a wire-frame look. You
can use fills to modify your 3-D object in Flash to create the appearance of
solidity.
For an example of creating a simple 3-D animation by using this technique, go
to the companion Web site at www.dummies.com/go/flashcs3 and look
for the 3d rotation.fla file.
What if you don’t have a 3-D program? Well, do you have Microsoft Word?
Yes, folks, you can create 3-D objects in your lowly word processing program.
To create a 3-D object with Word, follow these steps:
1. Open Microsoft Word and, in a new document, open the Drawing toolbar if it isn’t already open by choosing View➪Toolbars➪Drawing.
2. On the Drawing toolbar, click the AutoShapes drop-down arrow and
select a shape.
You can even draw your own shape by using the Scribble tool (one of
the options on the Lines submenu, under AutoShapes).
323
324
Part VI: The Part of Tens
3. Click in your blank document to place the shape.
If you want, use the Fill Color tool to change the fill. Select the shape and
then, in the Fill Color drop-down list, select Fill Effects and create a cool
gradient on the Gradient tab.
4. Click the 3-D button at the right end of the Drawing toolbar and select
a 3-D perspective from the box that opens.
You might need to try out a few choices until you get the best effect.
5. Click the 3-D button again and click the 3-D Settings button at the
bottom of the box to open the 3-D Settings toolbar.
Use the Tilt Left, Right, Up, or Down button to tilt the object until it
looks perfectly flat so that you don’t see any of the 3-D effect. Keep
the 3-D Settings toolbar open.
6. Choose Edit➪Copy to copy the shape to the Clipboard.
7. Return to Flash and choose Insert➪New Symbol; specify a movie
clip behavior for the symbol and then name it.
8. Click OK.
9. Choose Edit➪Paste to paste the shape into the first frame.
10. Go back to Word and decide which way you want your shape
to rotate.
You can choose up, down, left, or right.
11. Select your 3-D shape in the Word document and click twice on
Tilt Left (or Right, Up, or Down) on the 3-D Settings toolbar.
12. Copy the shape to the Clipboard.
13. Go to Flash and create a keyframe in the next frame.
14. Paste the shape from the Clipboard.
15. Repeat Steps 11 through 14 until you’re looking at your shape
on edge.
16. Select all the frames except the first and the last, and then choose
Edit➪Timeline➪Copy Frames.
17. Click the first empty frame (the one after your last frame) and then
choose Edit➪Timeline➪Paste Frames.
You now have the quarter revolution twice, and you need to modify the
second set so that it becomes the second quarter revolution.
Chapter 14: Ten Frequently Asked Questions
18. Select all the frames that you’ve pasted and choose Modify➪
Timeline➪Reverse Frames.
If you play the animation now, it looks as though the shape is revolving
one quarter and then back again.
19. Select the first of the frames that you pasted and choose Modify➪
Transform➪Flip Horizontal (if you used Tilt Left or Right in Word)
or Flip Vertical (if you chose Tilt Up or Down in Word).
20. Repeat Step 19 with the remaining frames that you’ve pasted.
You now have a half revolution.
21. Select all but the first and last frames and then choose Edit➪
Timeline➪Copy Frames.
22. Click the first empty frame after the last frame and choose Edit➪
Timeline➪Paste Frames.
23. Select all the frames that you’ve pasted and choose Modify➪
Timeline➪Reverse Frames.
You’re done! Play your animation and watch your shape roll.
This method does have some disadvantages. First, all of your images from
Word are imported as bitmaps, not vector images. Second, you’re animating
frame by frame. As a result, your file is larger and downloads more slowly. If
you use this method for just a small animation, however, it beats finding out
how to use a fancy 3-D program (and paying for it, too). Test the results and
see whether it works for you.
Look on our companion Web site (www.dummies.com/go/flashcs3) for
rotating star.fla, which is an example of using Word to create 3-D
objects. The animation is in a movie clip, so choose Control➪Test Movie to
see the results (or open the .swf file directly).
How Do I Center a Flash
Movie in a Web Page?
As we discuss in Chapter 13, you can make your Flash movie appear in a Web
page by choosing both the Flash and HTML formats in your Publish Settings
and then publishing your movie. Flash then generates the HTML code (like
the code in Figure 13-4) for a Web page. This Web page appears to contain
your Flash movie when you view the Web page in a browser. To make the
Flash movie centered in that Web page, you just need to add a little bit of
extra code to the HTML page, which you can do with a text editor.
325
326
Part VI: The Part of Tens
To add the code for centering your Flash movie in the Web page, follow
these steps:
1. After choosing the Publish Settings for Flash and HTML (using the
Flash Only or Flash HTTPS template in the HTML tab of the Publish
Settings dialog box, as we describe in Chapter 13), choose File➪
Publish.
Flash creates a Flash Player (.swf) file and a Web page (HTML) file.
2. Start a text editor or an HTML editor, and open the HTML page within
the editor.
You can use an HTML editor such as Dreamweaver or a text editor such
as Notepad (Windows) or TextEdit (Mac). In TextEdit, choose TextEdit➪
Preferences, and when the Preferences window appears, in the New
Document Attributes section (or in the New Document tab, if you have
a newer version of TextEdit), select Plain Text rather than Rich Text.
3. Find </head> in the file and insert this code before it:
<style type=”text/css” media=”screen”>
body {text-align: center; }
div#container {width: 550px; margin: 0px auto;
text-align: left; }
</style>
Be sure you find </head>, not <head>.
This code defines some Cascading Style Sheet (or CSS) styles that your
Web browser will use to dynamically create margins on the left and right
of a Flash movie that is 550 pixels wide so that the movie is automatically centered on the page. If your Flash movie is, say, 200 pixels wide,
change 550px in the preceding code to 200px.
4. Find the third occurrence of <script in the file (after about:
internet) and insert <div id=”container”> before it.
Be sure not to put anything between the <script> and </script> tags.
5. Find </noscript> in the file and insert </div> after it.
Be sure you find </noscript>, not <noscript>.
In HTML lingo <div> and <style> and any other words starting with a
bracket (<) are called tags. The <div> tag defines the beginning of a division or section of a Web page, and the </div> tag defines the end of it.
By giving the <div> an id equal to “container”, the Web browser will
use the style that you defined for “container” in Step 3 and apply it to
everything between the <div> and </div> tags.
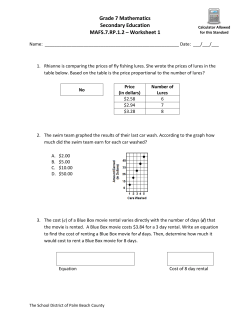
Figure 14-3 shows an example of an HTML file with all the code added.
Chapter 14: Ten Frequently Asked Questions
6. In the editor, save the file with the changes you made.
Now when you view the HTML page in a Web browser (assuming it’s a
fairly recent version of a Web browser), your Flash movie appears centered in the Web page.
Figure 14-3:
Here’s the
code
previously
shown in
Figure 13-4,
revised with
<style>,
</style>,
<div>, and
</div>
tags, which
center the
movie in the
Web page.
What Are the Size Limits
for a Flash Movie?
Usually you won’t be too concerned about how big a movie you can create
with Flash, because one of the reasons to use Flash is that it employs vector
graphics, tweening, and other methods to create small files that download
quickly over the Web. If you’re using Flash to create gigantic projects, that
can be great fun and even workable in some cases, but keep in mind that
Flash wasn’t primarily designed to do that. On the other hand, more and
more studios are using Flash for production animation (including broadcast
TV shows), and video is now an important feature of Flash.
327
328
Part VI: The Part of Tens
In any case, it’s interesting to know that, other than limits imposed by your
computer’s RAM, CPU, hard drive, video card, browser, and operating
system, there are few limits to the size and complexity of a Flash movie.
However, there are at least two limits: the minimum size of your Stage is 1
pixel wide and 1 pixel high, and the maximum Stage size is 2880 pixels wide
by 2880 pixels wide.
How Do I Dynamically Load
Music from the Web?
You can use ActionScript to load music into your movie live from the Web by
using the ActionScript load() and play() methods. (Turn to Chapter 10 to
find out more about ActionScript.) To load an MP3 file on the Web into your
movie while your movie is playing, follow these steps:
1. Create a new layer.
Chapter 6 explains how to add a new layer.
2. Click a keyframe.
If the frame you want to use is not a keyframe, right-click (Windows) or
Control+click (Mac) it and choose Insert Keyframe.
3. Choose Window➪Actions to open the Actions panel if it isn’t open
already. In the Actions panel, click the Script Assist button to deselect
it (if it’s selected).
If necessary, click the Actions panel title bar to expand the panel.
4. In the Script pane of the Actions panel, enter the following code:
var mySound:Sound = new Sound();
var
myChoice=”http://www.hotjazzcaravan.com/Music/
Im_an_Old_Cowhand_clip.mp3”;
var myRequest:URLRequest = new URLRequest(myChoice);
var myContext:SoundLoaderContext = new
SoundLoaderContext(8000, true);
mySound.load(myRequest, myContext);
mySound.play();
Replace http://www.hotjazzcaravan.com/Music/Im_an_Old_
Cowhand_clip.mp3 in the code with the Web address of the audio you
want to play. Or if the audio is going to remain in the same folder as your
Flash Player file, you can simply replace it with, for example, Im_an_
Old_Cowhand_clip.mp3. You can replace mySound, myChoice,
myRequest, and myContext with any names you like.
Chapter 14: Ten Frequently Asked Questions
The first ActionScript statement of the preceding code creates an
instance of a new sound object with the name mySound. (ActionScript
statements end with a semicolon.) The second ActionScript statement
creates a variable and sets it equal to a Web address (a URL). The third
ActionScript statement creates an instance of a request for an item that
has that Web address. The fourth ActionScript statement specifies how
many milliseconds of buffering (in this case, 8000 milliseconds, which
equals 8 seconds) to use when loading the sound. The fifth ActionScript
statement loads the sound specified in the third statement as a streaming sound by using the buffer size specified in the fourth statement.
Then the sixth ActionScript statement plays the sound.
The preceding code loads your file as streaming audio. You hear streaming audio as it’s being sent over the Web to you. You don’t have to download the entire audio file before you can start hearing it.
5. Choose Control➪Test Movie and enjoy the music.
329
330
Part VI: The Part of Tens


© Copyright 2026