
Making best use of Outlook 2010 Information Services ICT Training
Information Services ICT Training Making best use of Outlook 2010 July 2012 Version 1.22 Making best use of Outlook 2010 using Microsoft Exchange These materials have been produced by the IT Training and Assessment Unit Information Services The Queen’s University of Belfast These materials are for use only within Queen’s and with appropriate attribution. This document can be obtained in PDF format from the Unit’s web pages – http://www.qub.ac.uk/is/training and click on the links for Flexible Training Solutions. How to use this document This document can be used as a reference guide. Use the very detailed table of contents to find an item. The document also makes use of cross referencing. The document can be accessed online and navigated using the TOC and cross referencing. University Policy and guide to good practice You are advised to be familiar with the University’s Guidelines for the Use and Management of Email, go to http://www.qub.ac.uk/home/RegistrarsOffice/QUBonly/Downloads/ then choose Use and Management of Email (this will load down a PDF file of 8 pages). The University is currently updating these guidelines. IT Training and Assessment Unit, Queen’s University of Belfast July 2012 Making best use of Outlook 2010 using Microsoft Exchange Page 1 Overview .............................................................................. 4 The Outlook Ribbon ............................................................................................................4 About your Outlook folders................................................................................................5 To access your Outlook folders over the Internet ...........................................................6 About sharing folders in Outlook ......................................................................................7 About Passwords ..................................................................................................................7 Messaging ............................................................................ 7 The Inbox...............................................................................................................................8 Open a Mail Message............................................................................................................8 Outlook Views - Reading Pane ...........................................................................................9 Create a New Message....................................................................................................... 10 Insert a Mail Address ......................................................................................................... 10 Auto-Complete List ........................................................................................................... 10 Global Address List ........................................................................................................... 11 Email from an alternative address ................................................................................... 12 Insert a Subject ................................................................................................................... 13 Insert Text in the Message Window................................................................................ 13 Insert an Automatic Signature.......................................................................................... 13 Use the Spell Checker........................................................................................................ 15 Changing Outlook Options – automatic spelling check .............................................. 15 Copy a Message to Another Recipient............................................................................ 16 Drafts: Save or access ........................................................................................................ 16 Use the Blind Carbon Copy (Bcc) Option ..................................................................... 17 Choose how your messages are composed .................................................................... 17 Copy, Move and Delete Text ........................................................................................... 18 Attach a File to a Message ................................................................................................ 19 Delete/Remove a File Attached to a Message............................................................... 19 Open and Save a File Attachment ................................................................................... 20 Preview an attachment ...................................................................................................... 21 Attach an Outlook Item to a Message ............................................................................ 21 Set High or Low Priority................................................................................................... 22 Sent Items folder ................................................................................................................ 22 Track Messages (Delivery or Read receipts) .................................................................. 23 Delay the Delivery of a message ...................................................................................... 24 Recall or replace an email message after it is sent ......................................................... 25 Reply to Messages .............................................................................................................. 26 Replies sent to someone other than you ........................................................................ 26 Choose the Format of Your Message Replies ............................................................... 27 Forward a Message ............................................................................................................ 28 Delete a Message ................................................................................................................ 28 To delete more than one message: .................................................................................. 29 To restore a deleted message:........................................................................................... 29 To delete a message without it going into the Deleted Items folder ......................... 29 Recover Deleted Items ...................................................................................................... 30 Automatic Replies (Out of Office) .................................................................................. 31 Organize Messages (sorting, searches, housekeeping) .... 32 Sort Messages ..................................................................................................................... 32 Flag Messages ..................................................................................................................... 34 IT Training and Assessment Unit, Queen’s University of Belfast July 2012 Making best use of Outlook 2010 using Microsoft Exchange Page 2 See your flagged message in the Calendar ...................................................................... 35 Categorize Messages .......................................................................................................... 36 Searching ............................................................................................................................. 37 Conversations ..................................................................................................................... 39 Mailbox Cleanup/Saving Space ....................................................................................... 40 Strategies for reducing the Mailbox size ......................................................................... 41 Archiving ............................................................................................................................. 41 Folder Management ........................................................................................................... 42 Create a New Mail (or other type of) Folder ................................................................. 43 Move Messages to another Mail Folder.......................................................................... 43 Favorites .............................................................................................................................. 44 Saving important messages to your own File Store ...................................................... 44 Email Etiquette ................................................................. 45 Write Email messages that get attention......................................................................... 45 Dealing with SPAM ........................................................... 46 Short Cuts and useful Features .......................................... 48 Quick Access toolbar......................................................................................................... 48 Quick Steps ......................................................................................................................... 48 Handle Alarms/Reminders............................................................................................... 49 Calendar ............................................................................. 50 Appointments, Meetings and Events .............................................................................. 50 Calendar Views and Navigation ....................................................................................... 50 Date Navigation ................................................................................................................. 51 Schedule an Appointment ................................................................................................ 53 To edit an appointment..................................................................................................... 54 Create a recurrent series of appointments ...................................................................... 54 To alter one or more appointments in a recurrent series............................................. 55 Create an Appointment from an Email Message .......................................................... 55 Delete an event or appointment ...................................................................................... 56 Print Calendar ..................................................................................................................... 56 Add or Remove Bank/Public Holidays in your Calendar ........................................... 56 Altering the Time Interval ................................................................................................ 57 Set or remove Reminders.................................................................................................. 57 Reminders settings for all new appointments or meetings .......................................... 58 Schedule a meeting using the Free/Busy view .............................................................. 58 To View someone else’s calendar .................................................................................... 62 To Grant Permission to Other People to see your Exchange Calendar.................... 62 To check the Shared Calendar is up to date................................................................... 64 Mark an appointment private in an Exchange Calendar .............................................. 64 View and use a SharePoint calendar................................................................................ 64 Contacts ............................................................................. 65 Suggested Contacts ............................................................................................................ 65 Create a Contact ................................................................................................................. 67 Create a Contact from an email message........................................................................ 68 Create a Message to a Contact ......................................................................................... 68 IT Training and Assessment Unit, Queen’s University of Belfast July 2012 Making best use of Outlook 2010 using Microsoft Exchange Page 3 How to View all Emails Sent to Particular People........................................................ 68 Contact Group (formally known as a Distribution List).............................................. 69 Create and edit a Contact Group ..................................................................................... 69 Create a message using a Contact Group ....................................................................... 70 Email merge – an alternative to Contact Groups ......................................................... 70 Send a Copy of a Contact Group to Someone Else ..................................................... 70 Save a Copy of Contact Group that you have Received .............................................. 71 To View someone else’s contacts .................................................................................... 71 To Grant Permission to Other People to see your Exchange Contacts.................... 72 Hide items in Contacts ...................................................................................................... 73 Tasks.................................................................................. 74 Flags and Tasks .................................................................................................................. 74 Create a Task ...................................................................................................................... 75 Create a task from within the Daily Task List in the Calendar ................................... 76 Create a task from an email, contact, or calendar item ................................................ 76 About assigning a Task to Someone Else ...................................................................... 77 Assign a Task to Someone Else ....................................................................................... 78 Accept or decline a task assignment ................................................................................ 78 Reclaim a declined task assignment ................................................................................. 79 Send a status report or a comment about a task assignment ....................................... 79 To view tasks that you have assigned to others............................................................. 80 Viewing Tasks ..................................................................................................................... 81 Arrange tasks ...................................................................................................................... 82 To-Do Bar ........................................................................................................................... 83 Notes ................................................................................. 84 How to use this document This document can be used as a reference guide. Use the very detailed table of contents to find an item. The document also makes use of cross referencing. The document can be accessed online and navigated using the TOC and cross referencing. IT Training and Assessment Unit, Queen’s University of Belfast July 2012 Making best use of Outlook 2010 using Microsoft Exchange Page 4 Overview The Outlook Ribbon This replaces the Menus in earlier versions of Outlook. Below, you can see an enlarged view of the left-hand side of the Home ribbon (also showing the Quick Access Toolbar): Here you can see the common commands; including new commands like Clean Up in the Delete group (this lets you remove redundant messages in a conversation across folders). Related commands are presented in groups, e.g. New, Delete, Respond. You also can see the File tab new to all Office 2010 applications. It will be referred to when we want to select options and other advanced features. In the rest of the document you will be directed to the relevant part of the ribbon. IT Training and Assessment Unit, Queen’s University of Belfast July 2012 Making best use of Outlook 2010 using Microsoft Exchange Page 5 About your Outlook folders Outlook Navigation Pane showing the Folder List view Each member of staff has a Mailbox which contains folders (Inbox, Contacts, Calendar, Tasks, Notes, Sent items etc.,). These are stored on the Microsoft Exchange server; all folder contents can be accessed anywhere you have set up Outlook or you use Outlook Web Access. You can decide to share any of these. Outlook delivers your e-mail to the Inbox folder in your Mailbox. You might be responsible for more than one mailbox. In the example above, there are two mailboxes in the user’s Outlook session. IT Training and Assessment Unit, Queen’s University of Belfast July 2012 Making best use of Outlook 2010 using Microsoft Exchange Page 6 The following table lists what each folder is for: Calendar - This folder contains your schedule, including appointments, meetings, and events. Contacts - This folder stores information about people, such as name, address, phone number, and a wealth of other data. Deleted Items - This folder stores deleted Outlook items and can contain items of various types (contacts, messages, and tasks, …). You can recover items from the Deleted Items folder, giving you a way to “undelete” an item if you’ve made a mistake or changed your mind. If you delete an item from this folder, the item is can be recovered within a certain timeframe. Drafts - Use this folder to store unfinished drafts of messages and other items. For example, you can use the Drafts folder to store a lengthy e-mail message you haven’t had a chance to finish yet. Or, you might start a message, have second thoughts about sending it, and place it in the Drafts folder until you decide whether to send it. Journal - The Journal folder stores your journal items, allowing you to keep track of phone calls, time spent on a project, important e-mail messages, and other events and tasks. Notes - The Notes folder stores and organizes notes. You can move or copy notes to other folders in Outlook as well as to folders on disk (such as your desktop). You can also create shortcuts to notes. Outbox - The Outbox stores outgoing messages until they are delivered to their destination servers. You can configure Outlook to deliver messages immediately after you send them or have the messages wait in your Outbox until you process them (by synchronizing with the Exchange Server or performing a send/receive operation through your POP3 account, for example). Sent Items - The Sent Items folder stores a copy of messages you have sent. Tasks - The Tasks folder lists tasks that have been assigned to you or that you have assigned to either yourself or others. This includes any flagged messages. To access your Outlook folders over the Internet 1. The Web address is http://owa.qub.ac.uk (you don’t have to go via Queen’s Online to access your email). 2. Username is your staff number and password is your usual password. IT Training and Assessment Unit, Queen’s University of Belfast July 2012 Making best use of Outlook 2010 using Microsoft Exchange Page 7 About sharing folders in Outlook If, for example, you need to share your Calendar with someone else, 1) you and they need to have a Microsoft Exchange account and 2) you need to use the Calendar associated with your Mailbox. The other person then can grant you permission to access their calendar – the steps for sharing are described in To Grant Permission to Other People to see your Exchange Calendar, page 62. In the same way, for someone to see and use, for instance, your Contacts, then you must put these contacts into your Contacts folder within your Mailbox folders and grant them permission to access the Contacts. About Passwords You can change your password from within Queen’s Online. In the left-hand pane under Other choose Change Password. What is a ‘good’ password? A password should be 6 or more characters. It should consist of letters and non-letters. Do not use dictionary words, known personal or work information. Bad passwords: Mary66, Purch123 Use acronyms, words with no vowels, random capitals Good passwords: now_1215, csat75m Messaging To get to the messaging part of Outlook make sure Mail is selected (bottom left hand part of the Navigation pane): In the messaging part of Outlook you have 5 tabs (File, Home, Send/Receive and View): Most of the time you will use the commands shown in the ribbon associated with the Home tab (notice the groups of commands, New, Delete, Respond etc). IT Training and Assessment Unit, Queen’s University of Belfast July 2012 Making best use of Outlook 2010 using Microsoft Exchange Page 8 The Inbox The Inbox within your Mailbox is where all new received messages are held and displayed. 1. Click on the Inbox folder located in the Favorites part of the navigation panel. Open a Mail Message 2. A new message is highlighted in bold in your Inbox (Outlook calls this area of a message folder, the Message List). Double-click on a new message to open it This opens the message: IT Training and Assessment Unit, Queen’s University of Belfast July 2012 Making best use of Outlook 2010 using Microsoft Exchange Page 9 Tip At any time you can prompt Outlook to check for new messages: click on the Send/Receive tab then click Send/Receive All Folders. This is also a shortcut on the Quick Access toolbar (as you can see in the screen grab). Outlook automatically does this Send/Receive check. This may be every 20 minutes. Outlook Views - Reading Pane You may wish to see your messages with or without the Reading Pane. To do this: 1. Click on the View tab, and in the Layout group click Reading Pane 2. The options are shown below: IT Training and Assessment Unit, Queen’s University of Belfast July 2012 Making best use of Outlook 2010 using Microsoft Exchange Page 10 Create a New Message Make sure you are viewing the Home ribbon (click on the Home tab) then click on the New E-mail button in the New group. (Note the alternative tip (above): press Ctrl+N.) This displays the Message window. Now, you can commence message composition. Insert a Mail Address 1. Make sure the Message ribbon is displayed (click the Message tab). Primary mail addresses are inserted into the To box in the message window. 2. Insert the cursor in the To box and type the relevant email address. Auto-Complete List As you start to type an email address, Outlook will display a drop down list with the email addresses that correspond with the letters you are typing (in the example, overleaf, addresses that start with IT). This is called the Auto-Complete list. As you type more letters, the Auto-Complete List is refined and the name suggestions match what you type. Click the name you want to enter in the box. Using the mouse you can choose the correct one. If you are using the keyboard, select the name using the UP ARROW or DOWN ARROW keys, and then press ENTER (or TAB). If no suggestion matches what you are typing, continue typing. Names that you use less frequently move lower in the list over time, and eventually no longer appear. IT Training and Assessment Unit, Queen’s University of Belfast July 2012 Making best use of Outlook 2010 using Microsoft Exchange Page 11 These suggestions appear because Outlook remembers all the addresses you have used. If you notice one of these is wrong, hover the mouse over the address and then click the X to delete it from Outlook’s ‘memory’. See also, Suggested Contacts, page 65. Global Address List When composing an email message if you click on the To, Cc or Bcc buttons you are taken into the Global Address List, which contains the correct email addresses of staff members at Queen’s. Type the person’s first name and as you type any matched name will be displayed in the Name column. When you have found the correct person, click To, Cc, or Bcc. You can continue to choose other recipients and when you have finished click OK to return to the message you are composing. IT Training and Assessment Unit, Queen’s University of Belfast July 2012 Making best use of Outlook 2010 using Microsoft Exchange Page 12 Alternatively Within the Message window, an alternative to the steps above is to partially type an email address or a person's name then 1) press Ctrl-k (or Alt-k), 2) if there is more than one match, a list will be displayed. 3) select the name and 4) click OK. If no match is found, you will be informed that there are No Suggestions. The key point is you no longer need to go ‘hunting’ for a staff member’s email address. You may wish to email a group of staff, and all you have to do is to paste in or type the list separated by semi-colons and Outlook will ‘resolve’ the names. Note – from within the Global Address List you can also access email addresses from your list of Contacts using the drop down list below Address Book. Email from an alternative address If you have several email accounts set up in Outlook, you can choose which account you want to send your message from. Click the From button and select the relevant email account. Or, click on the Inbox for the preferred account and compose a new message. IT Training and Assessment Unit, Queen’s University of Belfast July 2012 Making best use of Outlook 2010 using Microsoft Exchange Page 13 Insert a Subject Enter a short overview of the message into the Subject text box. You are strongly advised to enter a meaningful subject line – it makes for ease of reading and communication, and housekeeping. If you don’t supply a subject the message may go into the recipient’s Junk E-mail folder. Insert Text in the Message Window You can insert text either before or after you insert the recipient email address(es) and subject of the message. Insert the cursor into the message body pane and type accordingly. When you have finished, click Send to send the message. Insert an Automatic Signature An Automatic Signature can be created by a user and then saved by Outlook for future use in email messages. A Signature can be your name, address, job title, etc., or any other information you deem appropriate. You can create more than one Signature, e.g., one for a certain role in work, one for a different role. 1. Open a new message. On the Message tab, in the Include group, click Signature, and then click Signatures. This displays the Signatures and Stationery dialogue box. IT Training and Assessment Unit, Queen’s University of Belfast July 2012 Making best use of Outlook 2010 using Microsoft Exchange Page 14 2. On the E-mail Signature tab, click New. Type a name for the signature and then click OK. 3. In the Edit signature box, type the text that you want to include in the signature (e.g. your name, department, telephone number, etc.). Some tips It is helpful to have no spaces in the telephone number as this makes it easier for mobile phone users to ring numbers given as part of a signature. You are advised not to have highly formatted signatures or embedded images as not all email users use Outlook with its sophisticated formatting; and images take up storage space. IT Training and Assessment Unit, Queen’s University of Belfast July 2012 Making best use of Outlook 2010 using Microsoft Exchange Page 15 4. Select whether you want to use the Signature for New messages and/or Replies/Forwards. Click OK. Use the Spell Checker When you have composed the text of your message, check it for spelling mistakes. From the Review Tab, choose Spelling & Grammar . It is possible get Outlook to automatically check your spelling before you send the message, see below. Changing Outlook Options – automatic spelling check 1. From the File tab choose Options. 2. In the Outlook Options box click Mail then click Always check spelling before sending. Re-start Outlook. When you click Send the spelling check will be invoked. If you decide to cancel the spelling check, Outlook asks: IT Training and Assessment Unit, Queen’s University of Belfast July 2012 Making best use of Outlook 2010 using Microsoft Exchange Page 16 Copy a Message to Another Recipient 1. Create a new message and enter the main recipient’s address in the To box. 2. Insert an email address into the Cc (carbon copy) field in the Message window and compose and send your email as normal. Or, insert a second address in the To: box, separating it from other addresses using a comma. Drafts: Save or access By default, Outlook automatically attempts to save any email message that you create but do not send (this is done every three minutes). You can choose to save a draft at any time (also when you attempt to close without sending, you are prompted to save your message). To save a draft of a message, click the File tab, and then click Save. [You could also add Save to the Quick Access Toolbar see Quick Access toolbar, page 48]. The message is saved in the Drafts folder. To open an existing draft, click the Drafts folder and then double-click the message. To delete any draft, click the message, and then press Delete. IT Training and Assessment Unit, Queen’s University of Belfast July 2012 Making best use of Outlook 2010 using Microsoft Exchange Page 17 Use the Blind Carbon Copy (Bcc) Option ‘Bcc’ is Blind carbon copy. This field is located directly below the Cc field in a Message window. It is used to send a copy of your message to other recipients for their information purposes, without the recipients in either the To field or the Cc field being able to see their email addresses (hence the label Blind) – i.e. other recipients of the message will not know that the person in the Bcc field has received the message. Nor will the other recipients know the person’s email address. 1. Insert an email address into the Bcc field in the Message window and compose and send your email as normal. Note: If you don’t have the Bcc line on your Message window, in the Message window – from the Options Tab, click Show Bcc. The only person who can see the names of Bcc recipients of a message is the sender. To view the BCC recipients of a message you have sent, open the message. Choose how your messages are composed Microsoft Outlook supports three message formats: Plain text, Rich Text format, or HTML (these are explained below). Plain text: This is a format that all e-mail applications support. You can set Outlook to open messages that you receive in plain text format only. Plain text doesn't support bold, italic, coloured fonts, or other text formatting. It also doesn't support pictures that are displayed directly in the message body, although you can include the pictures as attachments. Outlook Rich Text format (RTF): You can use RTF when sending messages within an organization that uses Microsoft Exchange; however, it is recommended that you use the HTML format. RTF supports text formatting, including bullets, alignment, and linked objects. Outlook automatically converts RTF formatted messages to HTML by default when you send them to someone who accesses their email via a Web browser, so that the message formatting is maintained and attachments are received. HTML: This is the default message format in Outlook. It is also the best format to use when you want to create messages that are similar to traditional documents, with various fonts, colours, and bullet lists. By default, when you select either of the options that allow formatting (HTML or Rich Text), the message is sent in HTML format. So when you use HTML, you know that what you send is what the recipient will see. IT Training and Assessment Unit, Queen’s University of Belfast July 2012 Making best use of Outlook 2010 using Microsoft Exchange Page 18 The format is determined by choosing Options from the File tab, then in the Compose messages in this format drop down list click your choose. To decide on a message by message basis within a new message click the Format Text tab and choose the format. In this example the choice is Plain Text. Copy, Move and Delete Text To copy text from one Message window to another: 1. Select the text you wish to copy. 2. From the Clipboard group on the Message Tab, choose Copy. 3. Insert the cursor in the other Message window (i.e., another Message window that is already open). 4. From the Clipboard group on the Message Tab, choose Paste. To move (cut) text from one active Message window to another: 1. Select the text you wish to move. 2. From the Clipboard group on the Message Tab, choose Cut. 3. Insert the cursor in the other active Message window (i.e., another message window that is already open). 4. From the Clipboard group on the Message Tab, choose Paste. IT Training and Assessment Unit, Queen’s University of Belfast July 2012 Making best use of Outlook 2010 using Microsoft Exchange Page 19 To move text from a document to a new Message window: 1. Minimise the open/active Message window. 2. Locate and open the relevant file. 3. Select the text within this file that you wish to move or copy. 4. From the Clipboard group in the document, choose either Cut or Copy. 5. Maximise the open/active Message window. 6. Insert the cursor at the appropriate location in the body of the message. 7. From the Clipboard group on the Message Tab, choose Paste. To delete text from a message window: 1. Select the text you wish to delete. From the Clipboard group on the Message Tab, choose Cut, or, press the <Delete> key on your keyboard. Attach a File to a Message 1. Create a new message and, from the Message tab, click the Attach File icon. The Insert File dialogue box should appear. 2. Select the location of the file. 3. Select the filename. By default All Files should be displayed. 4. Change the Files of type option if required, e.g., if you are wish to attach an Excel (.xls or .xlsx) file then use the drop down menu to choose Excel Files. 5. Once you have selected the relevant file, click Insert. 6. The attached file is displayed underneath the Subject line. Delete/Remove a File Attached to a Message You can remove a file you have attached (perhaps you have attached the wrong file or you need to make more changes to the document). 1. Right-click on the attached file and choose Remove Attachment. Tip: If you decide to edit an attachment, it is important that you 1) remove the attachment from the message and 2) locate the original document, edit it and then reattach the revised document. IT Training and Assessment Unit, Queen’s University of Belfast July 2012 Making best use of Outlook 2010 using Microsoft Exchange Page 20 Open and Save a File Attachment To open a file attachment: 1. From the open/active Message window, double-click on the attachment. 2. Outlook will automatically open the appropriate application, e.g., Microsoft Word for a Word (.doc or .docx) attachment. To save an attachment: 1. Right click on the attachment and choose Save As. 2. Choose a relevant location for the file from the Save in box drop-down menu. 3. You can change the file name if you wish. 4. Click OK to finish saving the file. To save all attachments: 1. Click once on an attachment.This displays the Attachments tab. 2. On the Attachments tab, in the Actions group, click Save All Attachments. 3. In the Save All Attachments dialog box, click OK. 4. Click a folder location, and then click OK. See also, Saving important messages to your own File Store, page 44. IT Training and Assessment Unit, Queen’s University of Belfast July 2012 Making best use of Outlook 2010 using Microsoft Exchange Page 21 Preview an attachment You can preview an attachment in the Reading Pane or from within an open message. Click on the attachment. In this example an Excel file is being previewed. To return to the message click on Message In the following example the attachment is a page created for the web and Outlook is alerting you to the fact that previewing the file might not show the full content and you may need to open the file rather than preview it. Reassurance: Outlook blocks potentially unsafe attachment file types (including .bat, .exe, .vbs, and .js files) that can contain viruses. You cannot view or access a blocked attachment file. Blocked attachment files are listed in the InfoBar. The InfoBar is part of an open e-mail message, appointment, contact, or task. This displays information such: your message has been replied to or forwarded, and so on. Attach an Outlook Item to a Message As well as attaching a file, you can also send an Outlook item such as an email message, contact, note, task, etc. as an attachment. 1. From the Message tab, choose Attach Item icon. 2. Then choose Outlook Item. IT Training and Assessment Unit, Queen’s University of Belfast July 2012 Making best use of Outlook 2010 using Microsoft Exchange Page 22 This displays the Insert Item box. 3. Select the location of the item you wish to attach, e.g. Inbox, Calendar, Tasks, etc. from the Look in box. 4. Within the Items box select the desired item within that folder (you can sort by the field headers, in this example, From, Subject, Received, Categories) and click OK. An alternative to this approach is to open a message and in the Respond group click More then choose Forward as Attachment. Set High or Low Priority When you send an email you have the option to mark it High Priority or Low Priority – typically related to how quickly you want the recipient to read and respond to your message. In the new message window, click the Message tab and choose the Importance level from the Tags group. (Notice that you can flag the message; how to flag a message is covered in the section, Flag Messages, page 34.) The incoming message with High Importance is shown with a ! as shown below Sent Items folder By default a copy of each sent message is stored in the Sent Items folder. IT Training and Assessment Unit, Queen’s University of Belfast July 2012 Making best use of Outlook 2010 using Microsoft Exchange Page 23 Track Messages (Delivery or Read receipts) It is possible to check if a message has been read or received by a recipient. To be notified about a single message 1. In the new message window, click the Options tab. 2. In the Tracking group, click the Request a delivery receipt or the Request a read receipt check box. If you ask for a read receipt the recipient is invited to send a receipt: You can get Outlook to automatically acknowledge all read receipts or not. 1. Click the File tab, then click Options. Click Mail. 2. Scroll down to Tracking, under For any message received that includes a read receipt request click one of the following options: If you ask for a read or delivery receipt Outlook facilitates you tracking your replies. 1. Open the message in which you asked for a read or delivery receipt (this will probably be in your Sent Items folder). 2. On the Message tab, in the Show group, click Tracking. The InfoBar displays the results so far. Note: Tracking does not appear until you have received one receipt. There might be some minutes between you receiving the first receipt in your Inbox and the Tracking button appearing. Note: Delivery receipt will not be as reliable as read receipt. IT Training and Assessment Unit, Queen’s University of Belfast July 2012 Making best use of Outlook 2010 using Microsoft Exchange Page 24 Delay the Delivery of a message This is facilitated through using rules or choosing to delay a particular message on composition. 1. In the new message window click the Options tab and in the More Options group click Delay Delivery. 2. In the Properties box under Delivery Options set the date and time of delivery. The message will sit in your Outbox until it is time for despatch: . You need to keep Outlook open for the delayed message to be sent on time. If you exit Outlook before the message is sent you will be asked what to do with the message in the Outbox: IT Training and Assessment Unit, Queen’s University of Belfast July 2012 Making best use of Outlook 2010 using Microsoft Exchange Page 25 Recall or replace an email message after it is sent If you send a message to another person or persons within Queen’s you can get Outlook to attempt to stop delivery; and, if you wish, replace the email message. It is not possible to recall messages sent to people outside Queen’s. 1. Go to the Sent Items folder and open the message that you wish to recall. 2. Click Actions in the Move group. 3. Click Recall This Message . This displays the Recall This Message dialogue box. You can ask Outlook to delete the unread copies of this message or delete and replace with a new message. The latter choice allows you to re-edit the message and send it again. Note: If you are sending the message to a large number of people, you may want to clear the Tell me if recall succeeds or fails for each recipient check box. Note: This process may be unsuccessful so it is not a good idea to rely on it! IT Training and Assessment Unit, Queen’s University of Belfast July 2012 Making best use of Outlook 2010 using Microsoft Exchange Page 26 Reply to Messages To reply to a message: 1. From the Inbox folder, doubleclick to open the email message you wish to reply to. 2. Click the Reply button located in the Respond group on the Message tab. 3. A Reply Message window appears when the Reply option is selected. 4. This window contains the text of the original message received – you may choose to type your reply either before or after the orignal message text. 5. Click Send to send the reply message, as normal. Sometimes you will receive emails which have been sent to more than one person as part of a mailing/distribution list, e.g., a work circular. You can reply to all the recipients of this type of message using the Reply to All function. You compose your reply email in exactly the same way as a reply to sender email – the only difference is that more than one recipient will be receiving your reply. To reply to all recipients: 1. From the Inbox folder, double-click to open the email message you wish to reply to. Click the Reply to All button located in the Respond group on the Message tab. Tip: Be careful here – you may only wish to reply to the sender. Often in national distribution lists people send personal or confidential information to all members of the list when they only meant the sender to receive the reply. Replies sent to someone other than you If you wish to send a message but have the recipient reply to a third person, you can do this in Outlook. 1. In a new message window, click the Options tab, and in the More Options group, click Direct Replies to. This displays the Properties box. IT Training and Assessment Unit, Queen’s University of Belfast July 2012 Making best use of Outlook 2010 using Microsoft Exchange Page 27 2. In the Have Replies sent to box add to (or delete) the name already there and add other name(s) by entering the relevant email addresses or click the Select Names button to add names from your address book or the Global Address List. Choose the Format of Your Message Replies From the File tab choose Options. Click Mail, and scroll down to Replies and forwards. When replying to a message or When forwarding a message the choices are: IT Training and Assessment Unit, Queen’s University of Belfast July 2012 Making best use of Outlook 2010 using Microsoft Exchange Page 28 If you wish to prefix each line of the original message then in the box below indicate which character you want as the prefix, typically the > symbol. Forward a Message Forwarding a message is simply sending it on to another recipient without having to reply to it personally, e.g., if you receive an email that should have gone to a colleague in another department, you can send (forward) it to them without having to insert a reply message. However, forwarding does allow you to insert text if you wish. In the example quoted it might be courteous to add a comment. To forward a message: 1. Open the email message you wish to forward. 2. Click the Forward button located in the Respond group on the Message tab. 3. Enter the address of the person you are forwarding the message to into the To: box. 4. Add a message if appropriate and click Send. Contrast this with including a message as an attachment – see Attach an Outlook Item to a Message, page 21. Delete a Message Messages can be deleted from within any folder, e.g., the Inbox folder. 1. Click once on the message you wish to delete. From the Delete group, click Delete or click on the Quick Access toolbar. The message is then removed and placed in the Deleted Items folder. 2. From there you can permanently delete the message or choose to empty the Deleted Items folder (be careful!). IT Training and Assessment Unit, Queen’s University of Belfast July 2012 Making best use of Outlook 2010 using Microsoft Exchange Page 29 3. To empty your deleted items, rightclick on the folder and from the menu choose Empty Folder: To delete more than one message: 1. Use the mouse together with the SHIFT key to select messages which are adjacent. To select messages which are not contiguous, press the Ctrl key and click each message 2. Then right click and choose Delete. If you are in the Deleted Items folder Outlook displays the dialogue box shown below. Click Yes. To restore a deleted message: Go to the Deleted Items folder, locate the message and move it to your preferred folder (for example, drag it to the Inbox). How to move messages is described on page 43. To delete a message without it going into the Deleted Items folder Highlight the item(s) and holding down the SHIFT key press Delete. This displays the dialogue box shown below. Click Yes. This is useful for deleting spam, where you don’t want to review the message again in the Deleted Items folder. IT Training and Assessment Unit, Queen’s University of Belfast July 2012 Making best use of Outlook 2010 using Microsoft Exchange Page 30 Recover Deleted Items It is possible to retrieve permanently deleted items but only if they are ‘younger’ than 30 days. 1. In the folder from which the item was deleted, or in the Deleted Items folder, click the Folder tab. In Clean Up group, click Recover Deleted Items. This displays the Recover Deleted Items box. 2. Select an item or items, and then click Recover Selected Items . Recovered items are restored to the folder from which they were deleted. The other choices are Select All , or delete . The Exchange administrator specifies the retention time for deleted items. At Queen’s items older than 30 days are removed from your Deleted Items, and the same rule applies to items in what is called the ‘dumpster’ (that is the area where you can recover items from). IT Training and Assessment Unit, Queen’s University of Belfast July 2012 Making best use of Outlook 2010 using Microsoft Exchange Page 31 Automatic Replies (Out of Office) If you are going to be away from the office for a number of days (or longer) you can set up a message that is automatically sent to anyone who emails you. To do this use the Automatic Replies (Out of Office). 1. Click the File tab. Click on Automatic Replies. This displays the Automatic Replies box. 2. Choose Send automatic replies. If appropriate click the check box: Only send during this time range. Then choose the start and end times for your automatic replies. On the Inside My Organization tab, type the response that you want to send to colleagues while you are out of the office. You may also choose to have your automatic reply to go to people outside Queen’s. 3. If you want to send a message to those outside Queen’s click on the Outside My Organization tab and choose either My Contacts only or Anyone outside my organisation. Then enter the text of your auto-reply. Note: this function is available via Outlook Web Access (https://owa.qub.ac.uk). Click on Options then Out of Office Assistant. IT Training and Assessment Unit, Queen’s University of Belfast July 2012 Making best use of Outlook 2010 using Microsoft Exchange Page 32 Organize Messages (sorting, searches, housekeeping) Sort Messages Messages within any folder can be sorted in a number of ways including by: 1. From/To 2. Received 3. Subject 4. Importance 5. Flag (flags are explained on page 34) 6. Categories (categories are explained on page 36) Sort by Field/Column header (From, To, etc.): Click on the header field of a specific sort type in order to sort the messages, e.g., click on the Received header in the Inbox to sort your messages by the date they were received (either oldest first or newest first). Tip: If you sort messages by From you can find a message from someone by pressing the first letter of their email address, e.g. pressing the C key finds a message from someone whose email address is Cxxxx; pressing CO in quick succession locates someone whose addresses starts Coxxxx. Sort using options in the Arrangement group (click the View tab) More options are show below: Working with groups of messages There are various kinds of groups within an email folder. Typically Outlook presents your messages grouped by date (today, yesterday, last week, month etc.). IT Training and Assessment Unit, Queen’s University of Belfast July 2012 Making best use of Outlook 2010 using Microsoft Exchange Page 33 Grouped by Date If you sort by a different header the groups change. Grouped by Sender (From) The groups can be collapsed (right click on one of the group headers) Once collapsed, you can perform operations on any group of messages. Right click on a particular group header. The pop-up menu presents the choices (some of these will be described in the following sections): IT Training and Assessment Unit, Queen’s University of Belfast July 2012 Making best use of Outlook 2010 using Microsoft Exchange Page 34 Flag Messages You can use flags to remind you to do something about a message, e.g. follow it up, reply to all, etc. 1. Click once on the message you wish to highlight. 2. Click the Home tab and in the Tags group click Follow Up – this presents a choice of red flags (or you can choose to Add Reminder to the selected message). Choose a flag to indicate the level of urgency and when it should be followed up. Choosing Custom allows you to choose a specific time and date. The flagged message will also appear in your Calendar for the specified date. This is shown on the next page. Click OK to return to the message folder. Another way to Flag a message is to click in the Flag Column in your Inbox. IT Training and Assessment Unit, Queen’s University of Belfast July 2012 Making best use of Outlook 2010 using Microsoft Exchange Page 35 You can also sort messages by flag (see below and under Sort Messages). When you flag a message you are creating a task. The task gets added to your To Do list (the To Do list will be covered in Tasks, page 83). See your flagged message in the Calendar When you set a specific deadline for a flagged message it is also displayed in the Daily Task List in the Calendar: This area also displays any tasks you have set for the same day. Tasks are covered in the Tasks section, page 74. IT Training and Assessment Unit, Queen’s University of Belfast July 2012 Making best use of Outlook 2010 using Microsoft Exchange Page 36 Categorize Messages Whilst flagging lets you prioritise messages, colour categorization facilitates another level of granularity helping you focus in on messages specific to projects, tasks etc. Messages can be colour coded and sorted by category. The key thing is probably only to generate a small number of key categories rather than a lot. You can assign more than one category to messages. You can also assign a frequently used category to a Quick Click where one mouse click assigns the category. Create a Category On the Home tab click Categorize in the Tags group. 1) Click All Categories. 2) Click New; this displays the Add New Category dialogue box. 3) In the Name box type a category name. 4) Choose a colour. Click OK and then click OK. You can edit the colours, rename or delete categories. Assign a Category to a message Right click a message in your Inbox or other email folder and then choose Categorise. IT Training and Assessment Unit, Queen’s University of Belfast July 2012 Making best use of Outlook 2010 using Microsoft Exchange Page 37 Assign a Quick Click category to a message On the Home tab, in the Tags group, click Categorize, and then click Set Quick Click. From the Set Quick Click dialogue box choose a category. To assign using Quick Click, click the Categories column next to a message: In this example, the Urgent category will be assigned. To clear a category: click in the Categories column beside the message. Searching The Search facility is very good in Outlook and can be used across all types of folder. 1. To use the search facility, click in the Search box (or press Ctrl+E). The Search box changes colour Start typing, as you type items that contain the text you typed appear with the search text highlighted. 2. To narrow your search, type more characters. 3. When you cannot find an item, you can extend the search. Click Try searching again in all Mail items. IT Training and Assessment Unit, Queen’s University of Belfast July 2012 Making best use of Outlook 2010 using Microsoft Exchange Page 38 This will displays items across your Mail folders and will identify the folder each item is in. 4. Return to the Search box by clicking or pressing Ctrl+E. Or, end your search by clicking Close Search . Refine a search When you search Outlook displays the Search Tools ribbon, allowing you to refine your search. The criteria are shown below. For instance, click Has Attachments to only show items that have attachments. You can also re-use previous searches, click Recent Searches. Remember: You can search in Calendar, Tasks, Contacts as well as across your email folders. Filtering Emails This is an another way of ‘sieving’ through your messages. Click the Home tab, and then click Filter E-mail (the choices are displayed below). When you use a filter, the Search Tools tab is displayed on the ribbon. To end the filter click Close Search. Search Folders Outlook offers a further search facility, Search Folders. This is a virtual rather than a real folder which points you to where you have messages that meet specific criteria, e.g. IT Training and Assessment Unit, Queen’s University of Belfast July 2012 Making best use of Outlook 2010 using Microsoft Exchange Page 39 messages to and from particular people, flagged messages, messages of a specific category. This is described in the document, To create a Search Folder. Conversations It is possible to group messages in the Inbox and other mail folders into Conversations. When this facility is turned on messages that have the same subject appear as Conversations – these can be viewed, expanded or collapsed. Group operations can be carried out on an entire conversation. Messages within each Conversation are sorted with the newest message on top. When a new message is received, the entire Conversation moves to the top of your message list. Working with Conversations 1. Click the View tab and click the tick box: Show as Conversations (then choose either All Folders or This folder): A conversation is indicated by a multiple item icon (arrowed below). The latest message in a conversation appears on top: 2. Click to expand the group and see the previous messages. When you click on the initial message Outlook graphically displays the message thread. Whichever message you click on is displayed in the Reading Pane. Notice how Outlook shows related messages from other folders (in this case the Sent items folder). If more messages have ‘joined’ the conversation Outlook indicates the number of unread messages beside the subject line (3 in the example below). Messages within each Conversation are sorted with the newest message on top. When a new message is received, the entire Conversation moves to the top of your message list. IT Training and Assessment Unit, Queen’s University of Belfast July 2012 Making best use of Outlook 2010 using Microsoft Exchange Page 40 Tip: The Conversation facility is greatly helped if the subject of the message is descriptive and not bland. At the time of writing it is not clear if Microsoft have sorted a problem whereby older messages with the same subject line get threaded into a later conversation. Mailbox Cleanup/Saving Space How to delete items is covered in an earlier section (see Delete a Message page 28, and subsequent sub-sections). It is important to prune, clean up your Mailbox every so often. Email management is also promoted through the use of a folder structure. Every item you create in Outlook uses storage space. Attachments considerably add to your Mailbox size. The Mailbox Cleanup commands offer you ways to view the size of your individual folders, see which items are bulking up your mailbox and you can archive or delete your older items. 1. Click the File tab. You can see the size of your Mailbox (the total allocation per account is 900 MB). 2. Click Cleanup Tools then Mailbox Cleanup. 3. Click View Mailbox Size. This displays each folder’s size plus the total folder size (marked 2 above). IT Training and Assessment Unit, Queen’s University of Belfast July 2012 Making best use of Outlook 2010 using Microsoft Exchange Page 41 Other choices (shown in the screen grab above) are: find items by age or by size, run AutoArchive, empty your deleted items. Outlook is size sensitive; what you may regard as small is huge in Outlook terms. If you sort any email folder by size, you can see this. Strategies for reducing the Mailbox size There are now various strategies for reducing the size, viz., delete redundant messages (the earlier messages in a thread), archiving, use other mechanisms for making documents available. These are briefly described below: 1. Delete all but the most recent message in a thread. This can be facilitated by viewing your messages by conversation and then asking Outlook to Clean Up Conversation (at the time of writing this feature is not as effective as it seems to be). 2. If the document is on a shared drive, the recipient could be directed to the document via a hyperlink: e.g. K:\Training Docs\Web Searching\Sample Searches18 print.doc (Insert tab then Hyperlink). 3. The Archive facility is described in the next section. 4. SharePoint: increasingly directorates and Schools are using SharePoint. Rather than send an attachment, send a link to the SharePoint to staff members or students (provided they have access to the site or sub-site). 5. QUB Dropbox – this is a facility where you can drop a file off for a colleague to pick up. The allowance is more generous that email (1 Gb). See http://go.qub.ac.uk/qubdropbox Archiving Information Services is in the process of developing a service whereby all staff Mailboxes are centrally archived. This will mean that it will not be necessary to carry out your own separate archiving. In the meantime users who have reached their email space allocation may have to consider using Outlook’s AutoArchive facility. This facility allows you to save or delete items on the basis of age. It can be automatically set up to run as often as you wish. The older items are written to a file, e.g. archive.pst. IT Training and Assessment Unit, Queen’s University of Belfast July 2012 Making best use of Outlook 2010 using Microsoft Exchange Page 42 This PST file can be opened and accessed via Outlook, so the items are not gone (unless you chose to delete older items). The steps for setting up AutoArchive are: click the File tab, click Options then click Advanced. Under AutoArchive click AutoArchive Settings. In the example shown below, AutoArchive is set to run every two weeks, and will move anything older than 6 months to the H: drive. Within Mailbox Cleanup (described above on page Error! Bookmark not defined.ff) you can choose to run AutoArchive now (once you click the AutoArchive button). To open the archive: click the File tab, click Open, then Open Outlook Data File and then locate the archive. If you are uncertain about archiving please contact the Help Desk on [email protected] or extension 3760. Folder Management It is good practice to place folders ‘under’ your Inbox, and structure folders as you would on your H: or other drive. An example is shown below: Please note: The contents of all folders contribute to your Mailbox size. IT Training and Assessment Unit, Queen’s University of Belfast July 2012 Making best use of Outlook 2010 using Microsoft Exchange Page 43 Create a New Mail (or other type of) Folder 1. Right click the Inbox (or wherever you want place a sub-folder). Select New Folder. This displays the Create New Folder dialogue box. 2. In the Name: text box, type the required name for the new folder, e.g., ECDL. 3. In the Select where to place the folder box, use the mouse to select where you wish the new folder to be located. You may wish to click the + to access the folders under the Inbox . 4. Click OK to create the new folder. Tip: These steps can be followed to create other types of folders (eg, contacts, tasks, etc). Before Step 3 choose the type of folder from the Folder contains drop down list. Move Messages to another Mail Folder 1. Ensure your Inbox is open and displaying your received messages. 2. Right-click on the message to display the shortcut menu. Choose Move. IT Training and Assessment Unit, Queen’s University of Belfast July 2012 Making best use of Outlook 2010 using Microsoft Exchange Page 44 3. If your desired folder isn’t shown, choose Other Folder (or Copy to Folder). The Move Items dialogue box is displayed. 4. Click once on the Folder you wish to move the message to. Expand as necessary using the +, 5. Click OK to complete moving the message to the selected folder. When you move a message it will be deleted from the email folder you moved it from. You can move an open message: click Move in the Move group of commands, and follow the steps listed above. Favorites Favorites is the area at the top of the Navigation panel where you can have quick access to frequently used email folders. You can add, remove, and arrange folders. When you add a folder you are placing a shortcut to the folder. To add a folder to Favorites, right click on the folder and choose Show in Favorites. To remove a folder Favorites right click on the folder and choose Remove from Favorites (this is not the same as deleting the folder). Saving important messages to your own File Store The University has guidelines on the use and management of email and one recommendation is about how to save important messages. The document is called Guidelines for the Use and Management of Email, go to http://www.qub.ac.uk/home/RegistrarsOffice/QUBonly/Downloads/ then choose Use and Management of Email (this will load down a PDF file of 8 pages). This means that you can save an email (with or without attachments) to any folder on your C: or, strongly recommended, network drive or SharePoint, and this is accessible outside of Outlook. To do this either, IT Training and Assessment Unit, Queen’s University of Belfast July 2012 Making best use of Outlook 2010 using Microsoft Exchange Page 45 1. Open the message. Click the File tab, choose Save As. Save the file as a file of type .MSG (you can rename the message; the name is taken from the subject heading). 2. This will save the message and any attachment. Or, 1. Open Outlook side by side with Windows Explorer and drag the message into the desired drive/folder in Windows Explorer. Email Etiquette Some rules about E-mail Etiquette These are particularly important when you don’t know the person you are writing to very well. Give your message a meaningful and accurate subject. Take care over the composition - you may have a large audience. Think about the content, spelling and punctuation. Be as concise as possible. Brief messages are more likely to be read! Be careful with humour and sarcasm; they are often not communicated well by computer. The smiley symbol :-) is often used to indicate humorous intent. Remember that mail directed to one person may well be forwarded or filed for later reading by someone else. When replying Include the points to which you are responding in the text of your reply. Readers then appreciate your comments rather than trying to remember what the original message stated. Try to keep things in perspective. Do not say anything to others in mail that you would not say to them personally in a room full of people. Never reply immediately to something that annoys, upsets or outrages you. This information draws upon advice offered by JISCMail - http://www.jiscmail.ac.uk See, also, the University’s Guidelines for the Use and Management of Email, go to http://www.qub.ac.uk/home/RegistrarsOffice/QUBonly/Downloads/ then choose Use and Management of Email (this will load down a PDF file of 8 pages). Write Email messages that get attention On the Microsoft web site there is an article about the McGhee Productivity Solutions (MPS) e-mail P.A.S.S. model: this provides tips to help compose your messages, help ensure that your messages are meaningful and useful and that the recipient has all the IT Training and Assessment Unit, Queen’s University of Belfast July 2012 Making best use of Outlook 2010 using Microsoft Exchange Page 46 relevant information at hand to act on them. Additional benefits for using the MPS email P.A.S.S. model are that you send and receive less e-mail and create quicker response times to your e-mail messages – see http://office.microsoft.com/enus/help/HA011430301033.aspx. The Help Facility within Outlook has a good practice section, where you can good tips about managing and writing emails. Dealing with SPAM What is Spam? – Generally considered to be unsolicited email: they may be offensive (e.g. pornographic), fraudulent (e.g. requests for money) or just a nuisance (e.g. bulk mailings advertising a particular service). Spam is not targeted at you personally. In all likelihood the sender of the spam has found your email address by trawling existing lists on the Internet or by ‘harvesting’ addresses from legitimate sources. Sometimes email addresses are simply guessed. You should not be embarrassed to receive spam – everyone else is receiving it as well. Some Don’ts Do not respond to suspicious spammed emails. A response only confirms the accuracy of your email address, and may result in even more messages filling up your inbox. If you are suspicious, do not click on the link asking to be taken off the sender's list, as the senders often use that as a ploy to confirm the recipient's address, resulting in even more spammed email. A recurrent and nasty scam, recently, has been messages which masquerade as being from the University or a bank, and which ask you for your username and password – this is known as phishing. Some of are very like ‘the real thing’. One tip is to make a judgement as to the authenticity of the message: look at the the part of the email address to the right of the @ symbol. What does Information Services do? Information Services implements a set of centrally applied rules to prevent such unsolicited email from being delivered to addresses at the University and to prevent our system from being used to relay such mail to other sites. The various measures in place prevent a large proportion of unsolicited email from getting through. However, if your address has made its way onto a 'spammers' list you may continue to be plagued by such email. The most effective action you can take is to delete these messages. You can also block the senders (see below). What can you do? The University detects spam outside of the Outlook software so you need to turn off automatic spam filtering in Outlook. When in the Mail part of Outlook, click Junk in the Delete group of commands, and then click 1) Junk E-mail Options; 2) in the dialogue box click the check box: No Auto Filtering. IT Training and Assessment Unit, Queen’s University of Belfast July 2012 Making best use of Outlook 2010 using Microsoft Exchange Page 47 Dealing with individual messages The choices shown in the first screen grab (above) are also available for each individual message, when you right click on the message in your message list. You can Block a sender, effectively adding them to your black list. Never block sender (also called white listing) Never block Sender’s Domain: in the example this would be any person with @example.com in their email address All of these options are available within OWA. Remember to delete the contents of your Junk E-mail folder. Advice about Receiving Offensive/Abusive Emails may be accessed on the Information Services web pages: www.qub.ac.uk/is, click on Key Services, then Email and Calendars. Items in the Junk E-mail folder which are not junk Occasionally email messages which are not junk can be re-directed to the Junk E-mail folder. You need to check the folder every so often. In the example below, the message InfoBar is indicating that the message was marked as spam but if you wish you can move it to the Inbox. IT Training and Assessment Unit, Queen’s University of Belfast July 2012 Making best use of Outlook 2010 using Microsoft Exchange Page 48 Short Cuts and useful Features Quick Access toolbar The Quick Access toolbar is very useful for frequently used commands. Here are some suggestions. Notice the toolbar includes Delete, Copy, Paste. This writer’s preference is for the quick access toolbar to be below the ribbon. A very useful shortcut for the calendar is Today: Note: If you wish to add the Cut command, that is not a command found in any ribbon, then within Customise Quick Access Toolbar choose More Commands, and then choose Commands Not in the Ribbon. Quick Steps With Quick Steps you can apply several actions at once to email messages. Some examples: if you often move messages to a specific folder; if you often contact the same group of people; IT Training and Assessment Unit, Queen’s University of Belfast July 2012 Making best use of Outlook 2010 using Microsoft Exchange Page 49 if you forward messages to your manager or peers, A one-click Quick Step can simplify the task. The Quick Steps facility is available from the Home tab. In the example shown a quick step will email a group called TU; another moves a message or group of messages to a folder called 2010-11 Induct. Use Create New to create your own quick steps. Handle Alarms/Reminders As you work you will find that you get reminders for tasks, flagged messages, appointments etc. The choices are to click Dismiss or Dismiss All; Snooze to be reminded again after the set interval (and change the interval from the drop down list), or Open item. See also Set or remove Reminders and Reminders settings for all new appointments or meetings, page 58. IT Training and Assessment Unit, Queen’s University of Belfast July 2012 Making best use of Outlook 2010 using Microsoft Exchange Page 50 Calendar The Microsoft Calendar is the calendar and scheduling component of Microsoft Outlook, and is fully integrated with e-mail, contacts, and other features. You can view a day, week, or month at once. With the Calendar you can: Create appointments and events Organize Meetings These topics are addressed in the succeeding sections. Appointments, Meetings and Events A meeting is an appointment you invite people to. Appointments are activities that you schedule in your calendar that do not involve inviting other people or reserving resources. An event is an activity that lasts 24 hours or longer. Tip: You may find it useful to have the Calendar open in a separate window from your messages. To do this, right click on the Calendar and choose Open in New Window: Calendar Views and Navigation Click the Home tab and in the arrange group choose a view: Month has 3 options: Low Detail: Shows only all day events Medium Detail: As above plus colouring to indicate free/busy. High Detail: shows everything IT Training and Assessment Unit, Queen’s University of Belfast July 2012 Making best use of Outlook 2010 using Microsoft Exchange Page 51 Schedule View: If you have multiple calendars this view shows them in a vertical direction: Date Navigation You can step through each day, week, and month using the arrow keys to the left of the date (in this example, move forward/backwards a week from 30th June): Or you can use the Date Navigator (2 above). In the following example, the date navigator is indicating that the calendar is showing the days shaded (27 through to 2). To move to a different month click date is always highlighted). or (Today’s Date Navigator To go to a particular day, make sure you are in Day view navigator click on the day you wish to view. IT Training and Assessment Unit, Queen’s University of Belfast . In the date July 2012 Making best use of Outlook 2010 using Microsoft Exchange Page 52 If you want to see two or more non-consecutive days side by side in the calendar, then in the date navigator, press the Ctrl key and click the second day. In the example below, the 27th and 29th are displayed side by side: note that days in bold have appointments scheduled on that day. For consecutive days press SHIFT and click. To view the days and dates for several months drag and release the edge boundary of the calendar either horizontally or vertically: Move to a different month by clicking on the name of the month: in this example click on . Then move up and down through the months, by dragging and releasing the mouse. IT Training and Assessment Unit, Queen’s University of Belfast July 2012 Making best use of Outlook 2010 using Microsoft Exchange Page 53 To go to a particular date click the launcher button in the Go To group. Then in the Go To Date box, enter the required date. To return to today’s date, click Access toolbar. Today is a useful button to have on the Quick Schedule an Appointment Click the Home tab, click New Appointment. Enter Subject, Location box, Start and End times (or click All day event), Show As Free/Tentative/Busy/Out of Office, Categorise and click Save and Close. How to create and edit categories is covered within the section Categorise Messages, page 36. Tip: Type any background information into the text area below the Start/End Time area. Other ways to create an appointment: Double click a day and time slot in the Calendar – this opens the Appointment window. Drag the mouse over the area between the desired start and end time; right click and click New Appointment. The appointment will open with these start and end times. IT Training and Assessment Unit, Queen’s University of Belfast July 2012 Making best use of Outlook 2010 using Microsoft Exchange Page 54 To edit an appointment Double click to open the appointment and change the settings as required. Or, to change the times, single click on the appointment and drag the edge of the appointment to an earlier or later start/end time Or, to change the date, click on the appointment, choose Cut (or Copy) from the Quick Access Toolbar. Go to the required date and click Paste from the Quick Access Toolbar. Or, to change the date click and drag an appointment to another date in the Date Navigator (if you hold down Ctrl the appointment is copied). Create a recurrent series of appointments 1. Open or create a new appointment. Click Recurrence in the Options group. 2. This displays the Appointment Recurrence dialogue box IT Training and Assessment Unit, Queen’s University of Belfast July 2012 Making best use of Outlook 2010 using Microsoft Exchange Page 55 Choose the frequency the appointment recurs (Daily, Weekly, Monthly, Yearly), select options for the day of week, every X weeks and then whether there is an end date or it ends after X occurrences. When you have finished, click OK. Click Save and Close to close the appointment. In the calendar the recurrence is shown by circular arrows: To alter one or more appointments in a recurrent series Double click an instance of the series. This displays the Open Recurring item dialogue box. Choose Open the Occurrence. Make the alterations and click Save and Close. The appointment is shown with a line through the circular arrows . Create an Appointment from an Email Message In your messaging list, within Mail, click the message. Click the Home tab and from the Move group click Move, then click Copy to Folder. In the Copy Items box, double click Calendar. The message now opens as a calendar appointment; you can set the times, dates, locations (the subject will be derived from the Subject of the message). This is a useful facility for carrying across background details and attachments for a meeting. IT Training and Assessment Unit, Queen’s University of Belfast July 2012 Making best use of Outlook 2010 using Microsoft Exchange Page 56 Delete an event or appointment 1. Delete the meeting by single clicking on the meeting in the Calendar and then clicking the Delete button or click . Print Calendar In Calendar, click the File tab, then click Print and in Settings choose the style: Daily, Weekly Agenda, Weekly Calendar, Monthly, etc.). Click on each to see the preview. Click on Print Options and in the Print dialogue box, set the Print range (Start and End dates) and other print settings. Add or Remove Bank/Public Holidays in your Calendar Click the File tab, then click Options. Click Calendar. Click Add Holidays. In the Add Holidays to Calendar box, you will notice the UK is already chosen. Click OK. IT Training and Assessment Unit, Queen’s University of Belfast July 2012 Making best use of Outlook 2010 using Microsoft Exchange Page 57 Outlook will confirm that the holidays have been added. They are added as all-day events. Click OK and then OK to close the Options. Altering the Time Interval The calendar is set to show a time interval of 30 minutes. This can be increased or decreased. 30 minute interval (default) 15 minute interval In Calendar, on the View tab, in the Arrangement group, click Time Scale, and then click the grid interval that you want to show in the calendar. Tip: Sometimes you need to move an event from one slot to another. If the event starts on the quarter hour the paste is precise when you change the interval to 15 minutes. Set or remove Reminders Open the appointment or meeting (or series if the appointment or meeting is recurring). In the Options group, from the Reminder drop down menu select the amount of time before the appointment or meeting that you want the reminder to appear (or select None). Click Save and Close. You can customise the sound played when the alarm goes off by clicking the Sound (speaker) icon (positioned at the bottom of the drop down list) IT Training and Assessment Unit, Queen’s University of Belfast July 2012 Making best use of Outlook 2010 using Microsoft Exchange Page 58 . Click the Browse button and select the sound file you want to play. If you do not want to hear a sound with the alarm, deselect the Play this sound option. Click OK to confirm your choice. Reminders settings for all new appointments or meetings Click the File tab, then Options. Click Calendar; then go to Calendar Options. To turn default reminders on or off for all new appointments or meetings, select or clear the Default reminders check box. If you wish to have reminders select the check box, enter the amount of time before the appointment or meeting when you want the reminder to appear. Schedule a meeting using the Free/Busy view A meeting is an appointment that requires the presence of several people. 1) Create a new appointment. Click Scheduling Assistant. The Scheduling Assistant helps you find the best time for your meeting. IT Training and Assessment Unit, Queen’s University of Belfast July 2012 Making best use of Outlook 2010 using Microsoft Exchange Page 59 2) The screen grab below shows some key features in Scheduling Assistant. 1) Indicates the date and time you wish to schedule. 2) Click Add Attendees to select names from the Global Address List (the GAL is explained on page 11). In the GAL you can choose if a person is required or optional in terms of the meeting attendees: 3) Or, you can enter each colleague, name by name; press Enter each time and Outlook will find the name from the GAL. 3) Each person’s free/busy time is displayed and you can see if the date and time suits everyone. Notice that the time doesn’t suit one of the attendees, the time conflicts with an appointment in their calendar. Outlook suggests other slots that might suit (right bottom corner of the current window). IT Training and Assessment Unit, Queen’s University of Belfast July 2012 Making best use of Outlook 2010 using Microsoft Exchange Page 60 Click to choose a time that suits everyone or, alter the start time/end time by clicking and dragging the vertical lines to locate a free slot where everyone is free. Outlook’s suggestions Manually change the meeting time The Scheduling Assistant will search each person’s calendar irrespective of whether or not they share their calendar. By default every member of staff’s free or blocked-out time is shown with no details of any blocked-out time, unless they have shared their calendar with you (the screen grab below shows one instance of this). 4) Once you have decided on a time slot click Appointment. Enter the Subject of the meeting, the Location, and enter any text to go along with this invitation. Click Send and this will go out as an email invitation to each of the suggested attendees. The Recipient view Each recipient will see the invite in their Inbox Once opened the message window displays … IT Training and Assessment Unit, Queen’s University of Belfast July 2012 Making best use of Outlook 2010 using Microsoft Exchange Page 61 Before the recipient does anything the appointment is placed in their calendar, and is marked as tentative. The recipient can reply to the meeting request by clicking: Accept if you want to accept the invitation Tentative if you can provisionally accept the invitation Decline if you want to turn down the invitation. It is also possible to Propose a New Time. The recipient can also edit the response or directly send the response In the recipient’s Sent Items folder, the subject of the reply is preceded by Accepted, Refused or Tentative. The Convenor tracks responses 5) The meeting convenor receives responses as messages in the Inbox and can track the combined responses in the Calendar. Double-click the meeting you are planning and click Tracking in the Show group to track who has accepted, declined etc. IT Training and Assessment Unit, Queen’s University of Belfast July 2012 Making best use of Outlook 2010 using Microsoft Exchange Page 62 To View someone else’s calendar You may be a Reviewer, i.e. you can read someone else’s calendar but not change or create any entry in the calendar. Or, you may be an Editor, i.e. you can read someone else’s calendar and make changes and new entries. The first 3 steps below need only be done once for each person’s calendar. 1. Check that you are in the Calendar folder before carrying out these steps (click Calendar in the navigation panel). Click on the File tab. Click Open, and then click Other User’s Folder. 1. This displays the Open Other User’s Folder box. Enter the person’s name or use the Name button to find the person from the Global Address List. This will open the person’s calendar beside your own calendar(s). To Grant Permission to Other People to see your Exchange Calendar 1. Right-click on your Exchange Calendar. From the pop-up menu choose Share, and then from the extended menu choose Calendar Permissions. This displays the Permissions tab within the Calendar Properties box. IT Training and Assessment Unit, Queen’s University of Belfast July 2012 Making best use of Outlook 2010 using Microsoft Exchange Page 63 Notice the default is Free/Busy time – this means every member of staff can see your blocked-out and unblocked-out time in your calendar. 2. Click the Add button. This display the Global Address List. Locate and select the person or persons you wish to give permissions to and press the Add button. You can keep adding names using the Add button – when complete click OK to close the Global Address List. 3. Now you need to set the Permission level for each person selected. Select a name and then using the Permission level drop down list choose a level. There are a lot of levels but the two “extremes” to choose are: a. Reviewer – Calendar folder is visible and items can be read. Or, b. Editor – all of the above plus ability to create items IT Training and Assessment Unit, Queen’s University of Belfast July 2012 Making best use of Outlook 2010 using Microsoft Exchange Page 64 To check the Shared Calendar is up to date 1. Click in the shared calendar and press Shift+F9. Mark an appointment private in an Exchange Calendar You can show blocked-out time in a shared calendar but not reveal the purpose of this time to those who have permission to access the calendar. Open or create an appointment and click Private in the Tags group. The appointment will be marked as Private in the other person’s view of your calendar. View and use a SharePoint calendar It is possible to open and use a SharePoint calendar within Outlook. 1. Within SharePoint, click Calendar, then Actions, and click Connect to Outlook. 2. SharePoint then asks Do you want to allow the website to open a program on your computer; click Allow. When prompted to confirm that you want to connect the SharePoint calendar to Outlook, click Yes or Allow. In Outlook, in Calendar, the SharePoint calendar is added to the Navigation Pane under Other Calendars. IT Training and Assessment Unit, Queen’s University of Belfast July 2012 Making best use of Outlook 2010 using Microsoft Exchange Page 65 Contacts Open the Contacts folder by right-clicking on Contacts in the Navigation panel, and then click Open in New Window. There are 3 places where you can draw upon contacts. 1. The Global Address List (see page 11) which is the University’s repository of staff member email addresses. 2. Your Outlook Contacts folder where you can store an individual or organisation’s e-mail address, street address, multiple phone numbers and any other information that relates to the contact, such as a birthday or anniversary date. This can also be accessed via the Global Address List. Within the Global Address List: use the drop down arrow below Address Book (See below): 3. Your Suggested Contacts, described below. Suggested Contacts Suggested Contacts is a new feature in Outlook 2010 which helps you find people you previously sent messages to. Suggested Contacts automatically keeps track of everyone you send a message to. These people are not in in your Outlook contacts. Unlike the Auto-Complete List that appears when you begin typing a name or e-mail address in the To, Cc, or Bcc boxes of a message, you can search your suggested contacts, and there is no maximum number of suggested contacts. The Auto-Complete List has a maximum of 1,000 entries. The Suggested Contacts folder is below the Contacts folder in the Navigation panel. IT Training and Assessment Unit, Queen’s University of Belfast July 2012 Making best use of Outlook 2010 using Microsoft Exchange Page 66 Find a suggested contact when composing a message 1. Create a new message. Click To, Cc, or Bcc. In the Select Names dialogue box, under Address Book, click Suggested Contacts. 2. Select a contact and then click To, Cc, or Bcc. Click OK. To search or check out your suggested contacts You can use the Search facility to look through your suggested contacts. The entries are sorted numerically, then alphabetically so you can use the index to the right of the Suggested Contacts window. To add a Suggested Contact to your Outlook Contacts Click the suggested contact that you want to move, and then on the Home tab, in the Actions group, click Move, and then click Contacts. If Contacts is not in the drop down list, click Other Folder, select the Contacts folder, and then click OK. IT Training and Assessment Unit, Queen’s University of Belfast July 2012 Making best use of Outlook 2010 using Microsoft Exchange Page 67 Create a Contact 1. In Contacts click New Contact in the New group. 2. Enter the details. You can specify how you want the contact's name to be filed. To enter multiple entries in a field, such as more than one address or email address, click the down arrow next to the field. Click Save and Close. IT Training and Assessment Unit, Queen’s University of Belfast July 2012 Making best use of Outlook 2010 using Microsoft Exchange Page 68 Create a Contact from an email message In the Inbox (or other email folder), in the Reading Pane, right click on the sender’s name. The click Add to Outlook Contacts. This will display the Contact dialogue box; fill in the details. Create a Message to a Contact In the Contacts folder, right click on a contact. Click Create, and then E-mail. How to View all Emails Sent to Particular People 1. Choose a contact by double clicking on their name in the Contacts folder. 2. Click Activities and all emails sent to that contact will be listed. IT Training and Assessment Unit, Queen’s University of Belfast July 2012 Making best use of Outlook 2010 using Microsoft Exchange Page 69 Contact Group (formally known as a Distribution List) A Contact Group is a collection of contacts (formally known as Distribution lists in Outlook). It provides an easy way to send messages to a group of people. Create and edit a Contact Group A Contact Group is used to send the same email to a number of people at the same time. You can create as many different such lists as you require and label them accordingly, e.g., Project Team A, Heads of School, Trainees, etc. 1. On the Home tab, click 1) New Contact Group; 2) Enter a Name, and then 3) Add Members. 2. Add Members offers 3 choices: You can add members from your own Outlook Contacts or from the Address Book (Global Address List) or you can create a new email contact. When you choose to create a new email contact, in the Add New Member dialogue box, you may wish to Add this person to your contacts. Click OK. 3. Click Save and Close. IT Training and Assessment Unit, Queen’s University of Belfast July 2012 Making best use of Outlook 2010 using Microsoft Exchange Page 70 A list can have as many or as few members as you require. Once you have created the contact group you can edit to either add new members or remove (delete) members. Open the contact group. To delete: highlight the member and click Remove Member. Create a message using a Contact Group In Contacts, right click on the Contact Group, click Create, and then click E-mail. You may have to use the Bcc: box to protect the list members’ confidentiality. Within the new message window, drag the list to the Bcc: box. Expand the list to see the members (click on the + symbol). A warning message comes up – click OK. At this point you can select to delete any member of the list – this does not affect your original distribution list. Email merge – an alternative to Contact Groups In your work it is possible that you send messages to many groups of people or send a message to a very large group. However, you may not wish to create and maintain many Contact Groups or a large Contact Group. Using lists of email addresses stored in Excel, you can use Word to perform an email merge on the Excel list (see the document Email Merge, at http://go.qub.ac.uk/ittrainingdocs). Send a Copy of a Contact Group to Someone Else In Contacts, right click on the Contact Group, click Forward Contact and then click As an Outlook Contact. IT Training and Assessment Unit, Queen’s University of Belfast July 2012 Making best use of Outlook 2010 using Microsoft Exchange Page 71 A new Message window will open with your distribution list as an attachment. Enter the recipient’s email address and complete and send your message as normal. Save a Copy of Contact Group that you have Received On receipt of the message and attachment, double click on the Contact Group. Click on the File tab for this contact group. Click Move to Folder, and then click Copy to Folder. This displays the Copy Item dialogue box. Click Contacts. Click OK. To View someone else’s contacts You may be a Reviewer, i.e. you can use someone else’s contacts but not change or create any new contacts. Or, you may be an Editor, i.e. you can use someone else’s contacts and make changes and new entries. The first 3 steps below need only be done once for each person’s contacts folder. 1. Check that you are in Contacts (click Contacts in the navigation panel). On the Home tab click Open Shared Contacts in the Share group. 2. This displays the Open Shared Contact dialogue box. Click on the Name button and from the Global Address List find and select the required name. This will place a Contacts folder for the other person in your list of Contact Folders (in the navigation panel). IT Training and Assessment Unit, Queen’s University of Belfast July 2012 Making best use of Outlook 2010 using Microsoft Exchange Page 72 To Grant Permission to Other People to see your Exchange Contacts It is possible to create an alternative Contacts folder where you store selected contacts you wish to share with other users (how to create a folder is explained in the section Create a New Mail (or other type of) Folder, page 43). 1. In Contacts, in the navigation panel right click on Contacts. Click Share, then click Folder Permissions in the extended menu. This displays the Contacts Properties with the Permissions tab selected. 2. Click the Add button. You should see a list of names from the Global Address List. Find the person or persons you wish to give permissions to; select the name and press the Add button. You can keep adding names using the Add button – when complete click OK or Apply. 3. Now you need to determine the Permission level for each person selected. Select a name and then using the Permission level drop down list choose a level: if you choose a. Reviewer – Contacts folder is visible and items can be read b. Editor – all of the above plus can create items IT Training and Assessment Unit, Queen’s University of Belfast July 2012 Making best use of Outlook 2010 using Microsoft Exchange Page 73 Hide items in Contacts You may not want all of the items in the shared contacts to be viewed by those who have permission to access the contacts. 1. Create or open the contact or Contact Group that you want to make private. 2. Click Private in the Tags group. Click Save and Close. IT Training and Assessment Unit, Queen’s University of Belfast July 2012 Making best use of Outlook 2010 using Microsoft Exchange Page 74 Tasks A Task is a personal or work-related errand that you want to track through to completion. You can share your Tasks folder, have recurrent tasks and include other people in tasks you want to carry out (similar to how a meeting is arranged). Tasks are displayed in three places, in 1. Tasks 2. the To-Do Bar (described on page 83), and 3. the Daily Task List in Calendar (described on page 76). If you subscribe to a SharePoint task list, any task assigned to you from this list also appears in all three locations. Open the Tasks folder by right-clicking on Tasks in the Navigation panel, and then click Open in New Window. Flags and Tasks Tasks and Flagged messages combine to form your To-Do list. (Contacts or Calendar items can also be flagged as tasks). The screen grab (below) illustrates this. A task is indicated by ; a flagged email message by . Some other points to note: The list shows the folder location of the item, %Complete and the Status. The Status and % Complete can be edited from within this list. In the example below the status of a flagged email message is being updated. If you click on Tasks you see only the tasks you have created or been assigned; in the example you can see a completed task. IT Training and Assessment Unit, Queen’s University of Belfast July 2012 Making best use of Outlook 2010 using Microsoft Exchange Page 75 Create a Task 1. In Tasks, click on the Home tab and in the New group, click New Task. Or, press Ctrl+N. 2. In the Subject box, type a task name. And complete any other boxes for the new Task, Start and End dates, Priority (Low, Normal or High). To make the task recur, click Recurrence, and select the frequency (Daily, Weekly, Monthly, Yearly) at which you want the task to recur. Click OK to close the Task Recurrence box. You can also set a time and date to be reminded about this task. 3. Click Save and Close. If you have set a Due date this task is placed in your Calendar on that date. The screen grab below shows part of the Calendar showing the Daily Task List. The post-it is showing the reminder time. IT Training and Assessment Unit, Queen’s University of Belfast July 2012 Making best use of Outlook 2010 using Microsoft Exchange Page 76 Create a task from within the Daily Task List in the Calendar 1. Hover the mouse over a blank area of the Daily Task List, on the day that you want your task to be completed on. Click to add a task. 2. Type a subject for the task, and then press ENTER. By default, the start and due dates are set for the day you inserted the task. To change the task start or due date, drag the task to the day that you want. To manually change the start or due date, double-click the task. Some Advice: If you have many tasks in your Daily Task List the following Blog comment from Microsoft might help you manage this: http://blogs.office.com/b/microsoft-outlook/archive/2007/12/07/the-daily-tasklist.aspx Create a task from an email, contact, or calendar item It is possible to create a task out of any Outlook item: email messages, contacts, calendar items, or notes. For example, a task has ‘emerged’ as a result of an email communication and the background to that task is in a particular email. Alternative methods are listed: A) Drag the item to Tasks in the Navigation Panel. B) Right click and drag the item to Tasks in the Navigation Panel. Three options are presented: Method A opens up the Task window: the contents of the original item (but not attachments) are copied into the body of the task. Method B offers choices as shown: with attachment means that the original item is attached and includes any attachments that were within the original item; with Text indicates the original attachment(s) are not included. Please note, even if the original item is deleted, the task is not deleted. IT Training and Assessment Unit, Queen’s University of Belfast July 2012 Making best use of Outlook 2010 using Microsoft Exchange Page 77 About assigning a Task to Someone Else It is important that you understand how this process works. The following description is taken largely from Microsoft Help: After you create a task and assign it to someone, you might want status reports and updates on the progress of the task. Also, if the person to whom you assign the task declines it, you can reassign the task to someone else. To assign a task, you first create the task, and then send it as a task request to someone. The person who receives the task request becomes the temporary owner of the task. This person can decline the task, accept the task, or assign the task to someone else. If the task is declined, it is returned to you. Even though a declined task is returned to you, the task remains owned by the recipient until you reclaim ownership by returning the task to your own task list (this is explained below under “Reclaim a declined task assignment”). If the recipient accepts the task, that person becomes its permanent owner. If that person later assigns the task to someone else, the new assignee becomes the owner. The owner is the only person who can make changes to the task. When an owner updates a task, all copies of the task - the copy with the person who originally sent the task request, and all copies with all other prior owners of the task are updated. When the owner completes the task, a status report is automatically sent to the person who originally assigned the task, all other prior owners, and anyone else who requested a report. NOTE, If you assign a task to more than one person at a time, you cannot keep an updated copy of that task in your task list. Therefore, to assign a project that involves more than one person and track its progress in Outlook, divide the project into separate tasks and assign each task individually. For example, to track a report to be written by three writers, create three separate tasks named Write Report: Writer 1, Write Report: Writer 2, and Write Report: Writer 3, and assign each individual task to the appropriate writer. Settings for Tracking tasks that you have assigned or been assigned By default Outlook keeps copies of tasks that you have assigned. For tasks that you have been assigned Outlook will send automatic status reports when you complete each task. The person to whom you have assigned a task can choose to send interim reports (see Send a status report or a comment about a task assignment, above). You can switch off these settings: click the File tab, click Options, and then click Tasks. Under Task options, check or uncheck Keep my task list updated with copies of tasks I assign to other people and/or Send status report when I complete an assigned task. IT Training and Assessment Unit, Queen’s University of Belfast July 2012 Making best use of Outlook 2010 using Microsoft Exchange Page 78 Assign a Task to Someone Else 1. In Tasks, click on the Home tab and in the New group, click New Task (or open an existing task). In the Manage Task group click Assign Task. 2. Then in the Error! Hyperlink reference not valid., enter the name of the person you want to assign the task to. To select a name(s) from the Global Address List, click the To button. 3. For a new task, in the Subject box, type a task name. (In an existing task, the Subject box is already filled in.) 4. Select or clear the Keep an updated copy of this task on my task list check box and the Send me a status report when this task is complete check box as desired. 5. Click Send. The recipient can accept or decline and you can track the task. Accept or decline a task assignment 1. The request comes into you Inbox. Open the task request and on the Task tab, in the Respond group, click Accept or Decline. 2. You now have a choice : Click Edit the response before sending, enter the text of your reply and click Send. Click Send the response with no comment. IT Training and Assessment Unit, Queen’s University of Belfast July 2012 Making best use of Outlook 2010 using Microsoft Exchange Page 79 Reclaim a declined task assignment Alternatives A) You can reclaim the task from the declined task message. Open the message and in the Manage Task group, click Return to Task List B) Open the email message that contains the task request. This message is usually in your Sent Items folder. On the Task tab, in the Manage Task group, click Return to Task List (as shown above). Send a status report or a comment about a task assignment 1. Open the task for which you want to send a status report or comment. 1) Update Status and % Complete as necessary. Status has the following options: 2) In the Manage Task group, click Send Status Report. 2. This displays a message window. Enter the email address(es) or name(s) in the To and Cc boxes. In the body of the message, type any information that you want to include in the status report. 3. Click Send. IT Training and Assessment Unit, Queen’s University of Belfast July 2012 Making best use of Outlook 2010 using Microsoft Exchange Page 80 To view tasks that you have assigned to others In the Navigation Pane, click Tasks. On the View tab, in the Current View group, click Change View, and then click Assigned. This displays only the assigned tasks. In the list of tasks you can see the owner and current status. Double click to open the task and you will see % Complete. IT Training and Assessment Unit, Queen’s University of Belfast July 2012 Making best use of Outlook 2010 using Microsoft Exchange Page 81 Viewing Tasks In tasks, in the View tab, Change View presents a number of options (described below): Detailed presents: a list of to-do items with column headings as shown below. There are less column headings in the Simple List: The To-Do list displays the items by their due date (overdue in red): Prioritised displays the to-do items grouped by priority (low, normal, high) Active displays the to-do items still outstanding Completed displays the to-do items by their completion date and struck through. Today displays the to-do items due today or overdue Next 7 Days displays the to-do items where dates in the next 7 days have been set as due. Overdue displays all overdue to-do items Assigned displays to-do items assigned to other people IT Training and Assessment Unit, Queen’s University of Belfast July 2012 Making best use of Outlook 2010 using Microsoft Exchange Page 82 Arrange tasks In combination with Change View you can choose one of the options in the Arrangements group (in tasks, click the View tab). It is useful to click Show in Groups (with its associated Reverse Sort and Expand/Collapse). The screen grab below shows a grouping by Folder: IT Training and Assessment Unit, Queen’s University of Belfast July 2012 Making best use of Outlook 2010 using Microsoft Exchange Page 83 To-Do Bar The To-Do bar was introduced in Outlook 2007: it can be displayed at all times wherever you are in Outlook. It combines a mini-calendar, your tasks list and your imminent appointments. (The mini-calendar (or Date Navigator) is also available in Calendar.) In the To-Do Bar, you can accept/decline meetings, access the full Calendar, add new tasks, categorize, rearrange, and change the dates of your tasks. Within any folder in Outlook click the View tab and, in the Layout Group, click To-Do Bar and choose Normal. You can choose what elements you want to see in the To-Do Bar: Date Navigator, Appointments, Task List; and you can choose Options to refine the appearance of the To-Do Bar. You can alter how the tasks are displayed. Click on 1) Arrange by and click to change the Sort order.) Within the To-Do Bar it is possible to create a new task (3) above. Enter the task name and press ENTER (you will then need to double click the new task to enter more details). You can rename a task; click on the title of the task, then click again, and rename it (if the item was, for example, a flagged email this action does not affect the subject of the original message). Using the Date Navigator you can go to a date, double click the date and it will open the Calendar on that date. IT Training and Assessment Unit, Queen’s University of Belfast July 2012 Making best use of Outlook 2010 using Microsoft Exchange Page 84 Notes Notes are the electronic equivalent of paper sticky notes. Use notes to jot down questions, ideas, reminders, and anything you would write on notepaper. You can leave notes open on the screen (desktop) while you work. To access your notes, in the navigation pane, right click on Notes and click Open in New Window. The navigation panel may not show Notes in this way. You can change the view in the panel by asking for more or less buttons (see below). The arrow indicates the Notes icon. Create a Note 1. In the New group, click New Note. 2. Type the text of the note 3. To close the note, click the Note icon in the upper-left corner of the Note window, and click Save and Close. Other options are available, including: Save as an Outlook Item in your file store outside of Outlook. Tip: You can leave the note open while you work. When you change the note, the changes are saved automatically. IT Training and Assessment Unit, Queen’s University of Belfast July 2012


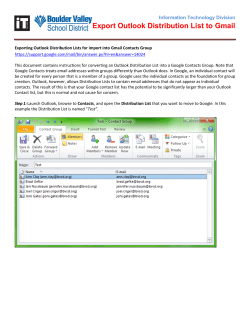


© Copyright 2026