
Go Natural! Let’s A gardener’s guide to composting,
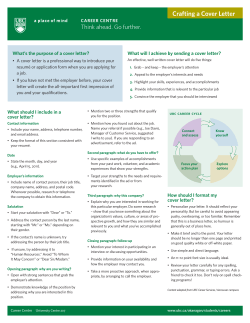
T
H E
B
A C K Y A R D
Let’s
B
A S I C S
Go Natural!
A gardener’s guide
to composting,
grasscycling
and water smart
gardening in the
Central Okanagan
Spring 2006
A partnership between
the Regional Waste Reduction Office,
the City of Kelowna, the Water Smart Program,
and Regional District Parks and Recreation
T
H E
B
A C K Y A R D
B
A S I C S
A Note From the Editors:
Contents
PAGE
CHAPTER 1: Yard Waste
• Why Organics Don’t Belong in the Landfill
3
• Backyard Composting
4
• Worm Composting
5
• Troubleshooting Compost Problems
6
• Building Your Own Composter
7-9
CHAPTER 2: Lawn Care
• Grasscycling
10
• 12 Step Program to Grow Great Grass
11
CHAPTER 3: Xeriscape and Pest
Free Gardening
• Xeriscape Waterwise Gardening
• Okanagan Xeriscape and Native Plants
12
13 - 14
• Local Suppliers
15
• Pesticide Free
16
CHAPTER 4: Water Conservation
17 - 18
• Only Rain Down the Drain
19
• Living by the Water
20
CHAPTER 5: Other Programs
• Central Okanagan Community Gardens
21
• Buying Local Means Living Greener
22
• One-Tonne Challenge
23
The Central Okanagan is a unique and special place, and the City of
Kelowna, Regional District of Central Okanagan and the Districts of
Peachland and Lake Country want to make our community an even
better place to live.
The beauty of it is we can play a part. Small changes to the way we
live can have positive impacts for the environment, our community and
our finances!
The Go Natural Gardener’s Guide is designed to provide information
and support to help you live and garden more sustainably. In addition
to learning about composting, xeriscape and pest-free gardening and
water conservation, this booklet provides information on some of the
interesting agricultural and gardening initiatives in our community.
And after reading about the One Tonne Challenge you may want to take
action on climate change and reduce green house gases.
We trust you will find lots of useful and interesting information, and
in some cases, financial assistance to help you do your bit to make the
Central Okanagan a healthier and better place to live.
Why ‘Go Natural’ in
Your Garden?
• You will have a healthier and more enjoyable garden
• You will encourage butterflies, birds and other wildlife to visit your
garden
• You will have more leisure time to enjoy your garden
• You will save money on taxes, your water bill and on costly chemical
fertilizers and pesticides
• You can help protect the natural habitat so native species thrive
Quick Facts
• Close to 40% of household waste in the Central Okanagan is organic
and could be easily composted. By keeping yard trimmings and
certain food wastes out of the municipal solid waste system, residents
will save hundreds of thousands of tax dollars in the long run.
• Diverting organics from disposal helps reduce the production of
leachate and greenhouse gases at landfills.
• Most residents in the Central Okanagan get their water from
aquifers or mountain lakes and streams. Only a portion of the City
of Kelowna gets its water from Lake Okanagan.
• If Kelowna residents could reduce water consumption in the month
of July by just 16%, the City could defer or eliminate $16 million in
infrastructure expansions.
• By planting a water-wise garden residents can easily reduce garden
watering by 60%.
T
H E
B
A C K Y A R D
B
A S I C S
3
Why Organics Don’t belong
in the
Landfill
utting organic materials in landfills not only takes up valuable space but also creates greenhouse gases and
contributes to global warming. Like many materials sent to the landfill, organic materials can be easily
handled in more environmentally conscious ways.
P
Contrary to what many believe, landfills are not like huge compost bins. When garbage arrives at the landfill it is spread evenly
across the working face and compacted down to take up as little
space as possible. After compaction, a layer of soil is added to
cover the garbage. This keeps the elements out, especially
oxygen. Without oxygen the garbage decomposes very slowly. In
fact, it is not unusual to find 50 year old newspapers that you
can still read.
Composition of the Disposed Waste
Stream at the Glenmore Landfill
16.2%
Other
Organics
10.8%
Yard
Waste
5.4%
Wood
(from
CRD)
Professor W.L. Rathje, the founder and director of the Garbage
Project at the University of Arizona, found ten year-old romaine
lettuce, 20 year-old Kaiser buns and 15 year-old hotdogs that
were still recognizable while conducting archeological studies of
modern landfills.
In the Okanagan over 40% of our garbage is composed of food
47.8%
19.9%
and yard and paper wastes. These are the materials that cause
Inorganic
Paper
the most problems in a landfill because of the moisture they add.
If these materials weren’t buried in landfills, odors and emissions like methane gas and liquid leachate, would be
significantly reduced.
Solution: Composting, Chipping, and Mulching
or•gan•ics ❘
ôrıganiks ❘
adjective
Food Waste – vegetable and fruit
waste
Yard Waste
Compostable Paper – paper towels
and tissues, newspaper, corrugated
cardboard, cardboard, office paper
Ironically, kitchen and yard waste like grass, leaves and potato peels
could easily be composted in our backyards and turned into a rich soil
amendment we could use on our gardens and lawns. Prunings can be
chipped and used for mulching. Paper and cardboard are not only
excellent choices for recycling but can be used as dry material in your
compost bin. A well functioning compost bin uses oxygen to decompose
materials. Instead of creating greenhouse gases, compost helps retain
moisture and returns needed nutrients to depleted soil, which is an
added bonus in the arid Okanagan.
Unless we reduce the amount of organic waste being buried in landfills
we create greater environmental problems and economic burdens for future generations.
By implementing a few at-home waste reduction strategies, you not only enjoy a beautiful well-fed yard but also
benefit our planet.
4
C
omposting is nature’s
way of turning yard,
garden and kitchen scraps
into rich, dark soil, called
humus. Finished compost
is an excellent conditioner for your soil, increasing the amount of air and
moisture reaching the
roots for larger, healthier,
plants. Composting is also
an easy and effective way to
reduce household garbage
by as much as 50%.
Composting is a simple
process, suited to the
amount of time and
energy you want to devote
to your compost pile. It’s
a unique way to return
something to the soil,
enriching the planet; right
in your own backyard.
T
H E
B
A C K Y A R D
Composting
your kitchen scraps.
Other methods of composting include burying kitchen
waste in trenches or mulching
leaves and yard waste.
2. Where to place it
• In a location that is easy to
reach, even in the middle of
winter.
• Near your main source of
compostables, such as the
garden.
• On well drained soil. Avoid
concrete or wood bases.
• In the sun; it will help to
speed up the composting
process.
• Ensure your composter is at
least four to five feet away
from building walls.
Hot composting is the process
where microorganisms break
down yard and kitchen waste,
turning it into ‘black gold’ or
humus. Here’s a step-by-step
guide to get you started:
1. Add dry and brown materials,
such as dead leaves and plants,
You will need:
• A compost container made
from untreated wood products
and chicken wire. Plans to
build different types of composters are in this booklet; or
• A commercially sold composter made of durable plastic
or wood; or
• Compost can also be made by
raking materials into a pile,
although this will increase
chances of animals digging up
A S I C S
Backyard
3. How to compost
1. To Start
B
dried grass clippings, and straw.
These are rich in carbon.
2. Add wet and green materials
such as green lawn and garden
trimmings, uncooked fruit and
vegetable peelings, coffee grounds,
tea bags and farm manures.
These are rich in nitrogen.
3. Layer the brown, carbon-rich
materials with the green, nitrogenrich materials. These layers of
carbon and nitrogen provide the
perfect food for the decomposing microorganisms to eat!
4. Be sure to keep your compost
pile as moist as a well wrung
sponge. This provides the right
amount of moisture for the
decomposers to do their job.
5. As the microorganisms
decompose the kitchen and yard
waste they give off heat. In fact,
a compost pile can reach temperatures of 55 degrees Celsius
or more! As the microorganisms
run out of nitrogen and carbonrich materials, or if the pile
dries out, it will cool down.
6. Turning the pile when it cools
down remixes the materials and
allows the hot composting process
to continue. Turning also mixes
air into the pile — a necessary
ingredient for those healthy,
aerobic microorganisms.
7. Continue to mix and add
materials. Your finished compost
should be ready anywhere from
six months to one year, depending on how often you tend to your
compost pile.
8. Composting will continue to
happen, even if you don’t tend to
your pile often. In this case,
macroorganisms such as worms
and bugs are doing the decomposing. Be sure to turn the pile
occasionally to prevent odours
and to mix the materials. While
this cool composting takes
longer, it’s also less work.
4. What to do with
the finished
compost
Mix it into your flower beds or
vegetable gardens. Use as a top
dressing for your lawn. Place
around the base of shrubs and
trees to conserve moisture.
Make potting soil by mixing
1/2 compost with 1/4 soil and
1/4 vermiculite.
What to feed your composter:
• Dry, brown materials such as dead leaves, plants, dry grass clippings, straw and corn stalks.
• Wet, green materials such as fruit and vegetable peelings or cores, leftovers from the
kitchen, green grass, weeds that have not gone to seed, and manures.
• Other materials that can go in include crushed egg shells, coffee grounds and filters,
tea bags, shredded paper or cardboard, dryer lint, hair, dirt.
What not to feed your composter:
• Meat, fish, poultry, dairy products, oil, dish water, BBQ ashes/coals, pet wastes, cooked
foods, sauces, grease, wood, bones.
• Non-compostables like plastics, glass and tin.
• Weeds that have gone to seed, and grass clipping with weed killer residue.
T
V
ermicomposting is simply
composting with worms!
It’s ideal for apartment
dwellers, or those with limited mobility, and for yearround and indoor composting. The type of worm used
is the red wiggler, whose
natural environment consists
of slightly moist decomposing
materials. This environment
can be simulated by a properly built and maintained
worm bin. Red wigglers eat
their weight in waste every
two days. They produce
nutrient-rich castings, that
become nutrient-rich compost.
The worms survive between
temperatures of 13°–25°C. If
they are outside it is important to keep them in the
shade during the summer, and
insulated during the winter.
Before you decide on the size
of box and amount of worms
you will need, weigh the
amount of organic waste you
produce per day on average.
The worm to waste ratio
should be 2:1, so for one kilogram of waste you need two
kilograms (or about 2,000)
of worms.
1. To Start
You will need:
• a box
• bedding
• some soil
• worms
• moisture
• food scraps.
The box should be about 30 cm
deep. Boxes are commercially
available or can be built.
Wooden bins should be sealed
with paraffin wax, or a similar
non-toxic substance, to increase
bin longevity, and avoid bin rot.
H E
B
A C K Y A R D
B
A S I C S
Worm Composting
2. Bedding
You will need enough bedding
to fill your worm bin to 2⁄ 3 of
its depth. Bedding must be
moistened with water, to be as
wet as a well wrung-out sponge.
Mix this with two handfuls of
soil, sand, or peat moss. Below
are some suggested beddings:
Once you have set up bedding
in your worm bin, and have
added your desired amount of
worms, you may begin adding
kitchen scraps. Waste should
always be buried, as the worms
stay below the surface. This will
discourage flies and odour. Bury
your waste in one area of your
Advantages
Shredded
paper
• free
• clean
• easy to prepare
Leaves
• free
• natural environment
for red wigglers
Corrugated • free
Cardboard • retains moisture well
Disadvantages
• tends to dry out
• can become matted
if not occasionally
forked through
• coloured ink may
contain toxins
• can become matted
• may contain toxins
from air pollution
• should be screened for
undesirable insects
• cannot use if waxed
or treated
• acidic
What to feed
your worms
Yes
• vegetable scraps
• fruit peels
• coffee grounds
and filters
• bread
No
• meats and animal
products
• oils
• cheese
• fish
5
composter at a time, to keep the
worm populations concentrated.
This will make harvesting finished
compost easier. Worms will
produce compost more quickly
if food is chopped or shredded.
3. To Harvest
Finished Compost
When the contents of your worm
bin are very brown, and the bedding is barely recognizable, you may
harvest the finished compost from
your bin. Here are two methods:
Easy:
1) Move all existing contents
to one half of the bin,
and put newly prepared
bedding in the other half.
2) Place food scraps only in
new bedding. In about a
month the worms will
migrate to the new side.
3) Remove finished compost
and even out new contents.
Fast:
1) Place contents on a
covered surface, such as a
black plastic bag or
burlap sheet, in sunlight
or other light source.
2) Worms will avoid light and
migrate down in the pile.
3) Remove top layer of castings until only small piles
with mostly worms remain.
4) Return worms to bin, with
freshly prepared bedding.
PLEASE: Take care of your
worms! They are living
creatures and when enclosed
in a simulated environment
they become your responsibility, just like a pet. Proper
care and diet will allow your
worms to thrive and continue
to produce nutrient-rich
compost for you!
T
6
H E
B
A C K Y A R D
B
A S I C S
Troubleshooting
Compost Problems
The Problem
The Cause
The Solution
Ammonia-like odor
Too much nitrogen-rich material
Add more dry brown material and turn more often
Strong odor
1) Pile is too wet
1) Add more dry materials and turn the pile more often
2) Inappropriate food waste was
added
2) Meats, oils, bones and processed foods are not
good composting choices
3) Food waste was not buried
3) Always be sure to bury your food waste. This not
only keeps down the smell but helps prevent
insects and other visiting pests.
1) Material is to big, dense
1) Try cutting materials into smaller pieces
2) Not enough oxygen
2) Turn the pile more often to add oxygen
3) Not enough nitrogen or carbon
3) Add nitrogen rich organics like grass clippings and fruit
and vegetable waste or carbon based materials like
dried grass and leaves (there should be a 50/50 mix)
Nothing seems
to be happening
4) Not enough moisture
4) You may need to add water during the dry
summer months
NOTE: Turning the pile always assists in the
composting process.
The pile is cold
The pile is too small or not enough
nitrogen and carbon materials
Turn the pile more frequently and continue to add
organic materials.
Possible Problems: Worm Composting
The Problem
Unpleasant Odor
The Cause
The Solution
1) Not enough air circulation
1) Mix up the bedding and waste regularly
2) Too much food in the bin
2) Put less food in the bin or add more worms
3) Food exposed
3) Bury food completely
4) Too moist
4) Add more paper to absorb the water
Flies
Food exposed
Bury all waste and add small amounts of soil and
peat moss.
Overly Moist
Too much water added or very moist
foods
Stop adding water and add more shredded paper
T
Cut each 12' 2"x 4" into four
pieces 3' long. Cut a 3⁄ 4" deep
and 31⁄ 2" wide section out of
each end, for a total of 32 lap cuts.
If using a handsaw and chisel,
cut 3⁄ 4" down at the 31⁄ 2 inch line
— at “A” in diagram at right.
Then cut a 1⁄ 2" deep groove into
the end of the board — at “B”
in the diagram. Place a thick wood
chisel in the end grove and split
the wood with a hammer to the
31⁄ 2" cut. If using a radial arm
saw, circular or table saw, set the
blade to 3⁄4" depth and make
multiple passes until the whole
section is removed.
Make four 3' square frames
from the lap-jointed 2"x 4"s. Put
enough construction adhesive to
fill the gaps when the lap joints
are screwed together. Fasten
each joint with four screws.
Cut the hardware cloth with
tinsnips into four 3' square sections. Bend the edges of the
cloth back over 1" for strength.
Lay one onto each of the four
frames. Centre and tack each
A C K Y A R D
B
A S I C S
Build Your Own
Composter:
his unit can handle slow, low
maintenance composting or
fast 14-day method composting.
T
Construction
B
H E
Backyard Wood
& Wire Bin
corner with a poultry wire staple.
Try to tension the cloth so it will
not sag when filled with compost.
Connect each pair of frames
together with two hinges. Then
put the hook and eye gate
latches on the other ends so that
the sections latch together.
Note: Do not use pressuretreated or chemically-treated
wood. Prior to construction,
treat the wood with a nontoxic wood preservative.
7
The Basics
• medium/large size yard,
large amounts of
organic waste
• need 2m x 1m space for
unit
• easy to assemble
• portable
• approx $70 to build
using new supplies. We
recommend creative
recycling of materials
whenever possible.
36"
B
31/2"
13/4"
A
Low Maintenance Method
Fill the bin with layers of brown and green organic materials,
and allow them to compost naturally. Ventilation is provided by
the side screens. To speed up the composting process, the pile
can be turned occasionally, and the materials chopped or
shredded. When the finished compost forms in the pile, the bin
can be disassembled and set up in a new location. The unfinished materials can be used to start the new pile and finished
compost from the old pile can be used.
14 Day Method
Requires a well built and maintained portable bin. To turn the
pile, unhook the sides and reassemble the bin in a new location. Use a pitchfork to move the pile into the new bin location.
The pile should be turned every couple of days and moisture or
dry materials added as is necessary, so that it is as moist as a
well wrung-out sponge.
Materials
• One 12' 2"x 4"
• Three 12' fir 2"x 4"s
• 12' of 36" wide 1⁄ 2" hardware
cloth
• 100 - 11⁄ 2" galvanized No. 8
wood screws
• Four 3" galvanized butt door
hinges
• 150 poultry wire staples or
power stapler
• One 10 oz. tube exterior
wood adhesive
• Four large hook and eye
gate latches
Tools
• Handsaw and chisel, or radial
arm saw with dado blade, or
circular saw, or table saw
• Hammer
• Screwdriver
• Tinsnip
• Caulking gun
• Pencil
• Small carpenter’s square
T
8
The Basics
• for large yard, large
amounts of waste.
• multi-family/strata complex.
• need 3m x 1m location
for unit.
• approx. $245 to build
using new materials. We
recommend creative
recycling of materials
whenever possible.
his unit can be used as a holding unit, where layers of organic
materials are left to compost naturally, or as a five week method
composter where greater maintenance is required. Ventilation
is provided by the wire screens.
T
Five Week Method
Begin with a traditional layered
compost pile of brown and
green organic materials already
built up in the centre bin.
• WEEK ONE: Start a dry
materials layer in the first bin.
Add kitchen and other green
and brown organic waste to
this pile.
• WEEKS TWO & THREE:
Keep adding waste to the first
bin. To turn the large volume
of matter in the centre bin,
remove the front boards from
this bin and mix the pile.
• WEEK FOUR: Transfer the
centre pile to the third bin, the
first pile to the centre bin, and
begin a new holding pile in the
first bin.
• WEEK FIVE: The compost
in the third bin should be ready
to use. This five week process
of transferring materials from
bin to bin ensures complete
mixing of the materials and
promotes rapid production of
finished compost. Continue this
five week process for a constant
supply of finished compost.
H E
B
A C K Y A R D
B
A S I C S
Wood and Wire
3 Bin Composter
Construction
Build Dividers Cut two 311⁄ 2"
and two 36" pieces from each
12' 2"x 4". Butt end nail the four
pieces into a 35" x 36" square.
Repeat for the other three sections.
Cut four 37" long sections of
hardware cloth, and bend back
the edges 1". Stretch the hardware
cloth across each frame, check
for squareness of the frame, and
staple the screen tightly into
place every 4" around the edge.
Set Up Dividers Set up
dividers parallel to one another
and 3 feet apart. Measure and
mark centre for the two inside
dividers. Cut boards on top of the
dividers and measure the positions
for the two inside dividers. Mark
a centre line for each divider on
the 9' 2"x 4". With each divider
line up the centre lines and make
the base board flush against the
outer edge of the divider. Drill a
1
⁄ 2" hole through each junction
centred 1" in from the inside edge.
Secure the base boards with carriage bolts, but do not tighten
yet. Turn the unit right side up
and repeat the process for the 9'
board. Using the carpenter’s
square or measuring between
opposing corners, make sure the
bin is square, and tighten all bolts
securely. Fasten a 9' long piece
of hardware cloth securely to the
back side of the bin with staples
every 4" around the frame.
Front Slats and Runners
Cut four 36" long 2"x 4"s for
front slat runners. Rip cut two of
these boards to 43⁄4" wide and
nail them securely to the front of
the outside dividers and baseboard, making them flush on top
Carriage
Bolts
15/16"
32"
36"
351/8"
351/8"
9'
Materials
• Two 18' 2"x 4"s
• Four 12' or eight - 6' 2"x 4"s
• One 9' and two 6' 2"x 4"s
• One 16' cedar 2"x 6"
• Nine 6' cedar 1"x 6"s
• 22 feet of 36" wide 1⁄ 2"
hardware cloth
• Twelve 1⁄ 2" carriage bolts 4" long
• Twelve washers and twelve
nuts for bolts
351/8"
15/16"
• Two lbs. of 3 1⁄2" galvanized nails
• Half lb. 2 1⁄ 2" galvanized casement nails
• 200 poultry wire staples (or rent
power stapler with 1" staples)
• One 12' and one 8' sheet 4 oz.
clear corrugated fibreglass
• 40 gasket aluminum nails for
corrugated fibreglass roofing
• Three 8' lengths of wiggle
moulding
and outside edges. Save the
remainder of rip but for use as
back runners. Centre the remaining full width boards on the front
of the inside dividers flush with
the top edge, and nail securely.
To create back runners, cut the
remaining 2"x 6"s into a 34" long
piece and then rip cut into 4 equal
pieces, 11⁄ 4"x 34". Nail the back
runner parallel to the front runners on side of divider leaving a
1" gap for slats. Cut all the 1"x 6"
cedar boards into slats 311⁄4" long.
Fibreglass Lid Use the remaining 9' 2"x 4"s for the back of the
lid. Cut four 321⁄2" 2"x 2"s and one
9' 2"x 2". Lay out into position on
the ground (as illustrated on the
front) and check for squareness.
Screw in the corner braces and
T braces on the bottom side of the
frame. Centre the lid frame, brace
side down, on the bin structure and
attach with hinges. Cut the wiggle
board to fit the front and back 9'
sections of the lid frame. Pre-drill
the wiggle board with 1⁄ 8" drill bit
and nail with 21⁄ 2" casement nails.
Cut fibreglass to fit flush with the
front and back edges. Overlay the
pieces at least one channel wide.
Pre-drill the fibreglass and wiggle
board for each nail hole. Nail on
top of every third hump with
gasketed nails.
• Two 3" zinc-plated hinges for lid
• Eight flat 4" corner braces with
screws
• Four flat 3" T-braces with screws
Tools
• Handsaw or circular power saw
• Drill with 1⁄ 2" and 1⁄ 8" bits
• Screwdriver • Hammer
• Tinsnips • Tape Measure
• Pencil • 3⁄ 4" wrench
• Carpenter’s square
• Safety glasses and ear protection
Note: Do not use pressure-treated
or chemically-treated wood. Prior
to construction, treat the wood
with a non-toxic wood preservative.
T
B
A C K Y A R D
B
A S I C S
9
Compost
A
compost screen can be
made in various sizes
depending on your needs.
These instructions are for a
screen that measures 15"x 20".
Place it over a wheelbarrow
or box when screening your
finished compost. Coarse or
incompletely decomposed
materials that remain on top
of the screen, such as nut
shells or twigs, can be
returned to the compost pile.
The finely textured compost
materials that passes through
the screen is ready to use.
You can use either a 1⁄4" or
1⁄2" mesh, depending on how
fine a finished material you
want. You may prefer the
finer mesh if you plan to use
the finished compost as a
top dressing on your lawn or
for a seed starting mix.
H E
Screen
Use handsaw and chisel to cut
out the four lap cuts (see
detail A).
Make square frame fitting the
20" sides into the 15" lap joints.
Put enough carpenter’s glue to
hold it together, then nail it.
Cut the galvanized mesh to the
size of your square and staple it
to the frame, or staple your
mesh to the frame and then cut
around the edges with tinsnips.
Try to tension the galvanized mesh
so it will not sag when filled with
compost.
Once the mesh is secure on
the bottom of the frame, nail the
quarter-round on 2" strapping
over the mesh so it will hold the
mesh in place and prevent it from
stabbing fingers and hands with
sharp mesh ends. (See detail B.)
See
Detail
“B”
15"
Detail “A”
20"
45º
1
/4"
Trim
1"
20"
Mesh
Galvanized Mesh
1"
15"
Detail “B”
15"
Materials
• One 1"x 3"x 72"
strapping or scrap
lumber pieces
• Two feet of 1⁄ 4" galvanized mesh
• Carpenter’s glue
• Nails
• One 72" quarter-round
trim
• Staples
Tools
•
•
•
•
•
Handsaw and chisel
Hammer
Tinsnip
Pencil
Carpenter’s square
Galvanized
Mesh
See Detail “A”
Compost
One way to use finished
compost is to make
compost tea. Place the
compost in a burlap bag
and insert it in a barrel of
water. Let it steep for a few
days. The nutrient-rich tea
can then be used on your
garden.
Construction
Procedure
Cut 6' of the 1"x 3" into four
pieces, two at 20" and two at 15".
Cut a 1⁄ 2" deep and 1" wide (or
the width of your strapping)
section out of the two 15" ends.
Place a tap at the bottom of
the drum. Seal it with silicone and place a wire mesh
over the tap from the inside
Tea
of the drum. You can add a lid
if you wish.
Variation
On a smaller scale you
can fill a watering can
half and half with water
and finished compost,
and let it steep until the
compost tea is ready.
Materials
•
•
•
•
Plastic drum
Tap
Silicone
Screen Mesh
Burlap
Bag
8"
Various
10
8
What is
Grasscycling?
Grasscycling is leaving the
grass clippings on the lawn
after mowing, allowing them
to work their way back into
the soil. Grasscycling provides a number of benefits
including more leisure time
and less garbage going to
our landfills. It’s easy to do
and works wonders for
your lawn!
Why Grasscycle?
It’s easy! No more need to bag
grass clippings. Grasscycled grass
clippings disappear into your
lawn and leave it healthy and
green.
Save time!
You can reduce the amount of
time you spend on your lawn by
more than 35%. No more fuss
and muss bagging clippings
means more time to spend on
the golf course, at the beach or
just enjoying the sunny
Okanagan!
Save money!
• Buy less fertilizer! Grass clippings left on the lawn can
make up 25% of your lawn’s
fertilizer requirements.
• Buy fewer garbage bags! No
T
H E
B
A C K Y A R D
B
A S I C S
Grasscycling
need to bag clippings.
• Buy fewer extra garbage tags!
Less grass clippings means
fewer garbage tags are needed
and fewer trips to the landfill.
Currently, only two bags or
containers per week are
accepted by City and Regional
District garbage haulers without buying extra tags.
• Any mower can be used to
grasscycle. No special equipment required!
Have a Healthier Lawn!
• Grass clippings are made up
of the same nutrients found in
lawn fertilizers: nitrogen,
phosphorus and potassium.
Clippings left on the lawn act
as a slow release fertilizer,
returning these nutrients back
to your lawn as they decompose.
• Grass clippings also help to
shade and protect the roots of
your lawn.
• Grass clippings reduce water
loss through evaporation, an
important consideration in the
Okanagan!
How do I Grasscycle?
A few simple changes can start you
Grasscycling:
Let it Grow!
• Keep your lawn a little longer,
at least 6 cm, or about 21⁄ 2 to
3 inches. A longer grass blade
provides more protection
from heat and water loss and
makes for a healthier root system.
• Mow as needed to keep lawn
height at 6 cm or about 21⁄ 2 to
3 inches. This may involve
mowing the lawn more often
in peak growing seasons, and
less often towards late sum-
mer and fall.
• When you mow, take off the top
1
⁄ 3 or 1⁄ 4 of the blade, no more
than one inch, to keep your
lawn at 6 cm, or 21⁄ 2 to 3
inches.
Let it Lie!
• Mow late in the day and give
the grass clippings a chance to
settle overnight. On average,
the grass clippings should be
gone in two to three days. This
may vary depending on moisture content. Drier clippings
will decompose more slowly
than moist clippings.
• Mowing in different directions
each time will avoid ruts
developing in your lawn.
Mow it Dry!
• Mow when grass is dry. If grass
is wet it may clump. If this
happens, simply mow over it
again, or collect the excess for
your composter. Dried grass
clippings can be used as a
protective cover for garden
and shrubs, to reduce water
loss and control weed growth.
Keep it Sharp!
• Keep your blade sharp for best
results.
• Some mowers can have a
mulching blade installed to chop
grass clippings up even finer
each time you mow. The smaller the clipping, the faster it will
break down and disappear.
Check with your local dealer.
And if you’re in the market for
a new mower, consider the
benefits of a mulching mower.
No Thatch!
• Thatch is a buildup of grass
roots and stems at the base of
your lawn that can hinder lawn
growth. Grasscycling does not
contribute to thatch, which is
actually caused by over watering and over fertilizing. Clippings
from grasscycling are made up
mostly of water (85%) and
break down quickly.
• Core aeration in the spring
and fall will prevent thatch
buildup, allowing moisture
and nutrients to penetrate the
roots. Care is needed when it
comes to de-thatching your
lawn — check with your local
lawn professional.
Compost!
• If clippings are too long, or
wet, you may want to collect
them for composting. Grass
clippings are an excellent
source of nitrogen for your
composter. Remember not to
compost your lawn clippings if
weed killer has been applied.
These harmful chemicals don’t
break down in the composting
process.
Grasscycling
in Action
For more information on composting, visit the Composting
Education Garden at Mission
Creek Regional Park on
Springfield Road or contact
the Waste Reduction Office at
469-6250. See for yourself
how easy Grasscycling can
be and how great your lawn
can look.
T
H E
B
B
A C K Y A R D
A S I C S
12-Step Program to
Grow Great
Grass!
1. AERATE in spring or fall to reduce soil compaction and allow air, water and nutrients to reach roots.
2. TOPDRESS with fine organic compost to improve water retention and soil condition.
3. OVERSEED heavily with a rye/fescue mix; bare patches invite weed invasions.
4. DETHATCH in fall to allow water, air and nutrients to reach roots and discourage insects and disease.
5. MOW HIGH to 6-8 cm to retain moisture, provide shade, and develop deep roots.
6. GRASSCYCLE your lawn clippings to provide 25% of your lawn’s nutrient needs.
7. SHARPEN UP your mower blades; grass recovers faster from a clean cut than from many tears.
8. WATER DEEPLY but infrequently, striving for 2.5 cm of water per week; overwatering leads to
disease and insects.
9. SKIP THE WEED AND FEED — blanket fertilizers and
herbicides can harm beneficial insects, soil and lawn health
and do not address the root of your weed problem. Try
pesticide alternatives such as hand-digging or biological
controls.
10. LIMIT YOUR LAWN and plant drought tolerant ground
covers and native plants. Increase diversity in your landscape
and create a more balanced ecosystem.
11. TOLERATE THE ODD “PEST” and accept clover,
dandelions and ants as part of the landscape; these and many
“pests” are actually beneficial.
12. CORRECTLY IDENTIFY the insect, disease or weed and
determine if they are a problem and why they are thriving. Use
pesticide alternatives.
Green Lawns
Healthy Families:
Be Pesticide Free
For more information contact
[email protected] or phone
469-8982 or 469-8688
11
12
eriscaping is an approach to
garden design, choice of
plants, and gardening techniques
that conserves water and helps
to protect the environment. In
order to save water, the concept
is to group plants according to
their water needs.
X
Why Xeriscape Gardening?
Plants in their natural environment in the Okanagan are
generally healthy, pest resistant
and drought tolerant. Therefore,
by planting locally grown native
Okanagan or drought tolerant
plants, the use of pesticides and
water will be reduced. Other
great benefits of water wise
gardening are that it requires
less maintenance, less money,
and less time than other landscaping, leaving you more time
to enjoy your garden.
Seven easy steps
to having a
Xeriscape Garden
T
H E
B
A C K Y A R D
B
A S I C S
Xeriscape
Water Wise Gardening
hardy and will lie dormant in the
hot summer and then rebound
when the rain returns. Plant
native grasses or ground cover
instead of turf to reduce water
requirements.
3. Plants
To have healthy, successful
plants, group the plants with
similar water and light needs as
well as complementary pH and
soil requirements. Consider the
plants’ ecology, the colors at
bloom, and water needs.
Hint: Place plants that require
more moisture along north and
east facing slopes and walls.
4. Mulches
In order to keep moisture in the
soil, protect the plant roots and
reduce weed growth. Use organic
mulches such as compost, wood
chips, leaf debris, bark mulch
and grass clippings.
7. Maintenance
Plants will need more frequent
watering to become established, then water according to
the plants’ requirements. And
remember not all plants need
the same amount of water.
Keep irrigation working efficiently to save water and
money!
5. Soil
Whenever you plant, add organic
matter to add essential nutrients,
which the plant will take up as
needed. Increasing the organic
content of the soil improves the
moisture retention and lowers
water use.
6. Irrigation
Well designed, installed, and
maintained irrigation systems
can reduce water consumption
by 60%.
Hint: You may still need to
water – but water where it
counts!
1. Planning
Take the time to plan your
garden. In the end it will pay
off! Design the landscape to
make the best use of what your
garden offers in the way of site,
climate and soil. Consider such
things as soil type, sunlight
requirements, wind, and
drainage patterns. The premise
is to group plants with similar
water needs close to each other.
2. Turf
Your grass area is the most time,
money and water intensive part
of the landscape. Keep an area
for lawn activities (animal areas,
play space for children) if
desired and limit the rest of the
grass in the yard. Use grass that
is naturally drought resistant and
consider how much shade/sun
time it will receive. Sheep fescues
and perennial ryegrasses are
Xeriscape garden at Mission Creek Regional Park.
An added
Bonus!
Many of the xeriscape
plants will attract beneficial
insects such as butterflies,
ladybird beetles, and dragonflies, as well as birds and
other wildlife. In addition,
you will be providing habitat and improving biodiversity while increasing the
quality of your air, water,
and soil systems.
T
H E
B
A C K Y A R D
B
A S I C S
Okanagan Xeriscape
and Native Plants
TYPE
13
V- vine, T- tree, S- shrub,
P- perennial, GC- ground cover,
G- grass
WATER #1 prefers dry well drained soils, #2 needs
some moisture,
#3 prefers moist to wet soil
This list is an excellent example of native and xeriscape plant varieties available from
most Okanagan growers. Please visit your local nursery for more information and ideas
on other native and non-native xeriscape plants.
LIGHT F-full sun, P-part shade, Sh- shade
PAGE
page reference in “Plants of the Southern
Interior” by Parish, Coupe and Lloyd
List compiled by Gwen Steele, Rick’s Garden World, and the Regional Parks Department
PLANTS NATIVE TO THE OKANAGAN
LATIN NAME
Purshia tridentata
Salix bebbiana
Artemesia tridentata
Spirea betulifolia
Ribes lacustre
Sambucus carulea
Linum perenne
Elymus spicatus
Gaillardia aristata
Crataegus columbiana
Juniperus communis
Salix exigua
Psuedotsuga menziesii
Acer glabrum
Elymus cinereus
Aruncus diocus
Festuca idahoensis
Koeleria cristata
Rosa woodsii “Kimberley”
Arctostaphylos uva-ursi
Aster cileolatus
Pinus contorta latifolia
Philadelphus lewisii
Alnus incana ssp. tenuifolia
Salix discolor
Holodiscus discolor
Mahonia aquifolium
Matteucia struthiopteris
Salix lucida ssp.lasiandra
Betula papyrifera
Artemesia frigida
Anaphalis margaritacea
Pinus ponderosa
Rosa woodsii
Rosa acicularis
Populus tremuloides
Cornus sericea
Antennaria rubra
Ceanothus sanguineus
COMMON NAME
Antelope-Bush
Bebb's Willow
Big Sagebrush
Birch-leaved Spirea
Black Gooseberry
Blue Elderberry
Blue Flax
Bluebunch Wheatgrass
Brown Eyed Susan
Columbian Hawthorne
Common Juniper
Coyote Willow
Douglas Fir
Douglas Maple
Giant Wildrye
Goatsbeard
Idaho Fescue
Junegrass
Kimberley Wild Rose
Kinnikinnick
Lindley's Aster
Lodgepole Pine
Mock Orange
Mountain Alder
Native Pussy Willow
Ocean Spray
Oregon Grape Holly
Ostrich Fern
Pacific Willow
Paper Birch
Pasture Sage
Pearly Everlasting
Ponderosa Pine
Prairie Rose
Prickly Rose
Quaking Aspen
Red Osier Dogwood
Red Pussytoes
Red Stemmed Ceanothus
TYPE
S
S
S
S
S
S
P
G
P
S/T
GC
S
T
S/T
G
P
G
G
S
GC
P
T
S
T
S
S
S
P
S
T
P
P
T
S
S
T
S
GC
S
WATER
1
2,3
1
1,2
1,2,3
1,2,3
1
1
1
2,3
1
3
1,2
1,2
2
2,3
1,2
1,2
1
1,2
2
1,2,3
1,2
3
2,3
1
1,2
1,2,3
3
3
1
1
1
1
1,2
1,2
2,3
1,2
1-Feb
LIGHT
F
F
F
F
F/P
F
F
F
F
F/P
F
F
F/P
F/P
F
P/S
P/Sh
F
F/P
F/P
S
F
F/P
F
F
F
F/P
P/Sh
F/P
F
F
F
F
F/P
F/P
F
F/P
F/P
F/P
PAGE
66
76
67
55
52
81
264
313
133
57
99
75
47
73
315
218
331
319
65
85
122
35
80
79
62
72
364
75
30
143
141
34
65
64
29
80
138
68
T
14
H E
B
A C K Y A R D
B
A S I C S
Okanagan Xeriscape
and Native Plants
PLANTS NATIVE TO THE OKANAGAN (continued)
LATIN NAME
Juniperus scopulorum
Sporobolus cryptandrus
Amelanchier alnifolia
Salix scouleriana
Penstemon fruitcosus “Purple Haze”
Rhus glabra
Symphiocarpus albus
Sheherdia canadensis
Ribes cereum
Artemesia dracunculus
Clematis ligusticifolia
Eleagnus commutata
Achillea millefolium
Potentilla fruiticosa “Yellow Gem”
COMMON NAME
Rocky Mountain Juniper
Sand Dropseed
Saskatoon
Scouler's Willow
Shrubby Penstemon
Smooth Sumac
Snowberry
Soopallalie
Squaw Currant
Tarragon
White Clematis
Wolf Willow
Yarrow (white)
Yellow Gem Potentilla
Other xeriscape plants which may be found at the
Mission Creek Regional Park Demonstration Garden
LATIN NAME
Yucca filamentosa
Sedum spectabilis
Iris germanica
Rubeckia fulgida 'Goldstrum'
Liatris spictata
Helictotrichon sempervirens
Buddelia davidii
Asclepias tuberosa
Hemerocrallis
Nepta
Heliopsis helianthoides
Calamagrostis acutiflora
Achillea filipendula
Echinops ritro
Stachys lantana
Coreopsis verticillata
Lavendula angustifloria
Echinacea purpurea
Gaillardia grandiflora
Pannicum virgatum
Knifophia uvaria
Perovskia atriplicifolia
Artemisia schmidtiana
Echinacea purpurea
COMMON NAME
Adam's Needle
Autmn Joy Sedum
Bearded Iris
Black-eyed Susan
Blazing Star
Blue Oat Grass
Butterfly Bush
Butterfly Weed
Daylily
Dropmore Blue Catmint
False Sunflower
Feather Reed Grass
Fern-leaved Yarrow
Globe Thistle
Lamb's Ear
Moonbeam Threadleaf Coreopsis
Munstead Lavender
Purple Coneflower
Red Blanket Flower
Red Switch Grass
Red-hot Poker
Russian Sage
Silver Mound Artemisia
White Coneflower
TYPE
T
G
S
S
S
S
S
S
S
P
V
S
P
S
WATER
1
1
1,2
2,3
1
1,2
1,2
2,1
1
1
2
2,3
1
1,2
LIGHT
F
F
F/P
F
F
F
F/P
F/P
F
F
F/P
F
F
F
PAGE
99
326
55
77
69
70
82
71
53
143
210
71
116
66
Okanagan Essentials
Quick Tips from Kim Kendal
of Rick’s Garden World
1. Xeriscape is more than just silvery fuzz.
There is an endless selection of flowering and
non-flowering xeriscape plants in all shapes and
colors. Visit your local nursery for information
and ideas.
2. Check the plant tag for its hardiness
rating. Most of the Okanagan is within hardiness zone 5. A plant, which is drought tolerant
in zone 6, may not be able to live through the
cold Okanagan winter nights.
3. Use Compost. There are many compost products on the market which, when used properly,
will increase the health of your plants and their
ability to be drought tolerant.
4. Plan twice, plant once. To ensure the most
success, draw your garden plan to scale and
label the available sunlight, water and soil condition. This will help you avoid having to move
struggling drought tolerant plants later.
T
H E
B
A C K Y A R D
B
A S I C S
15
Local
Suppliers
Composters and drought tolerant plants availability
March, 2006
Company
phone
Composters
Drought tolerant plants
All Things Organic
(www.allthingsorganic.com)
372-1835
Vermicomposters
and worms
Art Knapps
860-5633
Garden Gourmet
Earth Machine
Briteland Agricultural
Supplies
545-3420
Earth Machine
Briteland Biobarrel
Bylands Garden Centre
769-7272
Earth Machine
Yes
Dogwood Nursery
768-3355
Earth Machine
Yes
Elysium Garden Nursery
491-1368
Yes
Grasslands Nursery
494-4617
Xeriscape plants
The Greenery
762-7411
Xeriscape plants
Home Hardware
860-4663
768-3125
Scepter
Garden Gourmet
Home Depot
979-4500
Garden Gourmet
Okanagan Plant Ranch
491-4142
Drought tolerant plants
Old Ski Bowl Nursery
765-9381
Trees, shrubs and ground cover
Rona Revy
762-7389
Garden Gourmet
Rick’s Garden World
712-9500
No
Sagebrush Nursery
498-8892
Drought tolrant plants
West-Wind Nursery Ltd.
860-0025
862-8065
Yes
Wild West Nursery
809-8400
Specializes in Native Plants
Wonderful World of Worms
762-5907
Gardening Workshops
• Native Plants • Xeriscape
• Perennials and Ornamental Grasses
• Planting & Maintenance
For information call:
Gwen Steele at 762-6018
Kim Kendal (Rick’s Garden World) at 712-9500
Grasslands Nursery at 494-4617 (Workshops
on how to convert a garden to xeriscape)
Worm Castings
Yes
Yes
Specializes in xeriscape plants
T
16
H E
B
A C K Y A R D
Healthy Yards
B
A S I C S
Healthy Families:
Pesticide Free
he best remedy to combat
weeds, insects and disease in
your lawn and garden is to
create healthy soil and a balanced
ecosystem. Blanketing your landscape in pesticides and synthetic
fertilizers is a band-aid solution
which can amplify lawn and
garden problems and threaten
people, pets, wildlife and beneficial insects. It can also pollute
our waterways, impacting the
health and habitat of fish and
aquatic organisms.
T
resistant to disease and
insects.
• Diversify your plant selection
to provide habitat for beneficial insects and wildlife; this
will also create a more
balanced ecosystem.
• Avoid overwatering, which
leads to insects and disease.
• Rotate annual plants from year
to year to prevent disease and
insects from becoming established.
Building Blocks
to a Pesticide
Free Yard
Pesticide
Alternatives
Pesticides include products such
as insecticides, herbicides,
fungicides and rodenticides.
There are many environmentally
friendly, less toxic, pesticide
alternatives available, such as
mineral oil, acetic acid (vinegar), sulphur and insecticidal
soaps. You can also try creating
your own home remedies with
common household ingredients,
such as “Vinegar Weed
ERADICATOR.”
“When we
kill off the
natural
enemies of a
pest, we inherit
their work.”
— Carl Huffaker
Vinegar Weed
Eradicator
Ladybugs feed on soft-bodied
insects such as aphids. You can
even add these beneficial insects
to your garden!
Ingredients:
1 L water
2 tbsp salt
5 tbsp white or apple
cider vinegar
Directions:
Photo: Esther Wyatt
• Consider soil type and available
nutrients, light, and moisture
when planning a healthy
landscape.
• Choose drought tolerant
ground covers and native
plants; plants suited to their
environment will be stronger,
healthier and more
• Use an organic compost or
fertilizer to provide a slow
release of nutrients.
• Learn to tolerate the odd
“pest” and give nature a
chance to work.
• Use Pesticide Alternatives!
To receive your FREE Lawn Sign
or alternative recipe keychain,
visit www.kelowna.ca, email
[email protected] or phone
469-8982.
Add salt and vinegar to
boiling water. While still
hot, apply mixture to
undesirable weeds growing in walkways, driveways and your lawn and
garden.
NOTE:
This is non-specific;
therefore, apply to your
target only.
T
H E
B
A C K Y A R D
B
A S I C S
17
Water Conservation
THE BIG THREE:
Three reasons why we use so much water.
he top three reasons we use so much water in the Okanagan could be grass,
grass, grass, but that would be a little too simple. While lawn watering is the
biggest use of water at the average home, there are reasons we need to use more
water here than in other parts of the country. The top three reasons are…
T
1. Climate
We live in a semi-arid climate but we plant lawns and gardens like we live in the Lower Mainland. If you want
to grow lush plants in the desert, you’ll need a lot of water to do it. Why not consider converting parts of your
landscaping to include native, drought tolerant plants? Native plants are not dull looking. Visit a local nursery
and you’ll be surprised at the variety and colour of drought tolerant plants.
2. Poor Soil Conditions
Soil conditions in Kelowna are not conducive to growing grass. In some areas, the soil is little more than sand
and gravel, while in others it is almost solid clay. But you can improve your soil by topdressing with organic
material like compost. In sandy soil, compost will create aggregates that will hold moisture. On the other
hand, compost will help break down clay soil so that it, too, can hold more moisture.
3. Irrigation Systems
Don’t assume that just because you have an automatic irrigation system you are watering efficiently. Irrigation
systems are only as efficient as the person who sets the timer. You should inspect your system regularly to
make sure the water is landing where it is supposed to be landing. Also, if you do not have a water budget
function on your timer, you should consider upgrading your timer. A water budget will allow you to change the
timings for all your zones with just one button. This makes it easy to adjust your watering times for the seasons, or cooler, wet weather.
Core Sampling
How a 13 cm piece of
your soil can help you
conserve water
The health of your lawn is not determined by how green it is on the
surface. The main indicator of your
lawn’s health is the stuff underground that you can’t see.
By taking a core sample of your soil
you can determine the health of your
grass and see if there is damage
created by excessive fertilizer and
watering.
A core sample is simply a 13 cm
(5 inch) plug of your lawn that
exposes your grass and the root
system below the ground.
The first sign of over-watering is the
depth of the roots. Healthy grass
roots will be from 4 - 6 inches. If
your grass roots are very short, that’s
a sure sign of watering too much.
The next indicator is thatch. This is
the layer of spongy brown stuff
between the grass and the dirt. A
thick layer of thatch is another sign
of watering too much.
If the soil is extremely compacted,
this could be a sign of excessive
fertilizer use, which leads to
excessive watering.
You can actually create a water
thirsty lawn when you manage it
from the top, not from the bottom.
Just looking at the colour of your
grass may lead you to make decisions
that are ultimately harmful.
To grow a strong, healthy lawn that
can survive a little drought, you really
want to work on what’s underneath
the grass.
Creating a Monster
Here’s how so many lawns in Kelowna become
monsters with a voracious thirst for water
1. In the rush to have a green lawn as quickly as possible,
many people use fertilizers with high nitrogen content
in the spring.
2. High nitrogen fertilizers require a lot of water to
prevent the grass from burning.
continues on page 18
T
18
H E
B
A C K Y A R D
B
A S I C S
Water Conservation
Creating a Monster
continued from page 17
3. Excess lawn watering leads to shallow roots. All the
nutrients and water are on the surface, so the roots get
lazy, not bothering to dig deep.
4. Shallow roots leads to thatch.
5. Thatch repels water and shallow roots require excess
water to survive the heat of summer.
6. Voila! You have created a monster lawn that is
addicted to water.
So that’s what NOT to do. If you want to tame the monster
and create a lawn that requires far less water and
maintenance, take these tips from a Kelowna homeowner
who watered his lawn just six times in the Summer of 2005
(and yes, the grass looked fine).
Water Smart staff are available to help you save water.
1. Top dress your lawn with organic material (compost,
Glenmore Grow, etc.) as often as you can.
2. Leave grass clippings on your lawn. They contain
beneficial nitrogen and moisture.
3. Aerate often. This will loosen your soil, allowing
moisture, oxygen, and nutrients to penetrate to the
root level.
4. Get rid of the nitrogen fertilizers for your lawn. Don’t
use them. Ever!
5. Avoid excessive watering. This will encourage shallow
root growth.
And that’s it! Granted, it might take a
few years to build up your topsoil,
especially if you have a lot of clay or
sand, or if the soil has been compacted by excessive watering and
fertilizers. But in the long run, you’ll
have a healthier, happier lawn. And
it all starts by taking a look at that
13 cm piece of your soil.
The 12x12 Challenge:
To reduce water consumption
by 12% by 2012.
The City of Kelowna Water Utility is challenging every resident, business and institution to reduce their water consumption by a minimum of 12% by 2012. The Water Smart
program can help by providing:
• Free assessments
• Free sampling
• Cost shared programs:
These services are available to customers of
the City of Kelowna Water Utility
HOW TO CONTACT US
City of Kelowna Water Smart Program
Phone: 868-3339
Email: [email protected]
Web: www.getwatersmart.com
T
H E
B
A C K Y A R D
B
A S I C S
19
er
n
e
e
Gr
g
in
Liv
Only Rain
Down the Drain!
D
id you know that storm water run-off is the largest
single contributor to urban stream pollution? Rain
and snowmelt washes over our streets, driveways, and
lawns carrying with it a nasty cocktail that includes
pesticides, fertilizers, animal feces, oil, antifreeze and
soaps. These pollutants flow directly into storm drains
which flow to our streams and lakes untreated!
Help preserve our natural environment. Follow these
tips to make sure that ONLY RAIN GOES DOWN
THE DRAIN!
Car Care
General Clean-Up
• Never dump oil, antifreeze, paint or any other toxic
materials down a storm drain or on the ground. Instead,
take it to a proper collection facility, the Battery Doctors in
Kelowna or Boucherie Bottle Depot on the Westside or to
the Household Hazardous Waste Roundup in October.
• Sweep the driveway, sidewalk, and patio instead of hosing
them off. This reduces both water consumption and the
transport of sediments and pollutants into storm drains.
• Keep storm drain grates clear of leaves and debris so
water can drain properly.
• Fix all vehicle fluid leaks promptly.
• Use one or more of the following methods when washing
your car:
• Use phosphate-free soap
• Wash it over a gravel or grassy area
• Use a commercial carwash where wastewater is treated
Around the home
• Aim downspouts onto grassy or porous areas.
• Sweep up and properly dispose of construction debris
like concrete and mortar. DO NOT rinse down the gutter
or driveway, as concrete mixes are toxic to aquatic life.
• Rinse latex paint-contaminated brushes and rollers in
the sink, not outdoors; it will enter the sanitary treatment
plant and NOT the creek!
Yard Care
• Use the Go Natural gardening, grass and pest control
techniques outlined in this brochure to keep fertilizers
and pesticides out of streams and lakes.
• Around the home, choose to use more porous surfaces
such as paving stones or gravel in place of concrete.
Allowing storm water to filter through the ground
removes pollutants, reduces flooding and replenishes the
ground waters that nourish streams.
Pet Waste
• Flush pet waste down the toilet or throw it in a trashcan.
Nutrients from pet waste may wash into lakes and
streams affecting water quality.
For more information contact the
City of Kelowna
Environmental Division
at 469-8983 or e-mail
[email protected]
T
20
H E
B
A C K Y A R D
B
A S I C S
Living by Water - Let’s Enjoy
➋
➊
➌
➍
➋
➎
➍
➊
➍
➎
let’s enjoy
shoreline provides great wildlife
➊ Natural
habitat and can prevent erosion.
plants provide shoreline buffer and
➋ Native
natural air conditioning.
floating dock has low impact on “ribbon
➌ Small
of life” by allowing unimpeded flow and
minimizing the erosive force of water.
four-stroke or electric motors
➍ Well-maintained
use less energy and produce less pollutants.
nature to take care of itself. Then you
➎ Allow
can work less and relax more!
You don’t live near a stream or lake?
Storm drains connect us all to our drinking water.
Make sure you repair vehicle leaks, avoid fertilizer
and pesticide use, and NEVER dump anything down
a storm drain. Together we CAN make a difference!
➌
let’s talk
shore line eliminates “natural filter,”
➊ Hardened
degrades water quality and blocks wildlife access.
of natural vegetation and shade trees
➋ Removal
leads to overworked air conditioners which adds
to electricity bills.
dock destroys wildlife habitat, alters cur➌ Solid
rents, and causes erosion elsewhere.
spills, chemical run-off and poor fuel
➍ Fertilizer
management can deteriorate water quality.
work more, destroy more habitat and create
➎ You
more pollution!
For more information contact the
City of Kelowna
Environmental Division
at 469-8983 or e-mail
[email protected]
T
H E
B
A C K Y A R D
B
A S I C S
21
Central Okanagan
Community Gardens
“Gardens Grow Healthy Communities”
ommunity gardening is an
activity for persons of all
ages and abilities. A plot of
land is provided to interested
gardeners at the cost of fifteen
dollars per season (March to
November) to help cover the
cost of the garden’s upkeep.
Gardeners have access to irrigation water, compost bins, tools
and information at each garden
site. Gardeners are encouraged to
grow vegetables, herbs and flowering plants. It is each gardener’s
responsibility to maintain their
plot and surrounding areas using
the principles of Integrated Pest
Management. The use of pesticides in all Central Okanagan
Community Gardens gardens is
discouraged. Community activities
and work bees are an integral
part of each garden, providing
opportunities for fun, community
building. C0CG is a non-profit
society with four gardens located
throughout the area.
C
Cawston Avenue
Community Garden:
The Cawston garden is located
adjacent to the Unitarian Church,
north of downtown Kelowna.
The Church kindly donated the
land; the City of Kelowna provided the funding and numerous
businesses donated or reduced
the costs of most of the materials. This garden has ten 4’ X 4’
raised beds and three wheelchair accessible boxes. In addition to the shed, compost bins
and rain barrels on-site, Cawston
also offers a ‘free food’ box.
This box is planted and cared
for by the gardeners with the
resulting produce being available to anyone who needs it.
Hartman Road
Community
Garden:
The Hartman Road Community
Garden has thirty-four plots (10’
X 20” and 10’ X 13’). The site is
located on land donated by the
City of Kelowna Parks
Department. Community volunteers, including the youth from
the Rutland Boys & Girls Club,
built the Hartman site in May
2005. Funding for this project
was generously provided by
grants from the TD Friends of
the Environment Foundation, the
Diggers and Weeders, Canadian
Federation of University Women
and the Central Okanagan
Foundation. On-site there are
areas dedicated to the food bank
and two raised beds for wheelchair gardeners. Compost bins,
rain barrels and several picnic
tables are also available for the
gardener’s use.
Barlee Road
Community Garden:
Coming in April 2006… the
Barlee Road Community Garden!
Gardeners in the Springfield
Road area, surrounding Orchard
Park Mall, will be pleased to
know that plots are now available. Located on City of Kelowna
land, the garden design will
incorporate many of the same
features as at Hartman Road
including large plots, a tool
shed, compost bins and a shadygrove for picnics.
Winfield
Community Garden:
New in 2006! Lake Country gardeners will have a community
garden on land provided by Paul
and Judy Shoemaker of
Nurturing Nature Organics. The
Winfield garden, located on
Bottom Wood Lake Road, will
offer numerous, large plots.
Tools, irrigation water and compost bins will be incorporated
into the garden design. Plots are
available for May 2006.
Gardeners interested in a
plot or volunteering in any
of the four community
gardens are asked to call
the COCG Secretary –
Becky Vien at 862-8825
or Coordinator – Molly
Thurston at 764-7009 or
e-mail us [email protected]
T
22
H E
B
A C K Y A R D
B
A S I C S
Buying Local means
Living Greener
This page is brought to you by the Agricultural Advisory
Committees of the City of Kelowna and the Regional
District of Central Okanagan. These Committees are an
important liaison between local government and the
agricultural community and play a role in ensuring that
agricultural land and the work of farmers is respected and
protected.
FOR MORE INFORMATION:
www.kelowna.ca
www.regionaldistrict.com
griculture in the Central
Okanagan provides many
benefits, including:
A
a) a high-quality, accessible
food supply;
b) $75 million in annual sales,
$20 million in annual wages
and $829.5 million in capital
investment (2001 data);
c) preservation of open spaces;
d) an appealing balance
between urban and rural
lifestyles which attracts both
residents and visitors.
Farms occupy approximately
2400 hectares of land in our
region. These farms provide tree
and berry fruits, grapes, poultry
and eggs, meat, dairy products
including artisan cheeses,
vegetables, herbs and more.
Processors and world-famous
chefs have been attracted to our
region by the bounty of foods
available. They are establishing
businesses and creating delicious
products which are marketed
locally and internationally. All of
this activity depends on local
agriculture as a source of high
quality ingredients.
Buying Local Means
Living Greener
Tony Cetinski of Suncatcher
Farm is a local organic
grower and a member of the
RDCO AAC.
peak means no preservatives and
more food value.
• Get to know local farmers
and show them your appreciation. Successful farms close to
cities not
only provide
us with great
food; they
• What goes around
comes around! Every $1 you
spend locally will generate
another $3 to $4 in economic
activity. By supporting local
farmers, you also support all
of the suppliers who depend
on their business.
Raven Ridge Fuji Ice – Raven Ridge Iced
Ciders (from Kelowna Land and Orchard)
are one example of a premium product
made from local fruit.
Places where you can Buy Local
in the Central Okanagan
•
•
•
•
•
•
Seasonal Farmers’ Markets in Lake Country and Kelowna
Urban Harvest – Kelowna
Quality Greens – Kelowna, Westbank
Nature’s Fare – Orchard Plaza, Kelowna
Sunshine Market – Lakeshore Drive, Kelowna
Paul’s Produce, Okanagan Artisan Breads, L&D Meats
– Guisachan Village, Kelowna
• BC Fruit Packers warehouse store – Kelowna
• Wineries
• Farm Direct Sales
• You get better value when
you spend your money on freshness, quality, and great taste.
A strawberry or tomato picked
from a sun-warmed field and
eaten within hours tastes better
than a partially-ripe one shipped
thousands of miles.
• Reduce the environmental
impact by eliminating longdistance transportation, fuel consumption and packaging.
• Get more nutrition per
bite! Eating food at its seasonal
also discourage urban sprawl.
Local market tomatoes
T
H E
B
A C K Y A R D
T
he One Tonne Challenge is asking Canadians to reduce their
greenhouse gas emissions (GHG’s) by 20% or 1 tonne to
decrease the impact of climate change. Greenhouse gas emissions
are created from burning fossil fuels and releasing other pollutants such
as CO2 into the atmosphere,
which affect our health and
air quality.
Transportation is by far the
biggest culprit for increasing
GHG’s and decreasing air
quality. Every litre of gasoline
used in your vehicle produces
2.4 kg of carbon dioxide. Cars
and trucks contribute over 18%
(over 134 million tonnes) of
Canada’s total GHG’s.
In Kelowna there has been a
noticeable decrease in air quality over the past 10 years.
Take the One-Tonne Challenge.
Vehicle exhaust can account for
Get fit! Have fun!
almost two thirds of the smogcausing pollutants, which can be especially harmful to children and the
elderly and those with respiratory disease.
How you can do your part for the One-Tonne Challenge
B
A S I C S
23
Health, economic and environmental benefits of using
sustainable transportation
• Walking, cycling, jogging or inline skating enhances your
physical and mental health and improves your overall well
being. You can also increase your connection to the community
and social interaction.
• By walking or cycling 30-60 min each day, you can enjoy
significant health benefits and meet Canada’s recommended
physical activity guidelines (Health Canada Physical Activity
Guide).
• Reduce the air pollutants that negatively affect the health
of our lungs and heart. Vehicle emissions increase the chance
of asthma attacks and respiratory infections like pneumonia
and bronchitis, especially among the elderly and the young,
or those with existing respiratory disease.
• Enjoy the convenience of public transit by relaxing on
the bus, reading or taking a nap while someone else is driving,
instead of dealing with the stress of traffic.
• Save tons of money by spending less on gas and vehicle
maintenance.
• Reduce health care costs for all Canadians. Transport Canada
has estimated that transportation related emissions will cost
the health care system from $11 billion in 1997 to $38 billion
by 2020.
• Use sustainable transportation. Public transit and
carpooling saves money and keeps more vehicles off the road.
• Save tax dollars by reducing road construction and
maintenance costs.
• Walking, cycling, rollerblading and jogging will benefit your
health, your livelihood, the environment and save you money.
• Decrease traffic noise and traffic jams, which are
increasing each year in Kelowna.
• Drive 10% less. If you drive 20,000 km a year, reducing your
mileage by 2,000 km annually will save fuel, maintenance and
reduce your GHG’s significantly.
• Conserve natural habitat. Fewer cars on the road will
decrease the demand for more roads and parking lots, leaving
more area as green space.
• Don’t Idle. 10 minutes of idling a day from waiting at a drive
through restaurant or store can produce about a quarter of CO2
emissions annually, and will cost you over $70 in wasted fuel.
• Reduce the threat of climate change and join the
One-Tonne Challenge!
• Buy a more fuel efficient vehicle. A sports utility vehicle
emits 6 tonnes of CO2 per year, a mid sized sedan releases
4 tonnes, and a Hybrid vehicle emits 2 tonnes. Hybrids are
20-50% more efficient than a traditional vehicle and will save
money in fuel costs.
• Keep your vehicle well maintained. Poorly maintained
vehicles can use up to 50% more fuel and produce 50%
more CO2 than a properly maintained vehicle.
Every time you drive a car, use energy or burn fossil fuels you are
adding GHG’s to the atmosphere, which increases climate change.
It is important to do you part by taking the One-Tonne Challenge to
improve Kelowna’s health, create cleaner air, help the environment
and save money!
www.climatechange.gc.ca
www.i-go.ca
www.commuterchallenge.ca
B
A C K Y A R D
A S I C S
FOR MORE INFORMATION CONTACT:
The Waste Reduction Office
1450 KLO Road
Kelowna, B.C.
V1W 3Z4
Glenmore Dr.
Telephone:
(250) 469-6250
[email protected]
www.regionaldistrict.com
Gerstmar
Ziprick
Sp
Durnin
rin
gf
iel
d
North
Rd.
lin
ou
nv
Be
Bryns
EECO
Centre
Ba
Hall
Springfield
ron
Orchard
Park
Shopping
Centre
kie
Orchard
Plaza
Sutherland
97
Lec
Enterprise Way
Harvey Ave.
Leckie
Dilworth Dr.
Bernard Ave.
Dilworth Dr.
Highway 33 W.
Spall Rd.
B
Burtch
H E
Burtch
T
Mission Creek
Regional Park
City of Kelowna
Environmental Division
(250) 469-8983
www.city.kelowna.bc.ca
[email protected]
Water Smart Program
(250) 868-3339
[email protected]
www.getwatersmart.com
Agricultural Advisory Committee
www.kelowna.ca
www.regionaldistrict.com


© Copyright 2026