
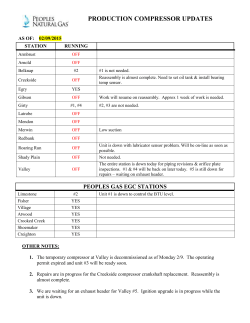
kleinn 6270rc manual - Kleinn Automotive Air Horns
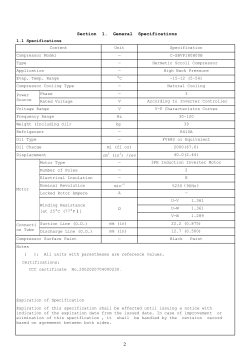
Model 6270RC 15% Duty Cycle Compressor Please read the contents of this manual before using this product. USER MANUAL SAVE THIS MANUAL FOR FUTURE REFERENCE Compressor Kit Contents: Air Compressor: Qty. 1 Model 6270RC Kleinn Air Compressor Components: Qty. 4 Compressor Mounting Hardware (Nuts, Shorter Bolts, Washers & Locking Washers) Qty. 1 Remote Mount Air Filter Housing with Element Qty. 1 Remote Mount Air Filter Fittings Qty. 1 Replacement Air Filter Element - Package of 2 Qty. 1 Leader Hose Bracket Clip Qty. 1 Air Line for Remote Mounting Air Filter Compressor Installation This air compressor can be mounted in any position, but we do not recommend mounting it upside down; as this can cause overheating and duty cycle loss. To maximize air compressor performance, install it as close to the battery as possible and use a larger gauge wire (12 GA minimum) to avoid amp draw increase and/or voltage loss. This compressor is moisture & dust resistant, but is not waterproof or dustproof. Do not install in areas exposed to excessive water or dirt. The compressor may be mounted underneath your vehicle as long as you use the remote air intake kit that is included with the system and relocate the air intake to a clean & dry location. Select a compressor mounting location where air line can be routed from the compressor air inlet to the remote inlet air filter. Make sure that the remote air filter is located in a clean and dry location. This air compressor comes with a heavy duty heat resistant stainless steel braided leader hose with built-in check valve. Do not remove this leader hose from the air compressor. Make sure that your compressor is properly fused. Amp draw is noted on the label affixed to the body of the air compressor as well as in the Specifications section on the next page. Always locate fuse as close as possible to power source (battery). Always use a “switched” power source and a relay that only supplies power to your compressor when the vehicle is running. (See wiring diagram below) Installing a Pressure Switch: Your system requires the use of a pressure switch that will turn the compressor on & off at preset pressures. The use of a 40-amp relay is required to prolong pressure switch lifespan. Wire the air compressor, relay and pressure switch using the diagram below: 1. Never install a pressure switch in directly across from the inlet port coming from the compressor. Tank pressure can be misread by the pressure switch and may cause undesired on/off operation. Install the pressure switch on the tank where it receives readings from deflected air being stored in the tank. 2. Never use a pressure switch that is rated beyond your compressor’s rated Maximum Working Pressure. Refer to specifications below for maximum working pressure. 3. Always use a relay to turn the compressor on and off. This will increase the life of the pressure switch. (Note: Relay wiring diagram above.) 4. The pressure switch leads are not polarized. One lead is connected to the power lead on your compressor, the other is routed to fused and switched power. COMPRESSOR SPECIFICATIONS 6270RC Air Compressor Compressor Type: Sealed, Oil-less Voltage: 12-volts Duty Cycle @ 72° F (100 PSI): 15% Maximum Amperage: 14 amps Maximum Working Pressure: 130 PSI Flow Rate @ 0 PSI (13.8 volts): 1.27 CFM Dimensions: 6” L x 3.25” W x 5” H IMPORTANT: This compressor is designed for use with air horns, air bags and other accessories that utilize the compressed air stored in the tank. It is not designed for continuous use applications such as tire inflation or air tools. 1. Your air compressor is equipped with a thermal overload protection circuit. This circuit will protect the air compressor from overheating and causing permanent damage to your air compressor. The thermal protection circuit will reset after approximately 30 minutes of inactivity. 2. To prevent discharge of your vehicle’s battery and to provide peak performance, keep the vehicle’s engine running while using the air compressor. Compressor Maintenance & Repairs 1. Periodically check all electrical and fitting connections. 2. Periodically check all mounting hardware. 3. Replace air filter element periodically, depending on operating conditions. 4. Regularly clean dust and dirt from compressor exterior to avoid heat buildup.. 5. Never lubricate the compressor using any oil or other lubricant. 6. Repair should not be performed by end user. Refer to Manufacturer. CAUTION: Never touch the air compressor or fittings connected to the air compressor with bare hands during or immediately after use. Leader hose and fittings will become very HOT during and after use. Compressor Installation Tips 1. Using the remote mount air filter will reduce operation noise by up to 25%. 3. Always mount the compressor at a point higher than the inlet port of the tank to keep moisture from being able to seep back to the compressor 4. When mounting the compressor, use a paint pen on the rubber isolators. Then, simply stamp the compressor against the chassis to make an imprint of exactly where to drill the mounting holes for the compressor. Testing Your System Run the compressor to build pressure in the air tank. When air pressure reaches the pressure switch cut-out pressure, the compressor will shut off. Inspect all air line connections for leaks by spraying a soap and water solution on them and looking for bubbles. If leaks are detected, re-attach hoses or apply Kleinn Air horn Juice™ to reseal. Periodically check your system’s fittings this way if your compressor turns on more often than normal without air use. When Installing This Air Compressor For Use with Air Horns: When installing for use with air horns, the air compressor system and horns are considered to be TWO SEPARATE SYSTEMS. The only thing that connects the two systems together is the air line that supplies the air solenoid attached to the air horn with air stored in the tank. Installing an Air Horn Solenoid: Note: the solenoid valve must NOT be connected to the relay used in the air system. To wire the horn solenoid for use, select one of the wires on the air horn solenoid and ground it. The second wire will be routed to the button that you will use to honk the air horn. On the back of the horn button, use the second terminal and route to 12-volt power and fused at 5 amps per solenoid at the battery. KLEINN MANUFACTURER LIMITED DEFECT WARRANTY: Kleinn Automotive Air Horns warrants this product, when properly installed and under normal conditions of use, to be free from defects in workmanship and materials for a period of one year from the provided date of purchase, to the original purchaser of the product. This warranty does not cover abuse, operation in a manner inconsistent with the product’s design, or damage resulting from exposure to the elements. If the defect is considered under warranty, Kleinn will, at its option, repair or replace the product free of charge to the original purchaser. Kleinn is not liable for installation charges, loss or damage of any kind incurred in the replacement or repair of any warranted product. Kleinn Automotive Accessories 2094 N. Dragoon St., Tucson, AZ 85745 (520) 579-1531 [email protected]


© Copyright 2026