
The treatment of white fluorosis spots by means of a
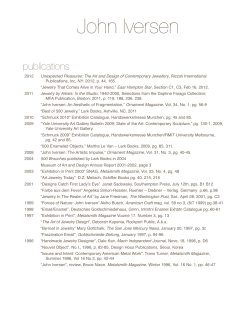
A Case Report
The treatment of white fluorosis spots by means of a
microinvasive approach: the infiltration method
Marie Clement
Because of the increasing demands on
Dental Practices in the field of cosmetic
treatment, it is essential to provide patients
with the best therapies. In modern
Practice, fluorosis-related whitish changes
on the anterior teeth are a frequent reason
for an aesthetic consultation. In the worst
case, these fluorosis spots may cause
psychological complications for patients.
In fact an attractive smile may play an
exceptionally important role in social
and interpersonal relationships. For the
treatment of lesions that appear visually
as white spots, a very mild approach is
recommended – the infiltration method.
This method, which was originally
developed to treat early carious lesions
[7], may also be used to mask white spots
thanks to a side effect, as it transforms the
tooth’s optical properties. The original
principle is based on an infiltrator
penetrating the carious lesion after it
has been conditioned with an acid and
then dried [2] [9]. If white fluorosis
spots are present, fluorosis-related
hypomineralization produces a refractive
index which differs from that of healthy
tooth enamel. The lesion does not absorb
any wavelengths and therefore appears
white [5]. However, thanks to the
infiltration into the porous lesion of a
highly fluid resin material, which has a
refractive index comparable to healthy
enamel, it is possible to restore the
enamel’s translucency [8]. This treatment
can be carried out with maximum
protection of tissue [4] [10].
Clinical case:
Photo 1: A young female patient attends
the Dental Practice. Her main concern is
unsightly “white spots”. She would like
to undergo treatment with anterior tooth
veneers to mask the fluorosis spots
completely. It is likely that the prophylactic
dose has been exceeded for many
years, as no fluoride status was determined
beforehand. The clinical examination
shows no carious lesions; the diagnosis
of fluorosis is confirmed. According to
Hattab’s classification [1] a class II fluorosis is present when it is characterized by
symmetrical opaque discoloration.
Page 1 of 2_10/2013
www.dmg-dental.com 1
4
2
5
3
6
Photo 2: External bleaching is performed
on her as an outpatient by means of a
vacuum-formed splint and 10% carbamide
peroxide gel. The treatment, in which the
splint is worn overnight, takes 21 days and
the result is examined once a week at the
Dental Practice. As bleaching increases the
overall brightness of the teeth it acts as a
mask for the smaller white flaws in the
enamel. The visual result after bleaching
may be satisfactory, but is insufficient. In
fact, the opaque fluorosis spots have not
been evened out enough by lightening
the rest of the tooth. For this reason, an
appointment is arranged to carry out the
infiltration method one month after the
end of the bleaching treatment.
Photo 3: At the appointment for
infiltration treatment prophylactic cleaning
is carried out initially using a brush and
prophylactic paste, in order to remove
the biofilm and therefore the saliva
proteins. By fitting a rubber dam a dry
operating area is established. This step is
especially important in order to protect the
soft tissues when applying Hydrochloric
Acid and to avoid any moisture during
infiltration of the resin material.
Photo 4: The next step is to establish
access to the hypomineralized fluorosized
lesions [5] [6]. The removal of heavily
mineralized, aprismatic enamel on the
surface of the lesions is required for this.
This involves etching with 15% HCl gel
(Icon-Etch, DMG) for 120 seconds [3]. The
application of acid is carried out using the
applicator tip supplied. To prevent uneven
etching, which may be caused by bubbles
arising from the gel, for example, the
surface is mechanically activated with a
microbrush. Icon-Etch is then suctioned
off, a 30-second rinse using water spray is
carried out and the surface blow-dried with
oil and water-free air.
Photo 5: Once the etching of the enamel
is complete, it is important to remove
the water contained in the microporous
parts of the fluorosized lesions before
infiltration with the resin material is carried
out. The resin infiltrator (Icon-Infiltrant)
is a hydrophobic Methacrylate resin
matrix (TEGDMA). For this reason the
lesions have to be dried thoroughly
beforehand. This initially involves
application of a 95% Ethanol solution
(Icon-Dry). The alcohol is applied to the
surface of the lesion using a blunt cannula
for 30 seconds. At this stage, it is possible
to monitor whether the white spots have
disappeared or are significantly reduced
and therefore draw conclusions about
the potential outcome of the treatment. If
the brightness of the lesions has not
regressed enough this means the
lesions’ micropores covered with a
hypermineralized layer, are not yet
completely accessible. In this situation the
etching process should be repeated.
Photo 6: Repetition of the etching process
over a period of 120 seconds.
A Case Report
7
9
Referenzen
1. Hattab FN et al. Dental discoloration:
an overview. J Esth Dent 1999; 11:291-300.
8
10
2. Meyer-Lueckel H, Paris S. Progression of
artificial enamel caries lesions after infiltration
with experimental light curing resins. Caries
Res. 2008;42(2):117-24.
3. Meyer-Lueckel H, Chatzidakis A, Naumann M,
Dörfer CE, Paris S. Influence of application
time on penetration of an infiltrant into natural enamel caries.J Dent. 2011 ; 39(7):465-9.
Photo 7: After rinsing, drying and
reapplying the Ethanol solution, the lesions
appear much less bright this time and have
almost disappeared. The lesions are now
accessible for the resin material infiltration
and it is possible to predict a satisfactory
result. If, on the other hand, the white
lesions are still recognizable after the
second application of Icon-Dry, you should
consider etching a third time.
This is followed by the final drying process
with oil and water-free air to allow the
Ethanol to evaporate. After this drying
process the lesions appear more
pronounced (white-opaque, bright). This
can be explained by the refractive index
of air.
Photo 8: At this stage the infiltration can
be carried out, after the interdental
matrices have been fitted. The resin
material (Icon-Infiltrant) is applied using
the enclosed applicator tip. The highly
liquid hydrophobic resin material
penetrates the porous parts of the lesions
due to capillary forces. This process takes
three minutes. As the resin material is
light-curing, this step has to be carried
out protected from light. The solvents are
removed by spraying air and any excess
material on the vestibular surface is
removed using dental floss. Polymerization
then takes place for 40 seconds before
the infiltration stage is repeated the same
way (resin material applied, and leaving it
to take effect for one minute and
polymerization for 40 seconds). This
second infiltration helps reduce porosity
on the surface.
Photo 9: At the end of the session the
rubber dam is removed and thorough
polishing is carried out to prevent external
Page 2 of 2_10/2013
www.dmg-dental.com discoloration in future. The excess material
in the approximate area is removed using
dental floss and fine grit polishing strips
if necessary. The vestibular areas are
polished with silicone tips. The final polish
is performed with silicone carbide brushes,
diamond pastes in combination with a
goat’s hair brush and aluminum oxide
paste in combination with a felt wheel.
Photo 10: With this patient immediate
improvement in her esthetic appearance
was achieved. Checks were carried out
every six months to evaluate the ageing
of the resin material over time. With this
minimally invasive treatment it was
possible to achieve a benefit for the patient
in terms of her smile, which has led to
significant changes in her personal and
social life.
4. Muñoz MA, Arana-Gordillo LA, Gomes GM,
Gomes OM, Bombarda NH, Reis A,
Loguercio AD.
Alternative esthetic management of fluorosis
and hypoplasia stains: blending effect obtained
with resin infiltration techniques. J Esthet
Restor Dent. 2013 Feb;25(1):32-9.
5. Newburn E, Brudevold F. Studies on the
physical properties of fluorosed enamel.
I. Microradiographic studies. Arch Oral Biol.
1960 ; 12:15-20.
6. Newburn E. Studies on the physical properties
of fluorosed enamel. II. Microhardness. Arch
Oral Biol. 1960 ; 12:21-7.
7. Paris S, Meyer-Lueckel H, Kielbassa AM. Resin infiltration of natural caries lesions.
J Dent Res. 2007 ; 86(7):662-6.
8. Paris S, Meyer-Lueckel H. Masking of labial
enamel white spot lesions by resin infiltration a clinical report. Quintessence Int. 2009 ; 40(9):713-8.
9. Robinson C, Brookes SJ, Kirkham J, Wood SR,
Shore RC. In vitro studies of the penetration
of adhesive resins into artificial caries-like lesions. Caries Res. 2001 ; 35(2):136-41.
10.Tirlet G, Chabouis HF, Attal JP. Infiltration, a new therapy for masking enamel white spots: a 19-month follow-up case series.Eur J Esthet Dent. 2013 Summer;8(2):180-90.
Kontaktadresse
Marie Clement
Private Practice in Lyon, France
Lecturer, Department of Operative Dentistry,
University of Lyon, France
34 quai Charles de Gaule
69006 Lyon
December 2013


© Copyright 2026