
Email Signature: Gmail - Brain Balance Marketing
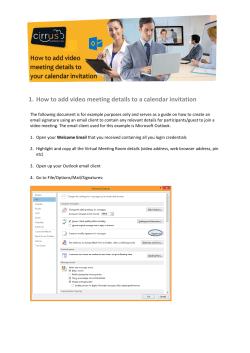
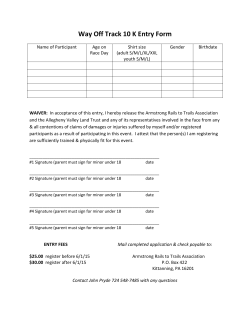
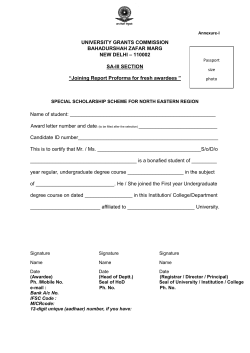
Setting Up Your Email Signature: Gmail USING GMAIL 1 Edit Your Signature Log into Gmail. Click Gear Icon in the upper right and select Settings, from the drop-down menu. 2 Copy Signature Using a browser, got to: http://www.brainbalancecenters.com/_mail/signature.htm Drag your cursor to highlight all the text and copy using Ctrl + C USING GMAIL 3 Paste & Edit Signature Return to Gmail and paste the signature into the signature window using Ctrl+V The signature window is located about halfway down the Settings page (you will need to scroll down to see it). Carefully select and edit each part of the signature that needs customizing. If you delete a pararaph return accidently, you may lose formatting. Just use Ctrl+Z (Undo) and try again. DO NOT TRY TO MANUALLY STYLE THE SIGNATURE. When complete, scroll to the very bottom and click Save Changes. Every time you create a new message, just start typing and your new signature will appear below it. Setting Up Your Email Signature: Mac Mail ON A MAC (USING MAIL) 1 Create Placeholder Signature In Mail, open Preferences via the menu bar by selecting MailPreferences and click on the Signatures tab. Create a new placeholder signature by clicking on the + icon at the bottom of the middle column and name it whatever you want. Drag your new signature from the midddle column onto your preferred mail box in the left column. Select your preferred mail box in the left column and then select the signature from the Choose Signature dropdown menu at the bottom. Note: At this point you will just see your name and email in the right column. Don’t worry about how it looks yet. Close the window and Quit Mail. It is important that you QUIT. 2 Open the Placeholder Signature Go to the Desktop (Finder). Hold down the Option key and select GoLibrary from the menu bar. You will have to manually navigate the remaining folders to find your signature file: MailV2MailDataSignatures. You will see one or more files with a long string of numbers and the suffix .mailsignature. Open the most recent one you just created in a simple text editor like TextEdit. DO NOT USE WORD. ON A MAC (USING MAIL) 3 Replace Placeholder Signature You will see some metadata info on top and some HTML code below it. Delete all the HTML code (highlighted below) and leave the metadata info untouched. DELETE Underneath the metadata info, copy and paste the new HTML code for your email signature. This code can be located online at: http://www.brainbalancecenters.com/_mail/signature.txt Save this file and Quit TextEdit. NEW CODE ON A MAC (USING MAIL) 4 Edit Signature Restart the Mail program. Navigate to your signature in Preferences as in step #1. Select each field in the right column and type in your personal information. If you delete a pararaph return accidently, you may lose formatting. Just select FileUndo from the menu bar and try again. DO NOT TRY TO MANUALLY STYLE THE SIGNATURE. The logo will show up as a question mark: this is fine. When complete, close the window. Every time you create a new message, just start typing and your new signature will appear below it. Setting Up Your Email Signature: Outlook ON A PC (USING OUTLOOK) 1 Create a Signature In Outlook, create a new message. On the Message tab, click Signature, and then click Signatures. In the popup dialogue box, click the New button to create a new signature, and name it anything you like. 2 Copy Signature Using a browser, got to: http://www.brainbalancecenters.com/_mail/signature.htm Drag your cursor to highlight all the text and copy using Ctrl + C ON A PC (USING OUTLOOK) 3 Paste & Edit Signature Return to Outlook and paste the signature into the signature window using Ctrl+V HIghlight each field and type your own data in its place. If you delete a pararaph return accidently, you may lose formatting. Just use Ctrl+Z (Undo) and try again. DO NOT TRY TO MANUALLY STYLE THE SIGNATURE. When complete, close the window. Every time you create a new message, just start typing and your new signature will appear below it.
© Copyright 2026