
Articulate Assistant⢠User Guide
User guide for Articulate Assistant software. Document No. ARTICASST_1.18 Articulate Assistant™ User Guide Version 1.18 Address: Articulate Instruments Limited Queen Margaret Campus, Queen Margaret University Drive Musselburgh EH21 6UU UK Phone:0131 474 0000 Fax:0131 474 0001 Email:[email protected] Information in this document is subject to change without notice and does not represent a commitment on the part of Articulate Instruments Ltd. The software described in this document is furnished under a license agreement and may be used and copied only in accordance with the terms of the license agreement. It is against the law to copy the software on any other medium except as specifically allowed in the license agreement. No part of this manual may be published, reproduced or transmitted in any form or by any means, electronic or mechanical, including photocopying and recording, for any purpose without the written permission of Articulate Instruments Ltd. Copyright 2003-2008 Articulate Instruments Ltd CHECK www.articulateinstruments.com FOR THE LATEST MANUAL AND SOFTWARE REVISION. 1 User guide for Articulate Assistant software. Document No. ARTICASST_1.18 Copyright 2003-2008 Articulate Instruments Ltd CHECK www.articulateinstruments.com FOR THE LATEST MANUAL AND SOFTWARE REVISION. 2 User guide for Articulate Assistant software. Document No. ARTICASST_1.18 1 System Setup .......................................................................................... 6 Installing Articulate Assistant™ Software.................................................... 6 Enabling the software with the USB key ..................................................... 6 Configuring EPG and Audio settings .......................................................... 6 Communication port setting ..................................................................... 7 Audio ....................................................................................................... 8 Advanced Audio....................................................................................... 9 Using Articulate Assistant™ Software ......................................................... 11 Software Features .................................................................................... 11 Overview................................................................................................... 11 The Basics ................................................................................................ 11 Loading a Client..................................................................................... 11 Creating a List of Prompts ..................................................................... 12 Picture Prompts ..................................................................................... 13 Audio Prompts ....................................................................................... 13 Selecting a Task Window....................................................................... 13 The Record Task Window......................................................................... 14 Setting Prompts. .................................................................................... 14 Making Your First Recording. ................................................................ 14 Redoing Your Recording........................................................................ 15 Making Your Second Recording ............................................................ 15 Selecting and Playing a File................................................................... 15 Grouping Recordings into Sessions....................................................... 15 Deleting Files ......................................................................................... 16 Controlling the Prompt List Display........................................................ 16 Controlling the Prompt List box and font size......................................... 17 Selecting and Zooming into a Region .................................................... 17 Moving the cursor through the recording ............................................... 17 Deleting a Region of a File..................................................................... 17 Automatic Prompt Advance ................................................................... 18 Single Palate Display............................................................................. 18 Palate Colour Scale ............................................................................... 19 Copy to clipboard................................................................................... 20 Variability Scores ................................................................................... 21 Cumulative Checkbox............................................................................ 21 Freezing the Palate Display ................................................................... 21 The File Status Panel ............................................................................ 21 The Data Values Status Panel............................................................... 22 The Analysis Task Window.......................................................................... 22 Waveform Display..................................................................................... 22 Save Selected to file .............................................................................. 22 Spectrogram Display ................................................................................ 23 Annotation................................................................................................. 24 Annotating the Waveform ...................................................................... 25 Annotating Using the Hotlist................................................................... 25 Snap-to-annotation ................................................................................ 27 Adding Keywords and Notes to the Annotation...................................... 27 Searching for Annotations using the Filter ............................................. 27 Selecting Annotated Regions to Play, Analyse or Edit........................... 29 Copyright 2003-2008 Articulate Instruments Ltd CHECK www.articulateinstruments.com FOR THE LATEST MANUAL AND SOFTWARE REVISION. 3 User guide for Articulate Assistant software. Document No. ARTICASST_1.18 Editing and Deleting Annotations........................................................... 29 Changing Start and Stop times .............................................................. 29 Concatenating annotated regions ............................................................. 30 EPG Analysis............................................................................................ 30 The EPG Palates Display ...................................................................... 30 Resizing Displays .................................................................................. 31 EPG Analysis Values............................................................................. 32 Finding Frames of Maximum and Minimum Contact.............................. 33 Closure detection................................................................................... 34 RMS Energy detection........................................................................... 35 Defining your own EPG analysis values ................................................... 36 Selecting Palate Contact Weights to form the Basis for an Analysis Value ............................................................................................................... 37 The mean Front/Back (COG) measure.................................................. 38 Defining your own COG measure .......................................................... 38 The mean Lateral measure.................................................................... 39 The mean Asymmetry measure............................................................. 39 The Standard Deviation (SD) measure.................................................. 39 The Area Measure ................................................................................. 41 The Anteriority Measure ........................................................................ 41 The Posteriority Measure....................................................................... 42 The Centrality Measure ......................................................................... 42 Defining your own RMS energy measure .............................................. 42 Future improvements............................................................................. 43 The EPG Feedback Task Window............................................................ 43 Comparing EPG Patterns ...................................................................... 44 Copying EPG Patterns to Reference Display......................................... 44 Loading Reference EPG Patterns.......................................................... 45 Saving Reference EPG Patterns to Library............................................ 45 Copying the Reference Palate to Word™ .............................................. 46 Comparing the Live Palate to the Reference Palate .............................. 46 Reward Display..................................................................................... 47 The Comparison Feedback Task Window ................................................ 47 Exporting Data .......................................................................................... 48 Specifying the Export File ...................................................................... 48 Specifying which EPG Frames to Export ............................................... 49 Specifying which Data Values to Export ................................................ 51 Saving and Retrieving Your Export Configuration Setup ....................... 54 Viewing Exported Data .......................................................................... 54 Exporting Movies ...................................................................................... 55 Backup...................................................................................................... 56 Copying Displays (Printing)....................................................................... 57 Copying to Word for Windows ............................................................... 57 Specifying Copy Colour ......................................................................... 58 The Copy Task ...................................................................................... 58 Printing Palates...................................................................................... 59 Copying Palates..................................................................................... 60 Designing Task Windows.......................................................................... 61 Entering and Exiting Design Mode......................................................... 61 Saving Design Changes ........................................................................ 62 Copyright 2003-2008 Articulate Instruments Ltd CHECK www.articulateinstruments.com FOR THE LATEST MANUAL AND SOFTWARE REVISION. 4 User guide for Articulate Assistant software. Document No. ARTICASST_1.18 Charts, Panels, Bars and Displays ........................................................ 62 Repositioning a module in a Task Window ............................................ 63 Deleting a Module from a Task Window ................................................ 64 Reordering the Task Bar Buttons........................................................... 64 Creating a New Task Window................................................................ 64 Deleting a Task Window ........................................................................ 64 Shortcut Keys .............................................................................................. 65 Index............................................................................................................ 66 Copyright 2003-2008 Articulate Instruments Ltd CHECK www.articulateinstruments.com FOR THE LATEST MANUAL AND SOFTWARE REVISION. 5 User guide for Articulate Assistant software. 1 Document No. ARTICASST_1.18 System Setup Installing Articulate Assistant™ Software To install the software, place the Setup CD in the CD player of your PC and run ‘Setup.exe’ from your CDROM drive. This will install the Articulate Assistant™ software under the ‘Program Files’ folder in ‘ArticAsst’ folder. The program can be run from the Windows Taskbar Start Menu (‘Start:Programs:ArticAsst:ArticAsst’). Enabling the software with the USB key The USB key should be plugged in AFTER Articulate Assistant™ v1.8 or higher has been installed. Articulate Assistant™ requires a USB key plugged into the usb port of the PC in order for the software to function fully. A USB key is provided for each issued license. During installation the necessary USB hardware device drivers will be installed on the PC. If the USB key is plugged in before Articulate Assistant™ (v1.8 or higher) is installed then windows will detect a new device and ask for the drivers. In this case simply insert the Articulate Assistant™ (v1.8 or higher) CD into the PC’s CDROM drive and direct Windows to locate the drivers on the CD. IMPORTANT: Keep your USB key safe when not in use as lost or stolen keys cannot be re-issued. Configuring EPG and Audio settings Switch on the SPI by operating the switch on its rear panel. Observe the front panel LED marked ‘POWER’ to confirm that the SPI is powered. Observe the similar LED on the front panel of the EPG3 scanner to confirm that the EPG3 scanner is powered. Run ‘Articulate Assistant™’ software. The display should look similar to Figure 1. Copyright 2003-2008 Articulate Instruments Ltd CHECK www.articulateinstruments.com FOR THE LATEST MANUAL AND SOFTWARE REVISION. 6 User guide for Articulate Assistant software. Document No. ARTICASST_1.18 A. Caption bar B. Menu/Task bar C. Prompt display D. Waveform display F. Prompt list G. Button bar Figure 1 Record Task Window The contact area should provide live feedback of contact between the tongue and the EPG palate. If the display does not respond, check that the handgrip is plugged in and being gripped by the client. Try pressing the RESET button on the rear of the SPI. You should hear a beep after 7 seconds and the palate display should go live. If there is still no response it may be that the communication port parameters and need to be changed from the default. Communication port setting Select the menu option ‘Options’ then select the submenu ‘Options:Comms…’. The COM port entry should normally be ‘COM1’. If it reads ‘COM1’, try changing it to ‘COM2’. If it reads ‘No port’ then try ‘COM1’. Figure 2 Com port selection dialogue TIP: If an EPG palate is not available it is possible to check that the system is working by stroking the multiplexer socket with a coin whilst holding the chrome handgrip. If COM1 is unavailable this is most likely due to the presence of other hardware on the PC. If your PC does not have a second serial port (COM2) then you must either: a) uninstall the competing hardware to make the port available b) install WinEPG on another PC with a free serial (COM) port c) contact Articulate Instruments Ltd for advice regarding USB-to-serial adapters. If the PC has no serial port, a Serial-to-USB cable (compliant with USB1.1 or higher) can be used to connect the WinEPG system via the USB port. If a Copyright 2003-2008 Articulate Instruments Ltd CHECK www.articulateinstruments.com FOR THE LATEST MANUAL AND SOFTWARE REVISION. 7 User guide for Articulate Assistant software. Document No. ARTICASST_1.18 Serial-to-USB cable is used, then the comport is likely to need to be set to COM4 or COM5. Test each setting to see on which setting the EPG palate display responds correctly. Audio Next, check the audio signal level. If using line-level input (see WinEPG Manual), then check that the audio meter is responding to the microphone signal. Adjust the control knob marked ‘Microphone’ until the needle on the meter rises above 8 but below 0 while speaking into the microphone. If line input is not available on you computer then the microphone should be connected directly to the PC soundcard microphone input. Now talk into the microphone and the audio display should be similar to the one below. If there is no signal (a flat line in the display) then the audio mixer settings may need to be changed. Figure 3 Wave display showing audio signal at correct level In Articulate Assistant™, select the menu option ‘Options:Audio…’ Then click on the tab marked ‘Recording Control’ or similar (the exact wording may vary between soundcards). If line-in is being used then make sure the ‘line–in’ checkbox marked ‘select’ is checked and the ‘microphone’ checkbox marked ‘select’ is unchecked. If Laryngograph is not being used then the box marked ‘Mono/Stereo’ should also show ‘Mono’. If microphone is plugged directly into the PC soundcard ‘microphone’ input then the microphone should be selected. Copyright 2003-2008 Articulate Instruments Ltd CHECK www.articulateinstruments.com FOR THE LATEST MANUAL AND SOFTWARE REVISION. 8 User guide for Articulate Assistant software. Document No. ARTICASST_1.18 Figure 4 Audio mixer setup for use with direct microphone input to sound card. Note. The appearance of this dialogue is liable to change depending on the sound card that is installed Now adjust the slider control on the ‘microphone’ or ‘line-in’ (as appropriate) until the waveform display responds to speech input to the microphone. Then close the dialogue box by clicking the X at the top right corner. Advanced Audio Figure 5 Muting microphone and line-in playback IT IS RECOMMENDED THAT PLAYBACK CHANNELS THAT MONITOR THE MICROPHONE AND LINE-IN INPUTS ARE MUTED. (See Figure 5) Otherwise feedback between the microphone and speakers can occur during recording. In addition the audible presence of the line-in monitor during recording can result in poor synchronisation. As a precaution, an automatic playback muting function is activated by default. This has the effect of muting ALL playback while the input is live. Playback is restored when a recording is loaded for review. If the microphone and line-in functions have been muted manually, the ‘Automute’ Copyright 2003-2008 Articulate Instruments Ltd CHECK www.articulateinstruments.com FOR THE LATEST MANUAL AND SOFTWARE REVISION. 9 User guide for Articulate Assistant software. Document No. ARTICASST_1.18 function can be disabled. The option to reset the ‘Automute’ is found by clicking on the ‘Show All’ checkbox in the Audio mixer. Figure 6 Audio mixer dialogue showing all controls The default (and recommended) recording settings are 22050Hz, 16 bits and Mono. These settings can be changed to other values within the capabilities of the soundcard installed in the PC. Copyright 2003-2008 Articulate Instruments Ltd CHECK www.articulateinstruments.com FOR THE LATEST MANUAL AND SOFTWARE REVISION. 10 User guide for Articulate Assistant software. Document No. ARTICASST_1.18 Using Articulate Assistant™ Software Software Features − Simple data management. The software automatically manages files, grouping files according to client and session without the need to open, save or name individual files. − Client-based. Individual clients or experimental subjects can be called up and notes taken and stored along with recorded data. − Easy to use. The software comes with an intuitive interface designed to be easy to operate for non-technical users. − Flexible. Advanced users such as researchers can build and store display layouts to suit particular tasks. Such users can also define their own analysis values and set parameters. − Multilevel annotation Data can be labelled with unlimited keywords. These keywords can be used to search and retrieve data throughout all annotated files. − Compatible. All analysis values generated by the program can be exported to a tab delimited text file suitable for importing into most statistical and database packages. − Convenient. Graphics and movies can be copied directly to Powerpoint for easy presentation of data. Overview Articulate Assistant™ is a full-featured articulatory display tool for Windows 95, 98, 2000, NT, XP and Windows 7. Articulate Assistant™ is designed to allow Speech & Language Therapists and Speech Scientists to record and analyse data produced by articulatory instrumentation such as EPG. Articulate Assistant™ is designed to work on 2 levels. − The first level requires no adjustment of parameters or technical knowledge. It is simple to use the onscreen buttons and pre-configured task windows to achieve basic recording, therapy and analysis functions . − The second level allows the user to design their own task windows and manipulate parameters through menu options and dialogue boxes. This allows the advanced user to define their own measurements. The Basics Loading a Client The first thing to do when the program is started up is to check that you have the correct client loaded. The client name or reference number is displayed on the Caption bar (Figure 1A) at the top of the main window. The first time the program is started, the tutorial client ‘Jane Smith’ will be loaded. If a new client is to be recorded or analysed then the ‘File:New Client…’ menu option Copyright 2003-2008 Articulate Instruments Ltd CHECK www.articulateinstruments.com FOR THE LATEST MANUAL AND SOFTWARE REVISION. 11 User guide for Articulate Assistant software. Document No. ARTICASST_1.18 should be selected and the ‘Client Dialogue Box’ should be filled in, in a similar manner to the tutorial client shown in Figure 7. Figure 7 Client Dialogue Box Client details need only be entered once. Thereafter, the client can be reloaded using the ‘File:Open Client’ menu option. Notes may be added at any future time by using the ‘Edit:Client…’ menu option. For convenience, the client data that is being worked on when the program is closed, is automatically loaded when the program is next started up. NB. All the client details and data files created in ‘Articulate Assistant™’ are automatically saved. The ‘File:Save Client As…’ menu option provides an easy way to save a copy of the entire client data record to a backup device. Creating a List of Prompts The list of prompts can be changed with the ‘Edit:Prompt List…’ menu option which calls up the ‘Prompt List Editor’ (Figure 8). To create a new list of text prompts, select the ‘File:New…’ menu option in the Prompt List Editor as shown in Figure 8. Then type your prompts, one per line, into the large blank window. To save your prompt list. There is a limitation on the character set that you can use in the prompt list. Essentially, because the prompt is also used as the filename, Windows gets confused if you use the following characters and so they should not be used: * Asterisk < >[ ] Brackets | Pipe = Equal sign + Plus sign ? Question mark " Quotes \/ Slashes , . : ; Comma, Period, Colon, Semicolon Copyright 2003-2008 Articulate Instruments Ltd CHECK www.articulateinstruments.com FOR THE LATEST MANUAL AND SOFTWARE REVISION. 12 User guide for Articulate Assistant software. Document No. ARTICASST_1.18 Figure 8 Prompt List Editor TIP: If you already have a list of prompts in a text file. Simply copy the list to the clipboard using <Ctrl c> in your text editor and paste into the Prompt List Editor using <Ctrl v> Picture Prompts An image can be associated with each prompt. First create the image using your favourite program (e.g. Paint, Boardmaker, Adobe Photoshop etc.). This can be a drawing or a photograph. Copy the image to the clipboard from within that program. Then, from the Prompt List Editor menu, select ‘Image:Paste’. Audio Prompts A prerecorded utterance or sound can be associated with each prompt. First record the audio prompt using your favourite program (e.g. Windows recorder, Cool Edit, Articulate Assistant etc.). Remember which folder you saved it in. You can use any windows (wav) file as an audio prompt. Then, from the Prompt List Editor menu, select ‘Audio:Add’ and select the appropriate wav file. You can play the file to check that it is the one you intended by clicking the Play button. Selecting a Task Window Within Articulate Assistant™ there are windows configured to help the user perform certain tasks like Recording or Analysing or providing EPG Feedback for therapy. A Task Window is selected by clicking on the Task Bar. Copyright 2003-2008 Articulate Instruments Ltd CHECK www.articulateinstruments.com FOR THE LATEST MANUAL AND SOFTWARE REVISION. 13 User guide for Articulate Assistant software. Document No. ARTICASST_1.18 The Record Task Window The recording Task window is shown in Figure 1. It is designed principally for the purpose of recording sets of utterances. The display provides the prompts for the speaker and provides checks on the quality of the recorded data. Setting Prompts. By default the prompt will show the prompt text, any image associated with the prompt, turn the text background green and play an audio prompt. The audio prompt will be played when the record button is pressed. (Once the audio prompt has finished playing, the recording process will progress as normal). To hide the text or the image or to prevent audio prompts from playing, right click on the Prompt display and uncheck the appropriate popup menu option. Making Your First Recording. The first recording in a session is achieved in the following way: 1. Select the prompt to be recorded by clicking on the prompt in the prompt list (Figure 9C) so that the selected prompt is highlighted. 2. Check that the waveform display is live (i.e. responds to the microphone). 3. Press the Record button . 4. Once pressed, the legend on the button changes to Stop allowing the user to stop the recording by pressing the same button. TIP: If the Stop button is not pressed then the recording will automatically stop after 6 seconds. This default can be changed using the ‘Options:Display: Utterances:Maximum Duration’ menu option. After recording has stopped, the software checks to see if the recording is too loud (clipped) or too quiet. And gives a warning. The recording has already been saved. The waveform and EPG files are displayed and can be visually checked and played back if necessary to confirm that the recording is OK. Copyright 2003-2008 Articulate Instruments Ltd CHECK www.articulateinstruments.com FOR THE LATEST MANUAL AND SOFTWARE REVISION. 14 User guide for Articulate Assistant software. Document No. ARTICASST_1.18 Redoing Your Recording If a recording is unsatisfactory because it is too loud, too quiet or the client said the wrong thing, then it is easy to re-record using the Redo button . The Redo button is available for up to 1 minute after a recording has been made in order to provide a simple means to overwrite the last recording that was made. If a recording needs to be replaced after that time then it must be selected, deleted and recorded again. Making Your Second Recording If you wish to record a second repetition of the same phrase, simply press the record button again. If you wish to record the next prompt in the list, press the Go Forward button . Then press the record button . Alternatively: You can select any prompt for recording by simply clicking on the text in the prompt list (Fig. 12C). Selecting and Playing a File A recorded file is represented by a crossed box in the ‘Prompt List’ display (Figure 9A). Empty boxes (Figure 9B) are simply place markers showing than no data was recorded for a particular session or prompt. To play a file that has been recorded by the current client, simply select a file by clicking on a crossed box opposite a prompt. The crossed box will turn white. The file will be displayed in the wave trace display, the EPG palates display and other data displays. Then click on the Play button to hear the whole file. Alternatively: Press the <F2> key on your keyboard to play. TIP: You can also play the file back at half speed or more slowly by clicking the right mouse button on the waveform display and choosing the Play Slowly x 2 option from the popup menu. Or you can use <F6> x2, <F7> x4, <F8> x8 Grouping Recordings into Sessions The date and time of a recording is automatically stored. All recordings made in one day are grouped and separated by a blue session separator line (Figure 9D) . If you hover the cursor over a box in the ‘Prompt List’ display the date and time of the recording are revealed as a ‘Hint’ next to the cursor. The date and time of a recorded file are also displayed in the status panel (Figure 9H) if a file is selected. Copyright 2003-2008 Articulate Instruments Ltd CHECK www.articulateinstruments.com FOR THE LATEST MANUAL AND SOFTWARE REVISION. 15 User guide for Articulate Assistant software. Document No. ARTICASST_1.18 The session number and repetition number (within each session) are shown at the bottom of the ‘Prompt List’ display. Session 3 Rep 2 circled above. Deleting Files Files may be deleted by using a right mouse click in the Prompt List display to invoke the popup menu . There are three options for deleting files. Either: − Delete File. Delete the selected file. − Delete All Files on <date>. Deletes all files recorded in one session. Note. This will delete files that are not visible too. See next section. − Delete all Files for <prompt>. Deletes all recordings of the selected prompt. Controlling the Prompt List Display The popup menu described in the previous section can be used to determine the files which are visible in the ‘Prompt List’ display. − Show Prompt list. When engaged in the task of recording files it is advantageous to show only the prompts which you mean to record i.e. the prompts in the currently loaded prompt list. − Show Recordings. When performing analysis it is only necessary to see files which have been recorded. − Show Both. The default is to show both. The default number of recordings (columns of boxes) is 20. This can be increased by using the ‘Options:Display’ menu and clicking on the tab marked Utterances . The ‘Maximum Attempts’ can be edited to increase it above 20. There is also the option to have the PC make a noise to mark the start and end of a recording. The drop down edit box shows all wav files in the folder containing ArticAsst.exe. Delete the contents of the drop down edit box if no sound is desired. This sound differs from the audio prompt in that it is the same for all recordings and is played the instant that recording goes live. Short sounds Copyright 2003-2008 Articulate Instruments Ltd CHECK www.articulateinstruments.com FOR THE LATEST MANUAL AND SOFTWARE REVISION. 16 User guide for Articulate Assistant software. Document No. ARTICASST_1.18 should be used under normal circumstances such as the BEEP and BOOP samples that come with the installation. With a larger number of ‘Attempts’ selected it may be necessary to use the scrollbar at the bottom of the ‘Prompt List’ display to bring the session of interest into view. Controlling the Prompt List box and font size It is possible to increase the size of the boxes in the prompt list by selecting the ‘Font…’ option from the popup menu and increase the font size. The ‘Checked Colour…’ popup menu option allows the colour of the checked boxes in the Prompts list to be changed to suit. Selecting and Zooming into a Region To select a region, click the left mouse button and drag on the waveform display. Alternatively: You can use the <shift> key, click the left mouse button and drag to select in any window (except the spectrogram window). To Zoom In to the region, click on the centre of the icon . To Zoom out to see the whole file, click on the centre of the icon . Click the appropriate side of the icon to move backwards ( )or forwards ( )through the waveform when zoomed in. Tip: Once a region is selected it is possible to adjust the left or right extent by using the <Ctrl> key while clicking the left mouse button and dragging. Moving the cursor through the recording The cursor can be moved by clicking the left mouse button and dragging in any window (except the waveform window). To move the cursor one waveform sample at a time, left click on the Waveform window and use the left and right cursor keys on the keyboard. To move the cursor one EPG sample at a time, left click on the EPG palates display and use the left and right cursor keys on the keyboard. Deleting a Region of a File To delete a region of the file: 1. Select the region to be deleted. (This might typically be some extra speech accidentally recorded at the beginning or the end of the file.) Copyright 2003-2008 Articulate Instruments Ltd CHECK www.articulateinstruments.com FOR THE LATEST MANUAL AND SOFTWARE REVISION. 17 User guide for Articulate Assistant software. Document No. ARTICASST_1.18 2. Click on the right mouse button in the Waveform window to bring up the popup menu option. and click on the ‘Delete Selected’ Automatic Prompt Advance For convenience, it is possible to make the prompt advance automatically to the next one in the list by checking the Auto Advance checkbox (Figure 9J). When Auto Advance is checked, the Go Forward button is replaced by a Go Back button . Using the Go Back button it is possible to move back to the last recorded file. Note: If you wish to redo a recording when Auto Advance is checked, you must press the Go Back button then the Redo button A. Crossed checkbox B. Empty checkbox C. Selected prompt prompt D. Blue session separator line E. Session scrollbar F. Play Button G. Record/Stop Button L. Data values status panel H. File status panel I. Go Back/Forward J. Auto Advance K. Redo Button Figure 9 Recording Listbox, Buttons and Status bar Single Palate Display The ‘Palate Display’ shows an average contact pattern for the currently selected region of the file. Or, it shows the current palate frame if no region has been selected. TIP: To quickly scan through an EPG recording, click the button and watch the ‘Single Palate Display’. Alternatively, click and drag the mouse along the ‘Palates Display’ (Figure 22). Copyright 2003-2008 Articulate Instruments Ltd CHECK www.articulateinstruments.com FOR THE LATEST MANUAL AND SOFTWARE REVISION. 18 User guide for Articulate Assistant software. Document No. ARTICASST_1.18 A. Colour key showing range from no contact (0%) to constant contact (100%) D. Variability scores. C. Cumulative checkbox. B. Palate frame number(s) (46 to 97 in this example) or Figure 10 Palate Displays Palate frames are numbered in sequence from the start of each file. The frame number (or numbers, if a region is selected) is displayed below the palate display (Figure 10B). Palate Colour Scale The colour key to the right of the single palate display maps the display colours to a scale which shows the percentage of selected frames for which each contact is on. For example, in Figure 10, the bottom right-hand contact is dark in colour. By reference to the colour key this indicates that this contact is on in all the frames in the selected region (frames 46 to 97). The colours of the palate can be changed using the ‘Options:Colors:Palate…’ menu option to bring up the dialogue box shown in Figure 11. A. Colour selector. Figure 11 Palate Colours Dialogue Click on the colour selectors to get a colour selection dialogue. The ‘Main Palate’ ‘Touching’ and ‘Not Touching’ selectors identify the ON and OFF colours for the live EPG input. The ‘Comparison’ ‘Touching’ and ‘Not Touching’ selectors control the colours in comparison to a reference palate (see section in this manual on Comparison Feedback). For normal EPG display with no superimposed reference template: Copyright 2003-2008 Articulate Instruments Ltd CHECK www.articulateinstruments.com FOR THE LATEST MANUAL AND SOFTWARE REVISION. 19 User guide for Articulate Assistant software. Document No. ARTICASST_1.18 Main Palate, Touching – EPG contact ON Main Palate, Not Touching – EPG contact OFF Comparison, Touching – Not used Comparison, Not Touching – Not used For comparison EPG display with superimposed reference template: Main Palate, Touching – EPG contact ON (and not matching a superimposed reference pattern) Main Palate, Not Touching – EPG contact OFF (and is also OFF in the superimposed reference pattern) Comparison, Touching – EPG contact ON and matching a superimposed reference pattern Comparison, Not Touching – EPG contact OFF (but is ON in the superimposed reference pattern) The shading scale can be substituted by other visual representations for the percentage contact. • Bars A bar fills each contact square. The percentage of the contact square filled represents the percentage of contact. • Shade Default representation. • Nums Represents as a numerical percentage. Copy to clipboard This is a quick option (see also Copy Palates) to copy a single palate pattern to a document in Word or similar. It differs in that the pattern is printed in the selected colours. Copy to clipboard is also available from the reference palate display which allows patterns to be created by hand and then printed. This is useful for generating templates for clients to take home with them. Right click on the palate display and select “Copy to clipboard…”. Then click on “Paste” or use <ctrl>V to paste into Word. Copyright 2003-2008 Articulate Instruments Ltd CHECK www.articulateinstruments.com FOR THE LATEST MANUAL AND SOFTWARE REVISION. 20 User guide for Articulate Assistant software. Document No. ARTICASST_1.18 Variability Scores The Variability Index provides a value for the stability/variability of articulatory gestures. To calculate the index, the percent frequency of activation of each contact across frames is measured. For each contact, 100% and 0% activation frequency represent invariance and are assigned a variance index of 0. The variability index increases as contact frequency approaches 50%, which is assigned a maximum index of 50. The overall variability index is calculated in two forms 1. by summing the index values for all contacts with more than 0% contact and dividing by that number of contacts. 2. by summing the index values for all contacts and dividing by 62. These two indices are shown in this order below the Single palate Display (Figure 10D). An index value of 0 represents invariance, the higher the variability index the more unstable the EPG patterns (maximum index value is 50). Cumulative Checkbox , then If the ‘Cumulative’ checkbox in the ‘Palate Display’ is set when a contact comes on it will stay on until the checkbox is unchecked. TIP: Checking the ‘Cumulative’ checkbox is a good way to check whether all the contacts on a users palate are still working OK Freezing the Palate Display It is possible to freeze the Single Palate Display so that the palate pattern does not change with live input or with the movement of cursors in a recorded file. Simply click anywhere on the Single Palate Display to freeze it and do the same again to unfreeze it. A label saying “UnFreeze” will appear to indicate that the display is frozen. The File Status Panel The file status panel (Figure 9H) shows the sample rate (default = 22050Hz) number of channels (default = 1 for mono recording) and the number of bits per sample (default:16). When a recorded file is selected, the file status panel displays also shows the prompt text with the date and time that the file was recorded and the full path of the wav file. Copyright 2003-2008 Articulate Instruments Ltd CHECK www.articulateinstruments.com FOR THE LATEST MANUAL AND SOFTWARE REVISION. 21 User guide for Articulate Assistant software. Document No. ARTICASST_1.18 The Data Values Status Panel The data values status panel (Figure 9L) shows the data values relevant to each window as the cursor is moved over it. When the cursor is over the Waveform or Palates displays it shows the time in seconds from the start of the file, the duration of the selected region and the palate number (or range of palate numbers when a region is selected). Over the Analysis Values display the time in seconds from the start of the file and the values of all the EPG parameters are shown. Over the spectrogram window the time and frequency are shown. The Analysis Task Window The Analysis Task window is shown in Figure 15 It is designed principally for the purpose of analysing and annotating sets of utterances. The display provides the waveform and spectrogram displays and provides means for annotating the data. Analysis values derived from the EPG data are also displayed. Waveform Display The use of this display in selecting regions and playing back was covered in the previous section. Additional features useful for analysis are the ability to superimpose tickmarks on the display. This can be selected using the right click popup menu in this display window. The tickmark resolution depends on the amount of zoom and is always marked in seconds. Figure 12 Waveform Display with popup menu options Save Selected to file It is possible to Save selected regions of a recording to a file. To do this, right click on the waveform display and select ‘Save Selected to file…’ to bring up the Save selected Dialogue box (Figure 13). Then choose whether to save the audio data (Save Wav file), the EPG data (Save EPG file) or both. There is a further option to preserve the alignment of the audio with the EPG. If this option is chosen the audio data will include a few extra samples at the start so that the time of the first audio sample aligns with the start of the first EPG frame. If this option is not selected then the audio file will consist of samples exactly as selected. Copyright 2003-2008 Articulate Instruments Ltd CHECK www.articulateinstruments.com FOR THE LATEST MANUAL AND SOFTWARE REVISION. 22 User guide for Articulate Assistant software. Document No. ARTICASST_1.18 Figure 13 Save Selected to file Dialogue box Spectrogram Display The spectrogram is based on a Hanning windowed FFT with 0.97 preemphasis. The resolution of this display can be changed using the ‘Options:Display:Spectrogram’ menu option. A value of 6 or 7 bits corresponds to a ‘Wideband spectrum’ which emphasises the formant structure of the speech. A value of 8 or 9 corresponds to a ‘Narrowband spectrum’ which emphasises the harmonic (pitch) structure of the speech. The spectrogram colours can be changed to suit using the right click popup menu to call up the spectrogram colours dialogue. Figure 14 Spectrogram Colours Dialogue The default colour scale is defined by only 2 colours, however it is possible to create more exiting spectrograms using a range of colours. The ‘Number’ box allows up to 6 colours to be chosen. The range of spectral power over which these colours are applied is determined by adjusting the cursors on the colour bar. Copyright 2003-2008 Articulate Instruments Ltd CHECK www.articulateinstruments.com FOR THE LATEST MANUAL AND SOFTWARE REVISION. 23 User guide for Articulate Assistant software. Document No. ARTICASST_1.18 Upper spectrogram colour Lower spectrogram colour The spectrogram disply can be manually refreshed by using the right click popup menu option, ‘Refresh’. Annotation The Analysis Task Window is shown in Figure 15. It is designed, principally, to allow the audio and EPG data to be annotated. Annotation can be made on the basis of the audio data by observing the waveform, the spectrogram or by playback. Annotation can also be made on the basis of EPG by observing the EPG palate sequence (Figure 15D) or the analysis values (Figure 15E) derived from the EPG such as total contacts or Centre of Gravity. Automatic annotation is also possible by selecting maximum or minimum points in a given analysis value trace (e.g. Find all the regions in a sentence where there are more than 4 contacts on in the posterior palate row). A. Menu and Task Bar B. Waveform and Label display C. Spectrogram display D. Palate sequence display E. Analysis values display F. Prompt List G. Button bar H. Status bar I. Annotation display J. Spectrogram colour scale bar K. Analysis value key L. Single Palate display Figure 15 Analysis Task Window Copyright 2003-2008 Articulate Instruments Ltd CHECK www.articulateinstruments.com FOR THE LATEST MANUAL AND SOFTWARE REVISION. 24 User guide for Articulate Assistant software. Document No. ARTICASST_1.18 Annotating the Waveform To annotate the waveform, place the cursor at the point you wish to in the Annotation editor (Figure annotate. Then press the Add button 18). An annotation marker will appear below the waveform and the Annotation Editor will show the default text . Replace this text with your own label, which should not have any blank characters in it. An underscore can be used to separate words. It is also possible to select a region of the waveform and annotate it. Annotating Using the Hotlist The annotation Hotlist is a quicker way to annotate if you have a set of labels and associated keywords that you will use many times. For example, you may wish to annotate word-initial and word-final velar and alveolar stop closures for 10 repetitions of 6 sentences for 3 subjects repeated in 2 sessions. To add an annotation using the hotlist, right click on the waveform display and select the “Add Annotation” option. A drop down ist of annotations then appears and by clicking on one of the entries the chosen annotation is automatically added for the selected region. Copyright 2003-2008 Articulate Instruments Ltd CHECK www.articulateinstruments.com FOR THE LATEST MANUAL AND SOFTWARE REVISION. 25 User guide for Articulate Assistant software. Document No. ARTICASST_1.18 Figure 16 Adding an annotation from the dropdown hotlist The hotlist can be tailored for each annotation task. To create and edit an annotation hotlist click on the button in the Annotation module. Then type out your list of annotations. You may wish to type them out in a word processor and then copy and paste into the hotlist editor. Figure 17 Editing the hotlist Copyright 2003-2008 Articulate Instruments Ltd CHECK www.articulateinstruments.com FOR THE LATEST MANUAL AND SOFTWARE REVISION. 26 User guide for Articulate Assistant software. Document No. ARTICASST_1.18 Snap-to-annotation The snap-to-annotation function allows selected regions to snap to nearby annotation boundaries. If you click near (within 4 pixels of) an annotation boundary the selected region boundary will jump to meet it. This is useful for ensuring neighbouring phonetic segments are contiguous.This feature can be switched off by right clicking on the waveform display and unchecking the Snap to Annotation option in the popup menu. Adding Keywords and Notes to the Annotation An annotation keyword is any text separated by a space character on the first line of annotation and can be used as the basis for searching through all annotated files. The first annotation keyword is also the label, which appears under the waveform as described in the previous section. You can add as many keywords as you like. Any text typed on the second and following lines in the lefthand panel of the Annotation Editor are regarded as annotation notes. Annotation notes are stored and can be recalled but they are not searchable. Figure 18 Annotation Editor Searching for Annotations using the Filter The Annotation Editor will, by default, display every annotation for the current recording. However, it is possible to control which annotations are displayed by using the Annotation Filter (Figure 19). Filter Source The files to be searched can be filtered according to: − This recording. Shows only annotations within the current file. − This prompt. Shows annotations for all repetitions and across all sessions for the current prompt. − This client. Shows annotations for all files recorded by current client. − All clients. Shows all files recorded by all clients. Copyright 2003-2008 Articulate Instruments Ltd CHECK www.articulateinstruments.com FOR THE LATEST MANUAL AND SOFTWARE REVISION. 27 User guide for Articulate Assistant software. Document No. ARTICASST_1.18 If ‘This client’ or ‘All clients’ are chosen then the search can be narrowed by would narrow specifying the prompt or part of the prompt. E.g. the search in the example set of prompts in Figure 11. to ‘a soup the chalk the dolls the sugar’, ‘a shoe a soup houses a saw’ and ‘a soup a slide a train a zoo’ while the sugar’ uniquely. is enough to specify ‘a soup the chalk the dolls Figure 19 Annotation Filter. The example shown defines a search through all files for the current client which have the word ‘soup’ in the prompt and find all the annotations with labels or keywords containing ‘s’ and the keyword ‘fricative’ in the first line of the annotation BUT not with labels/keywords containing ‘sh’, or ‘dh’ Filter Annotations The second level of filtering refines the search according to the keywords in the first line of the annotation. The options are: − Show all. No filter is applied to the files selected in ‘Filter Source’. − Filter. Filters the files to display in the ‘Annotation Editor’ only the annotations associated with the keywords typed in the first ‘Include Text’ box but not if they also contain keywords typed in the second ‘ExcludeText’ box. Note that to show all annotations but excluding selected keywords you can leave the “Include Text” box blank. If is selected then all the specified keywords must be present in the first line of the annotation for that annotation to be displayed. If is selected then only one of the specified keywords needs to be present in the first line of the annotation for that annotation to be displayed. The result of the filter settings in Figure 19 on the tutorial client ‘Jane Smith’ is shown in Figure 20. Copyright 2003-2008 Articulate Instruments Ltd CHECK www.articulateinstruments.com FOR THE LATEST MANUAL AND SOFTWARE REVISION. 28 User guide for Articulate Assistant software. Document No. ARTICASST_1.18 Selecting Annotated Regions to Play, Analyse or Edit There are two ways to select an existing annotated region. or 1. Click on the annotation marker on the waveform display ( ). If there are several markers close together then you will be given a choice. 2. Click on the annotation listed in the ‘Annotation Editor’ (as in Figure 20). This has the added advantage that it will automatically load the correct file. Figure 20 Result of filter settings shown in Figure 19 for the tutorial client Editing and Deleting Annotations Select the annotation by one of the methods shown in the previous section. The annotation details appear in the left hand window of the Annotation Editor. These may be edited. The selected annotation can be deleted by clicking on the button marked ‘Delete’ in the Annotation Editor. All the filtered annotation (i.e all annotations collected in the right hand window of the Annotation editor can be deleted in one go. To do this, right mouse click on the Annotation editor and select ‘Delete Filtered Annotations’. Alternatively, select ‘Edit|Annotations|Delete Filtered Annotations…’ from the application menu. Note, as a safeguard, confirmation is required after this option is selected, however, once deleted, annotations cannot be restored. Changing Start and Stop times Select the annotation by one of the methods shown in the previous section. The annotation start and stop times appear at the top of the display. These times can be edited. Start and stop times can also be adjusted by clicking near the end of the selected annotation on the Wave display, holding the <Ctrl> key down and dragging the cursor. Figure 21 Hold <Ctrl> key and click (and drag) near selected annotation boundary to adjust boundary Copyright 2003-2008 Articulate Instruments Ltd CHECK www.articulateinstruments.com FOR THE LATEST MANUAL AND SOFTWARE REVISION. 29 User guide for Articulate Assistant software. Document No. ARTICASST_1.18 TIP: Keep the Snap-to-annotation feature on when adjusting annotation boundaries to make it easy to align sequential annotations. Concatenating annotated regions All the currently filtered annotations can be concatenated together and stored temporarily by pressing the button. The button changes to a button that conveniently takes you back to where you were before the concatenation. The data is stored in a client folder called “catenated, files” and overwritten every time a new concatenation is performed. This facility assumes that all the wav files are in the same format. If a wav file containing a filtered annotation does not match the format then a warning dialogue will be shown and the annotation will be excluded from the concatenation. NB. You must select an entry from the right-hand Annotation Editor window. All subsequent wav files will be checked to see if they match the format of this selected entry. Concatenation can be used to calculate values calculated by selecting a region. For example the variability of all maximum contact EPG frames in target consonants can be calculated by concatenating all such annotated frames then selecting the whole concatenated file. The variability score will be displayed under the palate display window as described on page Error! Bookmark not defined. of this manual. By applying the max threshold detection to this same selection the overall maximum contact pattern could be found easily. It is sometimes the case that the concatenated audio data does not display in the Spectrogram window. This may be because there is not a sufficient dynamic range in the audio signal. An annotated segment of background silence included in the current filter setting may resolve this. This will be improved in the next version of this software. EPG Analysis The EPG Palates Display The ‘EPG Palates’ display has tickmarks running along the top of the display (Figure 22A). Each tickmark corresponds to an EPG palate but there is only room to display a few of the palates. The long tickmark (Figure 22C) that is connected to each displayed palate, indicates the moment in time that the palate was recorded. To see a sequence of EPG palates it is necessary to zoom in or resize the EPG palates display. See the following section on resizing displays. Reducing the height of the EPG Palates display will increase the number of displayed palates. Note that if there are tick marks Copyright 2003-2008 Articulate Instruments Ltd CHECK www.articulateinstruments.com FOR THE LATEST MANUAL AND SOFTWARE REVISION. 30 User guide for Articulate Assistant software. Document No. ARTICASST_1.18 between the palates that are displayed. Then zooming in or resizing the display will reveal them. B. Resize cursor A. Tickmarks C. Long Tickmark Figure 22 EPG Palates Display If zooming in or reducing the size of the EPG Palates display is undesirable, there is another way to view all the palates. Using the right mouse button, click in the EPG Palates window to reveal the popup window . Then click on the ‘Multiple Rows’ option. The ‘Multiple’ EPG palates display (Figure 23) will then create as many rows as necessary to show all the palates. Tickmark indicates missing palate ‘Multiple Rows’ reveals the missing palate aligned with the tickmark above Figure 23 EPG Palates Display (Multiple Rows) Resizing Displays As with any Windows program, task windows and dialogues within Articulate Assistant™ may be resized by moving the cursor over the edge of the window and clicking and dragging with the left mouse button. Articulate Assistant™ also allows most displays within a task window to be resized. That is to say that some parts of a task window may be made larger at the expense of others. This is mostly a matter of personal preference but you may wish to resize in order to: − Make the contents of the Prompt display more visible Figure 24. − To show more palates (See previous section) − To format a window in preparation for printing. Click and drag boundary downwards to enlarge. Copyright 2003-2008 Articulate Instruments Ltd CHECK www.articulateinstruments.com FOR THE LATEST MANUAL AND SOFTWARE REVISION. 31 User guide for Articulate Assistant software. Document No. ARTICASST_1.18 Figure 24 Resizing the Prompt display To resize any display: 1. Move the cursor over the boundary to the left, right, top or bottom of the display you wish to resize until it changes to look or this . like this 2. Click and drag with the left mouse button in the direction of the arrows EPG Analysis Values It is very useful to be able to observe how contact patterns change with time by observing the whole palate but for objective analysis it is useful to be able to extract a single value which represents the feature of change that is of interest. Common values used to analyse EPG dynamics are: 1. Palate Contact Totals over − The Whole Palate (All contacts) − The Alveolar region (First two rows) − The Palatal Region (Rows 3-5) − The Velar Region (Rows 6-8) 2. A Centre of Gravity Measure (CoG) which indicates whether the contact is at the front of the palate or at the back. See the following section for an explanation of how these values are calculated. These values can all be displayed in the ‘EPG Analysis Values’ display (Figure 25). Figure 25 The EPG Analysis Values Display It is possible to select which values to display by clicking the right mouse button in the ‘EPG Analysis Values’ display and clicking the corresponding Copyright 2003-2008 Articulate Instruments Ltd CHECK www.articulateinstruments.com FOR THE LATEST MANUAL AND SOFTWARE REVISION. 32 User guide for Articulate Assistant software. Document No. ARTICASST_1.18 value in the popup menu. Tickmarks can also be toggled on or off using this menu. Click here to display the Alveolar Total Tick indicates the values that are currently displayed Click here to hide the CoG Total Figure 26 EPG Analysis Values Popup Menu Finding Frames of Maximum and Minimum Contact It is possible to find maxima or minima of any EPG Analysis Value using the ‘Threshold…’ option in the Popup menu in Figure 26. The ‘Threshold Dialogue’ box shown in Figure 27 allows the user to either: 1. Automatically annotate all regions falling within the chosen threshold values for the chosen EPG value in the across the whole file. 2. Automatically annotate all regions falling within the chosen threshold values for the chosen EPG value and within the selected region. 3. Automatically annotate maximum or minimum points falling within the chosen threshold values for the chosen EPG value 4. Automatically annotate maximum or minimum points falling within the selected region of the file. 5. Automatically annotate maximum or minimum points falling within the whole utterance Or 6. Simply highlight the first instance of any of the above rather than annotating. Copyright 2003-2008 Articulate Instruments Ltd CHECK www.articulateinstruments.com FOR THE LATEST MANUAL AND SOFTWARE REVISION. 33 User guide for Articulate Assistant software. Document No. ARTICASST_1.18 Figure 27 The Threshold Dialogue Box The ‘Legend’ box provides a means for labelling each annotation. If there is more than one annotation generated by this dialogue then a numeric index is automatically added to the end of the legend to distinguish them. The region(s) button closes the dialogue box and finds the first region defined by the threshold value (or annotates all the regions defined by the threshold if this action is selected. The max and min, Midpoint, 1/3 point, 2/3 point buttons find the first frame of maximum value or minimum value respectively (or annotate a frame in each region defined by threshold if this action is selected). If the “Region is within threshold” option is selected then once the threshold dialogue is closed by selecting OK, the buttons on the Analysis Values display will find the next or previous point in the recording where the threshold conditions are met. Closure detection A new analysis value has been developed which measures the connectivity between the right and left sides of the palate. It is more sophisticated than Copyright 2003-2008 Articulate Instruments Ltd CHECK www.articulateinstruments.com FOR THE LATEST MANUAL AND SOFTWARE REVISION. 34 User guide for Articulate Assistant software. Document No. ARTICASST_1.18 simply counting the number of contacts in each row. It considers the amount of contact and also considers closures consisting of contacts on more than one row. To detect stop closures using the closure value, set the threshold in the range 80% -100% It will be necessary to lower the threshold for velar stops that don’t have complete closure If the Velar Closure analysis value is used then only closures in the last 3 rows will be considered. Likewise, if the Alveolar closure analysis value is used then only closures in the first three rows will be considered. To detect sibilants using the closure value, set the threshold in the range 40% -80% Figure 28 Alveolar and Velar closure measures for the sequence /t/ /k/ /t/ /k/ ... RMS Energy detection An RMS Energy measure evaluates the Root Mean Square (RMS) Energy of the Waveform over a specified frequency band. It is possible to specify your own RMS values for different frequency ranges. See following section for more details on how to do this. Copyright 2003-2008 Articulate Instruments Ltd CHECK www.articulateinstruments.com FOR THE LATEST MANUAL AND SOFTWARE REVISION. 35 User guide for Articulate Assistant software. Document No. ARTICASST_1.18 Figure 29 RMS energy analysis value Defining your own EPG analysis values The EPG analysis values such as ‘Alveolar Total’ and ‘COG’ can be created and modified easily within the program. To create a new EPG analysis value, first select Options:Analysis Values… from the menu to bring up the Analysis Values dialogue box (Figure 30). Figure 30 Analysis Values Dialogue Defining your own Velar Total Let’s create a new analysis value called ‘My Velar Total’ based on the posterior 2 rows rather than the 3 rows defined in the default ‘Velar Total’ value. To do this: 1. Open the analysis values dialogue box, click and type the chart name e.g. “My Velar Total” Copyright 2003-2008 Articulate Instruments Ltd CHECK www.articulateinstruments.com FOR THE LATEST MANUAL AND SOFTWARE REVISION. The 36 User guide for Articulate Assistant software. Document No. ARTICASST_1.18 Tab at the top of the dialogue box will now be labelled ‘My Velar Total’ . 2. Open the weights dialogue, click add and type the weights pattern name e.g. “Back 2 rows” The Weights value should now show ‘Back 2 rows ’ 3. Set the weights values so that the posterior 2 rows are ON (100%) and the remaining rows are OFF(0%) then close the Weights dialogue. 4. Ignore axis setting 5. Set Graph to AreaW 6. Close analysis values dialogue See following sections for a fuller explanation of each of these stages. Now, if you Right Click on the Analysis Values Display in the Analysis Task Window the value ‘My Velar Total’ will appear as an option. Click on it to make it appear in the Display. Selecting Palate Contact Weights to form the Basis for an Analysis Value button in the Analysis Values Dialogue box to get the Click on the Weights dialogue. Figure 31 The Weights dialogue For most analyses, weights are set to be either ON or OFF and are used to define the area of the palate that you wish to analyse. So for example, the default Alveolar Total display is based on the weights selection shown in Figure 31 where the contact weights are ON (100%) for the anterior 2 rows and OFF (0%) for the posterior 6 rows. There are four ways to change the value of a single contact weight. 1. Clicking on a contact toggles the weight ON or OFF Copyright 2003-2008 Articulate Instruments Ltd CHECK www.articulateinstruments.com FOR THE LATEST MANUAL AND SOFTWARE REVISION. 37 User guide for Articulate Assistant software. Document No. ARTICASST_1.18 2. Right clicking on a contact gives the options of 0%, 25%, 50%, 75% or 100% 3. Clicking on a contact and typing an integer value between 0 and 100 in the text edit box, to the right of the palate, sets the weight to the corresponding % 4. Clicking and dragging on a contact slides the weight value up and down It is also possible to change several contact weights to the same value at the same time. To do this: Press the <shift> key while clicking and dragging across a range of contacts then type in the value you want these contacts to be in the text edit box to the right of the palate. The mean Front/Back (COG) measure The mean (aka. Centre of Gravity, COG or centroid) calculation for front/back axis is as follows 8 ∑ (m − 0.5) R m 1− m =1 8 8∑ Rm 8 where Rm = ∑ c m, nWm,n n =1 m =1 = weighted sum of contacts in Row m c m ,n = contact value in mth row and nth column {0,1} Wm ,n = weight value in mth row and nth column {0..1} Weight values are specified in % {0..100%} but are applied to the formula as fraction in the range 0..1 in steps of 0.01. Normally, weight values are specified as 0 or 1 (i.e. 0 or 100%) Assuming the weights are set to 100% for all contacts, this formulation results in a maximum COG value of 0.9375 if only 1st (anterior) row contacts are on and a minimum COG value of 0.0625 if only the 8th (posterior) row. Defining your own COG measure You may wish to define your own COG based for example on only the middle four columns of the palate. By doing this, the lateral contacts which are on for high vowels and consonants are ignored thus making the COG measure more sensitive to the midsagittal contact which is more important in defining consonant articulation. To do this: 7. Open the analysis values dialogue box, click add and type the chart name e.g. “My COG” 8. Open the weights dialogue, click add and type the weights pattern name e.g. “Midcourse” 9. Set the weights values so that the central four columns are ON (100%) and the outer columns OFF(0%) then close the Weights dialogue. 10. Set axis to Front/back 11. Set Graph to mean 12. Close analysis values dialogue Copyright 2003-2008 Articulate Instruments Ltd CHECK www.articulateinstruments.com FOR THE LATEST MANUAL AND SOFTWARE REVISION. 38 User guide for Articulate Assistant software. Document No. ARTICASST_1.18 The mean Lateral measure The mean calculation for the lateral axis is designed to indicate whether there is more contact close to the midline of the palate or more contact towards the sides and is calculated as follows. 8 ∑ abs(n − 4.5)C n =1 n where abs is the absolute (unsigned) value 8 4∑ C n n =1 8 C n = ∑ c m ,nWm ,n m =1 = weighted sum of contacts in column n c m ,n = contact value in mth row and nth column {0,1} Wm ,n = weight value in mth row and nth column {0..1} The mean Asymmetry measure This mean calculation for the lateral axis is designed to indicate whether there is more contact towards one side or the other and is calculated as follows. 8 ∑ (n − 0.5)C n =1 8 8∑ C n n 8 where C n = ∑ c m ,nWm ,n m =1 n =1 = weighted sum of contacts in column n c m ,n = contact value in mth row and nth column {0,1} Wm ,n = weight value in mth row and nth column {0..1} The Standard Deviation (SD) measure. Standard deviation measurement is applied to all mean measures and can be displayed as a band around the mean by choosing the “mean+SD” graph tab in the analysis values dialogue box. The Standard deviation indicates whether the EPG pattern is spread across the whole palate (large SD) or concentrated around the mean (small SD. It is calculated for the different axes as follows: Front/Back Standard Deviation Copyright 2003-2008 Articulate Instruments Ltd CHECK www.articulateinstruments.com FOR THE LATEST MANUAL AND SOFTWARE REVISION. 39 User guide for Articulate Assistant software. Document No. ARTICASST_1.18 2 8 ∑ (m − 0.5) Rm 8 m =1 R ∑ 8 (m − 0.5) − m m =1 Rm ∑ m =1 1 where 8 8 ∑ Rm m =1 8 Rm = ∑ c m , nWm ,n n =1 c m,n = weighted sum of contacts in Row m = contact value in mth row and nth column {0,1} Wm ,n = weight value in mth row and nth column {0..1} Lateral Standard Deviation 2 8 ∑ abs (n − 4.5)C n 8 n =1 C ∑ 8 abs (n − 4.5) − n n =1 Cn ∑ n =1 1 8 4 ∑ Cn n =1 8 C n = ∑ c m ,nWm ,n m =1 = weighted sum of contacts in Column n c m ,n = contact value in mth row and nth column {0,1} Wm ,n = weight value in mth row and nth column {0..1} Asymmetric Standard Deviation 2 8 ∑ (n − 0.5)C n 8 n =1 C ∑ 8 (n − 0.5) − n n =1 C ∑ n n = 1 1 8 8 ∑ Cn where n =1 8 C n = ∑ c m ,nWm ,n m =1 = weighted sum of contacts in column n c m ,n = contact value in mth row and nth column {0,1} Copyright 2003-2008 Articulate Instruments Ltd CHECK www.articulateinstruments.com FOR THE LATEST MANUAL AND SOFTWARE REVISION. 40 User guide for Articulate Assistant software. Document No. ARTICASST_1.18 Wm ,n = weight value in mth row and nth column {0..1} The Area Measure There are two measures that evaluate the contact area. AreaW measures the total number of contacts as a fraction of the total weights 8 8 ∑∑ c Wm , n m ,n m =1 n =1 8 8 AreaW = ∑∑W m ,n m =1 n =1 AreaT measures the total number of contacts as a fraction of the whole palate (62 contacts) 8 8 ∑∑ c AreaT = Wm ,n m,n m =1 n =1 62 In general the weight values will either be ON or OFF (1 or 0). Example The Area measure can be used to calculate the total contacts in the alveolar region of the palate. To do this • Set the weights to 100% for rows 1 and 2 and to 0% for rows 3-8. • Select AreaW The resulting value will have a maximum of 1 when all the contacts in the first two rows are ON and a minimum of 0 when they are all off. If AreaT had been selected instead of AreaW then the values would have a maximum of 14/62 when all 14 contacts in the first two rows were ON rather than 1. Notice: All of the above values are normalised to the range 0-1. In the research literature, these values are sometimes unnormalised. For comparable values use the following multipliers. AreaT multiply by 62 Front/back mean and S.D. multiply by 8 Lateral mean and S.D. multiply by 4 Asymmetry mean and S.D. multiply by 8 The Anteriority Measure Anteriority,Posteriority and Centrality data reduction measures were prescribed by Fontdevila et al (Fontdevila,J.,Pallares, M.D. and Recasens, D., (1994) “The contact index method of electropalatographic data reduction”,Journal of Phonetics, 22, pp 141154). This formulation matches the published specification when all weight values are set to one. Ore local contact indices can be formulated by setting the weights for a subset of rows or columns to 1 and the remainder to 0. Copyright 2003-2008 Articulate Instruments Ltd CHECK www.articulateinstruments.com FOR THE LATEST MANUAL AND SOFTWARE REVISION. 41 User guide for Articulate Assistant software. 8 Document No. ARTICASST_1.18 8 log(∑∑ Am c m, nWm,n + 1) Anteriority = m =1 n =1 8 8 log(∑∑ AmWm, n + 1) m =1 n =1 where A = Row coefficients = [3587227/6,531441/8,59049/8,6561/8,729/8,81/8,9/8,1/8] c m ,n = contact value in mth row and nth column {0,1} Wm ,n = weight value in mth row and nth column {0..1} W0, 0 & W0, 7 always = 0 The Posteriority Measure 8 8 log(∑∑ Pm c m ,nWm,n + 1) Posteriority = m =1 n =1 8 8 log(∑∑ PmWm ,n + 1) m =1 n =1 P =Row coefficients = [1/6,9/8,81/8,729/8,6561/8,59049/8,531441/8, 4782969/8] c m ,n = contact value in mth row and nth column {0,1} Wm ,n = weight value in mth row and nth column {0..1} W0, 0 & W0, 7 always = 0 The Centrality Measure 8 8 log(∑∑ C n c m,nWm ,n + 1) Centrality = m =1 n =1 8 8 log(∑∑ C nWm,n + 1) m =1 n =1 C=Column coefficients = [1/14,17/16,289/16,4913/16,4913/16,289/8,17/16,1/14] c m ,n = contact value in mth row and nth column {0,1} Wm ,n = weight value in mth row and nth column {0..1} W0, 0 & W0, 7 always = 0 Defining your own RMS energy measure By selecting the RMS Energy measure some different options appear in the Analysis Values Dialogue (Figure 32). It provides the option of selecting the lower and upper limits of the audio spectrum over which the energy will be measures. There are default presets for low pass and high pass bands. The low pass might be used to detect voiced regions of speech and the high pass might be used to detect unvoiced regions. There is also an option to set the gain of the RMS value. This can be used to scale the RMS energy value within the range 0 to 1 so that it can be easily viewed in the analysis chart. Copyright 2003-2008 Articulate Instruments Ltd CHECK www.articulateinstruments.com FOR THE LATEST MANUAL AND SOFTWARE REVISION. 42 User guide for Articulate Assistant software. Document No. ARTICASST_1.18 Figure 32 RMS analysis value dialogue Future improvements The extraction of analysis values from EPG data will be expanded in future versions of this software. If you have any suggestions, please get in touch. The EPG Feedback Task Window The ‘EPG Feedback Task Window’ (Figure 33) is designed for live feedback using the EPG. It allows the client’s production in the clinic to be compared with typical productions or a previously saved ‘best effort’ by the client. Figure 33 EPG Feedback Task Window Copyright 2003-2008 Articulate Instruments Ltd CHECK www.articulateinstruments.com FOR THE LATEST MANUAL AND SOFTWARE REVISION. 43 User guide for Articulate Assistant software. Document No. ARTICASST_1.18 Comparing EPG Patterns The ‘Reference Palate Display’ (Figure 34) is used to show a palate pattern (or sequence of patterns) for the client to try to imitate. A. Palate Colour scale C. Palate Comparison gauge B. Left scroll button D. Right scroll button Figure 34 The Reference Palate Display Three buttons at the bottom of the display are used in the following way: Will copy whatever pattern is showing on the live EPG palate display at the instant that it is clicked. Click on this to select a pattern or sequence from a library. Save the pattern to the reference library. The ‘Palate Comparison Gauge’ (Figure 34C) on the left of the ‘Reference Palate Display’ shows how similar the live palate is to the reference palate. The left and right scroll buttons (Figure 34B, Figure 34D) allow the user to scroll through a palate sequence if an EPG sequence rather than a single EPG frame is loaded. Copying EPG Patterns to Reference Display button provides an easy way to transfer a pattern from the The live palate display on the left of the EPG Feedback Task Window. During a live feedback session with a client, click on the copy button immediately after the client produces the palate pattern you want to copy. The following copy dialogue box will pop up. Use the scrollbar to search through the last two seconds of palate patterns from the subject until you see the pattern you want to copy. Then double-click on the desired pattern to copy it to the reference palate display. Copyright 2003-2008 Articulate Instruments Ltd CHECK www.articulateinstruments.com FOR THE LATEST MANUAL AND SOFTWARE REVISION. 44 User guide for Articulate Assistant software. Document No. ARTICASST_1.18 Double-click on palate to copy Click and drag scrollbar to search through 200 palates Loading Reference EPG Patterns The ‘Reference Load Dialogue’ (Figure 35) provides three sources for reference palates − General Reference. A set of typical patterns or sequences of patterns perhaps generated by the user. − Client Reference. A set of reference patterns saved from previous EPG feedback sessions with the client. − Annotations. Any annotation may be loaded as a reference. See annotation section for help on filtering Figure 35 The Load Reference Dialogue Saving Reference EPG Patterns to Library The button displays a dialogue which allows the currently displayed reference pattern to be saved to a library so that it can be recalled in a future session. It also is possible to save the pattern displayed on the ‘Reference Palate Display’ by clicking the right mouse button in the ‘Reference Palate Display’ window to reveal the popup menu then selecting the ‘Save…’ option. The ‘Save Reference Dialogue’ (Figure 36) allows the pattern to be saved as: − a general Reference (available to any client) or − the Client’s Reference which is stored along with all other notesand files relating to the current client and which will only be accessible in the future when the current client is loaded. Copyright 2003-2008 Articulate Instruments Ltd CHECK www.articulateinstruments.com FOR THE LATEST MANUAL AND SOFTWARE REVISION. 45 User guide for Articulate Assistant software. Document No. ARTICASST_1.18 The Keywords edit box allows the reference pattern to be labelled. Figure 36 The Save Reference Dialogue Copying the Reference Palate to Word™ It is useful to be able to print off a reference pattern for a client to take home and use as a reference when practicing with the Portable Training Unit. Right-click on the palate display and select “Copy to clipboard…” the select “Current size” (or “200%” if a bigger picture is needed). Then open a word processing application, presentation software or similar and select “Paste” to copy into the document. Figure 37 Use "Copy to clipboard..." to print reference pattern. Note that you can either use a library reference, a copied reference pattern or a hand drawn reference pattern Comparing the Live Palate to the Reference Palate The ‘Palate Comparison Gauge’ (Figure 34C) is a vertical gauge comprising a blue bar which rises to the top of the gauge when the live palate display and the reference palate display match exactly. The match is based on the Copyright 2003-2008 Articulate Instruments Ltd CHECK www.articulateinstruments.com FOR THE LATEST MANUAL AND SOFTWARE REVISION. 46 User guide for Articulate Assistant software. Document No. ARTICASST_1.18 percentage of contacts which are ON in the reference AND ON in the live palate out of the total number of contacts which are ON in the reference pattern. Reward Display The ‘Reward Display’ at the top of the Feedback Task Window (Figure 33) button on the left to play a cartoon. To shows cartoons. Just click on the hide this display and make the palate displays bigger, click and drag the divider at the bottom of the Reward Display as shown in Figure 38. Figure 38 Hiding the reward display and making the Palates bigger The Comparison Feedback Task Window This task window is very similar to the EPG feedback task window but with two extra features. 1. An extra reference palate (red) which can be used to indicate to the client where NOT to make contact with the palate 2. The reference palate is superimposed on the live display. In the default display (Figure 39) the reference is shown as light pink which turns bright pink where the live input contact matches the reference and grey where it doesn’t. These colours can easily be changed to suit (see earlier section on changing palate colours). Copyright 2003-2008 Articulate Instruments Ltd CHECK www.articulateinstruments.com FOR THE LATEST MANUAL AND SOFTWARE REVISION. 47 User guide for Articulate Assistant software. Document No. ARTICASST_1.18 Figure 39 Comparison Feedback Task Window (Backing /t/ example) Exporting Data Specifying the Export File Articulate Assistant™ provides the means to export data to a tab-delimited text file, which is suitable for importing into most spreadsheets (e.g. Excel), databases and statistical packages. Figure 40 The Export Dialogue Box – File Name The ‘Export Dialogue Box’ (Figure 40) can be invoked using the ‘File:Export…’ menu option. The tabs at the top of the dialogue box can be clicked on to reveal three pages of the dialogue: − File. Choosing the name of the exported text file and its location. − Rows. Choosing what each row of the export file contains Copyright 2003-2008 Articulate Instruments Ltd CHECK www.articulateinstruments.com FOR THE LATEST MANUAL AND SOFTWARE REVISION. 48 User guide for Articulate Assistant software. Document No. ARTICASST_1.18 − Columns Choosing what each column of the Export file represents. The ‘File’ page shown in Figure 40 allows the name and path of the export file to be specified. The button provides an easy way to search your computer for the folder you wish to save the exported file in. Specifying which EPG Frames to Export Each row of the export file corresponds to an EPG frame. The frames chosen for export are defined using the ‘Rows’ page of the dialogue (Figure 41). The buttons at the top of the page define the rows as follows: − Client. All EPG frames of the current client will be exported. − Client + Prompt. All frames of all recordings of the current prompt will be exported. − Current. All frames of the current prompt will be exported. − Selected. All frames of the currently selected region of the current file will be exported. − Annotation. This by far the most common setting for row selection and it allows more detailed control over the frames to be exported. Figure 41 Export Row Definition With the ‘Annotation’ setting, it is possible to specify which palates within each annotated region are exported. The Choices are: − Start and End Time + all EPG samples in between. All EPG frames in each annotated region. Timing information is accessible to the nearest wav sample. Copyright 2003-2008 Articulate Instruments Ltd CHECK www.articulateinstruments.com FOR THE LATEST MANUAL AND SOFTWARE REVISION. 49 User guide for Articulate Assistant software. Document No. ARTICASST_1.18 − Start Time. Only data corresponding to the initial instant of each annotated region. − End Time. Only data corresponding to the final instant of each annotated region. − Start and End Times + N equally spaced samples in between. Only the initial and final instants of each annotated is set to more than 0 region . If then additional points in between the start and end points will be exported. These points will be evenly spaced in time. I.e if set to 1 then the midpoint will also be exported. − Time determined by threshold dialogue setting. Use the button to call up the threshold dialogue that allows you to specify a single time intstant within each annotation based on analysis values or time. o Maximum The first instance of the maximum value of the selected Analysis Value o Minimum The first instance of the minimum value of the selected Analysis Value o Midpoint. The temporal midpoint of the annotated region o One third The time instant one third of the way through the annotated region o Two thirds The toime instant two thirds of the way through the annotated region It is possible to include or exclude frames around the annotation boundaries. Example 1: You may have annotated the frame of maximum EPG contact in every example of a /t/ segment for a client. It is possible to export the 5 frames before and 2 frames after this annotation in order to provide context. Example 2: You may have annotated all /s/ segments recorded by a client. Transitions into an out of a segment are often co-articulated. It is possible to Copyright 2003-2008 Articulate Instruments Ltd CHECK www.articulateinstruments.com FOR THE LATEST MANUAL AND SOFTWARE REVISION. 50 User guide for Articulate Assistant software. Document No. ARTICASST_1.18 exclude the first 4 frames and last 4 frames of each annotated segment using this setting. The ‘Export Dialogue’ uses the current ‘Annotation Filter’ setting but for convenience the ‘Filter’ button is provided to allow the setting to be changed within the Export Dialogue. Note that the filter setting is not stored in the setup file. See section on Annotation for instructions on use of the ‘Filter Dialogue’. Specifying which Data Values to Export The ‘Columns’ page of the ‘Export Dialogue’ (Figure 42) allows the user to specify which values are to be exported for each EPG frame. The ‘Export Value List’ (Figure 42B) shows the values listed in the order that they will appear in the export file. Buttons below this window have the following function: − . Adds another value to the list. − . Deletes the currently selected value from the list. − . Moves the currently selected value to the bottom of the list. A. Currently selected value. C. Memo box with scroll bar B. Export Value List. Figure 42 Export Column Definition The buttons ‘Client’, ‘Time’, ‘Prompt’, ‘Annotation’, ‘Palate’, ‘Analysis’ and ‘Audio Data’ on the righthand side of the ‘Columns’ page change the currently selected value when clicked on. The buttons’ function is explained in the memo box (Figure 42C) in the bottom righthand side of the ‘Columns’ page. Note that it may be necessary to use the scroll bar to see the whole description. The options are: Client − Surname − Surname,Given names − Surname,Initials − Reference number Time Copyright 2003-2008 Articulate Instruments Ltd CHECK www.articulateinstruments.com FOR THE LATEST MANUAL AND SOFTWARE REVISION. 51 User guide for Articulate Assistant software. Document No. ARTICASST_1.18 − Offset into file to nearest EPG frame writes time in seconds of the annotation point/frame to nearest EPG frame. − Offset into file to nearest wav sample writes time in seconds of the annotation point/frame to nearest wave sample. − Date/Time of recording writes date/time of whole recording − Duration writes the duration in seconds of the annotated region/selected region to the nearest wav sample. Prompt Writes the word or phrase spoken Annotation − All keywords writes all keywords for the annotation if selected − First Keyword writes only the first keyword (Label) for the annotation if selected − Threshold Info writes the details of which analysis value and what criterion was used to select the time instant from the annotation Palate − Palate values writes a 1 or 0 in 62 columns each representing a palate contact. The contact order is left to right from front to back of the palate. − Filename writes full path and filename of EPG file − Palate frame number in file writes the EPG palate number indexed from the start of the file − Palate frame offset... records the EPG frame index relative to the first frame in an annotated or selected region. In the case where the rows page specifies that the last frame should be exported then the offset is relative to the last frame − Offset is from First/last records whether the offset is relative to the first or last frame Copyright 2003-2008 Articulate Instruments Ltd CHECK www.articulateinstruments.com FOR THE LATEST MANUAL AND SOFTWARE REVISION. 52 User guide for Articulate Assistant software. Document No. ARTICASST_1.18 Figure 43 Analysis value export Analysis Writes mean, SD, areaW or areaT calculated using the weights and axis specified by the selected chart. NOTE: In the case where the chart specifies Mean+SD the standard deviation is exported and where the chart specifies mean+Area the mean is exported. (See Analysis Values Section for more details on setting these values). − Calculate value for each row writes the analysis value for the selected time instant (row) − Mean value (all frames in annot) writes the average (mean) calculated over all the EPG frames in the annotation − Mean value (selected frames) writes the average (mean) calculated over all the selected frames in the annotation Variability − EPG variability of all contacts − EPG variability of active contacts − Calculated over annotation region Calculates variability over the whole annotation region regardless of how many rows are exported − Calculated over exported rows within annotation Calculates variability over the annotation region but only using the frames (rows) selected for export. Audio data − Filename writes full path and filename of wav file − File Creation Date/Time − Channels Copyright 2003-2008 Articulate Instruments Ltd CHECK www.articulateinstruments.com FOR THE LATEST MANUAL AND SOFTWARE REVISION. 53 User guide for Articulate Assistant software. − − − − Document No. ARTICASST_1.18 Bytes per sample Sample Rate File offset in samples Length of EPG frame in samples Saving and Retrieving Your Export Configuration Setup Configuration of the export file can be quite elaborate but once it has been determined the configuration can be saved in an *.xsu file using the ‘Export Setup’ within the ‘Export Dialogue Box’ . Both ‘Save’ and ‘Save As’ buttons will bring up a dialogue which allows the name and location of the configuration setup file to be selected. Thereafter, the ‘Save’ button will save any subsequent changes to this file. The ‘Save As’ button will always bring up the dialogue to choose a name and location. This makes it easy to make minor changes to a configuration and save as an alternative setup. The ‘Open’ button allows previously saved configurations to be loaded. Figure 44 Export view dialogue Viewing Exported Data On Clicking the button there is an option to view the exported data . The Export view window has two parts. The left window shows the exported data values in a grid. Moving the mouse over a cell in the grid shows the entire contents of the cell. The righthand Copyright 2003-2008 Articulate Instruments Ltd CHECK www.articulateinstruments.com FOR THE LATEST MANUAL AND SOFTWARE REVISION. 54 User guide for Articulate Assistant software. Document No. ARTICASST_1.18 window shows a variability display generated from palates in all of the exported rows. NOTE: In the case where rows are exported based on initial and final time points of an annotation (+ N time points in between), the variability is calculated on the basis of EVERY EPG frame in the annotation. This limitation may be resolved in later versions of this software. The EPG variability graphic can be copied to the clipboard and pasted into a document. Exporting Movies It is possible to export avi movies of regions of EPG/audio data using the “File|ExportMovie” menu option. This is useful for including in presentations. Figure 45 Movie Export Dialogue The movie can be exported at 4 speeds. Real time X2 half speed X4 quarter speed to see the pattern changing slowly X8 quarter speed to see the pattern changing very slowly Note that the audio is slowed down also making it difficult to interpret. It is probably not useful to play the audio at half or quarter speed. If the “Show Waveform” checkbox is ticked then a waveform is included in the movie with a moving cursor that indicates the position in the waveform. A spectrogram will also be displayed BUT ONLY IF A SPECTROGRAM IS VISIBLE IN THE TASK WINDOW. I.e. If “Export Movie” is called when the Record Task Window is visible then no spectrogram will be displayed in the movie. If it is called when the Analyse Task Window is visible then a Spectrogram will be displayed in the movie. Copyright 2003-2008 Articulate Instruments Ltd CHECK www.articulateinstruments.com FOR THE LATEST MANUAL AND SOFTWARE REVISION. 55 User guide for Articulate Assistant software. Document No. ARTICASST_1.18 Figure 46 Example Exported Movie "The Dolls" Backup It is always advisable to make a backup of valuable data. Articulate Assistant™ makes it easy to backup data to a networked computer or rewritable medi such as a Zip drive (100, 200 or 750MB). The backup option is available on the menu bar ‘File:Backup…’ and is designed to remember the date that you last completed a backup and show all the files created by Articuate Assistant since that date. Figure 47 shows the Backup dialogue box. Figure 47 Backup Dialogue The button in the top righthand corner brings up a dialogue box (Figure 48) which allows you to select any drive or folder available from your computer including networked drives. The subdirectory dialogue does not create a folder. You must choose an existing folder and click on the OK button. Copyright 2003-2008 Articulate Instruments Ltd CHECK www.articulateinstruments.com FOR THE LATEST MANUAL AND SOFTWARE REVISION. 56 User guide for Articulate Assistant software. Document No. ARTICASST_1.18 Folder in which the client folders will be Figure 48 SubDirectory Dialogue The Backup dialogue allows you to backup files from any date and time till the present. The default time is the time of the last backup. Tabs at the top of the dialogue allow the selection of all client data or just the current client. Tickboxes down the lefthand side allow individual files to be included ( ) or excluded ( ) from the backup. The button sets all the files . The button sets all files . Click the button to copy all the selected data to client folders in the chosen subdirectory. TIP: The ‘Backup…’ dialogue is good for incremental backups. If you want to save all the recordings from the current client or all clients set the backup year to 2000. Alternatively you can use Microsoft Windows Explorer to copy the client folder(s). Copying Displays (Printing) It is possible to print any display in Articulate Assistant™ by copying the window to a graphics program such as ‘Paint’ or word processor such as ‘Word for Windows’. Copying to Word for Windows To copy a display: Copyright 2003-2008 Articulate Instruments Ltd CHECK www.articulateinstruments.com FOR THE LATEST MANUAL AND SOFTWARE REVISION. 57 User guide for Articulate Assistant software. Document No. ARTICASST_1.18 1. Click the right mouse button on the caption bar at the top of the window 2. Click on the ‘Copy’ option in the popup menu Then open ‘Word for Windows’ and click on the ‘Edit:Paste Special…’ menu option and click on the ‘OK’ button in the ‘Paste Special’ dialogue box. A complete Task Window set can be copied using the ‘Edit:Copy’ menu option Specifying Copy Colour The Window will be copied in ‘Grey scale’. It is also possible to copy the window in ‘Black and White’ or ‘Full Colour’. To change the colour, use the ‘Options:Color:Copy’ menu and select your choice of colour option. The Copy Task The ‘Copy Task’ comprises two windows. 1. A main window with menu, task buttons and prompt list 2. A second window with waveform/annotation, spectrogram, palates and EPG values which is ideal for copying to ‘Word for Windows’. The result of copying the tutorial data to Word is shown in Figure 49. Figure 49 The Copy Task Window pasted directly into this manual Other configurations of displays can be designed if needed. See the section on Designing new Task Windows. Copyright 2003-2008 Articulate Instruments Ltd CHECK www.articulateinstruments.com FOR THE LATEST MANUAL AND SOFTWARE REVISION. 58 User guide for Articulate Assistant software. Document No. ARTICASST_1.18 Printing Palates It is easy to print a sequence of numbered palates (left to right on the page) along with details about the palate sequence. This may typically be used in the clinic to keep a paper record of patient progress. To print palates, select the ‘File:Print Palates…’ menu option and the dialogue box shown in Figure 50. Note that this menu option is disabled until a specific file has been selected. The dialogue allows the user to adjust how many palates can be fitted onto a page by varying the number of ‘Palates across page’. The user can choose to add information to the top of the printed page. Checkboxes are provided to select information already held in the computer. Additional free text can be added. For example, the specific segment, word or phrase being spoken can be noted along with comment on the particular feature of interest. See Figure 50 for an example. A print preview screen (Figure 50A) shows an outline of the 1st page layout before it is printed. The dialogue also states approximately the number of pages required for the printout. The ‘Print Palates…’ option should work with the default printer installed on the users PC. Note: Some HP laser printers with limited memory can be very slow (20 mins) at spooling and printing a page of palates. Inkjet printers are much faster (about 30secs per page). The dialogue allows the palate numbers and/or currently selected annotations to be printed above each row of palates. Checkboxes can be clicked to select and deselect these options. It is also possible to show extra palates before and after the selected region. This is useful, for example, if an annotated speech segment is to be printed but some surrounding context is desired on the printout. Note, if the whole utterance is selected the before and after options are disabled. Copyright 2003-2008 Articulate Instruments Ltd CHECK www.articulateinstruments.com FOR THE LATEST MANUAL AND SOFTWARE REVISION. 59 User guide for Articulate Assistant software. Document No. ARTICASST_1.18 A. Print Preview Screen Figure 50 Print Palates Dialogue Copying Palates It is easy to copy a sequence of numbered palates (left to right on the page).This may typically be used to produce clinical reports or research papers. To copy palates, select the ‘Edit:Copy Palates…’ menu option and the dialogue box shown in Figure 51. Note that this menu option is disabled until a specific file has been selected. The dialogue allows the user to adjust how many palates can be fitted onto a page by varying the number of ‘Palates across page’. A copy preview screen (Figure 51A) shows an outline of the 1st page layout before it is copied. Only the palates fitting on this page will be copied. The ‘Copy Palates…’ option should work with any Windows application that can paste a bitmap from the clipboard such as Word. The resolution of the bitmap can be set to low medium or high or specified using custom and setting the ‘width’ edit boxes. The ‘height’ edit box value will be automatically set to the optimum size to fit the palates displayed in the preview box but this can be overridden. The greater the size in pixels, the better the resolution but the more memory the bitmap will need. Note that if the size is set too low to be able to represent the number of palates on the page then ‘copy palates’ may not provide a sensible picture. Copyright 2003-2008 Articulate Instruments Ltd CHECK www.articulateinstruments.com FOR THE LATEST MANUAL AND SOFTWARE REVISION. 60 User guide for Articulate Assistant software. Document No. ARTICASST_1.18 A. Print Preview Screen Figure 51 Copy Palates Dialogue As with the Print palates display, it is possible to include palate number or annotations above the palate sequence. The annotations are selected using the ‘filter’ option in the annotation window. Designing Task Windows Entering and Exiting Design Mode In order to enter design mode the user must click on the caption bar (Figure 1A) of Articulate Assistant™ with the right mouse button. Then select the ‘Design…’ option in the popup menu . Note: If there is more than one window with a caption bar (e.g. The Copy Task Window) then only the Caption bar with Articulate Assistant™ written in it has the ‘Design’ option The ‘Design Dialogue’ list will then appear (Figure 52). Figure 52 Design Dialogue To exit design mode without saving any changes simply close the ‘Design Dialogue by clicking on the . Copyright 2003-2008 Articulate Instruments Ltd CHECK www.articulateinstruments.com FOR THE LATEST MANUAL AND SOFTWARE REVISION. 61 User guide for Articulate Assistant software. Document No. ARTICASST_1.18 Saving Design Changes Saving changes must be done before exiting design mode. To save changes made in design mode, click the right mouse button in the Task Bar (Figure 1B) to reveal the popup menu name>”’ (‘Save “Copy” ‘ in this example). and click on ‘Save “<Task Charts, Panels, Bars and Displays Task windows are made up of modules that dock together and can be resized and positioned to create an ensemble suited to a particular task. Modules fall into 4 categories as follows: Charts. Any module which has a display with a time axis . Panels. Modules that do not fall into the other 3 categories Bars. Modules that cannot be resized in normal operation Displays Any module with a graphical display, which doesn’t have a time axis Articulate Assistant™ V1.0 supports the following modules: Charts − Analysis Values. EPG analysis values − Palates. * − Wave. * − Spectrogram * Panels − Prompts. * Prompt list box − Annotations. * Annotation Editor − Prompt. * Bars − Status. − Menu. Menu, Task Bar and buttons Displays − Palate Reference and live palate display − Analysis Values Key to Analysis Values Chart and numerical readout Modules marked with a ‘*’ are limited to one instance per Task Window. To create a new module, simply select it from the menu in the ‘Design Dialogue’. Copyright 2003-2008 Articulate Instruments Ltd CHECK www.articulateinstruments.com FOR THE LATEST MANUAL AND SOFTWARE REVISION. 62 User guide for Articulate Assistant software. Document No. ARTICASST_1.18 Figure 53 Menu/Task/Button Bar popup menu The ‘Menu Bar’ can be configured further by right clicking in it to bring up the popup dialogue (Figure 53). The top three options in this popup menu control the visibility of ‘Menu’, Task ‘Setup Buttons’ and ‘Buttons’. There is a submenu allowing each of the buttons to be enabled or disabled. The ‘Palate Display’ also has a popup dialogue to control the visibility of elements of the display . The elements consist of: − Key. Colour scale − Score. Variability Index − Cumulative. Cumulative contact check box − Comparison. Palate comparison gauge It is also possible to specify whether the ‘Palate Display’ is a ‘Reference Palate Display’. Note: Only one ‘Reference Palate Display’ permitted per ‘Task Window’. Repositioning a module in a Task Window To rearrange the modules in a Task Window, click and drag the in the top left corner of the window (or the at the left edge in the case of ‘Bar’ type modules). Figure 54 Rearranging Modules in Design Mode Copyright 2003-2008 Articulate Instruments Ltd CHECK www.articulateinstruments.com FOR THE LATEST MANUAL AND SOFTWARE REVISION. 63 User guide for Articulate Assistant software. Document No. ARTICASST_1.18 Figure 54 shows the grey outline that will move about the screen and ‘dock’ in positions relative to other modules. When you are happy with the position release the mouse button. The relative size of the module can be adjusted as described on page 32 of this manual. It is also possible to move a module so that it exists in a separate window on its own. In fact this is the state of a new module created by selecting a menu option from the ‘Design Dialogue’. To get a module to be separate from the main window , click and drag until the grey outline is not aligned with the other modules (as shown in Figure 54) then release the mouse button. Repositioning modules is an art that improves with practice. Deleting a Module from a Task Window To delete a module from a Task Window move the module so that it exists in a separate window on its own (as described in the previous section) then close that window by clicking on the . Reordering the Task Bar Buttons It may be desirable to change the order in which the Task Bar buttons appear. To change the order click the right mouse button in the ‘Menu/Task Bar’ to bring up the popup menu (Figure 53). The Task Bar button corresponding to the current can be moved left or right one place by selecting the appropriate popup menu option. Repeat this to move the button one space each time. TIP: Articulate Assistant™ always starts in the first Task Window as defined by the order of the Task Bar buttons. To get Articulate Assistant™ to open in the Analysis Task simply move the Analysis Task button left so that it is first in the row. Creating a New Task Window To create a new Task Window click on ‘Save As New Setup’. Fill in the name of the new Task Window . A duplicate of the current window will be created. Then rearrange this new Task Window to suit. Deleting a Task Window To delete a Task Window, first select the Task Window to be deleted. Then use the menu/task/button popup menu and click on the ‘Delete “<task window>” ‘ option (e.g. ‘Delete EPG “Feedback” ’ in Figure 53). Copyright 2003-2008 Articulate Instruments Ltd CHECK www.articulateinstruments.com FOR THE LATEST MANUAL AND SOFTWARE REVISION. 64 User guide for Articulate Assistant software. Document No. ARTICASST_1.18 Shortcut Keys Help Playback Record Select visible region of waveform Adjust selected region/ selected annotation Select region in Palates or Analysis values windows F1 F2 F3 Ctrl+A Ctrl + drag mouse Shift + drag mouse Copyright 2003-2008 Articulate Instruments Ltd CHECK www.articulateinstruments.com FOR THE LATEST MANUAL AND SOFTWARE REVISION. 65 User guide for Articulate Assistant software. Document No. ARTICASST_1.18 Index Alveolar total EPG measure....... 32 Analysis Values ......................... 32 Closure ................................... 35 RMS........................................ 35 Analysis Values Display............. 32 Threshhold.............................. 33 Annotation.................................. 24 Adding keywords and notes.... 27 Adjusting boundaries .............. 29 Editing..................................... 29 Filtering ................................... 27 Hotlist...................................... 25 Selecting ................................. 29 Snap to annotation.................. 27 Anteriority EPG measure ........... 41 Asymmetry EPG measure ......... 39 Audio ........................................... 6 Automute ................................ 10 Checking audio signal level ...... 8 Playback Control....................... 9 Recording Control..................... 8 Recording settings .................. 10 Auto Advance ............................ 18 Centrality EPG measure ............ 42 Centre of Gravity............ See CoG CoG ........................................... 38 Defining your own measure ... 38, 43 Definition................................. 32 Colour Changing palate...................... 19 Changing spectrogram ........... 23 Com port setting .......................... 7 Copying a task window in design mode 64 Color/Black&white................... 58 EPG Patterns to Reference Display ................................. 44 Image to prompt list ................ 13 Palates.................................... 60 Promptlist to/from Word .......... 13 Reference pattern to document ............................................. 46 Task Window .......................... 58 Whole displays........................ 57 Cursor Moving .................................... 17 Deleting Files........................................ 16 Regions .................................. 18 Task window........................... 64 Edit Menu Annotation .............................. 24 Client…................................... 12 Copy ....................................... 58 Copy Palates…....................... 60 Delete File... ........................... 16 Prompt List….......................... 12 Zoom ...................................... 17 Exporting Data........................................ 48 Movies .................................... 55 File Menu Backup…................................ 56 Export… ................................. 48 New Client… .......................... 11 Open Client ............................ 12 Print Palates…........................ 59 Save Client As… .................... 12 Installing ...................................... 6 Lateral EPG measure ................ 39 Maximum Finding frames of.................... 33 Midpoint Exporting ................................ 50 Finding.................................... 34 Options Menu Analysis Values…................... 36 Audio…......................See Audio Colors:Copy............................ 58 Colors:Palate… ...................... 19 Comms… ................................. 7 Display.............................. 14, 16 Sync... ..... See WinEPG Manual Palatal total EPG measure ........ 32 Palates Display.......................... 30 Multiple rows .......................... 31 Playing a File ............................. 15 Posteriority EPG measure ......... 42 Printing Palates ................................... 59 Prompt Showing and hiding ................ 14 Prompt List Editor ...................... 12 Audio:Add............................... 13 File:New… .............................. 12 Copyright 2003-2008 Articulate Instruments Ltd CHECK www.articulateinstruments.com FOR THE LATEST MANUAL AND SOFTWARE REVISION. 66 User guide for Articulate Assistant software. Document No. ARTICASST_1.18 Image:Paste............................ 13 Prompts Listbox Changing number of boxes..... 16 Checked colour… ................... 17 Edit Prompt List See Prompt List Editor Font size ................................. 17 Font… ..................................... 17 Showing only prompts ............ 16 Showing only recorded files .... 16 Recording .................................. 14 Redoing ..................................... 15 Resizing Displays ...................... 31 RMS Defining your own measure .... 42 Saving Automatic................................ 12 Client Reference palate pattern ............................................. 45 Copy of client data record ....... 12 Export file................................ 49 Export setup ........................... 54 Full/Incremental backup ......... 56 Prompt list .............................. 12 Serial port setting..... See Com port Setting Tickmarks Analysis values display........... 33 Palates display ....................... 30 Waveform display ................... 22 USB key ...................................... 6 USB Port Connecting via a Serial-to-USB cable...................................... 8 Variability Calculation.............................. 21 Exporting ................................ 53 Single Palate Display.............. 21 Velar total EPG measure........... 32 Whole palate total EPG measure ............................................... 32 Zooming .................................... 17 Copyright 2003-2008 Articulate Instruments Ltd CHECK www.articulateinstruments.com FOR THE LATEST MANUAL AND SOFTWARE REVISION. 67


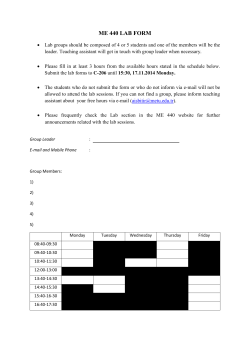


© Copyright 2026