
- Magento
Magento
Enterprise Edition
User Guide
Part V:
Store Operations
System Operations
Version 1.14.2
Contents
Store Operations
1
Chapter 1: Currency Rates
3
Currency Setup
4
Currency Symbols
8
Updating Currency Rates
8
Chapter 2: Managing Email Templates
11
Supported Email Clients
12
Template Layout and Styles
14
Inline and Non-Inline Styles
14
Preparing Your Email Logo
15
Supported File Formats
15
Image Size
15
Magento Upgrades
Transactional Email Configuration
Email Template Setup
Customizing Email Templates
16
16
20
22
Header Template
23
Footer Template
27
Message Templates
29
Email Templates
32
Chapter 3: Managing Data Transfer
33
Working with CSV Files
34
Product CSV Structure
Updated: 4/18/2015
34
Copyright © 2015 Magento, Inc. All rights reserved.
Customer CSV Structure
Import
35
36
File Validation
36
Importing Product Images
38
Import Guidelines
40
New Entities
40
Existing Entities
40
Complex Data
41
Invalid Files
41
Export
42
Dataflow
43
Scheduled Import/Export
48
Scheduled Import
49
Scheduled Export
56
Managing Scheduled Jobs
62
Chapter 4: Reports
65
Dashboard
66
Snapshot Reports
67
Dashboard Setup
67
Running Reports
69
Orders Report
69
Refreshing Report Statistics
72
Available Reports
72
Chapter 5: Admin Permissions
75
Creating New Users
76
Custom Roles
78
Price Resources
81
Promotion Resources
82
Product Resources
83
REST Roles
85
Unlocking Admin Accounts
85
Chapter 6: Security
87
Security Configuration
88
Magento Enterprise Edition User Guide, Version 1.14.2
iii
Website Restrictions
Closed for Maintenance
CAPTCHA
90
93
Admin CAPTCHA
94
Customer CAPTCHA
97
Encryption & Hashing
100
Changing the Database Key
100
System Operations
101
Chapter 7: Index Management
103
Accessing Index Management
104
Index Configuration
106
Manual Reindexing
108
Automatic Indexing
109
Indexing by Multiple Users
109
Index Modes
109
Index Scheduling
Index Cleanup
Chapter 8: Cache Storage
113
113
115
Clearing Caches
116
Full-Page Cache
120
Types of Page Visits
121
Page Cache Setup
122
Page Cache Auto-Generation
124
Page Cache Actions
126
Chapter 9: Alternate Media Storage
127
Media Storage Database Setup
128
Database Workflow
128
Media Storage CDN Setup
129
CDN Workflow
129
Chapter 10: Installing Solr Search
Solr Server Configuration
iv
90
131
132
Magento Enterprise Edition User Guide, Version 1.14.2
Solr Base File Setup
135
Chapter 11: Content Staging
137
Staging Site Configuration
138
Creating a Staging Site
140
Content Staging Workflow
Merging Content
Rolling Back Merged Content
Managing a Staging Site
Upgrading Magento
140
143
144
145
146
Chapter 12: Magento Connect
147
Installing Extensions
148
Chapter 13: Web Services
151
Magento Core API Settings
152
Activating Web Services
153
Chapter 14: System Tools
155
Admin Actions Log
156
Admin Actions Log Report
Server Backups & Rollback
158
159
Best Practices
159
Creating a Backup
160
Rolling Back Changes
161
Compilation
162
Cron
163
Support Tools
165
System Backups
165
System Reports
166
Index
Magento Enterprise Edition User Guide, Version 1.14.2
171
v
Store Operations
In this section…
Currency Rates
Email Templates
Data Transfer
Reports
Permissions
Security
Chapter 1:
Currency Rates
Magento Enterprise Edition gives you the ability to accept currencies from more than
two hundred countries around the world. When a store supports multiple currencies, a
Currency Chooser appears in the header of every page after the rates are updated.
Currency Chooser
If you accept payment in multiple currencies, make sure to monitor the currency rate
settings, because any fluctuation can affect your profit margin.
Currency symbols appear in product prices and sales documents such as orders and
invoices. You can customize the currency symbols as needed, and also set the display of
the price separately for each store or view.
Topics in this chapter include:
l
Currency Setup
l
Currency Symbols
l
Updating Currency Rates
Magento Enterprise Edition User Guide, Version 1.14.2
3
Currency Setup
Chapter 1: Currency Rates
Currency Setup
Before setting up individual currency rates, you must first specify which currencies you
accept, and the currency used to display prices in your store.
Step 1: Choose the Currencies You Accept
1.
On the Admin menu, select System > Configuration.
2.
In the panel on the left, under General, select Currency Setup.
3.
Click to expand the Currency Options section. Then, do the following:
a.
Set Base Currency to the primary currency that you use for online transactions.
b.
Set Default Display Currency to the currency that you use to display pricing in your
store.
c.
In the Allowed Currencies list, select all currencies that you accept as payment in
your store. Make sure that you also select your primary currency. (To select multiple
currencies, hold down the Ctrl key and click each option.)
Currency Options
4.
4
To define the scope of the base currency configuration, do the following:
a.
In the panel on the left, under Catalog, select Catalog. Then, click to expand the Price
section.
b.
Set Catalog Price Scope to define the scope of the base currency configuration as
either global, or limited to the website.
Magento Enterprise Edition User Guide, Version 1.14.2
Chapter 1: Currency Rates
Currency Setup
Price
5.
When complete, click the Save Config button.
Field Descriptions
FIELD
SCOPE
DESCRIPTION
CURRENCY OPTIONS
Base Currency
Website
The primary currency used in store transactions.
Default Display Currency
Store View
The primary currency used to display prices.
Allowed Currencies
Store View
The currencies accepted by your store for
payment.
Global
Determines the scope of the base currency.
Options include: Global / Website.
PRICE
Catalog Price Scope
Step 2: Configure the Import Connection
1.
In the panel on the left under General, select Currency Setup.
2.
Click to expand the WebserviceX section.
3.
In the Connection Timeout in Seconds field, enter the number of seconds of inactivity to
allow before the connection times out.
WebserviceX
Step 3: Configure the Scheduled Import Settings
1.
Continuing with Currency Setup, click to expand the Scheduled Import Settings section.
2.
To automatically update currency rates, set Enabled to "Yes." Then, do the following:
Magento Enterprise Edition User Guide, Version 1.14.2
5
Currency Setup
3.
Chapter 1: Currency Rates
a.
Set Service to the rate provider. The default value is “Webservicex.”
b.
Set Start Time to the hour, minute, and second that the rates will be updated
according to the schedule.
c.
To determine how often the rates are updated, set Frequency to one of the following:
l
Daily
l
Weekly
l
Monthy
d.
In the Error Email Recipient field, enter the email address of the person who is to
receive email notification if an error occurs during the import process. To enter
multiple email addresses, separate each with a comma.
e.
Set Error Email Sender to the store contact that appears as the sender of the error
notification.
f.
Set Error Email Template to the email template used for the error notification.
When complete, click the Save Config button.
Scheduled Import Settings
Field Descriptions
FIELD
SCOPE
DESCRIPTION
WEBSERVICEX
Connection Timeout in
Seconds
Global
Determines the number of seconds of inactivity
before a Webservicex session times out. Default
value: 100.
SCHEDULED IMPORT SETTINGS
Enabled
6
Store View
Determines if scheduled import is enabled.for the
store. Options include: Yes / No
Magento Enterprise Edition User Guide, Version 1.14.2
Chapter 1: Currency Rates
Currency Setup
Field Descriptions (cont.)
FIELD
SCOPE
Service
Store View
Specifies the service that provides the data for the
scheduled import. Default value: Webservicex.
Start Time
Store View
Indicates the start time by hour, minute, and
second, based on a 24-hour clock.
Frequency
Store View
Determines how often the scheduled import takes
place. Options include:
DESCRIPTION
Daily
Weekly
Monthly
Error Email Recipient
Store View
Identifies the email address of each person who is
notified by email in the event of an error. For
multiple recipients, separate each entry with a
comma.
Error Email Sender
Website
Identifies the store contact that appears as the
sender of the error email notification. Options
include:
General Contact
Sales Representative
Customer Support
Custom Email 1
Custom Email 2
Error Email Template
Website
Magento Enterprise Edition User Guide, Version 1.14.2
Specifies the template that is used as the basis of
the error email notification. Default template:
Currency Update Warnings
7
Currency Symbols
Chapter 1: Currency Rates
Currency Symbols
Manage Currency Symbols gives you the ability to customize the symbol associated with
each currency that is accepted as payment in your store.
Manage Currency Symbols
To customize currency symbols:
1.
On the Admin menu, select System > Manage Currency > Symbols.
Each enabled currency for your store appears in the Currency list.
2.
Enter a custom symbol for each currency you want to use, or select the Use Standard
checkbox to the right of each currency.
3.
To override the default symbol, clear the Use Standard checkbox. Then, enter the symbol
you want to use.
It is not possible to change the alignment of the currency symbol from left to right.
4.
When complete, click the Save Currency Symbols button.
Updating Currency Rates
Currency rates can be set manually, or be imported into the store. To ensure that your store
has the most current rates, you can configure the currency rates to be updated
automatically on schedule.
Before importing currency rates, complete the Currency Setup to specify the currencies that
you accept, and to set up the import connection and schedule.
Importing Currency Rates
8
Magento Enterprise Edition User Guide, Version 1.14.2
Chapter 1: Currency Rates
Updating Currency Rates
To manually update a currency rate:
1.
On the Admin menu, select System > Manage Currency Rates.
2.
Click the rate you want to change, and type the new value.
3.
When complete, click the Save Currency Rates button.
To import currency rates:
1.
On the Admin menu, select System > Manage Currency Rates.
2.
Set Import Service to the currency rate provider. WebserviceX is the default provider.
3.
Click the Import button.
The updated rates appear in the Manage Currency Rates list. If the rates have changed
since the last update, the old rate appears below for reference.
4.
When complete, click the Save Currency Rates button.
A message appears when the updated rates have been saved.
To import currency rates on schedule:
1.
Make sure that Cron is enabled for your store.
2.
Complete the Currency Setup to specify the currencies that you accept, and to set up the
import connection and schedule.
3.
To verify that the rates are imported on schedule, check the Manage Currency Rates list.
Then, wait for the duration of the frequency setting established for the schedule, and check
the rates again.
Magento Enterprise Edition User Guide, Version 1.14.2
9
Updating Currency Rates
Chapter 1: Currency Rates
Notes
10
Magento Enterprise Edition User Guide, Version 1.14.2
Chapter 2:
Managing Email Templates
Email templates define the layout, content, and formatting of automated messages
sent from your store. They are called transactional emails because each one is
associated with a specific type of transaction, or event.
Magento includes a set of responsive email templates that are triggered by a variety of
events that take place during the operation of your store. Each template is optimized
for any screen size, and can be viewed from the desktop, as well as on tablets and
smartphones. You will find a variety of prepared email templates related to customer
activities, sales, product alerts, admin actions, and system messages that you can
customize to reflect your brand.
Topics in this chapter:
l
Supported Email Clients
l
Template Layout and Styles
l
Preparing Your Email Logo
l
Magento Upgrades
l
Transactional Email Configuration
l
Email Template Setup
l
Customizing Email Templates
l
Email Template Reference
Magento Enterprise Edition User Guide, Version 1.14.2
11
Supported Email Clients
Chapter 2: Managing Email Templates
Supported Email Clients
A wide range of technologies is supported by the various email clients and services
available today. Although they do not all follow the same standards, and there is some
variation in the way email messages are rendered, we have found the following services to
be compatible with Magento Enterprise Edition.
Desktop Clients
OPERATING SYSTEM
CLIENTS SUPPORTED
OS X 10.8
Apple Mail 6
OS X 10.7
Outlook 2011
Outlook 2013
Windows 8
Outlook 2010
Windows 7
Outlook 2007
Outlook 2003
Mobile Clients
OPERATING SYSTEM
CLIENTS SUPPORTED
Android 4.2, “Jelly Bean”
Native email app
Android 2.3, “Gingerbread”
Native email app
Gmail App (Android 4.2)
Native email app
Blackberry 5 OS
Native email app
IOS 8
iPhone 6
iPhone 6 Plus
IOS 7
iPad (Retina)
iPad Mini
iPhone 5s
Mail on these devices:
IOS 6
12
iPhone 5
iPhone 4s
Magento Enterprise Edition User Guide, Version 1.14.2
Chapter 2: Managing Email Templates
Supported Email Clients
Web Clients
EMAIL APPLICATION
BROWSERS SUPPORTED*
AOL Mail
Chrome
Internet Explorer
Firefox
Gmail
Chrome
Internet Explorer
Firefox
Yahoo! Mail
Chrome
Internet Explorer
Firefox
Outlook.com
Chrome
Internet Explorer
* The latest version of each browser was used for testing.
Magento Enterprise Edition User Guide, Version 1.14.2
13
Template Layout and Styles
Chapter 2: Managing Email Templates
Template Layout and Styles
Magento Enterprise Edition has a set of responsive templates that define the header, body,
and footer of all automated email messages that are sent from your store. The content, or
body section, is combined with the header and footer to create each message. You can set
up the header and footer one time, and then use them for every message.
Inline and Non-Inline Styles
Email templates are written in HTML, and are associated with the locale. The CSS files that
provide the formatting instructions are stored separately, and reside on the server.
Many email clients do not support CSS formatting instructions that are stored separately
from the email message. For this reason, the non_inline_styles variable has been
added to the header of each message, to convert the external CSS styles to local, inline
styles. The variable points to the CSS file on the server that provides the styles that are
needed to format the template. The styles are then converted to inline styles, and copied to
the <styles> tag of each message.
When you examine the header template code, you will find the markup tag with the non_
inline_styles variable just after the <body> tag.
<body>
{{var non_inline_styles}}
<!-- Begin wrapper table -->
When customizing transactional email templates from the Admin, you can enter any
additional CSS styles that you need directly into the Template Styles box. They will be
included when the non_inline_styles are converted.
14
Magento Enterprise Edition User Guide, Version 1.14.2
Chapter 2: Managing Email Templates
Template Layout and Styles
Preparing Your Email Logo
To ensure that your logo renders well on high-resolution devices, the uploaded image
should be at least twice the size of the dimensions that are specified in the header template.
Be careful to preserve the aspect ratio of the logo, so the height and width resize
proportionally.
Logo with Transparent Background
Supported File Formats
Logos can be saved as any of the following file types. Logos with transparent backgrounds
can be saved as either .gif or .png files.
l
jpg / jpeg
l
gif
l
png
Image Size
To make the most of the limited vertical space in the header, the logo should be cropped to
eliminate any wasted space above or below the image. As a general rule, you can make an
image smaller than the original, but not larger without losing resolution. If possible, the
original artwork should be at least as large as the uploaded file. Taking a small image and
doubling its size in a photo editor does not improve the resolution.
For example, in the default header template, the display dimensions of the logo are 168
pixels wide by 48 pixels high. To increase the resolution of the image, the image that is
uploaded must be at least twice the size.
DIMENSIONS
1 x (display size)
2 x (image size)
2.5 x (image size)
Width:
168 px
336 px
420 px
Height:
48 px
96 px
120 px
If the original artwork was created as a vector, rather than a bitmap, it can be scaled up or
down to the dimensions needed without losing resolution. The image can then be saved in
one of the supported bitmap image formats. If the original logo artwork is a bitmap, the
original should be at least twice the display size.
Magento Enterprise Edition User Guide, Version 1.14.2
15
Transactional Email Configuration
Chapter 2: Managing Email Templates
Magento Upgrades
If you have upgraded from an earlier version of Magento Enterprise Edition, you can use an
email client to view each transactional email template that is generated by your store.
Verify that the logo, fonts, and styles render correctly.
Email templates that were created with earlier versions of Magento will not have the non_
inline_styles variable, and will not be responsive. However, most can be used as they
are.
To take advantage of the high-resolution display that is available on many devices, email
logos are now uploaded at twice their display size. If you intend to use the responsive email
templates, you should upload a higher resolution logo.
It is not necessary to reconfigure your email logo for use with custom templates that were
created with earlier versions of Magento.
Transactional Email Configuration
The configuration for transactional email templates is designed to support multiple
devices. The email logo that is uploaded is designed to render well on high-resolution
displays. The configuration specifies the header and footer templates that are used for all
transactional email messages sent within the scope of the configuration. To support the
requirements of many email clients, a variable has been added that is used to convert
external CSS styles to inline styles. The name of the external CSS file that it references is
specified in the configuration.
Transactional Emails
16
Magento Enterprise Edition User Guide, Version 1.14.2
Chapter 2: Managing Email Templates
Transactional Email Configuration
To configure transactional email templates:
1.
On the Admin menu, select System > Configuration.
2.
In the panel on the left, under General, select Design.
3.
If needed, set Current Configuration Scope in the upper-left corner to the website, store, or
store view where the configuration applies.
4.
Click to expand the Transactional Emails section. Then, do the following:
Step 1: Upload Your Logo
1.
To upload your prepared Logo Image, click the Browse button. Find the file on your
computer, and click to copy the path to the field.
2.
In the Logo Image Alt field, enter the alternate text to identify the image.
If you uploaded a logo image, enter the Logo Width and Logo Height in pixels. Enter each
value as a number, without the “px” abbreviation. These values refer to the display
dimensions of the logo in the header, and not to the actual size of the image.
Step 2: Select the Header and Footer Templates
If you have custom header and footer templates for your store, or for different stores, you
can specify which templates should be used for each, according to the scope of the
configuration.
1.
Select the Email Header Template to be used for all transactional email messages.
2.
Select the Email Footer Template to be used for all transactional email messages.
Step 3: Identify the CSS File(s)
In the Non-inline CSS File(s) field, enter the name of each CSS file that is needed to
format the content of your transactional email messages. Separate the names of mutiple
files with a comma. On the server, the CSS files reside in the following location:
[magento install dir]/skin/frontend/[package]/[theme]/css/
Magento Enterprise Edition User Guide, Version 1.14.2
17
Transactional Email Configuration
Chapter 2: Managing Email Templates
Field Descriptions
FIELD
Logo Image
SCOPE
Store View
DESCRIPTION
Identifies the logo file that appears in the header of
transactional email messages. To support highresolution displays, upload an image that is twice
the size that is needed. For example, if the actual
display dimensions of the logo are 100 pixels high
and 200 pixels wide, you should upload an image
that is 200 pixels high and 400 pixels wide.
To delete the current image and upload another,
select the Delete Image checkbox. Then, browse
to select the new image.
Allowed file types:
.jpg / .jpeg
.gif
.png
18
Logo Image Alt
Store View
Enter alternative text that appears if the logo
image is not available.
Logo Width
Store View
Enter the display width of the image in pixels, as a
number. Do not include the “px” abbreviation. It is
important to specify both width and height to
preserve the aspect ratio when the image is
rendered at different sizes.
Logo Height
Store View
Enter the display height of the image in pixels, as
a number. Do not include the “px” abbreviation. It
is important to specify both width and height to
preserve the aspect ratio when the image is
rendered at different sizes.
Email Header Template
Store View
Select the template to be used for the header of all
transactional email messages.
Email Footer Template
Store View
Select the template to be used for the footer of all
transactional email messages.
Non-inline CSS File(s)
Store View
Because many mail clients do not support
separate CSS files, Magento uses the non_inline_
styles variable to convert CSS styles to inline
style declarations that reside in the <style> tag of
the template.
Magento Enterprise Edition User Guide, Version 1.14.2
Chapter 2: Managing Email Templates
Transactional Email Configuration
Field Descriptions (cont.)
FIELD
SCOPE
DESCRIPTION
The markup tag is enclosed in double braces, and
includes a variable that contains the name of the
external CSS file.
{{var non_inline_styles}}
The location of the CSS file on the server is
relative to the following path:
skin/frontend/[package]/[theme]/css/
Magento Enterprise Edition User Guide, Version 1.14.2
19
Transactional Email Configuration
Chapter 2: Managing Email Templates
Email Template Setup
After creating a customized version of a template, remember to update your system
configuration so the correct template is used for each message. You can access the template
configuration from the System Configuration menu, or by clicking the link at the top of the
template when open in edit mode.
Sales Email Configuration
Method 1: Link to Configuration
This method is convenient to use when you finish customizing a template. With the
template open in edit mode, simply click the link at the top of the Template Information
section to jump to the configuration settings for the template.
Link to Template Configuration Settings
Method 2: Navigate to the Configuration
This is a convenient method when you have many customized templates that need to be
added to the configuration.
20
Magento Enterprise Edition User Guide, Version 1.14.2
Chapter 2: Managing Email Templates
Transactional Email Configuration
To configure sales email templates:
1.
On the Admin menu, select System > Configuration.
2.
In the panel on the left under Sales, select Sales Emails. Then, select the appropriate
template for the following sections:
Order
Order Comments
Invoice
Invoice Comments
Shipment
Shipment Comments
Credit Memo
Credit Memo Comments
RMA
RMA Admin Comments
RMA Customer Comments
RMA Authorization
Order Email Configuration
3.
When complete, click the Save Config button.
Magento Enterprise Edition User Guide, Version 1.14.2
21
Customizing Email Templates
Chapter 2: Managing Email Templates
To configure customer email templates:
1.
On the Admin menu, select System > Configuration.
2.
In the panel on the left under Customer, select Customer Configuration. Then, select the
appropriate template for the following sections:
l
Create New Account Options
l
Password Options
l
Store Credit Options
Store Credit Options
3.
When complete, click the Save Config button.
Customizing Email Templates
Magento includes a default email template for the body section of each message that is
sent by the system. Each template with the body content is combined with the header and
footer templates to create the complete message. The content is formatted with HTML and
CSS, and can be easily edited, and customized by adding variables and widgets.
The default templates already include your logo and store information and can be used as
they are, without further customization. As a best practice, you should view each default
email template and verify any changes you make before sending them to customers.
When a custom template is ready to be used, make sure to update your system
configuration, so the custom template will be used instead of the default template. Email
templates can be customized for each website, store, or store view. For detailed
instructions, see the following topics:
22
l
Header Template
l
Footer Template
l
Content Templates
Magento Enterprise Edition User Guide, Version 1.14.2
Chapter 2: Managing Email Templates
Customizing Email Templates
Header Template
The default header includes your email logo that is linked to your store. You can easily
insert variables to add store contact information to the header. To make more extensive
changes requires a working knowledge of both HTML and CSS. On the server, the header
template is located at:
[Magento install dir]/app/locale/en_US/template/email/html/header
Step 1: Load the Template
1.
On the Admin menu, select System > Transactional Emails.
2.
Click the Add New Template button. Then, do the following:
3.
a.
Set Template to “Email - Header.”
b.
Set Locale to the language of the email recipients.
Click the Load Template button.
Choosing the Email - Header Template
Step 2: Customize the Template
When working in the template code, be careful not to overwrite anything that is enclosed in
double braces.
1.
In the Template Name field, enter a name for your custom header.
2.
In the Template Content box, modify the HTML as needed.
Magento Enterprise Edition User Guide, Version 1.14.2
23
Customizing Email Templates
Chapter 2: Managing Email Templates
Template Information
3.
To insert a variable, position the cursor in the code where you want the variable to appear,
and click the Insert Variable button. Then, do the following:
a.
In the list of Store Contact Information variables, click the variable that you want to
insert.
You are not limited to the variables in this list, although they are the ones most often
included in the header. You can actually type the code for any system variable directly
into the template.
b.
Click the Preview Template button. Then, make any adjustments to the template that
are needed.
Insert Variable
4.
When complete, click the Save Template button.
Your custom header now appears in the list of Transactional Email templates.
24
Magento Enterprise Edition User Guide, Version 1.14.2
Chapter 2: Managing Email Templates
Customizing Email Templates
Custom Header Template
Step 3: Update the Configuration
1.
On the Admin menu, select System > Configuration.
2.
In the panel on the left, under General, select Design.
3.
If necessary, set the Current Configuration Scope to the website, store, or store view where
the header will be used.
4.
Click to expand the Transactional Emails section, and do the following:
a.
If the header is for a specific view, clear the Use Website checkbox that is next to the
Email Header Template field.
b.
Set Email Header Template to the name of the custom header that you just created.
Configuring a Custom Header for a Specific View
5.
When complete, click the Save Config button.
Magento Enterprise Edition User Guide, Version 1.14.2
25
Customizing Email Templates
Chapter 2: Managing Email Templates
Field Descriptions
FIELD
DESCRIPTION
Load default template
Template
Lists the selection of available templates, and identifies the
template to be customized.
Locale
Identifies the locale where the template is to be used.
Template Information
Template Name
The name of your custom template.
Template Subject
(N/A) This field isn’t used for header templates.
Template Content
The content of the template, in HTML.
Template Styles
(N/A) This field is not used for header templates.
Store Contact Information Variables
VARIABLE
26
MARKUP TAG
Base Unsecure URL
{{config path="web/unsecure/base_url"}}
Base Secure URL
{{config path="web/secure/base_url"}}
General Contact Name
{{config path="trans_email/ident_general/name"}}
General Contact Email
{{config path="trans_email/ident_general/email"}}
Sales Representative
Contact Name
{{config path="trans_email/ident_sales/name"}}
Sales Representative
Contact Email
{{config path="trans_email/ident_sales/email"}}
Custom1 Contact Name
{{config path="trans_email/ident_custom1/name"}}
Custom1 Contact Email
{{config path="trans_email/ident_custom1/email"}}
Custom2 Contact Name
{{config path="trans_email/ident_custom2/name"}}
Custom2 Contact Email
{{config path="trans_email/ident_custom2/email"}}
Magento Enterprise Edition User Guide, Version 1.14.2
Chapter 2: Managing Email Templates
Customizing Email Templates
Store Contact Information Variables (cont.)
VARIABLE
MARKUP TAG
Store Name
{{config path="general/store_information/name"}}
Store Contact Telephone
{{config path="general/store_information/phone"}}
Store Contact Address
{{config path="general/store_information/address"}}
Footer Template
The footer contains the closing and signature line of the email message. You can change the
closing to fit your style, and add additional information, such as the company name and
address below your name. More extensive changes requires a working knowledge of both
HTML and CSS. On the server, you will find the footer template in the following location:
[Magento install dir]/app/locale/en_US/template/email/html/header.html
Step 1: Load the Template
1.
On the Admin menu, select System > Transactional Emails.
2.
Click the Add New Template button. Then, do the following:
3.
a.
Set Template to “Email - Footer.”
b.
Set Locale to the language of the email recipients.
Click the Load Template button.
Choosing the Email - Footer Template
Magento Enterprise Edition User Guide, Version 1.14.2
27
Customizing Email Templates
Chapter 2: Managing Email Templates
Step 2: Customize the Template
When working in the template code, be careful not to overwrite anything that is enclosed in
double braces.
1.
In the Template Name field, enter a name for your custom footer.
2.
In the Template Content box, modify the HTML as needed.
Footer Template Information
3.
To insert a variable, position the cursor in the code where you want the variable to appear,
and click the Insert Variable button. Then, do the following:
a.
In the list of Store Contact Information variables, click the variable that you want to
insert.
b.
When you’re done, click the Preview Template button to verity the code. Then, make
any adjustments to the template that are needed.
Insert Variable
4.
When the template is finalized, click the Save Template button.
Your custom footer now appears in the list of Transactional Email templates.
28
Magento Enterprise Edition User Guide, Version 1.14.2
Chapter 2: Managing Email Templates
Customizing Email Templates
Custom Footer Template
Step 3: Update the Configuration
1.
On the Admin menu, select System > Configuration.
2.
In the panel on the left, under General, select Design.
3.
If necessary, set the Current Configuration Scope to the website, store, or store view where
the header will be used.
4.
Click to expand the Transactional Emails section, and do the following:
5.
a.
If the header is for a specific view, clear the Use Website checkbox that is next to the
Email Footer Template field.
b.
Set Email Footer Template to the name of the custom header that you just created.
When complete, click the Save Config button.
Message Templates
The process of customizing the main body of each message is the same as the customizing
the header or footer. The only difference is that there are many templates, listed in
alphabetical order. You can use the templates as they are, or customize the most important
messages first, such as messages related to customer accounts, and customer activities. For
a complete list, see the Email Template Reference at the end of this section.
Step 1: Choose a Default Template
1.
On the Admin menu, select System > Transactional Emails.
2.
Click the Add New Template button.
3.
In the Template list, select a default template from the list of predefined templates.
Load Default Template
Magento Enterprise Edition User Guide, Version 1.14.2
29
Customizing Email Templates
Chapter 2: Managing Email Templates
4.
If necessary, set the Locale to the store language.
5.
Click the Load Template button.
The path to the configuration settings for each default template appears at the top of the
Template Information section. You can click this link later when you are ready to update
the configuration with the name of the new template.
Template Information
Step 2: Customize the Content
1.
2.
30
In the Template Information section, do the following:
a.
Enter a Template Name for the new email template.
b.
In the Template Subject field, type the text that you want to appear in the Subject
line of the message.
c.
For a better view of the content and variables in the message, click the Convert to
Plain Text button. When prompted to confirm, click OK.
d.
To restore the HTML, click the Return HTML Version button.
e.
Edit the Template Content as needed.
(Optional) To insert a variable, do the following:
Magento Enterprise Edition User Guide, Version 1.14.2
Chapter 2: Managing Email Templates
Customizing Email Templates
a.
Position the cursor in the text where you want the variable to appear.
b.
Click the Insert Variable button.
The list includes the standard Store Contact Information variables, and an additional
list of variables that are specific to the template.
c.
In the list of available variables, click the variable you want to insert into the
template.
When a variable is selected, the markup tag that is associated with the variable is
inserted at the cursor position in the code.
Insert Variable
3.
When complete, click the Save Template button.
4.
Make sure to Preview the template code, and verify that the template is customer-ready.
Step 3: Update Your Configuration
Before the template can be used, the configuration must be updated with the name of the
new template. Do one of the following:
l
l
Click the link at the top of the Template Information section to jump to the
configuration settings for the template.
On the Admin menu, select System > Configuration. Then in the panel on the left,
under Sales, select Sales Emails.
Magento Enterprise Edition User Guide, Version 1.14.2
31
Customizing Email Templates
Chapter 2: Managing Email Templates
Email Templates
Customer Account
Product Alerts
New Account
Product Alerts Cron Error
New Account Confirmation Key
Product Price Alert
New Account Confirmed
Product Stock Alert
Forgot Password
Order Fulfillment
Remind Password
New Order
Customer Activity
New Order for Guest
Contact Form
Order Update
Customer Invitation
Order Update for Guest
Send Product to a Friend
Payment Failed
Share Wishlist
New Invoice
Gift Card Account Sent from Edit Page
New Invoice for Guest
Gift Card Accounts Generated from Gift
Card
Invoice Update
Gift Registry Owner Notification
New Shipment
Gift Registry Sharing
New Shipment for Guest
Gift Registry Update
Shipment Update
Reward Points Balance Update
Shipment Update for Guest
Reward Points Expiry Warning
New Credit Memo
Newsletters
Invoice Update for Guest
New Credit Memo for Guest
Newsletter Subscription Confirmation
Credit Memo Update
Newsletter Subscription Success
Credit Memo Update for Guest
Newsletter Unsubscription Success
Store Credit Update
Admin Activity
New RMA
Forgot Admin Password
New RMA for Guest
Currency Update Warnings
RMA Admin Comments
Import Failed / Export Failed
RMA Admin Comments for Guest
Email - Footer
RMA Authorization
Email - Header
RMA Authorization for Guest
Rule Reminder
RMA Customer Comments
System Notifications
Log Cleanup Warnings
File History Clean Failed
Token Status Change
Sitemap Generate Warnings
32
Magento Enterprise Edition User Guide, Version 1.14.2
Chapter 3:
Managing Data Transfer
The Import/Export tool gives you the ability to manage multiple customer and product
records in a single operation. If you have a large catalog of products, you will find it
much easier to export the data, edit the data in a spreadsheet, and then import the
data back into your store.
The CSV file format separates each data element by a comma, and is used as the
standard for data exchange operations. All spreadsheet and database applications
support the CSV file format. If you are working with a Mac, you should save the data in
the CSV (Windows) format.
Topics in this chapter:
l
Working with CSV Files
l
Importing Data
l
Exporting Data
l
Scheduled Import / Export
Magento Enterprise Edition User Guide, Version 1.14.2
33
Working with CSV Files
Chapter 3: Managing Data Transfer
Working with CSV Files
CSV files have a specific structure that must match the database. Each column heading
must exactly match the Attribute Code of the attribute that is represented by the column.
To ensure that the column headings can be read by Magento, first export the data from
your store as a CSV file. You can then edit the data and re-import it into Magento.
Important! We recommend that you use a program that supports UTF-8 encoding to edit CSV
files, such as Notepad++ or OpenOffice Calc. Microsoft Excel inserts additional characters into
the column header of the CSV file, which can prevent the data from being imported back into
Magento.
Product CSV Structure
The catalog products CSV file contains information about products and the relationships
between them. The table has the following structure:
Exported Product CSV in OpenOffice Calc
The first row of the table contains the names of the columns, there are two types of the
names, as shown in the following table. Other rows contain attributes values, service data,
and complex data. If a row contains the value in the SKU column, then this row the rows
below it describe the product. Each new SKU value begins the description of the next
product.
Each category is entered as a path, with a forward slash (/) between each level. For
example: Furniture/Living Room. Do not include the Root Category in the path.
During import, if a row that contains the SKU value is found to be invalid, then the row,
and all other rows with data for that product cannot be imported.
The minimal valid table contains only the SKU column. It can be used to delete entries
from the database. There is no limit to the number of the columns in the table. Columns
that do not contain data are ignored.
34
Magento Enterprise Edition User Guide, Version 1.14.2
Chapter 3: Managing Data Transfer
Working with CSV Files
Exported Product CSV in Notepad++
Product Column Names
_<name>
The names of the service columns and complex data columns.
Service columns contain entity properties, which are not
attributes. For example, columns with website or product type
information are service columns. The underscore as first
character is used to distinguish these columns from the attribute
column names.
<attribute name>
The names of the columns with values of both system-created
attributes and attributes created by the store administrator.
Customer CSV Structure
The customers CSV file contains customer information from the database, and has the
following structure:
Exported Customer CSV in OpenOffice Calc
The first row of the table contains the names of the attribute columns (which are the same
as attribute codes). There are two types of column names, as shown in the following table.
Other rows contain attribute values, service data, and complex data. Each row with nonempty values in the email and _website columns starts the description of the
subsequent customer. Each row can represent customer data with or without address data,
or the address data only. In case a row contains only the address data, values in the
columns, related to the customer profile, will be ignored and may be empty.
Magento Enterprise Edition User Guide, Version 1.14.2
35
Import
Chapter 3: Managing Data Transfer
To add or replace more than one address for a customer, in the import file add a row for
each new address with empty customer data and the new or updated address data below
the customer data row.
Exported Customer CSV in Notepad++
Customer Column Names
_<name>
The names of the service columns, and complex data columns.
Service columns contain entity properties, which are not
attributes. For example, columns with website or store
information are service columns. The underscore as first
character is used to distinguish these columns from the other
attributes names.
The _address_default_billing and the _address_
default_shipping columns are the default billing and
shipping addresses flags. If the address in the row is the default
billing and/or shipping address of the client, the _address_
default_billing and/or _address_default_shipping
columns in this row will have a value of “1.”
<attribute name>
The names of the columns with values of both system-created
attributes, and attributes created by the store administrator.
Import
Importing is available for all product types, except bundle, gift card, and downloadable
products. You can import customer data, product data, and product images.
File Validation
During the file validation process, all attribute values are checked for conformance with the
required data type (decimal, integer, varchar, text, datetime). Complex data, service data,
and attributes with values from a defined set (such as a drop-down or multiple select), are
checked to ensure their values exist in the defined sets.
For new entities, the presence of the required attribute values is checked. For existing
entities, the presence of required attributes values is not checked, but if a required value is
specified, it is validated by the attribute type.
36
Magento Enterprise Edition User Guide, Version 1.14.2
Chapter 3: Managing Data Transfer
Import
To import customer or product data:
1.
On the Admin menu, select System > Import/Export > Import. Then, do the following:
Import Settings
a.
b.
Set Entity Type to one of the following:
l
Products
l
Customers
Set Import Behavior to the way you want complex data to be managed if imported
records already exist in the database.
l
l
c.
d.
Complex data for products includes categories, websites, custom options, tier prices,
related products, up-sells, cross-sells, and associated products data.
Complex data for customers includes addresses.
Choose one of the following options:
Append Complex
Data
The new complex data will be added to the existing complex
data for the existing entries in the database.
Replace Existing
Complex Data
The existing complex data for the existing entities will be
replaced.
Delete Entities
If entities that are imported already exist in the database, they
will be deleted from the database.
At the Select File to Import field, click the Choose File button. Then, select the CSV
file that you have prepared for import.
2.
Click the Check Data button in the upper-right corner of the page. The system validates the
file. If the file is valid, the corresponding message and the Import button appear. If some of
the rows in the imported file are not valid and cannot be imported, the corresponding
information is included to the message, but you can proceed with importing. The invalid
rows will be skipped.
3.
If needed, make corrections to the CSV file.
4.
Click the Import button to import the data into the database.
Magento Enterprise Edition User Guide, Version 1.14.2
37
Import
Chapter 3: Managing Data Transfer
Importing Product Images
Multiple product images of each type can be imported into Magento, and associated with
the correct product. The path and file name of each product image is entered in the CSV
file, but the actual image files must be uploaded to the media/import directory on the
server.
Magento maintains product images in a directory structure that is organized
alphabetically. When you export product data to a CSV file, you can see the alphabetized
path before the file name of each image. However, when you import images, you typically
don’t need to specify a path, because Magento can manage it automatically. Usually, the
only thing you need to do is enter a forward slash before the file name of each image that is
to be imported.
Review the steps in the import method that you want to use, and run through the process
with a few products. After you understand how it works, you’ll feel confident importing
large quantities of images.
Important! We recommend that you use a program that supports UTF-8 encoding to edit CSV
files, such as Notepad++ or OpenOffice Calc. Microsoft Excel inserts additional characters into
the column header of the CSV file, which can prevent the data from being imported back into
Magento.
Method 1: Import Images to Default Path
The easiest way to import product images is to use Dataflow, and let Magento create and
manage the directory structure. For complete instructions, see Dataflow.
38
Magento Enterprise Edition User Guide, Version 1.14.2
Chapter 3: Managing Data Transfer
Import
Method 2: Import Images to Specific Path
1.
To import image files into a specific path, create the required directory structure in the
media/import folder as follows:
a.
Create the parent folder, named for the first character of the image file name.
b.
Create a subfolder, named for the second character of the image file name. For
example, the import path for filename.jpg would be as follows:
[magento installation folder]/media/import/f/i/filename.jpg
c.
Set the following permissions for all image folders and files:
Image Folders:
0777
Image Files:
0666 (or greater)
To set the appropriate permissions, change directories to the media/import folder,
and enter the following from the command line:
find . -type d -exec chmod 777 {} \;
find . -type f -exec chmod 666 {} \;
2.
In the CSV file, the image path and file name must be entered in the image, small_
image, and media_image columns for the correct SKU, according to image type. If you
prefer, you can use the same image for each type.
a.
In the appropriate column, enter the relative path to each image in the following
format:
/f/i/filename.jpg
Important! Use only lowercase characters in the image path and file name of any image to
be imported.
b.
3.
Make sure that the correct SKU is entered on each row that has an image file.
Complete the standard process to import product data.
Magento Enterprise Edition User Guide, Version 1.14.2
39
Import
Chapter 3: Managing Data Transfer
Import Guidelines
New Entities
Entities are added with the attribute values specified in the CSV file.
If there is no value, or there is a non-valid value, for a required attribute with no default
value set, then the entity (the corresponding row or rows) cannot be imported.
If there is no value, or there is a non-valid value, for a required attribute with the
default value set, then the entity (the corresponding row or rows) is imported, and the
default value is set for the attribute.
If the complex data is not valid, then the entity (the corresponding row or rows)
cannot be imported.
Existing Entities
For attributes that are not complex data, the values from the import file, including the
empty values for the non-required attributes, replace the existing values.
If there is no value, or there is a non-valid value, for a required attribute, then the
existing value is not replaced.
If the complex data for the entity is invalid, the entity (the corresponding row or rows)
cannot be imported, except the case, when Delete Entities was selected in the
Import Behavior drop-down menu.
40
Magento Enterprise Edition User Guide, Version 1.14.2
Chapter 3: Managing Data Transfer
Import
Complex Data
If an attribute that is specified in the import file already exists, and its value is derived
from a defined set of values, the following applies:
If the value is not already included in the defined set of values, the row can be
imported and a default value, if defined, is set for the attribute.
If the value is already included in the defined set, the corresponding row cannot be
imported.
If an attribute name is specified in the import file but is not yet defined in the system, it is
not created, and its values are not imported.
Invalid Files
A file cannot be imported if all rows are invalid.
A non-existing service data or complex data name is specified in the import file, such
as a column with a “_<non-existing name>” heading.
Magento Enterprise Edition User Guide, Version 1.14.2
41
Export
Chapter 3: Managing Data Transfer
Export
The best way to become familiar with the structure of your database is to export the data
and open it in a spreadsheet. Once you become familiar with the process, you’ll find that it
is an efficient way to manage large amounts of information.
All product types except gift cards can be exported.
To export customer or product data:
1.
On the Admin menu, select System > Import/Export > Export.
2.
In the Export Settings section, specify the following:
a.
b.
Set Entity Type to one of the following:
l
Customers
l
Products
Accept the default Export File Format of “CSV.”
Export Settings
3.
In the Entity Attributes section, you can include or exclude data to be exported according
to the entity attribute values.
l
l
42
To include records with specific attribute values, set the required values of the attributes
in the Filter column.
To omit an attribute from the export, select the Skip checkbox at the beginning of the
row.
Magento Enterprise Edition User Guide, Version 1.14.2
Chapter 3: Managing Data Transfer
Dataflow
Export Customers Based on Attribute Value
4.
Scroll down and click the Continue button in the lower-right corner of the page. Look for
the download prompt in the lower-right corner of your browser.
The CSV file that is generated can be edited and imported back into your store. Or, it can be
used for mailing or other application.
Dataflow
Magento Dataflow is a data exchange framework that can be used by both merchants and
developers. The basic Dataflow tool includes preconfigured profiles that make it easy to
import and export product and customer data. The profiles can be used as they are, or be
modified to meet your needs. You can create additional profiles for operations that are
performed on a regular basis. For more sophisticated applications, Advanced Profiles can be
defined in XML to perform custom data exchange operations.
The following instructions show how to use Dataflow profiles to export all product data,
and import new product images.
Step 1: Export All Products
1.
Before you begin, make sure that all changes to the product data have been saved.
2.
On the Admin menu, select System > Import/Export > Dataflow - Profiles.
3.
In the list of profiles, select Export All Products.
4.
In the panel on the left, click Run Profile.
5.
To begin the process, click the Run Profile in Popup button.
Magento Enterprise Edition User Guide, Version 1.14.2
43
Dataflow
Chapter 3: Managing Data Transfer
6.
Wait a few moments for the profile to begin execution. The length of time it takes to
complete the process depends on the size of the database. Do not close the window.
7.
When the process is complete,you can find the exported CSV file in the following location
on the server:
[magento-install-dir]/var/export/export_all_products.csv
Here’s how the exported data file looks from the command line of the server:
Exported CSV File from Command Line
8.
Use an SFTP utility to download the export_all_products.csv file from the server to your
desktop.
Downloaded File
9.
44
Then, open the file in any editor that supports UTF-8 encoding, such as Notepad++ or
OpenOffice Calc. To open the CSV file in OpenOffice Calc,specify a comma as the separator,
and double quotes as the text delimiter.
Magento Enterprise Edition User Guide, Version 1.14.2
Chapter 3: Managing Data Transfer
Dataflow
Text Import Separator Options
The CSV data appears in the spreadsheet as rows of product records organized into
columns of attributes, with the Attribute Code in the header of each column.
Exported Product Data in OpenOffice Calc
Step 2: Copy Images to the Server
The CSV file contains a path to each product image, but the actual image files must be
uploaded to the server. To make the images available to import, place them in the
media/import directory.
[magento-install-dir]/media/import
Use your SFTP utility to copy the product images that you want to import to the
media/import folder.
Magento Enterprise Edition User Guide, Version 1.14.2
45
Dataflow
Chapter 3: Managing Data Transfer
Copy Images to media/import Folder
Step 3: Edit the CSV File
1.
Edit the data as needed.
2.
Save your changes to the CSV file.
For this example, we will add three new images to SKU #hdb005. Because this is the only
product record that we’re going to update, the others can be deleted from the CSV file.
Currently, this product has only one image that is used for the base image, small image,
and thumbnail. Because we’re going to now offer this product in three colors, we need to
upload an image for each color, and replace the image that’s currently assigned to the
product. Because this is a simple product, we can later use Custom Options to add an
option for each color.
Magento creates a directory structure of product image files that is organized
alphabetically. You can see that path before each image file name in the CSV data.
However, when you import images, you must never include that path before the file name.
The only thing you have to do is to enter a forward slash before the file name of each image
that you want to import. Magento takes care of the rest. For this example, we need to add
the three image files that were uploaded to the media/import folder.
/hdb005_HOTP_600.jpg
/hdb005_MARM
/hdb005_SALM_600.jpg
In the data, we will replace the original image file name, and add the other two image file
references on separate blank lines. just below the original row. You must also enter the SKU
on each additional line, to associate the images with the product.
46
Magento Enterprise Edition User Guide, Version 1.14.2
Chapter 3: Managing Data Transfer
Dataflow
Update the CSV File with the Import Data
Step 4: Import Products
1.
On the Admin menu, select System > Import/Export > Dataflow - Profiles.
2.
In the list of profiles, select Import All Products.
This general-purpose profile that can be used to import or update any number or product
records.
3.
In the panel on the left, select Upload File.
4.
Because we’re uploading only one file, click the Browse button for File 1. Then, find the file
on your computer and click to select it. The path to the file appears in the input box.
5.
Click the Save and Continue Edit button.
6.
In the panel on the left, select Run Profile.
7.
Select the CSV file that you edited. If there are several files in the list, make sure to select
the right one. Then, click the Run Profile in Popup button.
8.
Wait a few moments for the profile to begin the import process. Do not close the window or
interrupt the process. Look for the “Finished Profile Execution” message at the bottom of
the list when the import process is complete. If you receive an error message, correct the
problem in the CSV file, and try again.
Step 5: Update the Index
Usually the index needs to be updated after changes are made to product data. If you
receive a message that the indexes are out of date, click the link and update the index.
Magento Enterprise Edition User Guide, Version 1.14.2
47
Scheduled Import/Export
Chapter 3: Managing Data Transfer
Scheduled Import/Export
Scheduled imports and exports can be run on a daily, weekly or monthly basis. The files to
be imported or exported can be located on local Magento servers, or on remote FTP servers.
Scheduled Import/Export is implemented by default, and does not require additional
configuration. All scheduled imports and exports are managed by the Cron job scheduler.
To access the scheduled import/export:
1.
On the Admin menu, select System > Import/Export > Scheduled Import/Export.
Scheduled Import/Export
2.
To create a new scheduled import or export job, click the Add Scheduled Import or Add
Scheduled Export button. After saving the record, a new scheduled import or export is
added to the list on the Scheduled Import/Export page.
3.
After each scheduled import and export operation, a copy of the import or export file is
placed in the var/log/import_export/%Y%/%m%/%d%/ directory on the Magento local
server.
The details of each import/export operation are not written to a log, but if an error occurs,
you will receive an Import or Export Failed email, which contains the error description.
After each import job, a reindex operation is performed automatically.
48
Magento Enterprise Edition User Guide, Version 1.14.2
Chapter 3: Managing Data Transfer
Scheduled Import/Export
Scheduled Import
The Scheduled Import process is similar to the manual Import process, with respect to the
available import file format and types of import entities:
l
The import file should be in .CSV format
l
You can import product and customer data
The advantage of using Scheduled Import is that you can import a data file multiple times
automatically, after specifying the import parameters, and schedule only once.
The details of each import operation are not written to a log, but in case of failure you will
receive an Import Failed email, with a description of the error. The result of the last
scheduled import job is shown in the Last Outcome column on the Scheduled
Import/Export page.
After each import operation, a copy of the import file is placed in the var/log/import_
export/%Y%/%m%/%d%/ directory on the server where Magento is deployed. The
timestamp, the marker of the imported entity (products or customers), and the type of the
operation (in this case, import) are added to the import file name.
After each scheduled import job, a reindex operation is performed automatically. On the
frontend, changes in the descriptions and other text information are reflected after the
updated data goes to the database, and the changes in prices are reflected only after the
reindex operation.
Process Overview
Step 1: Complete the Import Settings
Step 2: Complete the Import File Information
Step 3: Configure the Import Failed Emails
To create a scheduled import:
1.
On the Admin menu select System > Import/Export.
2.
In the upper-right corner, click the Add Scheduled Import button. Then, do the following:
Magento Enterprise Edition User Guide, Version 1.14.2
49
Scheduled Import/Export
Chapter 3: Managing Data Transfer
Step 1: Complete the Import Settings
1.
Enter a Name for the scheduled import.
2.
Enter a brief Description that explains the purpose of the import, and how it is to be used.
3.
Set Entity Type to one of the following:
4.
l
Products
l
Customers
Set Import Behavior to one of the following:
Append Complex
Data
Adds new complex data to the existing complex data for existing
entries in the database. This is the default value.
Replace Existing
Complex Data
Writes over existing complex for existing entities in the database.
Delete Entities
Deletes existing entries in the database.
5.
Set Start Time to the hour, minute, and second that the import is scheduled to begin.
6.
Set Frequency to one of the following:
7.
l
Daily
l
Weekly
l
Monthly
To activate the scheduled import, set Status to “Enabled.”
Import Settings
50
Magento Enterprise Edition User Guide, Version 1.14.2
Chapter 3: Managing Data Transfer
Scheduled Import/Export
Step 2: Complete the Import File Information
1.
Set Server Type to one of the following:
Local Server
Imports the data from the same server where Magento is
installed.
Remote FTP
Imports the data from a remote server.
Import File Information
2.
Enter the File Directory where the import file originates.
l
l
For Local Server, enter a relative within the Magento installation. For example,
var/import.
For Remote FTP server, enter the full URL and path to the import folder on the remote
server.
3.
Enter the File Name to be imported.
4.
For a Remote FTP connection, do the following:
a.
In the FTP Host [:Port] field, enter the domain name or IP address of the remote FTP
server where the import file directory is located.
b.
Enter the following FTP credentials for the remote server:
c.
d.
l
User Name
l
Password
Set File Mode to one of the following formats:
l
Binary
l
ASCII
Set Passive Mode to one of the following:
Yes
The server determines which port is used for the data channel. This
setting is generally used if the server has a firewall.
No
The client determines both the port and the data channel.
Magento Enterprise Edition User Guide, Version 1.14.2
51
Scheduled Import/Export
Chapter 3: Managing Data Transfer
Step 3: Configure the Import Failed Emails
1.
Set Failed Email Receiver to the store contact who is to receive notification if an error
occurs during the import.
2.
Set Failed Email Sender to the store contact that appears as the sender of the notification.
3.
Set Failed Email Template to the template that is used for the notification.
4.
In the Send Failed Email Copy To field, enter the email address of anyone who is to
receive a copy of the notification. Separate multiple email addresses with a comma.
5.
Set Failed Email Copy Method to one of the following:
Bcc
Sends a blind courtesy copy of the failed import notification.
The name and address of the recipient is included in the
original email distribution, but hidden from view.
Separate Email
Sends a copy of the failed import notification as a separate
email.
Import Failed Emails
6.
When complete, click the Save button.
The new scheduled import job is added to the list on the Scheduled Import/Export page.
From this page it can be run immediately for testing and edited. The import file is
validated before the execution of each import job.
52
Magento Enterprise Edition User Guide, Version 1.14.2
Chapter 3: Managing Data Transfer
Scheduled Import/Export
Field Descriptions
FIELD
DESCRIPTION
IMPORT SETTINGS
Name
The name of the import. Helps you to distinguish it if many
different scheduled imports are created.
Description
(Optional) You can enter an additional description.
Entity Type
Defines the data to be imported. Options include: Products /
Customers.
Import Behavior
Defines how complex data will be handled if entities, which are
being imported, already exist in the database. Complex data for
products include categories, websites, custom options, tier
prices, related products, up-sells, cross-sells, and associated
products data. Complex data for customers include addresses.
The following variants of handling the complex data are available:
Append Complex
Data
The new complex data will be added to
the existing complex data for the already
existing entries in the database. This is
the default value.
Replace Existing
Complex Data
The existing complex data for the
already-existing entities will be replaced.
Delete Entities
If entities which are being imported
already exist in the database, they will
be deleted from the database.
Start Time
Set the start hour, minutes, and seconds of the import.
Frequency
Define how often the import will be run. Options include:
Daily/Weekly/Monthly.
On Error
Define the system behavior in case errors are found during file
validation. Options include:
Stop Import
The file is not imported if any errors are
found during validation. This is the
default value.
Continue
Processing
In case errors are found during
validation, but importing is possible, the
file is imported.
Magento Enterprise Edition User Guide, Version 1.14.2
53
Scheduled Import/Export
Chapter 3: Managing Data Transfer
Field Descriptions (cont.)
FIELD
Status
DESCRIPTION
The import is enabled by default. You can suspend it by setting
the Status to Disabled.
IMPORT FILE INFORMATION
54
Server Type
You can import from a file located on the same server where
Magento is deployed (select Local Server) or from the remote
FTP server (select Remote FTP). If you select Remote FTP,
additional options for credentials and file transfer settings appear.
File Directory
Specify the directory where the import file is located. If Server
Type is set to Local Server, specify the path relative to the
Magento installation directory. For example, var/import.
File Name
Specify the name of the import file.
FTP Host[:Port]
(Appears if Server Type is set to Remote FTP) Specify the FTP
host domain name or IP address of the FTP server where the
import file directory is located.
User Name
(Appears if Server Type is set to Remote FTP) Specify the user
name for accessing the remote FTP server.
Password
(Appears if Server Type is set to Remote FTP) Specify the
password for accessing the remote FTP server.
File Mode
(Appears if Server Type is set to Remote FTP) Defines the file
mode, in which the file will be transferred from the remote FTP.
Select Binary or ASCII.
Passive Mode
(Appears if Server Type is set to Remote FTP) Defines whether
the file is transferred from the remote FTP in passive mode.
Options include:
Yes
The server determines which port is used for the
data channel. This setting is generally used if the
server has a firewall.
No
The client determines both the port and the data
channel.
Magento Enterprise Edition User Guide, Version 1.14.2
Chapter 3: Managing Data Transfer
Scheduled Import/Export
Field Descriptions (cont.)
FIELD
DESCRIPTION
IMPORT FAILED EMAILS
Failed Email Receiver
Specify the email address to which an email notification (failed
import email) is sent if the import fails.
Failed Email Sender
Specify the email address that is used as the sender for the
import failed email.
Failed Email Template
Select a template for the import failed email. By default, only the
Import Failed (Default Template from Locale option is available.
Custom templates can be created under System > Transactional
Emails.
Send Failed Email Copy
To
The email address to which a copy of import failed email is sent.
Send Failed Email Copy
Method
Select the copy sending method for the import failed email.
Magento Enterprise Edition User Guide, Version 1.14.2
55
Scheduled Import/Export
Chapter 3: Managing Data Transfer
Scheduled Export
Scheduled Export is similar to manual Export, with respect to the available export file
format and types of entities that can be exported:
l
You can export to .CSV format
l
You can export product and customer data
The advantage of using Scheduled Export is that you can export data multiple times
automatically, after specifying the export parameters, and schedule only once
Add Scheduled Export
The details of each export are not written to a log, but in case of failure you will receive an
Export Failed email, which contains the error description. The result of the last export job
appears in the Last Outcome column on the Scheduled Import/Export page.
After each export, the export file is placed in the user-defined location, and a copy of the
file is placed in the var/log/import_export/%Y/%m/%d/ directory on the server where
Magento is deployed. The timestamp and the marker of the exported entity (products or
customers) and type of the operation (in this case, export) are added to the export file
name.
Process Overview
Step 1: Complete the Export Settings
Step 2: Complete the Export File Information
Step 3: Configure the Export Failed Emails
Step 4: Choose the Entity Attributes
To create a scheduled export:
56
1.
On the Admin menu, select System > Import/Export > Scheduled Import/Export.
2.
In the upper-right corner, click the Add Scheduled Export button. Then, do the following:
Magento Enterprise Edition User Guide, Version 1.14.2
Chapter 3: Managing Data Transfer
Scheduled Import/Export
Step 1: Complete the Export Settings
1.
Enter a Name for the scheduled export.
2.
Enter a brief Description that explains the purpose of the export, and how it is to be used.
3.
Set Entity Type to one of the following:
l
Products
l
Customers
The Entity Attributes section at the bottom of the page is updated to reflect the selected
Entity Type.
4.
Accept “CSV” as the default File Format.
5.
Set Start Time to the hour, minute, and second that the export is scheduled to begin.
6.
Set Frequency to one of the following:
7.
l
Daily
l
Weekly
l
Monthly
To activate the scheduled export, set Status to “Enabled.”
Export Settings
Step 2: Complete the Export File Information
1.
Set Server Type to one of the following:
Local Server
To save the export file on the same server where Magento is
installed.
Remote FTP
To save the export file on a remote server.
Magento Enterprise Edition User Guide, Version 1.14.2
57
Scheduled Import/Export
Chapter 3: Managing Data Transfer
Export File Information
2.
Enter the File Directory where the export file is to be saved as follow:.
l
l
3.
For Local Server, enter a relative path within the Magento installation. For example,
var/export.
For Remote FTP server, enter the full URL and path to the target folder on the
destination server.
For a Remote FTP connection, do the following:
a.
In the FTP Host [:Port] field, enter the domain name or IP address of the remote FTP
server where the export file directory is located.
b.
Enter the following FTP credentials for the remote server:
c.
d.
l
User Name
l
Password
Set File Mode to one of the following formats:
l
Binary
l
ASCII
Set Passive Mode to one of the following:
Yes
The server determines which port is used for the data channel. This
setting is generally used if the server has a firewall.
No
The client determines both the port and the data channel.
Remote FTP Settings
58
Magento Enterprise Edition User Guide, Version 1.14.2
Chapter 3: Managing Data Transfer
Scheduled Import/Export
Step 3: Configure the Export Failed Emails
1.
Set Failed Email Receiver to the store contact who is to receive notification if an error
occurs during the export.
2.
Set Failed Email Sender to the store contact that appears as the sender of the notification.
3.
Set Failed Email Template to the template that is used for the notification.
4.
In the Send Failed Email Copy To field, enter the email address of anyone who is to
receive a copy of the notification. Separate multiple email addresses with a comma.
5.
Set Failed Email Copy Method to one of the following:
Bcc
Sends a blind courtesy copy. The name and address of the
recipient is included in the original email distribution, but is
hidden from view.
Separate Email
Sends the copy as a separate email.
Export Failed Emails
Step 4: Choose the Entity Attributes
1.
In the Entity Attributes section, choose the attributes that you want to include in the
export data.
l
l
2.
To filter export data by attributes value, enter the attribute value in the Filter column.
To exclude products or customers with certain attribute values, enter the values of the
attributes that you want to exclude, and select the checkbox in the Skip column.
When complete, click the Save button.
The new scheduled export job is added to the list on the Scheduled Import/Export page.
From this page it can be run immediately, for testing, and edited.
Magento Enterprise Edition User Guide, Version 1.14.2
59
Scheduled Import/Export
Chapter 3: Managing Data Transfer
Field Descriptions
FIELD
DESCRIPTION
EXPORT SETTINGS
Name
The name of the export. Helps you to distinguish it if many
different scheduled exports are created.
Description
(Optional) A description of the scheduled export.
Entity Type
Identifies the data to be exported. After the selection is made, the
Entity Attributes appear below. Options include: Products
/Customers.
File Format
Select the format of the export file. Currently only the .CSV
option is available.
Start Time
Set the start hour, minutes, and seconds of the export.
Frequency
Define how often the export job will be executed. Options
include:Daily/Weekly/Monthly.
Status
A new scheduled export is enabled by default. You can suspend
it by setting Status to Disabled. Options include:
Enabled/Disabled.
EXPORT SETTINGS INFORMATION
Server Type
60
Determines the location of the export file. Options include:
Local Server
Places the export file on the
same server where Magento is
deployed.
Remote FTP
Places the export file on a
remote server. Additional options
for credentials and file transfer
settings appear.
File Directory
Specify the directory where the export file is placed. In case
Server Type is set to Local Server, specify the relative to
Magento installation path. For example, var/export.
FTP Host[:Port]
(Visible if Server Type is set to Remote FTP) Specify the FTP
host domain name or IP address of the FTP server where the
export file directory is located.
Magento Enterprise Edition User Guide, Version 1.14.2
Chapter 3: Managing Data Transfer
Scheduled Import/Export
Field Descriptions (cont.)
FIELD
DESCRIPTION
User Name
(Visible if Server Type is set to Remote FTP) Specify the user
name for accessing the remote FTP server.
Password
(Visible if Server Type is set to Remote FTP) Specify the
password for accessing the remote FTP server.
File Mode
(Visible if Server Type is set to Remote FTP) Defines the file
mode in which the file will be transferred to the remote FTP.
Select Binary or ASCII.
Passive Mode
(Visible if Server Type is set to Remote FTP) Determines how
the port is established for the connection. Options include:
Yes
The server determines the port to be used for the
data channel. This setting is generally used if the
server has a firewall.
No
The client determines both the port and the data
channel.
EXPORT FAILED EMAILS
Failed Email Receiver
Specify the email address to which an email notification (export
failed email) is sent if the export fails.
Failed Email Sender
Specify the email address that is used as export failed email
sender.
Failed Email Template
Select a template for the failed export email. By default, only the
Export Failed (Default Template from Locale) option is available.
Send Failed Email Copy
To
The email address to which a copy of the failed export email is
sent.
Send Failed Email Copy
Method
Specify the copy sending method for the export failed email.
Magento Enterprise Edition User Guide, Version 1.14.2
61
Scheduled Import/Export
Chapter 3: Managing Data Transfer
Managing Scheduled Jobs
You can view and manage all existing scheduled imports/exports on the Scheduled
Import/Export page. All existing scheduled import/export jobs appear in the list. The Last
Outcome column shows the result of the last job. If the import or export has not been run
yet, it has the value “Pending.”
After each scheduled import and export operation copies of import and export files are
placed in the var/log/import_export/%Y/%m/%d/ directory. If History Cleaning is enabled,
the older files are automatically deleted.
To access scheduled imports/exports:
1.
On the Admin menu, select System > Import/Export > Scheduled Import/Export.
2.
To run the scheduled import/export immediately, in the Action column, click Run.
3.
To edit the scheduled import/export, in the Action column, click Edit, or click the
import/export job in list.
4.
To delete scheduled imports/exports, do the following:
5.
a.
Select the checkbox of each scheduled import/export job to be deleted.
b.
Set the Actions control to “Delete.”
c.
Click the Submit button.
d.
When prompted to conform, click OK.
To change status of scheduled imports/exports:
a.
Select the checkbox of each record to be changed.
b.
Set the Actions control to “Change Status.” Then, set the Status control to the setting
you want to apply to the selected records.
c.
Click the Submit button to update the records.
To configure file history cleaning:
62
1.
On the Admin menu, select System > Configuration.
2.
Because this task takes place on a global level, make sure Current Configuration Scope in
the upper-right corner is set to “Default Config.”
3.
In the Configuration panel on the left, under Advanced, select System.
4.
Click to expand the Scheduled Import/Export File History Cleaning section.
Magento Enterprise Edition User Guide, Version 1.14.2
Chapter 3: Managing Data Transfer
Scheduled Import/Export
Scheduled Import/Export File History Cleaning
5.
Complete the fields in this section, using the following field descriptions for reference.
6.
When complete, click the Save Config button.
Field Descriptions
FIELD
SCOPE
DESCRIPTION
Save Files, Days
Global
Specify for how long import/export history files are
stored.
Enable File History
Cleaning
Global
Select Yes if you want to activate the automatic
deletion of old import/exports files. By default, it is
set to No.
Start Time
Global
Specify the time when the files deletion starts.
Frequency
Global
Specify how often the cron checks if there are
history files that should be deleted. Options
include: Daily/Weekly/Monthly.
Error Email Recipient
Global
Specify the email address to which the error email
is sent if the file cleaning process fails.
Error Email Sender
Global
Select the email address from which the error
email is sent.
Error Email Template
Global
Select the template for the error email. By default,
only the File History Cleaning Failed (Default
Template from Locale) option is available.
Magento Enterprise Edition User Guide, Version 1.14.2
63
Scheduled Import/Export
Chapter 3: Managing Data Transfer
Notes
64
Magento Enterprise Edition User Guide, Version 1.14.2
Chapter 4:
Reports
Magento Enterprise Edition provides a wide selection of reports to keep you current on
everything from the contents of your customers’ shopping carts to the tags they use.
Report data can be viewed online or downloaded as a CSV or XML data file. The main
types of reports are Sales, Invitations, Products, Customers, Tags, Reviews, and Search
Terms.
Topics in this chapter:
l
Dashboard
l
Running Reports
l
Refreshing Report Statistics
l
Available Reports
Magento Enterprise Edition User Guide, Version 1.14.2
65
Dashboard
Chapter 4: Reports
Dashboard
The dashboard is usually the first page that appears when you log in to the Admin, and
gives an overview of sales and customer activity.
The blocks on the left provide a snapshot of lifetime sales, average order amount, the last
five orders, and search terms. The graph depicts the orders and amounts for the selected
date range. You can use the tabs above the graph to toggle between the two views.
Topics in this section include:
l
Snapshot Reports
l
Dashboard Setup
Dashboard
66
Magento Enterprise Edition User Guide, Version 1.14.2
Chapter 4: Reports
Dashboard
Snapshot Reports
The tabs at the bottom of the Dashboard provide quick reports about your best-selling and
most viewed products, new customers and those who have purchased the most.
Bestsellers
Lists your best-selling products, showing the price and quantity ordered.
Most Viewed Products
Lists the most recently viewed products and the number of times viewed.
New Customers
Lists recently registered customers.
Customers
Lists the customers who have ordered the most during the specified range of time.
Dashboard Setup
By default, the dashboard is the startup page for the Admin. However, if you prefer, you
can change the configuration to display a different page when you log in. You can also set
the starting dates used in dashboard reports, and disable the display of the charts section.
To set the date range:
Set Select Range to one of the following:
l
Last 24 Hours
l
Last 7 Days
l
Current Month
l
YTD
l
2YTD
To set the starting dates:
1.
On the Admin menu, select System > Configuration.
2.
In the panel on the left, under General, select Reports.
3.
Click to expand the Dashboard section, do the following:
Magento Enterprise Edition User Guide, Version 1.14.2
67
Dashboard
Chapter 4: Reports
a.
Set Year-To-Date Starts to the month and year that the current year began.
b.
Set Current Month Starts to the current month.
Dashboard
To change the Admin startup page:
1.
On the Admin menu, select System > Configuration. Then in the Configuration panel on
the left, under Advanced, select Admin.
2.
In the Admin UI section, set Startup Page to the page you want to first appear when you
log in to the Admin.
3.
Click the Save Config button to save the setting.
Startup Page
To turn off real-time data:
If you have a lot of data to process, the performance of the Dashboard can be improved by
turning off the display of real time data.
1.
On the Admin menu, select System > Configuration. Then in the Configuration panel on
the left, under Sales, select Sales.
2.
Click to expand the Dashboard section. Then, set Use Aggregated Data (beta) to “Yes.”
To disable charts:
1.
On the Admin menu, select System > Configuration. Then in the Configuration panel on
the left, under Advanced, select Admin.
Turn Off Dashboard Charts
2.
In the Dashboard section, set Enable Charts to “No.”
3.
When complete, click the Save Config button.
A message on the Dashboard indicates that the chart is now disabled.
68
Magento Enterprise Edition User Guide, Version 1.14.2
Chapter 4: Reports
Running Reports
Running Reports
Magento provides a variety of reports that you can access at any time. To see the reports
that you can generate in Magento, from the Reports menu, select a type of report and then
select a specific report of that type. Some report pages have filter controls that enable you
to narrow the scope of the report.
When you are finished making filter selections, click Show Report (or Refresh, for some
reports) to generate the report.
Reports
Orders Report
The Orders report includes real-time data, and can include orders of any status during a
specific period of time.
To run the Orders report:
1.
On the Admin menu, select Reports > Sales > Orders. Then, do the following:
a.
A message indicates the last time the report statistics were refreshed. If necessary,
click the link to refresh the statistics.
b.
Set Show Report for to the website, store, or store view that you want to include in
the report.
c.
Set Match Period To to one of the following:
d.
l
Order Created Date
l
Order Updated Date
To determine how the report data is aggregated by row, set Period to one of the
following:
l
Day
l
Month
l
Year
Magento Enterprise Edition User Guide, Version 1.14.2
69
Running Reports
Chapter 4: Reports
e.
To include activity during a specfic period, click the calendar icon
and select the
From and To dates.
f.
Do one of the following:
l
l
2.
To include all orders, set Order Status to “Any.”
To include only orders with a specific status, set Order Status to “Specified.” Then,
select each order status that you want to include in the report.
g.
To omit any empty rows from the report, set Empty Rows to “No.”
h.
To show actual, rather than projected values, set Show Actual Values to “Yes.”
When ready to run the report, click the Show Report button.
Orders Report by Month
To export report data:
1.
2.
70
Set the Export to control to one of the following:
l
CSV
l
Excel XML
Click the Export button. Then, look for the download file in the lower-left corner of your
browser window.
Magento Enterprise Edition User Guide, Version 1.14.2
Chapter 4: Reports
Running Reports
Field Descriptions
FILTER CONTROL
DESCRIPTION
Show Report For
Determines the store view or website(s) to be included in the
report.
Match Period To
Enables you to select which records to report on, based on either
the order creation date or the order modified date.
Period
Enables you to aggregate the report data into rows for each day,
month, or year within your report From and To dates.
From and To
Determines the start and end dates covered by the report.
Order Status
For Order Status, select Any to include all orders, or select
Specified to select one or more order status values from a list.
Empty Rows
Enables you to select whether to include date period rows that
have no data.
Show Actual Values
Enables you to select whether to display actual (Yes) or projected
(No) values. Projected values are based on estimates of amounts
to be paid.
Magento Enterprise Edition User Guide, Version 1.14.2
71
Running Reports
Chapter 4: Reports
Refreshing Report Statistics
To reduce performance impact when generating sales reports, Magento calculates and
stores the statistics that are needed for each report. When you generate a report, the report
uses the stored statistics, rather than recalculate the statistics for each report.
To include the most recent data, the sales report statistics must be refreshed manually
before the report is generated.
Report Statistics
To refresh sales report statistics:
1.
On the Admin menu, select Reports > Refresh Statistics.
2.
In the list, select the checkbox of each report that needs to be refreshed.
3.
Set the Actions control to one of the following:
4.
l
Refresh Lifetime Statistics
l
Refresh Statistics for the Last Day
When complete, click the Submit button.
Available Reports
Report Descriptions
REPORT
Total Ordered
DESCRIPTION
Reports > Sales > Orders
Shows orders for the specified time period.
Order Taxes
Reports > Sales > Tax
Shows taxes charged for orders in the specified time period;
grouped by tax rate.
Total Invoiced vs. Paid
72
Reports > Sales > Invoiced
Magento Enterprise Edition User Guide, Version 1.14.2
Chapter 4: Reports
Running Reports
Report Descriptions (cont.)
REPORT
DESCRIPTION
Shows amounts paid and unpaid for invoiced orders in the
specified time period.
Total Shipped
Reports > Sales > Shipping
Shows orders shipped in the specified time period, grouped by
carrier/method; includes shipping charge amounts.
Total Refunded
Reports > Sales > Refunds
Shows refunds applied to orders in the specified time period.
Coupons Usage
Reports > Sales > Coupons
Shows coupons used for orders in the specified time period,
grouped by coupon code.
PayPal Settlement
Reports > Sales > PayPal Settlement Reports
Shows PayPal settlements for the specified time period. Click
Fetch Updates to retrieve data from PayPal.
Products in Carts
Reports > Shopping Cart > Products in carts
Shows products that are currently in shopping carts.
Abandoned Carts
Reports > Shopping Cart > Abandoned Carts
Shows shopping carts that were started but then abandoned.
Enables you to contact customers to offer incentives to turn an
abandoned cart into a conversion.
Products Bestsellers
Reports > Products > Bestsellers
Shows the products that were sold in the highest quantity in the
specified time period.
Products Ordered
Reports > Products > Products Ordered
Shows all products that were ordered in the specified time period.
Most Viewed
Reports > Products > Most Viewed
Shows the products that were viewed the most times in the
specified time period.
Low Stock
Reports > Products > Low Stock
Shows the products whose stock levels are low.
Downloads
Reports > Products > Downloads
Magento Enterprise Edition User Guide, Version 1.14.2
73
Running Reports
Chapter 4: Reports
Report Descriptions (cont.)
REPORT
DESCRIPTION
Shows the number of purchases and downloads for each
downloadable product.
New Accounts
Reports > Customers > New Accounts
Shows the new accounts that were created during the specified
time period.
Customers by Orders
Total
Reports > Customers > Customers by orders total
Customers by Number of
Orders
Reports > Customers > Customers by number of orders
Customers Reviews
Reports > Reviews > Customers Reviews
Shows the customers listed in descending order of total order
amount.
Shows the customers listed in descending order of number of
orders placed.
Shows the customers listed in descending order of number of
reviews contributed.
Products Reviews
Reports > Reviews > Products Reviews
Shows the products listed in descending order of number of
reviews.
Customers Tags
Reports > Tags > Customers
Shows the customers listed with the number of tags each one
has created.
Products Tags
Reports > Tags > Products
Shows the number of unique tags and total number of tags
created for each product.
Popular Tags
Reports > Tags > Popular
Shows the number of times each tag has been applied.
Search Terms
Reports > Search Terms
Shows terms submitted with the search tool.If Hits are high, but
the Results are low, you should review product names and
descriptions so you can promote products related to the term.
74
Magento Enterprise Edition User Guide, Version 1.14.2
Chapter 5:
Admin Permissions
Magento uses roles and permissions to create different levels of access to the Admin.
When your store is first set up, you receive a set of login credentials for the
Administrator role, with full permissions. However, you can restrict the level of
permissions on a “need to know” basis for other people who work on your site. For
example, a designer can be given access to only the Design tools, but not to areas with
customer and order information.
In addition, you can further restrict Admin access to only a specific site, or set of sites
and their associated data. If you have multiple brands or business units with separate
stores on the same Magento installation, you can provide Admin access to each of your
business units but hide and protect their data from other Admin users.
If an Admin user’s access is restricted to a specific set of websites and/or stores, the
websites and stores for which they are not authorized will either not appear or be
grayed-out as inactive. Only the sales and other data for allowed websites and stores is
shown.
Topics in this chapter:
l
Creating New Users
l
Custom Roles
l
REST Roles
l
Unlocking Accounts
Magento Enterprise Edition User Guide, Version 1.14.2
75
Creating New Users
Chapter 5: Admin Permissions
Creating New Users
When your store is first installed, your login credentials have with full administrative
access. As a best practice, one of the first things you should do is to create another user
account with full Administrator permissions. That way, you can use one account for your
everyday Administrative activities, and reserve the other as a “Super Admin” account in
case you forget your regular credentials or they somehow become otherwise unusable.
If there are others on your team, or service providers who need access, you can create a
separate user account for each, and assign a restricted role. To limit the websites or stores
that admin users can access when they log in, you must first create a role with limited
scope and resources. Then, you can assign the role to a specific user account. Admin users
assigned to a restricted role can see and change data only for websites or stores that are
associated with the role. They cannot change any global settings or data.
Step 1: Create a New User
1.
On the Admin menu, select System > Permissions > Users.
2.
Click the Add New User button.
3.
In the Account Information section, do the following:
Account Information
a.
Enter the User Name for account.
The User Name should be easy to remember. It is not case-sensitive. For example, if
your user name is “John,” you can also log in as “john.”
b.
Complete the following information:
l
First Name
l
Last Name
l
Email address
This email address must be different from the one that is associated with your
original Admin account.
76
Magento Enterprise Edition User Guide, Version 1.14.2
Chapter 5: Admin Permissions
c.
Creating New Users
Assign a Password to the account.
The password should be seven or more characters long, and include both letters and
numbers.
d.
4.
In the Password Confirmation box, repeat the password to make sure it was entered
correctly.
Set This Account is to “Active.”
Step 2: Define the Role
1.
In the User Information panel on the left, click User Role. Then, in the list of Roles, select
Administrators. (Initially, it will be the only role available.)
Add New User Role
2.
When complete, click the Save User button.
You now have two accounts with Administrator access.
Magento Enterprise Edition User Guide, Version 1.14.2
77
Custom Roles
Chapter 5: Admin Permissions
Custom Roles
To give someone restricted access, the first step is to create a role with the appropriate level
of permissions. After the role is created, you will add the new user, set up the login
credentials, and assign the role to the user account. After the role is established, you can
create new Administrator users at any time, and assign the restricted role to grant the user
limited access to the following resources:
l
Price Resources
l
Promotion Resources
l
Product Resources
Add New Role
Step 1: Define the Role
1.
On the Admin menu, select System > Permissions > Roles. Then in the upper-left corner,
click the Add New Role button.
2.
In the Role Information section, enter a descriptive Role Name.
Role Name
3.
78
In the panel on the left, select Role Resources.
Magento Enterprise Edition User Guide, Version 1.14.2
Chapter 5: Admin Permissions
4.
Custom Roles
In the Role Scope section, set Role Scopes to “Custom.” Then, select the checkbox of each
website and view to which you want to grant permission.
Role Scopes
5.
In the Roles Resources section, select the checkbox of each Admin Resource that you want
to grant those with the role permission to access.
Important! Be sure to disable access to the Permissions tool if you are limiting access for a
given role. Otherwise, users with this role will be able to modify their own restrictions.
Role Resources, Collapsed View
6.
(Optional) In the panel on the left, select Role Users. Then, assign additional
Administrator user accounts to the new role.
7.
When complete, click the Save Role button. The role now appears in the list.
Step 2: Add the New User
1.
On the Admin menu, select System > Permissions > Users.
2.
Click the Add New User button.
3.
In the Account Information section, do the following:
Magento Enterprise Edition User Guide, Version 1.14.2
79
Custom Roles
Chapter 5: Admin Permissions
Account Information
a.
Assign a User Name to the account.
The User Name should be easy to remember. It is not case-sensitive. For example, if
your user name is “john,” you can also log in as “John.”
b.
c.
Complete the following information:
l
First Name
l
Last Name
l
Email address
Assign a Password to the account.
The password should be at least seven characters long, and include letters and
numbers.
4.
d.
In the Password Confirmation field, type the password again to make sure it was
entered correctly.
e.
Set This Account is to “Active.”
In the User Information panel on the left, click User Role. Then, in the list of Roles, select
the option for the role you want to assign to the new user.
New User Role
5.
80
When complete, click the Save User button.
Magento Enterprise Edition User Guide, Version 1.14.2
Chapter 5: Admin Permissions
Custom Roles
Price Resources
Product Status Permissions
PERMISSION
RESTRICTIONS
Read
When Read permission is granted for the product status, the Admin user
cannot change the value of the Status product attribute. When creating a
new product, the Status field is unavailable for editing and is set to
Disabled.
Edit
When the Edit permission is given for the product status, the Admin user
can change the values of the Status product attribute.
Price Permissions
PERMISSION
Read
RESTRICTIONS
When the Read permission is given for the price, the Admin user can
view, but cannot edit, the product price-related fields. When creating a
new product, the Price attribute (or Amount, in case of a gift card product)
is unavailable for editing and set to the default value, and creating
recurring profiles is unavailable.
When adding custom options, or associated products for a configurable
product, or links for downloadable products, the prices are unavailable for
editing and are set to zero, the Price Type field is unavailable for editing
and set to Fixed.
Edit
When Edit permission is given for the product price, the Admin user has
full access to all price-related fields.
When access to product management is granted, but neither Read nor
Edit permissions for product price are specified, all price-related fields
and columns are hidden, and management of recurring profiles is
unavailable. The Admin user can still create new products and add
custom options, associated products, and links for downloadable
products. In this case, the price fields and price columns in the grids are
hidden and are set to the default or zero value. The price and total
columns are hidden on the Manage Products page, the Category
Products tab of the Category view, and the customer’s shopping cart
view in the Admin Panel.
Magento Enterprise Edition User Guide, Version 1.14.2
81
Custom Roles
Chapter 5: Admin Permissions
Promotion Resources
For promotions management resources, you can grant read/edit access rights to the
following resources:
l
Catalog Price Rules
l
Shopping Cart Price Rules
l
Automated Email Reminder Rules
Read and Edit permissions for Catalog Price Rules, Shopping Cart Price Rules, and
Automated Email Reminder Rules are set up and applied in the same way. When only
Read permission is granted for a resource (such as for catalog price rules or shopping cart
rules), the Admin user can view only the existing rules. No fields can be edited, and all
management buttons are hidden When Edit permission is granted for a given resource, the
Admin user has complete access to the resource.
To grant Read permission only;
1.
Follow the instructions to create a custom role.
2.
In the Roles Resources section, select the Resource checkbox, and clear the Edit checkbox.
Promotional Rule Permissions
PERMISSION
82
RESTRICTIONS
Read
The user can view the existing rules, but all fields are unavailable for
editing and the management buttons are hidden. For example, on the
Price Rules page, the Apply Rule and Add New Rule buttons are hidden;
on the Edit Rule page, only the Back button is available.
Edit
The user has the complete access to the subsection, including all fields
and buttons.
Magento Enterprise Edition User Guide, Version 1.14.2
Chapter 5: Admin Permissions
Custom Roles
Product Resources
For product management, you can grant the following access rights:
l
Product Status Permissions
l
Product Price Permissions
l
Access Without Permissions
When an Admin user with Read Product Price permissions creates a new product, the
product price is set to the default value.
To set the default price:
1.
On the Admin menu, select System > Configuration. Then in the panel on the left, under
Catalog, select Catalog.
2.
In the upper-right corner, make sure that Current Configuration Scope is set to "Default
Config."
3.
Click to expand the Price section, and do the following:
4.
Enter the Default Product Price.
If the default price is not set, it is considered equal to zero. As a result, a user with Edit access
rights for product status and Read access rights for product prices can create products which will
appear in the store with a price of zero.
5.
When complete, click the Save Config button.
Product Status Permissions
PERMISSION
RESTRICTIONS
Read
The Status field of the products is unavailable for editing. When creating
a product, the field is unavailable for editing and is set to Disabled.
Performing mass Status change on the Products page is unavailable.
Edit
The Status field of the products is available for editing by the backend
user.
Magento Enterprise Edition User Guide, Version 1.14.2
83
Custom Roles
Chapter 5: Admin Permissions
Product Price Permissions
PERMISSION
Read
RESTRICTIONS
When editing existing products or performing mass change of attributes
values, all fields on the Prices tab are displayed, but are unavailable for
editing.
When creating a new product, the Price field on the Prices tab is
unavailable for editing, and is set to the default value. All other price
related fields on this tab (Special Price, Special Price From/To Date, Tier
Price; if MAP is enabled, all MAP related settings) are not displayed. For
gift card products, the Amount field on the Prices tab is unavailable for
editing and is set equal to the default price value. All other amount-related
fields (Allow Open Amount, Open Amount Min Value, Open Amount Max
Value) are not displayed.
Management of recurring profiles is unavailable. When creating a new
product, the Enable Recurring Profile attribute is set to No and is
unavailable for editing.
When adding custom options, or associated products for configurable
products, or links for downloadable products, the Price field is
unavailable for editing and is set to zero, and the Price Type field is
unavailable for editing and is set to Fixed.
Edit
The admin user has the right to access and change all price-related fields
and columns of the product management section.
No Permission
All price related fields and columns are hidden.
On the Prices tab, for both new and existing products, the Price, Special
Price, Tier Price, Cost (if applied), Special Price From Date, Special
Price To Date attributes, and all MAP-related settings are hidden. For
new products the Price is set to the default value. The same logic applies
to the Amounts and the Allow Open Amount, Open Amount Min Value,
and Open Amount Max Value fields for the gift card products.
For both new and existing products, the Enable Recurring Profile field is
displayed, but is unavailable for editing. For the existing products, all
other fields related to the product profile are hidden. For new products the
Enable Recurring Profile field is set to No.
On the Related Products, Up-sells, Cross-sells tabs of the product view,
the Price column in the grids is not displayed.
On the Custom Options tab, Associated Products tab of the product
view, the Price and Price Type columns in the grids are not displayed.
When adding a new custom option or a new associated product for a
configurable product, the Price and Price Type fields are hidden. For new
entries, the Price is set to zero, and the Price Type is set to Fixed.
84
Magento Enterprise Edition User Guide, Version 1.14.2
Chapter 5: Admin Permissions
Unlocking Admin Accounts
Product Price Permissions (cont.)
PERMISSION
RESTRICTIONS
On the Downloadable Information tab for downloadable products, the
Price column is hidden. For the new rows the Price is set to zero.
On the Manage Products and Category Products pages (Categories >
Manage Categories > Category Products tab), the Price columns in the
grids are hidden.
In the customer’s shopping cart views (accessible from the Customer’s
page), the Price, Total and Subtotal columns are hidden.
Admin users without Read or Edit permissions can still see product
option prices when configuring products for customers’ shopping carts.
REST Roles
The REST API defines a set of functions that developers can use to perform requests and
receive responses. To learn more about REST permissions, see: Web Services.
Unlocking Admin Accounts
For the security of your business, user accounts are locked after six failed attempts to log in
to the Admin. The account can be unlocked by any other user with full Administrator
permissions.
To unlock an admin account:
1.
On the Admin menu, select System > Permissions > Locked.
Any locked user accounts appear in the list.
2.
In the list, select the checkbox of the locked account.
3.
In the upper-right corner, set the Actions control to “Unlock.”
4.
Click the Submit button to unlock the user account.
Magento Enterprise Edition User Guide, Version 1.14.2
85
Unlocking Admin Accounts
Chapter 5: Admin Permissions
Notes
86
Magento Enterprise Edition User Guide, Version 1.14.2
Chapter 6:
Security
Maintaining a secure environment for the operation of your store is of utmost
importance to the success of your business. In this chapter , you will learn how to
manage Admin sessions and credentials; implement CAPTCHA; and manage website
restrictions, encryption, hashing, and events logging.
Topics in this chapter:
l
Security Configuration
l
Website Restrictions
l
CAPTCHA
l
Encryption & Hashing
l
Admin Actions Log
Magento Enterprise Edition User Guide, Version 1.14.2
87
Security Configuration
Chapter 6: Security
Security Configuration
The security settings give you the ability to control the lifetime of user sessions, timeouts,
and passwords; and and whether to allow your Magento store to run in a frame. (This
setting can prevent clickjacking.) In addition you can add a secret key to URLs, and
determine the case sensitivity of login credentials.
For security reasons Magento strongly recommends against running your store in a frame.
Security Configuration
To configure Admin security:
88
1.
On the Admin menu, select System > Configuration.
2.
In the panel on the left, under Advanced, select Admin.
3.
Click to expand the Security section, and complete the settings as needed.
4.
When complete, click the Save Config button.
Magento Enterprise Edition User Guide, Version 1.14.2
Chapter 6: Security
Security Configuration
Field Descriptions
FIELD
SCOPE
DESCRIPTION
Add Secret Key to URLs
Global
Options include: Yes / No
Login Is Case Sensitive
Global
Options include: Yes / No
Session Lifetime
(seconds)
Global
Determines the length of a user session in
seconds.
Allow Magento Backend to Global
run in frame
This option prevents “clickjacking” if you run your
store in an iframe. Enabling the option causes the
X-Frame-Options response header to be sent.
Options include: Enabled/Only from same
domain.
For security reasons, it is recommended that this
setting not be enabled.
Allow Magento Frontend to Global
run in frame
This option prevents “clickjacking” if you run your
store in an iframe. Enabling the option causes the
X-Frame-Options response header to be sent.
Options include: Enabled/Only from same
domain.
For security reasons, it is recommended that this
setting not be enabled.
Maximum Logon Failures
to Lockout Account
Global
Determines the number of consecutive failed login
attempts that will cause that account to become
locked. If you do not want to enable the lockout
feature, leave this field blank.
Lockout Time (minutes)
Global
Determines the number of minutes the account is
locked after a failed login.
Password Lifetime (days)
Global
Determines the number of days until Magento
requests administrators to change their
passwords. If you do not want to enable the
password lifetime feature, leave this field blank.
Password Change
Global
Determines if administrators are required to
change their passwords when the password
lifetime is reached. Options include:
Magento Enterprise Edition User Guide, Version 1.14.2
89
Website Restrictions
Chapter 6: Security
Field Descriptions (cont.)
FIELD
SCOPE
DESCRIPTION
Forced
Administrators are
required to change their
passwords when they
expire.
Recommended
Administrators are
notified when the
password expires, but are
not required to change the
password.
Website Restrictions
Website restrictions give you the ability to either shut down access to your site completely
while performing maintenance, or restrict access to specific customers. For private sale or
B2B websites, you can require that customers log in to view the site.
Closed for Maintenance
To temporarily close your website when performing maintenance, you can do so easily by
setting the website restrictions to “website closed.” This will temporarily redirect site
visitors to a landing page of your choice.
To restrict access to an entire website:
1.
On the Admin menu, select System > Configuration.
2.
In the panel on the left, under General, select General.
3.
Click to expand the Website Restrictions section, and complete the fields as described
below.
Website Restrictions
4.
90
When complete, click the Save Config button.
Magento Enterprise Edition User Guide, Version 1.14.2
Chapter 6: Security
Website Restrictions
Field Descriptions
FIELD
Access Restriction
Restriction Mode
SCOPE
Website
Website
Magento Enterprise Edition User Guide, Version 1.14.2
DESCRIPTION
Determines whether the website restriction
features are enabled. Options include:
Yes
Website access is restricted in the
manner set in the fields below.
No
Restrictions are disabled and the
following settings have no effect.
There are three possible modes. Options include:
Website Closed
All access to the frontend
website is restricted and
the website is essentially
“closed.” All frontend
URLs are temporarily
redirected to the page
specified as the Landing
Page below. This setting
can be useful during site
maintenance or just prior
to launch.
Private Sales:
Login Only
Users can only access
the frontend website if
they first log in. All
frontend URLs are
temporarily redirected to
either the specified
landing page or to the
login form until the user
logs in. Users cannot
create a new account
themselves when the site
is in this mode.
91
Website Restrictions
Chapter 6: Security
Field Descriptions (cont.)
FIELD
SCOPE
DESCRIPTION
Private Sales:
Login and Register
Startup Page
Store View
Users can only access
the frontend website if
they first log in. All
frontend URLs are
temporarily redirected to
the login form until the
user logs in. Users can
create a new account
themselves when the site
is in this mode.
Determines whether the site displays the login
form or a landing page until a user logs in. This
setting is only applicable in Private Sales mode (if
the previous setting is either Private Sales: Login
Only or Private Sales: Login and Register),
because the Website Closed option prohibits
users from logging in altogether. Options include:
To login form
Users are redirected to
the log in form until they
log in.
To landing page
Users are redirected to
the static page specified
below until they log in.
Important! Be sure to include a link to the login
page from the specified landing page so that
customers can log in to access the full site.
92
Landing Page
Store View
Specifies the landing page users see either when
the website is closed or when you have chosen to
start up from a landing page in Private Sales
mode.
HTTP Response
Website
Specify the HTTP response sent out when your
website is closed and a connection is attempted
by bots, crawlers, or spiders. Options include:
Magento Enterprise Edition User Guide, Version 1.14.2
Chapter 6: Security
CAPTCHA
Field Descriptions (cont.)
FIELD
SCOPE
DESCRIPTION
503 Service
unavailable
The page is not available,
and the index will not be
updated.
200 OK
The landing page returned
is the correct page, and
the spider might assume
the landing page is the
only page on the site.
CAPTCHA
CAPTCHA is an acronym for “Completely Automated Public Turing test to tell Computers
and Humans Apart.” A CAPTCHA is a visual device that ensures that a human being,
rather than a computer, is interacting with the site. CAPTCHA can be used for both the
Admin and customers.
l
Admin CAPTCHA
l
Customer CAPTCHA
Users can reload the displayed CAPTCHA by clicking the Reload icon in the upper right
corner of the image. The number of reloads is not limited.
The Magento CAPTCHA was implemented using a Zend Framework module, and is fully
configurable.
CAPTCHA in Customer Login
Magento Enterprise Edition User Guide, Version 1.14.2
93
CAPTCHA
Chapter 6: Security
Admin CAPTCHA
For an extra level of security, you can add a CAPTCHA to the Admin Login page.
Administrator users can reload the displayed CAPTCHA by clicking the Reload icon in the
upper-right corner of the image. The number of reloads is not limited.
Admin CAPTCHA
To configure CAPTCHA for the Admin:
94
1.
On the Admin menu, select System > Configuration.
2.
In the panel on the left, under Advanced, select Admin.
3.
In the upper-right corner, set Current Configuration Scope to "Default."
4.
Click to expand the CAPTCHA section, and complete the settings as described below.
5.
When complete, click the Save Config button.
Magento Enterprise Edition User Guide, Version 1.14.2
Chapter 6: Security
CAPTCHA
Field Descriptions
FIELD
SCOPE
DESCRIPTION
Enable CAPTCHA in
Admin
Global
Enables CAPTCHA for the Admin login page.
Options include: Yes / No
Font
Global
Determines the font used to display the
CAPTCHA. To add your own font, put the font file
in the same directory as your Magento instance
and specify it in the config.xml file at:
app/code/core/Mage/Captcha/etc/
Forms
Global
Determines the form where the CAPTCHA is
used. Available options: Admin Login / Admin
Forgot Password.
Displaying Mode
Global
Defines preconditions for displaying CAPTCHA.
Available options:
Always
CAPTCHA is always
required to log in the
Admin.
After number of
attempts to login
When selected displays
the Number of
Unsuccessful Attempts
to Login field. Enter the
number of login attempts
allowed. A value of 0
(zero) is similar to setting
Displaying Mode to
Always. This option does
not cover the Forgot
Password form. If
CAPTCHA is enabled
and set to be appear on
this form, then it is
always included on the
form.
To track the number of unsuccessful login
attempts, all attempts to log in from one email
address from a single IP-address are counted.
The maximum number of login attempts allowed
from a single IP-address is 1,000. This limitation
applies only when CAPTCHA is enabled.
Magento Enterprise Edition User Guide, Version 1.14.2
95
CAPTCHA
Chapter 6: Security
Field Descriptions (cont.)
FIELD
96
SCOPE
DESCRIPTION
CAPTCHA Timeout
(minutes)
Global
Determines the lifetime of the current CAPTCHA.
After the CAPTCHA expires, the user must reload
the page.
Number of Symbols
Global
Determines the number of symbols that are used
for creating CAPTCHA. Maximum allowed value
is 8. You can also specify a range, for example, 58; each generated CAPTCHA can contain
different number of symbols.
Symbols Used in
CAPTCHA
Global
Determines the symbols used in the CAPTCHA.
Only letters (a-z and A-Z) and numbers (0-9) are
allowed. The default set of symbols suggested in
the field excludes similar looking symbols like “i”,
“l”, “1”. Displaying these symbols in CAPTCHA
decreases the chances that a user will recognize
CAPTCHA correctly.
Case Sensitive
Global
Determines if the letters used in the CAPTCHA
are case sensitive.
Magento Enterprise Edition User Guide, Version 1.14.2
Chapter 6: Security
CAPTCHA
Customer CAPTCHA
CAPTCHA can be required to log in to a customer account, or be configured to appear after
several unsuccessful attempts.. It can also be used for other forms in the storefront.
Customer CAPTCHA Configuration
To configure CAPTCHA for customers:
1.
On the Admin menu, select System > Configuration.
2.
In the panel on the left, under Customers, select Customer Configuration.
3.
Set Current Configuration Scope to the website where you want the configuration to
apply.
4.
Click to expand the CAPTCHA section, and complete the fields as described below.
5.
When complete, click the Save Config button.
Magento Enterprise Edition User Guide, Version 1.14.2
97
CAPTCHA
Chapter 6: Security
Field Descriptions
FIELD
SCOPE
DESCRIPTION
Enable CAPTCHA on
Frontend
Website
Enables the CAPTCHA in the storefront. Options
include: Yes / No
Font
Website
Determines the font that is used to display the
CAPTCHA. To add your own font, put the font file
in the same directory as your Magento instance
and specify it in the config.xml stored at:
app/code/core/Mage/Captcha/etc/
Forms
Website
Determines the form(s) where CAPTCHA is
used. Options include:
Create User
Login
Forgot Password
Checkout as Guest
Register during Checkout.
Displaying Mode
98
Website
Determines when the CAPTCHA appears.
Options include:
Always
CAPTCHA is always
required to log in.
After number of
attempts to login
When selected displays
the Number of
Unsuccessful Attempts
to Login field. Enter the
number of login attempts
allowed. A value of 0
(zero) is similar to setting
Displaying Mode to
Always. This option does
not cover the Forgot
Password and Create
User forms. If CAPTCHA
is enabled and set to be
appear, then it is always
included on these form.
Magento Enterprise Edition User Guide, Version 1.14.2
Chapter 6: Security
CAPTCHA
Field Descriptions (cont.)
FIELD
SCOPE
DESCRIPTION
To track the number of unsuccessful login
attempts, all attempts to log in from one email
address from a single IP-address are counted.
The maximum number of login attempts allowed
from a single IP-address is 1,000. This limitation
applies only when CAPTCHA is enabled.
CAPTCHA Timeout
(minutes)
Website
Determines the lifetime of the current CAPTCHA.
When the CAPTCHA expires, the user must
reload the page.
Number of Symbols
Website
Determines the number of symbols that are used
in the CAPTCHA. Maximum allowed value is 8.
You can also specify a range, for example, 5-8.
Symbols Used in
CAPTCHA
Website
Determines which symbols are used in the
CAPTCHA. Only letters (a-z and A-Z) and
numbers (0-9) are allowed. The default set of
symbols suggested in the field excludes similar
looking symbols like i, l, or 1. Displaying these
symbols in CAPTCHA decreases the chances
that a user will recognize CAPTCHA correctly.
Case Sensitive
Website
Determines if the characters used in the
CAPTCHA are case sensitive. Options include:
Yes / No
Magento Enterprise Edition User Guide, Version 1.14.2
99
Encryption & Hashing
Chapter 6: Security
Encryption & Hashing
Magento Enterprise Edition hashes all data that does not require decryption by using a
strong SHA-256 hashing algorithm instead of the previously used MD5. Legacy passwords
will be hashed using the new algorithm whenever they are entered by customers, and all
new passwords will be hashed using the SHA-256 algorithm.
Magento Enterprise Edition also encrypts all data that does require decryption by using an
industry-standard AES-256 algorithm. This includes credit card data and integration
(payment and shipping modules) passwords.
Changing the Database Key
Magento Enterprise Edition provides a tool to change the database key that is used for data
encryption and decryption. This database key was generated when Magento was originally
installed in your production environment. The key should be changed if the old key is ever
compromised, as well as on a regular basis to improve security. When the key is changed,
all legacy data is re-encoded using the new key.
Step 1: Make the File Writable
To make key change possible, the following file must be writable:
/opt/home_trials/baron/app/etc/local.xml
Step 2: Change the Encoding Key
1.
On the Admin menu, select System > Manage Encryption Key.
2.
Select whether or not the new encryption key will generate automatically. If not, a New Key
field appears so you can manually enter a new key.
3.
When complete, click the Change Encryption Key button.
The encryption key is changed and all previous data is encoded with the new key. The new
encryption key appears for reference.
Write down the new key and keep it in a safe place. It will be required to decrypt the data,
if any problems occur with your files.
100
Magento Enterprise Edition User Guide, Version 1.14.2
System Operations
In this section…
Index Management
Cache Management
Alternate Media Storage
Installing Solr Search
Content Staging
Magento Connect
Web Services
System Tools
Chapter 7:
Index Management
Indexing is how Magento transforms data such as products, categories, and so on, to
improve the performance of your web store. As data changes, the transformed data
must be updated—or reindexed. Magento has very sophisticated architecture that stores
merchant data (including catalog data, prices, users, stores, and so on) in many
database tables. To optimize storefront performance, Magento accumulates data into
special tables using indexers.
For example, suppose you change the price of an item from $4.99 to $3.99. Magento
must reindex the price change to display it on your store. Without indexing, Magento
would have to calculate the price of every product on the fly—taking into account
shopping cart price rules, bundle pricing, discounts, tier pricing, and so on. Loading
the price for a product would take a long time, possibly resulting in cart abandonment.
Topics in this chapter:
l
Accessing Index Management
l
Index Configuration
l
Manual Reindexing
l
Automatic Reindexing
l
Index Scheduling
Magento Enterprise Edition User Guide, Version 1.14.2
103
Accessing Index Management
Chapter 7: Index Management
Accessing Index Management
The Index Management tool can be accessed from the System menu, or by clicking the link
in the message that appears at the top of the workspace when indexes are out of date.
Index Management
To access Index Management:
1.
On the Admin menu, select System > Index Management.
Index Management has a slightly different presentation, depending on your configuration:
2.
l
If you use Solr search engine for full-text catalog.
l
If you use Flat catalog product options.
Any indexer with a checkbox next to its name can be managed manually. The other
indexers update automatically according to your Magento cron job. The default mode for
each indexer is set in the system configuration.
Column Descriptions
COLUMN
104
DESCRIPTION
Index
The name of the indexer.
Description
A description of the indexer.
Mode
Applies only to the indicated indexers. Most of the indicated
indexers are set to Update on Save, which means a reindex is
required when a change is saved.
Status
Displays one of the following:
Magento Enterprise Edition User Guide, Version 1.14.2
Chapter 7: Index Management
Accessing Index Management
Column Descriptions (cont.)
COLUMN
DESCRIPTION
Reindex Required
A change has been made that requires
reindexing. If a checkbox and Reindex
Required link appears, can be reindexed
manually.
Ready
The index is up-to-date.
Scheduled
Reindexing is scheduled to take place.
Running
Reindexing is currently running.
The following options apply only to the automatic indexers:
Scheduled
Reindexing is required but hasn't run yet
according to your Magento cron job.
Running
Rreindexing is required and is either
running or in the queue.
Outdated
Indicates reindexing is required but there
is an issue preventing it from running. If
this state persists, submit a bug report.
Update Required
Applies only to the indicated indexers. Indicates whether or not
you must manually reindex. (The value in the Mode column
indicates whether the indexer must be manually updated.)
Updated At
Displays the date and time an index was last manually updated,
or Never if the index has never been manually updated.
Action
Indexers that require manual updating display a Reindex Data
link. Click the link to reindex only that option.
Magento Enterprise Edition User Guide, Version 1.14.2
105
Index Configuration
Chapter 7: Index Management
Index Configuration
The default mode for each indexer is set in the system configuration. For most indexers, the
default mode can be overridden from the Index Management page.
For example, to schedule the category flat catalog and the category flat product index using
your Magento cron job and to immediately reindex everything else, choose the following
options:
Category Flat Index:
Updates when scheduled.
Product Flat Index:
Updates when scheduled.
All other indexers:
Updates on Save.
To configure indexing options:
1.
On the Admin menu, select System > Configuration.
2.
In the panel on the left, under Advanced, select Index Management.
3.
Click to expand Index Options. Then, set each index to one of the following:
Update on Save
Immediately performs a partial reindex when an item
changes.
Update When Scheduled
Updates the index according to your Magento cron job.
Index Options
4.
106
When complete, click the Save Config button.
Magento Enterprise Edition User Guide, Version 1.14.2
Chapter 7: Index Management
Index Configuration
Configuration by Indexer Type
INDEXER TYPE
CONFIGURABLE?
Catalog Category/Product
Index
No
Configure only partial reindexing frequency.
Category URL Rewrite
Yes
Also configure partial reindexing frequency.
Product URL Rewrite
Yes
Also configure partial reindexing frequency.
Redirect URL Rewrite
No
Configure only partial reindexing frequency.
Category Flat Index
Yes
Also configure partial reindexing frequency.
Product Flat Index
Yes
Also configure partial reindexing frequency.
Price and Stock Index
No
Configure only partial reindexing frequency.
Category Permissions
No
Category permissions indexing occurs
automatically and is not configurable.
Magento Enterprise Edition User Guide, Version 1.14.2
107
Manual Reindexing
Chapter 7: Index Management
Manual Reindexing
Indexers that require manual updates have a checkbox in the first column next to their
name (Product Attributes, Tag Aggregation Data).
l
l
If the Status column indicates “Reindex Required,” and the Update Required column
indicates “No,” only a partial index is produced when you index manually.
If the Status column indicates “Reindex Required,” and the Update Required column
indicates “Yes,” a full index is produced when you index manually.
Index States
To reindex manually:
108
1.
On the Admin menu, select System > Index Management.
2.
Select the checkbox of each item to be reindexed.
3.
Set Actions to “Reindex Data.”
4.
Click the Submit button.
Magento Enterprise Edition User Guide, Version 1.14.2
Chapter 7: Index Management
Automatic Indexing
Automatic Indexing
Magento reindexes automatically whenever one or more items are changed. Actions that
trigger reindexing include price changes, creating catalog or shopping cart price rules,
adding new categories, and so on). Reindexing is performed as a background process, and
your store remains accessible during the processes.
Indexing by Multiple Users
To avoid problems when multiple Admin users update objects that trigger automatic
reindexing, set all indexers to run as cron jobs. Otherwise, every time an object is saved,
any affected objects with interdependencies might cause a deadlock. Symptoms of a
deadlock include high CPU usage and MySQL errors. As a best practice, schedule indexing
as a cron job to prevent deadlocks from occurring.
Index Modes
The default mode for each indexer is specified in the system configuration. By default,
indexers that require manual updating are set to “Update on Save,” which means
reindexing occurs after a change is made from the Admin. The other option is to manually
reindex every time a change is made. (For example, if you change product attributes in the
Admin, you must manually update the Product Attributes index.) If you ever need to
override the default index mode, you can use the Action control.
To change the index mode:
1.
On the Admin menu, select System > Index Management.
2.
Select the checkbox of each indexer you want to change.
3.
Set Actions to “Change Index Mode.” Then, set Index Mode to one of the following:
4.
l
Update on Save
l
Manual Update
Click the Submit button to apply the change to each selected indexer.
Magento Enterprise Edition User Guide, Version 1.14.2
109
Automatic Indexing
Chapter 7: Index Management
Events that Trigger Reindexing
Reindexing Triggers
INDEX TYPE
Product Prices
REINDEXING EVENT
Add customer group
Change configuration settings
Flat catalog1 product data
Add store
Add store group
Add, edit, or delete attribute (for searching and filtering)
Flat catalog category data
Add store
Add store group
Add, edit, or delete attribute (for searching and filtering)
Catalog category/product
index
Add, edit, or delete products (single, mass, and import)
Change product-to-category relations
Add, edit, or delete categories
Add or delete stores
Delete store groups
Delete websites
Catalog search index
Add, edit, or delete products (single, mass, and import)
Add or delete stores
Delete store groups
Delete websites
Stock status index
Change inventory configuration settings.
Category permissions
index
Add store, add store group, add or delete or update attribute (for
searching and filtering)
1 The flat product and category indexers also influence how catalog and shopping cart price rules are indexed.
If you have a large number of SKUs (about 500,000 or more), you will notice a dramatic improvement in
indexing time for price rules. To take advantage of this improvement, you must enable Use Flat Catalog
Product.
110
Magento Enterprise Edition User Guide, Version 1.14.2
Chapter 7: Index Management
Automatic Indexing
Index Actions and Controls
Index Actions
ACTION
Creating a new store, new
customer group, or any
action listed in “Actions
that Cause a Full
Reindex.”
RESULT
Full reindex
Bulk loading of items in the Partial reindex (only
following ways:
changed items are
reindexed)
l
Magento import/export
l
l
TO CONTROL
Full reindexing is performed on
the schedule determined by your
Magento cron job. In a few cases,
full reindexing must be performed
manually.
At the frequency determined by
your Magento cron job.
Direct SQL query
Any other method that
directly adds, changes,
or deletes data.
Changing scope (for
example, from global to
website)
Partial reindex (only
changed items are
reindexed)
At the frequency determined by
your Magento cron job.
Events that Trigger Full Reindexing
Full Reindex Triggers
INDEXER
Catalog Category Flat
Indexer
EVENT
Create a new web store
Create a new web store view
Create, or delete an attribute that is any of the following:
l
Searchable or visible in advanced search
l
Filterable
l
Filterable in search
l
Used for sorting
Change an existing attribute to be any of the preceding.
Enable flat category frontend options
Catalog Product Flat
Indexer
Create a new web store
Create a new web store view
Magento Enterprise Edition User Guide, Version 1.14.2
111
Automatic Indexing
Chapter 7: Index Management
Full Reindex Triggers (cont.)
INDEXER
EVENT
Create, or delete an attribute that is any of the following:
l
Searchable or visible in advanced search
l
Filterable
l
Filterable in search
l
Used for sorting
Change an existing attribute to be any of the preceding.
Enable flat category frontend options
Stock status indexer
Price Indexer
When the following Catalog Inventory options changes in the
system configuration:
Stock Options
Display Out of Stock Products
Product Stock
Options
Manage Stock
Adding a new customer group.
When any of the following Catalog Inventory options changes in
the system configuration:
Category or Product
Indexer
Stock Options
Display Out of Stock Products
Product Stock
Options
Manage Stock
Price
Catalog Price Scope
Create or delete a store view
Delete a store
Delete a website
112
Magento Enterprise Edition User Guide, Version 1.14.2
Chapter 7: Index Management
Index Scheduling
Index Scheduling
For most indexers, you can use one of two scheduling methods:
Method 1: Immediate Partial Reindex
A partial index displays the results immediately in the store. We recommend that you use
immediate partial reindexing unless many items are being updated by multiple users at
the same time. If in doubt, you can check the system resource utilization using top, or a
similar command.
Method 2: Cron Job
It is recommended that you set up a cron job to manage index scheduling for stores with a
high traffic load, or if many items are updated at the same time by multiple users. To learn
more, see: How to Set Up a Cron Job.
Index Cleanup
Each time the partial reindexing job runs, a record is created in the Magento database to
indicate the status of the job. These records can be used for troubleshooting in case a job
fails. However, the “success” records take up space in the database, and should be removed
periodically.
The Index Management page gives you the ability to clean up the index by removing the
“success” records that occur during a partial index. The process can take anywhere from a
few seconds to a few minutes, depending on the number of records. We recommend that
you clean the index once per day during off-peak hours.
Cleaning the index has a negligible effect on server performance, and no effect on customers in
the store.
To schedule indexing:
1.
On the Admin menu, select System > Configuration.
2.
In the panel on the left, under Advanced, select Index Management.
3.
Click to expand Index Clean Schedule. Then, do the following:
Index Clean Schedule
Magento Enterprise Edition User Guide, Version 1.14.2
113
Index Scheduling
4.
Chapter 7: Index Management
a.
Set Enable Scheduled Cleanup to “Yes.”
b.
Set the Start Time to the hour, minute, and second.
c.
Set Frequency to one of the following:
l
Daily
l
Weekly
l
Monthly
When complete, click the Save Config button.
Field Descriptions
FIELD
114
SCOPE
DESCRIPTION
Enable Scheduled
Cleanup
Global
Enables a scheduled cleanup of partially-indexed
records. Options include: Yes / No
Start Time
Global
Specifies the hour, minute, and second the
cleanup is scheduled to begin. The time is entered
in 24-hour format and is based on the clock on
your Magento server.
Frequency
Global
Specifies how often the index is to be cleaned.
Options include:
Daily
(Recommended) Cleans
the index once per day.
Weekly
Clean the index once per
week on the first day of
the week.
Monthly
Clean the index once per
month on the first day of
the month.
Magento Enterprise Edition User Guide, Version 1.14.2
Chapter 8:
Cache Storage
Using Magento’s cache management system is an easy way to improve the performance
of your site. The Cache Storage Management page shows the status of each primary
cache and its associated tag. Whenever one of the caches needs to be refreshed, a notice
appears at the top of the workspace to guide you through the process.
There are separate command buttons to flush the Magento-specific cache, and the more
all-inclusive cache storage. In addition, there are command buttons to flush the catalog
product images cache and JavaScript/CSS cache.
On the server, the default location for the primary Magento cache is var/cache. As an
alternative to using the Cache Management tool, the contents of each cache can be
manually deleted from the server.
Topics in this chapter:
l
Clearing Caches
l
Full-Page Cache
Magento Enterprise Edition User Guide, Version 1.14.2
115
Clearing Caches
Chapter 8: Cache Storage
Clearing Caches
After clearing a cache, always refresh your browser to make sure that it uses the most recent
files.
Cache Storage Management
To refresh specific caches:
1.
Do one of the following:
l
Click the Cache Management link in the message at above the workspace.
l
On the Admin menu, select System > Cache Management.
The status of each cache that needs to be refreshed appears in yellow and marked,
“Invalidated.”
116
Magento Enterprise Edition User Guide, Version 1.14.2
Chapter 8: Cache Storage
Clearing Caches
Cache Refresh Needed
2.
3.
Do one of the following:
l
For each cache that needs to be refreshed, click the checkbox at the beginning of the row.
l
To select a group, click one of the selection options above the list.
Set Actions to “Refresh,” and click the Submit button.
Refreshing Multiple Caches
Magento Enterprise Edition User Guide, Version 1.14.2
117
Clearing Caches
Chapter 8: Cache Storage
To flush the product image cache:
1.
From the Cache Storage Management page, under Additional Cache Management, click the
Flush Catalog Images Cache button.
The message, “Image cache was cleaned” appears at the top of the workspace.
2.
Make sure to also clear the cache of your browser.
To flush the JavaScript/CSS cache:
1.
From the Cache Storage Management page, under Additional Cache Management, click the
Flush JavaScript/CSS Cache button.
The message, “The JavaScript/CSS cache has been cleaned” appears at the top of the
workspace.
2.
Clear the cache of your browser.
Buttons
BUTTON
DESCRIPTION
Flush Magento Cache
Removes all items in the default Magento cache (var/cache),
according to its associated Magento tag.
Flush Cache Storage
Removes all items from the cache, regardless of Magento tag. If
your system uses an alternate cache location, any cached files
used by other applications will be removed in the process.
Flush Catalog Images
Cache
Removes all automatically resized and watermarked catalog
images that are stored at: media/catalog/product/cache.
If recently uploaded images aren't reflected in the catalog, try
flushing the catalog and refreshing your browser.
Flush JavaScript/CSS
Cache
118
Removes the merged copy of JavaScript and CSS files from the
cache. If recent changes to the style sheet or JavaScript aren't
reflected in the store, try flushing the JavaScript/CSS cache and
refreshing your browser.
Magento Enterprise Edition User Guide, Version 1.14.2
Chapter 8: Cache Storage
Clearing Caches
Cache Types
TYPE
Configuration
DESCRIPTION
System and module configuration files.
Associated tag: CONFIG
Layouts
System:
config.xml, local.xml
Module:
config.xml
Page layout building instructions.
Associated tag: LAYOUT_GENERAL_CACHE_TAG
Blocks HTML Output
The HTML that is associated with page blocks.
Associated tag: BLOCK_HTML
Translations
Language translation files.
Associated tag: TRANSLATE
Collections Data
Files that contain data that is the result of a query.
Associated tag: COLLECTION_DATA
EAV Types and Attributes
Attribute entities, types, and values.
Associated tag: EAV
Web Services
Configuration
Web Services definition files (api.xml)
Web Services
Configuration
Web Services definition files (api2.xml)
Page
Full page cache.
Associated tag: CONFIG_API
Associated tag: CONFIG_API2
Associated tag: FPC
Magento Enterprise Edition User Guide, Version 1.14.2
119
Full-Page Cache
Chapter 8: Cache Storage
Additional Cache Management
BUTTON
Flush Catalog Images
Cache
DESCRIPTION
Removes all automatically resized and watermarked catalog
images that are stored at: media/catalog/product/cache.
If recently uploaded images aren't reflected in the catalog, try
flushing the catalog and refreshing your browser.
Flush Swatch Images
Cache
Removes pregenerated swatch image files.
Flush JavaScript/CSS
Cache
Removes the merged copy of JavaScript and CSS files from the
cache. If recent changes to the style sheet or JavaScript aren't
reflected in the store, try flushing the JavaScript/CSS cache and
refreshing your browser.
Re-build Visual
Merchandiser categories
Rebuilds the categories.
Full-Page Cache
Magento Enterprise Edition uses full-page caching on the server to quickly display
category, product, and CMS pages.
Topics in this section include:
l
Types of Page Visits
l
Page Cache Setup
l
Page Cache Actions
Full-page caching improves response time and reduces the load on the server. Without
caching, each page might need to run blocks of code and retrieve information from the
database. However, with full-page caching enabled, a fully-generated page can be read
directly from the cache.
120
Magento Enterprise Edition User Guide, Version 1.14.2
Chapter 8: Cache Storage
Full-Page Cache
Types of Page Visits
Cached content can be used to process the requests from similar types of visits. As a result,
pages shown to a casual visitor might differ from those shown to a customer. For the
purposes of caching, each visit is one of three types:
Non-sessioned
During a non-sessioned visit, a shopper views pages, but does not interact with the store.
The system caches the content of each page viewed, and serves them to other non-sessioned
shoppers.
Sessioned
During a sessioned visit, shoppers who interact with the store—through activities such as
comparing products or adding products to the shopping cart—are assigned a session ID.
Cached pages that are generated during the session are used only by that shopper during
the session.
Customer
Customer sessions are created for those who have registered for an account with your store
and shop while logged in to their accounts. During the session, customers can be presented
with special offers, promotions, and prices that are based on the customer group to which
they are assigned.
Magento Enterprise Edition User Guide, Version 1.14.2
121
Full-Page Cache
Chapter 8: Cache Storage
Page Cache Setup
The default configuration settings for the page cache can be used “as is” or changed as
needed. The site administrator can determine how deeply site content is cached for each
page.
Full-page caching is enabled by default and can be used as needed. It’s generally a good
idea to disable page caching while a site is in development, and enable it when the site goes
live. After making content changes to products, CMS pages or blocks, you can refresh the
page cache to update the content.
To change the cache configuration:
1.
On the Admin menu, select System > Configuration. Then in the panel on the left under
Advanced, select System.
2.
Click to expand the Full Page Cache Settings section, and do the following:
Full Page Cache Settings
3.
122
a.
Set Max Allowed Page Depth to the maximum number of layered navigation filters or
parameters to be cached per page.
b.
If you want to cache pages for only the default currency, set Enable Cache for Not
Default Currencies to “No.”
c.
Enter the Max. Cache Size in megabytes.
Click the Save Config button to save your settings.
Magento Enterprise Edition User Guide, Version 1.14.2
Chapter 8: Cache Storage
Full-Page Cache
Field Descriptions
FIELD
SCOPE
DESCRIPTION
Maximum Allowed Page
Depth
Store View
Determines the number of layered navigation
filters, or parameters that are cached with the
page. For example, each filter that is applied to a
page is considered to be another parameter. If
page depth is limited to two, each filter is cached,
as well as any combination of two filters. To
control the number of cached files that are stored,
combinations of three or more filters are not
cached.
Enable Cache For Not
Default Currencies
Store View
Determines if pages with currencies other than
the default currency are cached.
Max Cache Size
Store View
Magento Enterprise Edition User Guide, Version 1.14.2
Yes
Enables page caching for all
currencies allowed in the store.
Each allowed currency represents
another variant of the same page.
When enabled, this option greatly
increases the size of the cache.
No
Only pages for the default
currency are cached.
Determines the maximum size of the full-page
cache, in megabytes. By default, the cache is set
to 1024 MB.
123
Page Cache Auto-Generation
Chapter 8: Cache Storage
Page Cache Auto-Generation
Magento pages are typically cached when the page is visited for the first time. However,
when a site first goes live, or after making a large number of content changes, you might
want to force a full regeneration of the page cache. The entire website is crawled during the
auto-generation process, which creates more cached pages than would be produced by page
visits alone. Auto-generating the page cache ensures that each page in the site loads
quickly the first time, and every time thereafter.
Because the auto-generation process is resource intensive, it should be initiated during lowtraffic hours. It is recommended that you auto-generate the full-page cache only as needed,
and flush the Magento cache to trigger the process. Afterward, you can disable the autogenerate process until the next time you want to regenerate the full page cache.
Step 1: Configure Page Cache Auto Generation
1.
On the Admin menu, select System > Configuration. In the panel on the left under
Advanced, select System.
2.
Click to expand the Full Page Cache Auto Generation section. Then, do the following:
Full-Page Cache Auto Generation
3.
a.
To regenerate the full-page cache, set Enable Page Cache Auto Generation to “Yes,”
b.
In the Crawler Thread Number field, enter the number of parallel requests you want
to make during the process. Parallel requests can speed up the process, but require
more system resources. In most cases, it is recommended to use from one to five.
c.
To avoid caching pages with currencies other than the default. set Generate Page
Cache for Not Default Currencies to “No.”
When complete, click the Save Config button.
Step 2: Flush the Magento Cache
124
1.
On the Admin menu, select System > Cache Management.
2.
In the upper-right corner, click the Flush Magento Cache button.
Magento Enterprise Edition User Guide, Version 1.14.2
Chapter 8: Cache Storage
Page Cache Auto-Generation
Flush Magento Cache
Field Descriptions
FIELD
Enable Pages Cache Auto
Generation
Crawler Thread Number
DESCRIPTION
Yes
Enables Page Cache Auto Generation, but does
not cause the page cache to be auto-generated.
After enabling the process, go to Cache
Management screen (System > Cache
Management) and flush the Magento cache. This
action will trigger the auto-generation process.
No
The page cache will not be generated by a crawler
and will be generated only as visitors visit each
page on your site.
Determines the number of parallel requests during this process.
The crawler class that emulates the first visit to a page can work
in a multi-thread mode. A higher number of threads will reduce
the amount of time required to cache all pages; however, it will
also consume more system resources. Be careful with this
option. Depending on your hardware and server configuration, it
is recommended that you use no more than one to five parallel
threads.
Generate Pages Cache
Determines whether pages with currencies other than the default
For Not Default Currencies currency will be cached.
Magento Enterprise Edition User Guide, Version 1.14.2
125
Page Cache Auto-Generation
Chapter 8: Cache Storage
Page Cache Actions
If the content of a block on a cached page changes, the cached page is retrieved, the block
overwritten, and the updated page is saved back to the cache. The page cache can be built
gradually as pages are visited, or auto-generated for the entire site.
To manage cache operations:
1.
On the Admin menu, select System > Cache Management.
Page Cache Actions
2.
3.
126
Under Cache Storage Management, select the Page Cache checkbox. In the upper-right, set
the Actions control to one of the following:
Enable
Turns on page caching. By default, the page cache is enabled.
Disable
Turns off page caching.
Refresh
Clears the page cache. If Page Cache is enabled, new pages are added
to the cache as they are visited. If Full-Page Cache Auto Generation is
enabled, refreshing the page cache triggers the process.
Click the Submit button to apply the action.
Magento Enterprise Edition User Guide, Version 1.14.2
Chapter 9:
Alternate Media Storage
Magento Enterprise Edition gives you the option to store media files in a database on a
database server, or on a Content Delivery Network (CDN), as opposed to storing them
on the file system of the web server. The advantage of using alternate storage is that it
minimizes the effort required to synchronize media when multiple instances of the
system that are deployed on different servers that need access to the same images, CSS
files, and other media files.
Topics in this chapter:
l
Media Storage Database Setup
l
Media Storage CDN Setup
Magento Enterprise Edition User Guide, Version 1.14.2
127
Media Storage Database Setup
Chapter 9: Alternate Media Storage
Media Storage Database Setup
By default, all images, compiled CSS files, and compiled JavaScript files of the Magento
instance are stored in the file system on the web server. You can choose to store these files
in a database on a database server. One advantage of this approach is the option of
automatic synchronization and reverse synchronization between the web server file system
and the database. You can use the default database to store media or create a new one. To
be able to use a newly created database as media storage, you must add information about
it and its access credentials to the local.xml file.
Database Workflow
When the customer opens the store page, its browser requests the HTML code and the
media specified in the HTML code from the Magento system. The system searches the
requested media in the file system and passes it to the browser, if it is found. If the system
does not find the media in the file system, it requests the media from the database
specified in the settings, places the media to the file system, and sends it to the customer’s
browser.
To get the files from the database to the file system on the web server a PHP script is used.
When the browser requests media from the web server, there are two alternatives for when a
PHP script is run:
l
l
If web server rewrites are enabled in the Magento system and supported by the server,
the PHP script is run only when the requested media is not found in the web server file
system.
If web server rewrites are disabled in the Magento system or not supported by the server,
the PHP script is run in any case, even when the required media exists in the file system
of the web server.
To use a database for media storage:
128
1.
On the Admin menu, select System > Configuration.
2.
In the panel on the left, under Advanced, select System.
3.
This configuration takes place at the global level, so set Current Configuration Scope to
“Default Config.”
4.
Click to expand the Storage Configuration for Media section. Then, do the following:
Magento Enterprise Edition User Guide, Version 1.14.2
Chapter 9: Alternate Media Storage
Media Storage CDN Setup
Storage Configuration for Media
5.
a.
Set Media Storage to “Database.”
b.
Set Select Media Database to the database you want to use.
c.
Click the Synchronize button to transfer the existing media to the newly selected
database.
d.
Enter the Environment Update Time in seconds.
When complete, click the Save Config button.
Media Storage CDN Setup
Storing media files in a CDN is another alternative supported in Magento. There is no full
integration with a specific CDN, and you are responsible for choosing and configuring a
CDN on your own. After configuring the CDN, you must complete the configuration from
the Admin. The changes can be made at either the global or website level.
CDN Workflow
When a CDN is selected as media storage, all paths to media on the web store pages are
changed to paths to the CDN. Retrieving media that is stored in a CDN works as follows:
l
l
l
When a customer opens a page in the store, the browser addresses the CDN with the
request to acquire some media files, such as images.
If the CDN does not yet have these images in its storage, it requests them from the
server, and provides images to the customer’s browser.
If the CDN already has the required images in storage, it simply serves the requested
images to the customer's browser.
Important! When a CDN is used as media storage, JavaScript may not function properly if the
CDN is not in your subdomain. This is a browser security feature.
Magento Enterprise Edition User Guide, Version 1.14.2
129
Media Storage CDN Setup
Chapter 9: Alternate Media Storage
To configure a content delivery network:
1.
On the Admin menu, select System > Configuration.
2.
In the panel on the left, under General, select Web.
3.
Set the Current Configuration Scope as needed.
4.
Click to expand the Unsecure section. Then, do the following:
Unsecure Configuration
5.
a.
Change the value of the Base Media URL.
b.
Change the value of the Base JavaScript URL.
Click to expand the Secure section.
Secure Configuration
6.
130
a.
Change the value of the Base Media URL.
b.
Change the value of the Base JavaScript URL.
When complete, click the Save Config button.
Magento Enterprise Edition User Guide, Version 1.14.2
Chapter 10:
Installing Solr Search
Solr is not bundled with Magento and must be installed separately by your hosting firm
or system administrator. Although Magento does not provide support for configuring
Solr server we do provide Solr configuration and schema files to help your hosting firm
or system administrator with the initial server configuration. Please contact the
Magento Support team for assistance.
When you enable and configure Solr, quick search and advanced search are redirected
to the Solr server, although the results appear in the same way as they would if using
the default MySQL-based search.
During the installation process, you must specify the host name, port, and the
password to connect to the server where Solr search engine is installed. You will need
this information to complete the Solr configuration.
Topics in this chapter:
l
Solr Server Configuration
l
Solr Base File Setup
Magento Enterprise Edition User Guide, Version 1.14.2
131
Solr Server Configuration
Chapter 10: Installing Solr Search
Solr Server Configuration
A number of parameters must be set up in the Magento Admin to establish the connection
to the Solr search engine. Solr can be installed either on the same server as Magento, or on
a different server. The following instructions cover the configuration for the Magento server
installation.
Solr Catalog Search Configuration
To enable Solr:
132
1.
On the Admin menu, select System > Configuration.
2.
In the panel on the left, under Catalog, select Catalog. Then, click to expand the Catalog
Search section.
3.
Set Search Engine to “Solr.” When the Solr options appear, do the following:
a.
Enter the fully-qualified Solr Server Hostname or IP address.
b.
Enter the number of the port that is assigned to be the Solr Server Port.
c.
Enter the Solr Server Password.
Magento Enterprise Edition User Guide, Version 1.14.2
Chapter 10: Installing Solr Search
Solr Server Configuration
d.
In the Solr Server Timout field, enter the number of seconds of inactivity that can
pass before the connection times out.
e.
For a standard Solr installation, you can accept the default Solr Server Path. For a
custom deployment, enter the installation path.
4.
When complete, click the Save Config button.
5.
When the initial Solr installation is complete, complete the search configuration to take full
advantage of the capabilities of Solr.
Field Descriptions
FIELD
SCOPE
DESCRIPTION
Minimal Query Length
Store View
The minimum number of characters allowed in a
catalog search.
Maximum Query Length
Store View
The maximum number of characters allowed in a
catalog search.
Maximum Query Words
Count
Store View
The maximum number of words allowed in a
query.
Search Engine
Global
Identifies the search engine used for the site. For
this configuration, the search engine is: Solr
Solr Server Hostname
Global
The fully qualified host name or IP address of the
Solr server.
Solr Server Port
Global
Identifies the port used by the Solr server. Any
unused port can be assigned to Solr.
Solr Server Username
Global
(Optional) The Solr user name, if required for
authentication.
Solr Server Password
Global
(Optional) The Solr password, if required for
authentication.
Solr Server Timeout
Global
The number of seconds of inactivity before the
server times out.
Solr Server Path
Global
Specifies the path to the Solr server. Accept the
default entry, unless you have customized Solr or
changed the deployment path. The value must
match that in webapp_name-value in the Solr
installation, and is entered without leading or
trailing backslashes.
Magento Enterprise Edition User Guide, Version 1.14.2
133
Solr Server Configuration
Chapter 10: Installing Solr Search
Field Descriptions (cont.)
FIELD
Indexation Mode
SCOPE
Global
DESCRIPTION
Determines how Solr processes indexed content.
Options include:
Final commit
(Default) Offers better
performance than a partial
commit. Solr processes the
content when you initiate a
reindex. Users see content
from the previous index, and
the store remains available for
other requests.
Indexing begins after all
unneeded data is removed
and new data is added. Users
see the results of the indexed
data immediately.
Partial commit All content is removed after
reindexing. As content is
gradually reindexed, users
see only the indexed results.
Engine
autocommit
Enable Search
Suggestions
Store View
Search Suggestions Count Store View
134
Content is put into the index
queue but is not committed.
You must configure Solr to
commit at regular intervals (for
example, every 5 minutes) or
when a certain number of
uncommitted items is
reached.
Determines if search suggestions are displayed
for common misspellings. When enabled, search
suggestions are offered for any request that
returns no results. Search suggestions can
impact the performance of search. Options
include: Yes / No
The maximum number of suggestions offered.
Default value: 2
Magento Enterprise Edition User Guide, Version 1.14.2
Chapter 10: Installing Solr Search
Solr Base File Setup
Field Descriptions (cont.)
FIELD
SCOPE
DESCRIPTION
Show Results Count for
Each Suggestion
Store View
Determines if the number of search results is
shown for each suggestion. (Depending on
theme, the number usually appears in brackets
after the suggestion.) Options include: Yes / No
Enable Solr Engine for
Catalog Navigation
Global
Determines if Solr is used for layered navigation.
Options include: Yes / No
Solr Base File Setup
Solr includes the following base files that must be completed for every language used in the
system. Solr supports search functionality for twenty languages. Solr calls the fields for the
language used by the current store.
Solr Base Files
BASE FILES
DESCRIPTION
protwords.txt
Protected words. Use a protected word file to prevent the
stemmer algorithm from reducing two unrelated words to the
same base word.
spellings.txt
Definitions of misspelled words.
stopwords.txt
Words that stop the search (have no meaning for search).
synonym.txt
Synonyms for every language.
Magento Enterprise Edition User Guide, Version 1.14.2
135
Solr Base File Setup
Chapter 10: Installing Solr Search
Notes
136
Magento Enterprise Edition User Guide, Version 1.14.2
Chapter 11:
Content Staging
Content staging websites are hidden websites that can only be accessed through a
password-protected URL. A content staging site can have the same domain as your live
store, or a separate domain, but it runs on the same Magento installation and database
as the live site.
Content staging websites should never be used for code or development work.
Topics in this chapter:
l
Staging Site Configuration
l
Creating a Staging Site
l
Merging Content
l
Managing Content Staging
Magento Enterprise Edition User Guide, Version 1.14.2
137
Staging Site Configuration
Chapter 11: Content Staging
Staging Site Configuration
The configuration determines the point of entry to the staging site and its landing page.
To configure a content staging website:
1.
On the Admin menu, select System > Configuration.
2.
In the panel on the left, under General, select General.
3.
Click to expand the Staging Websites section. Then, complete the fields as described
below.
Staging Websites
4.
138
When complete, click the Save Config button.
Magento Enterprise Edition User Guide, Version 1.14.2
Chapter 11: Content Staging
Staging Site Configuration
Field Descriptions
FIELD
Automatically Create
Entry Points for Staging
Websites
SCOPE
Global
DESCRIPTION
Determines if the entry points (index files) for beta
sites are created automatically. Options include:
Yes
Generated entry points
automatically.
No
If you plan to host your Staging
Websites on a separate domain,
select No.
Folder Name for Entry
Points
Global
If created automatically, will be created as
subdirectories in this path. This folder must be
writable.
Close Website During
Merge or Rollback
Global
Determines if access will be restricted to the live
site while the merge or rollback is being
performed. Options include:
Landing Page
Store View
Magento Enterprise Edition User Guide, Version 1.14.2
No
If you select No, the site
(s) can be accessed as
usual.
Close Entire
Frontend
(Recommended) All sites
are restricted.
Close Only
Relevant
Websites
Access is restricted only
to the site(s) involved in
the merge or rollback
activity.
Select the CMS page that will be shown if the site
is closed during a merge or rollback activity.
139
Creating a Staging Site
Chapter 11: Content Staging
Creating a Staging Site
Magento Enterprise Edition allows you to create as many staging websites as required. You
can also create Staging Websites based on other Staging Websites. This allows more people
to work on different parts of the new content. The content can be merged to the beta
Website, fully tested and reviewed, and finally merged to the production (live) Website.
Content Staging Workflow
From the Admin, a staging website is accessed in the same way as a normal website. You
can create, edit, and delete content and products in exactly the same way. However,
because it uses the same database as the live store, any products deleted from a staging
site are deleted from the live store, as well. Set the configuration scope as you work to
determine whether you’re working on the staging site or the live site.
When your changes are approved, you can merge the staging website with the live website
and do not have to re-enter data or configuration changes. During the merge, all the
content assigned to the staging website is assigned to the live website, and all attributes on
the staging website/store view level are copied to the matching live website/store view. All
mapping and content selection details can be controlled by the administrator, so only the
content and content types you want will be merged. Additionally, during merging, a
rollback (backup) can be created.
To create a new content staging website:
1.
On the Admin menu, select System > Content Staging > Staging Websites.
This page lists all existing Staging Websites.
2.
In the upper-right corner, click the Add Staging Website button. Then, do the following:
Staging Website Settings
140
a.
Set Source Website to one of existing websites. Then, click the Continue button.
b.
Complete the Staging Website section, using these field descriptions for reference.
Magento Enterprise Edition User Guide, Version 1.14.2
Chapter 11: Content Staging
Creating a Staging Site
Staging Website
3.
In the Select Original Website Content to be Copied to the Staging Website section, select
the checkbox of each type of content to be copied to the staging website.
Select Original Website Content to be Copied to the Staging Website
4.
In the Select Original Website Store Views to be Copied to the Staging Website, select the
checkbox of each store view that is to be copied to the staging website.
Select Original Website Store Views to be Copied to Staging
5.
When complete, click the Create button to save your settings. You will be redirected to the
Staging Websites list.
After the staging site is set up, you can edit content, and assign it to the Staging site, or
change attributes at the Website or Store View level. You can also change the Label and
Frontend Restriction options. A record of all changes to the site, such as creation, merge, or
rollback, can be viewed on the Event History tab.
Important! Never delete a product from a content staging website, because it will be deleted
from the live site, as well. To remove a product from a content staging website, simply disable it.
Magento Enterprise Edition User Guide, Version 1.14.2
141
Creating a Staging Site
Chapter 11: Content Staging
Field Descriptions
FIELD
142
DESCRIPTION
Master Website Code
The name assigned to the staging environment, for internal
reference.
Staging Website Code
Unique website code of the Staging Website. This field will be
pre-populated with and automatically generated code, although
you have the ability to modify the value.
Staging Website Name
Name of the Staging Website. This field will be pre-populated
with and automatically generated name, although you have the
ability to modify the value.
Frontend Restriction
Controls how the frontend of the Staging Website can be
accessed. Options include:
Not accessible
Disables access to the entire staging
frontend.
Accessible
The staging site is open and can be
accessed by anyone that knows the
URL.
Require HTTP
Authentication
The staging site will show a username
and password prompt on access, which
can be configured below.
HTTP Login
The user name required for HTTP Authentication.
HTTP Password
The password required for HTTP Authentication.
Magento Enterprise Edition User Guide, Version 1.14.2
Chapter 11: Content Staging
Merging Content
Merging Content
After making all the necessary content changes on the staging website you can merge or
schedule merging of the staging website to another website. For a scheduled merge to be
applied, the Magento cron job must be running on the server.
Only one backup can be created for each website per merge. Backups are created in the
database and require significant database space. Because backups are not updated when
Magento is updated, any table structure that changes during an update cannot be restored
from a backup.
To merge or schedule a merging:
1.
On the Admin menu, select System > Content Staging > Staging Websites.
2.
In the list, click the the staging website that you want to merge.
3.
Click the Merge button to open the mapping configuration page.
4.
In the top section, define the mapping of the websites and store views. This controls which
staging website is merged to which live website, and which staging store view is merged to
which live store view.
a.
Select the To Website, which is the target website. The To website can be either the
source website, or another website.
b.
Click Add New Store View Map.
c.
Select the From and To Store Views. Each option can be selected only once.
d.
Repeat this process to add maps for all store views that need to be merged.
5.
Select the Create a backup checkbox to create a backup of the live site before merging.
6.
In the list, select all items that you want to merge from the staging to the live website.
7.
Click Merge Now or specify a date and time and click Schedule Merge.
Magento Enterprise Edition User Guide, Version 1.14.2
143
Merging Content
Chapter 11: Content Staging
Rolling Back Merged Content
If you have selected to create a backup when merging a website, a backup of the target
website is created just before the merge. The backup contains only the tables that are
related to the content staging merge, and is not a backup of the entire site.
To roll back content:
1.
On the Admin menu, select System > Content Staging > Backups.
2.
Find the backup in the list that you want to roll back, and open the record.
3.
In the panel on the left, select Rollback. Then, choose the items that you want to restore.
You can only select the items which are available.
4.
Click the Rollback button. After the website is restored, you will be redirected to the backup
grid.
Items are available for rollback only if the table versions of the backup and original Website
match. If they do not match, the rollback is not possible with Magento functionality. It can be
carefully performed using manual database administration tools, however this is not
recommended. The table version might change when an upgrade of the Magento system also
changes the structure of some of the tables.
Rollback can be used either to restore content if an error is noticed after a merge, or to
restore to a previous site version when the staging site is used for seasonal or temporary
website changes.
Website Backup Information
TAB
144
DESCRIPTION
Backup General Info
Displays the basic backup information. Table Prefix is the prefix
used for backup tables of this website in the database.
Rollback History
Displays events associated with this backup.
Rollback
Contains the list of items which are available for rollback.
Magento Enterprise Edition User Guide, Version 1.14.2
Chapter 11: Content Staging
Managing a Staging Site
Managing a Staging Site
Content staging is a very powerful tool, but requires caution to use it effectively. An
important thing to understand is that the staging website it is not a separate beta website
with a separate database. It is another website in the store that is hidden. Thus, creating
and deleting content, such as products, requires special attention.
Important! Never delete products from a content staging website, because they will be deleted
from the live site, as well. To remove a product from a content staging website, simply disable it.
To remove products from a staging website:
1.
On the Admin menu, select Catalog > Manage Products.
2.
Click to open the product in edit mode. Then, do one of the following:
l
l
3.
In the panel on the left, select Websites. Then uncheck the staging website that you
want to disassociate from the product.
Set Choose Store View to the staging website. Then, on the General tab, set Status to
“Disabled.”
When complete, click the Save button.
This product is removed from the staging website, but still exists in the production site,
until a merge is performed.
4.
Follow the instructions to merge the staging website into the production website.
The product is now unassigned or disabled in the staging website, as well as in the
production website. The product can be safely deleted, as it is no longer used.
To create a product on a staging website:
1.
On the Admin menu, select Catalog > Manage Products.
2.
In the upper-right corner, click the Add Product button. Then, do the following:
3.
a.
Create the product as usual.
b.
In the panel on the left, select Websites. Then, assign the product only to the staging
website.
c.
When complete, click the Save button.
Merge the Staging Website into the production Website by following the instructions.
The product is now available in both the staging and production websites. Similar steps
should be taken when working with other types of content.
Magento Enterprise Edition User Guide, Version 1.14.2
145
Managing a Staging Site
Chapter 11: Content Staging
To change the staging environment settings:
1.
On the Admin menu, select System > Content Staging > Staging Websites.
2.
Find the site in the list, and click to open the record in edit mode.
3.
Make the necessary changes, and click the Save button.
Upgrading Magento
When using a staging website, take special care when upgrading Magento. Upgrades
modify the staging website, but not the backups. In some cases, especially if the upgrade
modifies content tables, an upgrade can render the backup unusable. It is recommended
that you upgrade Magento either before you work on a staging website, or after a merge has
been completed, confirmed, and no rollback is expected.
146
Magento Enterprise Edition User Guide, Version 1.14.2
Chapter 12:
Magento Connect
Magento Connect is the marketplace for Magento extensions. There are hundreds of
extensions and themes from all over the world. Magento out-of-the-box supports a few
of the most popular ones. However, community members are developing and
publishing new extensions in order to extend Magento with various new features.
In this chapter:
l
Installing Extensions
Magento Connect
Magento Enterprise Edition User Guide, Version 1.14.2
147
Installing Extensions
Chapter 12: Magento Connect
Installing Extensions
Many extensions are available on Magento Connect, and the installation process varies for
each. Some extensions require additional configuration after the installation. Please read
the documentation provided by the extension developer for specific instructions. The
following instructions outline the general process. Before installing any extension, always
backup your store.
To back up your store:
1.
On the Admin menu, select System > Magento Connect > Magento Connect Manager.
2.
Select the Create Backup checkbox and select the backup type.
The backup is created automatically, and is listed under System > Tools > Backups.
To install an extension:
1.
Go to Magento Connect.
2.
Use the filters to browse through the available extensions.
3.
On the page of the extension you want to install, do the following:
a.
If the extension is available for sale, click the Get Extension button. Then, follow the
prompts to purchase the extension.
b.
Click the Get Extension Key key button.
c.
Click the link to read the license agreement, and if you agree to the terms, select the
checkbox.
An extension key similar to this appears: magento-core/Mage_xxxx. The key is a
special link that Magento needs to install the extension to your store.
d.
4.
148
Click Select to select the key, and press Ctrl + C to copy it to the clipboard.
Log in to your store Admin, and do the following:
a.
On the Admin menu, select System > Magento Connect > Magento Connect
Manager.
b.
When prompted, enter your Admin User Name and Password. Then, click the Log In
button.
Magento Enterprise Edition User Guide, Version 1.14.2
Chapter 12: Magento Connect
Installing Extensions
Log In to Magento Connect Manager
5.
c.
In the Install New Extensions section, paste the Extension Key.
d.
Click the Install button and wait for the installation to complete.
You can now return to your store Admin and use the extension.
Look for new options in the related section of the Admin. For example, a payment
extension will appear in System > Configuration > Sales > Payment Methods.
Magento Enterprise Edition User Guide, Version 1.14.2
149
Installing Extensions
Chapter 12: Magento Connect
Notes
150
Magento Enterprise Edition User Guide, Version 1.14.2
Chapter 13:
Web Services
Web services share information across networks using standards-based technologies.
Information from your store can be shared with other Web-based services to help create
a more integrated set of tools for your business.
Web services retrieve information from your store using an application programming
interface, the Magento Core API. The Magento Core API includes all the parameters for
data requests that other web services need to access information from your store.
Topics in this chapter:
l
Magento Core API Settings
l
Activating Web Services
Magento Enterprise Edition User Guide, Version 1.14.2
151
Magento Core API Settings
Chapter 13: Web Services
Magento Core API Settings
The Magento Core API supports both SOAP and XML RPC protocols. The API is
permission-based, and allows access to the Customer, Catalog, and Order modules of your
store.
The WSDL (Web Services Description Language) definition that you create for your
Magento Enterprise Edition API solution ism by default, WS-I compliant. This makes it
possible to use tools that require a WS-I complaint WSDL definition for API integration. No
additional settings are required. Use the following endpoint URL for all WSI-I APIs, and
replace {site_url} with the store domain.
WS-I Endpoint URL
http://{site_url}/api/wsi_soap/?wsdl
To change the general settings:
By default, the API default character set is UTF-8, and the timeout for client sessions is
3600 seconds. You can change the default settings through the system configuration of the
store.
1.
On the Admin menu, select System > Configuration.
2.
In the panel on the left, under Services, select Magento Core API. Then, click to expand the
General Settings section. Then, do the following:
Magento Core API General Settings
3.
152
a.
Enter the name of the Default Response Charset that you want to use.
b.
Enter the length of the Client Session Timeout in seconds.
c.
To enable WS-I Compliance, select “Yes.”
d.
To enable the WSDL Cache, select “Yes.”
When complete, click the Save Config button.
Magento Enterprise Edition User Guide, Version 1.14.2
Chapter 13: Web Services
Activating Web Services
Activating Web Services
Web Services give you the ability to grant permission to third-party applications to access
your store data for the purpose of integration.
Step 1: Create a Web Service Role
1.
On the Admin menu, select System > Web Services > SOAP/XML-RPC Roles.
2.
Click the Add New Role button.
3.
In the Role Information section, enter a Role Name such as “API.”
4.
In the panel on the left, select Role Resources. Then do one of the following:
l
l
l
5.
To enable full access, set Resource Access to “All.”
To provide limited access to data, set Resource Access to “Custom.” Then, select the
checkbox of each resource that is available to this role.
By default, when a area is selected, full access is granted. However, you can specify the
actions that a person is allowed to take. Specific types of access are listed under many of
the resource links, so it is easy to determine exactly what a user is allowed to do with
the resource.
When complete, click the Save Role button.
Step 2: Create a Web Service User
1.
On the Admin menu, select Web Services > SOAP/XML-RPC-Users.
2.
Click the Add New User button.
3.
Complete the following fields:
4.
l
User Name
l
First Name
l
Last Name
l
Email
In the API Key field, type in a verification key, or password. This is the access credentials
that third-party web services will use to access your Magento store.
Magento Enterprise Edition User Guide, Version 1.14.2
153
Activating Web Services
Chapter 13: Web Services
Web Service User
5.
To confirm, re-enter the key in the API Key Confirmation field.
6.
In the panel on the left, select User Role. Then, select a role for the user.
7.
When complete, click the Save User button.
Step 3: Add Custom Scripts to Your Store
Some third-party web services rely on snippets of JavaScript code to gather data. Some web
services require you to insert code in the HTML <head> section, while others require the
code to be in the HTML footer, below the closing </body> tag.
154
Magento Enterprise Edition User Guide, Version 1.14.2
Chapter 14:
System Tools
The system toolsgive developers, system administrators, and support engineers easy
access to routine system processes and reports.
Topics in this chapter:
l
Admin Actions Log
l
Server Backup & Rollback
l
Compilation
l
Cron
l
Support Tools
Magento Enterprise Edition User Guide, Version 1.14.2
155
Admin Actions Log
Chapter 14: System Tools
Admin Actions Log
Logging of administrator actions enables you to track of backend activities. For most
events, the available information includes the action, the name of the user who performed
it, whether it was a success or failure, and the ID of the object on which the action was
performed. Additionally the IP and date are always logged.
In addition, you can control how long the log entries are stored and how often they are
archived. The Admin Actions archive lists the CSV log files that are stored on the server
at: var/admin_logs. By default, the file name includes the current date in ISO format: yyyyMMddHH.csv.
Log archiving requires a cron job to be set up.
Admin Actions Log
To set up the Admin Actions Log:
156
1.
On the Admin menu, select System > Configuration.
2.
In the panel on the left, under Admin, select System.
3.
Click to expand the Admin Actions Logging section, and do the following:
l
To enable admin logging, select the checkbox of each module.
l
To disable admin logging, clear the checkbox of each module.
Magento Enterprise Edition User Guide, Version 1.14.2
Chapter 14: System Tools
Admin Actions Log
Admin Actions Log Setup
4.
When complete, click the Save Config button.
To set up Admin Actions Log Archiving:
1.
On the Admin menu, select System > Configuration.
2.
In the panel on the left, under Admin, select System.
3.
Click to expand the Admin Actions Log Archiving section, and complete the settings as
described below.
Admin Actions Log Archiving
4.
When complete, click the Save Config button.
Field Descriptions
FIELD
SCOPE
DESCRIPTION
Log Entry Lifetime, Days
Store View
Determines how long the log entries are stored in
the database before being removed. If there are
many administrators working on the site, you can
change this value from the default (60 days) to a
lower value to avoid filling the capacity of the
database.
Log Archiving Frequency
Store View
Determines how often old events are saved to the
archive. Options include: Daily / Weekly / Monthly
Magento Enterprise Edition User Guide, Version 1.14.2
157
Admin Actions Log
Chapter 14: System Tools
Admin Actions Log Report
The Admin Actions Log report includes every activity that has taken place during the
lifetime specified for log entries. Report columns include a timestamp, action group and
action taken, username, result, and name of the affected module. If applicable, the Item_id
column displays the ID of an affected item, such as customer ID, order ID, or product ID.
The log data can be exported to CSV or XML format using the Export control at the top of
the report.
To view the Admin Actions Log Report:
1.
On the Admin menu, select System > Admin Actions Log > Report.
2.
To view the Admin User Data for any log entry, click the View link.
Log Entry Admin User Data
To export the report:
1.
Before exporting the data, use the list controls to filter and sort the data that you want to
include.
2.
Set the Export to control to one of the following formats:
3.
l
CSV
l
Excel XML
Click the Export button.
To archive the log:
158
1.
On the Admin menu, select System > Admin Logging > Archive.
2.
Click the file name to download the archived file.
Magento Enterprise Edition User Guide, Version 1.14.2
Chapter 14: System Tools
Server Backups & Rollback
Server Backups & Rollback
Magento Enterprise Edition gives you the ability to back up different parts of the system—
such as the database, file system, or both—and to rollback automatically. Files are
compressed using the .gz and .tgz formats.
Topics covered in this section include:
l
Creating a Backup
l
Rolling Back Changes
Best Practices
Restrict Access to Backup Tools
Access to the Backups and Rollback management tool can be restricted by configuring user
permissions for backup and rollback resources. To restrict access, leave the corresponding
checkbox unselected. If you need to grant access to the rollback resources, you must grant
access to backup resources as well.
Backup Before Installing Extensions and Updates
Always perform a backup before installing an extension or updating Magento. Magento
Connect Manager (MCM) includes a backup option that you can use before installing an
extension or upgrading to a new release.
Magento Enterprise Edition User Guide, Version 1.14.2
159
Server Backups & Rollback
Chapter 14: System Tools
Creating a Backup
Database backup files are compressed using the .gz format. For the system backups and
database and media backups, the .tgz format is used. Backup files are stored in the
var/backups directory in your Magento file system. The files that are stored in the
/var/cache, /var/log, /var/session and /var/report folders are excluded from the backup.
Create a Backup
To create a backup:
1.
On the Admin menu, select System > Tools > Backups.
2.
Click one of the following buttons, depending on the backup type you need to create:
System Backup
Creates a complete backup of the database and the file system. On
the next step you will have the possibility to choose whether to
include the media folder to the backup.
Database and
Media Backup
Creates a backup of the database and the media folder.
Database Backup
Creates a backup of the database.
3.
To put the store into maintenance mode during the backup, select the checkbox. After the
backup is created, maintenance mode is turned off automatically.
4.
If you are creating a system backup, select the Include Media folder to System Backup
checkbox if you want to include the media folder. When prompted, confirm the action.
Records of all created backups are listed on the Backups page. Deleting a record deletes the
archive file as well.
160
Magento Enterprise Edition User Guide, Version 1.14.2
Chapter 14: System Tools
Server Backups & Rollback
To backup from Magento Connect Manager
1.
On the Admin menu, select System > Magento Connect > Magento Connect Manager.
2.
Select the Create Backup checkbox and select the backup type.
3.
Proceed with an extension installation or Magento update. The backup is created
automatically and available at System > Tools > Backups.
Rolling Back Changes
Important! Use the Rollback with caution. Customers who are in the process of checking out
when you start the rollback may not be able to complete the process.
To roll back the whole system or the database:
1.
On the Admin menu, select System > Tools > Backups.
2.
On the Backups page, find the backup you want. Then in the Action column, click the
Rollback link.
All changes made since the backup was created are lost after the rollback.
3.
Confirm the rollback. When prompted, enter your Admin Password. Then, choose whether
you want to put your store into the maintenance mode during the roll back. When restoring
file system or database and media files you can choose to use the FTP connection.
After the rollback, you are redirected to the Admin login page.
4.
Refresh all cache types and rebuild required indexes.
Magento Enterprise Edition User Guide, Version 1.14.2
161
Compilation
Chapter 14: System Tools
Compilation
The compiler is disabled by default. The first time you run the compiler, the status changes
to “Enabled.” A summary of the compilation state appears at the top, and includes the
status of the compiler and state of the compilation, the number of files compiled, and the
number of compiled scopes.
To run the compiler:
1.
On the Admin menu, select System > Tools > Compilation.
2.
Click the Run Compilation Process button.
To disable the compiler:
Click the Disable button.
Compilation Complete
162
Magento Enterprise Edition User Guide, Version 1.14.2
Chapter 14: System Tools
Cron
Cron
Magento performs some operations on schedule by periodically running a script. You can
control the execution and scheduling of Magento cron jobs from the Admin of your store.
Store operations that run according to a cron schedule include:
l
Email (Transactional and any other email sent from the store.)
l
Catalog Price Rules
l
Newsletters
l
Google Sitemap Generation
l
Customer Alerts and Notifications
l
Currency Rate Updates
l
Log Cleanup
Make sure that the secure and unsecure base URLs for the store are set correctly, so the
URLs that are generated during cron operations are correct. To learn more about cron jobs,
see How to Set Up a Cron Job.
To configure cron:
1.
On the Admin menu, select System > Configuration.
2.
In the panel on the left, under Advanced, select System. Then, click to expand the Cron
section.
3.
Enter the number of minutes for each of the following:
4.
l
Generate Schedules Every
l
Schedule Ahead for
l
Missed if not Run Within
l
History Cleanup Every
l
Success History Lifetime
l
Failure History Lifetime
When complete, click the Save Config button.
Magento Enterprise Edition User Guide, Version 1.14.2
163
Cron
Chapter 14: System Tools
Field Descriptions
FIELD
164
SCOPE
DESCRIPTION
Generate Schedules Every Store View
Determines the frequency in minutes, that
schedules are generated.
Schedule Ahead for
Store View
Determines the number of minutes in advance
that schedules are generated.
Missed if Not Run Within
Store View
Determines the number of minutes before a cron
job that hasn’t yet executed is marked as missed.
History Cleanup Every
Store View
Determines the number of minutes that pass
before the cron history is cleaned.
Success History Lifetime
Store View
Determines the number of minutes that the record
of successfully completed cron jobs are kept in
the database.
Failure History Lifetime
Store View
Determines the number of minutes that the
record of failed cron jobs are kept in the
database.
Magento Enterprise Edition User Guide, Version 1.14.2
Chapter 14: System Tools
Support Tools
Support Tools
The Support Tools are designed to identify known issues in your system. They can be used
as a resource during the development and optimization processes, and as a diagnostic tool
to help our support team more quickly identify and resolve issues.
The topics included in this section are:
l
System Backups
l
System Reports
System Backups
The Manage System Backups page lists all the available system backups. The backups can
be filtered by status and date. The backup includes complete code and database dumps.
Generating a System Backup
To generate a system backup:
1.
On the Admin menu, select System > Tools > Support > System Backups.
2.
Click the New Backup button.
Backups take some time to process. While the backup is processing, it will appear in the
list with an “Incomplete” status.
Magento Enterprise Edition User Guide, Version 1.14.2
165
Support Tools
Chapter 14: System Tools
System Reports
The system reporting tool gives you the ability take periodic full, or partial, snapshots of
the system, and save them for future reference. You can compare performance settings
before and after code development cycles, or changes to server settings. The system
reporting tool can dramatically reduce the time spent preparing and submitting the
information required by Support to begin an investigation.
From the Manage System Reports page, you can view and download existing reports, delete
reports, and create new reports.
Manage System Reports
To access system reports:
1.
On the Admin menu, select Tools > Support > System Reports.
2.
To view a report, click the View link at the end of the row.
3.
To download a report, click the Download link at the end of the row.
4.
To create a new report, click the New Report button. Then, do the following:
a.
In the list, select each report type that you want to include.
By default, all reports are selected.
166
Magento Enterprise Edition User Guide, Version 1.14.2
Chapter 14: System Tools
Support Tools
Generate System Report
b.
Click the Create button to generate the report.
It might take a few minutes for the report to generate, depending on the report types
selected. When the report is ready, it appears at the top of the list with a timestamp
and description of its contents.
New System Report
Magento Enterprise Edition User Guide, Version 1.14.2
167
Support Tools
Chapter 14: System Tools
System Reports
REPORT TYPE
General
INFORMATION INCLUDED
Magento Version
Data Count
Cache Status
Index Status
Compiler Status
Data
Corrupted Categories Data
Duplicate Categories By URL Key
Duplicate Products By URL Key
Duplicate Products By SKU
Duplicate Orders By Increment ID
Duplicate Users By Email
Environment
Environment Information
MySQL Status
Modules
Custom Modules List
Disabled Modules List
All Modules List
Core Modules List
Enterprise Modules List
Configuration
Configuration
Data from app/etc/enterprise.xml
Data from app/etc/local.xml
Data from app/etc/config.xml
Shipping Methods
Payment Methods
Payments Functionality Matrix
Rewrites
Active Class Rewrites
Class Rewrite Conflicts
File Rewrites
Controller Rewrites
Router Rewrites
Files
Modified Core Files
Applied Solutions List
168
Magento Enterprise Edition User Guide, Version 1.14.2
Chapter 14: System Tools
Support Tools
System Reports (cont.)
REPORT TYPE
INFORMATION INCLUDED
Patch Files List
Missing Core Files
New Files
Files Permissions
DB Tables
Modified Core Tables
Missing Core Tables
New Tables
Missing DB Routines List
New DB Routines List
Missing DB Triggers List
New DB Triggers List
DB Tables Status
DB MyISAM Tables Status
DB Routines List
DB Triggers List
Logs
Log Files
Top System Messages
Today's Top System Messages
Top Exception Messages
Today's Top Exception Messages
Attributes
User Defined Eav Attributes
New Eav Attributes
Entity Types
All Eav Attributes
Category Eav Attributes
Product Eav Attributes
Customer Eav Attributes
Customer Address Eav Attribute
RMA Item Eav Attributes
Events
Custom Global Events
Custom Admin Events
All Global Events
All Admin Events
Magento Enterprise Edition User Guide, Version 1.14.2
169
Support Tools
Chapter 14: System Tools
System Reports (cont.)
REPORT TYPE
INFORMATION INCLUDED
Core Global Events
Core Admin Events
Enterprise Global Events
Enterprise Admin Events
Cron
Cron Schedules by status code
Cron Schedules by job code
Errors in Cron Schedules Queue
Custom Global Cron Jobs
Custom Configurable Cron Jobs
Cron Schedules List
All Global Cron Jobs
All Configurable Cron Jobs
Core Global Cron Jobs
Core Configurable Cron Jobs
Enterprise Global Cron Jobs
Enterprise Configurable Cron Jobs
Design
Design Themes Config
Adminhtml Themes List
Frontend Themes List
Install Themes List
Adminhtml Skins List
Frontend Skins List
Install Skins List
Stores
Websites Tree
Websites List
Stores List
Store Views List
170
Magento Enterprise Edition User Guide, Version 1.14.2
Apple Mail 12
Archive
Admin actions 157
Index
Attribute
entities 40
Autogenerate
A
page cache 126
Abandoned carts
report 73
Access Restriction, website 91
B
Backup 144
Add
create 148
New User 79
delete 160
Admin
during merge 143
access 75
General Info 144
account, unlock 85
Actions Log 156
CAPTCHA 93
permissions 159
Backups, system 165
Base
lockout 89
currency 8
password 89
JavaScript URL 130
permissions 75
role 76
role, create 77
role, custom 78
media URL 130
Bestsellers 67
Beta website 140
Blocks HTML Output, cache 119
security 87-88
Startup Page 68
C
user 76
user, create 76
Cache 115
Allowed Currencies 4
configuration 122
Android, email 12
CSS files 118, 120
API 151
full page 126
Core 152
JavaScript 118
Key 154
module 119
Append Complex Data 37, 50, 53
Magento Enterprise Edition User Guide, Version 1.14.2
size 123
171
Index
Storage Management 115
system 119
email templates 14
CSV file 33, 40, 65, 70
types 119
customer structure 35
CAPTCHA 93
structure 34
configuration, Admin 94
Currencies, page cache 122
configuration, store 97
Currency
Category
Import Rates 9
Flat Index 106
rates 8
CDN 129
Setup 8
JavaScript use 129
symbols 8
media retrieval 129
Symbols 8
Chrome, email 13
Custom
Clean history, scheduled jobs 62
Clear cache 116
scripts 154
Customer
Closed for Maintenance 90
CSV structure 35
Collections Data, cache 119
import 36
Comma-separated values 33
Reviews, report 74
Compilation 162
Tags, report 74
config.xml 119
Customers 67
Configuration
by Number of Orders, report 74
cache 119
by Orders Total, report 74
security 87-88
reports 65
Content
Delivery Network 129
merge 143
staging 140, 144
Convert to Plain Text 30
Coupon
Usage, report 73
Cron 163
Cron job 113, 143
CSS
cache 118, 120
D
Dashboard 66
charts 68
configuration 67
Data location 48
Database
and Media Backup 160
backup 160
compression, backup 160
key, change 100
email 22
172
Magento Enterprise Edition User Guide, Version 1.14.2
Index
media storage 128
Excel
Dataflow 43
Default
XML 70
Export 42
Display Currency 8
Dataflow 43
email template 22
failed email 48
Delete Entries, Import 37
product data 42
Downloads, report 74
product types 42
reindex 48
E
Scheduled 56
Settings 42
EAV
to, report 70
Types and Attributes, cache 119
Edit
Extension
install 148
permission, price rules 82
permission, product 83
Email
CSS file 16
F
File
footer 17, 27
compression, backup 159
header 16
history, clean 62
header template 23
validation, import 36
logo 15-16
Firefox, email 13
message templates 29
Flat
template 14, 22
template, configure 11
template, default 22
index 106
Flush
Cache Storage 118
Email clients 12
Catalog Cache 118
email, browsers 13
JavaScript cache 118
email, upgrades 16
JavaScript/CSS Cache 118, 120
Encryption 100
Magento Cache 118
Entity
product image cache 118
Attributes 42
Footer, email 27
Entry point, staging site 139
Frame, running your store in 89
Events
Frontend
log 156
Magento Enterprise Edition User Guide, Version 1.14.2
Restriction, staging 142
173
Index
Full
Product Images 43
page cache 119, 126
reindex 48
page cache, settings 122
Scheduled 49
reindex 111
Settings, scheduled 53
in-line styles 14
G
Index 103
actions 111
Get Extension Key 148
Clean Schedule 113
Gmail 12
cleanup 113
configure 106
H
Management 104
Hashing 100
modes 109
Header template, email 23
Options 106
Hidden
website 140
HTML
schedule 113
Indexation Mode, Solr 134
Install
email 22
HTTP authentication, staging 142
extension 148
Integration 151
Internet Explorer
I
email 13
Iframe, running your store in 89
Invitations
Image
cache, flush 118
reports 65
iPhone, email 12
import 38
Import 36
Behavior 41
J
JavaScript
Currency Rates 9
cache 118
Dataflow 43
failed email 48
L
Failed Emails, scheduled 55
File Information, scheduled 54
file validation 36
guidelines 40
images 38
174
Landing page 92
during rollback 139
Layered Navigation
Solr 135
Magento Enterprise Edition User Guide, Version 1.14.2
Index
Layouts
report 73
cache 119
local.xml 119, 128
Log archive 158
N
New
Log report 158
Accounts, report 74
Login
case-sensitive 89
Logo image, email 15, 18
Logo size, email 18
Low Stock, report 73
Customers 67
Non-inline CSS 14
Non-inline CSS Files 18
Non-sessioned visit 121
non_inline_styles 14
Not Default Currencies, cache 123
M
Magento
Connect 147
Connect Manager, backup 159
O
Order Taxes, report 72
Orders
Connect, install extension 148
Connect, Manager 148
report 69
Outlook 12-13
Core API 151
upgrades, email 16
P
Maintenance
mode 90
Master Website Code 142
Match Period To, report 71
Media
retrieval, CDN 129
Storage 129
Storage, database 128
Merge
content 143
mapping 143
staging 140
Most Viewed
Products 67
Page
cache, configure 122
session, customer 121
visit, type 121
Page cache 119
Partial
reindex 111
Password
Admin 89
PayPal
Settlement Report 73
Permissions
admin 75
backup 159
Magento Enterprise Edition User Guide, Version 1.14.2
175
Index
custom 78
rollback 159
PHP script
Tags, report 74
Profiles, Dataflow 43
Promotions
database media storage 128
Popular Tags
resources 82
Protected words, Solr 135
report 74
R
Price
display 8
permissions 81, 84
resources 81
Price Rule
permissions 82
Private Sales
Login and Register 92
Login Only 91
Product
data, export 42
file structure 34
Flat Index 106
image cache 118
import 36
price, permissions 84
reviews
report 74
status, permissions 81, 83
type
export 42
Product Bestsellers, report 73
Product Images
Import 43
Products
in Carts, report 73
Ordered, report 73
Read
permission, price rules 82
permission, product 83
Redindex
after export 48
Refresh
cache 116
report data 72
statistics 72
Reindex 108
events 110
full 111
manual 108
partial 111
required 108
Replace
Complex Data 37
Existing Data 50, 53
Report 69, 72
export 70
statistics, refresh 72
types 65
Resource Access, Custom 153
REST roles 85
Restriction Mode, website 91
Return HTML Version 30
reports 65
176
Magento Enterprise Edition User Guide, Version 1.14.2
Index
Reviews
reports 65
Rewrite, indexer type 107
Role
custom 78
Secret Key
URLs 89
Security 87-88
running in frame, iframe 89
Server
Resources 79
backup 159
scope 79
rollback 159
Rollback 161
content 144
503 Service Unavailable 93
Session
create 140
customer 121
History 144
ID 121
merge 144
lifetime 89
resources 159
Sessioned visit 121
SHA-256 100
S
Show Actual Values, report 70-71
Sales
email templates 20
reports 65
Schedule
merge 143
reindex 113
Scheduled
import 49
Import/Export 48
job, run 62
Scheduled Jobs, cron 163
Scripts
custom 154
Search Terms
report 74
reports 65
Seasonal changes, rollback 144
Solr
Base Files 135
configuration 133
install 132
language support 135
Server Path 133
Spelling, Solr 135
Staging Website 140, 143
catalog 145
code 142
configure 138
create 140
database use 145
disable product 145
entry point 139
Startup Page 92
Admin 68
Stop words, Solr 135
Magento Enterprise Edition User Guide, Version 1.14.2
177
Index
Storage
Transactional Emails
configuration, media 128
Store Contact Information, variables 26
configuration 16
Translations, cache 119
Storefront
CAPTCHA 93
Subdomain, CDN 129
Support tools 165
U
Under construction 90
Unlock
Support Tools
System Backups 165
Admin account 85
User Role, Admin 77
System Reports 166
Synchronization 128
V
Synonyms
Solr 135
System
backup 160
var/backups 159
var/cache 115
Variables
email 22
System backups 165
Store Cotact Information 26
System Reports 166
System Tools 155
Visit
non-sessioned 121
sessioned 121
T
Tags
W
reports 65
Templates, transactional email 29
Third-party
applications 153
Total
Invoiced vs. Paid, report 72
Ordered, report 72
Refunded, report 73
Shipped, report 73
Transactional emails 14
templates 29
Web server
synchronization 128
Web Services 85, 151-152
Configuration, cache 119
Website
Backup Information 144
hide 140
restrictions 90
Widget
email 22
WS-I 152
178
Magento Enterprise Edition User Guide, Version 1.14.2
Index
X
XML
file 65
Magento Enterprise Edition User Guide, Version 1.14.2
179
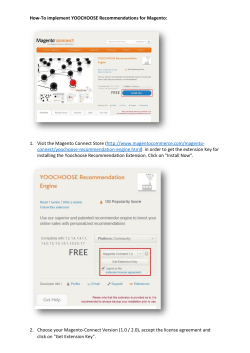


© Copyright 2026