
Building A VO Website Using WordPress
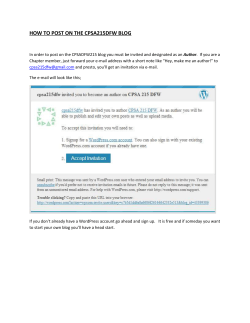
Building A Website
Using Wordpress
Why A Website
❖
Promote personal brand!
❖
Allows others to contact/find you!
❖
Professional / edited and curated materials by you!
❖
❖
Authority on cached web materials!
Allow other to view your rich media!
❖
Audio / Video / Updated Social Media
Why Wordpress
❖
Most utilized website system!
❖
Thousands of themes!
❖
Static and Blog style websites!
❖
Easily configurable!
❖
Fun to build with!
❖
SEO friendly & Mobile Ready!
❖
Multiple plans for use (Free & Paid & Self-Hosted) !
❖
Lot’s of web support and troubleshooting
What Is A Website
❖
Static code FILES written in HTML & CSS!
❖
Dynamic FILES written in PHP & Javascript!
❖
A WEB SERVER to HOST and serve pages as requested!
❖
A WEB BROWSER to translate code pages to viewable
materials!
❖
(Optionally) A web served database to organize website
Database
Web Server
Name Server!
DNS
Your Files!
HTML, CSS, Javascript
www.site.com
Web Browser
PC
Anatomy of a web request
Types Of Websites
❖
Static!
❖
❖
Dynamic!
❖
❖
Pre-coded web pages that display identically always. Think
personal web pages.!
Website that changes based on coding rules. This is usually a
mix of static plus code to offer app like functionality, think
weather.com, MSN.com, yahoo.com etc.!
Web App!
❖
Fully functional application based in the cloud. Think Facebook,
Twitter, Pinterest etc.
What You’ll Need
❖
A computer to create, post and update a website.!
❖
A desire to create and learn!
❖
[Optionally], a hosted server (monthly cost)!
❖
[Optionally], a personalized domain name (yearly cost)!
❖
A WORDPRESS.COM account (we’ll create this in class)!
❖
A SOUNDCLOUD account (we’ll create this in class)!
❖
Pictures (headshots etc…), Audio (vo demo), Bio
Hosting Configurations
❖
Self Hosting!
❖
❖
Shared Hosting!
❖
❖
Company branded and sub-domained website with limited functionality. (e.g.
mysite.somecompany.com)!
Augmented Free Hosting!
❖
❖
Hosting services provided by a company. This includes access to an manipulation of what goes on
server. It also includes always on internet connection and customer service.!
Free Hosting!
❖
❖
Your own computer, web server, always on internet connection and the ability to troubleshoot
system!
Upgraded (for fee) free hosting that allows more control. This system usually allows creation and
web editorial of your site via pre-built template engine!
Template Engine Hosting!
❖
(see augmented free hosting) This is a WYSIWYG (what you see is what you get) template
platform where you edit via drag and drop. They host for you, often these come bundled with
domains.
What We’ll Create
❖
Free-Hosted Service!
❖
❖
Template Driven Design Website!
❖
❖
Sub-Domain of Wordpress.com!
WYSIWYG!
Use free services like Soundcloud to host media
wordpress.com
Create a domain name
Fill out the account information
[Optionally] Create a custom URL. (We won’t do this for our class)
Choose a theme (I chose Hemingway Rewritten, please do the same)
wordpress.com main dashboard
WP ADMIN is the link to create, edit and maintain our website
Your website dashboard, the main area where you can electively create, edit and maintain pages, and your overall website.
PAGES section. Let’s click on ALL PAGES
The ALL PAGES section. Lets ADD NEW page
The NEW PAGE section. This is where you can add title and body. Note the WYSIWYG interface.
Let’s call our first page CONTACT. Then, let’s click the ADD CONTACT FORM button.
The ADD CONTACT FORM page. Let’s ADD A NEW FIELD to our form.
Let’s add a RADIO BUTTON TYPE. Radio buttons allow you to choose ONE of many options.
Here’s our completed form, with radio button.
In the EMAIL NOTIFICATIONS section, let’s add our email address and a subject line for our email.
Once saved, this is the SHORTCODE wordpress creates to build the form on our page. Please don’t change this text. Leave it alone.
PUBLISH area of the page. Here you can publish or save draft, delete and even change the time the page was created.
Let’s ADD a new page called HOME. Let’s fill the page in with our bio. Then publish the page.
Let’s now go to our MEDIA LIBRARY. This is where our media is stored. Pictures, music and video.
Let’s ADD NEW media. You can SELECT FILES or DRAG them in. Let’s add our head shots.
Here are the head shots I’ve uploaded. This is the media library - after upload.
You can click on an item and edit it’s METADATA. It’s good to rename it’s properties to something better than the camera take number.
Let’s create a NEW PAGE and call it Headshots. Then, let’s ADD MEDIA to the newly created page.
In the MEDIA LIBRARY, let’s CREATE a NEW GALLERY
The CREATE GALLERY page. Let’s select our pics to add to the gallery.
Here are the GALLERY SETTINGS. I usually LINK to NONE.
Let’s CREATE a NEW PAGE and call it VOICEOVER.
Let’s go to SOUNDCLOUD.com and SIGN UP for an account. We’ll use this audio player for our site.
Let’s create our account
Fill out our details
Once created, let’s UPLOAD our demo to the SOUNDCLOUD account.
Soundcloud upload area
METADATA on upload. Let’s name it, give it a tag (like voiceover) and maybe choose an image (our headshot).
This is our player. Let’s click on the SHARE button to get our EMBED TEXT for our wordpress voiceover page.
Click on the EMBED tab. Use the HORIZONTAL PLAYER, click WORDPRESS CODE and then COPY the CODE.
Now back on our site, let’s PASTE that SOUNDCLOUD code into the VOICEOVER page and publish it.
Main SETTINGS section
GENERAL settings section. Let’s change our SITE TITLE and TAGLINE if needed.
Under READING SETTINGS, let’s choose a STATIC PAGE and set it to our HOME PAGE.
Under SHARING SETTINGS you can connect other pages you have.
Under SETTINGS, let’s choose to edit our THEME by choosing the CUSTOMIZE option.
Here is the page where you can customize things like background, title, widgets and colors.
Let’s change our HEADER IMAGE. Take note of the SIZE REQUIRED above. We can also randomly choose headers if we want.
I’ve downloaded a header image to my computer, now let’s choose to upload that image to the media library. Images need to be in the
media library before you can add them to pages.
Sometimes you’ll need to CROP the image to match the size the header needs.
In the ALL PAGES section, using the QUICK EDIT option on each page, we can TURN OFF the comments section. For static
pages, comments get in the way. they work better for blogs. Lets TURN OFF comments on ALL of our pages.
In each page, near the bottom, you can turn ON or OFF the SHARING OPTIONS and LIKES. Let’s TURN OFF those options for
ALL of our pages.
In the APPEARANCE section, let’s choose the MENUS option. This is how we create and change our site navigation.
This is our MENUS page. In the main area you see your pages. On the left, there’s a section to add things to that main menu. The
MENU NAME is the name of the menu. It’s possible to have several menus. I usually only have one.
Let’s add a link to IMDB. Put in your IMDB page should you want to (the web url to your personal IMDB page) and title it IMDB.
Then add it to menu.
In the main section of this page, you can rearrange the pages of your site. PAGE means page, CUSTOM means LINK.
And, here’s our final site!!!
Extras
❖
Change theme!
❖
Add blog
To change Theme, go to Appearance section, then Themes.
Main Themes page. This is where you can change themes.
Lets activate the ECTO theme.
Lets CUSTOMIZE the theme. Hit CUSTOMIZE. You can also get here from Appearance > Customize
Let’s change the color of the background to the FEATURED BLUE THEME.
Let’s re-add the header image we used in the earlier theme.
Let’s add our MENU (navigation) to the primary menu option
Let’s visit the CATEGORIES section of the POSTS area
Let’s ADD some CATEGORIES. These are tags for blog posts you write. It’ll help organize your future posts.
Let’s ADD a NEW POST from the POST section. (Posts are timely articles, like blog entires)
Let’s create our first post. I’ve made a generic one here.
Let’s TAG or POST with a few CATEGORIES
Let’s ADD a new page (for our blog)
Create a new page and call it BLOG. Leave it blank, we don’t want anything in it at this stage. Publish it.
Head to SETTINGS > READING
Let’s set the POSTS page to the newly created BLOG page.
Our BLOG page
Things We Didn’t Cover
❖
Widgets!
❖
❖
Comments!
❖
❖
You can allow or not allow comments on blogs!
Plugins!
❖
❖
Page add-ons that ad extra functionality!
Wordpress has thousands of plugins to add deeper functionality
to your website!
Store!
❖
Wordpress has options to sell goods on your page
Why Upgrade ($99 yr)
❖
❖
Unique domain name of your choosing!
❖
not a sub-domain (ex. mysite.wordpress.com)!
❖
more professional approach!
Ability to add rich media to site!
❖
Audio / Video (Video Press)!
❖
Ability to use plugins to build out feature set!
❖
No Ads!
❖
Larger storage!
❖
Premium support


© Copyright 2026